
Owner Instructions
Original Instructions
Warning! Read instructions before using the machine
www.numatic.com
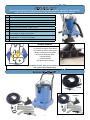
CleanTec
NHL 15

2
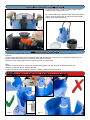
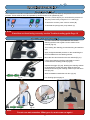
1.
Move furniture.
2.
Vacuum thoroughly.
3.
Test carpet for colour fastness (out of sight).
4.
Spot clean as necessary.
5.
Open window for ventilation.
6.
Always use a low foaming carpet cleaner.
7.
Always work backwards towards the Exit Door.
8.
Clean full carpet area - Hi pump setting for heavy soiling and Lo
pump setting for lightly soiled areas.
9.
Do not overwet remember
‘ What goes in, must come out again!’
10.
Leave windows open to help carpet dry naturally.
Product Features
* TriJet carpet extraction head.
* Lo pressure for lightly soiled areas.
* Hi pressure for heavy soiled areas.
* Quality upholstery tool supplied.
* Dump hose emptying option.
* 4 wheel mobility.
* 15 litres capacity.
* Full Aluminium tool head.
The Hi - Lo system puts you in complete control, when you need more, you get more and when you need
less, you are but a switch away.
Kit B26
Kit BS27
Good carpet cleaning is very much a team effort between operative and machine
and a few well established rules to be followed to get the best results.
Cleaning tips
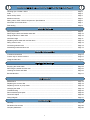
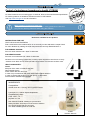
Contents / Kits - B26 - BS27

3
Before continuing, please refer to Quick Set Up Guide on Page 8
!
!
Cleaning Tips / Kit B26 - BS27 ........................................................................................................ Page 2
Index ............................................................................................................................................... Page 3
Quick Set Up Guide ....................................................................................................................... Page 4
Machine Overview ........................................................................................................................... Page 5
Rating Label / PPE / Critical components / Specications ................................................................ Page 6
Information for wet machines ............................................................................................................ Page 7
Fault nding ...................................................................................................................................... Page 8
Machine Set up.
Fitting the handle .............................................................................................................................. Page 9
Removing the dome and waste water tank ..................................................................................... Page 10
Filling the Nuchem / water tank ....................................................................................................... Page 10
Chemical usage ................................................................................................................................ Page 11
Replacing waste water tank and the dome ........................................................................................ Page 12
Fitting vacuum hose ......................................................................................................................... Page 12
Connecting solution tube ................................................................................................................ Page 12
Assembling wands and oor tool ..................................................................................................... Page 13
Operating the machine
Controls and switches ....................................................................................................................... Page 14
Correct way to use the machine ...................................................................................................... Page 14
Using the hand tool .......................................................................................................................... Page 15
Cleaning the machine
Emptying the waste water ................................................................................................................ Page 16
Removing the wands and oor tool .................................................................................................. Page 16
Cleaning the Tanks and lters .......................................................................................................... Page 16
Blocked Nozzles ................................................................................................................................ Page 17
Warranty ............................................................................................................................................ Page 22
Declaration Documents .................................................................................................................... Page 23
Company Addresses ........................................................................................................................ Page 24
Maintenance
Maintenance .................................................................................................................................... Page 18
Replacing the vacuum lter ............................................................................................................... Page 18
Replacing vacuum or pump fuses ..................................................................................................... Page 18
Changing the cable ........................................................................................................................... Page 19
Troubleshooting ............................................................................................................................... Page 20
Recommended spare parts .............................................................................................................. Page 20
Technical helpline ............................................................................................................................. Page 20
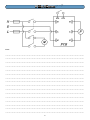
Wiring Diagram ................................................................................................................................ Page 21
Documentation

4
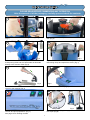
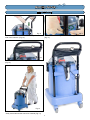
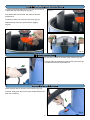
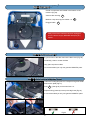
Quick Set Up Guide
Fit the handle to the machine using the xings supplied.
(Fig 1)
Remove the dome, unclip and remove the waste water
tank (Fig 2)
Fill the NuChem / water tank, up to the full level mark,
avoid pouring uids into the central tube as this leads
directly to the vacuum motor (Fig 3).
Replace the waste water tank, lock in place using the
red locking clamp and replace the dome. (Fig 4)
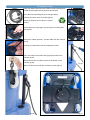
Assemble the wands and oor-tool and hose and
secure to the machine (Fig 5)
Connect the solution tube (Fig 6)
The switches on the front of the machine, control the
vacuum and pump operations. (Fig 7)
See page 15 for cleaning controls.
Operate the trigger (Fig 8) to apply water and vacuum
the carpet (Fig 9).
21
3 4
5 6
7
PLEASE READ BEFORE COMMENCING ANY OPERATION
After the removal of all the packaging, carefully open and check the contents.
8
Fig 1 Fig 2
Fig 3 Fig 4
Fig 5 Fig 6
Fig 7
Fig 9
Fig 8

5
14
15
16
17
13
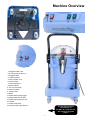
Machine Overview
1. Plugged Cable cover
2. 6.3 amp time lag fuse x 2.
3. Plugged cable
4. Cable grommet
5. Vacuum lter cover
6. Vacuum lter
7. Castor wheels x 4
8. Quick release
9. Hi Lo Pump Switch
10. Vacuum Switch
11. Pump Switch
12.Dome
13. Waste tank locking toggle
14. Waste tank vacuum lter
15. Waste tank emptying hose
16. Handle
17. Cable strain relief
18. Solution tube quick release
1
3
4
5
6
7
2
9 10
11
12
For full easy to follow
Instructions on
the NHL 15 set up and use,
See quick set up guide
page 4
7
77
8
18

6
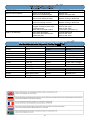
Model Motor Airow Suction
Cleaning
Range
Capacity
Wet
Noise
NHL 15 1060W 49 L/sec 2400mm 26.8m 15 Litres
75.6 dB(A)
uncertainty +/- 0.2 dB(A)
Pump
Solution
Tank
Size
H x W x D
Gross
Weight
(Full)
Specications
NHL 15
2 Bar
30psi
4 Bar 60
psi
15 Litres
435 x 425
x 725 mm
35 Kgs
Company
name and address
Machine Description
Max Pressure
IPX Rating
WEEE Logo
Weight (Ready to use)
CE Mark
Voltage / Frequency
Power Rating
Yr / Wk / Serial Number
About the machine
WEEE Legislation
(Waste, Electrical and Electronic Equipment)
Vacuum cleaner, accessories and packaging should be sorted
for environmental-friendly recycling.
Only for EU countries:
Do not dispose of Vacuum cleaner into household waste!
According to the European Directive 2002/96/EC on waste
electrical and electronic equipment and its incorporation into
national law.
Vacuum cleaners that are no longer suitable for use
must be separately collected and sent for recovery
in an environmental-friendly manner.
Ear Protection Safety Footwear Head Protection Safety Gloves Dust / Allergens Protection Eye Protection Protective Clothing
Caution Floorsign
Hi Viz Jacket
Safety Critical Components
• Mains Lead
HO5VV-F - 3 x 1.00mm - 10m
• 6.3 amp time lag Fuse
Rating Label - WEEE - PPE -
Safety Critical Components
PPE
(personal protective equipment)
that may be required for certain operations.
NOTE:
A risk assessment should be conducted to determine which PPE should be worn.
Max cleaning agent temp

7
Information for Spray Extraction Vacuum Cleaners
WARNING
Read the instruction manual before using the machine.
Operators shall be adequately instructed on the use of these machines.
As with all electrical equipment, care and attention must be exercised at all times during use, in addition to ensuring
that routine and preventative maintenance is carried out periodically to ensure safe operation.
Failure to carry out maintenance as necessary, including the replacement of parts to the correct standard could render
this equipment unsafe and the manufacturer can accept no responsibility in this respect.
The machine shall be disconnected from the mains by removing the plug from the supply socket during cleaning or
maintenance and when replacing parts or converting the machine to another function.
The machine is not to be used by children or persons with reduced physical, sensory or mental capabilities, or lack of
experience or knowledge, unless they have been given supervision or instruction.
Children being supervised are NOT to play with the machine.
This appliance is intended to be assembled, cleaned and maintained by an adult.
This machine is not a toy.
CAUTION!
If foam/liquid comes out of machine exhaust, switch off immediately.
Allow the accumulated liquid to drain out through the machine exhaust, check the waste water level, empty the
waste water container if full.
Immediately upon start up there will be a certain amount of liquid issuing from the machine exhaust which will be the
residue of liquid still within the power head. This will be quickly discharged after which the machine should function
normally.
Liquid ejected from the machine could be hazardous as a result of its temperature, pressure or chemical
content.
This machine is not suitable for the collection of biological hazards, hazardous or explosive dust. You should contact
your local distributor if you require a machine capable of performing these tasks.
Ensure that the ltration system tted to the machine is suitable for the material being collected.
This machine is for indoor use only.
This machine shall be stored indoors only
NOTE: This machine is also suitable for commercial use, for example in hotels, schools, hospitals, factories, shops,
rental businesses and ofces for other than normal housekeeping purposes.
This machine can be used for cleaning carpet and upholstery.
DO
• Dry Vacuum the carpet before using wet extraction cleaner.
• Turn off pump and operate the trigger, to release pressure in the dosing system, before removing spray tube.
• Keep your machine clean.
• Keep lters clean.
• Keep hoses and tubes clear.
• Replace any worn or damaged parts immediately.
• Regularly examine the power cord, if damage is found, power cord must be replaced by a qualied person
Using the correct Numatic original part.
• Ensure that all components are assembled correctly before use.
DON’T
• Use steam cleaners or pressure washers to clean the machine or use the machine in the rain.
• Immerse in water for cleaning.
• Allow any inexperienced repairs. Call the experts.
• Use to suck up hot ashes, or lighted cigarette ends.
• Run the machine over the power cable during operation as a hazard may occur.
• Pull on the cable to unplug the machine from the power supply.
• Walk over-wet carpets, upholstery or fabrics.
• Walk on clean carpets until fully dry.
• Spray onto people or animals.
• Attempt machine maintenance or cleaning unless the power supply plug has been removed from the supply
outlet.
• Do not use as a dry vacuum
Information for wet machines

8
Spray extraction machines only
• Use only approved cleaning preparations.
• Use defoamer if necessary.
Use of detergents
When using any detergent with this machine, please ensure you have read the safety data on the container and you
are familiar with the procedures to clear up spills, inhalation, skin and eye contact.
This product complies with the requirements IEC/EN 60335 -2-68.
When moving from one place to another, consider the weight of the machine.
Spray extraction maintenance/fault nding
If the vacuum cleaner stops working switch off and remove the plug from the wall, before investigating where the fault
lies.
If the vacuum cleaner has a blockage and will not pick up liquid, switch off and remove the plug from the wall.
Remove the dome and empty the liquid out of the waster water container.
If the waster water container is empty, check that the oor tool wands and hose are not blocked.
If no spray from nozzle the solution tank is empty, rell the solution tank.
Flush the system with clean water after use.
If the machine stops spraying then check the clean water tank level, empty the waste water tank and rell the clean
water tank as necessary.
If the spray nozzles are blocked, they have been designed to be easily cleaned. Undo the spray nozzle cap and clean
the nozzles.
A pin maybe used to clear the blockage.
After use always inspect the machine for damage.
Caution.
This machine has been designed to clean carpets and oors.
It must not be used when stood in water.
Fault Finding - Wet - Spray Extraction
Every time before use:-
Mains Cable.
Waste tank vacuum lter.
Hose, wands & tri jet assembly
Weekly
NuChem - water tank barrel lter (wash)
Vacuum lter (Check)
Visual inspection of Drum seal and bucket seal
Inspection schedule

9
Fitting the handle
Machine Set-Up
Slide the handle over the two tubes already tted to the
side of the machine. (Fig 10).
The handle can be used to enable the machine to be
easily moved around the area to be cleaned (Fig 13).
The handle makes an ideal way to store the cable
(Fig 12).
Secure the handle using the nut and bolt supplied
(Fig 11).
Fig 10 Fig 11
Fig 12
Fig 13

10
Removing the dome and waste-water tank.
To remove the dome, unclip the locking toggles and lift
the dome off the machine (Fig 14).
The waste water tank is held into place with a red locking
clamp. Undo the clamp (Fig 15) and lift the waste water
tank from the machine (Fig 16).
Fig 14
Fig 15 Fig 16
Filling the Nuchem / water tank.
The NHL 15 is equipped with a large 15 litre NuChem / water tank allowing large areas to be cleaned in a
single ll.
To ll the clean water tank remove the waste water tank and ll using hose, bucket or a suitable container (Fig 17).
Fill to the MAX level mark (Fig 18) located on the inside of the drum.
Ensure the clean water goes into the container and not the central tube.
Note.
Great care must be taken to ensure that contaminants (leaves, hair, dirt, etc) are not allowed to enter the
NuChem / water tank during the lling process.
If using a bucket or similar container, ensure it is always clean and free from debris.
Caution:-
Avoid tipping water into the central tube this is leads directly to the vacuum motor (Fig 19).
Fig 17
Fig 19
Fig 18

11
Chemical usage.
Control of substances hazardous to health (COSHH)
For best results use a non-foaming type of chemical, dilute to the manufacturers specication.
For further guidance on hazardous substances refer to HSE website.
Visit http://www.hse.gov.uk/ for UK information.
When handling and mixing chemicals.
Always ensure that chemical manufacturer’s safety guidelines are followed.
Only use non foaming chemicals when using this machine.
! !
NuChem 4 available for this product.
INSTRUCTIONS FOR USE
TEST FOR COLOUR FASTNESS
Find a small area on the material which is not normally on view and test the carpet / fabric
for colour fastness by rubbing the cloth dampened with correctly diluted NuChem 4.
FOR NORMAL SOILING:
Pour one 40ml measure into 5 litres of cold water.
FOR HEAVY SOILING:
Pour two 40 ml measures into 5 litres of cold water.
NuChem 4 is non-foaming, bactericidal, contains optical brighteners and leaves no tacky
residues in the fabric and is enhanced with both a delicate and discreet verbena scent.
HEALTH AND SAFETY
Caution:
Keep out of the reach of children and pets.
Wear suitable gloves.
Avoid contact with skin and eyes.
In case of eye contact ush with clean water seek medical attention.
In case of contact with the skin rinse with plenty of clean water.
Product data is available from Numatic.
NUCHEM
219847
Nuchem 500 mls
NuChem information
INGREDIENTS
Composition:
Greater than 30% = Among other ingredients water
Less than 5% = Sodium Xylene Sulphonate
Classied as irritant
CAS: 1300 - 72 - 7
[Xi] R36 / 37 / 38
Risk Phrases: R36/38: irritating to eyes and skin
Safety Phrases: S2: Keep out of the reach of children
S24: Avoid contact with skin and eyes
S37: Wear suitable gloves for hand use

12
Replacing the waste-water tank and dome.
To replace the waste-water tank t into the drum and lock
in place with the red locking clip (Fig 20).
If the waste tank is not locked, the machine will lose
performance.
Locate the handle into the front of the drum (Fig 21).
Ret the dome and lock in place with the toggles.
(Fig 22)
Fig 22
Fig 21
Fig 20
Fitting the vacuum hose.
Fit the Vacuum hose to the front of the machine (Fig 23).
Lock into place by twisting the hose securing onto the lugs
moulded into the neck of the machine.
Fig 23
Connecting the solution tube.
Fig 24
Fit the solution tube to the front of the machine (Fig 24).
The tube simply push ts into the quick release tted to the
front of the machine.

13
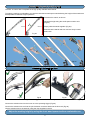
Assembling the wands and oor-tool
Assemble the wands, as shown.
Adjust the height using the small spacer wand to suit.
(Fig 25).
Simply slide the wands together (Fig 26).
Ensure that the wands and oor tool are rmly located
before use.
The NHL 15 comes with a complete set of high quality stainless steel wands.
To make the machine comfortable to use we have included a small spacer wand allowing the height of the wand set to
be adjustable for different height operatives.
The solution tube has been designed so the trigger can be tted either way on to the stainless curved wand. (g 27)
Connect the solution tube from the hose on to the operating trigger (Fig 28).
Connect the solution tube end into the quick release connector tted onto the oor-tool (Fig 29)
Clip the solution tube to the wand by using the clips supplied in the kit.
Connecting the solution tube
Adjust the working height by using the short wand spacer to allow comfortable use.
Fig 25
Fig 26
Fig 27 Fig 28
Fig 29
900mm 1000mm

14
Controls and Switches
Operating the machine
On heavy soiled carpets you can double the pressure of
the pump to 60 PSI by using the Hi / Lo switch (A)
To active the vacuum press ‘vacuum switch’ (B)
To activate the pump press ‘pump switch’ (C)
All the switches on the NHL machine have been designed to enable easy use and they are placed on the front of the
machine. These switches are to be operated by hand and NOT to be operated by foot.
A B C
Note.
If machine not functioning correctly, see the Trouble-shooting guide Page 19
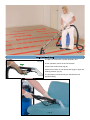
Correct way to use the machine
The NHL 15 oor-tool is provided with rear wheels
allowing the oor-tool to glide over the surface to be
cleaned (Fig 30).
Thus making the cleaning process less tiring and easier to
use.
Apply a slight downward pressure on the wand lifting the
oor-tool blade from the cleaning surface.
Move the oor-tool forward on the rear wheels (Fig 31).
Lift the wand allowing the oor-tool blade to come in
contact with the cleaning surface (Fig 32).
Operate the trigger (Fig 33), allowing the cleaning solution
to penetrate the carpet and slowly draw the oor-tool
rearward Vacuuming the cleaning solution up at the same
time (Fig 35).
Work backwards towards the exit door. (g 34)
For cleaning tips see page 2
Note.
Do not over wet remember ‘What goes in, must come out again!.
Fig 30
Fig 32
Fig 31
Fig 33
Fig 34

15
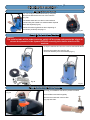
Using the hand tool
The NHL 15 comes with a quality upholstery tool
Fit the upholstery tool to the end of the hose.
Connect the solution tube (Fig 36)
Switch the machine on and operate the trigger to apply the
cleaning solution (Fig 37).
The upholstery tool should only be used with the low
pressure setting.
Fig 35
Fig 36
Fig 37

16
Emptying the waste water
Cleaning the machine
You can empty the waste water tank by using the
dump hose attached to the rear of the machine
(Fig 38).
The waste water tank can also be removed and
carried using the handle to a suitable waste disposal
area and emptied (Fig 39).
Follow the national guide lines when disposing of
chemicals. (COSHH) see page 11
Caution.
The solution tube will be under pressure, switch off the pump and operate the trigger to
release the pressure in the system BEFORE removing the solution tube from the
machine.
Removing the wands and oor-tool
Unclip the solution tube from the machine see NOTE above.
Remove the wands, oor-tool (Fig 40)
and hose assembly from the machine (Fig 41).
Cleaning the tanks, lters and hoses.
To keep your NUMATIC machine in pristine condition
Clean all lters and tanks regularly.
Remove the waste tank vacuum lter
(Fig 42) and clean.
Fig 38 Fig 39
Fig 40
Fig 41
Fig 42

17
Located in the bottom of the NuChem / water
tank is a barrel lter (Fig 43).
Clean if necessary.
Ensure the machine is cleaned and all hoses and tubes are
ushed with cold clean water (g 44).
After use, ensure the solution tube has been ushed
with clean water for at least 60 seconds.
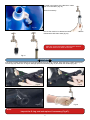
Blocked nozzles
If the spray nozzles are blocked, they have been designed to be easily cleaned. Undo the spray nozzle cap (Fig 45)
remove (Fig 46) check the ‘O’ ring for damage replace if necessary (Fig 47) and clean the nozzles (Fig 48).
Note.
Inspect the O ring seal and replace if necessary (Fig 47).
Fig 43
Fig 44
Fig 45 Fig 46
Fig 47 Fig 48

18
Replacing the vacuum lter
Maintenance
To gain access to this lter remove the lter cover (Fig 50).
Periodically, clean or renew the lter
using (207119) Vacuum lter
It is recommended you only use genuine NUMATIC parts.
Certain components are located in the bottom of the
machine (Fig 49).
Vacuum lter housing.
Mains 6.3 amp time lag fuse holder x 2.
Plugged cable.
A
B
B
C
A
C
B
Always ensure the machine has been unplugged
from the electric supply BEFORE attempting any
repairs.
Replacing the vacuum and pump fuses
Under the rectangular plate is 6.3 amp time lag fuse holder
Remove the plate (Fig 51).
Fuse (See g 52) is the mains fuse x 2.
Replace using (220179) 6.3 amp time lag fuses (Fig 54).
It is recommended you only use genuine NUMATIC parts.
B
Fig 50
Fig 51
Fig 52 Fig 53 Fig 54
Fig 49

19
Changing the cable
Check the cable before use if the cable is found to damaged or
scuffed (g 55) replace with a genuine Numatic part.
The Cable has been designed to be changed easily.
Unscrew the cable / fuse cover plate (g 56)
Ensure you dispose of the cable in a proper
manner.
Lift the cable off the pins (g 57) and remove from the plastic
clips (g 58).
Remove the rubber grommet, free the cable from the machine
(g 59)
Unscrew the cable strain relief and replace the cable.
Fit the new cable to the strain relief (g 60) and reit to the
machine (g 61).
Ret Grommet and clip cable in place to the bottom of the
machine (g 62).
Ret cover and secure with the 3 retaining screws (g 63).
Fig 55 Fig 56
Fig 57
Fig 58
Fig 59
Fig 61
Fig 60
Fig 62 Fig 63

20
PROBLEM CAUSE SOLUTION
Machine will not operate Missing or blown plug fuse.
Mains power cable damaged.
Replace fuse.
Replace damaged cable.
Vacuum will not operate Vacuum not turned on.
Vacuum fuse missing or blown.
Turn on vacuum.
Replace missing or blown fuse.
Pump will not operate Pump not turned on.
Pump fuse missing or blown.
Turn on vacuum.
Replace missing or blown fuse.
Poor water pick up Waste tank full.
Clogged / blocked vacuum hose.
Blocked oor-tool.
Waste tank not locked in place.
Empty waste tank.
Remove and clean.
Remove and clean.
Lock in place (see page 12)
Little or no water ow. Clean-water tank empty
Clean-water tank lter blocked
Nozzles blocked
Fill clean-water tank.
Remove and clean.
Remove and clean.
Part number Description Part number Description
237193 Dome 607248 BS27 Kit
525010 Top bucket c/w dump hose 602399 4.0m Hose
525009 Drum c/w water ttings 602922 Wand (bend)
313100 Castor (x4 Pack) 602920 Wand (Straight)
207119 Vac lter 602937 Wand (Extension)
220179 6.3 amp time lag fuse 602200 Tri jet oor tool
208464 Filter cap 602300 Solution tube c/w trigger
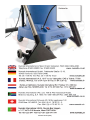
236010 UK plugged cable (10m) 602225 Upholstery tool
236124 Euro plugged cable (10m)
236018 Swiss plugged cable (10m) 607246 B26 Kit
236022 South African cable (10m) 602399 4.0m Hose
208425 Brass spray nozzle 602225 Upholstery tool
291023 ‘O’ Ring
Recommended Spare Parts NHL 15
Trouble-Shooting
Pagina se încarcă...
Pagina se încarcă...
Pagina se încarcă...
Pagina se încarcă...
-
 1
1
-
 2
2
-
 3
3
-
 4
4
-
 5
5
-
 6
6
-
 7
7
-
 8
8
-
 9
9
-
 10
10
-
 11
11
-
 12
12
-
 13
13
-
 14
14
-
 15
15
-
 16
16
-
 17
17
-
 18
18
-
 19
19
-
 20
20
-
 21
21
-
 22
22
-
 23
23
-
 24
24


în alte limbi
- English: Numatic NHL15
Lucrări înrudite
-
Numatic HVW370 Manualul proprietarului
-
-
Numatic PPR 180-11 Manual de utilizare
-
Numatic James JVP180 Owner Instructions
-
Numatic NBV190 Manual de utilizare
-
-
Numatic WVD 570 Manualul proprietarului
-
Numatic NRV 240-11 Manual de utilizare
Alte documente
-
Nilfisk-ALTO AERO 21 Operating Instructions Manual
-
Makita PM001G Manual de utilizare
-
Silvercrest SPR 330 A1 Instrucțiuni de utilizare
-
-
-
Thomas Bravo 20 Manualul proprietarului
-
LG V-KC701HEU Manual de utilizare
-
Hitachi RP 250YE Handling Instructions Manual
-
-
Ferm GRM1012 Manualul proprietarului