Nilfisk-ALTO AERO 21 Operating Instructions Manual
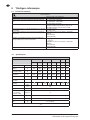
- Categorie
- Aspiratoare
- Tip
- Operating Instructions Manual
Acest manual este potrivit și pentru

107407182 C
Operating
instructions
AERO 21
AERO 21 INOX

Operating instructions .................................................................................................... 1
Bedienungsanweisungen ............................................................................................... 8
Instructions de fonctionnement ................................................................................... 15
Gebruiksaanwijzingen ................................................................................................... 22
Istruzioni per l’uso ......................................................................................................... 29
Bruksanvisning .............................................................................................................. 36
Bruksanvisning .............................................................................................................. 43
Betjeningsvejledning .................................................................................................... 50
Käyttöohje ...................................................................................................................... 57
Instruccciones de funcionamiento .............................................................................. 64
Instruções de Funcionamento ..................................................................................... 71
Οδηγίες λειτουργίες ...................................................................................................... 78
Kullanma Talimatları ...................................................................................................... 86
Navodila za delovanje ................................................................................................... 93
Upute za uporabu ........................................................................................................ 100
Návod na obsluhu ....................................................................................................... 107
Návod k obsluze ...........................................................................................................114
Instrukcje dotyczące obsługi ..................................................................................... 121
Használati útmutató .................................................................................................... 128
Instrucţiuni de utilizare ................................................................................................ 135
Указания за експлоатация ........................................................................................ 142
Руководство по эксплуатации ................................................................................. 149
Tööjuhised ................................................................................................................... 157
Norādījumi par ekspluatāciju ...................................................................................... 164
Naudojimo instrukcija ................................................................................................. 171
............................................................................................................................. 178
操作说明 ......................................................................................................................... 185
사용법 ............................................................................................................................. 191
คําแนะนําการใช้งาน ....................................................................................................... 197
Arahan Operasi ............................................................................................................. 203
ﺕﻉﻝﻱﻡﺍﺕ ﺍﻝﺕﺵﻍﻱﻝ ............................................................................................................ 210
AR

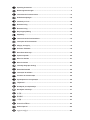
AERO 21-01 AERO 21-21
AERO 21-01 INOX
AERO 21-21 INOX

1A
*)
1
1
2
3
5
5
4
2A
1
2
3
3
4
5
6
8
8
7

3A
*)
A
B
4A
*)
1
2
60 mm

5A
*)
1B
*)
1
2
3
3
4
5
7
7
6

2B
*)
A
B
3B
*)
1
4
3x
3

4B
*)
5B
*)

1C
*)
1
2
2
3
5
6
7
4
1D
1 2
3
3
4
5
6
7
8
9
9

2D
1 2
3
3
4
5
6
9
10
10
8
7

*)
Optional accessories / Option depending on model
Original instruction
1
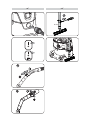
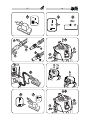
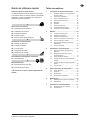
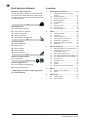
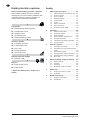
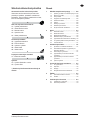
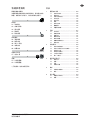
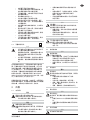
Quick reference guide
The pictorial quick reference guide
The pictorial quick reference guide is designed for
helping you when starting up, operating and storing
the unit. The guide are subdivided into 4 sections,
which are represented by symbols:
A
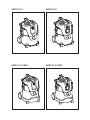
Before starting
1A - Unpack Accessories
2A - Filter Bag Installation
3A - Hose Insert
4A - Tube Fixed
5A - Accessories Placement
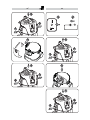
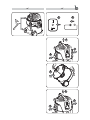
B
Control/Operation
1B - Emptying Container
2B - Blow Function
3B - Push & Clean
4B - Cable Storage
5B - Hose Storage
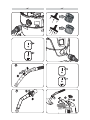
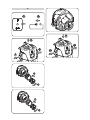
C
Connecting electrical appliances
1C - Power Tool
D
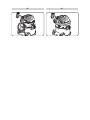
Replacement of:
1D - Filter Bag Replacement
2D - Filter Replacement
*) Optional accessories / Option depending on
model
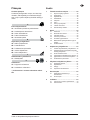
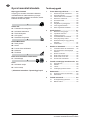
Contents
1 Important safety instructions ................... 2
1.1 Symbols used to mark instructions ............ 2
1.2 Instructions for use .................................... 2
1.3 Purpose and intended use ......................... 2
1.4 Electrical connection .................................. 2
1.5 Extension lead ........................................... 2
1.6 Guarantee .................................................. 2
1.7 Tests and approvals ................................... 2
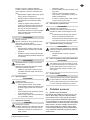
1.8 Important warnings .................................... 3
1.9 Double-insulated appliances* .................... 3
1.9.1 Only applicable to UK .............................. 3
1.9.2 Electrical connections ................................ 3
1.9.3 Blue-neutral brown-live .............................. 4
2 Risks .......................................................... 4
2.1 Electrical components ................................ 4
2.2 Picking up liquids ....................................... 4
2.3 Hazardous materials .................................. 4
2.4 Spare parts and accessories ..................... 4
2.5 Emptying dirt tank ...................................... 5
2.6 In explosive or inflammable atmosphere ... 5
2.7 Blower function. ........................................ 5
3 Control / Operation .................................... 5
3.1 Starting and operating of the machine ....... 5
3.2 Auto-On/Off-Operation for power tools* ..... 5
3.3 Before wet pick-up ..................................... 5
3.4 Emptying after wet pick-up ........................ 5
3.5 Emptying after dry pick-up ......................... 5
3.6 Push & Clean ............................................. 6
4 After using the cleaner ............................. 6
4.1 After use .................................................... 6
4.2 Transport .................................................... 6
4.3 Storage ...................................................... 6
4.4 Recycling the cleaner ................................ 6
5 Maintenance ............................................... 6
5.1 Regular servicing and inspection ............... 6
5.2 Maintenance .............................................. 6
6 Further information ................................... 7
6.1 EU Declaration of conformity ..................... 7
6.2 Specifications ............................................. 7

*)
Optional accessories / Option depending on model
Original instruction
2
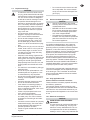
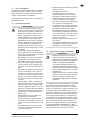
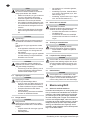
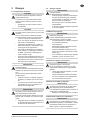
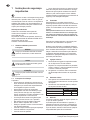
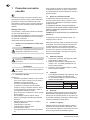
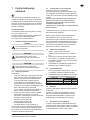
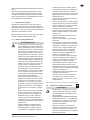
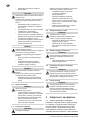
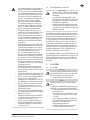
1 Important safety
instructions
This document contains the safety information re-
levant for the appliance along with a quick reference
guide. Before starting up your vacuum cleaner for
the first time, this instruction manual must be read
through carefully. Save the instructions for later use.
Further support
Further information on the appliance can be found
on our web site at www.nilfisk-alto.com.
For further queries, please contact the Nilfisk-ALTO
service representative responsible for your country.
See reverse of this document.
1.1 Symbols used to mark instructions
DANGER
Danger that leads directly to serious or irre-
versible injuries, or even death.
WARNING
Danger that can lead to serious injuries or
even death.
CAUTION
Danger that can lead to minor injuries and
damage.
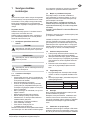
1.2 Instructions for use
The appliance must:
• only be used by persons, who have been in-
structed in its correct usage and explicitly com-
missioned with the task of operating it
• only be operated under supervision
• This appliance is not intended for use by per-
sons (including children) with reduced physical,
sensory or mental capabilities, or lack of experi-
ence and knowledge.
• Children shall be supervised to make sure that
they do not play with the appliance.
• Do not use any unsafe work techniques.
• Never use the vacuum cleaner without a filter.
• Switch off the appliance and disconnect the
mains plug in the following situations:
• Prior to cleaning and servicing
• Prior to replacing components
• Prior to changing over the appliance
• If foam develops or liquid emerges
Besides the operating instructions and the binding
accident prevention regulations valid in the country
of use, observe recognised regulations for safety
and proper use.
1.3 Purpose and intended use
This vacuum cleaner is designed, developed and
rigorously tested to function efficiently and safely
when properly maintained and used in accordance
with the following instructions.
This vacuum cleaner is to be used for commercial
or for household use. Accidents due to misuse can
only be prevented by those using the machine.
READ AND FOLLOW ALL SAFETY INSTRUC-
TIONS.
This machine is suitable for picking up dry, non-
flammable dust and liquids.
Any other use is considered as improper use. The
manufacturer accepts no liability for any damage re-
sulting from such use. The risk for such use is borne
solely by the user. Proper use also includes proper
operation, servicing and repairs as specified by the
manufacturer.
1.4 Electrical connection
1. It is recommended that the vacuum cleaner
should be connected via a residual current cir-
cuit breaker.
2. Arrange the electrical parts (sockets, plugs and
couplings) and lay down the extension lead so
that the protection class is maintained.
3. Connectors and couplings of power supply
cords and extension leads must be watertight.
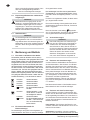
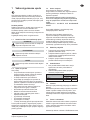
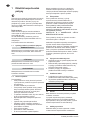
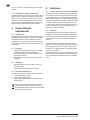
1.5 Extension lead
1. As an extension lead, only use the version
specified by the manufacturer or one of a higher
quality.
2. When using an extension lead, check the mini-
mum cross-sections of the cable:
Cable lenth Cross section
< 16 A < 25 A
up to 20 m 1.5 mm
2
2.5 mm
2
20 to 50 m 2.5 mm
2
4.0 mm
2
1.6 Guarantee
Our general conditions of business are applicable
with regard to the guarantee.
Unauthorised modifications to the appliance, the use
of incorrect brushes in addition to using the appli-
ance in a way other than for the intended purpose
exempt the manufacturer from any liability for the
resulting damage.
1.7 Tests and approvals
Electrical tests must be performed in accordance
with the provisions of safety regulations EN 62638.
These tests must be performed at regular intervals
and after repairs or modifications.
The vacuum cleaner has been approved in accor-
dance with IEC/EN 60335-2-69.

*)
Optional accessories / Option depending on model
Original instruction
3
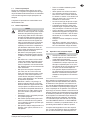
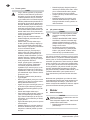
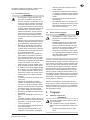
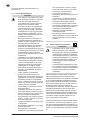
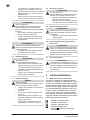
1.8 Important warnings
WARNING
• To reduce the risk of fire, electric shock,
or injury, please read and follow all safety
instructions and caution mar-kings before
use. This vacuum cleaner is designed to
be safe when used for cleaning functions
as specified. Should damage occur to
electrical or mechanical parts, the cleaner
and / or accessory should be repaired by
a competent service station or the manu-
facturer before use in order to avoid fur-
ther damage to the machine or physical
injury to the user.
• Do not leave the machine when it is
plugged in. Unplug from the socket when
not in use and before maintenance.
• Do not use with damaged cord or plug.
To unplug grasp the plug, not the cord.
Do not handle plug or cleaner with wet
hands. Turn off all controls before unplug-
ging.
• Do not pull or carry by cord, use cord as a
handle, close a door on cord, or pull cord
around sharp edges or cor ners. Do not
run cleaner over cord. Keep cord away
from heated surfaces.
• Keep hair, loose clothing, fingers and all
parts of the body away from ope nings and
moving parts. Do not put any objects into
openings or use with opening blocked.
Keep openings free of dust, lint, hair, and
anything else that could re du ce the flow
of air.
• This machine is not suitable for picking up
hazardous dust.
• Do not use to pick up flammable or com-
bustible liquids such as gasoline, or use
in areas where they may be pre sent.
• Do not pick up anything that is burning or
smoking, such as cigarettes, mat ches or
hot ashes.
• Use extra care when cleaning on stairs.
• Do not use unless filters are fitted.
• If the cleaner is not working properly or
has been dropped, da ma ged, left out-
doors, or dropped into water, re turn it to a
service center or dealer.
• If foam or liquid escapes from the ma-
chine, switch off immediately.
• The vacuum cleaner may not be used
as a water pump. The vacuum cleaner
is intended for vacuuming air and water
mixtures.
• Connect the vacuum cleaner to a properly
earthed mains supply. The socket outlet
and the extension cable must have an
operative protective conductor.
• Provide for good ventilation at the work-
ing place.
• Do not use the vacuum cleaner as a lad-
der or step ladder. The vacuum cleaner
can tip over and become damaged. Dan-
ger of injury.
1.9 Double-insulated appliances*
CAUTION
• Use only as described in this manual
and only with the manufacturer’s re com-
men ded attachments.
• BEFORE YOU PLUG IN YOUR CLEAN-
ER, check the rating plate at the cleaner
to see if the rated vol ta ge agrees within
10% of the voltage available.
• This appliance is provided with double
insu la tion. Use only identical re pla ce ment
parts. See instructions for ser vi cing dou-
ble insulated appliances.
In a double-insulated appliance, two systems of
insulation are provided instead of grounding. No
grounding means is provided on a double-insulated
appliance, nor should a mean for grounding be
added to the appliance. Servicing a double-insulated
appliance requires extreme care and knowledge
of the system, and should be done only by quali-
fied service personnel. Replacement parts for a
double-insulated appliance must be identical to the
parts they replace. A double insulated appliance is
marked with the words “DOUBLE INSULATION” or
“DOUBLE INSULATED.” The symbol (square within
a square) may also be used on the product.
The machine is equipped with a specially designed
cord which if damaged, must be replaced by a cord
of the same type. This is available at authorised
service centres and dealers and must be installed
by trained personnel.
1.9.1 Only applicable to UK.
Please read these essential instructions
These instructions have been prepared with safety
and efficiency paramount.
The machine operator must be trained by a suit-
ably qualified instructor and must understand these
instructions for use, and be made aware of any rel-
evant regulations and legislation in force at the time
of use.
1.9.2 Electrical connections
CAUTION
DOUBLE-INSULATED MACHINES -
IMPORTANT:
This 240 volt 50 Hz. machine are fitted with a
13 amp. 3 pin moulded plug. The plug is fit-
ted with a 13 amp. detachable fuse. The cor-
rect replacement for the fuse is identified by
marking or colour coding. Only fuses that are

*)
Optional accessories / Option depending on model
Original instruction
4
ASTA approved to BS 1362 should be fitted.
Never use the plug without the fuse cover fit-
ted. Replacement fuse covers are available at
any electrical retail outlet.
If the available socket outlet is not suitable for the
plug supplied, the plug must be cut off and an ap-
propriate plug fitted. The plug thus cut off MUST BE
DESTROYED for safety reasons before being dis-
posed of.
Machines built for other voltages and frequencies
are not normally supplied with a fitted plug.
If it is necessary to fit a plug, the wires in this power
supply cord are coloured in accordance with the fol-
lowing code:
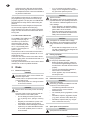
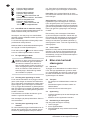
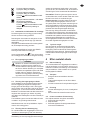
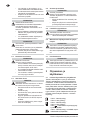
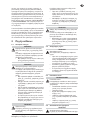
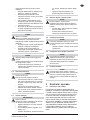
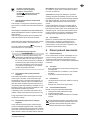
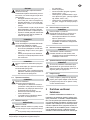
1.9.3 Blue-neutral brown-live
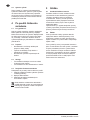
TO CONNECT THE NEW PLUG:
If using a three-pin plug, do
not make any connection to
the the terminal in the plug
which is marked with the let-
ter ‘E’ or by the safety earth
symbol or coloured green or
green & yellow.
The blue wire must be connected to the terminal in
the plug which is marked with the letter ‘N’ or is col-
oured black or blue.
The brown wire which must be connected to the ter-
minal in the plug which is marked with the letter ‘L’ or
is coloured red or brown.
If the plug to be fitted does not conform to the above
notation then consult a qualified electrician.
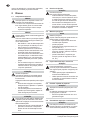
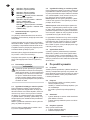
2 Risks
2.1 Electrical components
DANGER
The upper section of the vacuum cleaner con-
tains live components.
Contact with live components leads to serious
or even fatal injuries.
• Never spray water on to the upper section
of the vacuum cleaner.
DANGER
Electric shock due to faulty mains connecting
lead.
Touching a faulty mains connecting lead can
result in serious or even fatal injuries.
• Do not damage the mains power lead
(e.g. by driving over it, pulling or crushing
it).
• Regularly check whether the power cord
is damaged or shows signs of ageing.
• If the electric cable is damaged, it must be
replaced by an authorized Nilfisk distribu-
tor or similar qualified person in order to
avoid a hazard.
• In no circumstances should the power
supply cord be wrapped around fingers or
any part of the operators person.
CAUTION
Appliance socket.*
The appliance socket is only designed for the
purposes defined in the operating instructions.
The connection of different appliances can re-
sult in damage.
• Prior to plugging in an appliance, always
switch off the vacuum cleaner and the ap-
pliance that is to be connected.
• Read the operating instructions to the ap-
pliance to be connected and observe the
safety notes contained in these.
CAUTION
Damage due to unsuitable mains voltage.
The appliance can be damaged as a result of
being connected to an unsuitable mains volt-
age.
• Ensure that the voltage shown on the rat-
ing plate corresponds to the voltage of the
local mains power supply.
2.2 Picking up liquids
CAUTION
Picking up liquids.
Do not pick up flammable liquids
• Before liquids are picked up, always re-
move the filter bag/wastebag and check
that the float or the water level limit works
properly.
• The use of a separate filter element or
filter screen is recommended.
• If foam appears, stop work immediately
and emty the tank.
2.3 Hazardous materials
WARNING
Hazardous materials.
Vacuuming up hazardous materials can lead
to serious or even fatal injuries
• The following materials must not be
picked up by the vacuum cleaner:
• hazardous dust
• hot materials (burning cigarettes, hot ash,
etc.)
• flammable, explosive, aggressive liquids
(e.g. petrol, solvents, acids, alkalis, etc.)
• flammable, explosive dust (e.g. magne-
sium or aluminium dust, etc.)
2.4 Spare parts and accessories
CAUTION
Spare parts and accessories.

*)
Optional accessories / Option depending on model
Original instruction
5
The use of non-genuine spare parts and ac-
cessories can impair the safety of the appli-
ance.
• Only use spare parts and accessories
from Nilfisk-ALTO.
• Use only the brushes supplied with the
vacuum cleaner or specified in the operat-
ing manual.
2.5 Emptying dirt tank
CAUTION
Picking up environmentally hazardous materi-
als.
Materials picked up can present a hazard to
the environment.
• Dispose of the dirt in accordance with le-
gal regulations.
2.6 In explosive or inflammable atmosphere
CAUTION
This machine is not suitable for use in explo-
sive or inflammable atmospheres or where
such atmospheres are likely to be produced
by the presence of volatile liquid or inflamma-
ble gas or vapour.
2.7 Blower function.
CAUTION
The vacuum cleaner has a blower function.
Do not blow the outgoing air randomly in en-
closed areas. Use the blower function only
with a clean hose. Dusts can be hazardous to
one’s health.
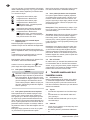
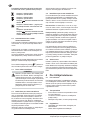
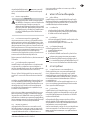
3 Control / Operation
3.1 Starting and operating of the machine
Check that the electrical switch is switched off (in
position 0). Check that suitable filters are installed
in the machine.Then connect the suction hose into
the suction inlet at the machine by pushing the hose
forward until it fits firmly in place at the inlet. Then
connect the two tubes with the hose handle, twist
the tubes in order to ensure that they are properly
fitted. Attach suitable nozzle to the tube. Choose
nozzle depending on what type of material that is to
be picked-up. Connect the plug into a proper electri-
cal outlet. Put the electrical switch into position 1 in
order to start the motor.
Press I : Activate the machine
Press 0 : Stop the machine
Press I : Activate the machine
Press 0 : Stop the machine
Press : Activate Auto-On/Off operation
Press I : Activate the machine - turn clock
wise for speed control
Press 0 : Stop the machine
Press : Activate Auto-On/Off operation
- turn counter clockwise for speed control
3.2 Auto-On/Off-Operation for power tools*
A socket outlet with earthing contact is integrated in
the vacuum cleaner. An external power tool can be
connected there.
The vacuum cleaner can be switched on and off by
the power tool connected. Dirt is picked up from the
source of dust immediately.
To comply with regulations, only approved dust pro-
ducing tools should be connected.
The maximum power consumption of the connected
electrical appliance is stated in section “Specifica-
tions”.
Before switching the switch to position ensure
that the tool connected to the appliance socket is
switched off.
3.3 Before wet pick-up
CAUTION
The machine is equipped with a float system
that shuts off the airflow through the machine
when the maximum liquid level is reached.
You will hear a noticeable change of the
sound from the motor and notice that the suc-
tion power decreases. When this occurs,
switch the machine off. Disconnect the ma-
chine from the socket. Never pick up liquid
without the float body in place.
3.4 Emptying after wet pick-up
Before emptying the container, unplug the vacuum
cleaner. Disconnect the hose from the inlet by pulling
out the hose. Release the latch by pulling them out-
wards so that the motor top is released. Open up the
motor top from container. Always empty and clean
the container and the float system after picking-up
liquids. Never pick up liquid without the float system
and filter installed in the machine.
Empty by tilting the container backwards and pour
the liquids into a floor drain or similar.
Put back the motor top to the container. Secure the
motor top with the latches.
3.5 Emptying after dry pick-up
Remove the electrical plug from the socket before
emptying after dry pick-up. Check the filters and
dustbag regularly. Release the latch by pulling them
outwards so that the motor top is released. Open up
the motor top from container.
Cartridge filter: To clean the filter you can either
shake, brush or wash it. Wait until it is dry before you
reuse it.

*)
Optional accessories / Option depending on model
Original instruction
6
Dustbag: check bag to ensure the fill factor. Re-
place dust bag if necessary. Remove the old bag.
The new bag is fitted by passing the carboard piece
with the rubber membrane through the vacuum inlet.
Make sure that the rubber membrane is passing past
the heightening at the vacuum inlet.
After emptying: Close motor top to the container and
secure the motor top with the latches. Never pick up
dry material without cartridge filter and dustbag fitted
in the machine. The suction efficiency of the vacuum
cleaner depends on the size and quality of the filter
and dust bag. Therefore - use only Original filter and
dust bags.
3.6 Push & Clean
The machine is equipped with a semi automatic filter
cleaning system. Push & Clean. The filter cleaning
system must be actuated latest when the vacuum-
ing performance is no longer sufficient. Regular use
of the filter cleaning feature increases the tool life of
the filter.
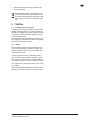
4 After using the cleaner
4.1 After use
Remove the plug from the socket when machine is
not in use. Wind up the cord starting from the ma-
chine. The power cord can be wound up around the
motor top or at the container. Some variants have
special storage places for accessories.
4.2 Transport
• Before transporting the dirt tank, close all the
locks.
• Do not tilt the cleaner if there is liquid in the dirt
tank.
• Do not use a crane hook to lift the cleaner.
4.3 Storage
• Store the appliance in a dry place, protected
from rain and frost.
• The machine shall be stored indoors only.
4.4 Recycling the cleaner
Make the old cleaner unusable.
1. Unplug the cleaner.
2. Cut the power cord.
3. Do not discard of electrical appliances with
household waste.
As specified in European Directive 2012/19/EU
on old electrical and electronic appliances,
used electrical goods must be collected sepa-
rately and recycled ecologically.
5 Maintenance
5.1 Regular servicing and inspection
Regular servicing and inspection of your machine must be
carried out by suitably qualified personnel in accordance
with relevant legislation and regulations. In particular, elec-
trical tests for earth continuity, insulation resistance, and
condition of the flexible cord should be checked frequently.
In the event of any defect, the machine MUST be with-
drawn from service, completely checked and repaired by
an authorized service technician.
5.2 Maintenance
Remove the plug from the socket before performing main-
tenance. Before using the machine make sure that the fre-
quency and voltage shown on the rating plate correspond
with the mains voltage.
The cleaner is designed for continuous heavy work. De-
pending on the number of running hours – the dust filter
should be renewed. Keep the vacuum cleaner clean with a
dry cloth, and a small amount of spray polish.
For details of after sales service contact your dealer
or Nilfisk-ALTO service representative responsible for your
country. See reverse of this document.

*)
Optional accessories / Option depending on model
Original instruction
7
6 Further information
6.1 EU Declaration of conformity
Declaration of Conformity
Product: Vacuum cleaner for wet and dry operation
Type: AERO 21
The design of the unit corre sponds to
the following pertinent regulations:
EC - Machinery Directive 2006/42/EC
EC - Directive EMC 2004/108/EC
EC - RoHS Directive 2011/65/EC
Applied harmonised standards: EN 60335-1:2012, EN 60335-2-69:2012, EN 55014-1:2006+A1+A2, EN 55014-2:1997+A1+A2,
EN 61000-3-2:2006+A1+A2, EN 61000-3-3:2008
Applied international standards and
technical specifi cations:
IEC 60335-2-69:2012
IEC 60335-1:2010
Name and address of the person
autho rised to compile the technical
fi le:
Anton Sørensen, Senior Vice President – Global R&D
Nilfisk A/S
Banemarksvej 58,
DK-2605 Broendby
Identity and signature of the person
empowered to draw up the declara-
tion on behalf of the manufacturer:
Anton Sørensen, Senior Vice President – Global R&D
Nilfisk A/S
Banemarksvej 58,
DK-2605 Broendby
Place and date of the declaration: Hadsund 11-03-2015
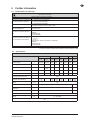
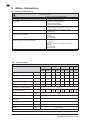
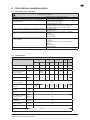
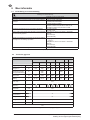
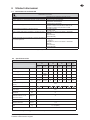
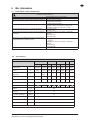
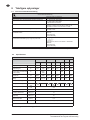
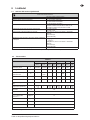
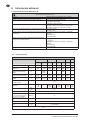
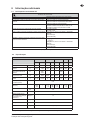
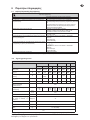
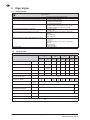
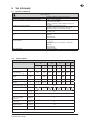
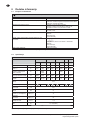
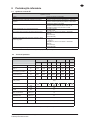
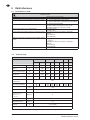
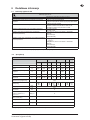
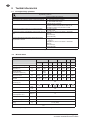
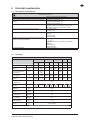
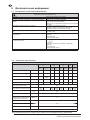
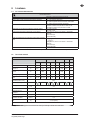
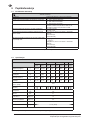
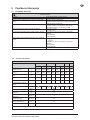
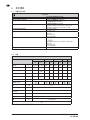
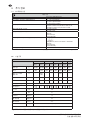
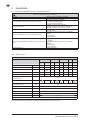
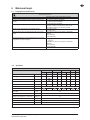
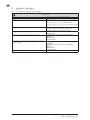
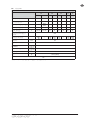
6.2 Specifications
AERO 21, AERO 21 INOX
EU GB CH US JP
21-01 21-21 21-01 21-01 21-01 21-21 21-01 21-01
Possible voltage V 220-240V 220-240V 230V 110V 230V 230V 120V 100V
Power P
iec
W 1000 1000 1000 1000 1000 1000 1000 1200
Connected load for appliance socket W -
2600 /
1300*
- - - 1300 - -
Mains frequency Hz 50/60 50/60 50/60 50/60 50/60 50/60 50/60 50/60
Fuse A 16 / 10* 16 / 10* 13 16 10 10 15 15
Protection grade (moist, dust) IP24
Protection class (electrical)
II
I
II
II II
I
II
II
Airflow
litres/min
m
3
/h
3600
216
Vacuum kPa 21 23
Sound pressure level 1 m,
EN 60704-1
dB(A)+/-2 72 73
Working sound level dB(A)+/-2 64 65
Vibration ISO 5349 m/s²+/- 1 <1,5
Weight kg 7,5 / 8,5 (INOX)
* DK
Specifications and details are subject to change without prior notice.
For Japan, the product complies with IEC 60335-1:2001 & IEC 60335-2-2:2002

*)
Optionales Zubehör / Optionen sind modellabhängig
Übersetzung der Originalanleitung
8
Kurzanleitung
Illustrierte Kurzanleitung
Die illustrierte Kurzanleitung soll Sie bei Inbe-
triebnahme, Benutzung und Lagerung des Geräts
unterstützen. Die Anleitung ist in vier Abschnitte ge-
gliedert, die durch die folgenden Symbole gekenn-
zeichnet sind:
A
Vorbereitung
1A - Zubehör auspacken
2A - Filterbeutel einsetzen
3A - Schlauch anschließen
4A - Rohr befestigen
5A - Zubehör einsetzen
B
Bedienung und Betrieb
1B - Behälter entleeren
2B - Gebläsefunktion
3B - Push & Clean
4B - Kabelaufbewahrung
5B - Schlauchaufbewahrung
C
Elektrogeräte anschließen
1C - Elektrowerkzeuge
D
Auswechseln:
1D - Filterbeutel auswechseln
2D - Filter auswechseln
*) Optionales Zubehör / Optionen sind modellab-
hängig
Inhalt
1 Wichtige Sicherheitsinformationen ......... 9
1.1 Kennzeichnung von Hinweisen .................. 9
1.2. Benutzungsregeln ...................................... 9
1.3 Zweck und bestimmungsgemäße Verwendung 9
1.4 Elektrischer Anschluss ............................... 9
1.5 Verlängerungskabel ................................... 9
1.6 Garantie ..................................................... 9
1.7 Prüfungen und Zulassungen .................... 10
1.8 Wichtige Warnhinweise ............................ 10
1.9 Doppelt isolierte Geräte ........................... 10
2 Gefahrenhinweise .................................. 11
2.1 Elektrische Teile ........................................11
2.2 Flüssigkeiten aufsaugen ...........................11
2.3 Gefahrstoffe ..............................................11
2.4 Ersatzteile und Zubehör ............................11
2.5 Schmutztank entleeren .............................11
2.6 Explosionsgefährdete oder
entflammbare Umgebungen .................... 12
2.7 Gebläsefunktion ...................................... 12
3 Bedienung und Betrieb ........................... 12
3.1. Einschalten und Bedienen des Geräts .... 12
3.2 Ein-/Ausschaltautomatik für
Elektrowerkzeuge* ................................... 12
3.3 Vor dem Nasssaugen .............................. 12
3.4 Entleeren nach dem Nasssaugen ............ 12
3.5 Entleeren nach dem Trockensaugen ....... 12
3.6 Push & Clean ........................................... 13
4 Nach der Verwendung des Geräts ......... 13
4.1 Nach Gebrauch ........................................ 13
4.2 Transport .................................................. 13
4.3 Lagerung .................................................. 13
4.4 Recycling des Saugers ............................ 13
5 Wartung .................................................... 13
5.1 Regelmäßige Wartung und Inspektion..... 13
5.2 Wartung ................................................... 13
6 Weitere Informationen ............................ 14
6.1 EU-Konformitätserklärung ....................... 14
6.2 Technische Daten .................................... 14

*)
Optionales Zubehör / Optionen sind modellabhängig
Übersetzung der Originalanleitung
9
1 Wichtige
Sicherheitsinformationen
Dieses Dokument enthält die Kurzanleitung sowie
wichtige Sicherheitsinformationen zum Gerät. Sie
müssen diese Bedienungsanleitung sorgfältig lesen,
bevor Sie Ihren Sauger zum ersten Mal in Betrieb
nehmen. Heben Sie diese Anleitung für die spätere
Verwendung auf.
Weitere Informationen
Weitere Informationen zum Gerät finden Sie auf
unserer Internetseite www.nilfisk-alto.de.
Bei Fragen wenden Sie sich bitte an den Nilfisk-AL-
TO-Service in Ihrem Land.
Siehe Rückseite dieses Dokuments.
1.1 Kennzeichnung von Hinweisen
GEFAHR
Eine Gefahr, die zu schweren Schäden und
Verletzungen, sogar tödlichen, führen kann.
WARNUNG
Eine Gefahr, die zu schweren Verletzungen,
sogar tödlichen, führen kann.
VORSICHT
Eine Gefahr, die zu leichteren Verletzungen
und Schäden führen kann.
1.2. Benutzungsregeln
Das Gerät darf
• nur von Personen eingesetzt werden, die in der
korrekten Anwendung unterwiesen und explizit
mit der Bedienung beauftragt wurden
• nur unter Aufsicht betrieben werden
• Der Gebrauch dieses Geräts durch Personen
(u. a. Kinder) mit verminderten körperlichen,
Wahrnehmungs- und geistigen Fähigkeiten oder
mit unzureichender Erfahrung und Wissen ist
nicht zulässig.
• Kinder müssen beaufsichtigt werden, um sicher-
zustellen, dass sie nicht mit dem Gerät spielen.
• Keine unsicheren Arbeitsmethoden einsetzen.
• Verwenden Sie den Staubsauger niemals ohne
Filter.
• In den folgenden Situationen das Gerät aus-
schalten und den Netzstecker ziehen:
• Vor Reinigung und Wartung
• Vor dem Auswechseln von Teilen
• Vor Änderungen am Gerät
• Falls sich Schaum entwickelt oder Flüssigkeit
austritt
Neben dieser Anleitung und den Bestimmungen zur
Unfallverhütung in Ihrem Land sind auch die Bestim-
mungen zur Sicherheit und verantwortungsvollen
Nutzung zu beachten.
1.3 Zweck und bestimmungsgemäße Verwendung
Dieser Staubsauger wurde sorgfältig entwickelt und
getestet, damit er effizient und sicher arbeitet, wenn
er korrekt gewartet und gemäß den folgenden An-
weisungen benutzt wird.
Dieser Staubsauger kann gewerblich oder im pri-
vaten Bereich verwendet werden. Unfälle aufgrund
missbräuchlicher Benutzung können nur durch die
Benutzer verhindert werden.
ALLE SICHERHEITSHINWEISE LESEN UND BE-
ACHTEN.
Das Gerät eignet sich zum Aufnehmen von trocke-
nen, nicht entflammbaren Stoffen und Flüssigkeiten.
Jegliche andere Verwendung gilt als Missbrauch.
Der Hersteller übernimmt keinerlei Haftung für
Schäden aus einer solchen Nutzung. Das Risiko
für solche Nutzung obliegt allein dem Benutzer. Die
zweckmäßige Verwendung beinhaltet den korrekten
Betrieb sowie regelmäßige Wartung und Reparatur
gemäß Anleitung des Herstellers.
1.4 Elektrischer Anschluss
1. Wir empfehlen den Anschluss des Staubsau-
gers über einen Fehlerstrom-Schutzschalter.
2. Die elektrischen Teile (Steckdosen, Stecker und
Verbindungen und Verlängerungskabel) so an-
ordnen, dass die Schutzklasse eingehalten wird.
3. Anschlüsse und Verbindungen von Stromkabeln
und Verlängerungskabeln müssen wasserdicht
sein.
1.5 Verlängerungskabel
1. Nur Verlängerungskabel mit den vom Hersteller
angegebenen oder höheren Spezifikationen
verwenden.
2. Bei Verwendung von Verlängerungskabeln den
Mindestdurchmesser beachten:
Kabellänge Kabelquerschnitt
< 16 A < 25 A
bis zu 20 m 1,5 mm
2
2,5 mm
2
20 bis 50 m 2,5 mm
2
4,0 mm
2
1.6 Garantie
Für die Garantie gelten unsere allgemeinen Ge-
schäftsbedingungen.
Der Hersteller haftet nicht für Schäden, die durch
nicht genehmigte Modifizierungen am Gerät, den
Einsatz von falschen Bürsten oder den Einsatz des
Geräts außerhalb des dafür vorgesehenen Verwen-
dungszwecks entstehen.

*)
Optionales Zubehör / Optionen sind modellabhängig
Übersetzung der Originalanleitung
10
1.7 Prüfungen und Zulassungen
Elektrische Prüfungen müssen unter Einhaltung
der Sicherheitsbestimmungen gemäß EN 65638
erfolgen. Diese Prüfungen müssen in regelmäßigen
Abständen sowie nach Reparaturen und Verände-
rungen durchgeführt werden.
Dieser Staubsauger wurde gemäß IEC/EN 60335-2-
69 zugelassen.
1.8 Wichtige Warnhinweise
WARNUNG
• Um die Gefahr von Feuer, Stromschlag
oder Verletzungen zu verringern, lesen
und befolgen Sie bitte vor dem Gebrauch
alle Sicherheitshinweise und -kennzei-
chen. Dieser Staubsauger ist so konstru-
iert, dass er sicher ist, wenn er für die
angegebenen Reinigungsfunktionen ver-
wendet wird. Bei Beschädigung von elekt-
rischen oder mechanischen Teilen muss
der Staubsauger bzw. das Zubehör von
einer qualifizierten Servicewerkstatt oder
dem Hersteller repariert werden, bevor
das Gerät wieder benutzt wird, damit wei-
tere Schäden am Gerät und Verletzungen
der Benutzer vermieden werden.
• Das Gerät nicht verlassen, wenn es an-
geschlossen ist. Bei Nichtgebrauch und
vor Wartungsarbeiten den Netzstecker
ziehen.
• Das Gerät nicht benutzen, wenn das
Zuleitungskabel oder der Netzstecker
beschädigt sind. Zum Herausziehen des
Steckers aus der Steckdose am Stecker
ziehen, nicht am Kabel. Den Stecker oder
das Gerät nicht mit nassen Händen an-
fassen. Vor dem Herausziehen des Netz-
steckers den Staubsauger ausschalten.
• Das Gerät nicht am Kabel hinter sich her-
ziehen oder am Kabel tragen. Das Kabel
nicht als Griff benutzen. Darauf achten,
dass das Kabel nicht eingeklemmt oder
um scharfe Ecken oder Kanten gezogen
wird. Mit dem Staubsauger nicht über das
Kabel fahren. Darauf achten, dass das
Kabel nicht mit heißen Oberflächen in
Berührung kommt.
• Haare, lose Kleidungsstücke und Kör-
perteile nicht in die Nähe von Öffnungen
oder beweglichen Teilen des Geräts brin-
gen. Das Gerät nicht einsetzen, falls eine
der Öffnungen blockiert ist und keine Ge-
genstände in die Öffnungen stecken. Die
Öffnungen frei halten von Staub, Fusseln,
Haaren und sonstigem Material, das den
Luftstrom hemmen könnte.
• Das Gerät eignet sich nicht zum Aufneh-
men von gefährlichem Staub.
• Keine entzündlichen oder brennbaren
Flüssigkeiten wie Benzin aufsaugen.
Nicht in Bereichen verwenden, wo solche
Flüssigkeiten vorhanden sein können.
• Keinesfalls rauchende oder brennende
Gegenstände (wie z. B. Zigaretten, Zünd-
hölzer , heiße Asche) aufsaugen.
• Bei der Reinigung auf Treppen besonders
vorsichtig sein.
• Nur verwenden, wenn die Filter einge-
setzt sind.
• Wenn das Gerät nicht richtig funktioniert,
es heruntergefallen oder beschädigt ist,
wenn es im Freien gestanden hat oder
ins Wasser gefallen ist, muss es zu einer
Servicewerkstatt oder einem Händler ge-
bracht werden.
• Den Staubsauger bei Schaumentwicklung
oder Austritt von Flüssigkeit sofort aus-
schalten.
• Der Staubsauger darf nicht als Wasser-
pumpe verwendet werden. Der Saugs-
auger ist dafür geeignet, ein Luft-Was-
ser-Gemisch aufzusaugen.
• Den Saugsauger an einem ordnungsge-
mäß geerdeten Netzanschluss anschlie-
ßen. Steckdose und Verlängerungskabel
müssen über einen funktionsfähigen
Schutzleiter verfügen.
• Am Arbeitsplatz für ausreichende Lüftung
sorgen.
• Den Staubsauger nicht als Tritt oder Lei-
ter benutzen. Der Saugsauger könnte
dabei umkippen und beschädigt werden.
Verletzungsgefahr.
1.9 Doppelt isolierte Geräte
VORSICHT
• Nur wie in dieser Anleitung beschrieben
und nur mit dem vom Hersteller empfoh-
lenen Zubehör benutzen.
• VOR DEM ANSCHLIESSEN DES
STAUBSAUGERS überprüfen, ob die
auf dem Typenschild angegebene Span-
nung mit der vorhandenen Netzspannung
übereinstimmt (max. ± 10 % Abweichung
zulässig).
• Dieses Gerät verfügt über eine doppelte
Isolierung. Nur identische Ersatz teile ver-
wenden. Siehe Anweisungen zur Wartung
von doppelt isolierten Geräten.
Bei doppelt isolierten Geräten werden statt einer
Erdung zwei Systeme der Isolierung verwendet. Bei
doppelt isolierten Geräten gibt es keine Vorrichtung
zur Erdung und eine solche Vorrichtung darf auch
nicht am Gerät angebracht werden. Die Wartung ei-
nes doppelt isolierten Geräts erfordert größte Sorg-
falt und Kenntnis des Geräts. Sie darf daher nur von
Pagina se încarcă...
Pagina se încarcă...
Pagina se încarcă...
Pagina se încarcă...
Pagina se încarcă...
Pagina se încarcă...
Pagina se încarcă...
Pagina se încarcă...
Pagina se încarcă...
Pagina se încarcă...
Pagina se încarcă...
Pagina se încarcă...
Pagina se încarcă...
Pagina se încarcă...
Pagina se încarcă...
Pagina se încarcă...
Pagina se încarcă...
Pagina se încarcă...
Pagina se încarcă...
Pagina se încarcă...
Pagina se încarcă...
Pagina se încarcă...
Pagina se încarcă...
Pagina se încarcă...
Pagina se încarcă...
Pagina se încarcă...
Pagina se încarcă...
Pagina se încarcă...
Pagina se încarcă...
Pagina se încarcă...
Pagina se încarcă...
Pagina se încarcă...
Pagina se încarcă...
Pagina se încarcă...
Pagina se încarcă...
Pagina se încarcă...
Pagina se încarcă...
Pagina se încarcă...
Pagina se încarcă...
Pagina se încarcă...
Pagina se încarcă...
Pagina se încarcă...
Pagina se încarcă...
Pagina se încarcă...
Pagina se încarcă...
Pagina se încarcă...
Pagina se încarcă...
Pagina se încarcă...
Pagina se încarcă...
Pagina se încarcă...
Pagina se încarcă...
Pagina se încarcă...
Pagina se încarcă...
Pagina se încarcă...
Pagina se încarcă...
Pagina se încarcă...
Pagina se încarcă...
Pagina se încarcă...
Pagina se încarcă...
Pagina se încarcă...
Pagina se încarcă...
Pagina se încarcă...
Pagina se încarcă...
Pagina se încarcă...
Pagina se încarcă...
Pagina se încarcă...
Pagina se încarcă...
Pagina se încarcă...
Pagina se încarcă...
Pagina se încarcă...
Pagina se încarcă...
Pagina se încarcă...
Pagina se încarcă...
Pagina se încarcă...
Pagina se încarcă...
Pagina se încarcă...
Pagina se încarcă...
Pagina se încarcă...
Pagina se încarcă...
Pagina se încarcă...
Pagina se încarcă...
Pagina se încarcă...
Pagina se încarcă...
Pagina se încarcă...
Pagina se încarcă...
Pagina se încarcă...
Pagina se încarcă...
Pagina se încarcă...
Pagina se încarcă...
Pagina se încarcă...
Pagina se încarcă...
Pagina se încarcă...
Pagina se încarcă...
Pagina se încarcă...
Pagina se încarcă...
Pagina se încarcă...
Pagina se încarcă...
Pagina se încarcă...
Pagina se încarcă...
Pagina se încarcă...
Pagina se încarcă...
Pagina se încarcă...
Pagina se încarcă...
Pagina se încarcă...
Pagina se încarcă...
Pagina se încarcă...
Pagina se încarcă...
Pagina se încarcă...
Pagina se încarcă...
Pagina se încarcă...
Pagina se încarcă...
Pagina se încarcă...
Pagina se încarcă...
Pagina se încarcă...
Pagina se încarcă...
Pagina se încarcă...
Pagina se încarcă...
Pagina se încarcă...
Pagina se încarcă...
Pagina se încarcă...
Pagina se încarcă...
Pagina se încarcă...
Pagina se încarcă...
Pagina se încarcă...
Pagina se încarcă...
Pagina se încarcă...
Pagina se încarcă...
Pagina se încarcă...
Pagina se încarcă...
Pagina se încarcă...
Pagina se încarcă...
Pagina se încarcă...
Pagina se încarcă...
Pagina se încarcă...
Pagina se încarcă...
Pagina se încarcă...
Pagina se încarcă...
Pagina se încarcă...
Pagina se încarcă...
Pagina se încarcă...
Pagina se încarcă...
Pagina se încarcă...
Pagina se încarcă...
Pagina se încarcă...
Pagina se încarcă...
Pagina se încarcă...
Pagina se încarcă...
Pagina se încarcă...
Pagina se încarcă...
Pagina se încarcă...
Pagina se încarcă...
Pagina se încarcă...
Pagina se încarcă...
Pagina se încarcă...
Pagina se încarcă...
Pagina se încarcă...
Pagina se încarcă...
Pagina se încarcă...
Pagina se încarcă...
Pagina se încarcă...
Pagina se încarcă...
Pagina se încarcă...
Pagina se încarcă...
Pagina se încarcă...
Pagina se încarcă...
Pagina se încarcă...
Pagina se încarcă...
Pagina se încarcă...
Pagina se încarcă...
Pagina se încarcă...
Pagina se încarcă...
Pagina se încarcă...
Pagina se încarcă...
Pagina se încarcă...
Pagina se încarcă...
Pagina se încarcă...
Pagina se încarcă...
Pagina se încarcă...
Pagina se încarcă...
Pagina se încarcă...
Pagina se încarcă...
Pagina se încarcă...
Pagina se încarcă...
Pagina se încarcă...
Pagina se încarcă...
Pagina se încarcă...
Pagina se încarcă...
Pagina se încarcă...
Pagina se încarcă...
Pagina se încarcă...
Pagina se încarcă...
Pagina se încarcă...
Pagina se încarcă...
Pagina se încarcă...
Pagina se încarcă...
Pagina se încarcă...
Pagina se încarcă...
Pagina se încarcă...
Pagina se încarcă...
Pagina se încarcă...
Pagina se încarcă...
Pagina se încarcă...
Pagina se încarcă...
Pagina se încarcă...
Pagina se încarcă...
Pagina se încarcă...
Pagina se încarcă...
Pagina se încarcă...
-
 1
1
-
 2
2
-
 3
3
-
 4
4
-
 5
5
-
 6
6
-
 7
7
-
 8
8
-
 9
9
-
 10
10
-
 11
11
-
 12
12
-
 13
13
-
 14
14
-
 15
15
-
 16
16
-
 17
17
-
 18
18
-
 19
19
-
 20
20
-
 21
21
-
 22
22
-
 23
23
-
 24
24
-
 25
25
-
 26
26
-
 27
27
-
 28
28
-
 29
29
-
 30
30
-
 31
31
-
 32
32
-
 33
33
-
 34
34
-
 35
35
-
 36
36
-
 37
37
-
 38
38
-
 39
39
-
 40
40
-
 41
41
-
 42
42
-
 43
43
-
 44
44
-
 45
45
-
 46
46
-
 47
47
-
 48
48
-
 49
49
-
 50
50
-
 51
51
-
 52
52
-
 53
53
-
 54
54
-
 55
55
-
 56
56
-
 57
57
-
 58
58
-
 59
59
-
 60
60
-
 61
61
-
 62
62
-
 63
63
-
 64
64
-
 65
65
-
 66
66
-
 67
67
-
 68
68
-
 69
69
-
 70
70
-
 71
71
-
 72
72
-
 73
73
-
 74
74
-
 75
75
-
 76
76
-
 77
77
-
 78
78
-
 79
79
-
 80
80
-
 81
81
-
 82
82
-
 83
83
-
 84
84
-
 85
85
-
 86
86
-
 87
87
-
 88
88
-
 89
89
-
 90
90
-
 91
91
-
 92
92
-
 93
93
-
 94
94
-
 95
95
-
 96
96
-
 97
97
-
 98
98
-
 99
99
-
 100
100
-
 101
101
-
 102
102
-
 103
103
-
 104
104
-
 105
105
-
 106
106
-
 107
107
-
 108
108
-
 109
109
-
 110
110
-
 111
111
-
 112
112
-
 113
113
-
 114
114
-
 115
115
-
 116
116
-
 117
117
-
 118
118
-
 119
119
-
 120
120
-
 121
121
-
 122
122
-
 123
123
-
 124
124
-
 125
125
-
 126
126
-
 127
127
-
 128
128
-
 129
129
-
 130
130
-
 131
131
-
 132
132
-
 133
133
-
 134
134
-
 135
135
-
 136
136
-
 137
137
-
 138
138
-
 139
139
-
 140
140
-
 141
141
-
 142
142
-
 143
143
-
 144
144
-
 145
145
-
 146
146
-
 147
147
-
 148
148
-
 149
149
-
 150
150
-
 151
151
-
 152
152
-
 153
153
-
 154
154
-
 155
155
-
 156
156
-
 157
157
-
 158
158
-
 159
159
-
 160
160
-
 161
161
-
 162
162
-
 163
163
-
 164
164
-
 165
165
-
 166
166
-
 167
167
-
 168
168
-
 169
169
-
 170
170
-
 171
171
-
 172
172
-
 173
173
-
 174
174
-
 175
175
-
 176
176
-
 177
177
-
 178
178
-
 179
179
-
 180
180
-
 181
181
-
 182
182
-
 183
183
-
 184
184
-
 185
185
-
 186
186
-
 187
187
-
 188
188
-
 189
189
-
 190
190
-
 191
191
-
 192
192
-
 193
193
-
 194
194
-
 195
195
-
 196
196
-
 197
197
-
 198
198
-
 199
199
-
 200
200
-
 201
201
-
 202
202
-
 203
203
-
 204
204
-
 205
205
-
 206
206
-
 207
207
-
 208
208
-
 209
209
-
 210
210
-
 211
211
-
 212
212
-
 213
213
-
 214
214
-
 215
215
-
 216
216
-
 217
217
-
 218
218
-
 219
219
-
 220
220
-
 221
221
-
 222
222
-
 223
223
-
 224
224
-
 225
225
-
 226
226
-
 227
227
-
 228
228


Nilfisk-ALTO AERO 21 Operating Instructions Manual
- Categorie
- Aspiratoare
- Tip
- Operating Instructions Manual
- Acest manual este potrivit și pentru
în alte limbi
- slovenčina: Nilfisk-ALTO AERO 21
Lucrări înrudite
Alte documente
-
Nilfisk MULTI II 22 INOX Manualul proprietarului
-
Viper LSU155P Manualul proprietarului
-
-
Makita DVC860L Manual de utilizare
-
Numatic NHL15 Owner Instructions
-
Adler Europe AD 7041 Manual de utilizare
-
LG VK8920SCAQ Manual de utilizare
-
Protool VCP 700 E-M Instrucțiuni de utilizare
-
LG V-C7050HTV Manual de utilizare
-
LG V-KC902HTMQ Manual de utilizare