
Internet/DAB+ Audio System
RA-E981B
INSTRUCTION MANUAL
NÁVOD K POUŽITÍ
INSTRUKCJA OBSŁUGI
NÁVOD NA POUŽITIE
HASZNÁLATI UTASÍTÁS
MANUAL DE INSTRUCȚIUNI
РЪКОВОДСТВО ЗА ЕКСПЛОАТАЦИЯ
EN
CZ
PL
SK
HU
RO
BG


EN
INTRODUCTION
• Thank you for buying our product.
• Please read through these operating instructions, so you will know how to operate your
equipment properly. After you finished reading the instructions manual, put it away in a safe
place for future reference.
SAFETY
General
• Do not drop the device and do not expose it to liquid, moisture or humidity. These might lead
to damage to the device.
• If the device is moved from a cold environment into a warmer one, do let it adapt to the new
temperature before operate the device. Otherwise, it might lead to condensation and cause
malfunctions in the device.
• Do not use the device in the dust environment as dust can damage the interior electronic
components and lead to malfunctions in the device.
• Protect the device from strong vibrations and place it on stable surfaces.
• Do not attempt to disassembly the device.
• If the device is not using for a long period of time, disconnect it from the power supply by
unplugging the power plug. This is to avoid the risk of fire.
• The ventilation should not be impeded by covering the ventilation openings with items, such
as newspapers, table-cloths, curtains, etc.
• No naked flame sources, such as lighted candles, should be placed on the apparatus.
• To maintain the compliance with the WiFi RF exposure requirement, place the product at
least 20 cm from nearby persons except when operating the controls.
Power adapter
• Only use the power adaptor delivered with the device.
• The socket outlet should be installed near the device and should be easily accessible.
• Never touch the power plug with wet hands and never pull on the power cable when pulling
the plug out of the power socket.
• Make sure the electrical voltage specified on the device and its power plug is corresponding
to the voltage of the power socket. Incorrect voltage will destroy the device.
Risks associated with high volumes
Connect headphones with volume set low and increase it if required. Prolonged
listening through some headphones at high volume settings can result in hearing
damage. To prevent possible hearing damage, do not listen at high
volume levels for long periods.
Battery handling and usage
• Only adults should handle battery. Do not allow a child to use this apparatus unless the
battery cover is securely attached.
• Remove batteries if exhausted or if they will not be used again for a long period. The
incorrect use of batteries can cause electrolyte leakage and will corrode the compartment or
cause the batteries to burst, therefore:
- Do not mix battery types, e.g. alkaline with zinc carbonate.
- When inserting new batteries, replace all batteries at the same time.
• Batteries contain chemical substances, so they should be disposed of properly.

EN
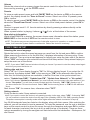
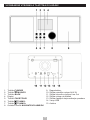
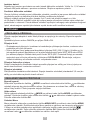
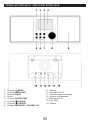
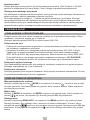
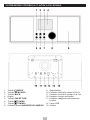
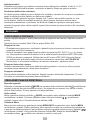
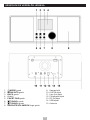
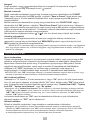
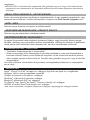
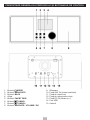
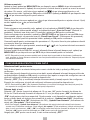
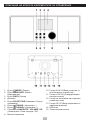
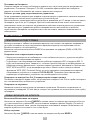
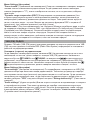
PRODUCT OVERVIEW AND CONTROL BUTTONS
1. /MODE button
2. MENU/INFO button
3. BACK button
4. Display
5. FAV/BT PAIR button
6. /TUNING- button
7. /TUNING+ button
8. NAVIGATE / VOLUME / OK knob
9. Speakers
10. AUX IN socket
11. Line Out socket
12. Headphone out socket
13. DC IN socket
14. USB port
15. Antenna

EN
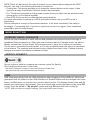
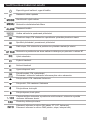
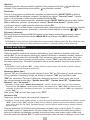
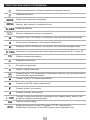
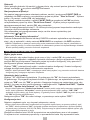
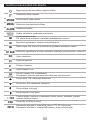
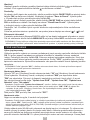
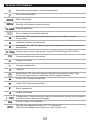
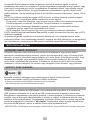
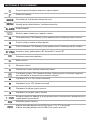
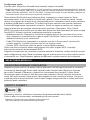
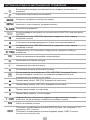
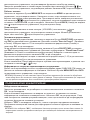
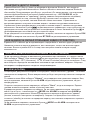
REMOTE CONTROL BUTTONS
Device power on/o; alarm o
Sleep setting
Open, close mode selection
Press to open, close menu
Alarm setting
Music: random and repeat playback
Previous track; FM: Press and hold to search for the previous station
Start playback; pause playback
Next track; FM: Press and hold to search for the next station
Press and hold to BT discoverable under BT mode
Select equalizer preset
Increase volume
Decrease volume
Mute, unmute
Conrm entry; FM: Scan; Playing: Press to view the picture or information in the
full-screen size
Move up; FM: Set frequency
Move down; FM: Set frequency
Move left, step back
Move right, step next
Number buttons: Press and hold to save station, press to retrieve saved favorite
station
Select favorite stations
Display FM mode info (Name, PTY, RT, frequency)
Display DAB mode info (Station, track, artist etc.)

EN
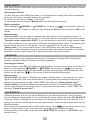
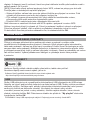
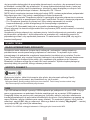
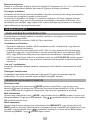
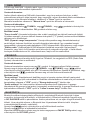
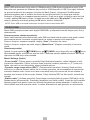
To install the batteries
Lift o the battery compartment cover from the rear of the remote control. Insert 2 x 1,5V AAA
size batteries in accordance with the diagram in the battery compartment. Take care to observe
the correct polarity.
Remote control operation
To operate the unit with the remote control, point the remote handset at the remote sensor on
the front panel and press the appropriate button on the remote handset.
The remote works best within a range of 6 ~ 7 meters from the front panel and on an angle of
30 degrees. Bright sunlight or room light conditions can interfere with the remote control. If the
remote operation is unsatisfactory or stops working entirely, rst try replacing the remote
batteries, then try reducing the room lighting conditions.
GETTING STARTED
CONNECTION AND PREPARATION
Connect the power adaptor to the back of device and plug it into power socket. Switch on the
device, it starts up.
Pull out the rod DAB/FM antenna for DAB and FM reception.
Connecting to the network
• A broadband connection in combination with a wireless access point, router or similar
network device.
• The network device needs to support WiFi (802.11 b/g/n) wireless connection. Make sure
you have setup the wireless network and you have the WEP, WPA or WPA2 security
password to activate the connection. You may also use the WPS (WiFi Protected Setup)
function for easy pairing between the network device and JVC RA-E981B. Check if the light
indicators on the network device are in appropriate status.
Connecting the line out
Use a standard audio cable to connect from the line out socket on the back of the device to the
external device.
Connecting the headphones
Turn the volume down before using the headphones. Inset the headphone plug (standard 3,5
mm) into the headphone socket at the front of the device.
GENERAL DEVICE FUNCTIONS
Power on/off
Press and hold /MODE on the device or press on the remote control to switch to standby
mode. The time, date and any active alarm times display on the screen. Switch on with the
same button.
Mode selection
Press /MODE on the device or MODE on the remote control to select modes. Rotate the
knob or press / on the remote control to select mode. Press OK to conrm.
Menu operation
Press and hold MENU/INFO on the device or MENU on the remote control to open the menu.
Press again to close the menu and return to playing screen. On the menu, rotate the knob or
press / on the remote control to move along the entries. Press OK to conrm. Press BACK
on the device or on the remote control to step back.

EN
Volume
Rotate the volume knob or press / on the remote control to adjust the volume. Switch o
the sound by pressing on the remote control.
Presets
To store an radio preset, press and hold FAV/BT PAIR on the device or FAV on the remote
control, the display shows the "Save to Preset" screen. Select one of the 10 presets, press
OK to conrm.
To select a preset, press FAV/BT PAIR on the device or FAV on the remote control, the display
shows the "Recall from Preset" screen. Select one of the listed preset stations, press OK to
conrm.
Shortcut to preset recall 1-10 favorite stations by directly pressing numbers directly on the
remote control.
When a preset station is playing, it shows 1, 2, etc. at the bottom of the screen.
Now playing information
While stream/DAB/FM is playing, the screen shows some information about the station, press
MENU/INFO on the device or INFO on the remote control to view.
NOTE: The device may process large amount of data after a period of operation, no matter in which
mode, it will cause the system freeze or malfunction. Reboot the device if necessary.
FIRST-TIME SETUP
Selecting the menu language
Rotate the knob to select the menu language you want from the list and press OK to conrm.
When powering the device on for the rst time, it displays information of privacy policy. Press
OK to continue. Then a setup wizard appears for helping you setup the main use of the device.
Select "YES" and conrm your selection and launch the setup wizard. Setup wizard helps you
setup the main use of the device.
NOTE: If you select "NO", the next window will ask you choose if you want to start the setup wizard again
next time you power the device on.
Setting date and time
Select "12" for 12-hour display format or "24" for 24-hour display format. If you select the 12-
hour format, the display shows "AM" in the morning or "PM" in the afternoon after the time.
After this, the following options are available, to dene if the time to be synchronized from
radios: "Update from DAB", "Update from FM", "Update from Network" or "No update".
Note: If you choose "Update from Network" you must indicate your time zone in the next window. If you
choose "No update", you will have to enter the date and time manually. "AM"/ "PM" displays only if
you have chosen the 12-hour time format. Select "AM" for the morning hours or "PM" for the afternoon
hours.
Next choose "ON" for summer time, otherwise select "OFF".
Setting network
Firstly the device asks if keep network connected.
Note: If you want to control the device in all operating modes via the app, select "YES". If choosing "NO",
it is not possible to control the device from the app in the (Standby, AUX IN, FM, DAB) operating modes.
The power consumption in standby mode will be higher when the network connection is kept up.
Any WLAN networks found are listed on the display, along with their names. After selecting the
network, you will be asked to input a password. To enter the password, use the reel or direction
keys on the remote control to move the cursor through the characters and press OK to conrm.
As each character is selected, the key is built up near the top of the display. There are three
options accessible by tuning the navigate reel back before the rst characters – Backspace, OK
and Cancel.

EN
[WPS] There will be hints for the type of network if your network device supports the WPS
function. Use one of the following methods of connection:
• Push button: The device prompts you to press the connect button on the router. It then
scans for a ready Push Button Connect network and connects.
• Pin: The device generates an 8-digit code number which you enter into the wireless router,
access point, or an external registrar.
• Skip WPS: Enter key as for a standard encrypted network.
For more information on setting up a WPS encrypted network, see your WPS router’s
instructions.
Device attempts to connect to the selected network. It will show connected if the setup is
successful. If connecting fails, it returns to a previous screen to try again. Once completed,
press OK to quit the setup wizard.
MODE SELECTION
INTERNET RADIO, PODCASTS
Device can play thousands of radio stations and podcasts from around the world though a
broadband Internet connection. When you select Internet radio or Podcasts mode, the device
directly contacts the Frontier Smart Technologies portal to get a list of stations or podcasts.
The list menu is provided from the portal, so it is only accessible when the device is connected
to the Internet. The contents and submenus may change from time to time. Choose required
category and search the station or podcast to listen.
SPOTIFY CONNECT
Use your phone, tablet or computer as a remote control for Spotify.
Go to spotify.com/connect to learn how.
The Spotify Software is subject to third party licenses found here:
http://www.spotify.com/connect/third-party-licenses
USB
USB mode plays audio from the USB stick/device after plugging into the USB port. Menus are
generated from the folders on the USB stick/device. Browse folders with the navigate reel, back
button, shue/repeat, or direction keys on the remote control. The display shows folder and le
names (not necessarily track names). Once you have found a track you want to play, press OK
to play. It can be added to "My playlist", press and hold OK when the track is playing.
NOTE: USB port does not support charging. Only support MP3 audio format.

EN
DAB+ RADIO
DAB mode receives DAB/DAB+ digital radio and displays information about the station, stream
and track playing.
Scanning for stations
The rst time you select DAB radio mode, or if the station list is empty, the radio automatically
performs a full scan to see what stations are available.
To start a full scan choose "Scan" in the menu.
To start a manual tune choose "Manual tune" and the desired frequency.
Station selection
Press repeatedly /TUNING+ or /TUNING- on the device or / on the remote to select a
station from the list. Conrm the selection by pressing the OK knob on the device or OK on the
remote.
Settings menu
"Prune invalid" Once the scan is complete, the radio shows a list of available stations. To
remove all invalid stations (marked with "?") that are listed but not available choose this option.
"Dynamic range compression (DRC)" If you are listening to music with a high dynamic range
in a noisy environment, you may wish to compress the audio dynamic range. This makes quiet
sounds louder, and loud sounds quieter. You can change DRC as o, low or high.
"Station order" You can choose the order of the DAB station list to be either Alphanumeric,
Ensemble or Valid. Ensemble lists groups of stations that are broadcast together on the same
ensemble. Valid lists valid stations rst, alphanumerically, then o-air stations.
FM RADIO
FM radio mode receives analogue radio from the FM band and displays RDS (Radio Data
System) information about the station and where broadcast.
Scanning for stations
To nd a station, press OK. The frequency display starts to run up as the device scans the FM
band. Press the and hold /TUNING+ or /TUNING- on the device or / on the remote
control to tune next/previous FM radio station that has a strong signal. Briey press the same
buttons on the device or / on the remote to nd desired station/frequency.
Settings menu
"Scan settings" By default, FM scans stop at any available station. This may result in a poor
signal-to-noise ratio (hiss) from weak stations. To change the scan settings to stop only at
stations with good signal strength, select "YES" after choosing "Strong station only?".
"Audio settings" All stereo stations are reproduced in stereo. For weak stations, this may
result in a poor signal-to-noise ratio (hiss). To play weak stations in mono, select "YES" after
choosing "Listen in mono only?".
BLUETOOTH
In Bluetooth mode, you can turn on the Bluetooth of your Bluetooth device. Go to the menu
and turn Bluetooth discoverable. From your Bluetooth device, search the radio JVC RA-E981B
to pairing. When it is waiting for pairing, there is a blinking Bluetooth icon at the bottom. If the
pairing is successful, the Bluetooth icon becomes steady. Control the music playback from your
Bluetooth device.
Control the music playback from your Bluetooth device. Press / on the remote control to go
back the forward track or go to the next track. Press to play or pause the track.
To disconnect from the radio, press and hold FAV/BT PAIR on the device or BT PAIR on the
remote control.

EN
AUX IN
AUX in mode plays audio from an external source. Turn the volume low on both the radio and,
if adjustable, the audio source device. Enter AUX mode, then adjust the volume as required.
SLEEP
To set the sleep timer, select "Sleep" under the Main menu. Or press on the remote control
to set. Choose from Sleep OFF, 15, 30, 45 or 60 minutes and conrm. Once you select a sleep
period, the system returns to the now playing screen.
ALARM
There are two versatile wake-up alarms with snooze facility. Each alarm can be set to start in a
particular mode.
Select "Alarms" under the Main menu to set or change an alarm. Alternately, press ALARM on
the remote control to congure.
After setup all the parameters, select "Save" to activate. The screen shows active alarms with
an icon at the bottom left.
At the set time, the alarm will sound. To temporarily silence, press any key excepted pressing
/MODE or ALARM on the device or pressing or ALARM on the remote control. You can
change the snooze period. The radio returns to standby for the set period, with the silenced
alarm icon ashing.
Press /MODE or ALARM on the device or press or ALARM on the remote control to turn o
the alarm.
UNDOK
The device gives a feature of network remote by smartphone or tablet in iOS or Android
system. By downloading the assigned app named UNDOK, you can view all the modes the
device. Search UNDOK from Google Play or Apple Store, and install it to your smartphone or
tablet.
Before using the UNDOK app, make sure the device and the smartphone / tablet are in the
same WiFi network. Launch the app. The app initializes and scans for Internet Radio in the
network. Tap the device to make the connection.
When prompted, enter the current PIN code. The default PIN is "1234". You can view and edit
the current PIN on the Internet Radio in the menu Select your desired mode in the main page.
You may then control the selected mode on your smartphone / tablet and on the display of the
device simultaneously.
NOTE: Be aware that if another smartphone / tablet with the app in the same network have access with
the device, the original connection will be cut off.

EN
SYSTEM SETTINGS
EQUALISER
Several preset EQ modes are available: Normal, Flat, Jazz, Rock, Movie, Classic, Pop, News
and My EQ. Press to EQ select. A user-dened setting is available; create your own EQ with
custom bass, treble settings.
NETWORK
"Network wizard" Enter to search AP SSID, then input the WEP / WPA key or choose Push
Button/Pin/Skip WPS to connect to the wireless network.
"PBC Wlan setup" Push Button Conguration, it is to connect the AP that supports WPS
(WiFi Protected Setup).
"View settings" View the information of current connected network: Active connection, MAC
address, Wlan region, DHCP, SSID, IP address, Subnet mask, Gateway address, Primary DNS
and Secondary DNS.
"Manual settings" Enable or disable DHCP (Dynamic Host Conguration Protocol). Input the
SSID, WEP / WPA key and/or other conguration.
"NetRemote PIN Setup" Here you can view and edit the NetRemote PIN. The default
NetRemote PIN is: 1234. The NetRemote PIN is required when you want to connect a
smartphone or Tablet PC to your radio using the feature mentioned in First-time Setup.
"Network prole" The device remembers the last four wireless networks it has connected to,
and automatically tries to connect to whichever one of them it can nd. From here you can see
the list of registered networks. You can delete unwanted networks.
"Clear network settings" Select "YES" to clear all the current network settings. Select "NO"
to cancel.
"Keep network connected" If you choose to keep network connected, the WiFi will not
disconnect even you are in standby mode or non-network mode. This option allows the device
to be ready for UNDOK and Spotify Connect connection in any modes.
TIME/DATE
Set the time manually or Auto update, Time format, Time zone, Daylight savings and Standby
format. Details can be referred to Setting date and time under First-time Setup.
LANGUAGE
The default language is English. Change it as your preference. Available languages: English,
Danish, Dutch, Finnish, French, German, Italian, Norwegian, Polish, Portuguese, Spanish,
Swedish, Turkish.
FACTORY RESET
Resetting all user settings to default values, so that time and date, network conguration and
presets are lost. However, current software version of the radio is maintained.
SOFTWARE UPDATE
"Auto-check setting" This option automatically checks for new updates from time to time.
Automatic updating is enabled by default.
"Check now" Search for available updates immediately. You will be asked if you want to go
ahead with download and installation of an update. After a software upgrade, all user settings
are maintained.
NOTE: Before starting a software upgrade, ensure that the radio is plugged into a stable main power
connection. Disconnecting power during an upgrade may permanently damage the unit.

EN
SETUP WIZARD
With this function, you can start the setup wizard at any time. Any parameters or stations
entered already are not deleted. For more information, please read the Section First-time
Setup.
INFO
View the rmware version and the radio ID.
PRIVACY POLICY
View the information of Privacy Policy.
BACKLIGHT
You may change the backlight of each environment (power on level or standby) to High,
Medium, Low or Auto. And adjust the timeout duration which the radio turns to standby
backlight level when it has not been controlled.
MAINTENANCE / CLEANING
• Always power off the unit when cleaning it.
• Never use any harsh or strong solvents to clean the device since these may damage the
surface of the device. Dry, soft cloth is appropriate, however, if the device is extremely dirty, it
may be wiped off with a slightly moist cloth. Make sure the device is dried off after cleaning.
When you are necessary to ship the device, store it in its original package. Save the package
for this purpose.
TRADEMARKS
Apple®, iPhone® and iPad® are trademarks, App Store is a service mark of Apple Inc.,
registered in the USA and other countries.
Google® and Android® are trademarks of Google Inc.
Windows® is a registered trademark of Microsoft Corporation.
Bluetooth® is a registered trademark of Bluetooth SIG, Inc.
The Spotify® logo, Spotify® and Spotify® Connect are registered trademarks of Spotify Ltd.
UNDOK is a trademark of Frontier Smart Technologies Ltd.
Other names and products can be the trademarks or registered trademarks of their respective owners.

EN
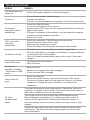
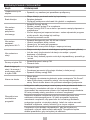
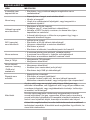
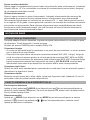
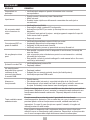
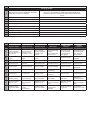
TROUBLESHOOTING
ERROR REMEDY
The device does not
switch on. • Check it the power adaptor is connected properly.
No sound.
• Turn on the sound as it may be muted .
• Increase the volume.
• Pull any connected headphone or speaker from the connector jack.
No network
connection can be
established.
• Check the WLAN function.
• Try to set an IP address at the device.
• Activate the DHCP function on the router and make the connection
again at the device.
• A firewall is activated on the network > set the respective program
in such a way that access is possible.
• Reboot the router
WiFi connection
cannot be
established.
• Check the availability of WLAN network on the router.
• Place the device closer to the router.
• Make sure the password is correct.
• Check the network as well as the access point and firewall.
No station is found.
• The station may not be available currently, try again later.
• The link of the station is changed or the station no longer transmits
> ask the provider for information.
• The link of manual added station may not be correct, check and
change it.
Hiss in FM mode. • Check/move the FM antenna.
• Move the radio.
No stations
available / burbling
/ intermittent in DAB
mode.
• Move the radio.
• Rescan local stations only (high-strength).
• Check the local DAB coverage.
Alarm does not
work.
• Switch on the alarm.
• Due to the volume setting, refer to the solutions of “No sound”.
• The source of alarm was set to be station but there is no network
connection. Change the source of alarm or reconfigure the
connection.
All other
undetermined
cases.
The smart radio may process large amount of data after a period of
operation, no matter in which mode, it will cause the system freeze or
malfunction. Reboot the device if necessary.
The normal function of the product may be disturbed by strong
Electro-Magnetic Interference. If so, simply reset the product to
resume normal operation by following the instruction manual. In
case the function could not resume, please use the product in other
location.
The device may malfunction when used in areas with strong radio
interference. The device will work properly again once there is no
more interference.

EN
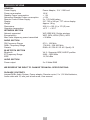
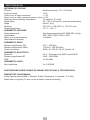
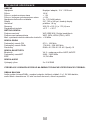
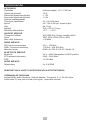
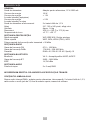
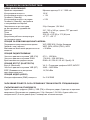
SPECIFICATIONS
GENERAL
Power Supply Power Adaptor, 12 V / 1500 mA
Power consumption 18 W
Standby Power consumption < 1 W
Networked Standby Power consumption < 2 W
Remote Control Power Supply 2 x 1,5V AAA battery
Display 2,8", 320 x 240 pxl, TFT colour display
Weight Approx.1,8 kg
Dimensions 302 (L) x 125 (H) x 175 (D) mm
Operation temperature +5°C – +35°C
NETWORK SECTION
Network supported WiFi IEEE 802.11b/g/n wireless
Encrypted key WEP, WPA, WPA2 (PSK), WPS
Max. radio frequency power transmitted < 20 dBm
RADIO SECTION
FM Frequency Range 87,5 – 108 MHz
DAB+ Frequency Range 174,928 – 239,200 MHz
Presets DAB+ 40 / FM 40 / IR 40 / Spotify 10
BLUETOOTH SECTION
Bluetooth V4.2 - Supports A2DP, AVRCP proles
BT Frequency Range 2402 – 2480 MHz
EIRP 14,784 dBm
AUDIO SECTION
Power output 2 x 5 Watts RMS
WE RESERVE THE RIGHT TO CHANGE TECHNICAL SPECIFICATIONS.
PACKAGE CONTENTS
Internet/DAB+ Audio System, Power adaptor, Remote control, 2 x 1,5V AAA batteries,
Audio cable with 3,5 mm jack at both ends, User manual

EN
WARNING: DO NOT USE THIS PRODUCT NEAR WATER, IN WET AREAS TO
AVOID FIRE OR INJURY OF ELECTRIC CURRENT. ALWAYS TURN OFF THE
PRODUCT WHEN YOU DON’T USE IT OR BEFORE A REVISION. THERE
AREN’T ANY PARTS IN THIS APPLIANCE WHICH ARE REPARABLE BY CONSUMER.
ALWAYS APPEAL TO A QUALIFIED AUTHORIZED SERVICE. THE PRODUCT IS
UNDER A DANGEROUS TENTION.
TO AVOID DANGER OF SUFFOCATION, KEEP THE PLASTIC BAG AWAY
FROM BABIES AND CHILDREN. DO NOT USE THIS BAG IN CRIBS,
BEDS, CARRIAGES OR PLAYPENS. THIS BAG IS NOT A TOY.
Disposal of old Electrical & Electronic Equipment
(Applicable in the European Union and other European countries with separate
collection systems)
This symbol on the product or on its packaging indicates that this product shall not be
treated as household waste. Instead it shall be handed over to the applicable
collection point for the recycling of electrical and electronic equipment. By ensuring
this product is disposed of correctly, you will help prevent potential negative
consequences for the environment and human health, which could otherwise be
caused by inappropriate waste handling of this product. The recycling of materials will help to
conserve natural resources. For more detailed information about recycling of this product,
please contact your local Civic Oce, your household waste disposal service or the shop
where you purchased the product.
Hereby, ETA a.s. declares that the radio equipment type RA-E981B is in compliance
with Directive 2014/53/EU. The full text of the EU declaration of conformity is available
at the following internet address: www.JVCAUDIO.cz/doc

CZ
ÚVOD
• Děkujeme vám za zakoupení tohoto výrobku.
• Přečtěte si prosím tento návod k použití, abyste věděli, jak správně tento přístroj ovládat.
Po přečtení návodu k použití jej uložte na bezpečné místo k možnému pozdějšímu využití.
BEZPEČNOST
Všeobecná ustanovení
• Chraňte přístroj před pádem a nevystavujte jej kapalinám, mokru ani vlhkosti. Mohlo by dojít
k jeho poškození.
• Pokud přístroj přesunujete ze studeného do teplejšího prostředí, nechte jej před uvedením
do provozu přizpůsobit nové teplotě. Jinak může dojít ke kondenzaci a nefunkčnosti
přístroje.
• Nepoužívejte přístroj v prašném prostředí, protože prach může poškodit vnitřní elektronické
součásti a vést k nefunkčnosti přístroje.
• Chraňte přístroj před silnými vibracemi a umísťujte jej na stabilní povrchy.
• Nepokoušejte se přístroj rozebrat.
• Jestliže přístroj delší dobu nepoužíváte, odpojte jej ze zásuvky vytažením elektrické
zástrčky. Zabráníte tím riziku požáru.
• Větrání by nemělo být blokováno zakrytím větracích otvorů předměty, jako jsou noviny,
ubrusy, závěsy atd.
• Nepokládejte na přístroj žádné zdroje otevřeného ohně, například zapálené svíčky.
• Abyste splnili požadavek na vystavení se rádiovým vlnám WiFi, umístěte výrobek alespoň
20 cm od osob, které se nacházejí v blízkosti, kromě případů, kdy používáte ovládací prvky.
Napájecí adaptér
• Používejte pouze napájecí adaptér dodaný se zařízením.
• Zásuvka by měla být instalována v blízkosti zařízení a měla by být snadno přístupná.
• Nikdy se nedotýkejte síťové zástrčky mokrýma rukama a při vytahování zástrčky ze zásuvky
nikdy netahejte za napájecí kabel.
• Ujistěte se, že elektrické napětí uvedené na přístroji a jeho napájecí zástrčce odpovídá
napětí v elektrické zásuvce. Nesprávné napětí způsobí zničení zařízení.
Rizika související s vysokou hlasitostí
Připojte sluchátka s hlasitostí nastavenou na nízkou úroveň a v případě potřeby ji
zvyšte. Delší poslech s vysokou hlasitostí může v případě některých sluchátek
způsobit poškození sluchu. Abyste předešli možnému poškození sluchu,
neposlouchejte dlouhodobě při vysoké úrovni hlasitosti.
Manipulace s bateriemi a jejich používání
• S baterií by měli manipulovat pouze dospělí. Nedovolte, aby tento přístroj používaly děti,
pokud kryt baterie není bezpečně připevněn.
• Baterie vyjměte, pokud jsou vybité nebo pokud nebudou delší dobu používány. Nesprávné
používání baterií může způsobit únik elektrolytu, korozi prostoru pro baterie nebo zapříčinit
prasknutí baterií, proto:
- Nekombinujte různé typy baterií, např. zásadité se zinko-karbonovými.
- Při vkládání nových baterií vyměňte všechny baterie současně.
• Baterie obsahují chemické látky, proto by měly být řádně zlikvidovány.

CZ
VYOBRAZENÍ VÝROBKU A TLAČÍTKA OVLÁDÁNÍ
1. Tlačítko /MODE
2. Tlačítko MENU/INFO
3. Tlačítko BACK
4. Displej
5. Tlačítko FAV/BT PAIR
6. Tlačítko /TUNING-
7. Tlačítko /TUNING+
8. Ovládací knoflík NAVIGATE/VOLUME/OK
9. Reproduktory
10. Zdířka externího vstupu AUX IN
11. Zdířka linkového výstupu Line Out
12. Zdířka výstupu sluchátek
13. Zdířka napájení stejnosměrným proudem
14. Vstup USB
15. Anténa

CZ
TLAČÍTKA DÁLKOVÉHO OVLADAČE
Zapnutí/vypnutí zařízení; vypnutí budíku
Nastavení režimu spánku
Otevřít/zavřít výběr režimu
Stisknutím otevřete/zavřete Menu
Nastavení budíku
Hudba: náhodné a opakované přehrávání
Předchozí stopa; FM: stisknutím a podržením vyhledáte předchozí stanici
Spuštění přehrávání; pozastavení přehrávání
Další stopa; FM: stisknutím a podržením vyhledáte následující stanici
Stisknutím a podržením se stane zařízení viditelným pro párování v režimu BT
Výběr ekvalizéru
Zvýšení hlasitosti
Snížení hlasitosti
Vypnou/zapnout zvuk
Potvrdit zadání; FM: vyhledávání;
Přehrávání: stisknutím zobrazíte informace přes celou obrazovku
Pohyb nahoru; FM: nastavení frekvence
Pohyb dolů; FM: nastavení frekvence
Pohyb doleva, krok zpět
Pohyb doprava, krok vpřed
Číselná tlačítka: stisknutím a podržením uložíte stanici, stisknutím vyvoláte
uloženou oblíbenou stanici
Předvolby oblíbených stanic
Zobrazení informací o režimu FM (název, PTY, RT, frekvence)
Zobrazení informací o režimu DAB (statice, stopa, interpret atd.)

CZ
Instalace baterií
Sejměte kryt prostoru pro baterie na zadní straně dálkového ovladače. Vložte 2 x 1,5 V baterie
velikosti AAA podle nákresu v prostoru na baterie. Dbejte na správnou polaritu.
Používání dálkového ovládání
Chcete-li přístroj ovládat pomocí dálkového ovladače, namiřte jej na senzor dálkového ovládání
na předním panelu a stiskněte příslušné tlačítko na dálkovém ovladači.
Dálkový ovladač nejlépe funguje v dosahu 6 až 7 metrů od předního panelu a v úhlu
do 30 stupňů. Dálkové ovládání může být rušeno jasným slunečním světlem nebo světelnými
podmínkami v místnosti. Pokud dálkové ovládání uspokojivé nefunguje nebo přestane fungovat
úplně, zkuste nejprve vyměnit jeho baterie a poté zkuste snížit osvětlení místnosti.
ZAČÍNÁME
PŘIPOJENÍ A PŘÍPRAVA
Připojte napájecí adaptér k zadní části přístroje a zapojte jej do zásuvky. Zapnutím spusťte
přístroj.
Vytáhněte tyčovou anténu DAB/FM pro příjem DAB a FM.
Připojení k síti
• Širokopásmové připojení v kombinaci s bezdrátovým přístupovým bodem, routerem nebo
podobným síťovým zařízením.
• Síťové zařízení musí podporovat bezdrátové připojení WiFi (802.11 b/g/n). Ujistěte se, že
jste správně nastavili bezdrátovou síť a máte bezpečnostní heslo WEP, WPA nebo WPA2
pro aktivaci připojení. Můžete také použít funkci WPS (WiFi Protected Setup) pro snadné
spárování mezi síťovým zařízením a přístrojem JVC RA-E981B. Zkontrolujte, zda jsou
světelné indikátory na síťovém zařízení ve správném stavu.
Připojení linkového výstupu
Pomocí standardního zvukového kabelu proveďte připojení ze zdířky pro linkový výstup na
zadní straně zařízení k externímu zařízení.
Připojení sluchátek
Před použitím sluchátek snižte hlasitost. Zapojte konektor sluchátek (standardně 3,5 mm) do
zdířky pro sluchátka na přední straně zařízení.
ZÁKLADNÍ FUNKCE PŘÍSTROJE
Zapnutí/vypnutí
Stisknutím a podržením tlačítka /MODE na zařízení nebo stisknutím tlačítka na dálkovém
ovladači přepnete do pohotovostního režimu. Na obrazovce se zobrazí čas, datum a všechny
aktivní časy budíků. Přístroj zapnete stejným tlačítkem.
Volba režimu
Režim vyberete stisknutím tlačítka /MODE na zařízení nebo tlačítka MODE na dálkovém
ovladači. Otočením knoíku nebo stisknutím tlačítek / na dálkovém ovladači vyberte režim.
Potvrďte stisknutím tlačítka OK.
Ovládání Menu
Menu zobrazíte stisknutím a podržením tlačítka MENU/INFO na zařízení nebo tlačítka MENU
na dálkovém ovladači. Dalším stisknutím Menu zavřete a vrátíte se na obrazovku přehrávání.
V Menu se můžete pohybovat po položkách otáčením knoíku nebo pomocí tlačítek /
na dálkovém ovladači. Volbu potvrďte stisknutím tlačítka OK. Stisknutím tlačítka BACK
na zařízení nebo na dálkovém ovládání se vrátíte o krok zpět.

CZ
Hlasitost
Hlasitost upravíte otáčením knoíku hlasitosti nebo stisknutím tlačítek / na dálkovém
ovladači. Zvuk vypnete stisknutím tlačítka na dálkovém ovladači.
Předvolby
Chcete-li uložit stanici do předvoleb, stiskněte a podržte tlačítko FAV/BT PAIR na přístroji
nebo tlačítko FAV na dálkovém ovladači. Na displeji se zobrazí "Save to Preset". Vyberte
jednu z 10 předvoleb a výběr potvrďte stisknutím tlačítka OK.
Chcete-li vybrat uloženou předvolbu, stiskněte tlačítko FAV/BT PAIR na přístroji nebo tlačítko
FAV na dálkovém ovladači. Na displeji se zobrazí "Recall from Preset". Vyberte jednu
z uložených stanic a výběr potvrďte stisknutím tlačítka OK.
Předvolbu 1 až 10 můžete rychle vyvolat stisknutím odpovídajícího čísla na dálkovém ovladači.
Pokud se přehrává stanice z předvoleb, na spodní straně displeje se zobrazí 1, 2, atd.
Zobrazení informací
Během přehrávání Streamu/DAB/FM mohou být na displeji zobrazeny informace o stanici.
Pro jejich zobrazení stiskněte tlačítko MENU/INFO na přístroji nebo INFO na dálkovém
ovladači.
POZNÁMKA: Přístroj může po určité době provozu zpracovávat velké množství dat. Bez ohledu na režim
to může způsobit „zamrznutí“ nebo nefunkčnost systému. V případě potřeby přístroj restartujte.
PRVNÍ NASTAVENÍ
Výběr jazyka nabídky
Otáčením knoíku vyberte ze seznamu požadovaný jazyk nabídky a potvrďte stisknutím
tlačítka OK. Při prvním zapnutí zařízení se zobrazí informace o zásadách ochrany osobních
údajů. Pokračujte stisknutím tlačítka OK. Poté se zobrazí průvodce nastavením, který vám
pomůže nastavit hlavní způsoby použití zařízení. Zvolte "YES", potvrďte výběr a spusťte
průvodce nastavením. Průvodce nastavením vám pomůže nastavit hlavní způsoby použití
zařízení.
POZNÁMKA: Pokud vyberete "NO", v dalším okně se zobrazí dotaz, zda chcete při příštím zapnutí
přístroje znovu spustit průvodce nastavením.
Nastavení data a času
Vyberte "12" pro 12hodinový formát zobrazení nebo "24" pro 24hodinový formát zobrazení.
Pokud vyberete 12hodinový formát, na displeji se zobrazí "AM" pro dopoledne nebo
"PM" pro odpoledne. Poté jsou k dispozici následující možnosti, které určují, zda se má
čas synchronizovat podle rádia: "Update from DAB", "Update from FM", "Update from
Network" nebo "No update".
Poznámka: Pokud zvolíte "Update from Network", musíte v dalším okně uvést své časové pásmo.
Pokud zvolíte "No update", budete muset datum a čas zadat ručně. "AM"/ "PM" se zobrazí pouze
v případě, že jste zvolili 12hodinový formát času. Pro dopolední hodiny vyberte "AM" a pro odpolední
hodiny "PM".
Dále zvolte "ON" pro letní čas, jinak zvolte "OFF".
Nastavení sítě
Nejprve se zařízení zeptá, zda nechat síť připojenou.
Poznámka: Pokud chcete ovládat přístroj ve všech provozních režimech prostřednictvím aplikace, vyberte
"YES". Pokud zvolíte "NO", nebude možné přístroj ovládat z aplikace v provozních režimech (pohoto-
vostní režim, AUX IN, FM, DAB). Spotřeba energie v pohotovostním režimu bude při trvalém síťovém
připojení vyšší.
Všechny nalezené sítě WLAN budou zobrazeny na displeji spolu s jejich názvy. Po výběru
sítě budete vyzváni k zadání hesla. Chcete-li zadat heslo, otáčením knoíku nebo pomocí
směrových tlačítek na dálkovém ovladači přesunujte kurzor mezi znaky a jejich výběr vždy
potvrďte stisknutím tlačítka OK. Při výběru jednotlivých znaků se heslo zobrazuje v horní části
Pagina se încarcă...
Pagina se încarcă...
Pagina se încarcă...
Pagina se încarcă...
Pagina se încarcă...
Pagina se încarcă...
Pagina se încarcă...
Pagina se încarcă...
Pagina se încarcă...
Pagina se încarcă...
Pagina se încarcă...
Pagina se încarcă...
Pagina se încarcă...
Pagina se încarcă...
Pagina se încarcă...
Pagina se încarcă...
Pagina se încarcă...
Pagina se încarcă...
Pagina se încarcă...
Pagina se încarcă...
Pagina se încarcă...
Pagina se încarcă...
Pagina se încarcă...
Pagina se încarcă...
Pagina se încarcă...
Pagina se încarcă...
Pagina se încarcă...
Pagina se încarcă...
Pagina se încarcă...
Pagina se încarcă...
Pagina se încarcă...
Pagina se încarcă...
Pagina se încarcă...
Pagina se încarcă...
Pagina se încarcă...
Pagina se încarcă...
Pagina se încarcă...
Pagina se încarcă...
Pagina se încarcă...
Pagina se încarcă...
Pagina se încarcă...
Pagina se încarcă...
Pagina se încarcă...
Pagina se încarcă...
Pagina se încarcă...
Pagina se încarcă...
Pagina se încarcă...
Pagina se încarcă...
Pagina se încarcă...
Pagina se încarcă...
Pagina se încarcă...
Pagina se încarcă...
Pagina se încarcă...
Pagina se încarcă...
Pagina se încarcă...
Pagina se încarcă...
Pagina se încarcă...
Pagina se încarcă...
Pagina se încarcă...
Pagina se încarcă...
Pagina se încarcă...
Pagina se încarcă...
Pagina se încarcă...
Pagina se încarcă...
Pagina se încarcă...
Pagina se încarcă...
Pagina se încarcă...
Pagina se încarcă...
Pagina se încarcă...
Pagina se încarcă...
Pagina se încarcă...
Pagina se încarcă...
Pagina se încarcă...
Pagina se încarcă...
Pagina se încarcă...
Pagina se încarcă...
Pagina se încarcă...
Pagina se încarcă...
Pagina se încarcă...
Pagina se încarcă...
-
 1
1
-
 2
2
-
 3
3
-
 4
4
-
 5
5
-
 6
6
-
 7
7
-
 8
8
-
 9
9
-
 10
10
-
 11
11
-
 12
12
-
 13
13
-
 14
14
-
 15
15
-
 16
16
-
 17
17
-
 18
18
-
 19
19
-
 20
20
-
 21
21
-
 22
22
-
 23
23
-
 24
24
-
 25
25
-
 26
26
-
 27
27
-
 28
28
-
 29
29
-
 30
30
-
 31
31
-
 32
32
-
 33
33
-
 34
34
-
 35
35
-
 36
36
-
 37
37
-
 38
38
-
 39
39
-
 40
40
-
 41
41
-
 42
42
-
 43
43
-
 44
44
-
 45
45
-
 46
46
-
 47
47
-
 48
48
-
 49
49
-
 50
50
-
 51
51
-
 52
52
-
 53
53
-
 54
54
-
 55
55
-
 56
56
-
 57
57
-
 58
58
-
 59
59
-
 60
60
-
 61
61
-
 62
62
-
 63
63
-
 64
64
-
 65
65
-
 66
66
-
 67
67
-
 68
68
-
 69
69
-
 70
70
-
 71
71
-
 72
72
-
 73
73
-
 74
74
-
 75
75
-
 76
76
-
 77
77
-
 78
78
-
 79
79
-
 80
80
-
 81
81
-
 82
82
-
 83
83
-
 84
84
-
 85
85
-
 86
86
-
 87
87
-
 88
88
-
 89
89
-
 90
90
-
 91
91
-
 92
92
-
 93
93
-
 94
94
-
 95
95
-
 96
96
-
 97
97
-
 98
98
-
 99
99
-
 100
100


în alte limbi
- slovenčina: JVC RA-E981B Používateľská príručka
- polski: JVC RA-E981B Instrukcja obsługi
Lucrări înrudite
Alte documente
-
Sharp DR-I470 Pro Manual de utilizare
-
LOEWE klang s1 s3 Manual de utilizare
-
Panasonic SCALL5CDEB Instrucțiuni de utilizare
-
Sharp DR-I470(BK) Manualul proprietarului
-
Hama 00054239 Manualul utilizatorului
-
Hama 00054850 Manualul utilizatorului
-
Hama IR80MBT Quick Manual
-
Hama DIR3110 Quick Manual
-
-
Hama 00054247 Manualul utilizatorului