Philips HD9020/40 Manual de utilizare
- Categorie
- Mașini pentru fabricarea pâinii
- Tip
- Manual de utilizare

HD9020

2

3
B
A
D
E
G
H
N
O
1 2 3 4
10 59 8 7 6
M
J
K
L
I
F
C
1

4

6
15
24
33
41
50
59
68
76
85
94
103
113
122
130
139

6
Congratulations on your purchase and welcome to Philips! To fully benet from the support that
Philips offers, register your product at www.philips.com/welcome.
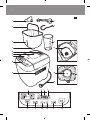
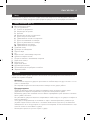
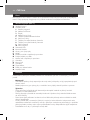
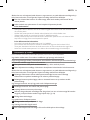
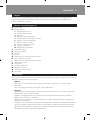
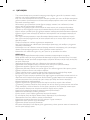
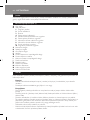
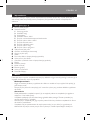
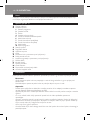
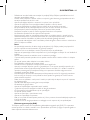
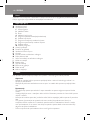
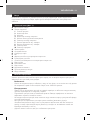
Air vents
Control panel
Program list
Weight indications
Display
Crust colour indications
Start/stop/cancel button
Crust colour selector
Timer decrease button
Timer increase button
Weight selector
Program selector
Removable lid
Viewing window
Steam vents
Shaft
Bread pan with non-stick coating
Bread pan handle
Kneading blade with non-stick coating
Measuring spoon
Metal hook
Measuring cup
Heating element
Cord storage facility
Mains cord
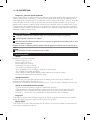
Read this user manual carefully before you use the appliance and save it for future reference.
- Never immerse the body of the breadmaker in water or any other liquid, nor rinse it under the
tap.
- Do not cover the steam and air vents while the breadmaker is operating.
- Check if the voltage indicated on the appliance corresponds to the local mains voltage before
you connect the appliance.
- Only connect the appliance to an earthed wall socket. Always make sure that the plug is
inserted rmly into the wall socket.
- Do not use the appliance if the plug, the mains cord, the body of the appliance or the bread pan
is damaged.
- This appliance is not intended for use by persons (including children) with reduced physical,
sensory or mental capabilities, or lack of experience and knowledge, unless they have been given
supervision or instruction concerning use of the appliance by a person responsible for their
safety.
- Children should be supervised to ensure that they do not play with the appliance.

- Keep the mains cord out of the reach of children. Do not let the mains cord hang over the edge
of the table or worktop on which the appliance stands.
- If the mains cord is damaged, you must have it replaced by Philips, a service centre authorised by
Philips or similarly qualied persons in order to avoid a hazard.
- Make sure that the heating element, the shaft of the bread pan and the outside of the bread pan
are clean and dry before you put the plug in the wall socket.
- Do not use the appliance for any other purpose than described in this manual.
- Do not plug in the appliance or operate the control panel with wet hands.
- Never connect this appliance to an external timer switch in order to avoid a hazardous situation.
- Do not come near the steam and air vents with your face or hands when the appliance
is operating.
- Do not open the lid during the baking process, as this may cause the dough or bread to
collapse.
- During the baking process, the appliance itself and the lid become extremely hot. Be careful not
to burn yourself.
- Do not remove the bread pan from the appliance during use.
- Never use any utensils to mix the ingredients in the bread pan during a baking program.
- Only put ingredients in the bread pan. Do not put or spill any ingredients and/or additives in the
inside of the appliance to avoid damage to the heating element.
- When you remove jam from the bread pan, lift the bread pan with both hands in oven mitts to
pour out the hot jam.
- Never use any accessories or parts from other manufacturers or that Philips does
not specically recommend. If you use such accessories or parts, your guarantee becomes
invalid.
- Do not touch the bread pan with sharp utensils to avoid damage.
- Do not expose the appliance to high temperatures, nor place it on a working or still hot stove
or cooker.
- Always place the appliance on a stable, level and horizontal surface.
- Always put the bread pan in the appliance before you put the plug in the wall socket and switch
on the appliance.
- Always unplug the appliance after use.
- Always let the appliance cool down before you clean or move it.
- Do not place the bread pan in a conventional oven to bake bread.
- This appliance is intended for household use only. If the appliance is used improperly or for
professional or semi-professional purposes or if it is not used according to the instructions in
the user manual, the guarantee becomes invalid and Philips refuses any liability for damage
caused.
- The accessible surfaces may become hot when the appliance is operating. Always use oven mitts
when you lift the bread pan by its handle or when you handle the hot bread pan, the kneading
blade or the hot bread.
- Beware of the hot steam that comes out of the steam vents during baking or out of the
breadmaker when you open the lid during or after the baking process.
- Do not lift and move the appliance while it is operating.
- Do not touch moving parts.
- Do not expose the appliance to direct sunlight.
- Do not insert metallic objects or alien substances into the steam vents.
- Do not use the bread pan if it is damaged.
- Always clean the appliance after use.
- Do not clean the appliance in the dishwasher.
- Do not use the appliance outdoors.
7

- Leave a free space of at least 10cm above, behind and on both sides of the appliance to prevent
damage due to radiated heat.
- To avoid damage to the appliance, do not place the bread pan or any other object on top of the
appliance.
This Philips appliance complies with all standards regarding electromagnetic elds (EMF). If handled
properly and according to the instructions in this user manual, the appliance is safe to use based on
scientic evidence available today.
This appliance has a backup function that remembers the status before a power failure, provided the
power supply resumes within 7 minutes. If the power failure occurs during a baking process, the
countdown of the baking time continues where it left off when the power supply resumes. If the
power failure lasts longer than 7 minutes and the failure occurs during a baking process, the
breadmaker automatically resets to the preset setting when the power supply resumes. Open the
breadmaker, remove its contents and start all over again. If you have set the timer and the preset
baking process has not yet started when a power failure occurs, the breadmaker automatically
resets to the preset setting when the power supply resumes. Open the breadmaker, remove its
contents and start all over again.
1 Remove all packaging material from the appliance. Be careful not to throw away the kneading
blade.
2 Remove any labels from the body of the appliance.
3 To remove any dust that may have accumulated on the appliance, wipe the outside of the
appliance, the bread pan and the kneading blade with a damp cloth.
Never use scouring pads, abrasive cleaning agents or aggressive liquids such as petrol or acetone
to clean the appliance.
4 Dry all parts thoroughly before you start to use the appliance.
The display shows the following things:
- Program number (1-12)
- Program or time icon
- Selected weight and selected crust colour
- Baking time countdown in minutes
- ’Fin’ when the program nished
- ’OFF’ when the program has been cancelled or reset
- ’Err’ when there is an error
- ’Add’ when extra solid ingredients (e.g. fruits or nuts) can be added
- Keep-warm animation when the baking process is nished
You can use the timer increase and decrease buttons when you want the bread to be ready at a
later time. The maximum delay time that can be set is 13 hours.
For example, set the timer to 13 hours at 19:00 hours to have the bread ready at 08:00 hours
the next morning.
- Press this button to start a program or to start timer countdown
8

- Press this button for 2 seconds until you hear 1 long beep and the message ‘OFF’ appears on
the display. This cancels the current program and the appliance goes back to the default setting
(i.e. program 1 - Basic White, 750g, medium crust colour). This does not switch off the appliance.
With the program selector, you can select one of 12 different programs. The number of the selected
program and the optimal processing time for this program is shown on the display.
With the crust colour selector, you can select one of three crust colours: light, medium or dark.. The
selected crust colour is shown on the display.
With the weight selector, you can select one of three weights: 500g, 750g or 1000g. The loaf weight
is shown on the display.
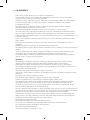
1 Put the appliance on a stable, horizontal and level surface.
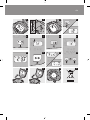
2 Turn the bread pan anticlockwise and lift it out of the appliance. (Fig. 2)
Note: Always remove the bread pan before you put ingredients in it, to avoid spilling ingredients into the
appliance.
3 Make sure the hole in the kneading blade and the shaft inside the bread pan are entirely
clean.
Note: If these parts are not clean, you may not be able to assemble the kneading blade properly.
4 Align the at side of the hole in the kneading blade with the at side of the shaft in the bread
pan. Then push the kneading blade rmly onto the shaft (Fig. 3).
Note: Make sure you push the kneading blade properly into place, otherwise it may come off during use,
which affects the mixing or kneading process.
Note: When the kneading blade is assembled properly onto the shaft, it has some horizontal play on the
shaft. This is normal.
5 Measure the ingredients for the recipe you want to prepare (see chapter ‘Standard bread
recipes’ in the Additional Baking Information booklet).
Note: Always measure ingredients accurately. See section ‘Measuring ingredients’ in chapter ‘Ingredients’ in
the Additional Baking Information booklet.
6 Put ingredients in the bread pan in the order they are listed in the recipe.
- Always add yeast last. Make a hollow in the centre of the our and sprinkle the yeast in it.
Do not mix the yeast with any of the wet ingredients, otherwise the bread may not rise properly,
especially when you use the timer.
- If an ingredient has to be added during the baking process, the appliance gives a short and long
beep three times after 30 minutes and the message ‘ADD’ appears on the display. If you do not
add an ingredient, the appliance simply continues with the baking process.
7 Put the bread pan in the appliance. Turn the bread pan clockwise until it locks into
position (Fig. 4).
If the bread pan is not assembled properly, the kneading blade does not work.
8 Fold down the handle of the bread pan and close the lid of the appliance.
9

9 Put the mains plug in the wall socket.
, The appliance beeps and ‘1’ appears on the display, which refers to the ‘Basic White’ program.
1 Press the program selector until the display shows the number of the program that is
appropriate for the recipe you want to prepare (Fig. 5).
, Each time you press the program selector, the number on the display increases by 1.
, After 2 seconds, the display alternately shows the selected program number and the
processing time.
Note: The appliance beeps when you accidentally press the wrong button, for instance when you press
the weight button during the Dough program.
2 Press the weight selector one or more times to select the appropriate loaf weight (Fig. 6).
Make sure the selected weight is appropriate for the amount of ingredients of the selected
recipe, to avoid the bread from becoming too big or burning. See chapter ‘Ingredients’ in the
Additional Baking Information booklet.
For instance, when you select a weight of 750g, the preset weight for white bread, use 455g or 3¼
cups of white our.
For programs 1 to 8, the preset weight is 750g.
, The dot on the left side of the display indicates the selected weight. The display also shows
the number of the selected program (Fig. 7).
3 If desired, press the crust colour selector one or more times to select the appropriate crust
colour (Fig. 8).
For programs 1 to 8, the preset crust colour is medium.
, The dot on the right side of the display indicates the selected crust colour. The display also
shows the number of the selected program (Fig. 9).
, The baking time for the selected program, weight and crust colour appears on the display.
The baking time is shown in hours and minutes (Fig. 10).
4 Press the start/stop/cancel button to start the bread making process. (Fig. 11)
During the baking process, the appliance itself and the lid become extremely hot. Be careful not
to burn yourself.
Note: You can watch the mixing, kneading and baking process through the viewing window. Occasionally,
some moisture may develop on the inside of the window. You can lift the lid to look inside during the
mixing and kneading stages, but DO NOT OPEN THE LID DURING THE BAKING PROCESS
(approximately the last hour of the entire processing time), as this may cause the bread to collapse.
, The display counts down the processing time in steps of 1 minute until the bread is ready.
, Each ve seconds, the display shows the selected program number instead of the processing
time.
, When the baking process is nished, the appliance beeps. Alternately, the message ‘Fin’
is shown on the display for 1 second and the keep-warm animation is shown for 5 seconds as
long as you do not press any button. (Fig. 12)
Note: The keep-warm mode does not work in the Dough program. If you leave nished dough in the
appliance too long, it may over-rise and produce poor baking results. For the best results, remove the
dough at the end of the program and follow the instructions in the recipe for shaping, resting and baking.
Note: If you do not remove the bread during or immediately after the keep-warm mode is nished, the
crust gets moist and loses its crispiness. The keep-warm mode DOES NOT overbake the bread or make it
darker.
10

You can use the timer if you want the bread to be ready at a later time. The maximum delay time
that can be set is 13 hours.
For example, set the timer to 13 hours at 19:00 hours to have the bread ready at 08:00 hours
the next morning.
Note: Do not use the timer function with recipes that require fresh ingredients that may go bad, for
instance eggs, fresh milk, sour cream or cheese.
To use the timer:
1 Put all ingredients in the bread pan.
2 Select the appropriate program, loaf weight and crust colour for your recipe.
, The total processing time for the selected settings is shown on the display.
3 Calculate the time difference (in hours) between the present time and the time you want the
bread to be ready.
For instance, if the current time is 19.00 hours and you want the bread to be ready the next
morning at 08.00 hours, the time difference is 13 hours.
4 Press the timer increase or decrease button until the display shows the correct time
difference (Fig. 13).
, Every time you press the timer increase or decrease button, the time increases or decreases
by 10 minutes. If you keep the buttons pressed, the time increases or decreases more quickly.
Note: If the time on the display reaches 13 hours and you still keep the timer increase button pressed,
the display goes back to the baking time of the set program.
Note: If you pass the time you want to set, press the opposite button to increase or decrease the time.
5 Press the start/stop/cancel button.
, The timer counts down the set time in minutes.
, The bread is ready when the timer has counted down to 00:00 and the appliance beeps.
The inside of the breadmaker, the bread pan, the kneading blade and the bread are very hot.
Always use oven mitts when you remove the bread pan at the end of the baking cycle or at any
time during the keep-warm mode.
1 To stop the keep-warm mode, press the start/stop/cancel button for 2 seconds. The display
shows “OFF”, cancels the current program and goes back to the default setting.
2 To switch off the appliance, remove the mains plug from the wall socket.
3 Using pot holders or oven mitts, open the lid and turn the bread pan anticlockwise. Then
grab the bread pan by its handle and lift it out of the appliance.
4 For easy bread removal, let the bread sit upright in the bread pan for 5 minutes. Then turn
the pan upside down, hold the handle and shake the bread out onto a wire cooling rack to
release heat and moisture from the bread faster.
If necessary, slide a at rubber or plastic spatula along the sides of the pan to loosen the loaf.
Do not use metal utensils to remove the bread, as these may damage the non-stick coating of the
bread pan.
Be careful, the bread pan and the bread are hot.
5 If the kneading blade is in the bottom of the bread, use the metal hook supplied with the
appliance to remove the kneading blade.
11

Always make sure that the kneading blade does not stay inside the bread, otherwise you may
damage the kneading blade when you slice the bread.
Do not use other metal utensils to remove the kneading blade, as these may damage the
non-stick coating of the kneading blade.
Be careful, the kneading blade and the bread are hot.
6 Immediately remove the kneading blade from the bread pan to prevent it from getting stuck.
Note: If the blade is stuck, ll the bread pan with water to a level above the kneading blade and let the
bread pan soak for 30 minutes. Then remove the kneading blade from the shaft.
7 Let the bread cool down on the wire cooling rack for 30-60 minutes before you slice it with
a bread knife or electric knife.
8 Let the appliance cool down before you clean it or before you bake another loaf of bread.
- Bread should be eaten while fresh, as it does not contain any preservatives. It can only be stored
for 1 or 2 days.
- Store the bread at room temperature in a tightly sealed plastic bag or an airtight container.
- Sliced bread loses its freshness and dries out more quickly than unsliced bread.
- Store French-style bread in a paper bag or exposed to the air to retain the crisp crust. This type
of bread is best eaten on the same day on which it was baked.
- Bread can be frozen in an airtight container for 4-6 weeks.
- You can slice the bread before freezing, to be able to use only a few slices at a time.
- If you defrost the entire loaf, let it defrost in the same container, to allow the moisture to be
reabsorbed by the bread.
- Let bread defrost at room temperature or at a low setting in the microwave.
For maximum safety, keep the appliance clean and free of grease and food residues.
Never immerse the appliance in water or any other liquid, nor rinse it under the tap.
Never use scouring pads, abrasive cleaning agents or aggressive liquids such as petrol or acetone
to clean the appliance.
1 Unplug the appliance and let it cool down before you clean it.
2 After baking, immediately remove the kneading blade from the bread pan to prevent it from
getting stuck.
Note: If the blade is stuck, ll the bread pan with water to a level above the kneading blade and let the
bread pan soak for 30 minutes. Then remove the kneading blade from the shaft.
3 Clean the kneading blade in hot water with some washing-up liquid. Clean the hole in the
kneading blade with a wooden toothpick or a nylon cleaning brush.
4 Clean the bread pan with a soft cloth moistened with hot water with some washing-up liquid.
Do not immerse the bread pan in water and do not clean it in the dishwasher.
5 Clean the shaft inside the bread pan with a soft cloth.
6 Rinse the inside of the bread pan with fresh water.
12

7 To remove the lid for easy cleaning, open the lid until it is at a 90° angle to the appliance and
then lift it out of the hinge on the appliance. (Fig. 14)
8 Wipe the lid with a moist cloth.
Do not clean the lid in the dishwasher.
9 Wipe the inside and outside of the appliance with a moist cloth.
Do not use chemical oven cleaners.
10 Dry all parts thoroughly with a soft dry cloth before you reassemble the appliance.
11 To reassemble the lid, insert the lid into the hinge and then close it. (Fig. 15)
1 Wind the mains cord round the cord storage hooks in the bottom of the appliance (Fig. 16).
2 Store the appliance in a safe, dry place.
- Do not throw away the appliance with the normal household waste at the end of its life, but
hand it in at an ofcial collection point for recycling. By doing this, you help to preserve the
environment (Fig. 17).
If you need service or information or if you have a problem, please visit the Philips website at
www.philips.com or contact the Philips Consumer Care Centre in your country (you nd its phone
number in the worldwide guarantee leaet). If there is no Consumer Care Centre in your country,
go to your local Philips dealer.
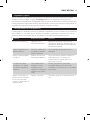
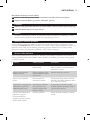
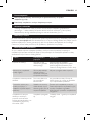
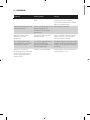
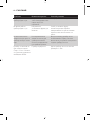
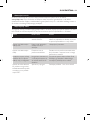
This chapter summarises the most common problems you could encounter with the appliance. If
you are unable to solve the problem with the information below, contact the Consumer Care
Centre in your country.
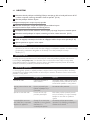
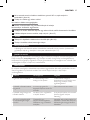
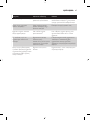
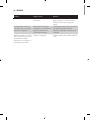
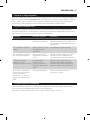
Problem Possible cause Solution
The buttons do not work. The plug is not in the wall
socket.
Put the plug in the wall socket.If
the problem persists, contact the
Consumer Care Centre in your
country.
The appliance produces
noise during operation.
The motor produces noise
during the kneading process.
This is normal.
No action required.
The appliance rattles during
operation.
The bread pan is not installed
properly.
To install the bread pan properly,
turn it clockwise until it locks into
position.
Some smoke comes out of
the steam vents and the
appliance produces a burning
smell.
Ingredients or bread crumbs
have collected on the heating
element or inside the
appliance.
Always clean the appliance after
use. Unplug the appliance and let
it cool down before you clean it.
13

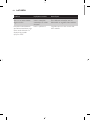
Problem Possible cause Solution
The appliance does not start
operating when I press the
start/stop/cancel button and
‘ERR’ appears on the display.
The appliance is overheated. Let the appliance cool down for
approx. 1 hour.
14

15
Поздравления за вашата покупка и добре дошли във Philips! За да се възползвате изцяло от
предлаганата от Philips поддръжка, регистрирайте продукта си на www.philips.com/welcome.
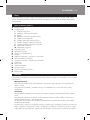
Вентилационни отвори
Пулт за управление
Списък на програмите
Индикатори за грамаж
Дисплей
Индикатори за цвят на коричката
Бутон за пуск/стоп/отмяна
Превключвател за цвят на коричката
Бутон за намаляване на таймера
Бутон за увеличаване на таймера
Превключвател за грамаж
Превключвател за програма
Подвижен капак
Прозорче за наблюдение
Парни отвори
Ос
Кофа за хляб с незалепващо покритие
Дръжка на кофата за хляб
Острие за месене с незалепващо покритие
Мерителна лъжица
Метална кука
Мерителна чашка
Нагревателен елемент
Приспособление за прибиране на кабела
Захранващ кабел
Преди да използвате уреда, прочетете внимателно това ръководство за експлоатация и го
запазете за справка в бъдеще.
- Не потапяйте корпуса на уреда за приготвяне на хляб във вода или друга течност и не го
мийте с течаща вода.
- Не покривайте парните и вентилационните отвори, когато уредът работи.
- Преди да свържете уреда към мрежата, проверете дали посоченото върху уреда
напрежение отговаря на напрежението на местната електрическа мрежа.
- Включвайте уреда само в заземен контакт. Винаги проверявайте дали щепселът е включен
както трябва в контакта.
- Не използвайте уреда, ако щепселът, захранващият кабел, корпусът на уреда или кофата за
хляб са повредени.
- Този уред не е предназначен за ползване от хора с намалени физически усещания или
умствени недостатъци или без опит и познания, включително деца, ако са оставени без
наблюдение и не са инструктирани от страна на отговарящо за тяхната безопасност лице
относно начина на използване на уреда.
- Наглеждайте децата, за да не си играят с уреда.

- Пазете захранващия кабел от достъп на деца. Не го оставяйте да виси през ръба на
масата или работния плот, на който е сложен уредът.
- Ако захранващият кабел се повреди, той трябва винаги да се подменя от Philips,
упълномощен сервиз на Philips или подобни квалифицирани лица, за да се избегне
опасност.
- Проверете дали нагревателният елемент, оста и външната страна на кофата за хляб са
чисти и сухи, преди да включите щепсела в контакта.
- Не използвайте уреда за цели, различни от указаното в това ръководство.
- Не включвайте щепсела на уреда и не работете с пулта за управление с мокри ръце.
- За да се избегне евентуална опасност, този уред не бива никога да се свързва към външен
таймерен ключ.
- Не приближавайте до вентилационните и парните отвори лицето или ръцете си, когато
уредът работи.
- Не отваряйте капака по време на печене, тъй като това може да доведе до спадане на
тестото или хляба.
- По време на печене уредът и капакът се нагряват силно. Внимавайте да не се опарите.
- Не изваждайте кофата за хляб от уреда по време на работа.
- Не разбърквайте продуктите в кофата за хляб с прибори по време на програма за печене.
- Поставяйте продуктите само в кофата за хляб. Не поставяйте и не разсипвайте
продукти и/или добавки във вътрешността на уреда, за да не се повреди нагревателният
елемент.
- Когато вадите конфитюр от кофата за хляб, вдигнете я с две ръце, като си сложите
кухненски ръкавици, за да излеете горещия конфитюр.
- Никога не използвайте аксесоари или части от други производители или такива, които не
са специално препоръчвани от Philips. При използване на такива аксесоари или части
вашата гаранция става невалидна.
- Не докосвайте кофата за хляб с остри прибори, за да не се повреди.
- Не излагайте уреда на високи температури и не го поставяйте върху работеща или все
още гореща готварска печка.
- Поставяйте уреда върху стабилна, равна и хоризонтална повърхност.
- Винаги слагайте кофата за хляб в уреда, преди да поставите щепсела в контакта и да
включите уреда.
- Винаги изключвайте уреда от захранващата мрежа след употреба.
- Оставяйте уреда да изстине, преди да го почистите или преместите.
- Не слагайте кофата за хляб в обикновена фурна, за да изпечете хляб.
- Този уред е предназначен само за битови цели. Ако уредът се използва неправилно или
за професионални или полупрофесионални цели или ако се използва по начин, който не е
в съответствие с указанията в това ръководство за експлоатация, гаранцията става
невалидна и Philips отказва отговорност за каквито и да е причинени щети.
- Външната повърхност може да се загрее, когато уредът работи. Използвайте кухненски
ръкавици, когато повдигате кофата за хляб за дръжката или хващате горещата кофа за
хляб, острието за месене или горещия хляб.
- Пазете се от горещата пара, която излиза от парните отвори по време на печене или от
уреда за приготвяне на хляб, когато отворите капака по време на печене или след края
му.
- Не вдигайте и не местете уреда по време на работа.
- Не докосвайте движещите се части.
- не излагайте уреда на пряка слънчева светлина.
- Не поставяйте метални предмети или несвойствени вещества в парните отвори.
- Не използвайте кофата за хляб, ако е повредена.
- Винаги почиствайте уреда след употреба.
16

- Не мийте уреда в съдомиялна машина.
- Не използвайте уреда на открито.
- Осигурете поне 10 см свободно пространство над и зад уреда и от двете му страни, за
да не се повреди поради излъчваната топлина.
- За да не се повреди уредът, не поставяйте върху него кофата за хляб или друг предмет.
Този уред Philips е в съответствие с всички стандарти по отношение на електромагнитните
излъчвания (EMF). Ако се употребява правилно и съобразно напътствията в Ръководството,
уредът е безопасен за използване според наличните досега научни факти.
Уредът има функция за съхраняване, която запомня състоянието преди спиране на тока, ако
захранването бъде възстановено в рамките на 7 минути. Ако токът спре по време на печене,
при възстановяване на захранването обратното борене на времето за печене продължава
оттам, докъдето е стигнало. Ако токът спре за повече от 7 минути по време на печене, при
възстановяване на захранването уредът за приготвяне на хляб се връща автоматично към
предварително зададената настройка. Отворете уреда, извадете съдържанието и започнете
отначало. Ако сте настроили таймера и предварително зададеният процес на печене все още
не е започнал, когато токът спре, при възстановяване на захранването уредът се връща
автоматично към предварително зададената настройка. Отворете го, извадете съдържанието
и започнете отначало.
1 Свалете всички опаковъчни материали от уреда. Внимавайте да не изхвърлите острието
за месене.
2 Махнете всички етикети от корпуса на уреда.
3 За да почистите прахта, която може да се е събрала по уреда, избършете външната му
страна, кофата за хляб и острието за месене с влажна кърпа.
Никога не използвайте за почистване на уреда фибро гъби, абразивни почистващи
препарати или агресивни течности, като бензин или ацетон.
4 Изсушете щателно всички части, преди да започнете да използвате уреда.
На дисплея се показват следните елементи:
- Номер на програмата (1-12)
- Икона за програма или време
- Избраните грамаж и цвят на коричката
- Обратно броене на времето за печене в минути
- ”Fin”, когато програмата е приключила
- ”OFF”, когато програмата е отменена или върната в начално положение
- ”Err”, когато има грешка
- ”Add”, когато могат да се добавят много твърди продукти (като плодове или ядки)
- Анимация, показваща поддържане на топлината, когато печенето е приключило
Можете да използвате бутоните за увеличаване и намаляване на таймера, когато искате
хлябът да бъде приготвен по друго време. Максималната отсрочка, която може да бъде
зададена, е 13 часа.
17

Например, нагласете таймера на 13 часа в 19:00 ч., за да бъде хлябът готов в 8:00 ч.
на следващата сутрин.
- Натиснете този бутон, за да стартирате програма или обратното броене на таймера
- Натиснете този бутон за 2 секунди, докато чуете еднократен дълъг звуков сигнал и на
дисплея се появи съобщението “OFF”. Така текущата програма се отменя и уредът се
връща към настройката по подразбиране (тоест, програма 1 - Основен бял, 750 г, умерен
цвят на коричката), без да се изключва.
С превключвателя за програма можете да изберете 12 различни програми. Номерът на
избраната програма и оптималното й време за обработка се извеждат на дисплея.
С превключвателя за цвят на коричката можете да изберете един от три цвята: светъл,
умерен или тъмен. Избраният цвят се извежда на дисплея.
С превключвателя за грамаж можете да изберете един от три грамажа: 500 г, 750 г или 1000
г. Грамажът на хляба се извежда на дисплея.
1 Поставете уреда върху стабилна, хоризонтална и равна повърхност.
2 Завъртете кофата за хляб обратно на часовниковата стрелка и я извадете от
уреда. (фиг. 2)
Забележка: Винаги изваждайте кофата за хляб, преди да сложите продукти в нея, за да не ги
разсипете в уреда.
3 Проверете дали отворът в острието за месене и оста в кофата за хляб са напълно чисти.
Забележка: Ако тези части не са чисти, възможно е да не сте в състояние да монтирате
правилно острието за месене.
4 Подравнете плоската страна на отвора в острието за месене с плоската страна на оста
в кофата за хляб. След това закрепете здраво с избутване острието за месене на
оста (фиг. 3).
Забележка: Проверете дали сте закрепили добре острието за месене на мястото му. В
противен случай то може да се откачи по време на работа, което се отразява на смесването
или месенето.
Забележка: Когато острието за месене е поставено правилно на оста, то играе леко в
хоризонтална посока. Това е нормално.
5 Измерете продуктите за рецептата, която желаете да приготвите (вижте главата
“Стандартни рецепти за хляб” в книжката “Допълнителна информация за печенето”).
Забележка: Измервайте прецизно продуктите. Вижте раздела “Измерване на продуктите” в
главата “Продукти” в книжката “Допълнителна информация за печенето”.
6 Поставете продуктите в кофата за хляб по реда на изброяването им в рецептата.
- Винаги добавяйте маята последна. Направете кухина в центъра на брашното и поръсете
маята в нея.
18

Не смесвайте маята с мокри продукти, в противен случай е възможно хлябът да не втаса
правилно, особено когато използвате таймера.
- Ако даден продукт трябва да се добави по време на печене, уредът издава трикратно
кратък и дълъг сигнал след 30 минути и на дисплея се извежда съобщението “ADD”. Ако
не добавите продукта, уредът просто продължава печенето.
7 Поставете кофата за хляб в уреда. Завъртете я по часовниковата стрелка, докато се
застопори на място (фиг. 4).
Ако кофата за хляб не е монтирана правилно, острието за месене няма да работи.
8 Приберете надолу дръжката на кофата за хляб и затворете капака на уреда.
9 Включете щепсела на захранващия кабел в контакта.
, Уредът издава звуков сигнал и на дисплея се извежда “1”, което обозначава програмата
“Основен бял”.
1 Натиснете превключвателя за програма, докато на дисплея се изведе номерът на
програмата, съответстващ на рецептата, която искате да приготвите (фиг. 5).
, При всяко натискане на селектора на програмите числото на дисплея се увеличава с 1.
, След 2 секунди на дисплея започва да се показва последователно номера на избраната
програма и времето за обработка.
Забележка: Устройството издава звуков сигнал, когато по невнимание натиснете погрешен
бутон, например ако натиснете бутона за грамаж по време на програма за тесто.
2 Натиснете превключвателя за грамаж един или повече пъти, за да изберете
подходящия грамаж на хляба (фиг. 6).
Проверете дали избраният грамаж е подходящ за количеството на продуктите в избраната
рецепта, за да не стане хлябът твърде голям и да не изгори. Вижте главата “Продукти” в
книжката “Допълнителна информация за печенето”.
Например, когато изберете грамаж от 750 г, предварително зададеният грамаж за бял хляб,
използвайте 455 г или 3¼ чаши бяло брашно.
За програми от 1 до 8 предварително зададеният грамаж е 750 г.
, Точката от лявата страна на дисплея показва избрания грамаж. На дисплея се показва и
номерът на избраната програма (фиг. 7).
3 Ако желаете, натиснете превключвателя за цвят на коричката един или повече пъти, за
да изберете подходящия цвят на коричката (фиг. 8).
За програми от 1 до 8 предварително зададеният цвят на коричката е умерен.
, Точката от дясната страна на дисплея показва избрания цвят на коричката. На дисплея
се извежда и номерът на избраната програма (фиг. 9).
, Времето за печене, съответстващо на избраните програма, грамаж и цвят на коричката,
се извежда на дисплея в часове и минути (фиг. 10).
4 Натиснете бутона за пуск/стоп/отмяна, за да започне приготвянето на хляб. (фиг. 11)
По време на печене уредът и капакът се нагряват силно. Внимавайте да не се опарите.
Забележка: Можете да наблюдавате смесването, месенето и печенето през прозорчето за
наблюдение. Понякога от вътрешната страна на прозорчето е възможно да се събере
известно количество влага. Можете да вдигнете капака, за да погледнете вътре по време на
етапите на смесване и месене, но НЕ ОТВАРЯЙТЕ КАПАКА ПО ВРЕМЕ НА ПЕЧЕНЕ
(приблизително последния час от цялото време на обработка), тъй като това може да
доведе до спадане на хляба.
19

, Обратното броене на времето за обработка се извежда на дисплея на стъпки от 1
минута, докато хлябът стане готов.
, На всеки пет секунди на дисплея се извежда номерът на избраната програма вместо
времето за обработка.
, Когато печенето приключи, уредът издава звуков сигнал. На дисплея се редуват
съобщението “Fin” за 1 секунда и анимацията, показваща поддържане на топлината, за 5
секунди, докато не натиснете някой бутон. (фиг. 12)
Забележка: Режимът за поддържане на топлината не работи при програмата за тесто. Ако
оставите готовото тесто твърде дълго време в уреда, то може да втаса твърде много и
резултатът от печенето да е лош. За постигане на оптимален резултат извадете тестото
след приключване на програмата и следвайте указанията в рецептата за оформяне, оставяне
да престои и печене.
Забележка: Ако не извадите хляба по време на режима за поддържане на топлината или
веднага след края му, коричката ще се овлажни и няма да е хрупкава. Режимът за поддържане
на топлината НЯМА да препече хляба или да го направи по-тъмен.
Можете да използвате таймера, ако искате хлябът да бъде приготвен по друго време.
Максималната отсрочка, която може да бъде зададена, е 13 часа.
Например, нагласете таймера на 13 часа в 19:00 ч., за да бъде хлябът готов в 8:00 ч.
на следващата сутрин.
Забележка: Не използвайте таймера с рецепти, изискващи пресни продукти, които могат да
се развалят, например яйца, прясно мляко, изкиснато кисело мляко или сирене.
За да използвате таймера:
1 Поставете всички продукти в кофата за хляб.
2 Изберете подходящите за вашата рецепта програма, тегло на хляба и цвят на
коричката.
, На дисплея се извежда общото време на обработка за избраните настройки.
3 Изчислете разликата в часове между настоящия момент и времето, когато искате
хлябът да бъде готов.
Например, ако в момента е 19:00 ч. и искате хлябът да бъде готов в 8:00 ч. на следващата
сутрин, времевата разлика е 13 часа.
4 Натиснете бутона за увеличаване или намаляване на таймера, докато на дисплея се
изведе правилната времева разлика (фиг. 13).
, При всяко натискане на бутона за увеличаване или намаляване на таймера времето се
увеличава или намалява с 10 минути. Ако задържите бутоните натиснати, времето се
увеличава или намалява по-бързо.
Забележка: Ако показаното на дисплея време достигне 13 часа и все още държите натиснат
бутона за увеличаване на таймера, дисплеят се връща към времето за печене на зададената
програма.
Забележка: Ако подминете времето, което желаете да зададете, натиснете
противоположния бутон, за да го увеличите или намалите.
5 Натиснете бутона за пуск/стоп/отмяна.
, Таймерът започва обратно броене на зададеното време в минути.
, Хлябът е готов, когато таймерът достигне 00:00 и уредът издаде звуков сигнал.
20
Pagina se încarcă ...
Pagina se încarcă ...
Pagina se încarcă ...
Pagina se încarcă ...
Pagina se încarcă ...
Pagina se încarcă ...
Pagina se încarcă ...
Pagina se încarcă ...
Pagina se încarcă ...
Pagina se încarcă ...
Pagina se încarcă ...
Pagina se încarcă ...
Pagina se încarcă ...
Pagina se încarcă ...
Pagina se încarcă ...
Pagina se încarcă ...
Pagina se încarcă ...
Pagina se încarcă ...
Pagina se încarcă ...
Pagina se încarcă ...
Pagina se încarcă ...
Pagina se încarcă ...
Pagina se încarcă ...
Pagina se încarcă ...
Pagina se încarcă ...
Pagina se încarcă ...
Pagina se încarcă ...
Pagina se încarcă ...
Pagina se încarcă ...
Pagina se încarcă ...
Pagina se încarcă ...
Pagina se încarcă ...
Pagina se încarcă ...
Pagina se încarcă ...
Pagina se încarcă ...
Pagina se încarcă ...
Pagina se încarcă ...
Pagina se încarcă ...
Pagina se încarcă ...
Pagina se încarcă ...
Pagina se încarcă ...
Pagina se încarcă ...
Pagina se încarcă ...
Pagina se încarcă ...
Pagina se încarcă ...
Pagina se încarcă ...
Pagina se încarcă ...
Pagina se încarcă ...
Pagina se încarcă ...
Pagina se încarcă ...
Pagina se încarcă ...
Pagina se încarcă ...
Pagina se încarcă ...
Pagina se încarcă ...
Pagina se încarcă ...
Pagina se încarcă ...
Pagina se încarcă ...
Pagina se încarcă ...
Pagina se încarcă ...
Pagina se încarcă ...
Pagina se încarcă ...
Pagina se încarcă ...
Pagina se încarcă ...
Pagina se încarcă ...
Pagina se încarcă ...
Pagina se încarcă ...
Pagina se încarcă ...
Pagina se încarcă ...
Pagina se încarcă ...
Pagina se încarcă ...
Pagina se încarcă ...
Pagina se încarcă ...
Pagina se încarcă ...
Pagina se încarcă ...
Pagina se încarcă ...
Pagina se încarcă ...
Pagina se încarcă ...
Pagina se încarcă ...
Pagina se încarcă ...
Pagina se încarcă ...
Pagina se încarcă ...
Pagina se încarcă ...
Pagina se încarcă ...
Pagina se încarcă ...
Pagina se încarcă ...
Pagina se încarcă ...
Pagina se încarcă ...
Pagina se încarcă ...
Pagina se încarcă ...
Pagina se încarcă ...
Pagina se încarcă ...
Pagina se încarcă ...
Pagina se încarcă ...
Pagina se încarcă ...
Pagina se încarcă ...
Pagina se încarcă ...
Pagina se încarcă ...
Pagina se încarcă ...
Pagina se încarcă ...
Pagina se încarcă ...
Pagina se încarcă ...
Pagina se încarcă ...
Pagina se încarcă ...
Pagina se încarcă ...
Pagina se încarcă ...
Pagina se încarcă ...
Pagina se încarcă ...
Pagina se încarcă ...
Pagina se încarcă ...
Pagina se încarcă ...
Pagina se încarcă ...
Pagina se încarcă ...
Pagina se încarcă ...
Pagina se încarcă ...
Pagina se încarcă ...
Pagina se încarcă ...
Pagina se încarcă ...
Pagina se încarcă ...
Pagina se încarcă ...
Pagina se încarcă ...
Pagina se încarcă ...
Pagina se încarcă ...
Pagina se încarcă ...
Pagina se încarcă ...
Pagina se încarcă ...
Pagina se încarcă ...
Pagina se încarcă ...
Pagina se încarcă ...
Pagina se încarcă ...
Pagina se încarcă ...
Pagina se încarcă ...
Pagina se încarcă ...
-
 1
1
-
 2
2
-
 3
3
-
 4
4
-
 5
5
-
 6
6
-
 7
7
-
 8
8
-
 9
9
-
 10
10
-
 11
11
-
 12
12
-
 13
13
-
 14
14
-
 15
15
-
 16
16
-
 17
17
-
 18
18
-
 19
19
-
 20
20
-
 21
21
-
 22
22
-
 23
23
-
 24
24
-
 25
25
-
 26
26
-
 27
27
-
 28
28
-
 29
29
-
 30
30
-
 31
31
-
 32
32
-
 33
33
-
 34
34
-
 35
35
-
 36
36
-
 37
37
-
 38
38
-
 39
39
-
 40
40
-
 41
41
-
 42
42
-
 43
43
-
 44
44
-
 45
45
-
 46
46
-
 47
47
-
 48
48
-
 49
49
-
 50
50
-
 51
51
-
 52
52
-
 53
53
-
 54
54
-
 55
55
-
 56
56
-
 57
57
-
 58
58
-
 59
59
-
 60
60
-
 61
61
-
 62
62
-
 63
63
-
 64
64
-
 65
65
-
 66
66
-
 67
67
-
 68
68
-
 69
69
-
 70
70
-
 71
71
-
 72
72
-
 73
73
-
 74
74
-
 75
75
-
 76
76
-
 77
77
-
 78
78
-
 79
79
-
 80
80
-
 81
81
-
 82
82
-
 83
83
-
 84
84
-
 85
85
-
 86
86
-
 87
87
-
 88
88
-
 89
89
-
 90
90
-
 91
91
-
 92
92
-
 93
93
-
 94
94
-
 95
95
-
 96
96
-
 97
97
-
 98
98
-
 99
99
-
 100
100
-
 101
101
-
 102
102
-
 103
103
-
 104
104
-
 105
105
-
 106
106
-
 107
107
-
 108
108
-
 109
109
-
 110
110
-
 111
111
-
 112
112
-
 113
113
-
 114
114
-
 115
115
-
 116
116
-
 117
117
-
 118
118
-
 119
119
-
 120
120
-
 121
121
-
 122
122
-
 123
123
-
 124
124
-
 125
125
-
 126
126
-
 127
127
-
 128
128
-
 129
129
-
 130
130
-
 131
131
-
 132
132
-
 133
133
-
 134
134
-
 135
135
-
 136
136
-
 137
137
-
 138
138
-
 139
139
-
 140
140
-
 141
141
-
 142
142
-
 143
143
-
 144
144
-
 145
145
-
 146
146
-
 147
147
-
 148
148
-
 149
149
-
 150
150
-
 151
151
-
 152
152


Philips HD9020/40 Manual de utilizare
- Categorie
- Mașini pentru fabricarea pâinii
- Tip
- Manual de utilizare
în alte limbi
- slovenčina: Philips HD9020/40 Používateľská príručka
- eesti: Philips HD9020/40 Kasutusjuhend