
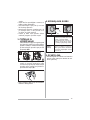
LIBRETTO DI USO
USER MANUAL
GEBRAUCHSANLEITUNG
MANUEL D’UTILISATION
.8//$1,0.ø7$3d,ö,
MANUAL DE USO
/,952'(,16758d®(63$5$87,/,=$d2
ȅǻǾīǿǼȈȋȇǾȈǾȈ
ɊɍɄɈȼɈȾɋɌȼɈɉɈɗɄɋɉɅɍȺɌȺɐɂɂ
*(%58,.6$$1:,-=,1*
ANVÄNDNINGSHANDBOK
,16758.&-$8ĩ<7.2:$1,$
1È92'.328ä,7Ë
.b<77g2+-((7
ȱɇɋɌɊɍɄɐȱəɁȿɄɋɉɅɍȺɌȺɐȱȲ
MANUAL DE FOLOSIRE
BRUGSVEJLEDNING
BRUKSVEILEDNING
1È92'1$328äË9$1,(
ɊɔɄɈȼɈȾɋɌȼɈɇȺɉɈɌɊȿȻɂɌȿɅə
1$92',/2=$8325$%2
SL
AR
BG
CZ
DA
DE
EN
ES
FI
FR
GR
IT
NL
NO
PL
PT
RO
RU
SK
SV
TR
UK
FCL70GF
FCO70GF
FCL70PW
FCO70CO
FCO70OA

IT
...............................................................................................................................................3
EN
...............................................................................................................................................7
DE
.............................................................................................................................................10
FR
.............................................................................................................................................14
TR
.............................................................................................................................................18
ES
.............................................................................................................................................21
PT
.............................................................................................................................................25
GR
.............................................................................................................................................29
RU
.............................................................................................................................................33
NL
.............................................................................................................................................37
SV
.............................................................................................................................................41
PL
.............................................................................................................................................45
CZ
.............................................................................................................................................49
FI
.............................................................................................................................................52
UK
.............................................................................................................................................56
RO
.............................................................................................................................................60
DA
.............................................................................................................................................63
NO
.............................................................................................................................................67
SK
.............................................................................................................................................70
BG
.............................................................................................................................................73
SL
.............................................................................................................................................77
AR
.............................................................................................................................................80

3
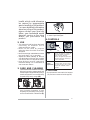
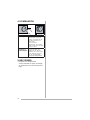
1. INFORMAZIONI SULLA
SICUREZZA
Per la propria sicurezza e per
il corretto funzionamento
dell’apparecchio, si prega di
leggere attentamente questo
manuale prima dell’installazione
e della messa in funzione.
Tenere queste istruzioni sempre
insieme all’apparecchio, anche
in caso di cessione o trasferimento
a terzi. È importante che gli
utilizzatori conoscano tutte le
caratteristiche di funzionamento
e sicurezza dell’apparecchio.
Il collegamento dei cavi
deve essere effettuato da
un tecnico competente.
• Il fabbricante non potrà
ritenersi responsabile per
eventuali danni risultanti da
un’installazione o utilizzazione
impropria.
• La distanza minima di
sicurezza tra il piano cottura
e la cappa aspirante è di 650
mm (alcuni modelli possono
essere installati a un’altezza
inferiore; vedere il paragrafo
relativo alle dimensioni di
lavoro e all’installazione).
• Se le istruzioni di installazione
del piano cottura a gas
specificano una distanza
maggiore di quella sopra
indicata, è necessario tenerne
conto.
• Controllare che la tensione
di rete corrisponda a quella
indicata sulla targa dati
applicata all’interno della
cappa.
• I dispositivi di sezionamento
devono essere installati
QHOO¶LPSLDQWR¿VVRLQFRQIRUPLWj
alle normative sui sistemi di
cablaggio.
• Per gli apparecchi di Classe
I, controllare che la rete
di alimentazione domestica
disponga di un adeguato
collegamento a massa.
• Collegare la cappa alla canna
fumaria con un tubo di diametro
minimo di 120 mm. Il percorso
dei fumi deve essere il più corto
possibile.
• Devono essere rispettate tutte
le normative riguardanti lo
scarico dell’aria.
• Non collegare la cappa
aspirante ai condotti fumari che
trasportano fumi di combustione
(per es. di caldaie, camini ecc.).
• Se la cappa è utilizzata in
combinazione con apparecchi
non elettrici (per es. apparecchi
a gas), deve essere garantito un
VXI¿FLHQWHJUDGRGLDHUD]LRQH
nel locale per impedire il ritorno
GL ÀXVVR GHL JDV GL VFDULFR
Quando la cappa per cucina è
utilizzata in combinazione con
apparecchi non alimentati dalla
corrente elettrica, la pressione
negativa nel locale non deve
superare 0,04 mbar per evitare
IT

4
che i fumi vengano riaspirati
nel locale dalla cappa.
• L’aria non deve essere
evacuata attraverso un
condotto utilizzato per lo
scarico dei fumi da apparecchi
di combustione alimentati a
gas o altri combustibili.
• Il cavo di alimentazione, se
danneggiato, deve essere
sostituito dal fabbricante o
da un tecnico del servizio
assistenza.
• Collegare la spina ad una
presa di tipo conforme alle
normative vigenti e in posizione
accessibile.
• Relativamente alle misure
tecniche e di sicurezza da
adottare per lo scarico dei
fumi è importante attenersi
scrupolosamente ai
regolamenti stabiliti dalle
autorità locali.
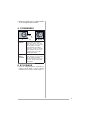
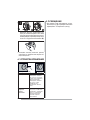
AVVERTENZA: prima di
installare la cappa,
rimuovere le pellicole di
protezione.
• Usare solo viti e minuteria di
tipo idoneo per la cappa.
AVVERTENZA: la mancata
installazione delle viti o dei
GLVSRVLWLYL GL ¿VVDJJLR LQ
conformità alle presenti
istruzioni può comportare
rischi di scosse elettriche.
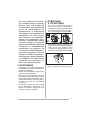
• Non osservare direttamente
con strumenti ottici (binocolo,
lente d’ingrandimento….).
• 1RQFXRFHUHDOÀDPEpVRWWROD
cappa: si potrebbe sviluppare
un incendio.
• Questo apparecchio può
essere utilizzato da bambini di
età non inferiore a 8 anni e da
persone con ridotte capacità
SVLFR¿VLFRVHQVRULDOL R FRQ
esperienza e conoscenze
LQVXIILFLHQWL SXUFKp
attentamente sorvegliati e
istruiti su come utilizzare in
modo sicuro l’apparecchio e
sui pericoli che ciò comporta.
Assicurarsi che i bambini non
giochino con l’apparecchio.
Pulizia e manutenzione da
parte dell’utente non devono
essere effettuate da bambini, a
meno che non siano sorvegliati.
• Sorvegliare i bambini,
assicurandosi che non giochino
con l’apparecchio.
• L’apparecchio non deve essere
utilizzato da persone (bambini
compresi) con ridotte capacità
SVLFR¿VLFRVHQVRULDOL R FRQ
esperienza e conoscenze
LQVXI¿FLHQWLDPHQRFKHQRQ
siano attentamente sorvegliate
e istruite.
Le parti accessibili possono
diventare molto calde
durante l’uso degli
apparecchi di cottura.
• 3XOLUHHRVRVWLWXLUHL¿OWULGRSR
LOSHULRGRGLWHPSRVSHFL¿FDWR
(pericolo di incendio). Vedere
il paragrafo Manutenzione e

5
pulizia.
• Deve essere presente
un’adeguata ventilazione
nel locale quando
la cappa è utilizzata
contemporaneamente ad
apparecchi che utilizzano
gas o altri combustibili (non
applicabile ad apparecchi che
scaricano unicamente l’aria nel
locale).
• Il simbolo sul prodotto o
sulla sua confezione indica
che il prodotto non può essere
smaltito come un normale
UL¿XWRGRPHVWLFR,OSURGRWWRGD
smaltire deve essere conferito
presso un apposito centro
di raccolta per il riciclaggio
dei componenti elettrici ed
elettronici. Assicurandosi che
questo prodotto sia smaltito
correttamente, si contribuirà
a prevenire potenziali
conseguenze negative per
l’ambiente e per la salute
che potrebbero altrimenti
derivare dal suo smaltimento
inadeguato. Per informazioni
più dettagliate sul riciclaggio
di questo prodotto, contattare
il Comune, il servizio locale
GL VPDOWLPHQWR UL¿XWL RSSXUH
il negozio dove è stato
acquistato il prodotto.
2. USO
• La cappa aspirante è progettata
esclusivamente per l’uso domestico
allo scopo di eliminare gli odori dalla
cucina.
• Non usare mai la cappa per scopi
diversi da quelli per cui è stata
progettata.
• 1RQODVFLDUHPDL¿DPPHDOWHVRWWROD
cappa quando è in funzione.
• 5HJRODUH O¶LQWHQVLWj GHOOD ¿DPPD LQ
modo da dirigerla esclusivamente
verso il fondo del recipiente di cottura,
assicurandosi che non ne avvolga i lati.
• Le friggitrici devono essere
costantemente controllate durante
l’uso: l’olio surriscaldato potrebbe
incendiarsi.
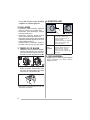
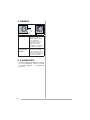
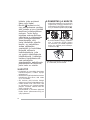
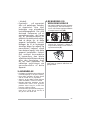
3. PULIZIA E
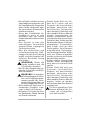
MANUTENZIONE
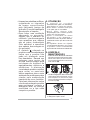
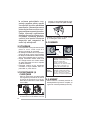
- ,O¿OWURDOFDUERQHDWWLYRQRQqODYDELOH
QpqULJHQHUDELOHHGHYHHVVHUHVR-
stituito ogni 4 mesi di funzionamento
circa o più frequentemente in caso di
utilizzo molto intenso (W).
W
- , ¿OWUL DQWLJUDVVR GHYRQR HVVHUH SXOLWL
ogni 2 mesi di funzionamento o più
frequentemente in caso di utilizzo
molto intenso e possono essere lavati
in lavastoviglie (Z).
Z
• Pulire la cappa utilizzando un panno
umido e un detergente liquido neutro.

6
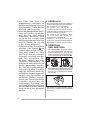
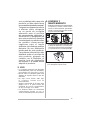
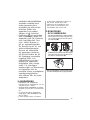
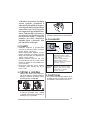
4. COMANDI
Luci Per accendere le luci,
spingere la manopola e
rilasciarla in modo che
fuoriesca dalla sua sede.
Per spegnere le luci
rispingere la manopola
verso l’interno, riportandola
nella posizione di
interruttore spento.
Regolazione
Velocità
Motore
Spingere la manopola e
rilasciarla in modo che
fuoriesca dalla sua sede,
ruotare la manopola per
scegliere una delle velocita’
di aspirazione disponibili.
5. ILLUMINAZIONE
• Per la sostituzione contattare l’Assisten-
za Tecnica (“Per l’acquisto rivolgersi
all’assistenza tecnica”).

7
1. SAFETY
INFORMATION
For your safety and correct
operation of the appliance,
read this manual carefully
before installation and use.
Always keep these instructions
with the appliance even if you
move or sell it. Users must fully
know the operation and safety
features of the appliance.
The wire connection has to
be done by specialized
technician.
• The manufacturer will not be
held liable for any damages
resulting from incorrect or
improper installation.
• The minimum safety distance
between the cooker top and
the extractor hood is 650 mm
(some models can be installed
at a lower height, please refer
to the paragraphs on working
dimensions and installation).
• If the instructions for installation
of the gas hob specify a
greater distance, this must be
respected.
• Check that the mains voltage
corresponds to that indicated
RQWKHUDWLQJSODWH¿[HGWRWKH
inside of the hood.
• Means for disconnection must
EH LQFRUSRUDWHG LQ WKH ¿[HG
wiring in accordance with the
wiring rules.
• For Class I appliances, check
that the domestic power supply
guarantees adequate earthing.
• Connect the extractor to the
H[KDXVWÀXHWKURXJKDSLSHRI
minimum diameter 120 mm.
7KHURXWHRIWKHÀXHPXVWEH
as short as possible.
• Regulations concerning the
discharge of air have to be
IXO¿OOHG
• Do not connect the extractor
hood to exhaust ducts carrying
combustion fumes (boilers,
¿UHSODFHVHWF
• If the extractor is used in
conjunction with non-electrical
appliances (e.g. gas burning
DSSOLDQFHVDVXI¿FLHQWGHJUHH
of aeration must be guaranteed
in the room in order to prevent
WKHEDFNÀRZRIH[KDXVWJDV
When the cooker hood is used
in conjunction with appliances
supplied with energy other than
electric, the negative pressure
in the room must not exceed
0,04 mbar to prevent fumes
being drawn back into the room
by the cooker hood.
• The air must not be discharged
LQWR D ÀXH WKDW LV XVHG IRU
exhausting fumes from
appliances burning gas or
other fuels.
• If the supply cord is damaged,
it must be replaced from the
manufacturer or its service
agent.
• Connect the plug to a socket
complying with current
regulations, located in an
EN

8
accessible place.
• With regards to the technical
and safety measures to be
adopted for fume discharging
it is important to closely follow
the regulations provided by the
local authorities.
WARNING: Before installing
the Hood, remove the
SURWHFWLYH¿OPV
• Use only screws and small
parts supplied with the hood.
WARNING: Failure to install
WKHVFUHZVRU¿[LQJGHYLFH
in accordance with these
instructions may result in
electrical hazards.
• Do not look directly at the
light through optical devices
(binoculars, magnifying
glasses…).
• 'RQRWÀDPEqXQGHUWKHUDQJH
KRRGULVNRI¿UH
• This appliance can be used
by children aged from 8 years
and above and persons with
reduced physical, sensory or
mental capabilities or lack of
experience and knowledge
if they have been given
supervision or instruction
concerning use of the appliance
in a safe way and understand
the hazards involved.
Children shall not play with
the appliance. Cleaning and
user maintenance shall not
be made by children without
supervision.
• Children should be supervised
to ensure that they do not play
with the appliance.
• The appliance is not to be used
by persons (including children)
with reduced physical, sensory
or mental capabilities, or lack
of experience and knowledge,
unless they have been given
supervision or instruction.
Accessible parts may
become hot when used with
cooking appliances.
• Clean and/or replace the Filters
DIWHUWKHVSHFL¿HGWLPHSHULRG
(Fire hazard). See paragraph
Care and Cleaning.
• There shall be adequate
ventilation of the room when
the range hood is used at
the same time as appliances
burning gas or other fuels (not
applicable to appliances that
only discharge the air back into
the room).
• The symbol on the product
or on its packaging indicates
that this product may not be
treated as household waste.
Instead it shall be handed over
to the applicable collection
point for the recycling of
electrical and electronic
equipment. By ensuring this
product is disposed of correctly,
you will help prevent potential
negative consequences for
the environment and human

9
health, which could otherwise
be caused by inappropriate
waste handling of this product.
For more detailed information
about recycling of this product,
please contact your local city
RI¿FH\RXUKRXVHKROGZDVWH
disposal service or the shop
where you purchased the
product.
2. USE
• The extractor hood has been designed
exclusively for domestic use to
eliminate kitchen smells.
• Never use the hood for purposes
other than those for which it has been
designed.
• 1HYHUOHDYHKLJKQDNHGÀDPHVXQGHU
the hood when it is in operation.
• $GMXVW WKH ÀDPH LQWHQVLW\ WR GLUHFW LW
onto the bottom of the pan only, making
sure that it does not engulf the sides.
• Deep fat fryers must be continuously
monitored during use: overheated oil
FDQEXUVWLQWRÀDPHV
3. CARE AND CLEANING
- 7KH$FWLYDWHGFKDUFRDO¿OWHULVQRWZDVK-
able and cannot be regenerated, and
must be replaced approximately every 4
months of operation, or more frequently
for particularly heavy usage (W).
W
- 7KH *UHDVH ¿OWHUV PXVW EH FOHDQHG
every 2 months of operation, or more
frequently for particularly heavy usage,
and can be washed in a dishwasher (Z).
Z
• Clean the hood using a damp cloth and
a neutral liquid detergent.
4.
CONTROLS
Lights To turn the lights on, press the
dial and release it so that it
pops out of its housing.
To turn the lights off, push the
dial back inwards, returning it
to the off position.
Motor
Speed
Adjustment
Press the dial and release it
so that it pops out of its hous-
ing, then turn the dial to select
one of the available suction
speeds.
5. LIGHTING
• For replacement contact technical support
(“To purchase contact technical support”).

10
1. SICHERHEITSINFORMA-
TIONEN
Zu Ihrer eigenen Sicherheit
und für die korrekte Funkti-
on des Gerätes lesen Sie bitte
diese Betriebsanleitung auf-
merksam durch, bevor Sie das
Gerät installieren und benutzen.
Verwahren Sie die Bedienungs-
anleitung stets zusammen mit
dem Gerät, auch wenn Sie
dieses an Dritte weitergeben
oder übertragen. Es ist wichtig,
dass der Benutzer alle Betriebs-
und Sicherheitsmerkmale des
Gerätes kennt.
Die Kabel müssen von ei-
nem zuständigen Fach-
mann angeschlossen wer-
den.
• Der Hersteller haftet nicht für
etwaige Schäden, die durch
eine fehlerhafte Installation
oder einen ungeeigneten Ge-
brauch entstehen könnten.
• Der min. Sicherheitsabstand
zwischen Kochfeld und Ab-
zugshaube beträgt 650 mm
(einige Modelle können auch
niedriger installiert werden;
siehe Absatz Installation).
• Sollten die Installationsanwei-
sungen des gasbetriebenen
Kochfelds einen größeren
Abstand als oben angegeben
vorsehen, ist dies zu berück-
sichtigen.
• Sicherstellen, dass die Netz-
spannung der auf dem Typen-
schild angegebenen Span-
nung entspricht. Das Typen-
schild ist im Inneren der Haube
angebracht.
• Trennvorrichtungen müssen
in der festen Anlage gemäß
Normen über Verkabelungssy-
steme installiert werden.
• Für Geräte der Klasse I sicher-
stellen, dass das Versorgungs-
netz des Gebäudes korrekt
geerdet ist.
• Die Abzugshaube an den
Schornstein mit einem Rohr mit
Mindestdurchmesser von 120
mm anschließen. Der Verlauf
des Rauchabzugs muss so
kurz wie möglich sein.
• Alle gesetzlichen Vorschriften
im Bereich Abluft einhalten.
• Die Abzugshaube darf nicht an
einen Schacht angeschlossen
werden, in den Rauchgase
abgeleitet werden (z. B. von
Heizkesseln, Kaminen, usw.).
• Falls die Abzugshaube mit
Geräten verwendet wird, die
nicht elektrisch betrieben sind
(z.B. Gasgeräte), muss im
Raum für eine ausreichende
Belüftung gesorgt werden,
GDPLW GHU 5FNÀXVV GHU$E-
gase verhindert wird. Wird die
Abzugshaube zusammen mit
nicht elektrisch betriebenen
Geräten eingesetzt, darf der
Unterdruck im Raum 0,04 mbar
nicht überschreiten, damit die
Abgase nicht wieder ange-
saugt werden.
DE

11
• Die Luft darf nicht durch einen
Kanal abgelassen werden, der
als Rauchabzug für Gasgeräte
oder Geräte verwendet wird,
die mit anderen Brennstoffen
betrieben werden.
• Wenn das Gerätekabel be-
schädigt ist, muss es vom
Hersteller oder von einem
Kundendiensttechniker ersetzt
werden.
• Den Stecker in eine den
einschlägigen Vorschriften
entsprechende zugängliche
Steckdose stecken.
• Was die technischen und
sicherheitsrelevanten Maß-
nahmen für den Rauchabzug
betrifft, sind die Vorgaben der
örtlichen Behörden streng
einzuhalten.
WARNUNG: Bevor die
Haube installiert wird, die
Schutzfolien abziehen.
• Nur für die Abzugshaube ge-
eignete Schrauben und Klein-
teile verwenden.
WARNUNG: Die mangeln-
de Verwendung von Schrau-
ben und Befestigungsele-
menten gemäß der vorlie-
genden Anleitung kann zu
Stromschlaggefahr führen.
• Nicht direkt mit optischen In-
strumenten (Fernglas, Lupe,
usw.) in das Licht schauen.
• Auf keinen Fall unter der Hau-
EH ÀDPELHUHQ 'DEHL N|QQWH
ein Brand entstehen.
• Dieses Gerät darf von Kin-
dern ab 8 Jahren und von
Personen mit beschränkten
geistigen, physischen oder
sensorischen Fähigkeiten
oder mangels Erfahrung und/
oder mangels Wissen benutzt
werden, vorausgesetzt, sie
werden aufmerksam beauf-
sichtigt oder über den sicheren
Gebrauch des Geräts und die
damit verbundenen Gefahren
eingewiesen. Sicherstellen,
dass Kinder nicht mit dem
Gerät spielen. Vom Benutzer
auszuführende Reinigungs-
und Wartungsarbeiten dürfen
nicht von Kindern ausgeführt
werden, sofern sie nicht dabei
beaufsichtigt werden.
• Kinder müssen beaufsichtigt
werden, damit sichergestellt
wird, dass sie nicht am Gerät
spielen.
• Dieses Gerät darf nicht von
Personen (einschließlich
Kindern) mit beschränkten
geistigen, physischen oder
sensorischen Fähigkeiten
oder mangels Erfahrung und/
oder mangels Wissen benutzt
werden, außer sie werden
aufmerksam beaufsichtigt und
eingewiesen.
Die frei zugänglichen Teile
können während des Ko-
chens mit Kochgeräten
sehr heiß werden.

12
• Die Filter sind nach den
angegebenen Intervallen zu
reinigen und/oder zu ersetzen
(Brandgefahr). Siehe Absatz
Wartung und Reinigung.
• Wenn die Abzugshaube gleich-
zeitig mit Geräten verwendet
wird, die Gas oder andere
Brennstoffe benutzen, muss
im Raum eine ausreichende
Belüftung vorhanden sein (gilt
nicht für Geräte, die nur Luft
in den Raum ablassen).
• Schutzschild bei Rissbildung
ersetzen. Das Symbol am
Produkt oder auf der Verpak-
kung weist darauf hin, dass
das Gerät nicht als normaler
Hausmüll entsorgt werden
darf. Das ausrangierte Ge-
rät muss vielmehr bei einer
speziellen Sammelstelle für
elektrische und elektronische
Geräte abgegeben werden.
Mit der vorschriftsmäßigen
Entsorgung des Gerätes
trägt der Benutzer dazu bei,
schädliche Auswirkungen auf
Umwelt und Gesundheit zu
vermeiden. Weitere Informa-
tionen zum Recycling dieses
Produktes können bei der
zuständigen Behörde, der
örtlichen Abfallbeseitigung
oder bei dem Händler, der das
Gerät verkauft hat, eingeholt
werden.
2. GEBRAUCH
• Die Abzugshaube wurde ausschließlich
für den häuslichen Gebrauch entwickelt,
um Kochdünste zu beseitigen.
• Die Haube darf nur für die ihr
zugedachten Zwecke benutzt werden.
• Unter der eingeschalteten Haube keine
offenen Flammen benutzen.
• Die Flamme so regulieren, dass
sie nicht über den Boden des
Kochgeschirrs hinausreicht.
• Fritteusen müssen während des
Gebrauchs ständig überwacht werden:
überhitztes Öl könnte sich entzünden.
3. REINIGUNG
UND WARTUNG
- 'HU$NWLYNRKOH¿OWHU LVW ZHGHU ZDVFK-
bar, noch regenerierbar und muss bei
normalem Betrieb zirka alle 4 Monate
oder auch öfter ausgewechselt werden,
je nach Intensität des Gebrauchs (W).
W
- 'LH)HWW¿OWHUVLQGDOOH0RQDWHRGHUEHL
intensiver Nutzung öfter zu reinigen und
können in der Spülmaschine gespült
werden (Z).
Z
• Die Haube mit einem feuchten Lappen
und einem neutralen Reinigungsmittel
abwischen.

13
4. BEDIENELEMENTE
Beleuchtung Um das Licht einzu-
schalten, bitte den
Drehgriff drücken
und dann loslassen,
so dass der aus
seinem Sitz heraus-
kommt.
Um das Licht
auszuschalten,
drücken Sie bitte
den Drehgriff wieder
hinein, so dass
der in seinen Sitz
wiederkommt.
Motorstufenregelung Bitte den Drehgriff
drücken und dann
loslassen, so dass
der aus seinem Sitz
herauskommt. Dann
drehen Sie den Griff
zur Regelung der
gewünschten verfüg-
baren Stufe.
5. BELEUCHTUNG
LED-Strahler
• Für den Austausch der LED-Strahler
wenden Sie sich bitte an den
Kundendienst.

14
1. CONSIGNES DE
SÉCURITÉ
3RXU YRWUH VpFXULWp HW SRXU
garantir le fonctionnement
correct de l’appareil, veuillez lire
attentivement ce manuel avant
d’installer et de mettre en fonction
l’appareil. Toujours conserver ces
instructions avec l’appareil,
même en cas de cession ou de
transfert à une autre personne.
Il est important que les utilisateurs
connaissent toutes les
FDUDFWpULVWLTXHV GH
IRQFWLRQQHPHQW HW GH VpFXULWp
de l’appareil.
La connexion des câbles doit
rWUH HIIHFWXpH SDU XQ
WHFKQLFLHQFRPSpWHQW
• En aucun cas le fabricant ne
peut être tenu pour responsable
G¶pYHQWXHOV GRPPDJHV GXV
à une installation ou à une
utilisation impropre.
• /DGLVWDQFHGHVpFXULWpPLQLPXP
entre le plan de cuisson et la
hotte aspirante est de 650 mm
(certains modèles peuvent être
LQVWDOOpVjXQHKDXWHXULQIpULHXUH
; voir le paragraphe concernant
les dimensions de travail et
l’installation).
• Si les instructions d’installation du
SODQGHFXLVVRQjJD]VSpFL¿HQW
XQHGLVWDQFHVXSpULHXUHjFHOOH
LQGLTXpH FLGHVVXV YHXLOOH]
LPSpUDWLYHPHQWHQWHQLUFRPSWH
• Assurez-vous que la tension
du secteur correspond à celle
LQGLTXpH VXU OD SODTXH GHV
FDUDFWpULVWLTXHV DSSRVpH j
O¶LQWpULHXUGHODKRWWH
• Les dispositifs de sectionnement
GRLYHQW rWUH PRQWpV GDQV
O¶LQVWDOODWLRQ¿[HFRQIRUPpPHQW
aux normes sur les systèmes
de câblage.
• Pour les appareils de Classe
I, s’assurer que l’installation
pOHFWULTXH GH YRWUH LQWpULHXU
dispose d’une mise à la terre
DGpTXDWH
• Reliez l’aspirateur du conduit de
FKHPLQpHDYHFXQWXEHD\DQW
un diamètre minimum de 120
PP/HSDUFRXUVGHVIXPpHV
doit être le plus court possible.
• Respecter toutes les normes
FRQFHUQDQWO¶pYDFXDWLRQGHO¶DLU
• Ne reliez pas la hotte aspirante
DX[ FRQGXLWV GH FKHPLQpH
TXL DFKHPLQHQW OHV IXPpHV
de combustion (par ex. de
FKDXGLqUHV GH FKHPLQpHV
etc.).
• Si vous utilisez l’aspirateur
en même temps que des
DSSDUHLOV QRQ pOHFWULTXHV
(par ex. fonctionnant au gaz),
veillez à ce que la pièce soit
DGpTXDWHPHQW YHQWLOpH DILQ
G¶HPSrFKHU OH UHWRXU GX ÀX[
GHVJD]G¶pYDFXDWLRQ6LYRXV
utilisez la hotte de cuisine en
même temps que des appareils
QRQDOLPHQWpVjO¶pOHFWULFLWpOD
SUHVVLRQQpJDWLYHGDQVODSLqFH
QHGRLWSDVGpSDVVHUPEDU
D¿Q G¶pYLWHU TXH OHV IXPpHV
FR

15
VRLHQWUpDVSLUpHVGDQVODSLqFH
où se trouve la hotte.
• 1HSDVpYDFXHUO¶DLUjWUDYHUV
XQH FRQGXLWH XWLOLVpH SRXU
O¶pYDFXDWLRQ GHV IXPpHV GHV
appareils de combustion
DOLPHQWpV DX JD] RX DYHF
d’autres combustibles.
• Si le cordon d’alimentation
HVW HQGRPPDJp IDLWHVOH
remplacer par le fabricant ou
par un technicien d’un service
DSUqVYHQWHDJUpp
• %UDQFKH]OD¿FKHjXQH SULVH
conforme aux normes en vigueur
et dans une position accessible.
• En ce qui concerne les
dimensions techniques et
GH VpFXULWp j DGRSWHU SRXU
O¶pYDFXDWLRQ GHV IXPpHV
veuillez vous conformer
scrupuleusement aux
UqJOHPHQWV pWDEOLV SDU OHV
DXWRULWpVORFDOHV
AVERTISSEMENT : Avant
d’installer la hotte, retirer les
¿OPVGHSURWHFWLRQ
• Utilisez exclusivement des vis et
des petites fournitures du type
DGDSWpSRXUODKRWWH
AVERTISSEMENT : toute
installation de vis et de
GLVSRVLWLIV GH ¿[DWLRQ QRQ
conformes à ces instructions
peut entraîner des risques
GHGpFKDUJHVpOHFWULTXHV
• Ne pas observer directement
avec des instruments
optiques (jumelles, lentilles
grossissantes...).
• Ne flambez pas des mets
sous la hotte : sous risque de
GpYHORSSHUXQLQFHQGLH
• &HWDSSDUHLOSHXWrWUHXWLOLVpSDU
des enfants de plus de 8 ans et par
GHVSHUVRQQHVGRQWOHVFDSDFLWpV
physiques, sensorielles ou
PHQWDOHV VRQW GLPLQXpHV RX
D\DQW XQH H[SpULHQFH HW GHV
FRQQDLVVDQFHV LQVXI¿VDQWHV
pourvu que ce soit sous la
surveillance attentive d’une
personne responsable et après
avoir reçu des instructions sur
la manière d’utiliser cet appareil
HQ WRXWH VpFXULWp HW VXU OHV
dangers que cela comporte.
Assurez-vous que les enfants ne
jouent pas avec cet appareil. Le
nettoyage et l’entretien de la part
de l’utilisateur ne doivent pas
rWUHHIIHFWXpVSDUGHVHQIDQWVj
PRLQVTX¶LOVQHVRLHQWVXUYHLOOpV
• Surveillez les enfants. S’assurer
qu’ils ne jouent pas avec
l’appareil.
• Cet appareil n’est pas
GHVWLQp j rWUH XWLOLVp SDU
des personnes (enfants
FRPSULV GRQW OHV FDSDFLWpV
physiques, sensorielles ou
PHQWDOHV VRQW GLPLQXpHV RX
D\DQW XQH H[SpULHQFH HW GHV
FRQQDLVVDQFHV LQVXI¿VDQWHV
à moins que celles-ci ne soient
DWWHQWLYHPHQW VXUYHLOOpHV HW
instruites.
Les parties accessibles

16
peuvent devenir très chaudes
durant l’utilisation des appareils
de cuisson.
• Nettoyer et/ou remplacer les
¿OWUHV DSUqV OH GpODL LQGLTXp
(danger d’incendie). Voir le
paragraphe Nettoyage et
Entretien.
• 9HLOOH]jFHTXHODSLqFHEpQp¿FLH
G¶XQH YHQWLODWLRQ DGpTXDWH
lorsque la hotte fonctionne en
même temps que des appareils
utilisant du gaz ou d’autres
combustibles (non applicable
DX[DSSDUHLOVTXLpYDFXHQWO¶DLU
uniquement dans la pièce).
• Le symbole PDUTXp VXU OH
produit ou sur son emballage
indique que ce produit ne peut
SDVrWUHpOLPLQpFRPPHGpFKHW
PpQDJHU QRUPDO /RUVTXH FH
SURGXLWGRLWrWUHpOLPLQpYHXLOOH]
le remettre à un centre de
FROOHFWHSUpYXSRXUOHUHF\FODJH
GX PDWpULHO pOHFWULTXH HW
pOHFWURQLTXH(QYRXVDVVXUDQW
TXH FHW DSSDUHLO HVW pOLPLQp
correctement, vous participez
j SUpYHQLU GHV FRQVpTXHQFHV
SRWHQWLHOOHPHQWQpJDWLYHVSRXU
l’environnement et pour la
VDQWp TXL ULVTXHUDLHQW GH VH
SUpVHQWHUHQFDVG¶pOLPLQDWLRQ
LQDSSURSULpH 3RXU WRXWH
LQIRUPDWLRQ VXSSOpPHQWDLUH
sur le recyclage de ce produit,
FRQWDFWH] YRWUH PXQLFLSDOLWp
YRWUH GpFKHWWHULH ORFDOH RX OH
PDJDVLQRYRXVDYH]DFKHWp
ce produit.
2. UTILISATION
• &HWWH KRWWH DVSLUDQWH D pWp FRQoXH
exclusivement pour un usage
GRPHVWLTXH GDQV OH EXW G¶pOLPLQHU
les odeurs de cuisine.
• Ne jamais utiliser la hotte pour des
REMHFWLIV GLIIpUHQWV GH FHX[ SRXU
OHVTXHOVHOOHDpWp FRQoXH
• 1H MDPDLV ODLVVHU XQ IHX YLI DOOXPp
sous la hotte lorsque celle-ci est en
fonction.
• 5pJOHUO¶LQWHQVLWpGXIHXGHPDQLqUHj
l’orienter exclusivemetnt vers le fond
de la casserole, en vous assurant qu’il
QHGpERUGHSDVVXU OHVF{WpV
• &RQWU{OHU FRQVWDPPHQW OHV IULWHXVHV
GXUDQWOHXUXWLOLVDWLRQO¶KXLOHVXUFKDXIIpH
risque de s’incendier.
3. NETTOYAGE ET
ENTRETIEN
- /H¿OWUHjFKDUERQDFWLIQHSHXWrWUHQL
ODYpQLUpJpQpUpHWLOGRLWrWUHUHPSODFp
environ tous les 4 mois de fonctionne-
ment ou plus souvent en cas d’utilisation
particulièrement intense (W).
W
- 1HWWR\HUOHV¿OWUHVjJUDLVVHWRXVOHV
mois de fonctionnement ou plus souvent
en cas d’utilisation particulièrement
LQWHQVH&HV¿OWUHVSHXYHQWrWUHODYpV
au lave-vaisselle (Z).
Z

17
• Nettoyer la hotte avec un chiffon humide
HWXQGpWHUJHQWOLTXLGH QHXWUH
4. COMMANDES
Lumières Pour allumer les lumières,
pousser le bouton et le relâ-
cher de façon à ce qu’il sorte
GHVD SRVLWLRQ GHGpSDUW
3RXUpWHLQGUH OHV OXPLqUHV
pousser à nouveau le bouton
YHUVO¶LQWpULHXUGH IDoRQ j OH
remet-tre dans sa position
G¶LQWHUUXSWHXUpWHLQW
Régulation
Vitesse
du moteur
Pousser le bouton et le relâ-
cher de façon à ce qu’il sorte
GHVD SRVLWLRQ GHGpSDUW
tourner le bouton pour choisir
une des vitesses disponibles
d’aspiration.
5. ÉCLAIRAGE
• Pour le remplacement, contacter le
Service après-vente (« Pour l’achat,
s’adresser au service après-vente »).

18
*h9(1/ø.
+$..,1'$%ø/*ø/(5
.HQGL JYHQOL÷LQL] DoÕVÕQGDQ
YH FLKD]ÕQ G]JQ oDOÕúPDVÕ
LoLQNXUXOXPYHGHYUH\HDOPDLú-
OHPOHULQLJHUoHNOHúWLUPHGHQ|QFH
OWIHQEXNÕODYX]XGLNNDWOLFHRNX-
\XQX]6DWÕú\DGDoQFúDKÕV-
ODUDGHYLUGXUXPXQGDGDKLLúEX
WDOLPDWODUÕFLKD]LOHELUOLNWHEXOXQ-
GXUXQ.XOODQÕFÕODUÕQFLKD]ÕQWP
LúOHWLP YH JYHQOLN |]HOOLNOHULQL
bilmeleri önemlidir.
.DEORED÷ODQWÕODUÕHKLOELUNLúL
WDUDIÕQGDQ\DSÕOPDOÕGÕU
• hUQQ\DQOÕúPRQWDMÕYH\DNXO-
ODQÕPÕQGDQGR÷DFDNRODQKDVDU-
lardan üretici sorumlu tutulamaz.
• Ocak ile davlumbaz aspiratörü
DUDVÕQGDNL PLQLPXP JYHQOLN
PHVDIHVL PP¶GLU ED]Õ
PRGHOOHU GDKD GúN ELU \N-
VHNOLNWHPRQWHHGLOHELOLUoDOÕúPD
ER\XWODUÕQDYHNXUXOXPXQDLOLúNLQ
SDUDJUDIDEDNÕQ
• *D]OÕRFD÷ÕQPRQWDMWDOLPDWODUÕ
\XNDUÕGDEHOLUWLOHQGHQGDKDID]OD
ELU PHVDIH ROPDVÕ JHUHNWL÷LQL
belirtiyorsa, bu göz önünde bu-
OXQGXUXOPDOÕGÕU
• ùHEHNHJHULOLPLQLQGDYOXPED]ÕQ
LoLQHX\JXODQPÕúRODQHWLNHW]H-
ULQGH EHOLUWLOHQ JHULOLPH NDUúÕOÕN
JHOLSJHOPHGL÷LQLNRQWUROHGLQ
• %D÷ODQWÕ NHVPH FLKD]ODUÕ NDE-
lolama sistemindeki yönetmelik-
lere uygun olarak sabit sisteme
monte edilmelidir.
• 6ÕQÕIFLKD]ODULoLQHYJoND\-
QD÷ÕQÕQG]JQWRSUDNODQGÕ÷ÕQÕ
kontrol edin.
• 'DYOXPED]ÕoDSÕHQD]PP
olan bir boru ile, duman tahliye
EDFDVÕQD ED÷OD\ÕQ 'XPDQÕQ
L]OHGL÷L J]HUJDK PPNQ RO-
GX÷XQFDNÕVDROPDOÕGÕU
• Hava tahliyesi ile ilgili tüm yönet-
PHOLNOHUHX\XOPDOÕGÕU
• Davlumbaz aspiratörünü, (örn;
úRIEHQú|PLQHYEJLEL\DQÕFÕ
duman ihtiva eden kanallara
ED÷ODPD\ÕQ
• (÷HUGDYOXPED]HOHNWULNOLROPD-
\DQ FLKD]ODU LOH |UQH÷LQ JD]OÕ
cihazlar) bir kombinasyon halin-
GHNXOODQÕOÕ\RUVDWDKOL\HJD]ÕQÕQ
JHUL\H GR÷UX DNÕúÕQÕQ |QOHQH-
bilmesi için, yeter seviyede bir
\HUHO KDYDODQGÕUPD VD÷ODQPÕú
ROPDOÕGÕU'DYOXPED]ÕQHOHNWULN
DNÕPÕ WDUDIÕQGDQ EHVOHQPH\HQ
cihazlarla kombine bir halde
NXOODQÕOGÕ÷Õ]DPDQLOJLOLPDKDO-
GHNL QHJDWLI EDVÕQo GXPDQÕQ
GDYOXPED] WDUDIÕQGDQ JHUL\H
emilmesini önlemek için, 0,04
PEDU¶ÕDúPDPDOÕGÕU
• +DYDJD]\DNPDFLKD]ODUÕQGDQ
YH\D GL÷HU \DNÕWODUGDQ oÕNDQ
HJ]R]JD]ODUÕLoLQNXOODQÕODQELU
kanaldan tahliye edilmemelidir.
• %HVOHPH NDEORVX H÷HU KDVDU
J|UPúVHUHWLFLWDUDIÕQGDQ\D
GDELUVHUYLVWHNQLV\HQLWDUDIÕQ-
dan ikame edilmelidir.
• )LúLPHYFXW\UUONWHNLPHY]X-
DWDX\JXQYHHULúLOHELOLUELUSUL]H
ED÷OD\ÕQ
TR

19
• 'XPDQÕQWDKOL\HVLLoLQX\JXODQD-
cak teknik ve emniyet tedbirlerine
LOLúNLQ RODUDN \HUHO PDNDPODU
WDUDIÕQGDQ EHOLUOHQHQ NXUDOODUD
WLWL] ELU úHNLOGH ULD\HW HGLOPHVL
önemlidir.
'ø..$7'DYOXPED]ÕPRQWH
etmeden önce, koruyucu
¿OPOHULoÕNDUWÕQ
• Davlumbaz için sadece vidalar
YHX\JXQWLSWHNLSDUoDODUNXOODQÕQ
'ø..$7 øúEX WDOLPDWODUD
uygun vida ve sabitleyicilerle
monte edilmemesi, elektrik
úRNODVRQXoODQDELOLU
• Optik aletler ile (dürbün, büyüteç,
YEGR÷UXGDQGR÷UX\DJ|]OHP-
lemeyin.
• 'DYOXPED]ÕQ DOWÕQGD IODPEH
\DSPD\ÕQÕ]\DQJÕQoÕNDELOLU
• %X FLKD] \DúÕQÕQ DOWÕQGD
ROPD\DQ oRFXNODU WDUDIÕQGDQ
ve psikolojik-fiziksel-duyusal
\HWHQHNOHUL VÕQÕUOÕ YH\D ELOJL YH
EHFHULOHUL \HWHUVL] RODQ NLúLOHU
WDUDIÕQGDQ FLKD]ÕQ HPQL\HWOL
ELU úHNLOGH QDVÕO NXOODQÕODFD÷Õ
YH ROXúDELOHFHN WHKOLNHOHU KDN-
NÕQGDGLNNDWOLFHGHQHWOHQPHOHUL
YHWDOLPDWODQGÕUÕOPDODUÕúDUWÕ\OD
NXOODQÕODELOLUdRFXNODUÕQHNLSPDQ
LOHR\QDPDGÕNODUÕQGDQHPLQROXQ
.XOODQÕFÕ WDUDIÕQGDQ \DSÕODFDN
WHPL]OLNYHEDNÕPLúOHPOHULGH-
netlenmedikleri sürece, çocuklar
WDUDIÕQGDQ\UWOPHPHOLGLU
• dRFXNODUÕFLKD]LOHR\QDPDGÕNOD-
UÕQGDQHPLQRODUDNJ|]OHPOH\LQ
• %XHYDOHWLSVLNRORMLN¿]LNVHOGX-
\XVDOVRUXQODUÕRODQYH\DWHFUEH
YH ELOJL HNVLNOL÷L RODQ NLúLOHUFH
(çocuklar dahil), güvenliklerin-
GHQ VRUXPOX ELULVL WDUDIÕQGDQ
gözlemlenmedikçe ve talimat
YHULOPHGLNoHNXOODQÕOPDPDOÕGÕU
(ULúHELOHQ SDUoDODU SLúLUPH
HNLSPDQODUÕQÕQ NXOODQÕOPDVÕ
HVQDVÕQGDoRNVÕFDNELUKDO
alabilirler.
• Belirtilen zaman periyodundan
VRQUD¿OWUHOHULWHPL]OH\LQYHYH\D
LNDPH HGLQ \DQJÕQ WHKOLNHVL
%DNÕP YH WHPL]OLN SDUDJUDIÕQD
EDNÕQ
• 'DYOXPED]JD]YH\DGL÷HU\D-
NÕWODUÕ NXOODQDQ EDúND DOHWOHUOH
ELUOLNWHNXOODQÕOGÕ÷ÕQGDRGD \H-
WHUOLGHUHFHGHKDYDODQGÕUÕOPDOÕGÕU
VDGHFHRGD\DKDYDVDOÕQÕPÕ\D-
SDQHYDOHWOHULQHX\JXQGH÷LOGLU
•
hUQ]HULQGH\DGDDPEDODMÕ
]HULQGHEXOXQDQLúDUHWUQQ
HYVHODWÕNODUJLELELULPKDLúOHPLQH
WDELROPDGÕ÷ÕQÕEHOLUWLUøPKDHGL-
lecek ürün, elektrikli ve elektronik
ELOHúHQOHULQLQ JHUL G|QúP
için, yetkili bir toplama merkezi-
ne teslim edilmelidir. Bu ürünün
GR÷UXúHNLOGHLPKDHGLOGL÷LQGHQ
HPLQ ROXQPDVÕ DNVL WDNGLUGH
X\JXQVX]ELUúHNLOGHLPKDVÕQGDQ
kaynaklanabilecek, çevre ve
VD÷OÕN EDNÕPÕQGDQ PXKWHPHO
ROXPVX]VRQXoODUÕQ|QOHQPHVL-
QH\DUGÕPFÕRODFDNWÕU%XUQQ
JHULG|QúPKDNNÕQGDGDKD
GHWD\OÕ ELOJL LoLQ %HOHGL\H LOH
\HUHODWÕNWRSODPDLPKDVHUYLVL

20
LOH \D GD UQQ VDWÕQ DOÕQGÕ÷Õ
PD÷D]DLOHLUWLEDWDJHoLQL]
.8//$1,0
• 'DYOXPED] PXWIDN NRNXODUÕQÕ JLGHUPHN
DGÕQDHYNXOODQÕPÕLoLQ WDVDUODQPÕúWÕU
• 'DYOXPED]Õ DVOD WDVDUODQGÕ÷Õ DPDoODU
KDULFLQGHNXOODQPD\ÕQ
• 'DYOXPED] oDOÕúÕUNHQ DOWÕQGD ERúXQD
\DQDQ\NVHNDWHúDVOD EÕUDNPD\ÕQ
• $WHú\R÷XQOX÷XQXVDGHFHWHQFHUHDOWÕQGD
NDODFDNYH\DQODUGDQWDúPDGÕ÷ÕQGDQHPLQ
RODFDNúHNLOGHD\DUOD\ÕQ
• )ULW|]OHU NXOODQÕP HVQDVÕQGD VUHNOL L]-
OHQPHOLGLUID]ODÕVÕQPÕú\D÷DWHúDODELOLU
7(0ø=/ø. 9( %$.,0
- $NWLINDUERQ¿OWUHVL\ÕNDQDELOLUGH÷LOGLU
\HQLGHQNXOODQÕODPD]YHKHUD\GDELU
YH\D\R÷XQNXOODQÕPROPDVÕGXUXPXQ-
GDGDKDVÕNRODUDNGH÷LúWLULOPHOLGLU(W).
W
- <D÷¿OWUHOHULKHUD\GDELUYH\D\R÷XQ
NXOODQÕP ROPDVÕ GXUXPXQGD GDKD
VÕNRODUDNWHPL]OHQPHOLGLUYHEXODúÕN
PDNLQHVLQGH\ÕNDQDELOLUOHU(Z).
Z
• 'DYOXPED]ÕQHPOLELUEH]YHQ|WUVÕYÕ
deterjanla temizleyin.
.21752//(5
,úÕNODU ,úÕNODUÕDoPDN LoLQ
\XYDVÕQGDQoÕNPDVÕ LoLQ
G÷PH\HNXOED EDVÕQ YH
VHUEHVWEÕUDNÕQ
,úÕNODUÕNDSDWPDN LoLQ G÷PH\L
NXOEXLoHUL\H GR÷UX HVNL
konumuna getirin.
Motor
+Õ]ÕQÕ
Ayarlama
'÷PH\HNXOED \XYDVÕQGDQ
oÕNDFDNúHNLOGH EDVWÕUÕQ YH
VHUEHVWEÕUDNÕQ G÷PH\L
(kulbu) var olan aspiratör
KÕ]ODUÕQGDQELULQL VHoPHN LoLQ
döndürün.
,ù,./$1',50$
• 'H÷LúWLUPHNLoLQ7HNQLN6HUYLVOHED÷ODQWÕ
kurun (“Edinmek için teknik servisle
ED÷ODQWÕNXUXQ´
Pagina se încarcă...
Pagina se încarcă...
Pagina se încarcă...
Pagina se încarcă...
Pagina se încarcă...
Pagina se încarcă...
Pagina se încarcă...
Pagina se încarcă...
Pagina se încarcă...
Pagina se încarcă...
Pagina se încarcă...
Pagina se încarcă...
Pagina se încarcă...
Pagina se încarcă...
Pagina se încarcă...
Pagina se încarcă...
Pagina se încarcă...
Pagina se încarcă...
Pagina se încarcă...
Pagina se încarcă...
Pagina se încarcă...
Pagina se încarcă...
Pagina se încarcă...
Pagina se încarcă...
Pagina se încarcă...
Pagina se încarcă...
Pagina se încarcă...
Pagina se încarcă...
Pagina se încarcă...
Pagina se încarcă...
Pagina se încarcă...
Pagina se încarcă...
Pagina se încarcă...
Pagina se încarcă...
Pagina se încarcă...
Pagina se încarcă...
Pagina se încarcă...
Pagina se încarcă...
Pagina se încarcă...
Pagina se încarcă...
Pagina se încarcă...
Pagina se încarcă...
Pagina se încarcă...
Pagina se încarcă...
Pagina se încarcă...
Pagina se încarcă...
Pagina se încarcă...
Pagina se încarcă...
Pagina se încarcă...
Pagina se încarcă...
Pagina se încarcă...
Pagina se încarcă...
Pagina se încarcă...
Pagina se încarcă...
Pagina se încarcă...
Pagina se încarcă...
Pagina se încarcă...
Pagina se încarcă...
Pagina se încarcă...
Pagina se încarcă...
Pagina se încarcă...
Pagina se încarcă...
Pagina se încarcă...
Pagina se încarcă...
-
 1
1
-
 2
2
-
 3
3
-
 4
4
-
 5
5
-
 6
6
-
 7
7
-
 8
8
-
 9
9
-
 10
10
-
 11
11
-
 12
12
-
 13
13
-
 14
14
-
 15
15
-
 16
16
-
 17
17
-
 18
18
-
 19
19
-
 20
20
-
 21
21
-
 22
22
-
 23
23
-
 24
24
-
 25
25
-
 26
26
-
 27
27
-
 28
28
-
 29
29
-
 30
30
-
 31
31
-
 32
32
-
 33
33
-
 34
34
-
 35
35
-
 36
36
-
 37
37
-
 38
38
-
 39
39
-
 40
40
-
 41
41
-
 42
42
-
 43
43
-
 44
44
-
 45
45
-
 46
46
-
 47
47
-
 48
48
-
 49
49
-
 50
50
-
 51
51
-
 52
52
-
 53
53
-
 54
54
-
 55
55
-
 56
56
-
 57
57
-
 58
58
-
 59
59
-
 60
60
-
 61
61
-
 62
62
-
 63
63
-
 64
64
-
 65
65
-
 66
66
-
 67
67
-
 68
68
-
 69
69
-
 70
70
-
 71
71
-
 72
72
-
 73
73
-
 74
74
-
 75
75
-
 76
76
-
 77
77
-
 78
78
-
 79
79
-
 80
80
-
 81
81
-
 82
82
-
 83
83
-
 84
84


