
WX041 WX041.1
P04
P10
P16
P22
P28
P34
P40
P46
P52
P58
P64
P70
P76
P82
EN
D
F
I
ES
NL
PL
HU
RO
CZ
SK
PT
SV
SL
Heat gun
Heißluftpistole
Décapeur thermique
Pistola termica
Pistola de calor
Hete lucht pistool
Pistolet do nagrzewania
Hőlégpisztoly
Suantă cu aer cald
Žhavící pistole
Tepelná pištoľ
Pistola de ar quente
Värmepistol
Toplotna pištola

Original instructions EN
Originalbetriebsanleitung D
Notice originale F
Istruzioni originali I
Manual original ES
Oorspronkelijke gebruiksaanwijzing NL
Instrukcja oryginalna PL
Eredeti használati utasítás HU
Instrucţiuni originale RO
Původní návod k používání CZ
Pôvodný návod na použitie SK
Manual original PT
Bruksanvisning i original SV
Izvirna navodila SL

5
1 2
3
4
6
7
8
9
3
A B C

Heat gun EN
54
PRODUCT SAFETY
GENERAL SAFETY
WARNINGS
WARNING! Read
all safety warnings
and all instructions.
Failure to follow the
warnings and instructions
may result in electric shock,
fire and/or serious injury.
Save all warnings and
instructions for future
reference.
This appliance can be used
by children aged from 8 years
and above and persons with
reduced physical, sensory
or mental capabilities or
lack of experience and
knowledge if they have
been given supervision or
instruction concerning use
of the appliance in a safe
way and understand the
hazards involved. Children
shall not play with the
appliance. Cleaning and user
maintenance shall not be
made by children without
supervision.
If the supply cord is
damaged, it must
be replaced by the
manufacturer, its service
agent or similarly qualified
persons in order to avoid a
hazard.
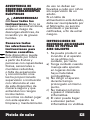
ADDITIONAL SAFETY
INSTRUCTIONS FOR YOUR
HEAT GUN
1. A fire may result if the
appliance is not used
with care, therefore
a) Be careful when
using the appliance in
place where there are
combustible materials.
b) Do not apply to the
same place for a long
time;
c) Do not use in presence
of an explosive
atmosphere;
d) Be aware that heat
may be conducted to
combustible materials
that are out of sight;
e) Place the appliance on
its stand after use and
allow it to cool down
before storage;
f) Do not leave the
appliance unattended
when it is switched on.

Heat gun EN
54
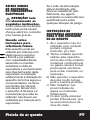
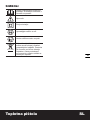
SYMBOLS
Read operator’s manual
Warning
Double insulation
Wear eye protection
Wear dust mask
Waste electrical products
must not be disposed of with
household waste. Please recycle
where facilities exist. Check with
your local authorities or retailer
for recycling advice.

Heat gun EN
76
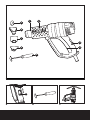
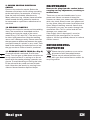
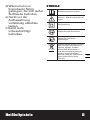
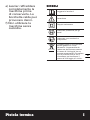
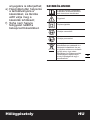
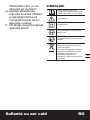
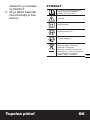
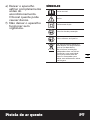
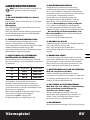
1. NOZZLE
2. HEAT PROTECTION
3. ON-OFF SWITCH/SELECTOR SWITCH
4. RUBBER OVERMOULD GRIP
5. REDUCTION NOZZLE *
6. WIDE NOZZLE *
7. REFLECTOR NOZZLE *
8. GLASS PROTECTION NOZZLE *
9.
SCRAPER *
*Not all the accessories illustrated or described are included in standard delivery.
TECHNICAL DATA
Type WX041 WX041.1
Voltage 230-240V~50Hz
Power input 2000W
Temperature/Airflow control I =50
o
C/300L/min
II =350
o
C/300L/min
III = 580
o
C/500L/min
Machine weight 0.8kg
Protection class
/ II
ACCESSORIES
Scraper 1
Glass protection nozzle 1
Reduction nozzle 1
Reflector nozzle 1
Wide nozzle 1
We recommend that you purchase your accessories from the same store that sold you the tool.
Refer to the accessory packaging for further details. Store personnel can assist you and offer
advice.

Heat gun EN
76
OPERATION
NOTE: Before using the tool, read the
instruction book carefully.
PUTTING INTO OPERATION
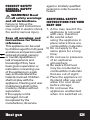
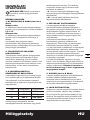
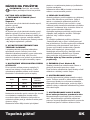
1. SWITCHING ON/OFF (See Fig. A)
Switching on:
To put into operation, slide the switch (3) to
position I, II or III.
Switching off:
To switch off, slide the on/off switch (3) to the
stop at position 0.
After working for a longer time with high
temperature, allow the unit to cool by running
in the cold air setting I before switching off.
2. THERMO-PROTECTION SWITCH-OFF
When the heater is overloaded (e.g. as a result
of restricted air flow), the unit switches it off
automatically, however, the blower continues
to run. When the unit has cooled to operating
temperature, the heater is switched on again.
3. SETTING THE AIR FLOW AND
TEMPERATURE
The switch (3) can be set to three blower
steps. Suitable air flow and temperature
combinations can be selected according to the
applications.
Step temperature Airflow
I 50
o
C 300L/min
II 350
o
C 300L/min
III 580
o
C 500L/min
The cold air setting I is suitable for cooling a
warmed work piece or for the drying of paint.
It is also suitable for cooling the unit before
placing down or the changing of nozzles.
The air setting II is suitable for Bending Plastic
and heating shrinking plastic.
The air setting III is suitable for stripping paint
and defrosting pipes.
4. WORKING EXAMPLES
Temperature settings given in the application
examples are suggested values that,
depending on the material characteristics, can
deviate. The distance between the nozzle and
work piece is dependent on the material to be
processed.
The ideal temperature should first be
ascertained by performing a test. Therefore,
begin with a lower temperature setting.
All application examples (except Removing
Paint from Window Frames) can be
performed without accessories. However,
the use of the recommended accessory part
simplifies the work and significantly improves
the quality of the results.
_ Be careful when changing the nozzle, danger
of burning! Do not tough the hot nozzle.
Allow the unit to cool. Wear protective
gloves.
5. SCRAPER (See Fig. B)
The scraper is ideal for stripping paint from
flat wooden surface and edges.
Remember to clean the blade after use with
wire wool and lightly oil before storing.
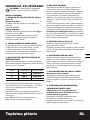
6. REMOVING PAINT
Choose the required nozzle and fit onto the
heat outlet. Soften the paint using hot air and
remove evenly using a spatula. Do not heat
the paint for too long since this will burn the
paint, making it more difficult to remove.
7. REMOVING PAINT FROM WINDOW
FRAMES
Danger of glass breaking!
Use of the glass protection nozzle is essential.
On profiled surfaces, paint can be removed
using a spatula and brushed off using a soft
wire brush.
8. DEFROSTING FROZEN PIPES
Water lines often do not differ in
appearance from gas lines. Gas
lines are not to be heated under any
circumstances.
Place on the reflector nozzle. Heat the frozen
zone always from the outside to the middle.
Warm plastic pipes as well as connections
between pipe pieces especially carefully to
prevent damage.

Heat gun EN
98
9. SHRINK SEATING ELECTRICAL
CABLES
Place on the reduction nozzle. Select the
diameter of the heat-shrink tubing according
to the work piece, for example, a cable lug.
Heat the heat-shrinkable sleeve evenly.
Many adhesives (e.g. stickers) become softer
when heated allowing adhesive bonds to
be separated or superfluous adhesive to be
removed.
10. WELDING PLASTICS
Place on the reduction nozzle and the welding
shoe. The materials to be welded and the
welding rod must be made of the same
material (e.g. PVC with PVC). The seam must
be clean and grease-free. Heat the welding
seam until it becomes tacky. Please note that
the temperature difference between the tacky
and liquid state of a plastic is very small. Then
feed in the welding rod and allow to run into
the gap so that a uniform bead is produced.
11. BENDING PLASTIC TUBE (See Fig. C)
Choose the hook nozzle and fit over heat
outlet. Turn the gun upside down and place on
its clip stand so that it is resting on a secure
bench with the nozzle pointing upwards, see
picture. To avoid buckling or kinking the tube,
fill the tube with dry sand and seal at both
ends. Heat the tube evenly by moving from
side to side and bend to required shape.
MAINTENANCE
Remove the plug from the socket before
carrying out any adjustment, servicing or
maintenance.
There are no user serviceable parts in your
power tool. Never use water or chemical
cleaners to clean your power tool. Wipe clean
with a dry cloth. Always store your power tool
in a dry place. Keep the motor ventilation slots
clean. Keep all working controls free of dust.
Occasionally you may see sparks through the
ventilation slots. This is normal and will not
damage your power tool.
If the supply cord is damaged, it must be
replaced by the manufacturer, its service
agent or similarly qualified persons in order to
avoid a hazard.
ENVIRONMENTAL
PROTECTION
Waste electrical products must not be
disposed of with household waste.
Please recycle where facilities exist.
Check with your local authorities or retailer for
recycling advice.

Heat gun EN
98
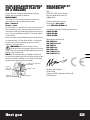
PLUG REPLACEMENT(ONLY
FOR REWIRABLE PLUG OF
UK & IRELAND)
If you need to replace the fitted plug then
follow the instructions below.
IMPORTANT
The wires in the mains lead are colored in
accordance with the following code:
Blue = Neutral
Brown = Live
As the colors of the wires in the mains lead of
this appliance may not correspond with the
coloured markings identifying the terminals in
your plug, proceed as follows. The wire which
is coloured
blue must be connected to the terminal which
is marked with N. The wire which is coloured
brown must be connected to the terminal
which is marked with L.
WARNING: Never connect live or
neutral wires to the earth terminal of the
plug. Only fit an approved BS1363/A plug and
the correct rated fuse.
NOTE: If a moulded plug is fitted and has to
be removed take great care in disposing of the
plug and severed cable, it must be destroyed
to prevent engaging into a socket.
Connect
Blue to N
(neutral)
Outer sleeve
firmly clamped
Cable grip
Brown L (live)
13 Amp fuse approved
to BS1362
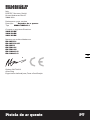
DECLARATION OF
CONFORMITY
We,
POSITEC Germany GmbH
Konrad-Adenauer-Ufer 37
50668 Köln
Declare that the product
Description Heat gun
Type WX041 WX041.1
Complies with the following directive:
2014/35/EU
2014/30/EU
2011/65/EU
Standards conform to
EN 60335-1
EN 60335-2-45
EN 62233
EN 55014-1
EN 55014-2
EN 61000-3-2
EN 61000-3-3
Suzhou 2017/04/13
Allen Ding
Deputy Chief Engineer,Testing &
Certification

Heißluftpistole D
1110
ALLGEMEINE
SICHERHEITSHINWEISE
FÜR
ELEKTROWERKZEUGE
WARNUNG
Lesen Sie alle
Sicherheitshinweise
und Anweisungen.
Versäumnisse bei
der Einhaltung der
Sicherheitshinweise und
Anweisungen können
elektrischen Schlag,
Brand und/oder schwere
Verletzungen verursachen.
Bewahren Sie alle
Sicherheitshinweise
und Anweisungen für
die Zukunft auf.
Dieses Gerät kann von
Kindern ab 8 Jahren und
Personen mit verringerten
physischen, sensorischen
oder mentalen Fähigkeiten
bzw. Mangel an Erfahrung
oder Kenntnis verwendet
werden, wenn sie von
einer Person beaufsichtigt
oderbezüglich des
Gebrauchs des Gerätes
in einer sicheren
Umgebung unterwiesen
werden und die damit
verbundenen Gefahren
verstehen. Kinder sollten
mit dem Gerät nicht
spielen und Reinigungs-
und Wartungsarbeiten
nur unter Aufsicht
durchführen.
Falls das Netzkabel
beschädigt sein sollte,
muss es vom Hersteller,
einem seiner Service-
Beauftragten oder einer
ähnlich qualifizierten
Person instandgesetzt
werden, damit es nicht zu
Gefährdungen kommt.
ZUSÄTZLICHE
SICHERHEITSHINWEISE
FÜR IHRE
HEISSLUFTPISTOLE
1. Bei unvorsichtiger
Handhabung des
Gerätes kann ein Brand
entstehen, deshalb
a) Seien Sie vorsichtig,
wenn Sie dieses Gerät
an Orten verwenden, an
denen sich entzündbare
Substanzen.
b) Gerät nicht für längere
Zeit auf ein und dieselbe
Stelle richten.
c) Nicht in der Nähe leicht
entzündbarer Gase oder
Materialien arbeiten.

Heißluftpistole D
1110
SYMBOLE
Bedienungsanleitung lesen
Achtung – Bedienungsanleitung
lesen!
Schutzisolation
Tragen Sie eine Schutzbrille
Tragen Sie eine Staub-
schutzmaske
Elektroprodukte dürfen nicht mit
dem normalen Haushaltsmüll
entsorgt werden, sondern
sollten nach Möglichkeit zu
einer Recyclingstelle gebracht
werden. Ihre zuständigen
Behörden oder Ihr Fachhändler
geben Ihnen hierzu gerne
Auskunft.
d) Wärme kann zu
brennbaren Teilen
gelangen, die sich außer
Sichtweite befinden.
e) Gerät vor der
Aufbewahrung
vollständig abkühlen
lassen.
f) Gerät nicht
unbeaufsichtigt
betreiben.

Heißluftpistole D
1312
1. DÜSE
2. WÄRMESCHUTZ
3. EIN-AUS-SCHALTER/STUFENWAHLSCHALTER
4. HANDGRIFFBEREICHE
5. REDUZIERDÜSE *
6. FLÄCHENDÜSE*
7. REFLEKTORDÜSE*
8. GLASSCHUTZDÜSE*
9. KRATZER *
* Abgebildetes oder beschriebenes Zubehör gehört teilweise nicht zum
Lieferumfang.
TECHNISCHE DATEN
Typ WX041 WX041.1
Nennspannung 230-240V~50Hz
Nennleistung 2000W
Temperatur/ Luftmenge ca. I =50
o
C/300L/min
II =350
o
C/300L/min
III = 580
o
C/500L/min
Gewicht 0.8kg
Schutzisolation
/ II
ZUBEHÖRTEILE
Kratzer 1
Glasschutzdüse 1
Reduzierdüse 1
Reflektordüse 1
Flächendüse 1
Wir empfehlen Ihnen, sämtliche Zubehörteile beim selben Fachhändler zu beziehen, bei dem Sie
auch Ihr Elektrowerkzeug gekauft haben. Weitere Informationen finden Sie auf der Verpackung
der Zubehörteile. Auch Ihr Fachhändler berät Sie gerne.
Heißluftpistole D

Heißluftpistole D
1312
HINWEISE ZUM BETRIEB
HINWEIS: Lesen Sie das Handbuch
vor Inbetriebnahme des Werkzeuges
sorgfältig durch.
INBETRIEBNAHME
1. EIN-AUS-SCHALTEN (Siehe Abb. A)
Ein- Schalten
Zur Inbetriebnahme Ein-Aus-Schalter(3) I, II
oder III in Stellung.
Aus-Schalten
Zum Ausschalten Ein-Aus-Schalter(3)bis zum
Anschlag in Stellung O.
drücken.
Nach längerem Arbeiten mit hoher Temperatur
Gerät vor dem Ausschalten zur Abkühlung in
der Kaltluftstufe I laufen lassen.
2. THERMOSCHUTZABSCHALTUNG
Bei Überlastung der Heizung (z.B. durch
Luftstau) schaltet das Gerät diese automatisch
ab, das Gebläse läuft jedoch weiter. Hat sich
das Gerät auf Betriebstemperatur abgekühlt,
wird die Heizung wieder zugeschaltet.
3. EINSTELLEN DER LUFTMENGE/
TEMPERATUR
Der Schalter (3)kann in. drei Gebläsestufen
geschaltet werden. Den Anwendungen
entsprechend können somit passende
Luftmengen- und Temperaturkombinationen
ausgewählt werden.
Stufe Temperatur Luftmenge
I 50
o
C 300L/min
II 350
o
C 300L/min
III 580
o
C 500L/min
Die Kaltluftstufe I ist geeignet zum Abkühlen
eines erhitzten Werkstückes oder zum Trocknen
von Farbe. Sie ist ebenso geeignet, um das
Gerät vor dem Abstellen oder dem Wechsel
von Aufsatzdüsen abzukühlen.
Lufteinstellung II eignet sich zum Verbiegen
und zum Heißschrumpfen von Plastik.
Lufteinstellung III eignet sich zum
Abbrennen von Farbe und zum Auftauen von
Rohrleitungen.
4. ARBEITSBEISPIELE
Angaben über Temperatureinstellungen in
den Anwendungsbeispielen sind Richtwerte,
die je nach Materialbeschaffenheit abweichen
können. Der Abstand der Düse zum Werkstück
richtet sich nach dem zu bearbeitenden
Material. Die jeweils zweckmäßigste
Temperatur ist durch einen Versuch zu
ermitteln. Beginnen Sie daher mit einer
niedrigen Temperaturstufe.
Alle Anwendungsbeispiele (außer Lack
von Fenstern entfernen) können ohne
Zubehör ausgeführt werden. Der Einsatz der
vorgeschlagenen Zubehörteile vereinfacht
jedoch die Arbeit und erhöht die Qualität des
Ergebnisses wesentlich.
Vorsicht beim Düsenwechsel,
Verbrennungsgefahr! Nicht die heiße
Düse berühren. Gerät abkühlen lassen.
Schutzhandschuhe tragen.
5. KRATZER (Siehe Abb. B)
Der dreieckige Schabehaken ist ideal, um Farbe
von flachen Holzflächen und-kanten zu entfernen.
Vergessen Sie nicht, die Klinge nach Gebrauch
mit Stahlwolle und ein wenig Öl zu säubern,
bevor Sie sie weglegen.
6. LACK ENTFERNEN/KLEBER LÖSEN
Flächendüse (7) aufsetzen. Lack mit Heißluft
aufweichen und gleichmäßig mit Spachtel
abheben. Lange Hitzeeinwirkung verbrennt
den Lack und erschwert das Entfernen. Der
Spachtel sollte scharf und sauber gehalten
werden. Viele Klebemittel (z.B. Aufkleber)
werden durch Wärme weich. Verbindungen
können dann getrennt oder überschüssiger
Kleber entfernt werden.
7. LACK VON FENSTERN ENTFERNEN
Glasbruchgefahr!
Unbedingt die Glasschutzdüse verwenden.
Auf profilierten Flächen kann der Lack mit dem
passenden Spachtel abgehoben und mit einer
weichen Drahtbürste abgebürstet werden.
8. WASSERLEITUNGEN AUFTAUEN
Wasserleitungen sind oft äußerlich nicht
von Gasleitungen zu unterscheiden.
Gasleitungen dürfen keinesfalls erwärmt
werden.
Reflektordüse aufsetzen. Die eingefrorene

Heißluftpistole D
1514
Stelle immer vom Rand zur Mitte erwärmen.
Kunststoffrohre sowie Verbindungen zwischen
Rohrstücken besonders vorsichtig erwärmen,
um Beschädigungen zu vermeiden.
9. SCHRUMPFEN
Reduzierdüse aufsetzen. Den Durchmesser
des Schrumpfschlauches entsprechend dem
Werkstück, z.B. Kabelschuh, wählen. Den
Schrumpfschlauch gleichmäßig erwärmen.
10. KUNSTSTOFF VERSCHWEISSEN
Reduzierdüse und Schweißschuh aufsetzen.
Die zu verschweißenden Werkstücke und der
Schweißdraht müssen aus dem gleichen
Material sein (z.B. PVC mit PVC). Die Naht
muss sauber und fettfrei sein. Nahtstelle
teigig erwärmen. Beachten Sie, dass der
Temperaturbereich zwischen teigigem und
flüssigem Zustand eines Kunststoffes gering
ist. Dann Schweißdraht zuführen und in
den Spalt einlaufen lassen, so dass eine
gleichmäßige Wulst entsteht.
11. KUNSTSTOFFROHRE VERFORMEN
(Siehe Abb. C)
Reflektordüse aufsetzen. Um ein Abknicken
des Rohres zu verhindern, muss dieses mit
Sand gefüllt und beidseitig verschlossen
werden. Rohr gleichmäßig erwärmen durch
seitliches Hin- und Herbewegen.
WARTUNG
Ziehen Sie grundsätzlich den
Netzstecker, bevor Sie Einstell-,
Reparatur- oder Wartungstätigkeiten
ausführen.
Ihr Werkzeug benötigt keine zusätzliche
Schmierung oder Wartung. Es enthält keine
Teile, die Sie warten müssen. Reinigen
Sie Ihr Werkzeug niemals mit Wasser oder
chemischen Loesungsmitteln. Wischen
Sie es mit einem trockenen Tuch sauber.
Lagern Sie Ihr Werkzeug immer an einem
trockenen Platz. Sorgen Sie dafür, dass bei
staubigen Arbeiten die Lüftungsöffnungen
frei sind. Falls es erforderlich sein sollte, den
Staub zu entfernen, trennen Sie zuerst das
Elektrowerkzeug vom Stromversorgungsnetz.
Verwenden Sie nichtmetallische Objekte zum
Entfernen von Staub und vermeiden Sie das
Beschädigen innerer Teile. Gelegentlich sind
durch die Lüftungsschlitze hindurch Funken zu
sehen. Dies ist normal und wird Ihr Werkzeug
nicht beschädigen.
Wenn ein Ersatz von Stecker oder
Anschlussleitung erforderlich ist, dann ist
dies von unserer Servicestelle oder einer
Elektrofachwerkstatt durchzuführen, um
Sicherheitsgefährdungen zu vermeiden.
Lassen Sie Reparaturen nur durch unsere
Servicestelle oder durch eine Fachwerkstatt
mit Originalersatzteilen durchführen.
UMWELTSCHUTZ
Elektroprodukte dürfen nicht mit dem
normalen Haushaltsmüll entsorgt
werden, sondern sollten nach
Möglichkeit zu einer Recyclingstelle gebracht
werden. Ihre zuständigen Behörden oder
Ihr Fachhändler geben Ihnen hierzu gerne
Auskunft.

Heißluftpistole D
1514
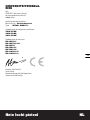
KONFORMITÄTSERKLÄRUNG
Wir,
POSITEC Germany GmbH
Konrad-Adenauer-Ufer 37
50668 Köln
Erklären hiermit, dass unser Produkt
Beschreibung WORX Heißluftpistole
Typ WX041 WX041.1
Den Bestimmungen der folgenden Richtlinien
entspricht:
2014/35/EU
2014/30/EU
2011/65/EU
Normen:
EN 60335-1
EN 60335-2-45
EN 62233
EN 55014-1
EN 55014-2
EN 61000-3-2
EN 61000-3-3
Suzhou 2017/04/13
Allen Ding
Stellvertretender Chefingenieur, Prüfung und
Zertifizierung

Décapeur thermique F
1716
AVERTISSEMENTS DE
SÉCURITÉ GÉNÉRAUX
POUR L’OUTIL
AVERTISSEMENT
Lire tous les
avertissements de
sécurité et toutes les
instructions. Ne pas
suivre les avertissements
et instructions peut
donner lieu à un choc
électrique, un incendie et/
ou une blessure sérieuse.
Conserver tous les
avertissements
et toutes les
instructions pour
pouvoir s’y reporter
ultérieurement.
Cet appareil peut être
utilisé par des enfants
âgés de 8 ans et plus
et des personnes ayant
des capacités physiques,
sensorielles ou mentales
réduites, ou présentant un
manque d’expérience et
de connaissances, si elles
sont sous surveillance ou
formées à l’utilisation de
l’appareil en toute sécurité
et comprennent les
risques qu’il entraîne.
Les enfants ne doivent
pas jouer avec l’appareil.
L’entretien et le nettoyage
ne doivent pas être
effectués par des enfants
sans surveillance.
Si le cordon
d’alimentation est
endommagé, il doit être
remplacé par le fabricant,
un technicien du S.A.V
ou toute autre personne
qualifiée afin d’éviter tout
danger.
INSTRUCTIONS
DE SECURITE
SUPPLEMENTAIRES
POUR VOTRE PISTOLET
THERMIQUE
1. Un incendie peut se
produire si l’appareil
n’est pas utilisé avec
soin, par conséquent,
a) Faites attention lorsque
vous utilisez cet appareil
dans les endroits
où se trouvent des
substances.
b) Ne jamais diriger
l’appareil sur un unique
point pendant une trop
longue période.
c) Ne pas travailler à
proximité de gaz ou de

Décapeur thermique F
1716
SYMBOLES
Lire le mode d’emploi
Avertissement
Double isolation
Porter des lunettes de protection
Porter un masque anti-poussière
Les déchets d’équipements
électriques et électroniques
ne doivent pas être déposés
avec les ordures ménagères.
Ils doivent être collectés
pour être recyclés dans des
centres spécialisés. Consultez
les autorités locales ou votre
revendeur pour obtenir
des renseignements sur
l’organisation de la collecte.
matériaux facilement
inflammables.
d) La chaleur peut
se propager par
conduction à des
pièces combustibles ou
inflammables hors du
champ de vision ou de
la vue de l’opérateur.
e) Laisser refroidir
complètement l’appareil
avant de le ranger. La
buse encore brûlante ou
échauffée peut causer
des dégâts.
f) Ne pas laisser l’appareil
en marche sans
surveillance.

Décapeur thermique F
1918
1. BUSE
2. PARE-CHALEUR
3. INTERRUPTEUR MARCHE-ARRÊT/SÉLECTEUR DE NIVEAU
4. POIGNÉE GRIP SOUPLE
5. RÉDUCTION *
6. BUSE À JET PLAT *
7. BUSE À RÉFLECTEUR *
8. BUSE PROTÈGE-VITRES *
9. GRATTOIR *
* Les accessoires reproduits ou décrits ne sont pas tous compris avec le modèle
standard livré.
CARACTÉRISTIQUES TECHNIQUES
Modèle WX041 WX041.1
Tension 230-240V~50Hz
Puissance 2000W
Température/ Débit d’air I =50
o
C/300L/min
II =350
o
C/300L/min
III = 580
o
C/500L/min
Poids 0.8kg
Double isolation
/ II
ACCESSOIRES
Grattoir 1
Buse protège-vitres 1
Buse à jet plat 1
Buse à réflecteur 1
Réduction 1
Nous recommandons d’acheter tous les accessoires dans le magasin où l’outil a été acheté.
Reportez vous à l’emballage pour de plus amples informations. Le personnel du magasin peut
apporter aide et conseils.

Décapeur thermique F
1918
FONCTIONNEMEN
REMARQUE: Avant d’utiliser cet outil,
lire attentivement les instructions.
MISE EN SERVICE
1. MISE EN MARCHE/ARRÊT (Voir Fig A)
Mise en marche
Pour mettre l’appareil en service, enfoncer
l’interrupteur Marche/Arrêt (3) en position I,
II ou III.
Arrêter l’appareil
Pour arrêter l’appareil, enfoncer à fond
l’interrupteur Marche/Arrêt (3) jusqu’en
position O.
Après une longue séance de travail à
température élevée, refroidir l’appareil avant
de l’éteindre en le laissant fonctionner sur le
niveau « Air froid » I .
2. COUPURE DE PROTECTION
THERMIQUE
En cas d’échauffement excessif (en cas de non
circulation d’air, par exemple), le chauffage
est automatiquement coupé tandis que la
soufflante, elle, continue de tourner. Une fois
que l’appareil est revenu à sa température de
service, le chauffage se remet en marche.
3. RÉGLAGE DU DÉBIT D’AIR/
TEMPÉRATURE
L’interrupteur Marche/Arrêt peut être commuté
sur 3 niveaux différents de débit d’air. On
peut donc moduler la quantité d’air et sa
température en fonction de l’application.
Niveau Température Débit d’air
I 50
o
C 300L/min
II 350
o
C 300L/min
III 580
o
C 500L/min
Le niveau « Air froid » I s’utilise pour refroidir
une pièce qui est chaude ou bien pour sécher
une couche de peinture. Il peut également
être utilisé pour refroidir l’appareil avant de
l’éteindre ou avant de changer de buse.
Le réglage de l’air II est destiné à plier du
plastique et à chauffer des plastiques se
rétrécissant .
Le réglage de l’air III est destiné à décaper la
peinture et à dégeler les tuyaux.
4. EXEMPLES D’UTILISATION
Les valeurs de température précisées pour
les exemples d’utilisation sont données à
titre indicatif. Elles peuvent être modifiées
en fonction des propriétés des matériaux.
De même, la distance à observer entre la
buse et la pièce à travailler dépend des
caractéristiques de cette dernière.
La température la mieux adaptée au matériau
et à l’utilisation doit être déterminée après un
essai préalable. Commencer donc le travail
avec une valeur de température
plus basse. Tous les exemples d’utilisation
(sauf ) peuvent être exécutés sans accessoires
supplémentaires. Cependant, l’utilisation des
accessoires proposés simplifie le travail et
augmente sensiblement la qualité du résultat.
Attention lors des changements de
buses : risque de brûlures! Ne pas entrer
en contact avec la buse brûlante. Laisser
l’appareil refroidir. Porter des gants de
protection.
5. GRATTOIR (Voir Fig.B)
Le crochet de razage triangulaire est idéal
pour décaper la peinture des surfaces en bois
plates et les bords.
N’oubliez pas de nettoyer la lame après
utilisation à l’aide de laine de verre et d’un peu
d’huile avant de la ranger.
6. DÉCAPAGE DE PEINTURE ET DE COLLE
Mettre en place la buse à jet plat (8). Ramollir
la peinture au jet d’air chaud et la retirer à
l’aide d’un couteau à décaper. Si l’action du jet
d’air chaud est trop longue, la peinture brûle
et ne s’enlève que difficilement. Le couteau à
décaper doit toujours être maintenu proper et
tranchant.
La plupart des produits adhésifs et colles
(p.ex. autocollants) se ramollissent sous l’effet
de la chaleur. Les assemblages peuvent alors
être défaits ou les restes de colles retirés.
7. DÉCAPAGE DE PEINTURE SUR CADRE
DE FENÊTRE
Risque de bris de verre!

Décapeur thermique F
2120
Impérativement utiliser la buse protège-vitres.
Sur les surfaces profilées, la peinture peut
être retirée au moyen d’un couteau à décaper
adéquat. Les restes peuvent être ensuite
éliminés à l’aide d’une brose métallique
souple.
8. DÉGIVRAGE DE CONDUITES D’EAU
Il est souvent difficile de faire la
difference entre une conduite d’eau et
une conduite de gaz. Ne jamais chauffer
une conduite de gaz.
Mettre en place la buse. Réchauffer la zone
gelée en partant de sa périphérie et en
progressant vers son centre. Réchauffer les
tubes en matières plastiques ainsi que
les segments de conduite avec toutes les
precautions requises afin d’éviter de les
endommager.
9. RÉTRACTION
Mettre en place la réduction. Choisir le
diamètre de la gaine thermorétractable en
fonction de la pièce (cosse de contact, par
exemple). Chauffer la gaine thermorétractable
de façon homogène.
10. SOUDAGE DES MATIÈRES
PLASTIQUES
Mettre en place la réduction et le patin à
souder. Les pièces à souder ainsi que le
fil à souder doivent être de matériaux
identiques (PVC avec PVC, par exemple). La
ligne de soudure doit être propre et exempte
de toute trace de graisse. Chauffer le joint
jusqu’à ramollissement. Tenir compte du fait
que la différence de température entre les
états pâteux et liquide d’une matière plastique
est très faible. Alimenter en fil à souder et le
faire couler dans la fente de manière à générer
un bourrelet régulier.
11. DÉFORMAGE DES TUYAUX EN
PLASTIQUE (Voir Fig. C)
Mettre en place la buse. Pour éviter que le
tuyau ne se rompe en pliant, celui-ci doit
être rempli de sable et obturé à ses deux
extrémités. Chauffer le tuyau régulièrement en
faisant aller et venir la buse.
ENTRETIEN
Retirer la fiche de la prise avant de
procéder à un réglage, une réparation ou
un entretien.
L’outil motorisé ne requiert pas de graissage
ou d’entretien supplémentaire. Il n’y a pas
de pièces réparables par l’utilisateur dans cet
outil. Ne jamais utiliser d’eau ou de nettoyants
chimiques pour nettoyer l’outil. Nettoyer
avec un chiffon sec. Toujours conserver l’outil
motorisé dans un endroit sec. Maintenir les
fentes de ventilation du moteur propres.
Empêcher que les commandes de marche
soient couvertes de sciure. Il est normal que
des étincelles soient visibles dans les fentes
de ventilation, cela n’endommagera pas l’outil
motorisé.
Si l’alimentation est endommagée, elle doit
être remplacée par le fabricant, son agent de
maintenance ou une personne qualifiée de
façon similaire, afin d’éviter tout danger.
PROTECTION DE
L’ENVIRONNEMENT
Les déchets d’équipements électriques
et électroniques ne doivent pas être
déposés avec les ordures ménagères.
Ils doivent être collectés pour être recyclés
dans des centres spécialisés. Consultez les
autorités locales ou votre revendeur pour
obtenir des renseignements sur l’organisation
de la collecte.
Pagina se încarcă...
Pagina se încarcă...
Pagina se încarcă...
Pagina se încarcă...
Pagina se încarcă...
Pagina se încarcă...
Pagina se încarcă...
Pagina se încarcă...
Pagina se încarcă...
Pagina se încarcă...
Pagina se încarcă...
Pagina se încarcă...
Pagina se încarcă...
Pagina se încarcă...
Pagina se încarcă...
Pagina se încarcă...
Pagina se încarcă...
Pagina se încarcă...
Pagina se încarcă...
Pagina se încarcă...
Pagina se încarcă...
Pagina se încarcă...
Pagina se încarcă...
Pagina se încarcă...
Pagina se încarcă...
Pagina se încarcă...
Pagina se încarcă...
Pagina se încarcă...
Pagina se încarcă...
Pagina se încarcă...
Pagina se încarcă...
Pagina se încarcă...
Pagina se încarcă...
Pagina se încarcă...
Pagina se încarcă...
Pagina se încarcă...
Pagina se încarcă...
Pagina se încarcă...
Pagina se încarcă...
Pagina se încarcă...
Pagina se încarcă...
Pagina se încarcă...
Pagina se încarcă...
Pagina se încarcă...
Pagina se încarcă...
Pagina se încarcă...
Pagina se încarcă...
Pagina se încarcă...
Pagina se încarcă...
Pagina se încarcă...
Pagina se încarcă...
Pagina se încarcă...
Pagina se încarcă...
Pagina se încarcă...
Pagina se încarcă...
Pagina se încarcă...
Pagina se încarcă...
Pagina se încarcă...
Pagina se încarcă...
Pagina se încarcă...
Pagina se încarcă...
Pagina se încarcă...
Pagina se încarcă...
Pagina se încarcă...
Pagina se încarcă...
Pagina se încarcă...
Pagina se încarcă...
Pagina se încarcă...
-
 1
1
-
 2
2
-
 3
3
-
 4
4
-
 5
5
-
 6
6
-
 7
7
-
 8
8
-
 9
9
-
 10
10
-
 11
11
-
 12
12
-
 13
13
-
 14
14
-
 15
15
-
 16
16
-
 17
17
-
 18
18
-
 19
19
-
 20
20
-
 21
21
-
 22
22
-
 23
23
-
 24
24
-
 25
25
-
 26
26
-
 27
27
-
 28
28
-
 29
29
-
 30
30
-
 31
31
-
 32
32
-
 33
33
-
 34
34
-
 35
35
-
 36
36
-
 37
37
-
 38
38
-
 39
39
-
 40
40
-
 41
41
-
 42
42
-
 43
43
-
 44
44
-
 45
45
-
 46
46
-
 47
47
-
 48
48
-
 49
49
-
 50
50
-
 51
51
-
 52
52
-
 53
53
-
 54
54
-
 55
55
-
 56
56
-
 57
57
-
 58
58
-
 59
59
-
 60
60
-
 61
61
-
 62
62
-
 63
63
-
 64
64
-
 65
65
-
 66
66
-
 67
67
-
 68
68
-
 69
69
-
 70
70
-
 71
71
-
 72
72
-
 73
73
-
 74
74
-
 75
75
-
 76
76
-
 77
77
-
 78
78
-
 79
79
-
 80
80
-
 81
81
-
 82
82
-
 83
83
-
 84
84
-
 85
85
-
 86
86
-
 87
87
-
 88
88


Worx WX041 Original Instructions Manual
- Tip
- Original Instructions Manual
- Acest manual este potrivit și pentru
în alte limbi
- français: Worx WX041
- čeština: Worx WX041
- English: Worx WX041
- slovenčina: Worx WX041
- polski: Worx WX041
- Deutsch: Worx WX041
- italiano: Worx WX041
- español: Worx WX041
- svenska: Worx WX041
- português: Worx WX041
- Nederlands: Worx WX041
Lucrări înrudite
Alte documente
-
Skil 8007 MA Manual de utilizare
-
Skil 8004 AA Manual de utilizare
-
-
Skil 8003 CA Manual de utilizare
-
Graphite 58G082 Manualul proprietarului
-
Hikoki RH650V Manual de utilizare
-
Defort DHG-2000N-K Manualul proprietarului
-
Bort BHG-2000L-K Manual de utilizare
-
Hitachi RH 650V Handling Instructions Manual
-