
Important
Please read this User’s Manual, and the Setup Manual (separate
volume) carefully to familiarize yourself with safe and effective usage.
• Please refer to the Setup Manual for basic information ranging from
monitor installation to using the monitor.
• The latest User’s Manual is available for download from our web site:
http://www.eizoglobal.com
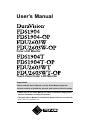
User’s Manual
Color LCD Monitor
Touch Panel Color LCD Monitor

2
No part of this manual may be reproduced, stored in a retrieval system, or transmitted, in any form or by
any means, electronic, mechanical, or otherwise, without the prior written permission of EIZO Corporation.
EIZO Corporation is under no obligation to hold any submitted material or information condential unless
prior arrangements are made pursuant to EIZO Corporation’s receipt of said information. Although every
effort has been made to ensure that this manual provides up-to-date information, please note that EIZO
monitor specications are subject to change without notice.

3
Notice for this monitor
Notice for this monitor
This product may not be covered by warranty for uses other than those described in the Setup Manual.
The specications noted in this manual are only applicable when the following are used:
• Signal cables specied by us
Only use optional products manufactured or specied by us with this product.
It takes about 30 minutes for the performance of electrical parts to stabilize. Please wait 30 minutes or more
after the monitor power has been turned on, and then adjust the monitor.
Monitors should be set to a lower brilliance to reduce changes in luminosity caused by long-term use and
maintain a stable display.
When the screen image is changed after displaying the same image for extended periods of time, an
afterimage may appear. Use the screen saver or power save function to avoid displaying the same image for
extended periods of time.
Periodic cleaning is recommended to keep the monitor looking new and to prolong its operation lifetime (refer
to “Cleaning” (page 4)).
The LCD panel is manufactured using high-precision technology. Although, missing pixels or lit pixels may
appear on the LCD panel, this is not a malfunction. Percentage of effective dots: 99.9994% or higher.
The backlight of the LCD panel has a xed lifetime. When the screen becomes dark or begins to icker,
please contact your local EIZO representative.
Do not scratch or press on the panel with any sharp objects, as this may result in damage to the panel. Do
not attempt to brush with tissues as this may scratch the panel.
When the monitor is cold and brought into a room or the room temperature goes up quickly, dew condensation
may occur on the interior and exterior surfaces of the monitor. In that case, do not turn the monitor on. Instead
wait until the dew condensation disappears, otherwise it may cause some damage to the monitor.
(Cautions for the Use of the Touch Panel)
• During touch operation
Be careful of the following points. Otherwise, damage may occur to the monitor.
- Do not strongly press, scratch, or poke the panel.
- Do not touch the panel with hard objects such as ballpoint pens or metals.

4
Notice for this monitor
Cleaning
Attention
• Chemicals such as alcohol and antiseptic solution may cause gloss variation, tarnishing, and fading of the panel,
and also quality deterioration of the image.
• Never use any thinner, benzene, wax, and abrasive cleaner, which may damage the panel.
• Do not allow liquid to enter the clearance between the panel and the panel frame.
The stains on the panel surface can be removed by using the provided cleaning cloth.
To use the monitor comfortably
• An excessively dark or bright screen may affect your eyes. Adjust the brightness of the monitor
according to the environmental conditions.
• Staring at the monitor for a long time tires your eyes. Take a 10-minute rest every hour.

5
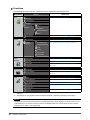
CONTENTS
CONTENTS
Notice for this monitor ......................................... 3
Cleaning .................................................................... 4
To use the monitor comfortably ............................. 4
CONTENTS ............................................................. 5
Chapter 1 Introduction ....................................... 6
1-1. Features ......................................................... 6
1-2. EIZO LCD Utility Disk.................................... 7
●
Disk contents and software overview ............. 7
1-3. Basic Operations and Functions ................ 8
●
Basic Adjustment menu operations ................ 8
●
Showing button guide...................................... 9
●
Functions ........................................................10
Chapter 2 Adjusting Screens .......................... 11
2-1. Setting the Resolution ................................11
●
Display resolution ........................................... 11
●
Setting resolution ...........................................11
2-2. Displaying Screen Correctly.......................12
●
Digital Signal Input .........................................12
●
Analog Signal Input ........................................12
2-3. Adjusting Color ............................................15
●
Adjusting brilliance (brightness) .....................15
●
To adjust color temperature ...........................16
●
To adjust gamma ............................................16
●
To adjust hue ..................................................16
●
To adjust color saturation ...............................17
●
To enhance outline of image ..........................17
●
To adjust gain .................................................17
2-4. Selecting Screen Size .................................18
2-5. Enabling / Disabling Auto Sharpness .......18
Chapter 3 Setting Monitor ............................... 19
3-1. Setting Brightness of Front Button ...........19
3-2. Setting Language .........................................19
3-3. Changing Adjustment Menu Display
Position .........................................................19
3-4.
Setting the Adjustment Menu orientation
... 20
3-5. Enabling / Disabling DDC/CI
communication ........................................... 20
3-6. Locking Buttons ...........................................21
3-7. Setting Backlight Off Mode ........................21
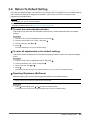
3-8. Turning the ECDIS Indicator ON / OFF ..... 22
3-9. Return To Default Setting........................... 23
●
To reset the color adjustment value .............. 23
●
To reset all adjustments to the default
settings .......................................................... 23
●
Resetting Brightness (Brilliance) ................... 23
Chapter 4 Touch Panel Settings
(FDS1904T / FDU2603WT) .............. 24
4-1. Calibrating the Monitor .............................. 24
4-2. ConguringTouchPanelOperation
Settings ........................................................ 26
4-3. Setting Touch Sound .................................. 27
Chapter 5 Power Saving Functions ................ 28
5-1. Setting Power Saving ................................. 28
5-2.
Setting the automatic power off function
... 28
Chapter 6 Troubleshooting .............................. 29
6-1. No picture .................................................... 29
6-2. Imaging problems (for both digital and
analog) .......................................................... 30
6-3. Imaging problems (for analog only) ..........31
6-4. Other problems ............................................31
6-5. Touch panel problems (for FDS1904T /
FDU2603WT only) ........................................ 32
Chapter 7 Reference ........................................ 33
7-1. Connecting Multiple PCs ........................... 33
●
To switch among input signals ...................... 34
●
To set input signal selection .......................... 34
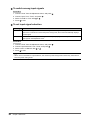
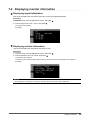
7-2. Displaying monitor information ................ 35
●
Displaying signal information ........................ 35
●
Displaying monitor information...................... 35
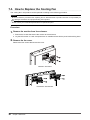
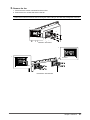
7-3. How to Replace the Cooling Fan ............... 36
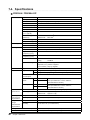
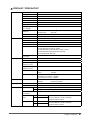
7-4. Specications ............................................. 40
●
FDS1904 / FDS1904-OP .............................. 40
●
FDS1904T / FDS1904T-OP ...........................41
●
FDU2603W / FDU2603W-OP ....................... 43
●
FDU2603WT / FDU2603WT-OP .................. 44
●
Pin Assignment ..............................................47
7-5. Preset Timing .............................................. 49
7-6. Optional Accessories ................................. 50
Appendix .............................................................. 51
Trademark ................................................................51
License .....................................................................51
Testing Standard .....................................................51
TypeApprovalofShipClassication ...................51
Warning for Radio interference ............................ 52
LIMITED WARRANTY ............................................. 53
Recycling Information ........................................... 54

6
Chapter 1 Introduction
Chapter 1 Introduction
Thank you very much for choosing an EIZO color LCD monitor.
1-1. Features
• 19.0″ LCD (FDS1904 / FDS1904T)
• 25.5″ LCD (FDU2603W / FDU2603WT)
Provides a display area (vertical: over 340 mm) required for radar on large ships.
• Applicable to the resolution of 1280 × 1024. (FDS1904 / FDS1904T)
• Applicable to the resolution of 1920 × 1200. (FDU2603W / FDU2603WT)
• Panel with a wide eld of view adopted
- Horizontal : 178°, vertical : 178°(FDS1904 / FDS1904T)
- Horizontal : 176°, vertical : 176°(FDU2603W / FDU2603WT)
• Dimming down to the low brightness
The mode allows the user to turn off the backlight.
(You can set the brightness when “Brilliance” in the Adjustment menu is set to the lower limit value.)
See “3-7. Setting Backlight Off Mode” (page 21).
• The buttons on the front of the monitor light up.
The buttons on the front of the monitor (operation buttons) light up orange to enable the monitor to be
operated in a dark environment as well. Their brightness can also be adjusted.
See “3-1. Setting Brightness of Front Button” (page 19).
• Cooling fan replacement is possible.
See “7-3. How to Replace the Cooling Fan” (page 36).
• Built-in warning buzzer
Controlled on the system side.
• Equipped with AC/DC power supplies.
Both AC power input and DC power input are provided to enable installation in various environments. In
addition, connecting both power inputs can provide a helpful backup if the AC power supply fails. (The AC
power supply takes priority during operation when both power inputs are connected.)
• HDCP (High-bandwidth Digital Content Interface)
• Type approval of ship classication
This product is pending approval for the following types of ship classications.
- NK (Nippon Kaiji Kyokai)
- DNV (Det Norske Veritas)
- ABS (American Bureau of Shipping)
- LR (Lloyd’s Register of Shipping)
For the latest information on approvals for ship classications, please refer to our website.
http://www.eizoglobal.com
• Testing Standards
This product complies with the IEC60945 4th edition standard.
• Optical bonding for increased screen strength and visibility*
1
(option: FDS1904-OP / FDS1904T-OP, FDU2603W-OP / FDU2603WT-OP)
*1 A technique in which a layer of resin is used to ll the gap (layer of air) between the LCD panel and clear
panel / touch panel, adhering the two together.
(FDS1904T / FDU2603WT only)
• Touch Panel provided
- Projected capacitive technology
- Supports the Windows Touch function (multi-touch) of Windows 10 / Windows 8.1 / Windows 7.

7
Chapter 1 Introduction
1-2. EIZO LCD Utility Disk
An “EIZO LCD Utility Disk” (CD-ROM) is supplied with this product. The following table shows the disk
contents and the overview of the software programs.
●
Disk contents and software overview
The disk includes adjustment software, touch panel software, and user’s manuals. Refer to Readme.
txt le on the disk for software startup procedures or le access procedures.
Item Overview
Screen adjustment pattern les Used when adjusting the image of analog signal input manually.
Touch Panel Driver
*1
Driver software for the touch panel.
*2
* If the following conditions are satised, use the standard Windows driver.
• The PC and monitor are connected with a USB cable
• The OS is Windows 8.1 or Windows 7
For setup details please refer to “Chapter 4 Touch Panel Settings
(FDS1904T / FDU2603WT)” (page 24).
TPOffset
*1
Software for adjusting the sensitivity of the touch panel
*2
Use this software when touch operations are not registered or only
registered after pressing hard.
User’s Manual of this monitor (PDF le)
Readme.txt le
*1 Used only for the FDS1904T / FDU2603WT.
*2 Refer to the corresponding User’s Manual on the CD-ROM for details on installation and use.

8
Chapter 1 Introduction
1-3. Basic Operations and Functions
●
Basic Adjustment menu operations
Note
• The language is set to English in the default settings. To change the language, please refer to “3-2. Setting
Language” (page 19).
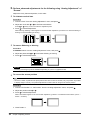
1.
Displaying Adjustment Menu
1. Press . The Adjustment menu appears.
Current display mode
Menu title
Settings
Menu
Item
2.
Adjusting / Setting
1. Choose a menu to adjust / set with , and then press .
2. Choose an item to adjust / set with , and then press .
3. Adjust / set the selected item with , and then press .

9
Chapter 1 Introduction
3.
Exiting
1. Press a few times. The Adjustment menu nishes.
●
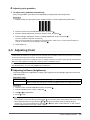
Showing button guide
Press the front buttons other than , and the button guide appears above the button.
BRILLIANCE
Note
• The Button Guide will continue to appear while the Adjustment menu is showing.
• The Button Guide is displayed differently depending on the selected menu or status.

10
Chapter 1 Introduction
●
Functions
The following table shows all the Adjustment menu’s adjustment and setting menus.
Main menu Setting Reference
Color
*1
Brilliance
“2-3. Adjusting Color” (page 15)
Temperature
*2
Gamma
*2
Advanced
Settings
Hue
*2
Saturation
*2
Outline Enhancer
Gain
*2
Color Reset
“3-9. Return To Default Setting” (page 23)
Screen
Screen Size
“2-4. Selecting Screen Size” (page 18)
Analog
Adjustment
Auto Adjustment
“2-2. Displaying Screen Correctly” (page 12)
Range Adjustment
Clock
Phase
Hor.Position
Ver.Position
Power
Manager
Power Save
“5-1. Setting Power Saving” (page 28)
Indicator
“3-1. Setting Brightness of Front Button” (page 19)
Eco Timer
“5-2. Setting the automatic power off function”
(page 28)
Menu Settings
Language
“3-2. Setting Language” (page 19)
Menu Position
“3-3. Changing Adjustment Menu Display Position”
(page 19)
Tools
Input
“To switch among input signals” (page 34)
Input Selection
“To set input signal selection” (page 34)
Auto Sharpness
“2-5. Enabling / Disabling Auto Sharpness” (page 18)
Signal Info
“7-2. Displaying monitor information” (page 35)
Monitor Info
All Reset
“3-9. Return To Default Setting” (page 23)
*1 Depending on which display mode has been applied to the product, the adjustable items under “Color”
may vary.
*2 Adjustments are not possible in the three ECDIS Standard compatible modes (Day, Dusk, Night).
Attention
• Display Mode has three ECDIS Standard compatible modes (Day, Dusk, Night) and a mode where you can
make settings of your choice (Custom). However, the Display Mode cannot be changed using the monitor.
Changes can be made on the system side.

11
Chapter 2 Adjusting Screens
Chapter 2 Adjusting Screens
2-1. Setting the Resolution
●
Display resolution
For details on compatible resolutions, refer to “Compatible Resolutions” in the Setup Manual.
●
Setting resolution
When you connect the monitor to the PC and nd that the resolution is improper, or when you want to
change the resolution, follow the procedure below.
Windows 10
1. Right-click the mouse anywhere on the desktop except for icons.
2. From the displayed menu, click “Display Settings”.
3. On the “Customize your display” dialog box, click “Advanced display settings”.
4. Select a monitor, then choose a resolution from the “Resolution” pull-down menu.
5. Click the “Apply” button.
6. When a conrmation dialog box is displayed, click “Keep changes”.
Windows 8.1 / Windows 7
1. For Windows 8.1
/ Windows 8, click the “Desktop” tile on the Start Screen to display the desktop.
2. Right-click the mouse anywhere on the desktop except for icons.
3. From the displayed menu, click “Screen resolution”.
4. On the “Screen Resolution” dialog box, select the monitor.
5. Click “Resolution” to select the desired resolution.
6. Click the “OK” button.
7. When a conrmation dialog box is displayed, click “Keep changes”.
Windows XP
1. Right-click the mouse anywhere on the desktop except for icons.
2. From the displayed menu, click “Properties”.
3. When the “Display Properties” dialog box is displayed, click the “Settings” tab and select desired
resolution for “Screen resolution” under “Display”.
4. Click the “OK” button to close the dialog box.
Mac OS X
1. Select “System Preferences” from the Apple menu.
2. When the “System Preferences” dialog box is displayed, click “Displays” for “Hardware”.
3. On the displayed dialog box, select the “Display” tab and select desired resolution in the
“Resolutions” eld.
4. Your selection will be reected immediately. When you are satised with the selected resolution,
close the window.

12
Chapter 2 Adjusting Screens
2-2. Displaying Screen Correctly
●
Digital Signal Input
When digital signals are input, images are displayed correctly based on the preset data of the monitor.
When performing advanced adjustment, see “2-3. Adjusting Color” (page 15) and subsequent pages.
●
Analog Signal Input
Attention
• It takes about 30 minutes for the performance of electrical parts to stabilize. Please wait 30 minutes or more
after the monitor power has been turned on, and then adjust the monitor.
• The self adjustment function does not work for the images under the vertical resolution of 480 or less.
• The self adjustment and auto adjustment functions work correctly when an image is fully displayed over the
Windows or Macintosh display area. They do not work properly in the cases below:
- When an image is displayed only on a part of the screen (command prompt window, for example)
- When a black background (wallpaper, etc.) is in use
Also, these functions cannot work properly in some graphic boards.
The monitor screen adjustment is used to suppress ickering of the screen or adjust screen position
and screen size correctly according to the PC to be used.
Note
• The self adjustment function works when all of the following conditions are satised:
- When a signal is input into the monitor for the rst time or when a resolution or vertical / horizontal scan
frequency not used before is set
If the screen is not displayed correctly even after performing the self adjustment operation, adjust the
screen according to the procedures on the following pages to use the monitor comfortably.

13
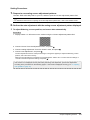
Chapter 2 Adjusting Screens
Setting Procedures
1.
Prepare to use analog screen adjustment patterns.
Load the “EIZO LCD Utility Disk” to your PC, and then open the “Screen adjustment pattern les”.
Note
• For details and instructions on opening the “Screen adjustment pattern les”, refer to the Readme.txt le.
2.
Perform the auto adjustment with the analog screen adjustment pattern displayed.
●
Toadjustickering,screenposition,andscreensizeautomatically
Procedure
1. Display Pattern 1 in full screen on the monitor using the “Screen adjustment pattern les”.
2. Choose “Screen” from the Adjustment menu, and press .
3. Choose “Analog Adjustment” from the “Screen” menu, and press
.
4. Choose “Auto Adjustment”, and press
.
The auto adjustment function works (the message “In Progress” appears) to adjust the ickering, screen
position, and screen size correctly.
When the auto adjustment is completed, a message appears. Select “OK” to conrm the new settings or
“Cancel”to restore the previous settings, and press
.
If the screen is not displayed correctly even after performing auto adjustment, perform the adjustments
according to the procedures on the following pages. If the screen is displayed correctly, go to “4. Adjusting
color gradation.” (page 15).

14
Chapter 2 Adjusting Screens
3.
Perform advanced adjustments for the following using “Analog Adjustment” of
“Screen”.
Adjust the clock, phase and position, in this order.
●
To eliminate vertical bars
Procedure
1. Choose “Clock” from the “Analog Adjustment” menu, and press
.
2. Adjust the clock with
or to eliminate vertical bars.
Press
or
slowly so as not to miss the adjustment point.
3. Press to exit the adjustment.
When blurring, ickering or bars appear on the screen after adjustment, proceed to “To remove ickering or
blurring” to remove ickering or blurring.
●
Toremoveickeringorblurring
Procedure
1. Choose “Phase” from the “Analog Adjustment” menu, and press
.
2. Adjust the phase with
or to minimize ickering or blurring.
3. Press
to exit the adjustment.
Attention
• Flickering or blurring may not be eliminated depending on your PC or graphics board.
●
To correct the screen position
Note
• Since the number of pixels and the pixel positions are xed on the LCD monitor, only one position is provided
to display images correctly. The position adjustment is made to shift an image to the correct position.
Procedure
1. Choose “Hor.Position” or “Ver.Position” from the “Analog Adjustment” menu, and press
.
2. Adjust the position with
or .
3. Press
to exit the adjustment.
When vertical bars appear on the screen after adjustment, go back to “To eliminate vertical bars”. (Clock →
Phase → Position)
4. Close Pattern 1.

15
Chapter 2 Adjusting Screens
4.
Adjusting color gradation.
●
To adjust color gradation automatically
Every color gradation (0 to 255) can be displayed by adjusting the signal output level.
Procedure
1. Display Pattern 2 in full screen on the monitor using the “Screen adjustment pattern les”.
2. Choose “Screen” from the Adjustment menu, and press .
3. Choose “Analog Adjustment” from the “Screen” menu, and press
.
4. Choose “Range Adjustment” from the “Analog Adjustment” menu, and press
.
The color gradation is adjusted automatically.
When the auto adjustment is completed, a message appears. Select “OK” to conrm the new settings or
“Cancel” to restore the precious settings, and press
.
5. Close Pattern 2.
2-3. Adjusting Color
Attention
• It takes about 30 minutes for the performance of electrical parts to stabilize. Please wait 30 minutes or more after
the monitor power has been turned on, and then adjust the monitor.
• The same image may be seen in different colors on multiple monitors due to their monitor-specic characteristics.
Make ne color adjustment visually when matching colors on multiple monitors.
Note
• The values shown in “%” or “K” are available only as reference.
●
Adjusting brilliance (brightness)
The screen brightness is adjusted by changing the brightness of the backlight (light source from the
LCD back panel).
Adjustable range
1 to 100% when “Backlight Off Mode” is set to “Off” (page 21)
0 to 100% when “Backlight Off Mode” is set to “On” (page 21)
(When the lower limit value (0%) is set, tthe backlight is turned off to darken the screen.)
Procedure
1. Choose “Color” from the Adjustment menu, and press
.
2. Choose “brilliance” from “Color”, and press
.
3. Use
or for adjustment.
4. Press
to exit.
Note
• The brightness can be set by directly pressing
or
(For the setting value, please display and check “Color”.)
• When adjusting brilliance by long pressing or , adjustment terminates when the default setting is
reached. You can continue adjustment by pressing
or again (When “ECDIS indicator” is “ON”, and the
monitor Display Mode is set to “Day”, “Dusk”, “Night”.)

16
Chapter 2 Adjusting Screens
●
To adjust color temperature
The color temperature can be adjusted.
The color temperature is normally used to express the hue of “White” and/or “Black” by a numerical
value. The value is expressed in degrees “K” (Kelvin).
The screen becomes reddish at a low color temperature, and bluish at a high color temperature, like
the ame temperature. The gain preset values are set for each color temperature setting value.
Adjustable range
Native, 4000K-10000K (specied by every 500K unit, including 9300K)
Procedure
1. Choose “Color” from the Adjustment menu, and press
.
2. Choose “Temperature” from “Color”, and press
.
3. Use
or for adjustment.
4. Press
to exit.
Note
• “Gain” allows you to perform more advanced adjustment (see “To adjust gain” (page 17)).
• If you set “Native”, the image is displayed in the preset color of the monitor (Gain: 100% for each RGB).
• When gain is changed, the color temperature is changed to “User”.
●
To adjust gamma
Gamma can be adjusted. The brightness of the monitor varies depending on the input signal,
however, the variation rate is not proportional to the input signal. To keep the balance between the
input signal and the brightness of the monitor is called as “Gamma correction”.
Adjustable range
1.8, 2.0, 2.2, 2.4, 2.6
Procedure
1. Choose “Color” from the Adjustment menu, and press
.
2. Choose “Gamma” from “Color”, and press
.
3. Use
or for adjustment.
4. Press
to exit.
●
To adjust hue
This function allows you to adjust the hue.
Adjustable range
-100 to 100
Procedure
1. Choose “Color” from the Adjustment menu, and press
.
2. Choose “Advanced Settings” from “Color”, and press
.
3. Choose “Hue”, and press
.
4. Use
or for adjustment.
5. Press
to exit.
Attention
• Using this function may make some color gradations unavailable for display.

17
Chapter 2 Adjusting Screens
●
To adjust color saturation
This function allows you to adjust color saturation.
Adjustable range
-100 to 100
Procedure
1. Choose “Color” from the Adjustment menu, and press
.
2. Choose “Advanced Settings” from “Color”, and press
.
3. Choose “Saturation”, and press
.
4. Use
or for adjustment.
5. Press
to exit.
Attention
• Using this function may make some color gradations unavailable for display.
Note
• The minimum value (-100) changes the screen to monochrome.
●
To enhance outline of image
OutlineEnhancer functions to emphasize outline of the images by emphasizing the color difference
between pixels composing the images. This may improve the texture of the material and its feel of the
images. On the contrary, it also functions to reproduce the images smoothly by gradating its outline.
Procedure
1. Choose “Color” from the Adjustment menu, and press
.
2. Choose “Advanced Settings” from “Color”, and press
.
3. Choose “Outline Enhancer”, and press
.
4. Select the display status in the range from -3 to 3 (soft to sharp) with
or as desired.
5. Press
to exit.
●
To adjust gain
The brightness of each color component red, green, and blue is called “Gain”. You can change the
hue of “white” by adjusting gain.
Adjustable range
0 to 100%
Procedure
1. Choose “Color” from the Adjustment menu, and press
.
2. Choose “Advanced Settings” from “Color”, and press
.
3. Choose “Gain”, and press
.
4. Choose the color to adjust from “Red”, “Green”, and “Blue”, and then press
.
5. Use
or for adjustment.
6. Press
to exit.
Attention
• Using this function may make some color gradations unavailable for display.
Note
• The value of gain changes with that of color temperature.
• When gain is changed, the color temperature is changed to “User”.

18
Chapter 2 Adjusting Screens
2-4. Selecting Screen Size
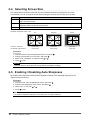
The image with the resolution other than the recommended resolution is displayed in full screen
automatically. You can change the screen size by using the “Screen Size” function from “Screen”.
Setting Function
Full Displays an image in full screen. Images are distorted in some cases because the vertical rate is not
equal to the horizontal rate.
Enlarged Displays an image in full screen. In some cases, a blank horizontal or vertical border appears to
equalize the vertical rate and the horizontal rate.
Normal Displays images with the specied resolution.
Example: Image size 1024 × 768
Full Enlarged Normal
FDS1904 / FDS1904T: (1280×1024) (1280×960) (1024×768)
FDU2603W / FDU2603WT: (1920×1200) (1600×1200) (1024×768)
Procedure
1. Choose “Screen” from the Adjustment menu, and press
.
2. Choose “Screen Size” from “Screen”, and press
.
3. Select “Full”, “Enlarged”, or “Normal” with
or .
4. Press
to exit.
Attention
• Selecting “Normal” may make some color gradations unavailable for display.
2-5. Enabling / Disabling Auto Sharpness
By enabling Auto Sharpness outlines will be adjusted according to the displayed image which can
improve its feel and texture.
Procedure
1. Choose “Tools” from the Adjustment menu, and press
.
2. Choose “Auto Sharpness” from “Tools”, and press
.
3. Select “On” or “Off” with
or .
4. Press
to exit.
Note
• The extent of adjustment depends on the setting value of “Outline Enhancer”.

19
Chapter 3 Setting Monitor
Chapter 3 Setting Monitor
3-1. Setting Brightness of Front Button
The brightness of the front buttons (control button and power button) can be set.
Attention
• They are set to light up under the following condition, and are set to “4” by default.
- Power button: When the power cord is connected to the power outlet.
- Control button: When the power button is turned on.
Procedure
1. Choose “PowerManager” from the Adjustment menu, and press
.
2. Choose “Indicator” from “PowerManager”, and press
.
3. Set the brightness so it is in the range from 1 to 7 with
or as desired.
4. Press
to exit.
3-2. Setting Language
This function allows you to select a language for the Adjustment menu and messages.
Selectable languages
English,German,French,Spanish,Italian,Swedish,Japanese,Simplied Chinese,Traditional Chinese
Procedure
1. Choose “Menu Settings” from the Adjustment menu, and press
.
2. Choose “Language” from “Menu Settings”, and press
.
3. Select a language with
or .
4. Press
to exit.
3-3. Changing Adjustment Menu Display Position
You can change the display position of the Adjustment menu.
Procedure
1. Choose “Menu Settings” from the Adjustment menu, and press
.
2. Choose “Menu Position” from “Menu Settings”, and press
.
3. Choose the position with
or .
4. Press
to exit.

20
Chapter 3 Setting Monitor
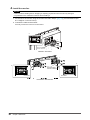
3-4. Setting the Adjustment Menu orientation
When the monitor is set to the portrait display mode, the orientation of the Adjustment Menu can be
changed as well.
Default setting: Landscape
Procedure
1. Press
for ve seconds or more to turn off the monitor.
2. Holding
down, press for at least two seconds to turn on the monitor.
The “Optional Settings” menu appears.
3. Choose “Orientation” from “Optional Settings”, and press .
4. Select “Landscape” or “Portrait” with
or , and press .
5. Select “Finish” with
or .
6. Press
.
The “Optional Settings” menu is closed.
Note
• When using the monitor screen in a portrait position, the graphics board supporting portrait display is
required. When placing the monitor in a portrait position, the settings of your graphics board need to be
changed. Refer to the User’s Manual of the graphics board for details.
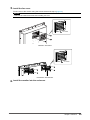
3-5. Enabling / Disabling DDC/CI communication
This function allows you to enable / disable the DDC/CI communication.
Procedure
1. Press
for ve seconds or more to turn off the monitor.
2. Holding
down, press for at least two seconds to turn on the monitor.
The “Optional Settings” menu appears.
3. Choose “DDC/CI” from “Optional Settings”, and press .
4. Select “On” or “Off” with
or , and press .
5. Select “Finish” with
or .
6. Press
.
The “Optional Settings” menu is closed.
Pagina se încarcă ...
Pagina se încarcă ...
Pagina se încarcă ...
Pagina se încarcă ...
Pagina se încarcă ...
Pagina se încarcă ...
Pagina se încarcă ...
Pagina se încarcă ...
Pagina se încarcă ...
Pagina se încarcă ...
Pagina se încarcă ...
Pagina se încarcă ...
Pagina se încarcă ...
Pagina se încarcă ...
Pagina se încarcă ...
Pagina se încarcă ...
Pagina se încarcă ...
Pagina se încarcă ...
Pagina se încarcă ...
Pagina se încarcă ...
Pagina se încarcă ...
Pagina se încarcă ...
Pagina se încarcă ...
Pagina se încarcă ...
Pagina se încarcă ...
Pagina se încarcă ...
Pagina se încarcă ...
Pagina se încarcă ...
Pagina se încarcă ...
Pagina se încarcă ...
Pagina se încarcă ...
Pagina se încarcă ...
Pagina se încarcă ...
Pagina se încarcă ...
Pagina se încarcă ...
Pagina se încarcă ...
Pagina se încarcă ...
Pagina se încarcă ...
-
 1
1
-
 2
2
-
 3
3
-
 4
4
-
 5
5
-
 6
6
-
 7
7
-
 8
8
-
 9
9
-
 10
10
-
 11
11
-
 12
12
-
 13
13
-
 14
14
-
 15
15
-
 16
16
-
 17
17
-
 18
18
-
 19
19
-
 20
20
-
 21
21
-
 22
22
-
 23
23
-
 24
24
-
 25
25
-
 26
26
-
 27
27
-
 28
28
-
 29
29
-
 30
30
-
 31
31
-
 32
32
-
 33
33
-
 34
34
-
 35
35
-
 36
36
-
 37
37
-
 38
38
-
 39
39
-
 40
40
-
 41
41
-
 42
42
-
 43
43
-
 44
44
-
 45
45
-
 46
46
-
 47
47
-
 48
48
-
 49
49
-
 50
50
-
 51
51
-
 52
52
-
 53
53
-
 54
54
-
 55
55
-
 56
56
-
 57
57
-
 58
58


în alte limbi
- English: Eizo FDS1904 User manual
Lucrări conexe
-
Eizo FDS1782T Manual de utilizare
-
-
-
Eizo FDF2382WT Manual de utilizare
-
-
-
Eizo MDU5501WT Manual de utilizare
-
-
Eizo S1933 Manual de utilizare
-