Hikoki CS3630DC Manual de utilizare
- Categorie
- Ferăstraie cu lanț fără fir
- Tip
- Manual de utilizare
Acest manual este potrivit și pentru

CS 3625DC ∙ CS 3630DC
en
de
fr
it
nl
es
pt
sv
da
no
fi
el
pl
hu
cs
tr
ro
sl
sk
bg
sr
hr
pt
sv
da
no
fi
sl
sk
bg
sr
hr
Handling instructions
Bedienungsanleitung
Mode d’emploi
Istruzioni per l’uso
Gebruiksaanwijzing
Instrucciones de manejo
Instruções de uso
Bruksanvisning
Brugsanvisning
Bruksanvisning
Käyttöohjeet
Οδηγίες χειρισμού
Instrukcja obsługi
Kezelési utasítás
Návod k obsluze
Kullanım talimatları
Instrucţiuni de utilizare
Navodila za rokovanje
Pokyny na manipuláciu
Инструкция за експлоатация
Uputstvo za rukovanje
Upute za rukovanje
en
de
fr
it
nl
es
el
pl
hu
cs
tr
ro
CS3630DC

2
1
AC
G
E
I
B
D
H
F
K M
L
J
O
N
PQR2
345
6 7

3
8 9
10
11 12
13 14 15
0.5–
1 mm

4
16 17
18 19 20
21 22 23
24 25 26

5
27 28 29
30 31 32
33 34
35 36 37

6
38 39 40
41 42
43

7
English
(Original instructions)
SYMBOLS
WARNING
The following show symbols used for the machine.
Be sure that you understand their meaning before
use.
CS3625DC / CS3630DC: Cordless Chain Saw
To reduce the risk of injury, user must read
instruction manual.
Do not use a power tool in the rain and
moisture or leave it outdoors when it is raining.
Only for EU countries
Do not dispose of electric tools together with
household waste material!
In observance of European Directive
2012/19/EU on waste electrical and electronic
equipment and its implementation in
accordance with national law, electric tools
that have reached the end of their life must
be collected separately and returned to an
environmentally compatible recycling facility.
Read, understand and follow all warnings and
instructions in this manual and on the unit.
Always wear eye, head and ear protectors
when using this unit.
Beware of chain saw kickback and avoid
contact with bar tip.
Always use chain saw two-handed.
It is important that you wear the protective
clothing for feet, legs, hands, fore-arms and
head.
This chain saw is for use by trained tree service
operator only. Use without proper training can
result in severe injuries.
Chain oil delivery rate adjustment
Disconnect the battery
WHAT IS WHAT? (Fig. 1)
A: Battery (sold separately): Power source to drive the
unit.
B: Switch: Device activated by the fi nger.
C: Lock-off lever: Lever that prevents the accidental
operation of the trigger.
D: Chain brake: Device for stopping or locking the saw
chain.
E: Side cover: Protective cover to the guide bar, saw
chain, clutch and sprocket when the chain saw is in
use.
F: Nut: Nut for securing side cover.
G: Tensioning screw: Device for adjusting tension of saw
chain.
H: Front handle: Support handle located at or towards the
front of the main body.
I: Rear handle (Top handle): Support handle located on
the rear of the main body.
J: Saw chain: Chain, serving as a cutting tool.
K: Guide bar: The part that supports and guides the saw
chain.
L: Spiked bumper: Device for acting as a pivot when in
contact with a tree or log.
M: Oil tank cap: Cap for closing the oil tank.
N: Oil sight glass: Window to check chain oil amount.
O: Hook: Tool for hanging the unit with rope etc.
P: Oil feeder: Container for oil.
Q: Chain case: Case for covering the guide bar and saw
chain when the unit is not being used.
R: Combi box spanner: The tool for removing or installing
a side cover and tensioning the saw chain.
WARNING
This chain saw (CS3625DC / CS3630DC) is
designed especially for tree care and surgery. Only
persons trained in tree care and surgery may use
this saw. Observe all literature, procedures and
recommendations from the relevant professional
organization. Failure to do so constitutes a high
accident risk. We recommend always using a rising
platform for sawing in trees. Rappelling techniques
are extremely dangerous and require special training.
The operator must be trained in and familiar with the
use of safety equipment and working and climbing
techniques. Always use the restraining equipment
for both the operator and the saw.
GENERAL POWER TOOL SAFETY
WARNINGS
WARNING
Read all safety warnings, instructions, illustrations
and specifi cations provided with this power tool.
Failure to follow all instructions listed below may result in
electric shock, fi re and/or serious injury.
Save all warnings and instructions for future
reference.
The term “power tool” in the warnings refers to your
mains-operated (corded) power tool or battery-operated
(cordless) power tool.
1) Work area safety
a) Keep work area clean and well lit.
Cluttered or dark areas invite accidents.
b) Do not operate power tools in explosive
atmospheres, such as in the presence of
fl ammable liquids, gases or dust.
Power tools create sparks which may ignite the dust
or fumes.

8
English
c) Keep children and bystanders away while
operating a power tool.
Distractions can cause you to lose control.
2) Electrical safety
a) Power tool plugs must match the outlet.
Never modify the plug in any way.
Do not use any adapter plugs with earthed
(grounded) power tools.
Unmodifi ed plugs and matching outlets will reduce
risk of electric shock.
b) Avoid body contact with earthed or grounded
surfaces, such as pipes, radiators, ranges and
refrigerators.
There is an increased risk of electric shock if your
body is earthed or grounded.
c) Do not expose power tools to rain or wet
conditions.
Water entering a power tool will increase the risk of
electric shock.
d) Do not abuse the cord. Never use the cord for
carrying, pulling or unplugging the power tool.
Keep cord away from heat, oil, sharp edges or
moving parts.
Damaged or entangled cords increase the risk of
electric shock.
e) When operating a power tool outdoors, use an
extension cord suitable for outdoor use.
Use of a cord suitable for outdoor use reduces the
risk of electric shock.
f) If operating a power tool in a damp location
is unavoidable, use a residual current device
(RCD) protected supply.
Use of an RCD reduces the risk of electric shock.
3) Personal safety
a) Stay alert, watch what you are doing and use
common sense when operating a power tool.
Do not use a power tool while you are tired
or under the infl uence of drugs, alcohol or
medication.
A moment of inattention while operating power
tools may result in serious personal injury.
b) Use personal protective equipment. Always
wear eye protection.
Protective equipment such as a dust mask, non-
skid safety shoes, hard hat or hearing protection
used for appropriate conditions will reduce
personal injuries.
c) Prevent unintentional starting. Ensure the
switch is in the off -position before connecting
to power source and/or battery pack, picking
up or carrying the tool.
Carrying power tools with your fi nger on the switch
or energising power tools that have the switch on
invites accidents.
d) Remove any adjusting key or wrench before
turning the power tool on.
A wrench or a key left attached to a rotating part of
the power tool may result in personal injury.
e) Do not overreach. Keep proper footing and
balance at all times.
This enables better control of the power tool in
unexpected situations.
f) Dress properly. Do not wear loose clothing or
jewellery. Keep your hair and clothing away
from moving parts.
Loose clothes, jewellery or long hair can be caught
in moving parts.
g) If devices are provided for the connection of
dust extraction and collection facilities, ensure
these are connected and properly used.
Use of dust collection can reduce dust-related
hazards.
h) Do not let familiarity gained from frequent use
of tools allow you to become complacent and
ignore tool safety principles.
A careless action can cause severe injury within a
fraction of a second.
4) Power tool use and care
a) Do not force the power tool. Use the correct
power tool for your application.
The correct power tool will do the job better and
safer at the rate for which it was designed.
b) Do not use the power tool if the switch does not
turn it on and off .
Any power tool that cannot be controlled with the
switch is dangerous and must be repaired.
c) Disconnect the plug from the power source
and/or remove the battery pack, if detachable,
from the power tool before making any
adjustments, changing accessories, or storing
power tools.
Such preventive safety measures reduce the risk of
starting the power tool accidentally.
d) Store idle power tools out of the reach of
children and do not allow persons unfamiliar
with the power tool or these instructions to
operate the power tool.
Power tools are dangerous in the hands of untrained
users.
e) Maintain power tools and accessories. Check
for misalignment or binding of moving parts,
breakage of parts and any other condition that
may aff ect the power tool’s operation.
If damaged, have the power tool repaired
before use.
Many accidents are caused by poorly maintained
power tools.
f) Keep cutting tools sharp and clean.
Properly maintained cutting tools with sharp cutting
edges are less likely to bind and are easier to
control.
g) Use the power tool, accessories and tool bits
etc. in accordance with these instructions,
taking into account the working conditions and
the work to be performed.
Use of the power tool for operations diff erent
from those intended could result in a hazardous
situation.
h) Keep handles and grasping surfaces dry,
clean and free from oil and grease.
Slippery handles and grasping surfaces do not
allow for safe handling and control of the tool in
unexpected situations.
5) Battery tool use and care
a) Recharge only with the charger specifi ed by
the manufacturer.
A charger that is suitable for one type of battery
pack may create a risk of fi re when used with
another battery pack.
b) Use power tools only with specifi cally
designated battery packs.
Use of any other battery packs may create a risk of
injury and fi re.
c) When battery pack is not in use, keep it away
from other metal objects, like paper clips,
coins, keys, nails, screws or other small metal
objects, that can make a connection from one
terminal to another.
Shorting the battery terminals together may cause
burns or a fi re.

9
English
d) Under abusive conditions, liquid may be
ejected from the battery; avoid contact. If
contact accidentally occurs, fl ush with water. If
liquid contacts eyes, additionally seek medical
help.
Liquid ejected from the battery may cause irritation
or burns.
e) Do not use a battery pack or tool that is
damaged or modifi ed.
Damaged or modifi ed batteries may exhibit
unpredictable behaviour resulting in fi re, explosion
or risk of injury.
f) Do not expose a battery pack or tool to fi re or
excessive temperature.
Exposure to fi re or temperature above 130°C may
cause explosion.
g) Follow all charging instructions and do
not charge the battery pack or tool outside
the temperature range specifi ed in the
instructions.
Charging improperly or at temperatures outside
the specifi ed range may damage the battery and
increase the risk of fi re.
6) Service
a) Have your power tool serviced by a qualifi ed
repair person using only identical replacement
parts.
This will ensure that the safety of the power tool is
maintained.
b) Never service damaged battery packs.
Service of battery packs should only be performed
by the manufacturer or authorized service
providers.
PRECAUTION
Keep children and infi rm persons away.
When not in use, tools should be stored out of reach
of children and infi rm persons.
CORDLESS CHAIN SAW SAFETY
WARNINGS
1) General chain saw safety warnings
a) This chain saw is not intended for tree felling.
Use of the chain saw for operations diff erent than
intended could result in serious injury to the operator or
bystanders.
b) The operator must be trained in safe climbing
techniques and in the use of all recommended
additional safety equipment, such as harness,
loops, straps, rope and karabiners, and other
fall arrest systems for the operator and the saw.
Establishing a secure location in the tree at each
working position is essential to avoid a hazardous
situation.
c) Wear eye protection, ear protection and protective
equipment for head, forearms, hands, legs and feet
that is suitable for tree climbing. Adequate protective
equipment will reduce personal injury from fl ying debris
or accidental contact with the saw chain.
d) Cut wood only. Do not use chain saw for purposes
not intended. For example: do not use chain saw
for cutting metal, plastic, masonry or non-wood
building materials. Use of the chain saw for operations
diff erent than intended could result in a hazardous
situation.
e) Always hold the chain saw with your right hand
on the rear handle and your left hand on the front
handle. Holding the chain saw with a reversed hand
confi guration increases the risk of personal injury and
should never be done.
f) Hold the chain saw by insulated gripping surfaces
only, because the saw chain may contact hidden
wiring. Saw chains contacting a "live" wire may make
exposed metal parts of the chain saw "live" and could
give the operator an electric shock.
g) Keep all parts of the body away from the saw chain
when the chain saw is operating. Before you start
the chain saw, make sure the saw chain is not
contacting anything. A moment of inattention while
operating chain saws may cause entanglement of your
clothing or body with the saw chain.
h) When cutting a limb that is under tension, be alert
for spring back. When the tension in the wood fi bres
is released, the spring loaded limb may strike the
operator and/or throw the chain saw out of control.
i) Use extreme caution when cutting thin branches.
The slender material may catch the saw chain and be
whipped toward you or pull you off balance.
j) Follow all instructions when clearing jammed
material, storing or servicing the chain saw.
Make sure the switch is off and the battery pack
is removed. Unexpected actuation of the chain saw
while clearing jammed material or servicing may result
serious personal injury.
k) Carry the chain saw by the front handle with the
chain saw switched off and away from your body.
When transporting or storing the chain saw, always
fi t the guide bar cover. Proper handling of the chain
saw will reduce the likelihood of accidental contact with
the moving saw chain.
l) Follow instructions for lubricating, chain tensioning
and changing the bar and chain. Improperly
tensioned or lubricated chain may either break or
increase the chance for kickback.
2) Causes and operator prevention of kickback:
Kickback may occur when the nose or tip of the guide
bar touches an object, or when the wood closes in and
pinches the saw chain in the cut. (Fig. 2)
Tip contact in some cases may cause a sudden reverse
reaction, kicking the guide bar up and back towards the
operator.
Pinching the saw chain along the top of the guide
bar may push the guide bar rapidly back towards the
operator.
Either of these reactions may cause you to lose control
of the saw which could result in serious personal
injury. Do not rely exclusively upon the safety devices
built into your saw. As a chain saw user, you should
take several steps to keep your cutting jobs free from
accident or injury.
Kickback is the result of machine misuse and/or
incorrect operating procedures or conditions and can
be avoided by taking proper precautions as given
below:
a) Maintain a fi rm grip, with thumbs and fi ngers
encircling the chain saw handles, with both hands
on the saw and position your body and arm to allow
you to resist kickback forces. (Fig. 3) Kickback
forces can be controlled by the operator, if proper
precautions are taken. Do not let go of the chain saw.
b) Do not overreach. This helps prevent unintended tip
contact and enables better control of the chain saw in
unexpected situations.
c) Only use replacement guide bars and saw chains
specifi ed by the manufacturer. Incorrect replacement
guide bars and saw chains may cause chain breakage
and/or kickback.
d) Follow the manufacturer’s sharpening and
maintenance instructions for the saw chain.
Decreasing the depth gauge height can lead to
increased kickback.

10
English
ADDITIONAL SAFEY WARNINGS
1. Work without pressure. In addition, always keep your
body warm.
2. Keep all parts of the body away from the saw chain
when the chain saw is operating.
3. Before commencing work, refl ect fully on the work
procedures involved and work to avoid accidents,
otherwise injury may occur.
4. Do not use in the event of bad weather, such as strong
wind, rain, snow, fog, or in areas prone to rockfall or
avalanches.
In bad weather, judgment may be impaired and the
vibration may result in disaster.
5. When visibility is poor, such as during bad weather or
night, do not use the unit. In addition, do not use it in
rain or in a location exposed to rain.
Unstable foothold or loss of balance may result in an
accident.
6. Check the guide bar and saw chain before starting the
unit.
○ If the guide bar or saw chain is cracked, or the product
is scratched or bent, do not use the unit.
○ Check if the guide bar and saw chain are securely
installed. If the guide bar or saw chain is broken or
dislodged, this may result in an accident.
7. Before starting work, check to ensure the switch does
not engage unless the lock-off lever is pressed.
If the unit does not working properly, immediately stop
using and request repair from your HiKOKI Authorized
Service Center.
8. Install the saw chain properly, in accordance with the
instruction manual.
If installed incorrectly, the saw chain will come off the
guide bar and injury may occur.
9. Never remove any of the safety devices equipped on
the chain saw (chain brake, lock-off lever, chain catcher
etc.).
In addition, do not alter or immobilize them.
Injury may occur.
10. In the following cases, switch the unit off and ensure
the saw chain is no longer moving:
○ When not in use.
○ When shifting to a new work location.
○ When inspecting, adjusting or replacing the saw chain,
guide bar, chain case and any other part.
○ When refi lling the chain oil.
○ When removing dust etc. from the body.
○ When removing obstacles, trash or sawdust generated
from work from the work area.
○ When you take off the unit, or when you get away from
the unit.
○ Otherwise, if you sense danger or anticipate risk.
If the saw chain is still moving, an accident may occur.
11. Work should generally be performed individually.
When multiple individuals are involved, ensure
suffi cient spacing between them.
12. Remain more than 15 m away from other people.
In addition, when working with multiple persons,
remain 15 m or more apart.
○ There is a risk of impact with scatters and other
accidents.
○ Prepare a whistle alert etc. and determine appropriate
contact method for other workers beforehand.
13. Before cutting standing trees, ensure the following:
○ Determine a safe evacuation location prior to cutting.
○ Remove obstacles (e.g., branches, shrubs) in advance.
14. During use, if the unit performance deteriorates, or you
notice any abnormal sound or vibration, immediately
switch off and discontinue use, and return to your
HiKOKI Authorized Service Center for inspection or
repair.
If you continue using, injury may occur.
15. If the unit is accidentally dropped or exposed to impact,
inspect carefully for damage or cracks and ensure
there is no deformation.
If the unit is damaged, cracked or deformed, injury may
occur.
16. When transporting the unit by car, secure the unit to
prevent it moving.
There is a risk of accident.
17. Do not switch the unit on while the chain case is
attached.
Injury may occur.
18. Ensure there are no nails and other foreign objects in
the material.
If the saw chain impact on the nail etc., injury may
occur.
19. To avoid the guide bar becoming entangled with the
material when chopping on a verge or when subject to
the weight of material while cutting, install a supporting
platform close to the cutting position.
If the guide bar becomes entangled, injury may occur.
20. If the unit is to be transported or stored after use, either
remove the saw chain, or attach the chain case.
If the saw chain comes into contact with your body,
injury may occur.
21. Adequately care for the unit.
○ To ensure work can be performed safely and effi ciently,
care for the saw chain to ensure it provides optimal
cutting performance.
○ When replacing the saw chain or guide bar, maintaining
the body, fi lling oil etc., follow the instruction manual.
22. Ask the shop to repair the unit.
○ Do not modify this product, since it already complies
with the applicable safety standards.
○ Always refer to your HiKOKI Authorized Service Center
for all repairs.
Attempting to repair the unit yourself may result in an
accident or injury.
23. When not using the unit, ensure it is properly stored.
Drain off the chain oil, and keep in a dry place out of
reach of children or a locked location.
24. If the warning label is no longer visible, peels off or is
otherwise unclear, apply a new warning label.
For the warning label, refer to your HiKOKI Authorized
Service Center.
25. When working, if local rules or regulations apply,
comply with the same.
26. Make sure that the battery is installed fi rmly. If it is at all
loose it could come off and cause an accident.
27. Do not use the product if the tool or the battery terminals
(battery mount) are deformed.
Installing the battery could cause a short circuit that
could result in smoke emission or ignition.
28. Keep the tool’s terminals (battery mount) free of swarf
and dust.
○ Prior to use, make sure that swarf and dust have not
collected in the area of the terminals.
○ During use, try to avoid swarf or dust on the tool from
falling on the battery.
○ When suspending operation or after use, do not leave
the tool in an area where it may be exposed to falling
swarf or dust.
Doing so could cause a short circuit that could result in
smoke emission or ignition.
29. Always use the tool and battery at temperatures
between -5°C and 40°C.

11
English
PRECAUTIONS FOR BATTERY AND
CHARGER (sold separately)
1. Always charge the battery at a temperature of
0°C–40°C. A temperature of less than 0°C will result in
over charging which is dangerous. The battery cannot
be charged at a temperature higher than 40°C.
The most suitable temperature for charging is that of
20°C–25°C.
2. Do not use the charger continuously.
When one charging is completed, leave the charger for
about 15 minutes before the next charging of battery.
3. Do not allow foreign matter to enter the hole for
connecting the rechargeable battery.
4. Never disassemble the rechargeable battery or
charger.
5. Never short-circuit the rechargeable battery.
Short-circuiting the battery will cause a great electric
current and overheat. It results in burn or damage to the
battery.
6. Do not dispose of the battery in fi re.
If the battery is burnt, it may explode.
7. Using an exhausted battery will damage the charger.
8. Bring the battery to the shop from which it was
purchased as soon as the post-charging battery life
becomes too short for practical use. Do not dispose of
the exhausted battery.
9. Do not insert objects into the air ventilation slots of the
charger.
Inserting metal objects or fl ammable into the charger
air ventilation slots will result in an electrical shock
hazard or damage to the charger.
CAUTION ON LITHIUM-ION BATTERY
To extend the lifetime, the lithium-ion battery equips with
the protection function to stop the output.
In the cases of 1 to 3 described below, when using this
product, even if you are pulling the switch, the motor may
stop. This is not the trouble but the result of protection
function.
1. When the battery power remaining runs out, the motor
stops.
In such case, charge it up immediately.
2. If the tool is overloaded, the motor may stop. In this
case, release the switch of tool and eliminate causes of
overloading. After that, you can use it again.
3. If the battery is overheated under overload work, the
battery power may stop.
In this case, stop using the battery and let the battery
cool. After that, you can use it again.
Furthermore, please heed the following warning and
caution.
WARNING
In order to prevent any battery leakage, heat generation,
smoke emission, explosion and ignition beforehand,
please be sure to heed the following precautions.
1. Make sure that swarf and dust do not collect on the
battery.
○ During work make sure that swarf and dust do not fall
on the battery.
○ Make sure that any swarf and dust falling on the power
tool during work do not collect on the battery.
○ Do not store an unused battery in a location exposed to
swarf and dust.
○ Before storing a battery, remove any swarf and dust
that may adhere to it and do not store it together with
metal parts (screws, nails, etc.).
2. Do not pierce battery with a sharp object such as a
nail, strike with a hammer, step on, throw or subject the
battery to severe physical shock.
3. Do not use an apparently damaged or deformed
battery.
4. Do not use the battery for a purpose other than those
specifi ed.
5. If the battery charging fails to complete even when a
specifi ed recharging time has elapsed, immediately
stop further recharging.
6. Do not put or subject the battery to high temperatures
or high pressure such as into a microwave oven, dryer,
or high pressure container.
7. Keep away from fi re immediately when leakage or foul
odor are detected.
8. Do not use in a location where strong static electricity
generates.
9. If there is battery leakage, foul odor, heat generated,
discolored or deformed, or in any way appears abnormal
during use, recharging or storage, immediately remove
it from the equipment or battery charger, and stop use.
10. Do not immerse the battery or allow any fl uids to fl ow
inside. Conductive liquid ingress, such as water, can
cause damage resulting in fi re or explosion. Store your
battery in a cool, dry place, away from combustible and
fl ammable items. Corrosive gas atmospheres must be
avoided.
CAUTION
1. If liquid leaking from the battery gets into your eyes,
do not rub your eyes and wash them well with fresh
clean water such as tap water and contact a doctor
immediately.
If left untreated, the liquid may cause eye-problems.
2. If liquid leaks onto your skin or clothes, wash well with
clean water such as tap water immediately.
There is a possibility that this can cause skin irritation.
3. If you fi nd rust, foul odor, overheating, discolor,
deformation, and/or other irregularities when using the
battery for the fi rst time, do not use and return it to your
supplier or vendor.
WARNING
If an electrically conductive foreign object enters the
terminals of the lithium ion battery, a short-circuit may
occur resulting in the risk of fi re. Please observe the
following matters when storing the battery.
○ Do not place electrically conductive cuttings,
nails, steel wire, copper wire or other wire in the
storage case.
○ Either install the battery in the power tool or store
by securely pressing into the battery cover until
the ventilation holes are concealed to prevent
short-circuits (See Fig. 4).
REGARDING LITHIUM-ION BATTERY
TRANSPORTATION
When transporting a lithium-ion battery, please observe
the following precautions.
WARNING
Notify the transporting company that a package contains a
lithium-ion battery, inform the company of its power output
and follow the instructions of the transportation company
when arranging transport.
○ Lithium-ion batteries that exceed a power output of
100 Wh are considered to be in the freight classifi cation
of Dangerous Goods and will require special
application procedures.
○ For transportation abroad, you must comply with
international law and the rules and regulations of the
destination country.

12
English
Power Output
2 to 3 digit number
NAMES OF PARTS (Fig. 1–Fig. 43)
Battery
(sold separately) Oil sight glass
Latch Oil pump adjuster
Ventilation holes Chain brake
Terminals Actuation
Battery cover Release
Insert Battery level indicator
switch
Pull out Battery level indicator
lamp
Lock-off lever Spike
Switch Rear handle
(Top handle)
Charge indicator lamp Front handle
Combi box spanner Round fi le
Side cover 1/5 of diameter of fi le
Nut Depth gauge jointer
Tensioning screw Flat fi le
Increase the tension Protruding depth
gauge head
Decrease the tension Round off
Saw chain Chain oil spout
Guide bar Groove
Sprocket Oil hole
Blade direction Chain catcher
Illustration showing
blade direction Battery sliding
grooves
Bolt Terminal
(Product)
Chain tensioner boss Air blow gun
Lug Terminal (Battery)
Guide bar tip Sliding grooves
Drive link Hook
Chain oil
SPECIFICATIONS
1. Power tool
Model CS3625DC CS3630DC
Voltage 36 V
Saw chain
Type 90PX-040X 90PX-045X
Pitch 9.5 mm (3/8")
Gauge 1.1 mm (0.043")
Guide bar
Type 104MLEA041 124MLEA041
Size (Max.
cutting
length) 250 mm 300 mm
Sprocket
Number of
teeth 6
Pitch 9.5 mm (3/8")
No-load chain speed 12.6 m/s (760 m/min)
Chain oil tank capacity 70 ml
Battery available for
this tool BSL36A18, BSL36B18
Weight* 2.0 kg
* Weight: Saw chain, guide bar, chain case, oil, battery
not included
NOTE
Due to HiKOKI’s continuing program of research and
development, the specifi cations herein are subject to
change without prior notice.
2. Battery (sold separetly)
Model BSL36A18
Voltage 36 V / 18 V*
Battery capacity 2.5 Ah / 5.0 Ah*
* The tool itself will automatically switch over.
STANDARD ACCESSORIES
In addition to the main unit (1 unit), the package contains
the accessories listed on page 324.
Standard accessories are subject to change without
notice.
APPLICATIONS
○ Cutting of timber/logs
○ Pruning of garden trees
CHARGING
Battery and battery charger are not included with this
product.
Before using the power tool, charge the battery as follows.
1. Connect the charger’s power cord to the
receptacle.
When connecting the plug of the charger to a
receptacle, the charge indicator lamp will blink in red
(At 1- second intervals).
2. Insert the battery into the charger.
Firmly insert the battery into the charger as shown in
Fig. 6 (on page 2).

13
English
3. Charging
When inserting a battery in the charger, the charge
indicator lamp will blink in blue.
When the battery becomes fully recharged, the charge
indicator lamp will light up in green. (See Table 1)
(1) Charge indicator lamp indication
The indications of the charge indicator lamp will be
as shown in Table 1, according to the condition of the
charger or the rechargeable battery.
Table 1
Charger
status Status of indicator
lamp Indication meaning
Before
charging
ON/OFF at 0.5 sec.
intervals (RED) Plugged into power
source *1
While
charging
Lights for 0.5 sec.
at intervals of 1 sec.
(BLUE) Charged at less
than 50%
Lights for 1 sec. at
intervals of 0.5 sec.
(BLUE) Charged at less
than 80%
Lights continuously
(BLUE) Charged at more
than 80%
Charging
complete
Lights continuously
(GREEN)
(Continuous buzzer
sound: about 6 sec.)
Overheat
standby
ON/OFF at 0.3 sec.
intervals (RED) Battery overheated.
Unable to charge. *2
Charging
impossible
ON/OFF at 0.1 sec.
intervals (PURPLE)
(Intermittent buzzer
sound; about 2 sec.)
Malfunction in
the battery or the
charger *3
*1 If the red lamp continues to blink even after the charger
has been attached, check to confi rm that the battery
has been fully inserted.
*2 Although charging will start once the battery has
cooled down even when left in situ, the best practice
is to remove the battery and allow it to cool down in a
shaded, well-ventilated location before charging.
*3
○ Fully insert the battery.
○ Check to confi rm that no foreign matter is stuck to the
battery mount or terminals.
<If charging takes a long time>
○ Charging will take longer at extremely low ambient
temperatures. Charge the battery in a warm location
(such as indoors).
○ Do not block the air vent. Otherwise the interior will
overheat, reducing the charger’s performance.
○ If the cooling fan is not operating, contact a HiKOKI
Authorized Service Center for repairs.
(2) Regarding the temperatures and charging time of the
rechargeable battery
The temperatures and charging time will become as
shown in Table 2.
Table 2
Model UC18YSL3
Type of battery Li-ion
Charging voltage 14.4–18 V
Temperatures at which the battery
can be recharged 0°C–50°C
Charging time for
battery capacity,
approx.
(At 20°C)
1.5 Ah 15 min
2.0 Ah 20 min
2.5 Ah 25 min
3.0 Ah 20 min
(BSL1430C,
BSL1830C: 30 min)
4.0 Ah 26 min
(BSL1840M: 40 min)
5.0 Ah 32 min
6.0 Ah 38 min
8.0 Ah 52 min
Multi
volt
battery
1.5 Ah (× 2 unit)
20 min
2.5 Ah (× 2 unit)
32 min
4.0 Ah (× 2 unit)
52 min
Number of battery cells 4–10
Charging voltage for USB 5 V
Charging current for USB 2 A
Weight 0.6 kg
NOTE
The recharging time may vary according to temperature
and power source voltage.
CAUTION
When the battery charger has been continuously used,
the battery charger will be heated, thus constituting
the cause of the failures. Once the charging has been
completed, give 15 minutes rest until the next charging.
4. Disconnect the charger’s power cord from the
receptacle.
5. Hold the charger fi rmly and pull out the battery.
NOTE
Be sure to pull out the battery from the charger after
use, and then keep it.
Regarding electric discharge in case of new
batteries, etc.
As the internal chemical substance of new batteries and
batteries that have not been used for an extended period
is not activated, the electric discharge might be low when
using them the fi rst and second time. This is a temporary
phenomenon, and normal time required for recharging
will be restored by recharging the batteries 2–3 times.
How to make the batteries perform longer.
(1) Recharge the batteries before they become completely
exhausted.
When you feel that the power of the tool becomes
weaker, stop using the tool and recharge its battery. If
you continue to use the tool and exhaust the electric
current, the battery may be damaged and its life will
become shorter.

14
English
(2) Avoid recharging at high temperatures.
A rechargeable battery will be hot immediately after
use. If such a battery is recharged immediately after
use, its internal chemical substance will deteriorate,
and the battery life will be shortened. Leave the battery
and recharge it after it has cooled for a while.
CAUTION
○ If the battery is charged while it is heated because it
has been left for a long time in a location subject to
direct sunlight or because the battery has just been
used, the charge indicator lamp of the charger lights
for 0.3 seconds, does not light for 0.3 seconds (off for
0.3 seconds). In such a case, fi rst let the battery cool,
then start charging.
○ When the charge indicator lamp fl ickers (at 0.2-second
intervals), check for and take out any foreign objects in
the charger’s battery connector. If there are no foreign
objects, it is probable that the battery or charger is
malfunctioning. Take it to your authorized Service
Center.
MOUNTING AND OPERATION
Action Figure Page
Removing and inserting the battery 5 2
Switch operation*172
Using the hook*219 4
Selecting accessories ―325
*1 Switch operation
When the switch is engaged while sliding the lock-off
lever, the saw chain rotates. (Fig. 7)
Unless the lock-off lever is being slid, the switch cannot
be engaged.
After the switch is engaged, the saw chain continues
rotating as long as it is pressed down.
When the switch is released, a brake is applied to stop
the saw chain rotation.
WARNING
Do not secure the lock-off lever in the slid position.
If the switch is accidentally engaged, the unit may
unexpectedly start and injury may occur.
*2 Using the hook
WARNING
When using the hook, ensure the unit is securely
suspended to avoid the risk of falling.
If the unit falls, an accident may occur.
INSTALLING (REPLACING) SAW
CHAIN
WARNING
○ To prevent accidents, always switch the unit off , and
remove the battery.
○ Don't use the saw chain or the guide bar other than
those specifi ed in “SPECIFICATIONS”.
CAUTION
Wear thick gloves and be careful to avoid injury with the
saw chain.
NOTE
○ When removing the saw chain, remove sawdust from
the oil spout, oil hole, and guide bar groove.
If sawdust accumulates, this may cause the unit to fail.
○ Use the correct type of saw chain in accordance with
the specifi cations.
If you install the wrong type of guide bar, the saw chain
may come off and injury may occur.
1. Removing the side cover (Fig. 8)
Turn the nut and remove the side cover.
2. Removing the saw chain and guide bar (Fig. 9)
Rotate the tensioning screw in the “-” direction to
introduce a small amount of slack in the saw chain,
then detach from the sprocket. Detach along with the
guide bar in the direction indicated by the arrow.
3. Engaging the new saw chain in the sprocket
(Fig. 10)
Attach the saw chain from the guide bar tip. Make sure
the saw chain is oriented so that the blade faces in the
direction shown in the illustration below the sprocket.
Insert the bolt and chain tensioner boss into the hole in
the guide bar while holding the chain and guide bar tip.
Engage the end of the saw chain to the sprocket and
mount the guide bar to the saw body.
4. Installing the side cover (Fig. 11)
Attach the side cover by inserting the lug into the slot in
the saw body. Make sure the saw chain does not come
loose from the guide bar.
Rotate the nut once to temporarily fi x it.
Remove any dirt around the side cover before
reattaching.
5. Adjusting the saw chain tension (Fig. 12)
○ While lifting the guide bar tip, turn the tensioning screw
to adjust the saw chain tension.
○ Turn the tensioning screw to the "+" to increase the saw
chain tension, and to the "-" to decrease it.
6. Checking the saw chain tension (Fig. 13)
Adjust the saw chain tension so that the gap between
the saw chain drive link and the guide bar is 0.5 to 1 mm
when you lift the saw chain slightly near the center of
the guide bar.
7. Securing the nut (Fig. 14)
When adjustment is complete, lift up the guide bar, and
fully tighten the nut.
WARNING
After adjusting the saw chain tension, ensure the nut is
fully tightened.
If it is loose, injury may occur.
INSPECTION AND PREPARATION
PRIOR TO USE
Prior to use, make the following inspection and preparation.
WARNING
○ To prevent accidents, always perform steps 1 to 3
ensuring the battery is removed from the body.
○ Do not secure the lock-off lever in the slid position.
If the switch is accidentally engaged, the unit may
unexpectedly start and injury may occur.
1. Ensuring the switch is off
○ If you insert the battery without knowing whether the
switch is engaged, the unit may unexpectedly start,
which may result in an accident.
○ When the switch is engaged while the lock-off lever is
in the slid position, the unit switches on, and when the
switch is released, the unit switches off .
2. Checking the saw chain tension
○ If the saw chain tension is incorrect, there is a risk of
damage to the saw chain or guide bar and malfunction.
Referring to steps 5 to 7 “Installing (replacing) saw
chain,” ensure an appropriate tension is set.
○ While the saw chain is still new, it is particularly
stretchy, so periodically check the tension and adjust
as required.
○ Also check the nut is securely tightened.
3. Checking the chain oil
○ This unit is delivered without chain oil inside. Ensure
the oil tank is fi lled with the chain oil provided before
use. (Fig. 15)

15
English
○ Periodically check the oil sight glass during work and
replenish oil as required.
○ If the chain oil supplied runs out, use HiKOKI chain oil
sold separately or equivalent chain oil on the market.
○ The chain oil lubricates automatically.
The discharge rate for auto lubrication is factory preset
to the maximum.
To reduce the discharge rate, turn the oil pump adjuster
on the right side of the oil sight glass clockwise.
(Fig. 16)
NOTE
○ The oil tank capacity is about 70 ml.
Make sure no oil leaks or overfl ows from the oil tank
when replenishing the chain oil.
○ We recommend that you stock up with chain oil.
If you continue working without chain oil, the saw chain
may burn through, or the motor may fail.
○ Be careful to avoid dust or other foreign matter from
entering the oil tank.
If dust and other foreign matter enter the oil tank, the
unit may fail.
○ Chain oil left in the tank may leak due to the structure of
this unit. Although this does not indicate a malfunction,
it may soil the storage location, so be careful.
When storing, empty the oil from the oil tank, and place
an item under the main body which can absorb any
leaks.
○ Replenish the oil after every approximately 10 minutes
of operation. (*Varies depending on the cutting usage
conditions)
4. Installing the battery (Fig. 5)
As shown in Fig. 5, push fi rmly until it clicks into place.
CAUTION
Securely attach the battery.
If the battery is not securely attached, it may come off
and injury may occur.
5. Checking operation of chain brake (Fig. 17)
WARNING
○ Although the chain brake is an emergency stop device,
this is not completely reliable. Operate carefully to
avoid the risk of kickback.
○ The chain brake is intended for use in emergencies and
when starting up. Do not use it indiscriminately.
○ To avoid impaired movement of the chain brake due to
buildup of sawdust etc., clean regularly.
○ The chain brake is an important component to ensure
safe use.
If you have any concern regarding the chain brake
operation, request repair from your HiKOKI Authorized
Service Center.
The chain brake is an emergency stop device that stops
the saw chain when the unit is subject to kickback etc., to
reduce risk.
(Refer to “Causes and operator prevention of kickback.”)
Push the chain brake in the direction indicated by the arrow
() to apply the chain brake and stop the saw chain. To
release the chain brake, release the switch and pull back
on the chain brake.
CAUTION
The chain brake functions only when power is turned
on. Check chain brake function in a location with no
people or obstructions nearby.
(1) Press the switch while sliding the lock-off lever.
(2) Once the saw chain begins turning, push the chain
brake forward toward the saw chain.
(3) If the saw chain stops, the chain brake is functioning as
it should. To release the brake, release the switch and
pull back on the chain brake.
6. Checking chain oil discharge (Fig. 18)
○ When switching the unit on, chain oil automatically
lubricates the saw chain and guide bar.
○ If oil does not seem to emerge 2 to 3 minutes after
the unit starts, check if any sawdust has accumulated
around the oil spout.
(Refer to “Cleaning the chain oil spout.”)
(Refer to “Checking the chain oil.”)
REMAINING BATTERY INDICATOR
You can check the battery’s remaining capacity by
pressing the remaining battery indicator switch to light the
indicator lamp. (Fig. 20, Table 3)
The indicator will shut off approximately 3 seconds after
the remaining battery indicator switch is pressed.
It is best to use the remaining battery indicator as a
guide since there are slight diff erences such as ambient
temperature and the condition of the battery.
Also, the remaining battery indicator may vary from those
equipped to a tool or charger (Battery is not included, sold
separately).
Table 3
State of
lamp Battery Remaining Power
Lights ;
The battery remaining power is over 75%.
Lights ;
The battery remaining power is 50%–75%.
Lights ;
The battery remaining power is 25%–50%.
Lights ;
The battery remaining power is less than
25%.
Blinks ;
The battery remaining power is nearly
empty. Recharge the battery soonest
possible.
Blinks ;
Output suspended due to high temperature.
Remove the battery from the tool and allow
it to fully cool down.
Blinks ;
Output suspended due to failure or
malfunction. The problem may be the
battery so please contact your dealer.
NOTE
Do not give a strong shock to the switch panel or break
it. It may lead to a trouble.
CUTTING PROCEDURES
WARNING
○ When working in trees, wear appropriate protection on
your eyes, head, hands, legs, and arms, as well as slip-
resistant foot protection.
○ Prior to operation, ensure that chain brake works.
○ During use, grip the handle securely with both hands.
(Fig. 3)
○ When cutting timber from the bottom, ensure the saw
chain does not impact with the timber.
If the unit is pushed back, injury may occur.
○ During work breaks or after work, always switch the unit
off , and remove the battery from the main body.

16
English
Always monitor the workplace and surrounding area,
ensure there are no objects which could cause injuries,
accidents or failure, and if any are present, remove them
in advance.
In particular, when establishing a foothold for working,
ensure there is no instability or any object which could be
tripped over.
Ensuring the unit is switched off
If the storage battery is inserted while the switch is
unknowingly engaged, the unit may unexpectedly
start, which may result in an accident.
Installing the battery (Fig. 5)
As shown in Fig. 5, push fi rmly until it clicks into place.
Engaging the switch
Ensuring the saw chain is not in contact with the timber,
engage the switch, and start cutting when the saw
chain speed has increased.
CAUTION
○ When switching the unit on, ensure the saw chain does
not contact with material or anything else.
○ During use, be careful to ensure the saw chain does
not contact with other material or object. In particular,
when you have fi nished cutting, be careful to ensure it
does not touch the ground.
NOTE
Refi ll the oil tank early to prevent the unit running out of
oil.
1. General cutting procedures
(1) Switch ON the power while keeping the saw slightly
away from the wood to be cut. Start sawing only after
the unit has reached full speed.
(2) When sawing a slender piece of wood, press the base
section of the guide bar against the wood and saw
downward as shown in Fig. 21.
(3) When sawing a thick piece of wood, press the spike on
the front section of the unit against the wood and cut it
with a lever action while using the spike as a fulcrum as
shown in Fig. 22.
(4) When cutting wood horizontally, turn the unit body to
the right so that the guide bar is below and hold the
upper side of the front handle with your left hand. Hold
the guide bar horizontally and place the spike that is
on the front of the unit body on the lumbar. Using the
spike as a fulcrum, cut into the wood by turning the rear
handle to the right. (Fig. 23)
(5) When cutting into wood from the bottom, touch the
upper part of the guide bar to the wood lightly. (Fig. 24)
(6) As well as carefully studying the handling instructions,
ensure practical instruction in the operation of the
chain saw prior to use, or at least practice working with
the chain saw by cutting lengths of round timber on a
sawing trestle.
(7) When cutting logs or timbers which are not supported,
support them properly by immobilizing them during
cutting using a sawing trestle or other proper method.
CAUTION
○ When cutting wood from the bottom, there is a danger
that the unit body may be pushed back toward the user
if the chain strongly impacts with the wood.
○ Do not cut all the way thorough the wood by starting
from the bottom since there is the danger of the guide
bar fl ying up out of control when the cut is fi nished.
○ Always prevent the operating chain saw from touching
the ground or wire fences.
2. Branch cutting
(1) Cutting branches from a standing tree:
A thick branch should initially be cut off at a point away
from the trunk of the tree.
First cut in about one third of the way from below, and
then cut off the branch from above. Finally, cut off the
remaining portion of the branch even with the trunk of
the tree. (Fig. 25)
CAUTION
○ Always be careful to avoid falling branches.
○ Always be alert for chain saw recoil.
(2) Cutting branches from fallen trees:
First cut off branches that do not touch the ground, then
cut off those which touch the ground. When cutting
thick branches that touch the ground, fi rst cut in about
half of the way from above, then cut the branch off from
below. (Fig. 26)
CAUTION
○ When cutting off branches which touch the ground, be
careful that the guide bar does not become bound by
pressure.
○ During the fi nal cutting stage, beware of the log
suddenly rolling.
3. Log cutting
When cutting a log positioned as shown in Fig. 27, fi rst
cut in about one third of the way from below, then cut
down all the way from above. When cutting a log that
straddles a hollow as shown in Fig. 28, fi rst cut in about
two thirds of the way from above, then cut upward from
below.
CAUTION
○ Ensure the guide bar does not become bound in the log
by pressure.
○ When working on inclined ground, be sure to stand on
the uphill side of the log. If you stand on the downhill
side, the cut-off log may roll toward you.
4. Cutting a log laid fl at
Make sure the log is stable.
Push the spike against the log. Use the spike as a
fulcrum about which the handle can be lifted to facilitate
cutting. (Fig. 29)
5. Cutting a log supported at both ends
Start by sawing to a depth of approximately one third from
the top, then saw from underneath to complete the cut.
The guide bar may become stuck within the saw cut
if you attempt to cut all the way through from the top.
(Fig. 30)
Precaution for cutting work
For large-scale operation or non-stop work
This tool comes with an over-heat protection circuit
that protects the electronic parts that control the
rechargeable battery. During sustained use or
during operations under high loads generated by
pressure against the tool, tool temperature will rise
and eventually trigger the over-heat protection circuit,
which will shut down the tool.
If this happens, let the tool cool for a length of time.
When the temperature drops, it will again become
possible to use the tool. When the rechargeable battery
has to be exchanged during continuous operation, let
the tool rest for about 15 minutes.
Gripping/pushing force of chain saw
Always grip the chain saw securely.
In addition, do not force the chain saw more than
necessary. When cutting, additional force exerted on
the chain saw will not accelerate the cutting speed.
This will strain the motor, impair the performance, and
damage or cause malfunction of the motor or guide bar.
Use the unit in the range where the saw chain is at a
reasonable speed.
In particular, when the saw chain stops (becomes
jammed) due to the excessive force, it may cause an
injury or failure of the unit.
Chain catcher
○ The chain catcher is located on the power head just
below the chain to further prevent the possibility of a
broken chain striking the chain saw user.
○ When the saw chain is cut, replace it with a new one
referring to “Installing (replacing) saw chain”.

17
English
SHARPENING OF THE CHAIN BLADE
WARNING
To prevent accidents, always turn off the switch and
remove the battery from the main body.
CAUTION
Always wear thick gloves when handling the saw chain.
NOTE
Sharpen the saw chain and adjust the depth gauge at
the central position on the guide bar, with the saw chain
attached to the main body.
When the sharpness of saw chains deteriorates, the motor
and each part of the body are burdened and the effi ciency
declines.
For optimal performance of the unit, frequent maintenance
is necessary to keep the saw chain sharp.
1. Blade sharpening
Use a 4 mm diameter round fi le.
The round fi le should be held against the chain blade
so that one-fi fth of its diameter extends above the top
of the blade, as shown in Fig. 31.
Sharpen the blades by keeping the round fi le at a 30°
angle in relation to the guide bar, as shown in Fig. 32.
File the blades by gently pushing the round fi le in the
direction of the grip.
Make sure the round fi le does not touch the saw chain
when drawing back the fi le.
Ensure that all saw blades are fi led at the same angle,
or the cutting effi ciency of the tool will be impaired.
Appropriate angles for sharpening the blades correctly
are shown in Fig. 33. (Round fi le is sold separately.)
2. Adjustment of depth gauge
WARNING
○ Do not sand the top part of the bumper tie strap and
bumper drive link, nor cause the shape of said parts to
deform.
○ Adjustment of depth gauges must be in line with the
predetermined dimensions and shapes, otherwise the
risk of kickback may increase, causing an injury.
Bumper tie strap Bumper drive link
Depth gauges shall be all lined up in the same manner
because they are used to adjust depth at the position
where the cutter inlays into the wood.
When sharpening the saw chain, be sure to check the
depth gauge every two or three times. (Fig. 34)
Place a depth gauge jointer on the saw chain, leave the
gauge visible at the groove, and use a fl at fi le to bevel
the portion out of the depth gauge jointer. (Fig. 35)
(Depth gauge jointer and fl at fi le are sold separately.)
After fi ling away the depth gauge, round off the front
side of the depth gauge as it was. (Fig. 36)
After sharpening the saw chain, place it into chain oil to
wash off the fi lings.
If fi lings are not cleaned off , the saw chain and guide
bar will quickly wear while in use.
The depth gauge jointer can also be used when
dressing with a round fi le. (Fig. 37)
MAINTENANCE AND INSPECTION
After operation, perform inspection and maintenance of
each part when storing the unit.
WARNING
During maintenance and inspection, always switch off
the unit and remove the battery from the main body.
CAUTION
Always wear thick gloves when handling the saw chain.
1. Inspection of saw chains
○ Occasionally inspect the saw chain. In the event of
any abnormality, replace it with a new one referring to
“Installing (replacing) saw chain” .
○ Inspect the chain tension and check If it is correctly
tightened.
○ Stop using the unit when the saw chain becomes blunt
and sharpen it referring to “Sharpening of the chain
blade”.
○ After use, carefully lubricate the saw chain and guide
bars with oil for rust-proofi ng.
NOTE
When cleaning the side cover, sprocket, chain oil
spout, and guide bar, see the procedure “Installing
(replacing) saw chain” and remove the saw chain.
2. Cleaning the side cover and sprocket (Fig. 38)
Clean and remove any swarf or dust left inside the
parts.
3. Cleaning the chain oil spout (Fig. 39)
Before cleaning the chain oil spout, remove the side
cover and guide bar.
4. Cleaning the guide bar (Fig. 40)
When sawdust and similar become clogged in the
groove of the guide bar or oil spout, the oil may not fl ow,
which may result in the unit failing.
Remove the guide bar and clean any sawdust clogged
in the groove after use and when replacing the saw
chain. (Refer to “Installing (replacing) saw chain.”)
5. Cleaning the chain brake (Fig. 41)
Use a brush to remove any swarf from the gap to the
saw body.
6. Inspecting the chain catcher (Fig. 42)
The chain catcher is designed to protect the operator
from being struck by the saw chain if the chain comes
loose or is severed.
The chain catcher is integrated into the side cover.
Check to confi rm that the chain catcher is not damaged.
7. Inspecting the mounting screws
Regularly inspect all mounting screws and ensure that
they are properly tightened. Should any of the screws
be loose, retighten them immediately. Failure to do so
could result in serious hazard.
8. Maintenance of the motor
The motor unit winding is the very “heart” of the power
tool.
Exercise due care to ensure the winding does not
become damaged and/or wet with oil or water.
9. Cleaning the battery installation compartment
and the battery (Fig. 43)
WARNING
Wear protective glasses and a dust mask when
cleaning with an air blow gun.
Failure to do so may result in inhalation or exposure of
the eyes to debris or dust.
Use a brush or air blow gun to remove any swarf or dust
and keep the saw clean.
NOTE
○ Allowing swarf and dust to build up during use may
cause the battery to fall off or other accidents.
Allowing swarf and dust to build up can also result in
malfunctions, including faulty contact between the
battery and the terminals.

18
English
○ After cleaning, check to confi rm that the battery can be
easily detached and reattached to the tool body.
10. Cleaning of the outside
When the chain saw is stained, wipe with a soft dry
cloth or a cloth moistened with soapy water. Do not use
chloric solvents, gasoline or paint thinner, for they melt
plastics.
11. Storage
○ Clean all parts thoroughly. Coat metal parts with a thin
layer of corrosion inhibitor.
○ Be sure to repair any damaged areas before storing.
○ When storing the unit, perform cleaning and
maintenance of each part and mount the chain case to
the guide bar.
○ Store the power tool and battery in a place in which
the temperature is less than 40°C and out of reach of
children.
NOTE
Storing Lithium-ion Batteries
Make sure the lithium-ion batteries have been fully
charged before storing them.
Prolonged storage (3 months or more) of batteries with
a low charge may result in performance deterioration,
signifi cantly reducing battery usage time or rendering
the batteries incapable of holding a charge.
However, signifi cantly reduced battery usage time may
be recovered by repeatedly charging and using the
batteries two to fi ve times.
If the battery usage time is extremely short despite
repeated charging and use, consider the batteries
dead and purchase new batteries.
CAUTION
In the operation and maintenance of power tools, the
safety regulations and standards prescribed in each
country must be observed.
Important notice on the batteries for the HiKOKI
cordless power tools
Please always use one of our designated genuine
batteries. We cannot guarantee the safety and
performance of our cordless power tool when used
with batteries other than these designated by us, or
when the battery is disassembled and modifi ed (such
as disassembly and replacement of cells or other
internal parts).
GUARANTEE
We guarantee HiKOKI Power Tools in accordance with
statutory/country specifi c regulation. This guarantee does
not cover defects or damage due to misuse, abuse, or
normal wear and tear. In case of complaint, please send
the Power Tool, undismantled, with the GUARANTEE
CERTIFICATE found at the end of this Handling instruction,
to a HiKOKI Authorized Service Center.
Information concerning airborne noise and vibration
The measured values were determined according to
EN62841 and declared in accordance with ISO 4871.
CS3625DC
Measured A-weighted sound power level: 98 dB (A)
Measured A-weighted sound pressure level: 89 dB (A)
Uncertainty K: 3 dB (A)
CS3630DC
Measured A-weighted sound power level: 98 dB (A)
Measured A-weighted sound pressure level: 88 dB (A)
Uncertainty K: 3 dB (A)
Wear hearing protection.
Vibration total values (triax vector sum) determined
according to EN62841.
CS3625DC
ah = 2.8 m/s2
Uncertainty K = 1.5 m/s2
CS3630DC
ah = 3.0 m/s2
Uncertainty K = 1.5 m/s2
The declared vibration total value and the declared noise
emission value have been measured in accordance with a
standard test method and may be used for comparing one
tool with another.
They may also be used in a preliminary assessment of
exposure.
WARNING
○ The vibration and noise emission during actual use
of the power tool can diff er from the declared total
value depending on the ways in which the tool is used
especially what kind of workpiece is processed; and
○ Identify safety measures to protect the operator that
are based on an estimation of exposure in the actual
conditions of use (taking account of all parts of the
operating cycle such as the times when the tool is
switched off and when it is running idle in addition to
the trigger time).
NOTE
Due to HiKOKI’s continuing program of research and
development, the specifi cations herein are subject to
change without prior notice.

19
English
TROUBLESHOOTING
Use the inspections in the table below if the tool does not operate normally. If this does not remedy the problem, consult
your dealer or the HiKOKI Authorized Service Center.
Symptom Possible cause Remedy
The motor sounds but the
saw chain...
○ does not move
○ does not move freely
The chain brake may be activated. Release by pulling the chain brake toward
you.
The saw chain tension is excessive. Check the saw chain tension, and if it is
too tight, loosen the tension.
Saw chain comes out of the sprocket. Check the saw chain is properly engaged
on the sprocket.
Inside the side cover...
→ sawdust is jammed
→ foreign matter is trapped
Clean the side cover.
In the guide bar groove...
→ sawdust is jammed
→ oil does not fl ow
Clean the guide bar groove and the oil
hole.
Make sure there is oil in the oil tank, and
replenish as required.
Poor sharpness The saw chain...
→ is worn out or the blade is broken
→ is rusted
Sharpen the saw chain.
If the wear or breakage is very severe,
replace with a new saw chain.
The direction of the saw chain is reversed, Re-attach ensuring the correct direction.
Saw chain tension is loose. Check the saw chain tension and tighten
if it is loose.
Chain oil
○ is slow-fl owing
○ does not come out
(seizes up)
Lack of chain oil in the tank. Replenish with chain oil.
Chain oil spout is clogged. Clean the chain oil spout.
Battery cannot be
installed. Attempting to install a battery other than
that specifi ed for the tool. Please install a multi volt type battery.

20
Deutsch (Übersetzung der Original-Gebrauchsanweisung)
SYMBOLE
WARNUNG
Die folgenden Symbole werden für diese
Maschine verwendet. Achten Sie darauf, diese vor
der Verwendung zu verstehen.
CS3625DC / CS3630DC: Akku-Kettensäge
Der Anwender muss die Bedienungsanleitung
lesen, um das Risiko einer Verletzung zu
verringern.
Verwenden Sie die Heckenschere nicht im
Regen oder bei Feuchtigkeit, und belassen sie
das Gerät bei Regen nicht im Freien.
Nur für EU-Länder
Werfen Sie Elektrowerkzeuge nicht in den
Hausmüll!
Gemäss Europäischer Richtlinie 2012/19/EU
über Elektro- und Elektronik- Altgeräte und
Umsetzung in nationales Recht müssen
verbrauchte Elektrowerkzeuge getrennt
gesammelt und einer umweltgerechaten
Wiederververtung zugeführt werden.
Lesen, verstehen und befolgen Sie alle
Warnungen und Anweisungen in dieser
Anleitung und am Gerät selbst.
Bei Gebrauch des Geräts immer Gesichts-,
Kopf- und Gehörschutz tragen.
Achten Sie auf einen möglichen Rückschlag
der Kettensäge und vermeiden Sie den
Kontakt mit der Schwertspitze.
Führen Sie die Kettensäge immer mit beiden
Händen.
Es ist wichtig, dass Sie Schutzbekleidung für
Füße, Beine, Hände, Unterarme und den Kopf
tragen.
Diese Kettensäge darf nur von geschulten
Forstarbeitern benutzt werden. Die
Verwendung ohne entsprechende Schulung
kann zu schweren Verletzungen führen.
Einstellung der Ölversorgung der Kette
Trennen Sie die Batterie ab
TEILEBEZEICHNUNGEN (Abb.1)
A Batterie (separat zu beziehen): Energiequelle für den
Antrieb des Gerätes.
B: Schalter: Das Gerät wird mit dem Finger aktiviert.
C: Entriegelungshebel: Dieser Hebel verhindert ein
unbeabsichtigtes Betätigen des Auslösers.
D: Kettenbremse: Vorrichtung zum Stoppen bzw.
Verriegeln der Sägekette.
E: Seitliche Abdeckung: Schutzabdeckung für Schwert
und Sägekette, Vorgelege und Kettenzahnrad, wenn
die Kettensäge in Benutzung ist.
F: Mutter: Mutter zur Befestigung der Seitenabdeckung.
G: Spannschraube: Vorrichtung zum Einstellen der
Spannung der Sägekette.
H: Vorderer Griff : Haltegriff an der Vorderseite des
Gerätkörpers.
I: Hinterer Griff (Oberer Griff ): Stützgriff an der Rückseite
des Hauptgehäuses.
J: Sägekette: Kette, die als Schneidewerk- zeug dient.
K: Schwert: Der Teil, der die Sägekette trägt und führt.
L: Stoßfänger mit Dorn: Diese Vorrichtung dient als
Drehpunkt, wenn sie in Berührung mit einem Baum
oder einem Baumstamm ist.
M: Öltankdeckel: Deckel zum Verschließen des Öltanks.
N: Öl-Sichtglas: Fenster zum Prüfen des Kettenölpegels.
O: Haken: Werkzeug, um das Gerät mit einem Seil usw.
aufzuhängen.
P Öleinspeisung: Ölbehälter.
Q: Kettengehäuse: Gehäuse zum Abdecken von Schwert
und Sägekette, wenn das Gerät nicht in Gebrauch ist.
R: Kombisteckschlüssel: Das Werkzeug zum Entfernen
oder Anbringen einer Seitenabdeckung und zum
Spannen der Sägekette.
WARNUNG
Diese Motorsäge (CS3625DC / CS3630DC) ist
speziell für Baump-fl ege und Baumchirurgie
vorgesehen. Alle Arbeiten mit dieser Motorsäge
dürfen nur von ausgebildeten Baumpfl egekräften
durchgeführt werden. Einschlägige Liter-atur und
Hinweise der Berufsgenos-senschaft befolgen. Bei
Nichtbeachtung besteht hohe Unfallgefahr. Zur Arbeit
mit der Motorsäge in Bäumen empfehlen wir stets
eine Arbeitsbühne einzusetzen. Die Arbeit mit der
Abseiltechnik ist extrem gefährlich und nur nach einer
speziellen Ausbildung durchzuführen. Der Bediener
muß im Umgang mit Sicherheitsausrüstungen und
mit den Ar-beitsund Klettertechniken geschult sein!
Rückhaltesysteme für Motorsäge und Bediener
anwenden.
ALLGEMEINE
SICHERHEITSHINWEISE FÜR
ELEKTROGERÄTE
WARNUNG
Bitte beachten Sie sämtliche mit diesem Elektrogerät
gelieferten Sicherheitshinweise, Anweisungen,
Illustrationen und technischen Angaben.
Wenn die nachfolgenden Anweisungen nicht befolgt
werden, kann es zu Stromschlag, Brand und/oder
ernsthaften Verletzungen kommen.
Bitte bewahren Sie alle Warnhinweise und
Anweisungen zum späteren Nachschlagen auf.
Der Begriff „Elektrowerkzeug“ bezieht sich in den
Warnhinweisen auf Elektrowerkzeuge mit Netz-
(schnurgebunden) oder Akkubetrieb (schnurlos).
Pagina se încarcă...
Pagina se încarcă...
Pagina se încarcă...
Pagina se încarcă...
Pagina se încarcă...
Pagina se încarcă...
Pagina se încarcă...
Pagina se încarcă...
Pagina se încarcă...
Pagina se încarcă...
Pagina se încarcă...
Pagina se încarcă...
Pagina se încarcă...
Pagina se încarcă...
Pagina se încarcă...
Pagina se încarcă...
Pagina se încarcă...
Pagina se încarcă...
Pagina se încarcă...
Pagina se încarcă...
Pagina se încarcă...
Pagina se încarcă...
Pagina se încarcă...
Pagina se încarcă...
Pagina se încarcă...
Pagina se încarcă...
Pagina se încarcă...
Pagina se încarcă...
Pagina se încarcă...
Pagina se încarcă...
Pagina se încarcă...
Pagina se încarcă...
Pagina se încarcă...
Pagina se încarcă...
Pagina se încarcă...
Pagina se încarcă...
Pagina se încarcă...
Pagina se încarcă...
Pagina se încarcă...
Pagina se încarcă...
Pagina se încarcă...
Pagina se încarcă...
Pagina se încarcă...
Pagina se încarcă...
Pagina se încarcă...
Pagina se încarcă...
Pagina se încarcă...
Pagina se încarcă...
Pagina se încarcă...
Pagina se încarcă...
Pagina se încarcă...
Pagina se încarcă...
Pagina se încarcă...
Pagina se încarcă...
Pagina se încarcă...
Pagina se încarcă...
Pagina se încarcă...
Pagina se încarcă...
Pagina se încarcă...
Pagina se încarcă...
Pagina se încarcă...
Pagina se încarcă...
Pagina se încarcă...
Pagina se încarcă...
Pagina se încarcă...
Pagina se încarcă...
Pagina se încarcă...
Pagina se încarcă...
Pagina se încarcă...
Pagina se încarcă...
Pagina se încarcă...
Pagina se încarcă...
Pagina se încarcă...
Pagina se încarcă...
Pagina se încarcă...
Pagina se încarcă...
Pagina se încarcă...
Pagina se încarcă...
Pagina se încarcă...
Pagina se încarcă...
Pagina se încarcă...
Pagina se încarcă...
Pagina se încarcă...
Pagina se încarcă...
Pagina se încarcă...
Pagina se încarcă...
Pagina se încarcă...
Pagina se încarcă...
Pagina se încarcă...
Pagina se încarcă...
Pagina se încarcă...
Pagina se încarcă...
Pagina se încarcă...
Pagina se încarcă...
Pagina se încarcă...
Pagina se încarcă...
Pagina se încarcă...
Pagina se încarcă...
Pagina se încarcă...
Pagina se încarcă...
Pagina se încarcă...
Pagina se încarcă...
Pagina se încarcă...
Pagina se încarcă...
Pagina se încarcă...
Pagina se încarcă...
Pagina se încarcă...
Pagina se încarcă...
Pagina se încarcă...
Pagina se încarcă...
Pagina se încarcă...
Pagina se încarcă...
Pagina se încarcă...
Pagina se încarcă...
Pagina se încarcă...
Pagina se încarcă...
Pagina se încarcă...
Pagina se încarcă...
Pagina se încarcă...
Pagina se încarcă...
Pagina se încarcă...
Pagina se încarcă...
Pagina se încarcă...
Pagina se încarcă...
Pagina se încarcă...
Pagina se încarcă...
Pagina se încarcă...
Pagina se încarcă...
Pagina se încarcă...
Pagina se încarcă...
Pagina se încarcă...
Pagina se încarcă...
Pagina se încarcă...
Pagina se încarcă...
Pagina se încarcă...
Pagina se încarcă...
Pagina se încarcă...
Pagina se încarcă...
Pagina se încarcă...
Pagina se încarcă...
Pagina se încarcă...
Pagina se încarcă...
Pagina se încarcă...
Pagina se încarcă...
Pagina se încarcă...
Pagina se încarcă...
Pagina se încarcă...
Pagina se încarcă...
Pagina se încarcă...
Pagina se încarcă...
Pagina se încarcă...
Pagina se încarcă...
Pagina se încarcă...
Pagina se încarcă...
Pagina se încarcă...
Pagina se încarcă...
Pagina se încarcă...
Pagina se încarcă...
Pagina se încarcă...
Pagina se încarcă...
Pagina se încarcă...
Pagina se încarcă...
Pagina se încarcă...
Pagina se încarcă...
Pagina se încarcă...
Pagina se încarcă...
Pagina se încarcă...
Pagina se încarcă...
Pagina se încarcă...
Pagina se încarcă...
Pagina se încarcă...
Pagina se încarcă...
Pagina se încarcă...
Pagina se încarcă...
Pagina se încarcă...
Pagina se încarcă...
Pagina se încarcă...
Pagina se încarcă...
Pagina se încarcă...
Pagina se încarcă...
Pagina se încarcă...
Pagina se încarcă...
Pagina se încarcă...
Pagina se încarcă...
Pagina se încarcă...
Pagina se încarcă...
Pagina se încarcă...
Pagina se încarcă...
Pagina se încarcă...
Pagina se încarcă...
Pagina se încarcă...
Pagina se încarcă...
Pagina se încarcă...
Pagina se încarcă...
Pagina se încarcă...
Pagina se încarcă...
Pagina se încarcă...
Pagina se încarcă...
Pagina se încarcă...
Pagina se încarcă...
Pagina se încarcă...
Pagina se încarcă...
Pagina se încarcă...
Pagina se încarcă...
Pagina se încarcă...
Pagina se încarcă...
Pagina se încarcă...
Pagina se încarcă...
Pagina se încarcă...
Pagina se încarcă...
Pagina se încarcă...
Pagina se încarcă...
Pagina se încarcă...
Pagina se încarcă...
Pagina se încarcă...
Pagina se încarcă...
Pagina se încarcă...
Pagina se încarcă...
Pagina se încarcă...
Pagina se încarcă...
Pagina se încarcă...
Pagina se încarcă...
Pagina se încarcă...
Pagina se încarcă...
Pagina se încarcă...
Pagina se încarcă...
Pagina se încarcă...
Pagina se încarcă...
Pagina se încarcă...
Pagina se încarcă...
Pagina se încarcă...
Pagina se încarcă...
Pagina se încarcă...
Pagina se încarcă...
Pagina se încarcă...
Pagina se încarcă...
Pagina se încarcă...
Pagina se încarcă...
Pagina se încarcă...
Pagina se încarcă...
Pagina se încarcă...
Pagina se încarcă...
Pagina se încarcă...
Pagina se încarcă...
Pagina se încarcă...
Pagina se încarcă...
Pagina se încarcă...
Pagina se încarcă...
Pagina se încarcă...
Pagina se încarcă...
Pagina se încarcă...
Pagina se încarcă...
Pagina se încarcă...
Pagina se încarcă...
Pagina se încarcă...
Pagina se încarcă...
Pagina se încarcă...
Pagina se încarcă...
Pagina se încarcă...
Pagina se încarcă...
Pagina se încarcă...
Pagina se încarcă...
Pagina se încarcă...
Pagina se încarcă...
Pagina se încarcă...
Pagina se încarcă...
Pagina se încarcă...
Pagina se încarcă...
Pagina se încarcă...
Pagina se încarcă...
Pagina se încarcă...
Pagina se încarcă...
Pagina se încarcă...
Pagina se încarcă...
Pagina se încarcă...
Pagina se încarcă...
Pagina se încarcă...
Pagina se încarcă...
Pagina se încarcă...
Pagina se încarcă...
Pagina se încarcă...
Pagina se încarcă...
Pagina se încarcă...
Pagina se încarcă...
Pagina se încarcă...
Pagina se încarcă...
Pagina se încarcă...
Pagina se încarcă...
Pagina se încarcă...
Pagina se încarcă...
Pagina se încarcă...
Pagina se încarcă...
Pagina se încarcă...
Pagina se încarcă...
Pagina se încarcă...
Pagina se încarcă...
Pagina se încarcă...
Pagina se încarcă...
Pagina se încarcă...
Pagina se încarcă...
Pagina se încarcă...
Pagina se încarcă...
Pagina se încarcă...
Pagina se încarcă...
Pagina se încarcă...
Pagina se încarcă...
Pagina se încarcă...
Pagina se încarcă...
Pagina se încarcă...
Pagina se încarcă...
Pagina se încarcă...
Pagina se încarcă...
Pagina se încarcă...
Pagina se încarcă...
Pagina se încarcă...
Pagina se încarcă...
-
 1
1
-
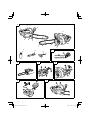 2
2
-
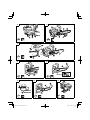 3
3
-
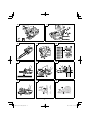 4
4
-
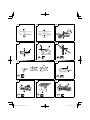 5
5
-
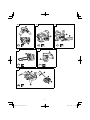 6
6
-
 7
7
-
 8
8
-
 9
9
-
 10
10
-
 11
11
-
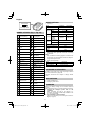 12
12
-
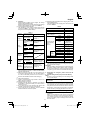 13
13
-
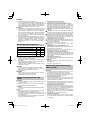 14
14
-
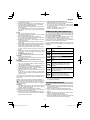 15
15
-
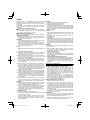 16
16
-
 17
17
-
 18
18
-
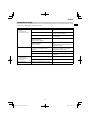 19
19
-
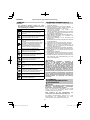 20
20
-
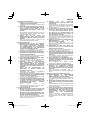 21
21
-
 22
22
-
 23
23
-
 24
24
-
 25
25
-
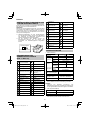 26
26
-
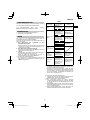 27
27
-
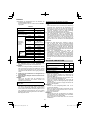 28
28
-
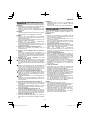 29
29
-
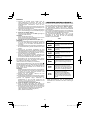 30
30
-
 31
31
-
 32
32
-
 33
33
-
 34
34
-
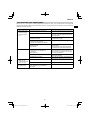 35
35
-
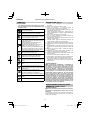 36
36
-
 37
37
-
 38
38
-
 39
39
-
 40
40
-
 41
41
-
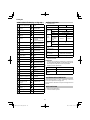 42
42
-
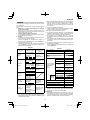 43
43
-
 44
44
-
 45
45
-
 46
46
-
 47
47
-
 48
48
-
 49
49
-
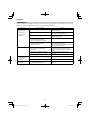 50
50
-
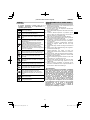 51
51
-
 52
52
-
 53
53
-
 54
54
-
 55
55
-
 56
56
-
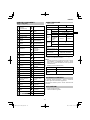 57
57
-
 58
58
-
 59
59
-
 60
60
-
 61
61
-
 62
62
-
 63
63
-
 64
64
-
 65
65
-
 66
66
-
 67
67
-
 68
68
-
 69
69
-
 70
70
-
 71
71
-
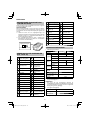 72
72
-
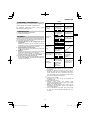 73
73
-
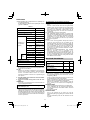 74
74
-
 75
75
-
 76
76
-
 77
77
-
 78
78
-
 79
79
-
 80
80
-
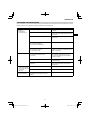 81
81
-
 82
82
-
 83
83
-
 84
84
-
 85
85
-
 86
86
-
 87
87
-
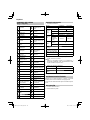 88
88
-
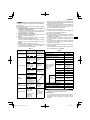 89
89
-
 90
90
-
 91
91
-
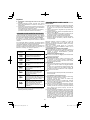 92
92
-
 93
93
-
 94
94
-
 95
95
-
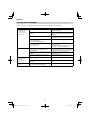 96
96
-
 97
97
-
 98
98
-
 99
99
-
 100
100
-
 101
101
-
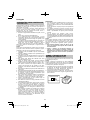 102
102
-
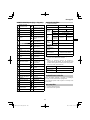 103
103
-
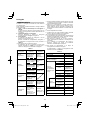 104
104
-
 105
105
-
 106
106
-
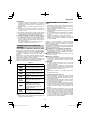 107
107
-
 108
108
-
 109
109
-
 110
110
-
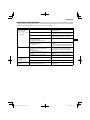 111
111
-
 112
112
-
 113
113
-
 114
114
-
 115
115
-
 116
116
-
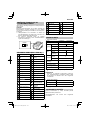 117
117
-
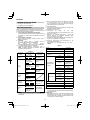 118
118
-
 119
119
-
 120
120
-
 121
121
-
 122
122
-
 123
123
-
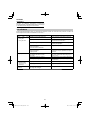 124
124
-
 125
125
-
 126
126
-
 127
127
-
 128
128
-
 129
129
-
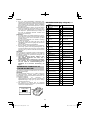 130
130
-
 131
131
-
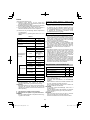 132
132
-
 133
133
-
 134
134
-
 135
135
-
 136
136
-
 137
137
-
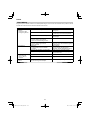 138
138
-
 139
139
-
 140
140
-
 141
141
-
 142
142
-
 143
143
-
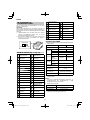 144
144
-
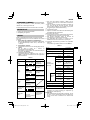 145
145
-
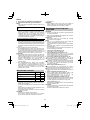 146
146
-
 147
147
-
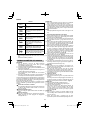 148
148
-
 149
149
-
 150
150
-
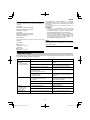 151
151
-
 152
152
-
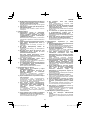 153
153
-
 154
154
-
 155
155
-
 156
156
-
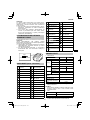 157
157
-
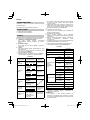 158
158
-
 159
159
-
 160
160
-
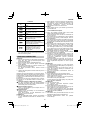 161
161
-
 162
162
-
 163
163
-
 164
164
-
 165
165
-
 166
166
-
 167
167
-
 168
168
-
 169
169
-
 170
170
-
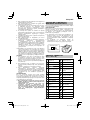 171
171
-
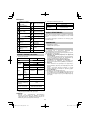 172
172
-
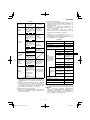 173
173
-
 174
174
-
 175
175
-
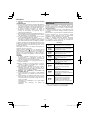 176
176
-
 177
177
-
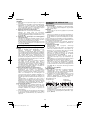 178
178
-
 179
179
-
 180
180
-
 181
181
-
 182
182
-
 183
183
-
 184
184
-
 185
185
-
 186
186
-
 187
187
-
 188
188
-
 189
189
-
 190
190
-
 191
191
-
 192
192
-
 193
193
-
 194
194
-
 195
195
-
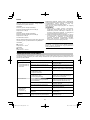 196
196
-
 197
197
-
 198
198
-
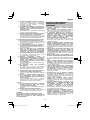 199
199
-
 200
200
-
 201
201
-
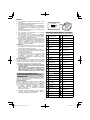 202
202
-
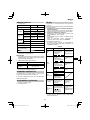 203
203
-
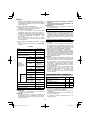 204
204
-
 205
205
-
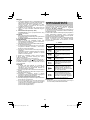 206
206
-
 207
207
-
 208
208
-
 209
209
-
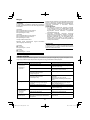 210
210
-
 211
211
-
 212
212
-
 213
213
-
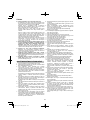 214
214
-
 215
215
-
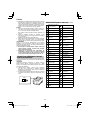 216
216
-
 217
217
-
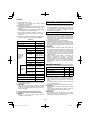 218
218
-
 219
219
-
 220
220
-
 221
221
-
 222
222
-
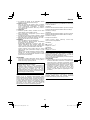 223
223
-
 224
224
-
 225
225
-
 226
226
-
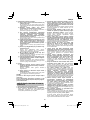 227
227
-
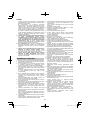 228
228
-
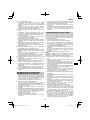 229
229
-
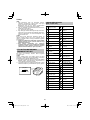 230
230
-
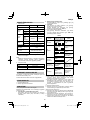 231
231
-
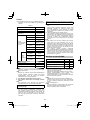 232
232
-
 233
233
-
 234
234
-
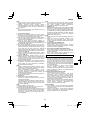 235
235
-
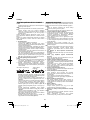 236
236
-
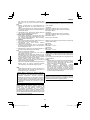 237
237
-
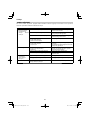 238
238
-
 239
239
-
 240
240
-
 241
241
-
 242
242
-
 243
243
-
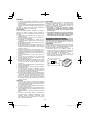 244
244
-
 245
245
-
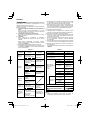 246
246
-
 247
247
-
 248
248
-
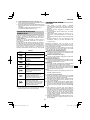 249
249
-
 250
250
-
 251
251
-
 252
252
-
 253
253
-
 254
254
-
 255
255
-
 256
256
-
 257
257
-
 258
258
-
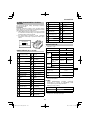 259
259
-
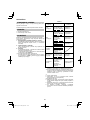 260
260
-
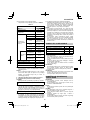 261
261
-
 262
262
-
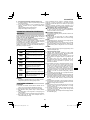 263
263
-
 264
264
-
 265
265
-
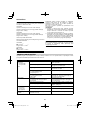 266
266
-
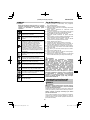 267
267
-
 268
268
-
 269
269
-
 270
270
-
 271
271
-
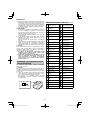 272
272
-
 273
273
-
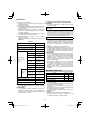 274
274
-
 275
275
-
 276
276
-
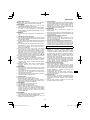 277
277
-
 278
278
-
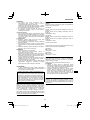 279
279
-
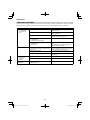 280
280
-
 281
281
-
 282
282
-
 283
283
-
 284
284
-
 285
285
-
 286
286
-
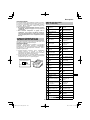 287
287
-
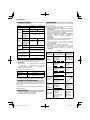 288
288
-
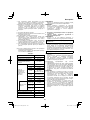 289
289
-
 290
290
-
 291
291
-
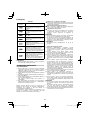 292
292
-
 293
293
-
 294
294
-
 295
295
-
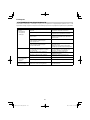 296
296
-
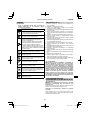 297
297
-
 298
298
-
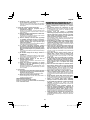 299
299
-
 300
300
-
 301
301
-
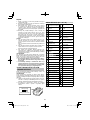 302
302
-
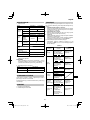 303
303
-
 304
304
-
 305
305
-
 306
306
-
 307
307
-
 308
308
-
 309
309
-
 310
310
-
 311
311
-
 312
312
-
 313
313
-
 314
314
-
 315
315
-
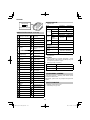 316
316
-
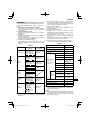 317
317
-
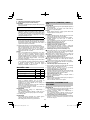 318
318
-
 319
319
-
 320
320
-
 321
321
-
 322
322
-
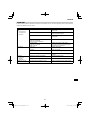 323
323
-
 324
324
-
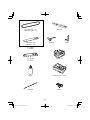 325
325
-
 326
326
-
 327
327
-
 328
328
-
 329
329
-
 330
330
-
 331
331
-
 332
332
-
 333
333
-
 334
334
-
 335
335
-
 336
336


Hikoki CS3630DC Manual de utilizare
- Categorie
- Ferăstraie cu lanț fără fir
- Tip
- Manual de utilizare
- Acest manual este potrivit și pentru
în alte limbi
- slovenčina: Hikoki CS3630DC Používateľská príručka
- italiano: Hikoki CS3630DC Manuale utente
- dansk: Hikoki CS3630DC Brugermanual
- português: Hikoki CS3630DC Manual do usuário
Lucrări înrudite
Alte documente
-
 Raider Industrial RDI-BCCS32 Manual de utilizare
-
Pattfield PE-AKS 18 Li Basic Manual de utilizare
-
Worx EC-P115 Manualul proprietarului
-
Hitachi CS 30Y Handing Instructions
-
Raider Garden Tools RDP-SBGP20 Manual de utilizare
-
Makita BUC122 Manual de utilizare
-
Makita UC010G Cordless Chain Saw Manual de utilizare
-
-
-
Bosch EasyMower 18V-32-200 Manual de utilizare
