
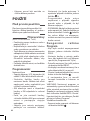
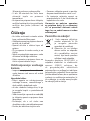
FR
EN
NL
DE
IT
ES
PT
EL
TR
SK
CS
PL
BS
BG
HR
RO
SR
SL

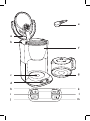
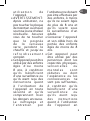
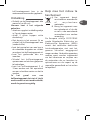
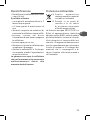
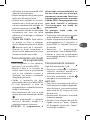
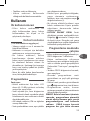
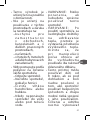
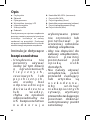
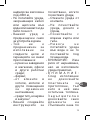
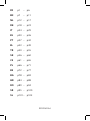
a
b
c
d
h
i
j
k
g
f
e
l
m

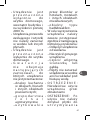
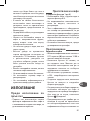
fig.4
fig.1
fig.1
fig.2 fig.3
fig.5 fig.6
fig.7 fig.8
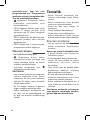
Beep
*
(*) : selon modèle - depending on model - afhankelijk van het model - je nach
Modell - a seconda del modello - en función del modelo - consoante o modelo -
Ανάλογα το οντέλο - modele bağlı olarak - podľa modelu - podle modelu - Zależnie
od modelu - zavisno od modela - - ovisno o modelu -
În funcie de model - - glede na model

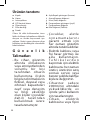
1
FR
1
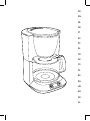
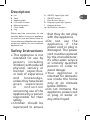
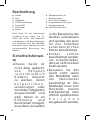
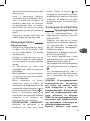
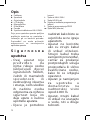
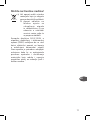
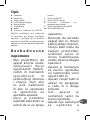
Description
a. Couvercle
b. Reservoir
c. Plaque chauffante
d. Ecran de contrôle LCD
e. Cuillere doseuse
f. Porte-filtre
g. Verseuse
h. Témoin Marche / Arrêt (rouge)
i. Touche Marche / Arrêt
j. Touche hour (Heure)
k. Témoin de programmation (vert)
l. Touche Programmation
m. Touche min (Minute)
Lire attentivement le mode d’emploi
avant la première utilisation de
votre appareil et conservez-le : une
utilisation non conforme dégagerait
le fabricant de toute responsabilité.
Consignes de sécurité
• Cet appareil n’est
pas prévu pour
être utilisé par des
personnes (y compris
les enfants) dont les
capacités physiques,
sensorielles ou
mentales sont
réduites ou des
personnes dénuées
d’expérience ou
de connaissance,
sauf si elles ont
pu bénéficier, par
l’intermédiaire d’une
personne responsable
de leur sécurité,
d’une surveillance
ou d’instructions
préalables concernant
l’utilisation de
l’appareil.
• Il convient de
surveiller les enfants
pour s’assurer qu’ils
ne jouent pas avec
l’appareil.
• Si le câble
d’alimentation
est endommagé,
n’utilisez pas
l’appareil. Faites
obligatoirement
remplacer le câble
d’alimentation par
le fabricant, son
service après-vente
ou des personnes de
qualification similaire

2
2
afin d’éviter tout
danger.
• Votre appareil est
destiné uniquement à
un usage domestique
et à l’intérieur de
la maison et à une
altitude inférieure à
2000m.
• Ne pas mettre
l’appareil, le câble
d’alimentation ou la
fiche dans l’eau ou
tout autre liquide.
• Votre machine a
été conçue pour un
usage domestique
seulement.
• Elle n’a pas été conçue
pour être utilisée dans
les cas suivants qui ne
sont pas couverts par
la garantie:
− Dans des coins de
cuisines réservés
au personnel dans
des magasins,
bureaux et autres
environnements
professionnels,
− Dans des fermes,
− Par les clients
des hôtels,
motels et autres
environnements à
caractère résidentiel,
− Dans des
environnements
de type chambres
d’hôtes.
• Toujours suivre
les instructions de
nettoyage pour
nettoyer votre
appareil;
− Débrancher
l’appareil.
− Ne pas nettoyer
l’appareil chaud.
− Nettoyer avec un
chiffon ou une
éponge humide.
− Ne jamais mettre
l’appareil dans
l’eau ou sous l’eau
courante.
• AVERTISSEMENT:
Risques de blessures
en cas de mauvaise

3
FR
3
utilisation de
l’appareil.
• AVERTISSEMENT:
Après utilisation, ne
pas toucher la plaque
de maintien au chaud,
soumise à une chaleur
résiduelle. Assurez
vous de ne toucher
que la poignée
de la verseuse
verre pendant la
chauffe et jusqu’au
refroidissement
complet.
• Cet appareil peut être
utilisé par des enfants
âgés d’au moins
8 ans, à condition
qu’ils bénéficient
d’une surveillance ou
qu’ils aient reçu des
instructions quant
à l’utilisation de
l’appareil en toute
sécurité et qu’ils
comprennent bien
les dangers encourus.
Le nettoyage et
l’entretien par
l’utilisateur ne doivent
pas être effectués par
des enfants, à moins
qu’ils ne soient âgés
de plus de 8 ans et
qu’ils soient sous
la surveillance d’un
adulte.
• Conserver l’appareil
et son câble hors de
portée des enfants
âgés de moins de 8
ans.
• Cet appareil peut
être utilisé par des
personnes dont les
capacités physiques,
sensorielles ou
mentales sont
réduites ou dont
l’expérience ou les
connaissances ne
sont pas suffisantes,
à condition qu’ils
bénéficient d’une
surveillance ou
qu’ils aient reçu
des instructions
quant à l’utilisation
de l’appareil en

4
4
toute sécurité et en
comprennent bien les
dangers potentiels.
• Les enfants ne doivent
pas utiliser l’appareil
comme un jouet.
• Avant de brancher l’appareil, vérifier
que la tension d’alimentation de
votre installation correspond à
celle de l’appareil et que la prise de
courant comporte bien la terre.
• Toute erreur de branchement annule
la garantie.
• Débrancher l’appareil lors d’une
absence prolongée et lors du
nettoyage.
• Ne pas utiliser l’appareil s’il ne
fonctionne pas correctement ou
s’il a été endommagé. Dans ce cas,
s’adresser à un centre service agréé.
• Toute intervention autre que le
nettoyage et l’entretien usuel par
le client doit être effectuée par un
centre service agréé.
• Le câble d’alimentation ne doit
jamais être à proximité ou en
contact avec les parties chaudes de
votre appareil, près d’une source de
chaleur ou sur un angle vif.
• Pour votre sécurité, n’utiliser que des
accessoires et des pièces détachées
adaptés à votre appareil.
• Ne pas débrancher la fiche de la
prise en tirant sur le câble.
• Ne pas utiliser la verseuse dans un
four à micro-ondes, sur une flamme
et sur des plaques de cuisinières
électriques.
• Ne pas remettre d’eau dans
l’appareil s’il est encore chaud.
• Tous les appareils sont soumis à un
contrôle qualité sévère. Des essais
d’utilisation pratiques sont faits
avec des appareils pris au hasard
ce qui explique d’éventuelles traces
d’utilisation.
• Toujours fermer le couvercle lors du
fonctionnement de la cafetière.
• N’utilisez pas la verseuse sans le
couvercle. Ne pas mettre d’eau
chaude dans les réservoirs.
• La cafetière ne doit pas être placée
à l’interieur d’un meuble lorsqu’elle
est en cours d’utilisation.
Utilisation
Avant la première
utilisation
• Faire fonctionner une première fois
votre cafetière filtre sans café avec
l’équivalent d’une verseuse d’eau
pour la rincer.
Préparation du café
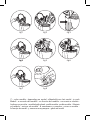
(Suivre les illustrations de 1 à 8)
• Utiliser uniquement de l’eau froide et
un filtre papier n°4.
• Ne pas dépasser la quantité d’eau
maximum indiquée sur le niveau
d’eau du réservoir.
• Cette cafetière est équipée d’un stop
- goutte permettant de se servir un
café avant la fin du passage d’eau.
Replacer rapidement la verseuse pour
éviter tout débordement.
• Attendre quelques minutes avant de
réaliser une seconde préparation du
café.

5
FR
5
Programmation
Réglage de l’heure
• Branchez la cafetière, l’écran LCD (d)
indique 12.00 et clignote pendant
quelques secondes.
• Appuyez sur la touche hour pour
choisir l’heure, soit plusieurs fois,
soit en continu pour un défilement
plus rapide.
• AM indique les heures du matin et
PM les heures de l’après-midi.
• Une fois l’heure réglée, appuyez sur
la touche min avec le même principe.
• Lorsque les minutes sont réglées,
attendez la fin du clignotement et
l’heure complète sera validée, ou
appuyer une fois sur la touche (i).
• Cette opération sera à renouveler en
cas de coupure électrique ou si vous
débranchez votre cafetière.
• A NOTER : Vous pouvez modifier
ou régler l’heure à tout moment.
Faites un appui long (minimum 3
secondes) sur la touche . L’heure
clignote à l’écran et vous pouvez
procéder au réglage par les touches
hour et Min.
Fonctionnement en mode
programmation
• Pour programmer votre cafetière,
appuyez 1 fois sur la touche PROG.
• Réglez l’heure et les minutes selon
l’heure à laquelle vous désirez que
votre cafetière se mette en marche
(cf ci-dessus le paragraphe « Réglage
de l’heure »).
• Validez le réglage en appuyant à
nouveau sur la touche PROG.
• L’écran affiche l’heure de
programmation, et le témoin
lumineux vert (k) est allumé.
• Pour afficher à nouveau l’heure
actuelle, faites un appui court sur la
touche .
• A l’heure programmée, le voyant
rouge s’allumera et la cafetière se
mettra à fonctionner.
ATTENTION : La programmation est
désactivée automatiquement à la fin
du cycle café, mais l’heure que vous
avez programmée est conservée.
Réactiver la programmation chaque
jour en appuyant sur la touche
PROG.
Pour programmer une nouvelle
heure, reportez-vous au paragraphe
«Fonctionnement en mode
programmation».
Vous pouvez toutefois à tout
moment :
• Mettre en marche ou arrêter votre
cafetière avec la touche .
• Annuler la programmation en
faisant un appui long (3 secondes)
sur la touche PROG (le témoin
lumineux (k) s’éteint).
• Réactiver la programmation en
appuyant 1 fois sur la touche PROG.
• Changer l’heure de programmation
en faisant un appui de 2 secondes
sur la touche PROG.
Fonctionnement manuel
Suivez les illustrations de 1 à 8.
• Appuyez sur la touche , le voyant
rouge s’allume et la cafetière se met
à fonctionner.
• Appuyez à nouveau sur la touche
pour arrêter le fonctionnement.
A NOTER
• Que ce soit en fonctionnement

6
manuel ou en mode programmation,
votre cafetière s’éteindra
automatiquement environ 30
minutes après la fin du cycle de café.
• Durant ces 30 minutes, votre café
est maintenu au chaud, à la bonne
température.
• Lorsque votre cafetière se met en
marche, elle émet un ‘bip’ et émet
deux ‘bip’ lors de son arrêt (selon
modèle).
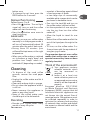
Nettoyage
• Pour évacuer la mouture usagée,
retirer le filtre papier contenant la
mouture.
• Débrancher et laisser refroidir la
cafetière.
• Nettoyer avec un chiffon ou une
éponge humide.
• Ne pas nettoyer l’appareil lorsqu’il
est encore chaud.
• Ne jamais immerger l’appareil.
• Aucun élément de votre cafetière ne
doit être mis au lave-vaisselle.
Détartrage
• Détartrez votre cafetière tous les mois
ou tous les 40 cycles.
Vous pouvez utiliser :
− soit un sachet de détartrant dilué
dans 2 grandes tasses d’eau.
− soit 2 grandes tasses de vinaigre
d’alcool blanc.
• Verser dans le réservoir (b) et mettre
la cafetière en marche (sans café).
• Laisser couler dans la verseuse
l’équivalent d’une tasse, puis arrêter
votre cafetière.
• Laisser agir pendant une heure.
• Remettre la cafetière en marche pour
terminer l’écoulement.
• Faire fonctionner la cafetière 2 ou 3
fois avec l’équivalent d’une verseuse
d’eau pour la rincer.
La garantie exclut les cafetières ne
fonctionnant pas ou mal par absence
de détartrage.
Participons à la protection
de l’environnement !
iVotre appareil contient
de nombreux matériaux
valorisables ou recyclables.
Confiez celui-ci dans un
point de collecte ou à défaut
dans un centre service agrée
pour que son traitement soit
effectué.
La directive Européenne 2012/19/
UE sur les Déchets des Equipements
Electriques et Electroniques (DEEE),
exige que les appareils ménagers
usagés ne soient pas jetés dans le
flux normal des déchets municipaux.
Les appareils usagés doivent êtres
collectés séparément afin d’optimiser
le taux de récupération et le recyclage
des matériaux qui les composent et
réduire l’impact sur la santé humaine
et l’environnement.

7
EN
Please read the instructions for use
carefully before using your appliance
for the first time and retain them for
future reference: Manufacturer cannot
accept any liability for non compliant
appliance use.
Safety Instructions
• This appliance is not
intended for use by
persons (including
children) with reduced
physical, sensory or
mental capacities,
or lack of experience
and knowledge,
unless they have been
given supervision
or instruction
concerning use of the
appliance by a person
responsible for their
safety.
• Children should be
supervised to ensure
that they do not play
with the appliance.
• Do not use the
appliance if the
power cord or plug is
damaged. The power
cord must be replaced
by the manufacturer,
its after-sales service
or similarly qualified
persons in order to
avoid danger.
• Your appliance is
intented for domestic
use inside the home
only at an altitude
below 2000m.
• Do not immerse the
appliance, power cord
or plug in water or
any other liquid.
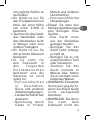
Description
a. Lid
b. Tank
c. Heating plate
d. LCD control screen
e. Measuring spoon
f. Filter holder
g. Jug
h. ON/OFF signal light (red)
i. ON/OFF button
j. Hour Button (hours)
k. Program signal light (green)
l. Program button
m. Min Button (minutes)

8
• Your appliance is
designed for domestic
use only.
• It is not intended to be
used in the following
applications, and the
guarantee will not
apply for:
− staff kitchen areas
in shops, offices
and other working
environments;
− farm houses;
− by clients in hotels,
motels and other
residential type
environments;
− bed and breakfast
type environments.
• Always follow the
cleaning instruction to
clean your appliance;
− Unplug the
appliance.
− Do not clean the
appliance while hot.
− Clean with a damp
cloth or sponge.
− Never immerse the
appliance in water or
put it under running
water.
• WARNING: Risks of
injuries if you don’t
use this appliance
correctly.
• WARNING: After
using, do not to touch
the keep warm plate,
subjected to residual
heat. Be sure to
manipulate only the
handle of glass jar
during heating until
cooling down.
• This appliance may
be used by children
of at least 8 years
of age, as long as
they are supervised
and have been given
instructions about
using the appliance
safely and are
fully aware of the
dangers involved.
Cleaning and user
maintenance shall not
be made by children
unless they are older

9
EN
than 8 and they are
supervised by an
adult.
• Keep the appliance
and its cord out of
reach of children
under 8 years of age.
• This appliance
may be used by
persons with reduced
physical, sensory or
mental capabilities,
or whose experience
or knowledge is not
sufficient, provided
they are supervised
or have received
instruction to use
the device safely
and understand the
dangers.
• Children should not
use the device as a
toy.
• Before plugging the appliance in,
make sure that the power it uses
corresponds to your electrical
supply system and that the outlet
is earthed.
• Any error in the electrical connection
will negate your guarantee.
• Unplug the appliance when you
have finished using it and when
you clean it.
• Do not use the appliance if it is not
working properly or if it has been
damaged. If this occurs, contact an
authorised service centre.
• All interventions other than cleaning
and everyday maintenance by the
customer must be performed by an
authorised service centre.
• The power cord must never be close
to or in contact with the hot parts
of your appliance, near a source of
heat or over a sharp edge.
• For your safety, only use the
manufacturer’s accessories and
spare parts designed for your
appliance.
• Do not pull on the cord to unplug
the appliance.
• Never put your coffee jug in a
microwave oven, on a flame or a
electric cooking plates.
• Do not fill the appliance with water
if it is still hot.
• All appliances are subject to strict
quality control procedures. These
include actual usage tests on
randomly selected appliances,
which would explain any traces of
use.
• Always close the lid when running
the coffee maker.
• Do not use the jug without the lid.
• Do not pour hot water in the tanks.
• The coffee-maker shall not be
placed in a cabinet when in use.
USE
Before using for the first
time

10
• Use your filter coffee maker without
coffee the first time using the
equivalent of a jug of water to rinse
the circuits.
Making coffee
(Follow figures 1 to 8)
• Use only cold water and a n°4 paper
filter.
• Do not exceed the maximum water
level indicated on the tank.
• This coffee maker is equipped with a
drip stop so that you can serve coffee
before the cycle ends. Replace the
jug immediately in order to avoid
overflowing.
• Wait a few minutes before you make
coffee a second time.
Programming
Setting the time
• Plug in the coffee maker. The LCD
screen (d) will display 12.00 and
flashes for a few seconds.
• Press the hour Button in order to set
the hour. You may do this repeatedly,
or continually for faster hour
progression.
• AM indicates morning hours and PM,
afternoon and evening hours.
• Once you have set the hour, press the
MINI button for minutes and follow
the same procedure.
• Once the minutes are set, wait for the
flashing to stop and the set time will
be validated. Otherwise, press the
(i) button once.
• The programming will have to be
repeated in case of a blackout or if
the coffee maker is unplugged.
• PLEASE NOTE :You can set or adjust
the time at any moment. Hold the
button down for a minimum of 3
seconds . Once the time flashes on
the screen, you may adjust the time
using the hour and Min buttons.
Program mode
functioning
• In order to program your coffee
maker, press the PROG button once.
• Set the hour and minutes according
to the time you wish your coffee
maker to start (please refer to
“Programming”, above).
• Validate the set time by pressing the
PROG button once more.
• The screen will display the set time
and the green light signal (k) will turn
on.
• In order to display the current time
again, briefly press the
button.
• At the set time, the red light signal
will turn on and the coffee maker will
start.
WARNING: The set program is
automatically deactivated at the
end of the coffee cycle; however,
the set time is saved. Reactivate the
set program every day by pressing
on the PROG button. In order to
set a different time, please refer to
paragraph “Using the appliance in
the Program Mode”.
It is possible at all times:
• Turn your coffee maker ON or OFF by
pressing the button.
• Cancel the programming by pressing
the PROG button for 3 seconds. When
you do so, the green light signal (k)
will turn off.
• In order to reactivate the program on
your coffee maker, press the PROG

11
EN
button once.
• To change the set time, press the
PROG button for 2 seconds.
Manual functioning
Follow figures 1 to 8.
• Press the button. The red light
signal will turn on and the coffee
maker will start functioning.
• Press the button once more to
stop functioning.
PLEASE NOTE
• Whether you use your coffee maker
manually or in the program mode, it
will turn off automatically about 30
minutes after the end of each cycle.
• During those 30 minutes, your
coffee will be kept warm, at the right
temperature.
• When your coffee maker is switched
on, it produces a single “beep” and
produces two “beeps” when it is
switched off (depending on model).
Cleaning
• To dispose of the used coffee
grounds, remove the used paper
filter.
• Unplug the coffee maker and let it
cool down.
• Clean with a damp cloth or sponge.
• Do not clean the appliance while it
is still hot.
• Never immerse the appliance in
water or any other liquid.
• None of the coffee maker parts
should be put in the dishwasher.
Descaling
• Descale your coffee maker every
month or every 40 cycles.
You can use:
− a packet of descaling agent diluted
in two large cups of water.
− or two large cups of commercially
available white vinegar which can be
purchased in hardware stores.
• Pour into the tank (b) and turn on
the coffee maker (without coffee).
• Let the equivalent of one cup pour
into the jug, then turn the coffee
maker off.
• Allow the liquid to stand for one
hour.
• Restart the coffee maker and let the
rest of the liquid pass through to the
jug.
• To rinse, run the coffee maker 2 or
3 more times with the equivalent of
one glass jug of water.
The guarantee does not cover coffee
makers that malfunction or cease to
operate because they have not been
regularly descaled.
Think of the environment!
iYour appliance contains
valuable materials which
can be recovered or
recycled.
Leave it at a local civic
waste collection point or at
an approved service centre,
where it will be disposed of
properly.
European directive 2012/19/UE
on Waste Electrical and Electronic
Equipment (WEEE), requires that old
household electrical appliances are
not thrown into the normal flow of
municipal waste. Old appliances must
be collected separately in order to
optimize the recovery and recycling
of materials they contain and reduce
the impact on human health and the
environment.

12
Lees de gebruiksaanwijzing grondig
door voordat u uw apparaat in gebruik
neemt en bewaar deze voor latere
raadpleging. De fabrikant is niet
aansprakelijk voor schade of letsel
veroorzaakt door verkeerd gebruik van
het apparaat.
Veiligheids-
voorschriften
• Dit apparaat
is niet bedoeld
voor gebruikers
(waaronder kinderen)
met beperkte fysische,
visuele of mentale
mogelijkheden,
of die een gebrek
hebben aan ervaring
en kennis, tenzij ze
onder toezicht staan
of aanwijzingen
hebben gekregen
omtrent het gebruik
van het apparaat
door een persoon die
verantwoordelijk is
voor hun veiligheid.
• Houd toezicht over
kinderen zodat ze
niet met het apparaat
spelen.
• Gebruik het apparaat
niet als het snoer
of de stekker
beschadigd is. Laat
het snoer vervangen
door de fabrikant,
dienst na verkoop
of gelijksoortig
gekwalificeerd
persoon om elk
gevaar te vermijden.
• Uw apparaat is
alleen bestemd voor
huishoudelijk gebruik
binnenshuis tot op
Beschrijving
a. Deksel
b. Reservoir
c. Verwarmingsplaat
d. LCD-controlescherm
e. Doseringslepel
f. Filterhouder
g. Schenkkan
h. Controlelampje Aan / Uit (rood)
i. Toets Aan / Uit
j. Toets hour (Uur)
k. Controlelampje Programmering
(groen)
l. Toets Programmering
m. Toets min (Minuten)

13
NL
een maximum hoogte
van 2000m.
• Dompel het apparaat,
het snoer of de stekker
niet onder in water of
een andere vloeistof.
• Uw apparaat is alleen
ontworpen voor
huishoudelijk gebruik.
• Het apparaat is
niet geschikt om
in de volgende
toepassingen gebruikt
te worden, en de
garantie geldt niet
voor:
− Kantines voor
personeel in winkels,
kantoren en andere
werkruimtes;
− Boerderijen;
− Door klanten in
hotels, motels
en andere
verblijfplaatsen;
− Bed & breakfasts
en vergelijkbare
instellingen.
• Volg altijd de schoon-
maakinstructies om
uw apparaat schoon
te maken;
− Trek de stekker van
het apparaat uit het
stopcontact.
− Dompel het
apparaat niet onder
in water.
− Maak schoon met
een vochtige doek of
spons.
− Dompel het
apparaat nooit in
water en plaats
het nooit onder
stromend water.
• WAARSCHUWING:
Risico op letsel als dit
apparaat verkeerd
wordt gebruikt.
• WAARSCHUWING:
Raak de
warmhoudplaat na
gebruik niet aan, de
plaat blijft nog enige
tijd warm. Raak tijdens
de werking alleen het
handvat van de glazen
kan aan totdat het
apparaat is afgekoeld.

14
• Dit apparaat mag
worden gebruikt
door kinderen vanaf
8 jaar als ze onder
toezicht staan of als
ze richtlijnen hebben
gekregen om het
apparaat veilig te
kunnen hanteren en
de risico's kennen.
Kinderen mogen
het apparaat
niet reinigen en
onderhouden tenzij
ze ouder dan 8 jaar
zijn en onder toezicht
van een volwassene
staan.
• Houd het apparaat en
het snoer buiten het
bereik van kinderen
jonger dan 8 jaar.
• Dit apparaat mag
worden gebruikt
door personen met
beperkte fysieke,
visuele of mentale
mogelijkheden,
of die een gebrek
aan ervaring of
kennis hebben, op
voorwaarde dat ze
onder toezicht staan
of aanwijzingen
hebben gekregen hoe
het apparaat veilig
te gebruiken en de
mogelijke gevaren
begrijpen.
• Kinderen mogen het
apparaat niet als
speelgoed gebruiken.
• Voordat u de stekker in het
stopcontact steekt, zorg dat de
spanning vermeld op het apparaat
overeenkomt met de netspanning
van uw woning en dat het
stopcontact geaard is.
• Elke fout in de elektrische verbinding
maakt uw garantie ongeldig.
• Haal de stekker uit het stopcontact
na gebruik en voor reiniging.
• Gebruik het apparaat niet als het
niet juist werkt of beschadigd is. Als
dit zich voordoet, neem contact op
met een bevoegd servicecentrum.
• Laat elke tussenkomst, uitgezonderd
de reiniging en dagelijks onderhoud
van het apparaat, aan een bevoegd
servicecentrum over.
• Leg het snoer nooit in de buurt van
of zorg dat deze niet in contact
komt met de hete delen van uw
apparaat, in de nabijheid van een
warmtebron of over een scherpe
rand.
• Voor uw veiligheid, gebruik alleen
toebehoren en reserveonderdelen
van de fabrikant die specifiek voor

15
NL
het apparaat zijn ontworpen.
• Trek niet aan het snoer om de
stekker uit het stopcontact te halen.
• Plaats uw koffiekan nooit in een
magnetronoven, op een vlam of een
elektrische kookplaat.
• Vul het apparaat niet opnieuw met
water als het nog warm is.
• Alle apparaten zijn onderhevig aan
strikte kwaliteitscontroleprocedures.
Deze omvatten effectieve
gebruikstesten op willekeurig
geselecteerde apparaten. Het is dus
mogelijk dat u sporen van gebruik op
uw apparaat aantreft.
• Sluit altijd het deksel voordat u het
koffiezetapparaat inschakelt.
• Gebruik de kan niet zonder deksel.
• Giet geen warm water in de
reservoirs.
• Plaats het koffiezetapparaat niet in
een kast wanneer deze in werking is.
Gebruikt
Voor het eerste gebruik
• Wanneer u uw koffiezetapparaat
met filter voor de eerste keer gaat
gebruiken, dient u het met de
schenkkan met water in te schakelen
om op die manier het toestel te
spoelen.
Bereiding van de koffie
(Volg de afbeeldingen van 1 tot 8)
• Gebruik alleen koud water en een
filterzakje nr. 4.
• Overschrijd nooit de maximale
hoeveelheid water die aangeduid
staat op het waterniveau van het
reservoir.
• Dit koffiezetapparaat is uitgerust met
een druppelstop, wat u toelaat om
uw koffie te drinken voordat al het
water doorgestroomd is. Vervang de
schenkkan snel om te voorkomen dat
hij overloopt.
• Wacht enkele minuten voordat u de
volgende koffie bereidt.
Programmering
Instelling van de tijd
• Steek de stekker in het stopcontact.
Het LCD-scherm (d) geeft 12.00 weer
dat gedurende enkele seconden op
het scherm knippert.
• Druk op de toets hour om de tijd
in te stellen, verscheidene keren
of ononderbroken om sneller af te
spelen.
• AM duidt de uren voor de middag
aan en PM de uren na de middag.
• Zodra de tijd is ingesteld, drukt u op
dezelfde manier op de knop min.
• Wanneer de minuten zijn ingesteld,
wacht u tot de cijfers niet langer
knipperen, het volledige uur wordt
gevalideerd of drukt u één keer op de
toets (i).
• U dient deze handeling te herhalen
wanneer de stroom onderbroken
wordt of u de stekker van uw
koffiezetapparaat uittrekt.
• OPMERKING: U kunt de tijd op elk
moment instellen of aanpassen.
Houd de knop gedurende minstens
3 seconden ingedrukt. Eenmaal de
tijd op het scherm knippert, kunt u
de tijd aanpassen met behulp van de
hour en Min knoppen.

16
Werking in
programmeringsmodus
• Om uw koffiezetapparaat te
programmeren drukt u 1 keer op de
toets PROG.
• Stel het uur en de minuten in
waarop u uw koffiezetapparaat
wilt aanzetten (zie de paragraaf
hierboven « Instelling van het uur »).
• Valideer de instelling door opnieuw
op de toets PROG te drukken.
• Het scherm geeft het
geprogrammeerde uur weer en het
groene controlelampje (k) licht op.
• Om opnieuw het huidige uur weer te
geven, dient u kort op de toets te
drukken.
• Op de geprogrammeerde tijd licht
het rode controlelampje op en
begint het koffiezetapparaat te
werken.
OPGELET : Aan het einde van de
koffiecyclus wordt het programma
automatisch gedeactiveerd. Het
uur dat u heeft geprogrammeerd
wordt wel opgeslagen. Reactiveer
het programma elke dag door
op de knop PROG te drukken.
Raadpleeg paragraaf “Werking in
programmeermodus” om een nieuw
uur in te stellen.
U kunt op elk ogenblik echter:
• uw koffiezetapparaat aanzetten of
stopzetten met de toets .
• de programmering annuleren
door lang (3 seconden) te drukken
op de toets PROG (het groene
controlelampje (k) dooft).
• 1 keer op de toets PROG drukken
om uw koffiezetapparaat te
programmeren.
• Het programmeringsuur wijzigen
door 2 seconden op de knop PROG
te drukken.
Hadmatige werking
Volg de afbeeldingen van 1 tot 8.
• Druk op de toets , het rode
controlelampje licht op en het
koffiezetapparaat begint te werken.
• Druk opnieuw op de toets om het
apparaat uit te zetten.
OPMERKING
• Of het koffiezetapparaat zich nu
in de modus handmatige werking
of programmering bevindt, , het
apparaat wordt circa 30 min na het
einde van elke cyclus automatisch
uitgeschakeld.
• Gedurende deze 30 minuten wordt
uw koffie warm en op de juiste
temperatuur gehouden.
• Bij het inschakelen van uw
koffiezetapparaat, hoort u één
pieptoon en bij het uitschakelen
hoort u twee pieptonen (afhankelijk
van het model).
Schoonmaken
• Om het gebruikte koffiemaalsel te
verwijderen, dient u het filterzakje
met het maalsel weg te nemen.
• Trek de stekker van het
koffiezetapparaat uit het
stopcontact en laat het toestel
afkoelen.
• Maak het schoon met een doek of
een vochtige spons.
• Maak het apparaat niet schoon
wanneer het nog warm is.
• Dompel het toestel nooit onder.
• Geen enkel element van uw

17
NL
koffiezetapparaat kan in de
vaatwasmachine worden geplaatst.
Ontkalking
• Ontkalk uw koffiezetapparaat elke
maand of na 40 cycli.
Hiervoor kunt u het volgende
gebruiken:
− ofwel een opgelost ontkalkingszakje
in 2 grote koppen water.
− ofwel 2 grote koppen witte
alcoholazijn.
• Giet de azijn in het reservoir (b) en
schakel het koffiezetapparaat aan
(zonder koffie).
• Laat het equivalent van een kop in
de schenkkan druppelen en schakel
vervolgens het koffiezetapparaat uit.
• Laat het gedurende één uur
inwerken.
• Schakel het koffiezetapparaat
opnieuw aan om het doorsijpelproces
te beëindigen.
• Laat het koffiezetapparaat 2 of
3 keer werken met het equivalent
van een schenkkan water om het te
spoelen.
In het geval van een
koffiezetapparaat dat niet of slecht
werkt omdat het niet wordt ontkalkt,
wordt de garantie ongeldig.
Help mee het milieu te
beschermen!
i Uw apparaat bevat
verscheidene waardevolle
of recycleerbare
materialen.
Breng het apparaat naar
een ophaalpunt of, als dat
er niet is, naar een erkende
servicedienst voor verdere
verwerking.
De Europese richtlijn 2012/19/UE
inzake Afgedankte Elektrische en
Elektronische Apparatuur (AEEA)
vereist dat verbruikte elektrische
huishoudapparaten niet met het
gewone huisafval weggegooid
mogen worden. Verbruikte apparaten
moeten apart worden ingezameld
om het herwinnen en recyclen van
de materialen die ze bevatten te
optimaliseren en de impact op de
menselijke gezondheid en het milieu
te beperken.
Pagina se încarcă ...
Pagina se încarcă ...
Pagina se încarcă ...
Pagina se încarcă ...
Pagina se încarcă ...
Pagina se încarcă ...
Pagina se încarcă ...
Pagina se încarcă ...
Pagina se încarcă ...
Pagina se încarcă ...
Pagina se încarcă ...
Pagina se încarcă ...
Pagina se încarcă ...
Pagina se încarcă ...
Pagina se încarcă ...
Pagina se încarcă ...
Pagina se încarcă ...
Pagina se încarcă ...
Pagina se încarcă ...
Pagina se încarcă ...
Pagina se încarcă ...
Pagina se încarcă ...
Pagina se încarcă ...
Pagina se încarcă ...
Pagina se încarcă ...
Pagina se încarcă ...
Pagina se încarcă ...
Pagina se încarcă ...
Pagina se încarcă ...
Pagina se încarcă ...
Pagina se încarcă ...
Pagina se încarcă ...
Pagina se încarcă ...
Pagina se încarcă ...
Pagina se încarcă ...
Pagina se încarcă ...
Pagina se încarcă ...
Pagina se încarcă ...
Pagina se încarcă ...
Pagina se încarcă ...
Pagina se încarcă ...
Pagina se încarcă ...
Pagina se încarcă ...
Pagina se încarcă ...
Pagina se încarcă ...
Pagina se încarcă ...
Pagina se încarcă ...
Pagina se încarcă ...
Pagina se încarcă ...
Pagina se încarcă ...
Pagina se încarcă ...
Pagina se încarcă ...
Pagina se încarcă ...
Pagina se încarcă ...
Pagina se încarcă ...
Pagina se încarcă ...
Pagina se încarcă ...
Pagina se încarcă ...
Pagina se încarcă ...
Pagina se încarcă ...
Pagina se încarcă ...
Pagina se încarcă ...
Pagina se încarcă ...
Pagina se încarcă ...
Pagina se încarcă ...
Pagina se încarcă ...
Pagina se încarcă ...
Pagina se încarcă ...
Pagina se încarcă ...
Pagina se încarcă ...
Pagina se încarcă ...
Pagina se încarcă ...
Pagina se încarcă ...
Pagina se încarcă ...
Pagina se încarcă ...
Pagina se încarcă ...
Pagina se încarcă ...
Pagina se încarcă ...
Pagina se încarcă ...
Pagina se încarcă ...
Pagina se încarcă ...
Pagina se încarcă ...
Pagina se încarcă ...
Pagina se încarcă ...
Pagina se încarcă ...
Pagina se încarcă ...
Pagina se încarcă ...
Pagina se încarcă ...
Pagina se încarcă ...
-
 1
1
-
 2
2
-
 3
3
-
 4
4
-
 5
5
-
 6
6
-
 7
7
-
 8
8
-
 9
9
-
 10
10
-
 11
11
-
 12
12
-
 13
13
-
 14
14
-
 15
15
-
 16
16
-
 17
17
-
 18
18
-
 19
19
-
 20
20
-
 21
21
-
 22
22
-
 23
23
-
 24
24
-
 25
25
-
 26
26
-
 27
27
-
 28
28
-
 29
29
-
 30
30
-
 31
31
-
 32
32
-
 33
33
-
 34
34
-
 35
35
-
 36
36
-
 37
37
-
 38
38
-
 39
39
-
 40
40
-
 41
41
-
 42
42
-
 43
43
-
 44
44
-
 45
45
-
 46
46
-
 47
47
-
 48
48
-
 49
49
-
 50
50
-
 51
51
-
 52
52
-
 53
53
-
 54
54
-
 55
55
-
 56
56
-
 57
57
-
 58
58
-
 59
59
-
 60
60
-
 61
61
-
 62
62
-
 63
63
-
 64
64
-
 65
65
-
 66
66
-
 67
67
-
 68
68
-
 69
69
-
 70
70
-
 71
71
-
 72
72
-
 73
73
-
 74
74
-
 75
75
-
 76
76
-
 77
77
-
 78
78
-
 79
79
-
 80
80
-
 81
81
-
 82
82
-
 83
83
-
 84
84
-
 85
85
-
 86
86
-
 87
87
-
 88
88
-
 89
89
-
 90
90
-
 91
91
-
 92
92
-
 93
93
-
 94
94
-
 95
95
-
 96
96
-
 97
97
-
 98
98
-
 99
99
-
 100
100
-
 101
101
-
 102
102
-
 103
103
-
 104
104
-
 105
105
-
 106
106
-
 107
107
-
 108
108
-
 109
109


Tefal CM461811 Manual de utilizare
- Tip
- Manual de utilizare
- Acest manual este potrivit și pentru
în alte limbi
- Türkçe: Tefal CM461811 Kullanım kılavuzu
- français: Tefal CM461811 Manuel utilisateur
- čeština: Tefal CM461811 Uživatelský manuál
- English: Tefal CM461811 User manual
- slovenčina: Tefal CM461811 Používateľská príručka
- polski: Tefal CM461811 Instrukcja obsługi
- Deutsch: Tefal CM461811 Benutzerhandbuch
- italiano: Tefal CM461811 Manuale utente
- español: Tefal CM461811 Manual de usuario
- português: Tefal CM461811 Manual do usuário
- Nederlands: Tefal CM461811 Handleiding
Lucrări conexe
-
Tefal CM461811 Manualul proprietarului
-
-
-
Tefal CM600840 Manual de utilizare
-
-
Tefal CM130870 Manualul proprietarului
-
Tefal CM520D10 Manual de utilizare
-
Tefal CM330510 Manual de utilizare
-
