Eizo DX0211-IP Manualul proprietarului
- Categorie
- Camere de supraveghere
- Tip
- Manualul proprietarului

English
Setup Manual
IP Decoding Box
Software Version 5.4
Important
Please read this “Setup Manual”, “Installation Manual”, and
“Instruction Manual” carefully to familiarize yourself with safe and
eective usage.
Please retain this manual for future reference.
• For the latest product information including the “Setup Manual”,
refer to our web site :
www.eizoglobal.com

2
SAFETY SYMBOLS
This manual and this product use the safety symbols below. They denote critical information.
Please read them carefully.
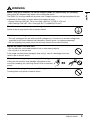
WARNING
Failure to abide by the information in a
WARNING may result in serious injury
and can be life threatening.
CAUTION
Failure to abide by the information in a
CAUTION may result in moderate injury
and/or property or product damage.
Indicates a warning or caution. For example, indicates an “electrical shock” hazard.
Indicates a prohibited action. For example, means “Do not disassemble”.
Related Manuals
Setup Manual
(this manual)
Describes precautions and procedures for connecting network
cameras and for displaying camera images on the monitor. (Installation
and initialization guidance)
Installation Manual
*1
Describes network camera registration, function settings, and system
settings. (Detail settings guidance)
Instruction Manual
*1
Describes operation of live image screen menus. (Operation guidance)
*1 The Instruction Manual and Installation Manual for the latest software version used can be obtained
from our web site. Select “Manuals” from “Support”, enter “DX0211-IP” in the “Enter model name”
box, and click “Search”.
www.eizoglobal.com
Installation of Adobe
®
Acrobat
®
Reader
®
is required.
This product has been adjusted specically for use in the region to which it was originally
shipped. If operated outside this region, the product may not perform as stated in the
specications.
No part of this manual may be reproduced, stored in a retrieval system, or transmitted, in any
form or by any means, electronic, mechanical, or otherwise, without the prior written permission
of EIZO Corporation.
EIZO Corporation is under no obligation to hold any submitted material or information
condential unless prior arrangements are made pursuant to EIZO Corporation’s receipt of said
information. Although every eort has been made to ensure that this manual provides up-to-
date information, please note that EIZO product specications are subject to change without
notice.

English
3
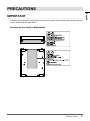
PRECAUTIONS
PRECAUTIONS
IMPORTANT
To ensure personal safety and proper maintenance, please read carefully this section and the
caution statements on the product.
Location of the Caution Statements

4
PRECAUTIONS
WARNING
If the unit begins to emit smoke, smells like something is burning, or makes strange
noises, disconnect all power connections immediately and contact your local EIZO
representative for advice.
Attempting to use a malfunctioning unit may result in re, electric shock, or equipment damage.
Do not disassemble or modify the product.
Touching the internal components may result in electrical shock or burn, as
this product contains internal components that may have high voltage or high
temperature. Also, modifying the product may result in re or electrical shock.
Refer all servicing to qualied service personnel.
Do not attempt to service this product yourself as opening or removing covers may result in
re, electric shock, or equipment damage.
Keep small objects or liquids away from the unit.
Small objects accidentally falling through the ventilation slots into the cabinet or
spillage into the cabinet may result in re, electric shock, or equipment damage. If
an object or liquid falls/ spills into the cabinet, unplug the unit immediately. Have the
unit checked by a qualied service engineer before using it again
Place the unit at the strong and stable place.
A unit placed on an inadequate surface may fall and result in injury or equipment damage. If
the unit falls, disconnect the power immediately and ask your local EIZO representative for
advice. Do not continue using a damaged unit. Using a damaged unit may result in re or
electric shock.
Use the unit in an appropriate location.
Not doing so may result in re, electric shock, or equipment damage.
• Do not place outdoors.
• Do not place in a transportation system (ship, aircraft, train, automobile, etc.)
where it may be aected by strong vibration or shock.
• Do not place in a dusty or humid environment.
• Do not place in environments with corrosive gases (such as sulfur dioxide,
hydrogen sulde, nitrogen dioxide, chlorine, ammonia, and ozone).
• Do not place in environments with dust, components that accelerate corrosion in
the atmosphere (such as sodium chloride and sulfur), conductive metals, and so
on.
• Do not place in a location where water is splashed on the product (bathroom,
kitchen, etc.).
• Do not place in a location where the steam comes directly on the product.
• Do not place near heat generating devices or a humidier.
• Do not place in a location where the product is subject to direct sunlight.
• Do not place in an inammable gas environment.
To avoid danger of suocation, keep the plastic packing bags away from babies and
children.

English
5
PRECAUTIONS
WARNING
When using an AC adapter, use the AC adapter (DVAC-01) specied by our company.
Using other AC adapters may result in re or electrical shock.
The DVAC-01 is not provided with a power cord. Prepare a power cord that complies with the
standards of the country or region where this product is used.
• Europe: Ratings: 250 VAC, 10 A; Cord type: H05VV-F, GTCE-3, 0.75 mm
2
• USA: Ratings: 125 VAC, 10 A; Cord type: SVT, 3/18AWG (0.75 mm
2
)
The AC adapter must be connected to a grounded main outlet.
Failure to do so may result in re or electric shock.
Use the correct voltage.
• The unit is designed for use with a specic voltage only. Connection to another voltage than
specied in this User’s Manual may cause re, electric shock, or equipment damage.
• Do not overload your power circuit, as this may result in re or electric shock.
Handle the power cord with care.
• Do not place the cord underneath the unit or other heavy objects.
• Do not pull on or tie the cord.
If the power cord becomes damaged, stop using it. Use of a damaged cord may
result in re or electric shock.
When disconnecting the power cord, pull the plug.
Pulling the cord section may damage it (exposure of the
core wire, breaking, etc.) and may result in re or electrical
shock.
Never touch the plug and power cord if it begins to thunder.
Touching them may result in electric shock.

6
PRECAUTIONS
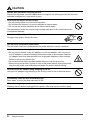
CAUTION
Handle with care when carrying the unit.
Disconnect the power cord and cables when moving the unit. Moving the unit with the cord
attached is dangerous. It may result in injury.
Do not put any object on the product.
• Do not put any object on or around the product.
• Do not place the product in a poorly-ventilated or narrow place.
• Do not use the product laid down on its side or upside down.
The temperature inside the product may rise and may result in re, electrical shock,
or equipment damage.
Do not touch the plug or AC adapter with wet hands.
Doing so may result in electrical shock.
Use an easily accessible power outlet.
This will ensure that you can disconnect the power quickly in case of a problem.
Be careful with the AC adapter because it becomes hot when used.
• Do not put any objects on the AC adapter or cover the adapter. Also, do not put
the AC adapter on carpet or bedding where heat tends to accumulate. Keep the
AC adapter away from heat sources such as portable heaters or direct sunlight.
Failure to do so may result in re.
• Do not touch the product with bare hands. Doing so may result in burns.
• When moving the product, be sure to turn o the power switch, unplug the power
plug from the outlet, and suciently cool down the product before moving.
Do not use the AC adapter hung dangling in the air.
Using the AC adapter hung dangling in the air may result in re or electrical shock.
Periodically clean the area around the plug.
Dust, water, or oil on the plug may result in re.
When cleaning the product, shut down the power input.
Cleaning the unit while it is plugged into a power outlet may result in electric shock.

English
7
Notice for this product
Notice for this product
About the Usage of This Product
This product is a device that outputs video images from network cameras to a monitor
connected using HDMI cable.
When using the product in an application where extremely high reliability and safety are
required as mentioned below, take measures to secure safety before using it.
• Transportation equipment (vessels, aircraft, trains, automobiles, etc.)
• Various safety devices such as disaster prevention devices and crime prevention
devices
• Equipment and instruments that are directly associated with human life (medical
instruments such as life support systems or the equipment used in the operating room)
• Nuclear control devices (nuclear control systems, safety protection systems used at
nuclear power facilities, etc.)
• Main communication equipment (operation control systems for transportation systems,
air trac control systems, etc.)
This product may not be covered by warranty for uses other than those described in this
manual.
The specications noted in this manual are only applicable when the following are used:
• Power cords provided with the product
• Signal cables specied by us
Only use optional products manufactured or specied by us with this product.
About the Installation
When the product is cold and brought into a room or the room temperature goes up quickly,
dew condensation may occur on the interior and exterior surfaces of the product. In that case,
do not turn the product on. Instead wait until the dew condensation disappears, otherwise it
may cause some damage to the product.
Install this product on a stable surface such as a desk with its at surface as the bottom in a
horizontal orientation.
This product can be mounted on the monitor by using a special mounting bracket (separately
sold option). The mounting bracket can be purchased from our web site.
www.eizoglobal.com
With respect to the installation orientation when the mounting bracket is used, refer to the
instruction sheet of the mounting bracket.
If this product is placed on a lacquer-nished desk, the color may adhere to the bottom of the
product due to the composition of the rubber.

8
Notice for this product
Disclaimer
Our company shall bear no responsibility for any damage (including lost prots, etc.) incurred
directly or indirectly by using this product or by malfunctions, etc. (including, but not limited to,
those caused by the following).
1. Misuse or carelessness by the customer
2. Disassembly, repair, or modication by the customer
3. Inability to display images due to some reason or cause including malfunction or failure
of this product
4. Use of the product in combination with a third-party device
5. Occurrence of an event such as infringement of privacy due to some cause with
respect to the images monitored by the customer
6. Loss of registered or recorded information due to some cause
While this product displays camera surveillance images, the use of this product alone does
not directly prevent crime.
Network Security Request
Because this product is used by connecting to networks, the following risks apply
1. Leakage of information through this product.
2. Unauthorized operation of this product by a malicious third party.
3. Interference or suspension of the use of this product by a malicious third party.
In order to prevent the above described damage, it is the user’s responsibility to implement
adequate network security measures including the measures described below.
• Use this product with a safety-ensured network by using a rewall or other network
security systems.
• Change the administrator password periodically.

9
CONTENTS
English
CONTENTS
PRECAUTIONS ..............................................3
IMPORTANT ..................................................... 3
Notice for this product ................................. 7
About the Usage of This Product .................. 7
About the Installation ..................................... 7
Disclaimer ........................................................ 8
Network Security Request ............................. 8
CONTENTS ..................................................... 9
Package Contents ....................................... 10
Controls and Functions .............................. 10
Setup ............................................................ 12
Connecting the Network Camera(s) .............13
Connecting the Monitor .................................14
Connecting Operating Devices ....................15
●
Connecting a USB device .....................15
●
Connecting an AC Adapter
(Separately Sold Option) .......................15
Turning On the Power ....................................16
●
Live Image Screen ................................17
Perform Initialization .....................................19
●
Log In ....................................................19
●
Setting the Date and Time ................... 21
●
Performing Network Settings ............... 22
●
Registering a Camera Using Auto
Discovery ............................................. 24
●
Registering a Camera Manually ........... 26
●
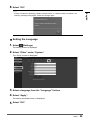
Setting the Language ........................... 29
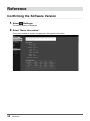
Reference ..................................................... 30
Conrming the Software Version ................ 30
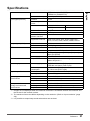
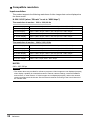
Specications .................................................31
●
Compatible resolution .......................... 32
●
Outline Dimensions .............................. 34
Troubleshooting .......................................... 35
The Screen is not Displayed ........................ 35
Imaging Problems ......................................... 36
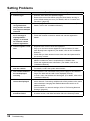
Setting Problems ........................................... 38
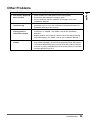
Other Problems ............................................. 39
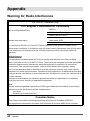
Appendix ......................................................40
Warning for Radio Interference ................... 40
LIMITED WARRANTY .................................... 42
Recycling Information / Informationen zum Thema
Recycling /
Informations sur le recyclage / Сведения по утилизации ...............i

Package Contents
Check that all of the following parts are included. If any of these are missing or damaged, contact
your dealer or local EIZO representative.
• DX0211-IP (this product)
• Setup Manual
• HH050HS
HDMI cable (HDMI-HDMI)
• Contact Addresses
• Mounting screws for PCSK-03 / PCSK-03R
Used for mounting PCSK-03 or PCSK-03R adapter for smaller device.
Attention
• No power cord is supplied with this product. Use a power cord that complies with the rating and
standards of the country or region where this product is used.
Note
• It is recommended that the packing box and materials be kept for future usage such as for moving or
transporting the product.
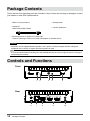
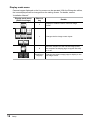
Controls and Functions
1 2 3 4 5
6 7 8 9 10
Front
Rear
10
Package Contents

English
Names Details
1. Connection terminal
for the remote control
light reception unit
Use this terminal to connect the remote control light reception unit
where the remote control light reception section on the main unit
cannot be used. (Terminal for use with models with remote controls.)
2. Reset button
Pressing and holding this button for 10 seconds will initialize the
following information:
• Camera information
• USB lock
• User account setting
3.
button Turns the power on or o.
4. Power indicator
Indicates the product’s operating status.
Blue Normal operating mode
Flashing blue Starting up
Red Power o
OFF Power not connected
5. Remote control light
reception section
Receives signals from the remote control. (A function for use with
models equipped with a remote control)
6. DC input Connects the AC adapter.
7. LAN port
Connects the network cable. Inputs power when connected to a
network hub that supports PoE+.
a b
a) Status LED
Orange
Power is being supplied
through the PoE+.
OFF
Power is being supplied
through the AC adapter.
b) Link LED
Green
Network connection
established
OFF
Network connection not
established
8. USB downstream port Connects a USB mouse, USB keyboard, or joystick.
9. HDMI1 / HDMI2 HDMI output connector. Connects to monitors that support HDMI.
10. Stereo mini jack Audio output terminal. Connects a commercial stereo mini jack cable.
11
Controls and Functions

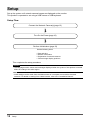
Setup
Set up the system until network camera images are displayed on the monitor.
This product is operated or set using a USB mouse or USB keyboard.
Setup Flow
Connect the Network Camera(s) (page 13)
Turn On the Power (page 16)
Perform Initialization (page 19)
Set the following items.
• Date and time
• Network information
• Registration of network cameras
• Camera image display positions
This completes the setup procedure.
Attention
• The language used in menus and messages displayed when the system of this product is started
diers according to the sales region.
Note
• Initial settings can be made from the Web browser of a computer connected to the same
network. For details on setting from a Web browser, refer to the “Installation Manual”.
12
Setup

English
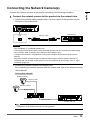
Connecting the Network Camera(s)
Connect the network cameras to this product according to the following procedure.
1.
Connect the network camera to this product via the network hub.
1. Connect the network cable (straight cable, Cat 5e or higher) to this product and the
LAN port of the network hub.
LAN
Network cable
Network hub
Attention
• Use a1000Base-T-compatible network hub.
• If the network hub supports PoE+, the product will operate from the network hub power supply.
• Use a straight cable of category 5e or above for the network cable.
• Congure the network in consideration of the communication performances of the various
devices.
• Adjust the network camera settings so that the video image resolution reaches the level of
resolution that can be input to this product. For the resolution that can be input, refer to “Input
resolution” (page 32).
2. Connect the network camera to the network hub.
For connecting the network cameras and the network hub, refer to the network camera
User’s Manual.
Connection example
Network camera
Network hub
*1
Product main unit
Network camera
Network cable
Network cable
Network cable
Note
• A maximum of 48 network cameras can be registered.
13
Setup

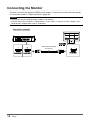
Connecting the Monitor
Connect a monitor that supports HDMI to this product. Connect the monitor that can display
at a resolution listed in “Output resolution” (page 33).
Attention
• This product has two HDMI terminals. (HDMI 1 and HDMI 2)
• Connect the monitor to HDMI 1 if “Multi-Monitor” under “Other” in “System” is set to “Single”. (The
“Multi-Monitor” default value is set to “Extended”.)
Connection example
HDMI cable HH050HS
(Accessory)
14
Setup

English
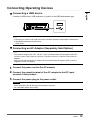
Connecting Operating Devices
●
Connecting a USB device
Connect a USB mouse, USB keyboard, or joystick to the USB downstream port.
Note
• Connecting to a device with USB hub function enables operation with multiple USB devices.
• Compatible joysticks are shown below.
- A XIS T8311
●
Connecting an AC Adapter (Separately Sold Option)
Note
• This product supports the PoE+ function. If the connected network hub supports the PoE+
function, power is input from the LAN port. Therefore, there is no need to connect the AC
adapter.
• When connected to both the AC adapter and a network hub that supports PoE+, power is
supplied from the AC adapter.
1.
Connect the power cord to the AC adapter.
2.
Connect the output terminal of the AC adapter to the DC input
terminal of this product.
3.
Connect the power plug to the power outlet.
Attention
• Insert the power cord all the way into the power connector.
• Do not bundle cables when wiring.
15
Setup

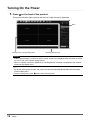
Turning On the Power
1.
Press on the front of the product.
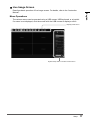
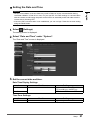
The power indicator lights up blue and the live image screen is displayed.
Network camera image display area Message display area
Menu
Attention
• It takes approximately 1 minute for the live image screen to be displayed after the power is turned
on. Do not turn o the power during startup.
• When no network camera is registered, a “Not Registered” message is displayed in the network
camera image display area.
Note
• By default, when power is input, the power indicator automatically ashes blue and the startup
process takes place.
• To turn o the power, press
on the front of this product.
16
Setup

English
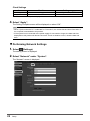
●
Live Image Screen
Describes basic operation of live image screen. For details, refer to the “Instruction
Manual”.
Menu Operations
The various menus can be operated using a USB mouse, USB keyboard, or a joystick.
If a menu is not displayed, click the screen with the USB mouse to display a menu.
System setup menu / Camera control menu
Display mode menu
17
Setup

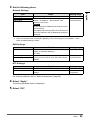
Display mode menu
Camera images displayed on the live screen can be operated. With the Enterprise edition,
the icons displayed can be changed from the setting screen. For details, see the
“Installation Manual”.
Display mode menu
(Default settings)
Shortcut
key
Details
F
Displays or hides the menu of the live image
screen.
L Changes the live image screen layout.
S
Turns the sequence of the camera image (mode
that switches the display page at regular intervals)
on or o.
PageDown /
PageUp
Changes the camera image page to display on the
live image screen.
18
Setup

English
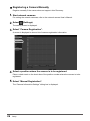
Perform Initialization
This section describes settings to display network camera images on the monitor.
Note
• Initial settings can be made from the Web browser of a computer connected to the same network.
For details on setting from a Web browser, refer to the “Installation Manual”.
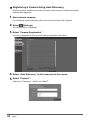
●
Log In
1.
Select (Login).
The login screen is displayed.
Login screen
Login
2.
Enter “Username” and “Password”.
Enter the user name and password shown below and then press .
Username: “admin”
Password: “admin”
Note
• The above user name and password are the default settings.
• When the “Account Type” is set to “LDAP”, you can temporarily change the account type when
logging in by checking “Allow choosing of account type on the login dialog.” under “LDAP” in
advance.
19
Setup

Entering characters
• When entering using a USB mouse
Clicking an item that requires characters to be input, such as a text box, will display a software
keyboard. When the focus is moved out of the software keyboard, the software keyboard is
hidden.
• When entering using a USB keyboard
Entered characters are displayed in the text box.
3.
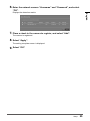
Select “Login”.
The display returns to the live image screen where you can select (Settings).
Settings
20
Setup
Pagina se încarcă...
Pagina se încarcă...
Pagina se încarcă...
Pagina se încarcă...
Pagina se încarcă...
Pagina se încarcă...
Pagina se încarcă...
Pagina se încarcă...
Pagina se încarcă...
Pagina se încarcă...
Pagina se încarcă...
Pagina se încarcă...
Pagina se încarcă...
Pagina se încarcă...
Pagina se încarcă...
Pagina se încarcă...
Pagina se încarcă...
Pagina se încarcă...
Pagina se încarcă...
Pagina se încarcă...
Pagina se încarcă...
Pagina se încarcă...
Pagina se încarcă...
Pagina se încarcă...
Pagina se încarcă...
Pagina se încarcă...
Pagina se încarcă...
Pagina se încarcă...
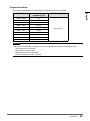
-
 1
1
-
 2
2
-
 3
3
-
 4
4
-
 5
5
-
 6
6
-
 7
7
-
 8
8
-
 9
9
-
 10
10
-
 11
11
-
 12
12
-
 13
13
-
 14
14
-
 15
15
-
 16
16
-
 17
17
-
 18
18
-
 19
19
-
 20
20
-
 21
21
-
 22
22
-
 23
23
-
 24
24
-
 25
25
-
 26
26
-
 27
27
-
 28
28
-
 29
29
-
 30
30
-
 31
31
-
 32
32
-
 33
33
-
 34
34
-
 35
35
-
 36
36
-
 37
37
-
 38
38
-
 39
39
-
 40
40
-
 41
41
-
 42
42
-
 43
43
-
 44
44
-
 45
45
-
 46
46
-
 47
47
-
 48
48


Eizo DX0211-IP Manualul proprietarului
- Categorie
- Camere de supraveghere
- Tip
- Manualul proprietarului
în alte limbi
- English: Eizo DX0211-IP Owner's manual
Lucrări înrudite
Alte documente
-
Samsung BD-D5300 Manual de utilizare
-
-
-
Samsung BD-D7000 Manual de utilizare
-
-
Panasonic TY-CC20W Manualul proprietarului
-
Panasonic VLWD812FX Instrucțiuni de utilizare
-
Ambu aBox™ 2 Instrucțiuni de utilizare