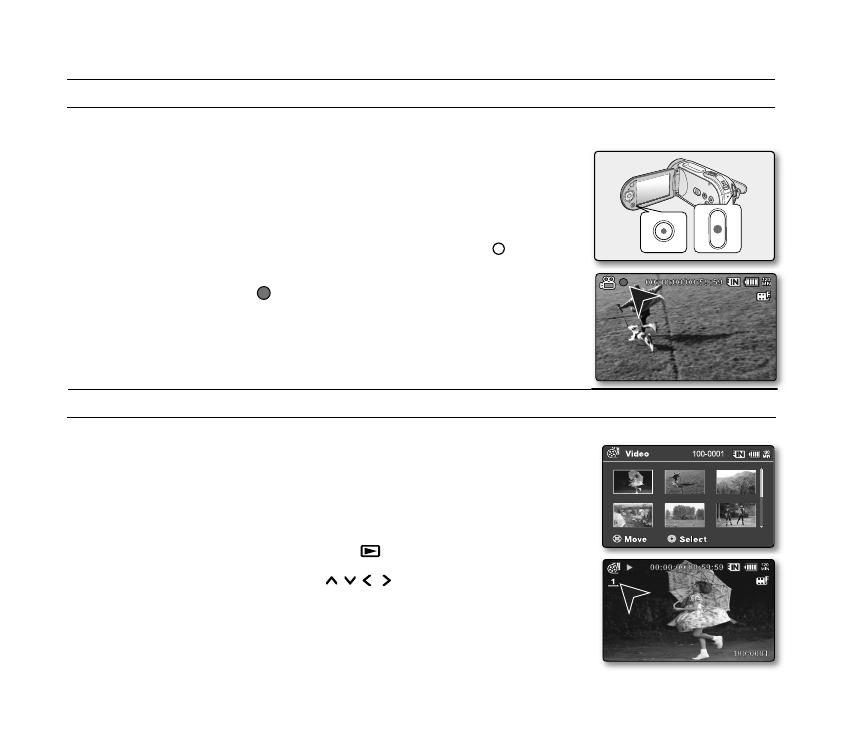
Samsung VM-MX20R Manualul proprietarului

Categorie
Camere video
Tip
Manualul proprietarului
imagine the possibilities
Thank you for purchasing this Samsung product.
To receive more complete service, please
register your product at
www.samsung.com/global/register
ROM
FIN
POL
BUL
DUT
TUR
NOR
HUN
GRE
CRO
SER
SVK
CZE
FRA
POR
SWE
ITA
SPA
GER
DAN
SLO
ENG
VP-MX20
VP-MX20H
VP-MX20L
VP-MX20R
VP-MX20C
VP-MX20CH
* Your memory camcorder comes with CD manual and Quick start guide(printed).
For more detailed instructions, refer to the user manual(PDF) provided on the CD.
Memory Camcorder
quick start guide
2_English
getting to know your memory camcorder
WHAT'S INCLUDED WITH YOUR MEMORY CAMCORDER
Your new memory camcorder comes with the following accessories. If any of these items is missing from your box, call
Samsung’s Customer Care Centre.
+
The exact shape of each item may vary by model.
Battery pack
(IA-BP85ST)
AC power adapter
(AA-E9 type)
Audio/Video Cable USB Cable
Quick start guide User manual CD Software CD* Cradle*
Pouch* Carrying Case*
The contents can vary depending on the sales region.
Parts and accessories are available at your local Samsung dealer and service centre.
The memory card is not included.
You have to connect the AC power adaptor to the cradle when connecting external devices using the cradle.
Your camcorder includes user manual CD and quick start guide(printed). For more detailed instructions,
refer to the user manual (PDF) on the provided CD.
* : This is an optional accessory. To buy one, contact your nearest Samsung dealer.
English_3
ENG
MODE indicator
( Record ( ) / Player ( ))
Recording start/
stop button
MODE button Grip belt
AV cable jack Swivel Hand-grip
USB jack (USB) Grip belt hook
DC IN jack (DC IN) Cradle receptacle
Jack cover Tripod receptacle
Charging indicator (CHG) Memory card/
POWER switch
Battery slot cover
FRONT & LEFT & REAR & BOTTOM VIEW
Lens open/close switch LCD screen
Internal microphone Built-in speaker
Lens button
MENU button EASY Q button
OK button
LCD ENHANCER ( )
button
Control button (
) Zoom lever (W/T)
Recording start/stop button
5
4
1
2
3
6
7
10
9
8
11
12
13
5
4
1
2
3
6
7
9
10
12
11
13
14
8
15
1
2
3
4
5
7
9
8
10
11
12
15
14
13
OPEN
CLOSE
1
2
3
7
8
9
121110
13
4
5
6
6
4_English
CONNECTING A POWER SOURCE
There are two types of power source that can be connected to your memory camcorder.
Do not use provided power supply units with other equipment.
- The battery pack: used for outdoor recording.
- The AC power adapter : used for indoor recording and playing back.
Inserting the battery pack
1. Slide and open the battery slot cover as shown in the diagram.
2. Insert the battery pack into the battery slot until it softly clicks.
Make sure that the SAMSUNG logo is facing up while the
set is placed as shown in the diagram.
3. Slide and close the battery slot cover.
Ejecting the battery pack
1. Slide and open the battery slot cover and push the battery lock.
Gently push the battery lock in the direction as shown in
the diagram to eject the battery out.
2. Pull the ejected battery out in the direction as shown in the diagram.
3. Slide and close the battery slot cover.
preparation
Charging the Battery Pack
1. Slide the POWER switch downward to turn off the power.
2. Open the LCD screen and insert the battery pack to the
memory camcorder.
3. Open the DC IN/USB/AV jack cover.
4.
Connect the AC power adapter to the DC IN jack of your
memory camcorder.
5.
Connect the AC power adapter to a wall socket.
The CHG (charging) indicator lights up in orange and showing
that the battery pack is charging.
The CHG (charging) indicator lights up in green when the
battery is fully charged.
6.
When the battery pack is fully charged, disconnect the AC power adapter from the memory camcorder.
Even with the power switched off, the battery pack will still discharge if it is left attached to the memory camcorder.
It is recommended that you remove the battery pack from the
memory
camcorder.
C
AR
D
C
AR
D
C
AR
D
Insert Eject
CAR
D
1
5
4
2
3
English_5
ENG
SELECTING THE STORAGE MEDIA (VP-MX20C/MX20CH ONLY)
You can record on the built-in memory or a memory card, so you should select the desired storage media before
starting recording or playback.
Before inserting or ejecting the memory card, turn the memory camcorder off.
about the storage media
INSERTING / EJECTING THE MEMORY CARD
Inserting a memory card
1. Turn the memory camcorder off.
2. Slide the memory card slot cover to the right to open the cover.
3.
Insert the memory card into the memory card slot in the direction of the
arrow shown in the diagram until it softly clicks.
4. Close the cover.
Ejecting a memory card
1. Turn the memory camcorder off.
2.
Slide the memory card slot cover to the right to open the cover.
3. Slightly push the memory card inwards to pop it out.
4. Pull the memory card out of the memory card slot and close the cover.
CAR
D
CARD
CARD
1. Press the MENU button.
The menu list will appear.
2. Press the Control button (
/ ) to select "Settings".
3.
Press the Control button ( / ) to select "Storage", then press the OK button.
4. Press the Control button ( / ) to select "Memory" or "Card", then press
the OK button.
"Memory": When using the built-in memory.
"Card": When using the memory card.
5. Press the MENU button to exit.
6_English
recording
RECORDING MOVIE IMAGES
Memory camcorder provides two Recording start/stop buttons.
One is on the rear side of the camcorder and the other one is on the LCD panel.
Select the Recording start/ stop button according to the use.
1. Turn the memory camcorder on.
Connect a power source to the memory camcorder.
(A battery pack or an AC power adapter)
Slide the POWER switch downward to turn on the power.
Set the appropriate storage media. (VP-MX20C/MX20CH only)
(If you want to record on a memory card, insert the memory card.)
Set the Lens open/close switch to open (
).
²
page 3
2. Check the subject on the LCD screen.
3. Press the Recording start/stop button.
The recording indicator (
) will display and recording will start.
Pressing the Recording start/stop button again during recording will set the
memory camcorder to recording pause mode.
4. When recording is finished, turn the memory camcorder off.
MOVIE IMAGES PLAYBACK
You can find a desired movie image quickly using thumbnail index view.
1. Turn the memory camcorder on.
Slide the POWER switch downward to turn on the power.
Set the appropriate storage media. (VP-MX20C/MX20CH only)
(If you want to record on a memory card, insert the memory card.)
2. Open the LCD screen.
Adjust brightness or contrast of the LCD screen.
3. Press the MODE button.
Switches to Movie Play mode (
).
The recorded movie images are displayed in thumbnail index view.
4. Use the
Control button (
/ / / ) to select the desired movie images,
and the press the OK button.
Shortcut menu for playback will be displayed for a while.
The selected movie images are played according to Play Option setting.
To stop playback and return to the thumbnail index view, move the zoom lever.
playback
English_7
ENG
connecting to a PC
INSTALLING THE CYBERLINK MEDIASHOW4
CyberLink MediaShow4 is a software for easy of editing MPEG, AVI, and other video files, still images, and other
contents for creating a movie.
Before you begin:
Quit any other software you are using. (Check that there are no other application icons on the status bar.)
If you perform installation of software that is already installed, uninstallation will start.
In this case, perform the installation again after uninstallation is finished.
This manual only refers to software installation and PC connection.
For more details on software, refer to the “Online help/Read me” on the CyberLink MediaShow4 CD.
¼¼
»»
¾
8_English
CONNECTING THE USB CABLE
Connect the USB cable to copy movie images in a recording medium to the PC and vice versa. When the USB cable is
connected in Record / Play mode, the product will switch to USB mode immediately.
1. Connect the memory camcorder to the PC with a
USB cable.
Don’t apply excessive force when inserting
or extracting a USB jack.
Insert a USB jack after checking the
direction of its insertion is correct.
It is recommended to use the AC adapter
as the power supply instead of the battery
pack.
When the USB cable is connected,
turning on or off the camcorder causes
malfunctions of the PC.
PC
Memory camcorder
USB cable
connecting to other devices
CONNECTING TO A TV
To playback your recordings, the television must be PAL compatible.
We recommend that you use the AC power
adaptor as the power source for the memory
camcorder.
Use the provided AV cable to connect the memory
camcorder to a TV as follows:
1. Connect the end of the
AV
cable with the single
plug to the AV jack of the memory camcorder.
2. Connect the other end with video (yellow) and left
(white) / right (red) audio cables to the TV.
VIDEOAUDIO
LR
Memory camcorder
Normal TV
AV cable
Signal flow
connecting to a PC
Red
Yellow
White
GER
VP-MX20
VP-MX20H
VP-MX20L
VP-MX20R
VP-MX20C
VP-MX20CH
* Ihr Camcorder wird mit einem Benutzerhandbuch auf CD und einer Kurzanleitung (gedruckt) geliefert.
Weitere detaillierte Anweisungen erhalten Sie im Benutzerhandbuch (PDF) auf der CD.
imagine the possibilities
Wir freuen uns, dass Sie sich für ein Samsung-
Produkt entschieden haben! Registrieren Sie Ihr
Gerät auf der folgenden
Webseite, um unsere gesamten Serviceleistungen
in Anspruch nehmen zu können:
www.samsung.com/global/register
Memory Camcorder
Kurzanleitung
02_German
LIEFERUMFANG DES MEMORY CAMCORDERS
Ihr neuer Memory Camcorder verfügt über das folgende Zubehör. Sollte eines dieser Teile nicht im Lieferumfang
enthalten sein, wenden Sie sich an den Kundendienst von Samsung.
+
Das Design der einzelnen Teile kann je nach Modell variieren.
Akku
(IA-BP85ST)
Netzteil
(Akkutyp AA-E9)
Audio-/Videokabel USB-Kabel
Kurzanleitung
CD
Benutzerhandbuch
Software-CD* Dockingstation*
Beutel* Transporttasche*
überblick über den Memory Camcorder
Der Lieferumfang kann je nach Verkaufsgebiet unterschiedlich sein.
Ersatzteile und Zubehör sind bei Ihrem Samsung-Fachhändler und bei den Samsung-Servicepartnern erhältlich.
Speicherkarten werden nicht mitgeliefert.
Sie müssen das Netzteil an die Basisstation anschließen, wenn externe Geräte daran angeschlossen werden.
Ihr Camcorder kommt mit einem Benutzerhandbuch auf CD und einer Anleitung zur schnellen Inbetriebnahme (gedruckt).
Bitte lesen Sie für detaillierte Informationen das Benutzerhandbuch (PDF), das sich auf der mitgelieferten CD befindet.
* (Option): Dies ist ein optionales Zubehör. Um ein solches zu erwerben, wenden Sie sich an einen Samsung-
Händler in Ihrer Nähe.
German_03
GER
Aufnahmetaste/Stopptaste
Halteschlaufe
Drehbügel
Öse für die Halteschlaufe
Anschluss für Dockingstation
Stativanschluss
Abdeckung für
Speicherkarten-/
Akkusteckplatz
LCD-Monitor
Integrierter Lautsprecher
Taste
EASY Q-Taste
LCD-OPTIMIERUNGSTASTE
( )
Zoomregler (W/T)
VORDERSEITE UND LINKE SEITE / RÜCKSEITE UND UNTERSEITE
1
2
3
4
5
7
9
8
10
11
12
15
14
13
ÖFFNEN
SCHLIESSEN
1
2
3
7
8
9
121110
13
4
5
6
6
Anzeige MODE (Aufnahme
( ) / Wiedergabe ( )
Taste MODE
AV-Anschluss
USB-Anschluss (USB)
DC IN-Netzteilanschluss (DC IN)
Anschlusskappe
Ladeanzeige (CHG)
Ein-/Ausschalter POWER
Schalter Objektiv geöffnet bzw.
geschlossen
Integriertes Mikrofon
Objektiv
Taste MENU
Taste OK
Steuertaste ( )
Aufnahmetaste/Stopptaste
5
4
1
2
3
6
7
10
9
8
11
12
13
5
4
1
2
3
6
7
9
10
12
11
13
14
8
15
04_German
STROMVERSORGUNG HERSTELLEN
Der Memory Camcorder kann über zwei Arten mit Strom versorgt werden.
Verwenden Sie das mitgelieferte Netzteil nicht mit anderen Geräten.
- Akku: für Aufnahmen im Freien.
- Netzteil: für Aufnahmen in Innenräumen und Wiedergabe.
Akku einsetzen
1.
Öffnen Sie die Akkufachabdeckung wie in der Abbildung dargestellt.
2. Setzen Sie den Akku ein, bis er hörbar einrastet.
Achten Sie darauf, dass das SAMSUNG-Logo nach oben
zeigt, wie in der Abbildung dargestellt.
3. Schließen Sie die Akkufachabdeckung.
Akku entnehmen
1. Öffnen Sie die Akkufachabdeckung, und drücken Sie auf die
Akkuverriegelung.
Drücken Sie die Akkuverriegelung vorsichtig in die in der
Abbildung angezeigte Richtung, um den Akku auszugeben.
2. Ziehen Sie den ausgegebenen Akku in der angezeigten Richtung heraus, wie in der Abbildung dargestellt.
3. Schließen Sie die Akkufachabdeckung.
Akku laden
1. Schieben Sie den Schalter POWER nach unten, um das Gerät
auszuschalten.
2. Klappen Sie den LCD-Monitor auf und setzen Sie den Akku in
den Memory Camcorder ein.
3. Öffnen Sie die Abdeckung für die DC IN/USB/AV-Anschlüsse.
4.
Verbinden Sie das Netzteil mit dem Netzanschluss DC IN des
Memory Camcorders.
5. Verbinden Sie das Netzteil mit einer Steckdose.
Die Ladeanzeige CHG beginnt orange zu blinken und zeigt
damit an, dass der Akku geladen wird.
Die Ladeanzeige CHG leuchtet grün, wenn der Akku vollständig geladen wird.
6. Wenn der Akku vollständig aufgeladen ist, entfernen Sie das Netzteil vom Memory Camcorder.
Der Akku entlädt sich auch bei ausgeschaltenem Camcorder, falls dieser im Gerät verbleibt.
Es wird empfohlen, den Akku aus dem Memory Camcorder zu entnehmen.
vorbereitung
C
AR
D
C
AR
D
C
AR
D
Einsetzen Entnehmen
CAR
D
1
5
4
2
3
German_05
GER
SPEICHERMEDIEN AUSWÄHLEN (NUR VP-MX20C/MX20CH)
Videoaufnahmen können im internen Speicher oder auf einer Speicherkarte aufgezeichnet werden. Legen Sie daher vor der
Aufnahme oder Wiedergabe das gewünschte Speichermedium fest.
Vor dem Einlegen oder Entnehmen der Speicherkarte schalten Sie den Memory Camcorder aus.
informationen zu den Speichermedien
SPEICHERKARTE EINSETZEN/ENTNEHMEN
Speicherkarte einsetzen
1. Schalten Sie den Memory Camcorder aus.
2. Schieben Sie die Abdeckung des Speicherkartensteckplatzes zum
Öffnen nach rechts.
3. Stecken Sie die Speicherkarte, wie in der Abbildung dargestellt,
in den Steckplatz, bis diese hörbar einrastet.
4. Schließen Sie die Abdeckung.
Speicherkarte entnehmen
1. Schalten Sie den Memory Camcorder aus.
2.
Schieben S bdeckung des Speicherkartensteckplatzes zum
Öffnen nach rechts.
3. Drücken Sie die Speicherkarte leicht in das Gerät, bis sie herausspringt.
4. Ziehen Sie die Karte aus dem Steckplatz, und schließen Sie die Abdeckung.
CAR
D
CARD
CARD
1. Drücken Sie die Taste MENU.
Das Menü wird angezeigt
2.
Drücken Sie die Steuertaste (
/ ) um die Option
"Settings (Einstellungen)"
zu wählen.
3.
Drücken Sie die Steuertaste (
/ ) um die Option "Storage (Sp.typ)" zu
wählen, und drücken Sie anschließend die Taste OK.
4. Drücken Sie die
Steuertaste (
/ ) um die Option "Memory (Speicher)"
oder “Card” (Karte) zu wählen, und drücken Sie dann die Taste OK.
"Memory (Speicher)": Bei Verwendung des internen Speichers.
"
Card (Kart)": Bei Verwendung der Speicherkarte.
5. Drücken Sie die Taste MENU, um das Menü zu verlassen.
06_German
aufnahme
VIDEOAUFNAHME
Der Memory Camcorder verfügt über zwei Aufnahmetasten (Start/Stopp.) Eine befindet sich auf der
Rückseite des Camcorders, die andere auf dem LCD-Monitor. Verwenden Sie nach Bedarf die entsprechende
Aufnahmetaste (Start/Stopp).
1. Schalten Sie den Memory Camcorder ein.
Schließen Sie den Memory Camcorder an eine Stromquelle an.
(Akku oder Netzteil)
Schieben Sie zum Einschalten den Schalter POWER nach unten.
Wählen Sie das gewünschte Speichermedium. (Nur VP-MX20C/MX20CH)
(Zur Aufnahme auf eine Speicherkarte legen Sie diese ein.)
Setzen Sie den Öffnungs-/Verschlussschalter des Objektivs auf Öffnen ( ).
²
Seite 3
2. Überprüfen Sie das Motiv auf dem LCD-Monitor.
3. Drücken Sie die Aufnahmetaste (Start/Stopp).
Die Aufnahmeanzeige (
) erscheint, und die Aufnahme beginnt.
Durch erneutes Drücken der Aufnahmetaste (Start/Stopp) während der
Aufnahme wird der Memory Camcorder in den Pausemodus versetzt.
4. Schalten Sie den Memory Camcorder nach Beenden der Aufnahme aus.
VIDEOAUFNAHMEN WIEDERGEBEN
Mit Hilfe der Miniaturindexansichten können Sie leicht nach den gewünschten Videoaufnahmen suchen.
1. Schalten Sie den Memory Camcorder ein.
Schieben Sie zum Einschalten den Schalter POWER nach unten.
Wählen Sie das gewünschte Speichermedium. (nur VP-MX20C/MX20CH)
(Zur Aufnahme auf eine Speicherkarte legen Sie diese ein.)
2. Klappen Sie den LCD-Monitor auf.
Passen Sie die Helligkeit oder den Kontrast auf dem LCD-Monitor an.
3. Drücken Sie die Taste MODE.
Wechselt zum Modus Videowiedergabe (
).
Die Videoaufnahmen werden in der Miniaturindexansicht angezeigt.
4. Wählen Sie mit Hilfe der Steuertaste ( / / / ) die gewünschte
Videoaufnahme aus, und drücken Sie die Taste OK.
Es erscheint kurz das Shortcut-Menü für die Wiedergabe.
Die ausgewählte Videoaufnahme wird entsprechend der Einstellung in den
Wiedergabeoptionen wiedergegeben.
Um die Wiedergabe zu beenden und zu der Miniaturansicht zurückzukehren,
betätigen Sie den Zoomregler.
wiedergabe
German_07
GER
anschluss an einen PC
CYBERLINK MEDIASHOW4 INSTALLIEREN
CyberLink MediaShow4 ist eine Software für das einfache Bearbeiten von MPEG, AVI und anderen Videodateien,
sowie Bildern und anderen Komponenten die zur Herstellung eines Films nötig sind
.
Bevor Sie beginnen:
Beenden Sie alle Programme die Sie verwenden.
(Überprüfen Sie ob keine andere Anwendung in der Taskleiste angezeigt wird.)
Wenn Sie die Installation einer Software durchführen, die bereits installiert war, so beginnt der
Deinstallationsprozess. Führen Sie in diesem Fall nach abgeschlossener Deinstallation die Installation erneut
durch.
Dieses Handbuch beschreibt nur die Installation der Software und den Anschluss and den PC.
Für weitere Informationen bezüglich der Software, lesen Sie bitte “Online help/Readme” auf der CyberLink
MediaShow4 CD.
¼¼
»»
¾
08_German
USB-KABEL ANSCHLIESSEN
Zum Kopieren von Videos von einem Speichermedium auf den PC oder umgekehrt schließen Sie das USB-Kabel
an.Wenn das USB-Kabel im Modus Aufnahme/Wiedergabe angeschlossen sein sollte, so wird das Produkt automa-
tisch in den USB-Modus umschalten.
1. Verbinden Sie den Memory Camcorder mit
einem USB-Kabel mit dem PC.
Wenden Sie beim Anschließen oder
Entfernen des USB-Kabels keine Gewalt an.
Überprüfen Sie vor dem Anschließen des USB-
Kabels die Ausrichtung des Steckers.
Verwenden Sie für die Stromversorgung das
Netzteil anstelle des Akkus.
Bei angeschlossenem USB-Kabel führt das
Ein- oder Ausschalten des Camcorders zu
Fehlfunktionen am PC.
anschluss an einen PC
PC
Memory camcorder
USB Kabel
anschluss an andere geräte
ANSCHLUSS AN EIN FERNSEHGERÄT
Um Ihre Aufnahmen wiedergeben zu können muss das Fernsehgerät mit PAL kompatibel sein
Wir empfehlen die Benutzung des Netzteils für die Stromversorgung des Memory Camcorders.
Verbinden Sie den Memory Camcorder
wie folgt über das mitgelieferte AV-Kabel mit einem
Fernsehgerät:
1. Verbinden Sie das Ende des AV-Kabels mit dem
einfachen Anschluss mit dem TV-Anschluss des
Memory Camcorders.
2. Verbinden Sie das andere Ende mit den Kabeln
Video (gelb) und links (weiß)/ rechts (rot) mit dem
Fernsehgerät.
VIDEOAUDIO
LR
Memory camcorder
Normales TV
AV-Kabel
Signalübertragung
Gelb
Weiß
Rot
FRA
imaginez les possibilités
Nous vous remercions d'avoir choisi un produit Samsung.
Pour bénéficier d’un service plus complet, veuillez enregistrer
votre produit sur le site
www.samsung.com/global/register
VP-MX20
VP-MX20H
VP-MX20L
VP-MX20R
VP-MX20C
VP-MX20CH
* Votre caméscope est fourni avec un manuel sur CD et un guide de démarrage rapide (imprimé).
Pour obtenir des instructions plus détaillées, reportez-vous au manuel d’utilisation (PDF) contenu sur le CD.
Caméscope à mémoire
Guide de démarrage rapide
02_French
ELEMENTS FOURNIS AVEC VOTRE CAMESCOPE A MEMOIRE FLASH
Votre nouveau caméscope à mémoire flash est livré avec les accessoires répertoriés ci-après. Si vous constatez
l’absence de l’un de ces éléments de votre emballage, vous devrez contacter le Service clientèle de Samsung.
+
L'apparence des articles varie selon le modèle utilisé.
Module batterie
(IA-BP85ST)
Adaptateur secteur
(type AA–E9)
Câble vidéo Câble USB
Guide de démarrage
rapide
CD du manuel
d’utilisation
CD d’installation des
logiciels*
Socle de recharge*
Pochette* Etui*
familiarisez-vous avec votre caméscope à mémoire flash
Le contenu peut varier en fonction du lieu de vente de l'appareil.
Les pièces et les accessoires sont disponibles auprès de votre revendeur Samsung ou du service après-vente
le plus proche.
La carte mémoire n'est pas incluse.
Il faut relier l’adaptateur secteur au socle lors de la connexion de périphériques externes à l’aide de ce même socle.
Votre caméscope est fourni avec un manuel d’utilisation sur CD et un guide de démarrage rapide (imprimé).
Pour obtenir des instructions plus détaillées, reportez-vous au manuel d’utilisation (PDF) contenu sur le CD.
*(En option) : il s'agit d'un accessoire proposé en option. Pour l’acquérir, contactez votre revendeur Samsung
le plus proche.
French_03
FRA
Touche de démarrage/
arrêt de l’enregistrement
Dragonne
Poignée pivotante
Crochet de dragonne
Fiche pour socle de recharge
Douille de trépied
Carte mémoire / trappe
batterie
Ecran LCD
Haut-parleur intégré
Touche
Touche EASY Q
Touche OPTIMISATEUR
LCD ( )
Levier de zoom (W/T)
Voyant MODE
(Enregistrement ( ) /
Lecture ( ))
Touche MODE
Prise câble vidéo
Prise USB
Prise DC IN (Entrée CC)
Cache-prise
Voyant de charge (CHG)
Interrupteur marche/arrêt
Interrupteur d’ouverture/
fermeture de l'objectif
Microphone interne
Objectif
Touche MENU
Touche OK
Touches de direction
( )
Touche de démarrage/arrêt de
l’enregistrement
VUE AVANT GAUCHE / VUE INFERIEURE ARRIERE
1
2
3
4
5
7
9
8
10
11
12
15
14
13
OUVRIR
FERMER
1
2
3
7
8
9
121110
13
4
5
6
6
5
4
1
2
3
6
7
10
9
8
11
12
13
5
4
1
2
3
6
7
9
10
12
11
13
14
8
15
04_French
BRANCHEMENT D’UNE SOURCE D'ALIMENTATION
Vous pouvez brancher votre caméscope à mémoire flash sur de deux types de source d'alimentation.
N'utilisez pas les adaptateurs d'alimentation fournis avec d'autres appareils.
- Le module batterie : utilisé pour l'enregistrement en extérieur.
- L'adaptateur secteur CA : utilisé pour l’enregistrement et la lecture en intérieur.
Insertion de la batterie
1. Faites glisser la trappe de la batterie pour l’ouvrir, comme illustré.
2. Insérez le module batterie dans son logement jusqu'à ce que vous
entendiez un léger déclic.
Assurez-vous que le logo SAMSUNG est correctement orienté face
vers le haut lorsque vous positionnez le la batterie comme illustré.
3. Faites glisser la trappe de la batterie pour le refermer.
Ejection du bloc batterie
1. Faites glisser la trappe de la batterie pour l’ouvrir et tirez sur le dispositif
de verrouillage du module.
Poussez doucement le dispositif de verrouillage du module dans la direction indiquée sur le schéma pour éjecter la batterie.
2. Tirez sur la batterie éjectée dans le sens indiqué sur l'illustration.
3. Faites glisser la trappe de la batterie pour le refermer.
Charge de la batterie
1. Faites glisser l'interrupteur marche/arrêt vers le bas pour éteindre
l'appareil.
2. Ouvrez l’écran LCD et insérez la batterie dans le caméscope à
mémoire flash.
3. Soulevez le cache-prise DC IN/USB/AV.
4.
Branchez l'adaptateur secteur dans la prise DC IN du caméscope à
mémoire flash.
5.
Reliez l'adaptateur secteur à une prise murale.
Le voyant de charge s'allume en orange pour indiquer que la
batterie est en cours de chargement.
6. Aussitôt que la batterie est complètement chargé, déconnectez l’adaptateur secteur du caméscope à mémoire flash.
Si la batterie est laissée dans son logement, elle continuera de se décharger, même lorsque l'alimentation est coupée.
Par conséquent, nous vous recommandons de retirer la batterie du caméscope à mémoire flash.
préparation
C
AR
D
C
AR
D
C
A
R
D
Insertion Ejection
CAR
D
1
5
4
2
3
  • Page 1 1
  • Page 2 2
  • Page 3 3
  • Page 4 4
  • Page 5 5
  • Page 6 6
  • Page 7 7
  • Page 8 8
  • Page 9 9
  • Page 10 10
  • Page 11 11
  • Page 12 12
  • Page 13 13
  • Page 14 14
  • Page 15 15
  • Page 16 16
  • Page 17 17
  • Page 18 18
  • Page 19 19
  • Page 20 20
  • Page 21 21
  • Page 22 22
  • Page 23 23
  • Page 24 24
  • Page 25 25
  • Page 26 26
  • Page 27 27
  • Page 28 28
  • Page 29 29
  • Page 30 30
  • Page 31 31
  • Page 32 32
  • Page 33 33
  • Page 34 34
  • Page 35 35
  • Page 36 36
  • Page 37 37
  • Page 38 38
  • Page 39 39
  • Page 40 40
  • Page 41 41
  • Page 42 42
  • Page 43 43
  • Page 44 44
  • Page 45 45
  • Page 46 46
  • Page 47 47
  • Page 48 48
  • Page 49 49
  • Page 50 50
  • Page 51 51
  • Page 52 52
  • Page 53 53
  • Page 54 54
  • Page 55 55
  • Page 56 56
  • Page 57 57
  • Page 58 58
  • Page 59 59
  • Page 60 60
  • Page 61 61
  • Page 62 62
  • Page 63 63
  • Page 64 64
  • Page 65 65
  • Page 66 66
  • Page 67 67
  • Page 68 68
  • Page 69 69
  • Page 70 70
  • Page 71 71
  • Page 72 72
  • Page 73 73
  • Page 74 74
  • Page 75 75
  • Page 76 76
  • Page 77 77
  • Page 78 78
  • Page 79 79
  • Page 80 80
  • Page 81 81
  • Page 82 82
  • Page 83 83
  • Page 84 84
  • Page 85 85
  • Page 86 86
  • Page 87 87
  • Page 88 88
  • Page 89 89
  • Page 90 90
  • Page 91 91
  • Page 92 92
  • Page 93 93
  • Page 94 94
  • Page 95 95
  • Page 96 96
  • Page 97 97
  • Page 98 98
  • Page 99 99
  • Page 100 100
  • Page 101 101
  • Page 102 102
  • Page 103 103
  • Page 104 104
  • Page 105 105
  • Page 106 106
  • Page 107 107
  • Page 108 108
  • Page 109 109
  • Page 110 110
  • Page 111 111
  • Page 112 112
  • Page 113 113
  • Page 114 114
  • Page 115 115
  • Page 116 116
  • Page 117 117
  • Page 118 118
  • Page 119 119
  • Page 120 120
  • Page 121 121
  • Page 122 122
  • Page 123 123
  • Page 124 124
  • Page 125 125
  • Page 126 126
  • Page 127 127
  • Page 128 128
  • Page 129 129
  • Page 130 130
  • Page 131 131
  • Page 132 132
  • Page 133 133
  • Page 134 134
  • Page 135 135
  • Page 136 136
  • Page 137 137
  • Page 138 138
  • Page 139 139
  • Page 140 140
  • Page 141 141
  • Page 142 142
  • Page 143 143
  • Page 144 144
  • Page 145 145
  • Page 146 146
  • Page 147 147
  • Page 148 148
  • Page 149 149
  • Page 150 150
  • Page 151 151
  • Page 152 152
  • Page 153 153
  • Page 154 154
  • Page 155 155
  • Page 156 156
  • Page 157 157
  • Page 158 158
  • Page 159 159
  • Page 160 160
  • Page 161 161
  • Page 162 162
  • Page 163 163
  • Page 164 164
  • Page 165 165
  • Page 166 166
  • Page 167 167
  • Page 168 168
  • Page 169 169
  • Page 170 170
  • Page 171 171
  • Page 172 172
  • Page 173 173
  • Page 174 174
  • Page 175 175
  • Page 176 176
  • Page 177 177

Samsung VM-MX20R Manualul proprietarului

Categorie
Camere video
Tip
Manualul proprietarului