
E
CZ
F
D
GB
I
P
NL
FIN
GR
RO
H
BG
PL
S
RUS
SK
Operating Instructions
Bedienungsanleitung
Mode d‘emploi
Instrucciones de uso
Gebruiksaanwijzing
Istruzioni per l‘uso
Instrukcja obsługi
Használati útmutató
Manual de utilizare
Návod k použití
Návod na použitie
Manual de instruções
Bruksanvisning
Руководство по эксплуатации
Работна инструкция
Οδηγίες χρήσης
Käyttöohje
00
186420
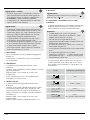
RainyWeather Station
Wetterstation


A
B C
SET
C/F
MEM RAIN
OFF
ON
1
26
13 15 14 16 17 18 2122
2 19 2012
3
27
28 31
32
34
35
29
4
5
6
10
11
30
31
32
33
7 23 24 258 9

2
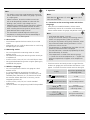
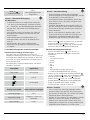
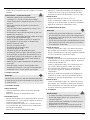
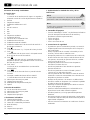
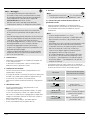
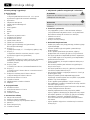
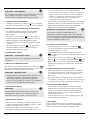
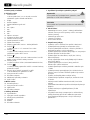
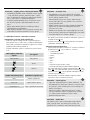
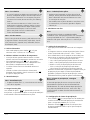
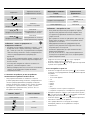
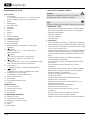
GOperating instruction
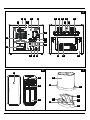
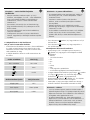
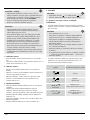
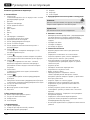
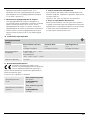
Controls and Displays
A Base station
1. LIGHT button
= activates the backlight (approx. 10 seconds) / manual
search for a signal from the wireless rain gauge
2. Display
3. Outdoor temperature
4. DCF radio symbol
5. Time
6. Day of the week
7. Day
8. Month
9. Year
10. Room temperature
11. Rainfall histogram
12. Rainfall display
13. Rain alarm symbol
14. Battery status symbol
15. Measuring station + wireless rain gauge wireless symbol
16. „ “ button
= switches between °C and °F / sets the time and date
17. ‘ ’ button
= increases the current set value / manual search for a
signal from the measuring station
18. ‘ ’ button
= displays the stored maximum/minimum outdoor and
indoor temperature values / reduces the current set value
19. ‘RAIN’ button
= rainfall display (1H/24H/WEEK/MONTH/TOTAL)
20. ‘ ’ button
= displays rain alarm value / sets rain alarm value
21. Rain alarm ON/OFF slide switch
= activates/deactivates the rain alarm
22. Recess for wall mounting
23. Battery compartment
24. Battery compartment release
25. Base
B Measuring station
26. Transmission indicator light
27. Recess for wall mounting
28. Channel selection
29. Battery compartment
C Wireless rain gauge
30. Rain gauge cover
31. Drill holes for ground mounting
32. Locks for the rain gauge cover
33. Spirit level
34. Rocker
35. Battery compartment
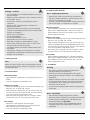
1. Explanation of Warning Symbols and Notes
Warning
This symbol is used to indicate safety instructions or to draw
your attention to specic hazards and risks.
Note
This symbol is used to indicate additional information or
important notes.
2. Package Contents
•‘RAINY’ weather station with wireless rain gauge (base
station for indoors / measuring station and wireless rain
gauge for outdoors)
•4 AAA Micro batteries
•2 AA Mignon batteries
•These operating instructions
3. Safety Notes
•The product is intended for private, non-commercial use only.
•Use the product for its intended purpose only.
•Protect the product from dirt, moisture and overheating, and
only use it in a dry environment.
•Do not use the product in the immediate vicinity of heaters
or other heat sources or in direct sunlight.
•Keep this product, as all electrical products, out of the reach
of children!
•Do not operate the product outside the power limits given in
the specications.
•Do not use the product in areas where the use of electronic
devices is not permitted.
•Do not use the product in moist environments and avoid
splashes.
•Do not place the product near interference elds, metal
frames, computers, TVs, etc. Electronic devices and window
frames can negatively affect the product’s functionality.
•Do not drop the product and do not expose it to any major
shocks.
•Do not modify the product in any way. Doing so voids the
warranty.
•Keep the packaging material out of the reach of children due
to the risk of suffocation.
•Dispose of packaging material immediately according to
locally applicable regulations.
•Do not open the device or continue to operate it if it
becomes damaged.
•Do not attempt to service or repair the product yourself.
Leave any and all service work to qualied experts.
•Use the item only in moderate climatic conditions.
Warning – Batteries
•When inserting batteries, note the correct polarity (+ and
- markings) and insert the batteries accordingly. Failure to
do so could result in the batteries leaking or exploding.

3
Warning – Batteries
•Only use batteries (or rechargeable batteries) that match
the specied type.
•Before you insert the batteries, clean the battery contacts
and the polar contacts.
•Do not allow children to change batteries without
supervision.
•Do not mix old and new batteries or batteries of a
different type or make.
•Remove the batteries from products that are not being
used for an extended period (unless these are being kept
ready for an emergency).
•Do not short-circuit batteries.
•Do not charge batteries.
•Do not throw batteries in a re.
•Keep batteries out of the reach of children.
•Never open, damage or swallow batteries or allow
them to enter the environment. They can contain toxic,
environmentally harmful heavy metals.
•Immediately remove and dispose of dead batteries from
the product.
•Avoid storing, charging or using the device in extreme
temperatures and extremely low atmospheric pressure (for
example, at high altitudes).
4. Getting Started
Note
Before use, make sure that you insert the batteries into the
measuring station and the wireless rain gauge rst, and then
into the base station.
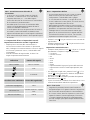
4.1 Insert batteries
Measuring station
•Open the battery compartment (29) and remove the contact
breaker.
•Then close the battery compartment cover.
Wireless rain gauge
•Remove the rain gauge cover (30) by simultaneously pressing
both locks (32), on either side, inwards.
•Open the battery compartment (35) next to the rocker (34),
and insert two AAA Micro batteries with the correct polarity.
•Then close the battery compartment cover.
•Now replace the rain gauge cover (30), and press it down
until the two locks (32) snap into place on either side.
Base station
•Remove the screen protector from the display.
•Open the battery compartment (23) and insert two AAA
Micro batteries with the correct polarity.
•Then close the battery compartment cover.
4.2 Replacing the batteries
Note – Replacing the batteries
•Note that the stations have to be resynchronised each
time you change the batteries in the measuring or base
station or in the wireless rain gauge.
•To do this, remove the batteries from the other station and
then reinsert them, or change them as required.
Measuring station
•Open the battery compartment (29), remove and properly
dispose of the depleted batteries, and insert two new AA
Mignon batteries with the correct polarity. Then close the
battery compartment cover.
Wireless rain gauge
•Remove the rain gauge cover (30) by simultaneously pressing
both locks (32), on either side, inwards.
•Open the battery compartment (35) next to the rocker (34),
remove and properly dispose of the depleted batteries, and
insert two new AAA Micro batteries with the correct polarity.
Then close the battery compartment cover.
•Now replace the rain gauge cover (30), and press it down
until the two locks (32) snap into place on either side.
Base station
•Open the battery compartment (23), remove and properly
dispose of the depleted batteries, and insert two new AAA
Micro batteries with the correct polarity. Then close the
battery compartment cover.
5. Installation
Warning
•Buy special or suitable installation material from a
specialised dealer for wall-mounting.
•Ensure that no faulty or damaged parts are installed.
•Never apply force during installation. This could damage
the product.
•Before installation, ensure that the chosen wall is suitable
for the weight to be mounted, and make sure that there
are no electrical wires, water, gas or other lines at the
installation site on the wall.
•Do not mount the product above locations where persons
might linger.
Note – Installation
•We recommend initially placing the base station,
measuring station and wireless rain gauge in the intended
locations without installing them, and making all the
settings described in 6. Operation.
•Only install the stations once the appropriate settings
have been made and a stable wireless connection is
established.

4
Note
•The wireless transmission range between the measuring
station, base station and wireless rain gauge is up to 100
m in open spaces.
•Before installation, ensure that wireless transmission
will not be disrupted by interference or obstacles like
buildings, trees, vehicles, high-voltage lines, etc.
•Before the nal installation, ensure that there is sucient
reception between the intended installation locations.
•When installing the measuring station, ensure that it is
protected from direct sunlight and rain.
•The international standard height for measuring air
temperature, according to the German Meteorological
Service, is 2 m (6.5 ft) above ground.
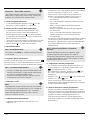
5.1 Base station
•Use the base to position the base station (25) on a level
surface.
•Alternatively, you can install the base station on a wall using
the opening (22) on the back.
5.2 Measuring station
•You can also position the measuring station on a level
outdoor surface.
•We recommend installing the measuring station securely on
an outdoor wall.
•Install an anchor, screw, nail, etc. in the wall of your choice.
•Hang up the base/measuring station using the opening (27)
intended for this purpose.
5.3 Wireless rain gauge
•You can also position the wireless rain gauge on a level
outdoor surface.
•It is recommended that you position the wireless rain
gauge safely, stably and horizontally in an area that is not
covered by trees, roof eaves, etc., to allow rain to fall into
the container without obstruction. If necessary, use the
integrated spirit level (33).
•Install an anchor, screw, nail, etc. into the intended
undersurface.
•Secure the wireless rain gauge using the drill holes provided
(31).
6.Operation
Note
Hold down the ‘ ’ button (17) or the ‘ ’ button (18) to
select the values faster.
6.1 Connection to the measuring station and wireless
rain gauge
•After you have inserted the batteries, the base station
automatically searches for a connection to the measuring
station and the wireless rain gauge, and performs initial setup.
Note
•Initial setup takes approx. 2 minutes.
•During the connection attempt, the measuring station +
wireless rain gauge wireless symbol (15) will ash.
•Do not press any buttons during setup. Otherwise, values
may not be transmitted correctly and there is a risk of
value errors and inaccuracies.
•The setup process is completed when the indoor (10) and
outdoor (3) measurement data is displayed.
•The measured value is automatically updated by the base
device about every 45 seconds.
•If the temperature is outside of the measuring range,
--.- (lower than minimum temperature) or --.- (higher than
maximum temperature) will appear on the temperature
display.
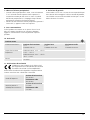
•If the base station consistently receives no signal from the
wireless rain gauge, press and hold the LIGHT button (1) for
approx. 3 seconds to start the manual search for the signal.
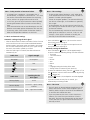
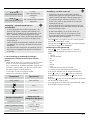
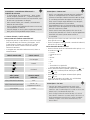
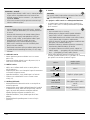
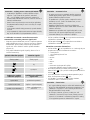
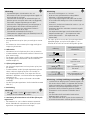
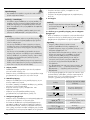
Display Search for a signal from the
measuring station
Display ashing Active
Displayed continuously Successful –
signal is being received
Displayed continuously
Inactive –
No signal received from
measuring station
Displayed continuously
Inactive –
No signal received from
wireless rain gauge

5
Note – Faulty transfer of measured values
•In isolated cases, interference – for example, from a
WLAN network, a computer or a television set – can cause
the transfer of measured values between the measuring
station, wireless rain gauge and base station to fail.
•In this case, you must resynchronise the stations by briey
removing the batteries from all stations and reinserting
them.
•If the measured values are not transferred again once the
batteries are inserted, replace the batteries with new ones.
•If necessary, select a new location for the base station in
order to avoid possible interference in the future.
6.2 Basic and manual settings
Automatic setting using the DCF signal
•After the base station has been switched on for the rst time
and successful transmission has been established between
the base station, measuring station and wireless rain gauge,
the clock will automatically search for a DCF signal. During
the search, the wireless symbol (4) will ash.
•When the radio signal is received, the date and time are
automatically set.
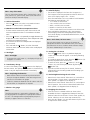
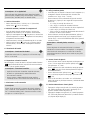
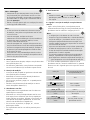
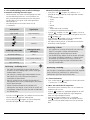
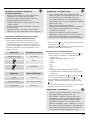
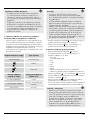
Radio icon Signal strength
No symbol No reception
Poor
Excellent
Radio icon Searching for the
DCF signal
Flashing display Active
Constant display Successful – signal is being
received
No display Error – signal search ended
Note – Time settings
•If, during initial setup of the device, a DCF radio signal
is not received within the rst few minutes, the search is
aborted. The radio symbol disappears.
•If there are reception problems, we recommend leaving
the clock to sit overnight, since interference is generally
less at night.
•In the meantime, you can start a manual search for the
DCF radio signal at another location or you can manually
set the time and date.
•The clock automatically continues to search for the DCF
radio signal on a daily basis (1:00 a.m., 2:00 a.m. and
3:00 p.m.). If the signal is received successfully, the
manually set time and date are overwritten.
•Press and hold the ‘ ’ button (18) to start the manual
search for the DCF radio signal.
•Press the ‘ ’ button (18) again to interrupt the manual
search for the DCF radio signal.
Manually setting the date/time
•Press and hold the ‘ ’ button (16) for approximately 3
seconds to make the following settings one after the other.
•Time zone
•12/24-hour format
•Hour
•Minute
•Year
•Month
•Day
•Language setting for the day of the week
•Setting of the rain measuring unit (mm/inch)
•To select the individual values, press the ‘ ’ button (17) or
the ‘ ’ button (18) and conrm each selection by pressing
the ‘ ’ button (16).
•Press the ‘ ’ button (16) to adopt the set value displayed
and to skip.
•If you do not make an entry for 10 seconds, you
automatically exit Settings mode.
Note – Time zone
•The DCF signal can be received over long distances, but
always transmits the current Central European Time in
Germany. Make sure you account for the time difference
in countries with another time zone.
•If you are in Moscow, the time is 3 hours later than in
Germany. This means that you should set +3 for the
time zone. The clock then automatically sets the time to
3 hours after the DCF signal received or relative to the
manually set time.

6
Note – Day of the week
You can choose from German (GER), English (ENG), French
(FRE), Italian (ITA), Spanish (SPA), Dutch (DUT) and Danish
(DAN) for the day of the week display.
6.3 Celsius/Fahrenheit
•Press the ‘ ’ button (16) when in any mode to choose
between °C (Celsius) and °F (Fahrenheit).
6.4 Maximum and minimum temperature values
•The base station automatically stores the maximum and
minimum temperature values in the outdoor and indoor
areas.
•Press the " " button (18) repeatedly to toggle between the
display of the current temperature, lowest temperature (MIN)
and maximum temperature (MAX).
•The maximum and minimum temperatures are displayed
for 10 seconds.
•Press and hold the " " button (18) when the stored
maximum (MAX) and minimum (MIN) values are displayed
to reset them.
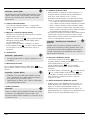
6.5 Backlight
Note – Backlight
•If you press the
LIGHT
button (1), the display will light up
for approx. 10 seconds.
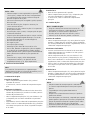
6.6 Low battery charge
As soon as the battery symbol appears on the display of
the base station, the capacity of the batteries in the measuring
station is very low. Replace the batteries immediately.
Note – Replacing the batteries
•Note that the stations have to be resynchronised each
time you change the batteries in the measuring or base
station or in the wireless rain gauge.
•To do this, remove the batteries from all stations and then
reinsert them, or change them as required.
7. Wireless rain gauge
Note
The fallen precipitation is measured in millimetres (mm). 1
mm of precipitation corresponds to a precipitation amount
of 1 l/m². The average amount of precipitation per year in
Germany is approx. 800 mm ^= 800 l/m².
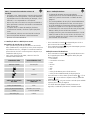
7.1 Rainfall display
•The rainfall is displayed in the form of a histogram (11).
•The histogram shows the precipitation values for the last 6
hours (max. display range: 5 mm – 50 mm).
•Press the RAIN button (19) in any mode to switch between
the following rainfall displays (12):
•1H = rainfall in the last hour
•24H = rainfall in the last 24 hours
•WEEK = rainfall in the last week
•MONTH = rainfall in the last month
•TOTAL = total rainfall since rst-time use or the last reset
•Press and hold the RAIN button (19) in the respective
rainfall display to reset the stored precipitation amounts.
Each rainfall display (1H/24H/WEEK/MONTH/TOTAL) can be
individually reset.
Note – Rain alarm, 24-hour count
The rain alarm informs you as soon as the amount of
precipitation exceeds a user-denable value. If this value is
reached within 24 hours, the base station will emit a beep.
The data is deleted daily at 24:00 hours.
7.2 Setting the rain alarm
•Press the ‘ ’ button (20) in any mode to display the
current rain alarm value for approx. 10 seconds (presetting:
12.7 mm).
•To change the preset alarm value, keep the ‘ ’ button (20)
pressed; the preset alarm value ashes.
•To select the value, press the ‘ ’ button (17) or the ‘
’ button (18), and conrm your selection by pressing the ‘
’ button (20).
•If you do not make an entry for 10 seconds, the device
automatically exits the settings mode and the settings you
made are saved.
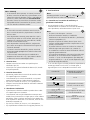
7.3 Activating/deactivating the rain alarm
•Move the rain alarm ON/OFF slide switch (21) to the left to
the ON position. The rain alarm is activated and the rain
alarm symbol (13) appears on the display (2).
•Move the rain alarm ON/OFF slide switch (21) to the right to
the OFF position. The rain alarm is deactivated and the rain
alarm symbol (13) disappears from the display (2).
7.4 Stopping the rain alarm
•If the rain alarm is activated and the set alarm value is
exceeded, the alarm is triggered and a beep will sound on
the base station for two minutes. The rain alarm symbol (13)
ashes. After that, the rain alarm stops automatically.
•Press the LIGHT button (1) or any other button of your choice
to stop the rain alarm manually.

7
8. Care and Maintenance
Only clean this product with a slightly damp, lint-free cloth and
do not use aggressive cleaning agents. Make sure that water
does not get into the product.
9. Warranty Disclaimer
Hama GmbH & Co KG assumes no liability and provides no
warranty for damage resulting from improper installation/
mounting, improper use of the product or from failure to
observe the operating instructions and/or safety notes.
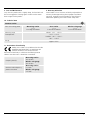
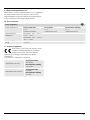
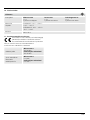
10. Technical Data
Weather Station a
Max. transmitting power Measuring station
1.5 V
2 AA Mignon batteries
Base station
1.5 V
2 AAA Micro batteries
Wireless rain gauge
1.5 V
2 AAA Micro batteries
Measuring range
for temperature
Indoors: -10°C – +50°C /
+14°F – +122°F
Outdoors: -40°C – +60°C /
-40°F – +140°F
Range Approx. 100 m
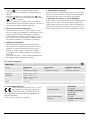
11. Declaration of Conformity
Hereby, Hama GmbH & Co KG declares that the radio
equipment type [00186420] is in compliance with
Directive 2014/53/EU. The full text of the EU
declaration of conformity is available at the following internet
address: www.hama.com ->00186420-> Downloads.
Frequency band(s)
Measuring station
433.92 MHz
Wireless rain gauge
433.92 MHz
Maximum radio-frequency
power transmitted
Measuring station
0.14 mW
Wireless rain gauge
0.16 mW

8
GOperating instruction
Bedienungselemente und Anzeigen
A Basisstation
1. LIGHT-Taste
= Aktivierung Hintergrundbeleuchtung (ca. 10 Sekunden) /
Manuelle Suche nach Signal von Funk-Regenmesser
2. Display
3. Außentemperatur
4. DCF-Funksymbol
5. Uhrzeit
6. Wochentag
7. Tag
8. Monat
9. Jahr
10. Raumtemperatur
11. Histogramm Regenmenge
12. Anzeige Regenmenge
13. Regenalarmsymbol
14. Batteriestatussymbol
15. Funksymbol Messstation + Funk-Regenmesser
16. „ “ Taste
= Wechsel zwischen °C und °F /
Einstellung von Zeit und Datum
17. „ “ Taste
= Erhöhung des aktuellen Einstellungswertes /
Manuelle Suche nach Signal von Messstation
18. „ “ Taste
= Anzeige der gespeicherten Max.-/Min. Außen- und
Innentemperaturwerte /
Verringerung des aktuellen Einstellungswertes
19. „RAIN“ Taste
= Anzeige Regenmenge (1H/24H/WEEK/MONTH/TOTAL)
20. „ “ Taste
= Anzeige Regenalarmwert / Einstellung Regenalarmwert
21. Regenalarm ON-/OFF-Schiebeschalter
= Aktivierung/ Deaktivierung Regenalarm
22. Aussparung für Wandmontage
23. Batteriefach
24. Batteriefachentriegelung
25. Standfuß
B Messstation
26. Kontrollleuchte Übertragung
27. Aussparung für Wandmontage
28. Kanalauswahl
29. Batteriefach
C Funk-Regenmesser
30. Abdeckung Regenmesser
31. Bohrungen für Bodenmontage
32. Verschlüsse für die Abdeckung des Regenmessers
33. Wasserwaage
34. Wippe
35. Batteriefach
1. Erklärung von Warnsymbolen und Hinweisen
Warnung
Wird verwendet, um Sicherheitshinweise zu kennzeichnen
oder um Aufmerksamkeit auf besondere Gefahren und
Risiken zu lenken.
Hinweis
Wird verwendet, um zusätzlich Informationen oder wichtige
Hinweise zu kennzeichnen.
2. Packungsinhalt
•Wetterstation „RAINY“ mit Funk-Regenmesser (Basisstation
für den Innenbereich / Messstation und Funk-Regenmesser
für den Außenbereich)
•4 Batterien AAA Micro
•2 Batterien AA Mignon
•diese Bedienungsanleitung
3. Sicherheitshinweise
•Das Produkt ist für den privaten, nicht-gewerblichen
Haushaltsgebrauch vorgesehen.
•Verwenden Sie das Produkt ausschließlich für den dazu
vorgesehenen Zweck.
•Schützen Sie das Produkt vor Schmutz, Feuchtigkeit und
Überhitzung und verwenden Sie es nur in trockenen
Umgebungen.
•Betreiben Sie das Produkt nicht in unmittelbarer Nähe
der Heizung, anderer Hitzequellen oder in direkter
Sonneneinstrahlung.
•Dieses Produkt gehört, wie alle elektrischen Produkte, nicht
in Kinderhände!
•Betreiben Sie das Produkt nicht außerhalb seiner in den
technischen Daten angegebenen Leistungsgrenzen.
•Benutzen Sie das Produkt nicht in Bereichen, in denen
elektronische Produkte nicht erlaubt sind.
•Verwenden Sie das Produkt nicht in einer feuchten
Umgebung und vermeiden Sie Spritzwasser.
•Positionieren Sie das Produkt nicht in der Nähe von
Störfeldern, Metallrahmen, Computern und Fernsehern etc.
Elektronische Geräte sowie Fensterrahmen beeinträchtigen
die Funktion des Produktes negativ.
•Lassen Sie das Produkt nicht fallen und setzen Sie es keinen
heftigen Erschütterungen aus.
•Nehmen Sie keine Veränderungen am Produkt vor. Dadurch
verlieren Sie jegliche Gewährleistungsansprüche.
•Halten Sie Kinder unbedingt von dem Verpackungsmaterial
fern, es besteht Erstickungsgefahr.
•Entsorgen Sie das Verpackungsmaterial sofort gemäß den
örtlich gültigen Entsorgungsvorschriften.
•Öffnen Sie das Produkt nicht und betreiben Sie es bei
Beschädigungen nicht weiter.

9
•Versuchen Sie nicht, das Produkt selbst zu warten oder zu
reparieren. Überlassen Sie jegliche Wartungsarbeit dem
zuständigen Fachpersonal.
•Verwenden Sie den Artikel nur unter moderaten klimatischen
Bedingungen.
Warnung – Batterien
•Beachten Sie unbedingt die korrekte Polarität
(Beschriftung + und -) der Batterien und legen Sie diese
entsprechend ein. Bei Nichtbeachtung besteht die Gefahr
des Auslaufens oder einer Explosion der Batterien.
•Verwenden Sie ausschließlich Akkus (oder Batterien), die
dem angegebenen Typ entsprechen.
•Reinigen Sie vor dem Einlegen der Batterien die
Batteriekontakte und die Gegenkontakte.
•Gestatten Sie Kindern nicht ohne Aufsicht das Wechseln
von Batterien.
•Mischen Sie alte und neue Batterien nicht, sowie
Batterien unterschiedlichen Typs oder Herstellers.
•Entfernen Sie Batterien aus Produkten, die längere Zeit
nicht benutzt werden (außer diese werden für einen
Notfall bereit gehalten).
•Schließen Sie die Batterien nicht kurz.
•Laden Sie Batterien nicht.
•Werfen Sie Batterien nicht ins Feuer.
•Bewahren Sie Batterien außerhalb der Reichweite von
Kindern auf.
•Batterien nie öffnen, beschädigen, verschlucken oder
in die Umwelt gelangen lassen. Sie können giftige und
umweltschädliche Schwermetalle enthalten.
•Entfernen und entsorgen Sie verbrauchte Batterien
unverzüglich aus dem Produkt.
•Vermeiden Sie Lagerung, Laden und Benutzung bei
extremen Temperaturen und extrem niedrigem Luftdruck
(wie z.B. in großen Höhen).
4. Inbetriebnahme
Hinweis
Beachten Sie, dass Sie bei der Inbetriebnahme immer
zuerst die Batterien in die Messstation sowie in den Funk-
Regenmesser, und dann in die Basisstation einlegen.
4.1 Batterien einlegen
Messstation
•Öffnen Sie das Batteriefach (29) und entfernen Sie den
Kontaktunterbrecher.
•Schließen Sie die Batteriefachabdeckung anschließend.
Funk-Regenmesser
•Drücken Sie die beiden Verschlüsse der Regenmesser-
Abdeckung (32) an den Seiten gleichzeitig nach innen und
nehmen Sie die Abdeckung des Regenmessers (30) ab.
•Öffnen Sie das Batteriefach (35) neben der Wippe (34) und
legen Sie zwei Batterien AAA Micro polrichtig ein.
•Schließen Sie die Batteriefachabdeckung anschließend.
•Setzen Sie nun die Abdeckung des Regenmessers (30) wieder
auf und drücken diese nach unten, bis beide Verschlüsse der
Regenmesser-Abdeckung (32) an den Seiten eingerastet sind.
Basisstation
•Entfernen Sie die Schutzfolie auf dem Display (1).
•Öffnen Sie das Batteriefach (23) und legen Sie zwei Batterien
AAA Micro polrichtig ein.
•Schließen Sie die Batteriefachabdeckung anschließend.
4.2 Batterien wechseln
Hinweis
•Beachten Sie, dass Sie nach jedem Batteriewechsel an
Mess-, Basisstation oder Funk-Regenmesser eine neue
Synchronisation der Stationen erfolgen muss.
•Nehmen Sie dazu die Batterien der anderen Station
heraus und setzen sie erneut ein oder wechseln Sie diese
bei Bedarf ebenfalls aus.
Messstation
•Öffnen Sie das Batteriefach (29), entnehmen und entsorgen
Sie die verbrauchten Batterien und legen Sie zwei neue
Batterien AA Mignon polrichtig ein. Schließen Sie die
Batteriefachabdeckung anschließend.
Funk-Regenmesser
•Drücken Sie die beiden Verschlüsse der Regenmesser-
Abdeckung (32) an den Seiten gleichzeitig nach innen und
nehmen Sie die Abdeckung des Regenmessers (30) ab.
•Öffnen Sie das Batteriefach (35) neben der Wippe (34),
entnehmen und entsorgen Sie die verbrauchten Batterien
und legen Sie zwei neue Batterien AAA Micro polrichtig ein.
Schließen Sie die Batteriefachabdeckung anschließend.
•Setzen Sie nun die Abdeckung des Regenmessers (30) wieder
auf und drücken diese nach unten, bis beide Verschlüsse der
Regenmesser-Abdeckung (32) an den Seiten eingerastet sind.
Basisstation
•Öffnen Sie das Batteriefach (23), entnehmen und entsorgen
Sie die verbrauchten Batterien und legen Sie zwei neue
Batterien AAA Micro polrichtig ein. Schließen Sie die
Batteriefachabdeckung anschließend.
5. Montage
Warnung
•Besorgen Sie sich spezielles bzw. geeignetes
Montagematerial im Fachhandel für die Montage an der
vorgesehenen Wand.
•Stellen Sie sicher, dass keine fehlerhaften oder beschädigten
Teile montiert werden.
•Wenden Sie bei der Montage niemals Gewalt oder hohe
Kräfte an. Diese können das Produkt beschädigen.

10
Warnung
•Prüfen Sie vor Montage die Eignung der vorgesehenen
Wand für das anzubringende Gewicht und vergewissern
Sie sich, dass sich an der Montagestelle in der Wand
keine elektrischen Leitungen, Wasser-, Gas- oder sonstige
Leitungen benden.
•Montieren Sie das Produkt nicht an Orten, unter denen sich
Personen aufhalten könnten.
Hinweis – Montage
•Es wird empfohlen, die Basis- und Messstation sowie
den Funk-Regenmesser zunächst an den gewünschten
Aufstellorten ohne Montage zu platzieren und alle
Einstellungen - wie in 6. Betrieb beschrieben –
vorzunehmen.
•Montieren Sie erst nach korrekter Einstellung und stabiler
Funkverbindung die Station/en.
Hinweis
•Die Reichweite der Funkübertragung zwischen Mess-,
Basisstation und Funk-Regenmesser beträgt im freien Gelände
bis zu 100m.
•Achten Sie vor der Montage darauf, dass die Funkübertragung
nicht durch Störsignale oder Hindernisse wie Gebäude, Bäume,
Fahrzeuge, Hochspannungsleitungen, u.a. beeinusst wird.
•Stellen Sie vor der endgültigen Montage sicher, dass
zwischen den gewünschten Aufstellorten ausreichender
Empfang besteht.
•Achten Sie bei der Montage der Messstation darauf, dass
diese vor direkter Sonne und Regen geschützt positioniert ist.
•Die internationale Standardhöhe für die Messung der
Lufttemperatur beträgt laut Deutschem Wetterdienst 2m
(6,5ft) über Grund.
5.1 Basisstation
•Stellen Sie die Basisstation mithilfe des Standfußes (25) auf
einer ebenen Fläche auf.
•Alternativ können Sie die Basisstation mithilfe der
Aussparung (22) auf der Rückseite an einer Wand montieren.
5.2 Messstation
•Die Messstation können Sie ebenfalls auf einer ebenen
Fläche im Außenbereich aufstellen.
•Es wird empfohlen, die Messstation sicher und fest an einer
Außenwand zu montieren.
•Befestigen Sie Dübel, Schraube, Nagel, etc. in der dafür
vorgesehenen Wand.
•Hängen Sie die Messstation mit der dafür vorgesehenen
Aussparung (27) daran ein.
5.3 Funk-Regenmesser
•Den Funk-Regenmesser können Sie ebenfalls auf einer
ebenen Fläche im Außenbereich aufstellen.
•Es wird empfohlen, den Funk-Regenmesser sicher, fest
und waagerecht in einem Bereich zu platzieren, der nicht
durch Bäume, Dachvorsprünge oder ähnliches verdeckt
wird, damit der Regen ohne Behinderung in den Behälter
fallen kann. Verwenden Sie gegebenenfalls die integrierte
Wasserwaage (33).
•Befestigen Sie Dübel, Schraube, Nagel, etc. in dem dafür
vorgesehenen Boden.
•Befestigen Sie den Funk-Regenmesser an den dafür
vorgesehenen Bohrungen (31).
6. Betrieb
Hinweis
•Halten Sie die
„” Taste
(17) oder die
„” Taste
(18)
gedrückt, um die Werte schneller auswählen zu können.
6.1 Verbindung zur Messstation und zum Funk-
Regenmesser
•Nach dem Einlegen der Batterien sucht die Basisstation
automatisch nach einer Verbindung zur Messstation und zum
Funk-Regenmesser und führt die Ersteinrichtung durch.
Hinweis
•Die Ersteinrichtung dauert ca. 2 Minuten.
•Während dem Verbindungsversuch blinkt das Funksymbol
Messstation + Funk-Regenmesser (15) auf.
•Vermeiden Sie in dieser Zeit jegliche Betätigung der
Tasten! Andernfalls können Fehler und Ungenauigkeiten
bei den Werten und deren Übertragung entstehen.
•Der Vorgang ist beendet, sobald die Messdaten für Innen-
(10) und Außenbereich (3) angezeigt werden.
•Der Messwert wird vom Basisgerät etwa alle 45 Sekunden
automatisch aktualisiert.
•Liegt der Temperaturwert außerhalb des Messbereichs,
wird in der Temperaturanzeige --.- (für Temperaturen
unterhalb des Messbereichs) bzw. --.- (für Temperaturen
oberhalb des Messbereichs) angezeigt.
•Wird wiederholt kein Signal von dem Funk-Regenmesser
empfangen, drücken und halten Sie die LIGHT-Taste (1) für
ca. 3 Sekunden, um die manuelle Suche nach dem Signal
zu starten.
Anzeige Suche nach Signal von
Messstation + Funk-Regenmesser
Blinkende Anzeige Aktiv
Dauerhafte Anzeige
Erfolgreich –
Signal wird empfangen
Dauerhafte Anzeige
Inaktiv –
Kein Signalempfang Messstation

11
Dauerhafte Anzeige
Inaktiv –
Kein Signalempfang Funk-
Regenmesser
Hinweis – fehlerhafte Übertragung
der Messwerte
•In einzelnen Fällen kann es aufgrund von Störsignalen
– z.B. durch ein WLAN-Netzwerk, Computer, Fernseher,
etc. – vorkommen, dass die Übertragung der Messwerte
zwischen Basis-, Messstation und Funk-Regenmesser
fehlschlägt.
•Synchronisieren Sie dann die Stationen neu, indem Sie
die Batterien aller Stationen kurz herausnehmen und
erneut einsetzen.
•Sollten die Messwerte anschließend erneut nicht
übertragen werden, wechseln Sie die Batterien durch
neue aus.
•Wählen Sie ggfs. einen neuen Aufstellort für die
Basisstation, um die möglichen Störsignale zukünftig
zu umgehen.
6.2 Grundeinstellung und manuelle Einstellungen
Automatische Einstellung nach DCF-Signal
•Nach dem ersten Einschalten der Basisstation und
erfolgreicher Übertragung zwischen Basis-, Messstation und
Funk-Regenmesser, beginnt die Uhr automatisch die Suche
nach einem DCF-Signal. Während des Suchvorgangs blinkt
das Funksymbol (4) auf.
•Bei Empfang des Funksignals werden Datum und Uhrzeit
automatisch eingestellt.
Funksymbol Signalstärke
Kein Symbol Kein Empfang
Schlecht
Hervorragend
Anzeige Funksymbol Suche nach DCF-Funksignal
Blinkende Anzeige Aktiv
Dauerhafte Anzeige Erfolgreich – Signal wird
empfangen
Keine Anzeige Inaktiv
Hinweis – Uhrzeiteinstellung
•Wird innerhalb der ersten Minuten während der
Ersteinrichtung kein DCF-Funksignal empfangen, wird die
Suche beendet. Das Funksymbol erlischt.
•Bei Empfangsstörungen wird empfohlen, die Uhr über
Nacht stehen zu lassen, da hier die Störsignale in der
Regel geringer sind.
•Sie können währenddessen eine manuelle Suche nach
dem DCF-Funksignal an einem anderen Aufstellungsort
starten oder die manuelle Einstellung von Uhrzeit und
Datum vornehmen.
•Die Uhr sucht automatisch weiterhin täglich (01:00,
02:00 und 03:00 Uhr) nach dem DCF-Funksignal. Bei
erfolgreichem Signalempfang werden die manuell
eingestellte Uhrzeit und das Datum überschrieben.
•Halten Sie die „ “-Taste (18) gedrückt, um die manuelle
Suche nach dem DCF-Funksignal zu starten.
•Drücken Sie erneut die „ “-Taste (18), um die manuelle
Suche nach dem DCF-Funksignal zu unterbrechen.
Manuelle Einstellung Datum/Uhrzeit
•Drücken und halten Sie die „ “-Taste (16) für ca. 3
Sekunden, um folgende Einstellungen nacheinander
vorzunehmen.
•Zeitzone
•12/24-Stunden-Format
•Stunde
•Minute
•Jahr
•Monat
•Tag
•Spracheinstellung für den Wochentag
•Einstellung der Regenmesseinheit (mm/inch)
•Drücken Sie zum Auswählen der einzelnen Werte die „
“ Taste (17) oder die „ ” Taste (18) und bestätigen Sie die
jeweilige Auswahl durch Drücken der „ “ -Taste (16).
•Drücken Sie die „ “ -Taste (16), um den angezeigten
Einstellungswert zu übernehmen und zu überspringen.
•Erfolgt 10 Sekunden keine Eingabe, wird der
Einstellungsmodus automatisch verlassen.
Hinweis – Zeitzone
•Das DCF-Signal kann weitläug empfangen werden,
entspricht jedoch immer der MEZ, die in Deutschland
gilt. Beachten Sie daher, dass Sie in Ländern mit anderer
Zeitzone die Zeitverschiebung beachten.
•Benden Sie sich in Moskau, ist es dort bereits 3 Stunden
später als in Deutschland. Stellen Sie daher bei der
Zeitzone +3 ein. Die Uhr stellt sich dann immer nach
Empfang des DCF-Signals bzw. in Bezug auf die manuell
eingestellte Uhrzeit automatisch 3 Stunden weiter.

12
Hinweis – Wochentag
Sie können für die Wochentaganzeige die Sprachen Deutsch
(GER), Englisch (ENG), Französisch (FRE), Italienisch (ITA),
Spanisch (SPA), Niederländisch (DUT) oder Dänisch (DAN)
wählen.
6.3 Celsius/Fahrenheit
•Drücken Sie in einem beliebigen Modus die „ “-Taste (16),
um zwischen °C (Celsius) oder °F (Fahrenheit) auszuwählen.
6.4 Höchst- und Tiefstwerte der Temperatur
•Die Basisstation speichert die Höchst- und Tiefstwerte der
Temperatur im Außen- und Raumbereich automatisch ab.
•Drücken Sie wiederholt die „ ” Taste (18), um zwischen der
Anzeige von aktueller Temperatur, niedrigster Temperatur
(MIN) und höchster Temperatur (MAX) zu wechseln.
•Die Höchst- und Tiefstwerte werden 10 Sekunden angezeigt.
•Drücken und halten Sie die „ ” Taste (18), wenn die
abgespeicherten Höchst- (MAX) und Tiefstwerte (MIN)
angezeigt werden, um diese zurückzusetzen.
6.5 Hintergrundbeleuchtung
Hinweis – Hintergrundbeleuchtung
Drücken Sie die LIGHT-Taste (1), wird das Display für ca. 10
Sekunden beleuchtet.
6.6 Niedrige Batteriekapazität
Sobald das Batteriesymbol auf dem Display der
Basisstation angezeigt wird, ist die Kapazität der Batterien
in der Messstation sehr gering. Wechseln Sie die Batterien
umgehend aus.
Hinweis – Batteriewechsel
•Beachten Sie, dass Sie nach jedem Batteriewechsel an
Mess-, Basisstation oder Funk-Regenmesser eine neue
Synchronisation der Stationen erfolgen muss.
•Nehmen Sie dazu die Batterien aller Stationen heraus und
setzen Sie erneut ein oder wechseln Sie diese bei Bedarf
ebenfalls aus.
7. Funk-Regenmesser
Hinweis
Der gefallene Niederschlag wird in der Maßeinheit Millimeter
(mm) angegeben. Ein Niederschlag von 1 mm entspricht
der Niederschlagsmenge von 1 l/m². Die durchschnittliche
Niederschlagsmenge in Deutschland beträgt ca. 800 mm pro
Jahr ^= 800 l/m² pro Jahr.
7.1 Anzeige der Regenmenge
•Die Regenmenge wird in Form eines Histogramms (11)
angezeigt.
•Das Histogramm zeigt die Niederschlagswerte der letzten 6
Stunden (max. Anzeigebereich: 5 mm – 50 mm).
•Drücken Sie in einem beliebigen Modus die RAIN-Taste
(19), um zwischen folgenden Regenmengen-Anzeigen (12)
zu wechseln:
•1H = Anzeige der Regenmenge der letzten Stunde
•24H = Anzeige der Regenmenge der letzten 24 Stunden
•WEEK = Anzeige der Regenmenge der letzten Woche
•MONTH = Anzeige der Regenmenge des letzten Monats
•TOTAL = Anzeige der Regenmenge gesamt seit der
Inbetriebnahme oder der letzten Rückstellung
•Halten Sie die RAIN-Taste (19) in der jeweiligen
Regenmengen-Anzeige gedrückt, um die gespeicherten
Niederschlagsmengen zurückzusetzen. Jede Regenmengen-
Anzeige (1H/24H/WEEK/MONTH/TOTAL) kann individuell
zurückgesetzt werden.
Hinweis – Regenalarm, 24-Stunden-Zählung
Der Regenalarm informiert Sie, sobald mehr Niederschlag
fällt als der individuell festgelegte Alarmwert. Wenn der
eingestellte Regenalarmwert innerhalb von 24 Stunden
erreicht wird, ertönt ein Piepton an der Basisstation. Die
Daten werden täglich um 24:00 Uhr gelöscht.
7.2 Einstellung Regenalarm
•Drücken Sie in einem beliebigen Modus die „ “ Taste
(20), um den aktuellen Regenalarmwert für ca. 10 Sekunden
anzuzeigen (Voreinstellung: 12,7 mm)
•Halten Sie die „ “ Taste (20) gedrückt bis der
voreingestellte Alarmwert blinkt, um diesen individuell
festzulegen.
•Drücken Sie zum Auswählen des Wertes die „ “-Taste (17)
oder die „ ”-Taste (18) und bestätigen Sie die Auswahl
durch Drücken der „ “-Taste (20).
•Erfolgt 10 Sekunden keine Eingabe, wird der
Einstellungsmodus automatisch verlassen und die
vorgenommenen Einstellungen gespeichert.
7.3 Aktivierung/ Deaktivierung Regenalarm
•Schieben Sie den Regenalarm ON-/OFF-Schiebeschalter (21)
nach links auf die Position ON. Der Regenalarm ist aktiviert
und auf dem Display (2) wird das Regenalarmsymbol (13)
angezeigt.
•Schieben Sie den Regenalarm ON-/OFF-Schiebeschalter
(21) nach rechts auf die Position OFF. Der Regenalarm ist
deaktiviert und das Regenalarmsymbol (13) auf dem Display
(2) erlischt.

13
7.4 Regenalarm beenden
•Ist der Regenalarm aktiviert, wird dieser bei Überschreiten
des eingestellten Alarmwertes ausgelöst und es ertönt
für zwei Minuten ein Piepton an der Basisstation. Das
Regenalarmsymbol (13) blinkt. Danach wird der Regenalarm
automatisch beendet.
•Drücken Sie die LIGHT-Taste (1) oder eine andere beliebige
Taste, um den Regenalarm manuell zu beenden.
8. Wartung und Pflege
Reinigen Sie dieses Produkt nur mit einem fusselfreien, leicht
feuchten Tuch und verwenden Sie keine aggressiven Reiniger.
Achten Sie darauf, dass kein Wasser in das Produkt eindringt.
Tauchen Sie die Wetterstation bzw. den Sensor niemals in
Wasser ein. Vermeiden Sie Spritzwasser.
9. Haftungsausschluss
Die Hama GmbH & Co KG übernimmt keinerlei Haftung
oder Gewährleistung für Schäden, die aus unsachgemäßer
Installation, Montage und unsachgemäßem Gebrauch des
Produktes oder einer Nichtbeachtung der Bedienungsanleitung
und/oder der Sicherheitshinweise resultieren.
10. Technische Daten
Wetterstation a
Stromversorgung Messstation
1.5 V
2 Batterien AA Mignon
Basisstation
1.5 V
2 Batterien AAA Micro
Funk-Regenmesser
1.5 V
2 Batterien AAA Micro
Messbereich
Temperatur
Innenbereich: -10°C – +50°C /
+14°F – +122°F
Außenbereich: -40°C – +60°C /
-40°F – +140°F
Reichweite ca. 100 m
11. Konformitätserklärung
Hiermit erklärt die Hama GmbH & Co KG, dass der
Funkanlagentyp [00186420] der Richtlinie
2014/53/EU entspricht. Der vollständige Text der
EU-Konformitätserklärung ist unter der folgenden
Internetadresse verfügbar: www.hama.
com->00186420 ->Downloads.
Frequenzband/
Frequenzbänder
Messstation
433.92 MHz
Funk-Regenmesser
433.92 MHz
Abgestrahlte maximale
Sendeleistung
Messstation
0.14 mW
Funk-Regenmesser
0.16 mW

14
FMode d‘emploi
Éléments de commande et d'affichage
A Station de base
1. Touche LIGHT
= allumage du rétroéclairage (env. 10 secondes) / recherche
manuelle du signal du pluviomètre sans l
2. Écran
3. Température extérieure
4. Icône radio du signal DCF
5. Heure
6. Jour de la semaine
7. Jour
8. Mois
9. Année
10. Température ambiante
11. Histogramme de la pluviosité
12. Achage de la pluviosité
13. Icône d’alarme pluie
14. Icône d’état des piles
15. Icône radio de la station de mesure et du pluviomètre sans l
16. Touche « »
= commutation entre achage en °C et °F / réglage de
l'heure et de la date
17. Touche « »
= augmentation de la valeur en cours de réglage / recherche
manuelle du signal de la station de mesure
18. Touche « »
= achage des températures intérieure et extérieure max./
min. enregistrées / diminution de la valeur en cours de
réglage
19. Touche «RAIN»
= achage de la pluviosité (1H/24H/WEEK/MONTH/TOTAL)
20. Touche « »
= achage du seuil xé pour l’alarme pluie / réglage du seuil
pour l’alarme pluie
21. Sélecteur ON/OFF de l’alarme pluie
= activation / désactivation de l’alarme pluie
22. Fente pour installation murale
23. Compartiment à piles
24. Déverrouillage du compartiment à piles
25. Pied
B Station de mesure
26. Témoin de contrôle de transmission
27. Fente pour installation murale
28. Sélection du canal
29. Compartiment à piles
C Pluviomètre sans l
30. Couvercle du pluviomètre
31. Perçages pour le montage au sol
32. Fermetures pour le couvercle du pluviomètre
33. Niveau à bulle
34. Bascule
35. Compartiment à piles
1. Explication des symboles d‘avertissement et
des remarques
Avertissement
Ce symbole est utilisé pour indiquer des consignes de
sécurité ou pour attirer votre attention sur des dangers et
risques particuliers.
Remarque
Ce symbole est utilisé pour indiquer des informations
supplémentaires ou des remarques importantes.
2. Contenu de l'emballage
•Station météorologique «RAINY» avec pluviomètre sans
l (station de base pour l’intérieur / station de mesure et
pluviomètre sans l pour l’extérieur)
•4 piles LR03/AAA micro
•2 piles LR6/AA mignon
•Mode d'emploi
3. Consignes de sécurité
•Ce produit est destiné à une installation domestique non
commerciale.
•Utilisez le produit exclusivement conformément à sa
destination.
•Protégez le produit de toute saleté, humidité, surchauffe et
utilisez-le uniquement dans des environnements secs.
•N’utilisez pas le produit à proximité immédiate d‘un
chauffage, d’autres sources de chaleur ou exposé aux rayons
directs du soleil.
•Cet appareil, comme tout appareil électrique, doit être gardé
hors de portée des enfants !
•N‘utilisez pas le produit en dehors des limites de puissance
indiquées dans les caractéristiques techniques.
•N‘utilisez pas le produit dans les zones dans lesquelles
l‘utilisation d‘appareils électroniques est interdite.
•N‘utilisez pas le produit dans un environnement humide et
évitez toute projection d‘eau.
•Utilisez l‘appareil exclusivement branché à une prise de
courant appropriée. La prise de courant doit être située à
proximité du produit et doit être facilement accessible.
•Protégez le produit des secousses violentes et évitez tout
choc ou toute chute.
•N’apportez aucune modication à l’appareil. Des
modications vous feraient perdre vos droits de garantie.
•Tenez les emballages d‘appareils hors de portée des enfants,
risque d‘étouffement.
•Recyclez les matériaux d’emballage conformément aux
prescriptions locales en vigueur.
•Ne tentez pas d‘ouvrir le produit en cas de détérioration et
cessez de l’utiliser.
•Ne tentez pas de réparer l’appareil vous-même ni d’effectuer
des travaux d’entretien. Déléguez tous travaux d‘entretien à
des techniciens qualiés.

15
•Utilisez l’article uniquement dans des conditions climatiques
modérées.
Avertissement – concernant les piles
•Respectez impérativement la polarité de la pile
(marquage + et -) lors de l‘insertion dans le boîtier ;
risques d‘écoulement et d‘explosion des piles si tel n‘est
pas le cas.
•Utilisez exclusivement des batteries (ou des piles) du
type indiqué.
•Avant d‘insérer les piles, nettoyez-en les contacts, ainsi
que les contacts d‘accouplement.
•N‘autorisez pas à des enfants de remplacer les piles d‘un
appareil sans surveillance.
•N’utilisez pas simultanément des piles usagées et des piles
neuves ou des piles de différents types.
•Retirez les piles des produits que vous ne comptez pas
utiliser pendant un certain temps (à l‘exception des
produits d‘alarme en veille).
•Ne court-circuitez pas les piles.
•Ne tentez pas de recharger les piles.
•Ne jetez pas de piles au feu.
•Conservez les piles hors de portée des enfants.
•Ne tentez pas d‘ouvrir les piles, faites attention à ne pas
les endommager, les jeter dans l’environnement et à ce
que des petits enfants ne les avalent pas. Les piles sont
susceptibles de contenir des métaux lourds toxiques et
nocifs pour l‘environnement.
•Retirez les piles usagées immédiatement du produit pour
les recycler.
•Évitez de stocker, charger et utiliser le produit à des
températures extrêmes et à une pression atmosphérique
extrêmement basse (à haute altitude, par exemple).
4. Insertion des piles
Remarque
Lors de la mise en service, insérez tout d'abord les piles dans
la station de mesure et dans le pluviomètre sans l, puis dans
la station de base.
4.1 Insertion des piles
Station de mesure
•Ouvrez le compartiment à piles (29) et retirez le lm de
protection.
•Refermez le couvercle du compartiment à piles.
Pluviomètre sans l
•Appuyez simultanément sur les deux fermetures du couvercle
du pluviomètre (32), sur les côtés de l’appareil, et retirez le
couvercle du pluviomètre (30).
•Ouvrez le compartiment à piles (35), à côté de la bascule
(34), et insérez deux piles LR03/AAA micro conformément
aux indications de polarité.
•Refermez le couvercle du compartiment à piles.
•Replacez le couvercle du pluviomètre (30) et appuyez sur
ce dernier vers le bas jusqu’à l’enclenchement des deux
fermetures du couvercle du pluviomètre (32) sur les côtés.
Station de base
•Retirez le lm protecteur situé sur l’écran (1).
•Ouvrez le compartiment à piles (23) et insérez deux piles
LR03/AAA micro conformément aux indications de polarité.
•Refermez le couvercle du compartiment à piles.
4.2 Remplacement des piles
Remarque
•Veuillez noter que vous devrez effectuer une nouvelle
synchronisation des stations après chaque remplacement
des piles de la station de mesure, de la station de base ou
du pluviomètre sans l.
•Lors de cette synchronisation, extrayez également les piles
de la station qui continuait à fonctionner, puis réinsérez-
les ou remplacez ces dernières.
Station de mesure
•Ouvrez le compartiment à piles (29), retirez et éliminez les
piles usagées, puis insérez deux nouvelles piles LR6/AA
mignon conformément aux indications de polarité. Refermez
ensuite le couvercle du compartiment à piles.
Pluviomètre sans l
•Appuyez simultanément sur les deux fermetures du couvercle
du pluviomètre (32), sur les côtés de l’appareil, et retirez le
couvercle du pluviomètre (30).
•Ouvrez le compartiment à piles (35) à côté de la bascule
(34), retirez et éliminez les piles usagées, puis insérez
deux nouvelles piles LR03/AAA micro conformément
aux indications de polarité. Refermez le couvercle du
compartiment.
•Replacez le couvercle du pluviomètre (30) et appuyez sur
ce dernier vers le bas jusqu’à l’enclenchement des deux
fermetures du couvercle du pluviomètre (32) sur les côtés.
Station de base
•Ouvrez le compartiment à piles (23), retirez et éliminez les
piles usagées, puis insérez deux nouvelles piles LR03/AAA
micro conformément aux indications de polarité. Refermez
ensuite le couvercle du compartiment à piles.
5. Installation
Avertissement
•En vue de l'installation, procurez-vous le matériel
de montage adéquat pour le mur concerné dans un
commerce spécialisé.
•Veuillez contrôler que l'emballage ne contienne aucune
pièce erronée ou endommagée.
•N'appliquez en aucun cas une force excessive lors de
l'installation. Le produit pourrait en être endommagé.

16
Avertissement
•Avant l'installation, vériez que le mur prévu pour recevoir
la station dispose d'une force portante susante et
qu'aucune conduite d'électricité, d'eau, de gaz ni aucune
autre conduite ne passe dans cette partie de la cloison.
•N‘installez pas le produit à un endroit où des personnes
sont susceptibles de se tenir.
Remarque – Installation
•Nous vous recommandons de positionner la station de
base, la station de mesure et le pluviomètre sans l dans
les endroits envisagés sans effectuer le montage, puis
de procéder ensuite aux réglages décrits au chapitre 6.
Fonctionnement.
•Procédez à l'installation de la/des station(s) uniquement
après avoir effectué les réglages et après réception d'une
connexion radio stable.
Remarque
•La portée de la transmission radio entre la station de
mesure, la station de base et le pluviomètre sans l est de
100 m dans un espace dégagé.
•Veuillez contrôler, avant l'installation, que la portée
radio ne soit pas altérée par des interférences ou des
obstacles tels que bâtiments, arbres, véhicules, lignes
haute tension, etc.
•Veuillez contrôler, avant l'installation dénitive, la bonne
qualité de la transmission entre les deux stations.
•Veuillez également protéger la station de mesure de
l'ensoleillement direct et de la pluie lors de l'installation.
•Selon le Deutsches Wetterdienst (le service
météorologique de la République fédérale d'Allemagne),
la hauteur standard internationale de mesure de la
température de l'air est de 2 m (6,5 ft) au-dessus du sol.
5.1 Station de base
•Placez la station de base sur une surface plane à l'aide de
son pied (25).
•Vous pouvez également installer la station de base sur un
mur à l'aide de la fente (22) située sur sa face arrière.
5.2 Station de mesure
•Vous pouvez également placer la station de mesure à
l'extérieur, sur une surface plane.
•Nous vous recommandons d'installer solidement la station
de mesure à une paroi extérieure.
•Fixez cheville, vis, clou, etc. dans la paroi prévue pour
recevoir l'installation.
•Suspendez la station de base / de mesure à l'aide de la fente
(27) prévue à cet effet.
5.3 Pluviomètre sans fil
•Vous pouvez également placer le pluviomètre sans l à
l'extérieur, sur une surface plane.
•Nous vous recommandons de positionner le pluviomètre sans
l sur une surface sûre, solide et horizontale, à un endroit
non obstrué par des arbres, des auvents, etc., le but étant
que la pluie puisse tomber dans le récipient sans obstacle.
Utilisez, le cas échéant, le niveau à bulle intégré (33).
•Fixez la cheville, la vis, le clou, etc. au plancher prévu à
cet effet.
•Fixez le pluviomètre sans l au niveau des perçages prévus
à cet effet (31).
6. Fonctionnement
Remarque
Maintenez la touche “ ” (17) ou la touche “ ” (18)
enfoncée an de faire déler rapidement les chiffres.
6.1 Connexion à la station de mesure et au pluviomètre
sans fil
•La station de base recherche automatiquement une connexion à
la station de mesure et au pluviomètre sans l, puis effectue la
première conguration après l’insertion des piles.
Remarque
•La première conguration dure environ 2 minutes.
•L'icône radio de la station de mesure et du pluviomètre
sans l (15) clignote pendant la tentative de connexion.
•N'appuyez sur aucune touche pendant cette phase ;
des erreurs, des mesures inexactes ou une mauvaise
transmission de celles-ci pourraient en résulter.
•La conguration est terminée dès que les valeurs
mesurées pour la zone intérieure (10) et pour la zone
extérieure (3) apparaissent à l'écran.
•La station de base met automatiquement la valeur
mesurée à jour toutes les 45 secondes environ.
•Une valeur de température hors de la plage de mesure
est indiquée par --.- (pour une température inférieure à
la plage de mesure) ou par --.- (pour une température
supérieure à la plage de mesure).
•Après plusieurs échecs de réception du signal, maintenez la
touche LIGHT (1) enfoncée pendant environ 3 secondes an
de lancer une recherche manuelle du signal.

17
Achage
Recherche du signal en
provenance de la station de
mesure
Achage clignotant Recherche active
Achage permanent Recherche aboutie –
signal reçu
Achage permanent
Recherche inactive –
Aucune réception de signal
(station de mesure)
Achage permanent
Recherche inactive –
Aucune réception de signal
(pluviomètre sans l)
Remarque – Transmission défectueuse des
valeurs mesurées
•Dans certains cas, des interférences provoquées, par
exemple, par un réseau WiFi, un ordinateur, un téléviseur,
sont susceptibles d'empêcher la transmission des valeurs
mesurées entre la station de base, la station de mesure et
le pluviomètre sans l.
•Effectuez alors une nouvelle synchronisation des stations
en extrayant brièvement les piles de toutes les stations,
puis en les réinsérant.
•Remplacez les piles par des piles neuves dans le cas où
les valeurs mesurées ne sont toujours pas transmises
correctement.
•Le cas échéant, choisissez une autre emplacement pour la
station de base an d’éviter toute interférence éventuelle.
6.2 Réglage de base et paramétrage manuel
Réglage automatique sur la base du signal horaire DCF
•L'horloge recherche automatiquement le signal DCF après la
première mise sous tension de la station de base et en cas
de transmission correcte entre la station de base, la station
de mesure et le pluviomètre sans l. Le symbole radio (4)
clignote pendant la recherche du signal.
•Le réveil règle automatiquement la date et l‘heure dès
réception du signal radio.
Symbole radio Intensité du signal
Aucun symbole Aucune réception
Mauvaise réception
Réception excellente
Achage du
symbole radio
Recherche du signal
horaire DCF
Achage clignotant Recherche active
Achage permanent Recherche aboutie –
signal en cours de réception
Aucun achage Recherche inactive
Remarque – Réglage de l‘heure
•Le réveil interrompt la recherche en cas d‘échec de
réception du signal horaire DCF pendant la minute suivant
la première conguration. Le symbole radio s‘éteint.
•En cas de problème de réception, nous vous conseillons
d’attendre une nuit ; les signaux parasites sont
généralement plus faibles pendant la nuit.
•Vous pouvez lancer une nouvelle recherche manuelle
du signal horaire DCF en changeant l’emplacement du
réveil ou encore effectuer un réglage manuel de l’heure
et de la date.
•L’horloge continue à rechercher quotidiennement le signal
horaire DCF (à 01h00, 02h00 et 03h00). Les réglages
manuels de l‘heure et de la date seront corrigés dès que
la station reçoit correctement le signal horaire.
•Maintenez la touche “ “ (18) enfoncée an de lancer la
recherche manuelle du signal horaire DCF.
•Appuyez une nouvelle fois sur la touche “ “ (18) an
d’interrompre la recherche manuelle du signal horaire DCF.
Réglage manuel de la date / de l'heure
•Appuyez sur la Touche “ “ (16) pendant environ 3 secondes
an d'effectuer successivement les réglages suivants :
•Fuseau horaire
•Format 12/24 heures
•Heure
•Minute
•Année
•Mois
•Jour
•Paramétrage de la langue pour le jour de la semaine
•Réglage de l’unité de mesure de la pluie (mm/inch)
•Appuyez sur la touche “ ” (17) ou sur la touche “ ” (18)
an de sélectionner les différentes valeurs, puis conrmez
votre sélection en appuyant sur la touche “ “ (16).
•Appuyez sur la touche “ “ (16) an d’adopter la valeur
achée et passer au réglage suivant.
•Le mode de paramétrage s'interrompt automatiquement
si vous n'appuyez sur aucune touche pendant plus de 10
secondes.

18
Remarque – Fuseau horaire
•Il est possible de recevoir le signal DCF à grande distance;
ce signal correspond toutefois toujours à l‘heure en
vigueur en Allemagne. Veuillez donc noter qu‘un décalage
horaire doit être adopté dans les pays situés dans un autre
fuseau horaire.
•Si vous vous trouvez, par exemple, à Moscou, le
décalage horaire entre Moscou et l‘Allemagne est de 3
heures (l‘heure de Moscou est en avance). Réglez donc
le fuseau horaire sur +3. L‘horloge s‘adaptera alors
automatiquement à l‘heure captée par le signal horaire
DCF ou à l‘heure réglée manuellement et lui ajoutera
3 heures.
Remarque – Jour de la semaine
Vous pouvez acher le jour de la semaine dans les langues
suivantes : allemand (GER), anglais (ENG), français (FRE), italien
(ITA), espagnol (SPA), néerlandais (DUT) ou danois (DAN).
6.3 Celsius / Fahrenheit
•Appuyez sur la touche „ “ (16), dans n’importe quel mode
an de sélectionner °C (Celsius) ou °F (Fahrenheit).
6.4 Valeurs maximale et minimale de la température
•La station de base enregistre automatiquement les valeurs
maximale et minimale de la température de l’air extérieur
et de l’intérieur.
•Appuyez de façon répétée sur la touche " " (18) pour
basculer entre l’achage de la température actuelle, de la
température la plus basse (MIN) et de la température la plus
élevée (MAX).
•Les valeurs maximales et minimales sont achées pendant
10 secondes.
•Appuyez sur la touche " " (18) et maintenez-la appuyée
lorsque les valeurs maximales (MAX) et minimales (MIN)
mémorisées sont achées, pour les réinitialiser.
6.5 Rétroéclairage
Remarque – Rétroéclairage
Appuyez sur la touche LIGHT (1) an d‘allumer l‘écran
pendant environ 10 secondes.
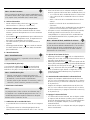
6.6 Piles faibles
Si le symbole de pile apparaît à l’écran de la station de
base, cela signie que la capacité des piles de la station de
mesure est très basse. Veuillez dans ce cas remplacer les piles
au plus vite.
Remarque – Remplacement de la pile
•Veuillez noter que vous devrez effectuer une nouvelle
synchronisation des stations après chaque remplacement des
piles de la station de mesure, de la station de base ou du
pluviomètre sans l.
•Retirez les piles de toutes les stations, puis réinsérez-les ou
remplacez-les, si besoin est, pour resynchroniser les modules.
7. Pluviomètre sans fil
Hinweis
Les précipitations sont achées en millimètres (mm). Une
précipitation de 1 mm correspond à une pluviosité de 1 l/m².
La pluviosité moyenne en Allemagne est d’env. 800 mm par
an ^= 800 l/m² par an.
7.1 Affichage de la pluviosité
•La pluviosité s’ache sous la forme d’un histogramme (11).
•L’histogramme ache l’indice des précipitations des 6
dernières heures (zone d’achage max. : 5 mm – 50 mm).
•Appuyez, dans n’importe quel mode, sur la touche RAIN
(19) pour commuter entre les achages de pluviosité (12)
suivants :
•1H = achage de la pluviosité de la dernière heure
•24H = achage de la pluviosité des dernières 24 heures
•WEEK = achage de la pluviosité de la dernière semaine
•MONTH = achage de la pluviosité du dernier mois
•TOTAL = achage de la pluviosité totale, depuis la mise
en service ou depuis la dernière réinitialisation
•Dans l’achage de pluviosité sélectionné, maintenez la
touche RAIN (19) enfoncée an de réinitialiser les valeurs
enregistrées. Chaque achage de pluviosité (1H/24H/WEEK/
MONTH/TOTAL) peut être réinitialisé indépendamment.
Remarque – Alarme pluie, comptage sur
24 heures
L’alarme pluie vous informe dès qu’une précipitation dépasse
le seuil d’alarme xé. Un signal sonore retentira sur la station
de base dès que le seuil réglé est atteint en l’espace de 24
heures. Les données sont supprimées tous les jours à 00h00.
7.2 Réglage de l’alarme pluie
•Appuyez, dans n’importe quel mode, sur la touche «
» (20) an d’acher pendant env. 10 secondes le seuil
actuellement paramétré pour l’alarme pluie (préréglage :
12,7 mm)
•Pour modier la valeur préréglée pour l’alarme, maintenez
la touche « » (20) enfoncée jusqu’au clignotement de
la valeur.
•Pour sélectionner la valeur, appuyez sur la touche « » (17)
ou sur la touche « » (18), puis conrmez votre sélection en
appuyant sur la touche « » (20).
•Le mode de réglage s'interrompt automatiquement et les
réglages effectués seront enregistrés si vous n'appuyez sur
aucune touche pendant plus de 10 secondes.
Pagina se încarcă...
Pagina se încarcă...
Pagina se încarcă...
Pagina se încarcă...
Pagina se încarcă...
Pagina se încarcă...
Pagina se încarcă...
Pagina se încarcă...
Pagina se încarcă...
Pagina se încarcă...
Pagina se încarcă...
Pagina se încarcă...
Pagina se încarcă...
Pagina se încarcă...
Pagina se încarcă...
Pagina se încarcă...
Pagina se încarcă...
Pagina se încarcă...
Pagina se încarcă...
Pagina se încarcă...
Pagina se încarcă...
Pagina se încarcă...
Pagina se încarcă...
Pagina se încarcă...
Pagina se încarcă...
Pagina se încarcă...
Pagina se încarcă...
Pagina se încarcă...
Pagina se încarcă...
Pagina se încarcă...
Pagina se încarcă...
Pagina se încarcă...
Pagina se încarcă...
Pagina se încarcă...
Pagina se încarcă...
Pagina se încarcă...
Pagina se încarcă...
Pagina se încarcă...
Pagina se încarcă...
Pagina se încarcă...
Pagina se încarcă...
Pagina se încarcă...
Pagina se încarcă...
Pagina se încarcă...
Pagina se încarcă...
Pagina se încarcă...
Pagina se încarcă...
Pagina se încarcă...
Pagina se încarcă...
Pagina se încarcă...
Pagina se încarcă...
Pagina se încarcă...
Pagina se încarcă...
Pagina se încarcă...
Pagina se încarcă...
Pagina se încarcă...
Pagina se încarcă...
Pagina se încarcă...
Pagina se încarcă...
Pagina se încarcă...
Pagina se încarcă...
Pagina se încarcă...
Pagina se încarcă...
Pagina se încarcă...
Pagina se încarcă...
Pagina se încarcă...
Pagina se încarcă...
Pagina se încarcă...
Pagina se încarcă...
Pagina se încarcă...
Pagina se încarcă...
Pagina se încarcă...
Pagina se încarcă...
Pagina se încarcă...
Pagina se încarcă...
Pagina se încarcă...
Pagina se încarcă...
Pagina se încarcă...
Pagina se încarcă...
Pagina se încarcă...
Pagina se încarcă...
Pagina se încarcă...
Pagina se încarcă...
Pagina se încarcă...
Pagina se încarcă...
Pagina se încarcă...
-
 1
1
-
 2
2
-
 3
3
-
 4
4
-
 5
5
-
 6
6
-
 7
7
-
 8
8
-
 9
9
-
 10
10
-
 11
11
-
 12
12
-
 13
13
-
 14
14
-
 15
15
-
 16
16
-
 17
17
-
 18
18
-
 19
19
-
 20
20
-
 21
21
-
 22
22
-
 23
23
-
 24
24
-
 25
25
-
 26
26
-
 27
27
-
 28
28
-
 29
29
-
 30
30
-
 31
31
-
 32
32
-
 33
33
-
 34
34
-
 35
35
-
 36
36
-
 37
37
-
 38
38
-
 39
39
-
 40
40
-
 41
41
-
 42
42
-
 43
43
-
 44
44
-
 45
45
-
 46
46
-
 47
47
-
 48
48
-
 49
49
-
 50
50
-
 51
51
-
 52
52
-
 53
53
-
 54
54
-
 55
55
-
 56
56
-
 57
57
-
 58
58
-
 59
59
-
 60
60
-
 61
61
-
 62
62
-
 63
63
-
 64
64
-
 65
65
-
 66
66
-
 67
67
-
 68
68
-
 69
69
-
 70
70
-
 71
71
-
 72
72
-
 73
73
-
 74
74
-
 75
75
-
 76
76
-
 77
77
-
 78
78
-
 79
79
-
 80
80
-
 81
81
-
 82
82
-
 83
83
-
 84
84
-
 85
85
-
 86
86
-
 87
87
-
 88
88
-
 89
89
-
 90
90
-
 91
91
-
 92
92
-
 93
93
-
 94
94
-
 95
95
-
 96
96
-
 97
97
-
 98
98
-
 99
99
-
 100
100
-
 101
101
-
 102
102
-
 103
103
-
 104
104
-
 105
105
-
 106
106


în alte limbi
- français: Hama 00 186420 Manuel utilisateur
- slovenčina: Hama 00 186420 Používateľská príručka
- italiano: Hama 00 186420 Manuale utente