Hama 00092659 EWS-165 Operating Instructions Manual
- Categorie
- Ceasuri cu alarmă
- Tip
- Operating Instructions Manual

00092659/09.15
All listed brands are trademarks of the corresponding companies. Errors and omissions excepted,
and subject to technical changes. Our general terms of delivery and payment are applied.
Hama GmbH & Co KG
86652 Monheim
/Germany
www.hama.com
E
CZ
D
GB
I
RO
PL
RUS
Operating Instructions
Bedienungsanleitung
Instrucciones de uso
Руководство по эксплуатации
Istruzioni per l‘uso
Instrukcja obsługi
Návod k použití
Návod na použitie
Manual de utilizare
EWS-165Weather Station
Wetterstation
F Vous pouvez télécharger le mode d’emploi complet dans votre langue en saisissant la référence sur
www.hama.com.
N De volledige BDI in uw landstaal zijn onder invoer van het artikelnummer op
www.hama.com als download ter beschikking.
J Μπορείτε να κατεβάσετε το πλήρες εγχειρίδιο χειρισμού στη γλώσσα
σας πληκτρολογώντας τον κωδικό προϊόντος στη σελίδα
www.hama.com.
H A teljes kezelési útmutatót saját nyelvén a cikkszám megadása után letöltheti a
www.hama.com címről.
O Pode descarregar o manual de instruções completo no seu idioma em
www.hama.com, indicando o número de artigo.
S Du hittar den fullständiga bruksanvisningen på ditt språk på
www.hama.com för nedladdning. Du behöver bara fylla i artikelnumret.
L Täydellisen oman kielisen käyttöohjeen voit ladata tuotenumeron antamalla osoitteesta
www.hama.com.
B Може да изтеглите пълните инструкции за експлоатация на вашия език,
като въведете номера на позиция при
www.hama.com.
SK
00
092659

2
3
G Operating instruction
A
B
20
21
23
22
28
24
25
26
27
8
9
10
12
16
19
11
13
15
18
1
2
4
5
7
14
17
3
6
Controls and Displays
A Base station
1. Measuring station wireless symbol
2. Channel display
3. Outdoor temperature
4. Room temperature
5. Wireless symbol
6. Time zone
7. Day
8. Outdoor temperature trend
9. Room temperature trend
10. Time
11. Weekday / seconds
12. Alarm symbol
13. Month
14. button
= reducing the current setting / manually searching for
the signal from the measuring station
15. CHANNEL button
= channel selection
16. ▲ button
= increasing the current setting / activating/ deactivating
manual radio signal reception
17. MODE button
= Einstellungen / Bestätigung des Einstellungswerts
/ Wechsel zwischen Sekunden-, Wochentag- und
Zeitzonenanzeige
18. ALARM ON/OFF button
= display / setting alarm modes
19. MEM button
= accessing/ resetting the stored maximum/minimum
values
20. SNOOZE button
= stops the alarm
21. Opening for wall mounting
22. Base
23. Battery compartment
B Measuring station
24. Battery compartment
25. Mounting plate
26. Cut-out for vertical mounting
27. Cut-out for horizontal mounting
28. Clips
Thank you for choosing a Hama product.
Take your time and read the following instructions and
information completely. Please keep these instructions in a
safe place for future reference. If you sell the device, please
pass these operating instructions on to the new owner.
1. Explanation of Warning Symbols and Notes
Warning
This symbol is used to indicate safety instructions or to
draw your attention to specic hazards and risks.
Note
This symbol is used to indicate additional information or
important notes.
2. Package Contents
•Weather station EWS-165
(base station for indoor/outdoor measuring station)
•Base
•2x AAA batteries
•2x AA batteries
•These operating instructions
3. Safety Instructions
•The product is intended for private, non-commercial use
only.
•Do not operate the product outside the power limits given
in the specications.
•Do not use the product in moist environments and avoid
splashes.
•Do not use the product in the immediate vicinity of heaters
or other heat sources or in direct sunlight.
•Do not use the product in areas where the use of electronic
devices is not permitted.
•Do not place the product near interference elds, metal
frames, computers, TVs, etc. Electronic devices and window
frames can negatively affect the product’s functionality.
•Do not drop the product and do not expose it to any
major shocks.
•Do not open the device or continue to operate it if it
becomes damaged.
•Do not attempt to service or repair the product yourself.
Leave any and all service work to qualied experts.
•Keep the packaging material out of the reach of children
due to the risk of suffocation.
•Dispose of packaging material immediately according to
locally applicable regulations.
•Do not modify the product in any way. Doing so voids the
warranty.
Warning – Batteries
•Immediately remove and dispose of dead batteries from
the product.
•Only use batteries (or rechargeable batteries) that
match the specied type.
•Do not mix old and new batteries or batteries of a
different type or make.
•When inserting batteries, note the correct polarity (+
and - markings) and insert
the batteries accordingly. Failure to do so could result in
the batteries leaking or exploding.
•Do not charge batteries.
•Keep batteries out of the reach of children.
•Do not short circuit the batteries/rechargeable batteries
and keep them away from uncoated metal objects.
4. Getting Started
4.1. Inserting the batteries
Measuring station
•Open the battery compartment (24) and remove the
contact breaker. Replace the battery compartment cover.
Base station
•Open the battery compartment (23) and remove the
contact breaker. Replace the battery compartment cover.
4.2. Replacing the batteries
Measuring station
•Open the battery compartment (24), remove and properly
dispose of the dead batteries and insert two new AAA
batteries with the correct polarity. Replace the battery
compartment cover.
Base station
•Open the battery compartment (23), remove and properly
dispose of the dead batteries and insert two new AA
batteries with the correct polarity. Replace the battery
compartment cover.
Note
Before use, ensure you insert the batteries in the
measuring station rst and then in the base station.
5. Installation
Note – Installation
•We recommend initially placing the base and
measuring stations in the intended locations without
installing them and making all the settings described in
6. Operation – to do.
•Only install the stations once the appropriate settings
have been made and a stable wireless connection is
established.
Note
•The wireless transmission range between the measuring
and base stations is up to 30 m in open spaces.
•Before installation, ensure that wireless transmission
will not be disrupted by interference or obstacles like
buildings, trees, vehicles, high-voltage lines, etc.
•Before the nal installation, ensure that there is
sucient reception between the intended installation
locations.
•When installing the measuring station, ensure that it is
protected from direct sunlight and rain.
•The international standard height for measuring air
temperature is 1.25 m (4 ft) above ground.
Warning
•Buy special or suitable installation material from a
specialised dealer for wall-mounting.
•Ensure that no faulty or damaged parts are installed.
•Never apply force during installation. This could
damage the product.
•Before installation, ensure that the chosen wall is
suitable for the weight to be mounted, and make sure
that there are no electrical wires, water, gas or other
lines at the installation site on the wall.

4
5
5.1. Base station
•Use the base (22) to position the base station on a level
surface.
•Alternatively, you can install the base station on a wall
using the opening (21) on the back.
5.2. Measuring station
•You can fasten the measuring station horizontally or
vertically to an outer wall using a mounting plate (25).
•If you want to mount the measuring station horizontally,
use rawl plugs, screws, etc. to fasten the mounting plate
(25) using the central cut-out (27) to the wall intended
for installation.
•If you want to mount the measuring station vertically, use
rawl plugs, screws, etc. in the wall intended for installation
and hang the mounting plate (25) using cut-out (26).
•Gently push the measuring station until you hear a latching
sound (“click”) as it engages with the clips (28).
6. Operation
Note – Input
Hold down the ▲ button (16) or the button (14) to
select the values faster.
6.1. Connection to the measuring station
•After you insert the batteries, the base station automatically
searches for a connection to the measuring station and
performs initial setup.
Note
•Initial setup takes approx. 2 minutes.
•During connection, the wireless symbol on the
measuring station will ash (1).
•Do not press any buttons during setup. Otherwise,
values may not be transmitted correctly and there is a
risk of value errors and inaccuracies.
•The setup process is completed when the indoor (4)
and outdoor (3) measurement data is displayed.
•The measured value is automatically updated by the
base device about every 45 seconds.
•If the temperature is outside of the measuring range,
--.- (lower than minimum temperature) or --.- (higher
than maximum temperature) will appear on the
temperature display.
•If the base station still does not receive a signal from the
measuring station, press and hold the button (14) for
approx. 3 seconds to start the manual search for th
Display
Search for a signal from the
measuring station
Display ashing
Active
Displayed continuously
Successful –
signal is being received
Displayed continuously
Inactive –
no signal reception
Note – Faulty transfer of measured values
•In isolated cases, interference - e.g. from a WLAN
network, a computer or a television set - can cause the
transfer of measured values between the measuring
station and the base station to fail.
•In this case, you must resynchronise the stations by
briey removing the batteries from both stations and
reinserting them.
•If the measured values are not transferred again once
the batteries are inserted, replace the batteries with
new ones.
•If necessary, select a new location for the base station
in order to avoid possible interference in the future.
6.2. Selecting the channel/other measuring stations
Note
•You can install two more measuring stations in addition
to the included measuring station. Ensure that the base
and measuring stations are set to the same channel.
Visit www.hama.com for suitable measuring stations.
•The transmission channel on the supplied measuring
station cannot be changed/set (CH1).
•Press the CHANNEL button (15) repeatedly to set the
channel to that set on the respective measuring station.
CH1, CH2 or CH3 (2) is displayed.
•Select CH1 if you are only using the measuring station
supplied.
•The base station now shows the data measured (3) on the
selected measuring station (2).
6.3. Basic and manual settings
Automatic setting using the DCF signal
After the rst time the base station is switched on and
successful transmission is established between the base
station and the measuring station, the clock will automatically
search for a DCF signal. During the search, the wireless
symbol (5) will ash.
Display Searching for the DCF signal
Display ashing
Active
No display /
Displayed continuously
Inactive –
no signal reception
Displayed continuously
Successful –
signal is being received
•If the station still does not receive a signal, press and
hold the ▲ button (16) for approx. 3 seconds to start the
manual search for the DCF signal. The wireless symbol (5)
will start to ash.
Note – Time settings
•The search process takes about 3-10 minutes. If the
search fails, it ends and is repeated at the next clock
hour.
•In the meantime you can, however, set the time and
the date manually.
•The clock automatically continues to search for the DCF
signal every hour. If the signal is received successfully,
the manually set time and date are overwritten. The
clock automatically continues to search for the DCF
signal every hour. If the signal is received successfully,
the manually set time and date are overwritten.
•Press and hold the ▲ button (16) again for approx. 3
seconds to stop the manual search. The wireless symbol
(5) will go out.
Note – Summer time
•The clock automatically switches to summer time.
•Please note that DCF signal reception is required for
automatic summer time switch-over. If necessary, start
the DCF signal search manually.
Manually setting the date/time
Note – Time and time zone
•In press the MODE button (17) repeatedly to toggle
between the following different displays:
•Time with seconds display, time with weekday display,
time adjusted according to time zone with weekday
display, time adjusted according to time zone with
seconds display
•The time zone symbol (6) is displayed when the time
has been adjusted according to the time zone.
•Press and hold the MODE button (17) for approx. 3
seconds to make the following settings one after the other:
•Year (10)
•Month (13)
•Day (7)
•D/M – M/D (7/13) display
•12/24 hour format (10)
•Hours (10)
•Minutes (10)
•Weekday (11)
•Time zone (10)
•Temperature unit (°C / °F) (11)
•To select the individual values, press the ▲ button (16) or
the button (14) and conrm each selection by pressing
the MODE button (17).
•Press the MODE button (17) to adopt the set value
displayed and to skip.
•If you do not make an entry for 2 minutes, you
automatically exit the setup mode.

6
7
6.4. Weather
•The weather station indicates a trend as to how the values
for the outdoor temperature (8), room temperature (9) are
likely to develop over the next few hours.
Display Trend
Increasing
Constant
Decreasing
6.5. Maximum and minimum temperature values
•The base station automatically stores the maximum and
minimum outdoor/indoor temperature.
•Repeatedly press the MEM button (19) to switch between
the current temperature, minimum temperature (MIN)
and maximum temperature (MAX). The maximum and
minimum temperatures are displayed for 10 seconds.
•Press and hold the MEM button (19) for approx. 3 seconds
to reset the stored maximum and minimum values.
6.6 Low battery capacity
Measuring station
If the batteries need to be replaced, the symbol for low
battery charge will appear next to the outdoor
temperature display on the base device. Replace the batteries
immediately.
Base station
If the batteries need to be replaced, the symbol for low
battery charge will appear next to the time display on
the base device. Replace the batteries immediately.
Note – Replacing the batteries
•Note that the stations have to be resynchronised each
time after you change the batteries in the measuring
or base station.
•To do this, remove the batteries from the other station
and then reinsert them, or change them as required.
7. Care and Maintenance
Only clean this product with a slightly damp, lint-free cloth
and do not use aggressive cleaning agents. Make sure that
water does not get into the product.
8. Warranty Disclaimer
Hama GmbH & Co. KG assumes no liability and provides no
warranty for damage resulting from improper installation/
mounting, improper use of the product or from failure to
observe the operating instructions and/or safety notes.
9. Service and Support
Please contact Hama Product Consulting if you have any
questions about this product.
Hotline: +49 9091 502-115 (German/English)
Further support information can be found here:
www.hama.com
10. Technical Data
Base station
Measuring station
Power supply
3,0 V
2 x AA batteries
3,0 V
2 x AAA batteries
Measuring range
Temperature
-5°C – +50°C/
23°F – 122°F
-10°C – +60°C/
14°F – 140°F
Measurement
increments
Temperature
0,1°C / 0,2°F 0,1°C / 0,2°F
Temperature
measurement
cycle
~ 45 s~45 s
Radio-controlled
DCF clock
YesNo
Max. number
of measuring
stations
3
Frequency 433 MHz
Range ≤ 30 m
Note – Weekday
You can choose from German (DE), English (EN), Swedish
(SW), Dutch (DU), Spanish (SP), Italian (IT) or French (FR)
for the weekday display.
Setting the time zone
Note – Time zone
•The DCF signal can be received over long distances,
but always transmits the current Central European
Time in Germany. Make sure you account for the time
difference in countries with another time zone.
•If you are in Moscow, the time is 3 hours later than in
Germany. This means that you should set +3 for the
time zone. The clock then automatically sets the time to
3 hours after the DCF signal received or relative to the
manually set time.
Alarm
•In repeatedly press the ALARM ON/OFF button (18) to
display the different alarms. The respective alarm symbols
(12) / / and the corresponding alarm
time/time interval and/or OFF are displayed.
•Press and hold the ALARM ON/OFF button (18) for
approx. 3 seconds to set the alarm time of the alarm
displayed. The hours display/time interval starts to ash.
•Press the ▲ button (16) or the button (14) to select
the hour for the alarm time/time interval and conrm your
selection by pressing the ALARM ON/OFF button (18).
The minutes display begins to ash. The early alarm is
already activated after conrming the time interval.
•Repeat the process to set the minutes for the alarm time.
•Press the ALARM ON/OFF button (18) repeatedly to also
set the other alarm mode or return to the time display (10).
•If you do not make an entry for 2 minutes, you
automatically exit the setup mode.
Note – Alarm
•When activated, the weekday alarm only triggers an
alarm on weekdays (Monday to Friday). The alarm
symbol (12)
is displayed if this alarm is activated.
•When activated, the once-only alarm only triggers an
alarm once. The alarm symbol (12) is displayed
if this alarm is activated. This alarm is automatically
deactivated after the alarm has sounded.
•When activated and when the outside temperature is <
0°C/ 32°F, the early alarm triggers an alarm 15, 30, 45,
60 or 90 minutes before the actual alarm ( and/or
). The alarm symbol (12) is displayed if this
alarm is activated.
•To determine whether the alarm should be triggered,
the set alarm time is compared to the currently
displayed time (whether normal or time zone-shifted).
•In the corresponding display, press the ▲ button (16) or
the button (14) to activate/deactivate the corresponding
alarm.
The alarm symbol (12) will appear/not appear.
Note – Early alarm
The early alarm can only be activated if at least one of
the two alarm functions ( / ) has already been
activated.
•If the alarm is triggered, the alarm symbol (12) will begin
to ash and an alarm will sound.
•Press the ALARM ON/OFF button (18) to stop the alarm.
Otherwise, it will stop automatically after 2 minutes.
Otherwise, after two minutes snooze mode is activated
automatically.
Note – Snooze function
•While the alarm signal is sounding, press the SNOOZE
button (20) to activate the snooze function. The alarm
symbol (12) begins to ash in the display. The alarm
signal is stopped for 8 minutes, after which it will
sound again.
•The snooze function can be activated three consecutive
times.

8
9
D Bedienungsanleitung
Bedienungselemente und Anzeigen
A Basisstation
1. Funksymbol Messstation
2. Kanalanzeige
3. Außentemperatur
4. Raumtemperatur
5. Funksymbol
6. Zeitzone
7. Tag
8. Außentemperaturtendenz
9. Raumtemperaturtendenz
10. Uhrzeit
11. Wochentag / Sekunde
12. Alarmsymbol
13. Monat
14. -Taste
= Verringerung des aktuellen Einstellungswertes /
Manuelle Suche nach Signal von der Messstation
15. CHANNEL-Taste
= Kanalauswahl
16. ▲-Taste
= Erhöhung des aktuellen Einstellungswertes /
Aktivierung/ Deaktivierung manueller Funksignal-
Empfang
17. MODE-Taste
= Einstellungen / Bestätigung des Einstellungswerts /
Wechsel zwischen Sekunden-, Wochentag- und
Zeitzonenanzeige
18. ALARM ON/OFFF-Taste
= Anzeige / Einstellung Alarm-Modi
19. MEM-Taste
= Abruf/ Reset der gespeicherten Höchst-/ Tiefstwerte
20. SNOOZE-Taste
= Unterbrechung des Wecksignals
21. Aussparung für Wandmontage
22. Standfuß
23. Batteriefach
B Messstation
24. Batteriefach
25. Montageplatte
26. Aussparung für senkrechte Befestigung
27. Aussparung für waagerechte Befestigung
28. Clips
Vielen Dank, dass Sie sich für ein Hama Produkt entschieden
haben!
Nehmen Sie sich Zeit und lesen Sie die folgenden
Anweisungen und Hinweise zunächst ganz durch. Bewahren
Sie diese Bedienungsanleitung anschließend an einem
sicheren Ort auf, um bei Bedarf darin nachschlagen zu
können. Sollten Sie das Gerät veräußern, geben Sie diese
Bedienungsanleitung an den neuen Eigentümer weiter.
1. Erklärung von Warnsymbolen und Hinweisen
Warnung
Wird verwendet, um Sicherheitshinweise zu kennzeichnen
oder um Aufmerksamkeit auf besondere Gefahren und
Risiken zu lenken.
Hinweis
Wird verwendet, um zusätzlich Informationen oder
wichtige Hinweise zu kennzeichnen.
2. Packungsinhalt
•Wetterstation EWS-165
(Basisstation für den Innenbereich / Messstation für den
Außenbereich)
•Standfuß
•2AAA Batterien
•2AA Batterien
•diese Bedienungsanleitung
3. Sicherheitshinweise
•Das Produkt ist für den privaten, nicht-gewerblichen
Haushaltsgebrauch vorgesehen.
•Betreiben Sie das Produkt nicht außerhalb seiner in den
technischen Daten angegebenen Leistungsgrenzen.
•Verwenden Sie das Produkt nicht in einer feuchten
Umgebung und vermeiden Sie Spritzwasser.
•Betreiben Sie das Produkt nicht in unmittelbarer Nähe
der Heizung, anderer Hitzequellen oder in direkter
Sonneneinstrahlung.
•Benutzen Sie das Produkt nicht in Bereichen, in denen
elektronische Produkte nicht erlaubt sind.
11. Recycling Information
Note on environmental protection:
After the implementation of the European
Directive 2002/96/EU and 2006/66/EU in the
national legal system, the following applies:
Electric and electronic devices as well as batteries
must not be disposed of with household waste.
Consumers are obliged by law to return electrical and
electronic devices as well as batteries at the end of their
service lives to the public collecting points set up for this
purpose or point of sale. Details to this are dened by the
national law of the respective country. This symbol on the
product, the instruction manual or the package indicates that
a product is subject to these regulations. By recycling, reusing
the materials or other forms of utilising old devices/Batteries,
you are making an important contribution to protecting our
environment.
12. Declaration of Conformity
Hama GmbH & Co. KG hereby declares that this
device is in compliance with the basic
requirements and other relevant regulations of the
1999/5/EC guideline. You will nd the declaration of
conformity with R&TTE directive 99/5/EC on the internet at
www.hama.com.

10
11
•Positionieren Sie das Produkt nicht in der Nähe von
Störfeldern, Metallrahmen, Computern und Fernsehern etc.
Elektronische Geräte sowie Fensterrahmen beeinträchtigen
die Funktion des Produktes negativ.
•Lassen Sie das Produkt nicht fallen und setzen Sie es keinen
heftigen Erschütterungen aus.
•Öffnen Sie das Produkt nicht und betreiben Sie es bei
Beschädigungen nicht weiter.
•Versuchen Sie nicht, das Produkt selbst zu warten oder zu
reparieren. Überlassen Sie jegliche Wartungsarbeit dem
zuständigen Fachpersonal.
•Halten Sie Kinder unbedingt von dem Verpackungsmaterial
fern, es besteht Erstickungsgefahr.
•Entsorgen Sie das Verpackungsmaterial sofort gemäß den
örtlich gültigen Entsorgungsvorschriften.
•Nehmen Sie keine Veränderungen am Produkt vor. Dadurch
verlieren sie jegliche Gewährleistungsansprüche.
Warnung – Batterien
•Entfernen und entsorgen Sie verbrauchte Batterien
unverzüglich aus dem Produkt.
•Verwenden Sie ausschließlich Akkus (oder Batterien),
die dem angegebenen Typ entsprechen.
•Mischen Sie alte und neue Batterien nicht, sowie
Batterien unterschiedlichen Typs oder Herstellers.
•Beachten Sie unbedingt die korrekte Polarität
(Beschriftung + und -) der Batterien und legen Sie
diese entsprechend ein. Bei Nichtbeachtung besteht
die Gefahr des Auslaufens oder einer Explosion der
Batterien.
•Laden Sie Batterien nicht.
•Bewahren Sie Batterien außerhalb der Reichweite von
Kindern auf.
•Schließen Sie Akkus/Batterien nicht kurz und halten Sie
sie von blanken Metallgegenständen fern.
4. Inbetriebnahme
4.1. Batterien einlegen
Messstation
•Öffnen Sie das Batteriefach (24) und entfernen
Sie den Kontaktunterbrecher. Schließen Sie die
Batteriefachabdeckung anschließend.
Basisstation
•Öffnen Sie das Batteriefach (23) und entfernen
Sie den Kontaktunterbrecher. Schließen Sie die
Batteriefachabdeckung anschließend.
4.2. Batterien wechseln
Messstation
•Öffnen Sie das Batteriefach (24), entnehmen und
entsorgen Sie die verbrauchten Batterien und legen Sie
zwei neue AAA Batterien polrichtig ein. Schließen Sie die
Batteriefachabdeckung anschließend.
Basisstation
•Ö
ffnen Sie das Batteriefach (23), entnehmen und
entsorgen Sie die verbrauchten Batterien und legen Sie
zwei neue AA Batterien polrichtig ein. Schließen Sie die
Batteriefachabdeckung anschließend.
Hinweis
Beachten Sie, dass Sie bei der Inbetriebnahme immer
zuerst die Batterien in die Messstation, und dann in die
Basisstation einlegen.
5. Montage
Hinweis – Montage
•Es wird empfohlen, die Basis- und Messstation
zunächst an den gewünschten Aufstellorten ohne
Montage zu platzieren und alle Einstellungen - wie in
6. Betrieb beschrieben – vorzunehmen.
•Montieren Sie erst nach korrekter Einstellung und
stabiler Funkverbindung die Station/en.
Hinweis
•Die Reichweite der Funkübertragung zwischen der
Mess- und Basisstation beträgt im freien Gelände bis
zu 30m.
•Achten Sie vor der Montage darauf, dass die
Funkübertragung nicht durch Störsignale oder
Hindernisse wie Gebäude, Bäume, Fahrzeuge,
Hochspannungsleitungen, u.a. beeinusst wird.
•Stellen Sie vor der endgültigen Montage sicher, dass
zwischen den gewünschten Aufstellorten ausreichender
Empfang besteht.
•Achten Sie bei der Montage der Messstation darauf,
dass diese vor direkter Sonne und Regen geschützt
positioniert ist.
•Die internationale Standardhöhe für die Messung der
Lufttemperatur beträgt 1,25 m (4 ft) über Grund.
Warnung
•Besorgen Sie sich spezielles bzw. geeignetes
Montagematerial im Fachhandel für die Montage an
der vorgesehenen Wand.
•Stellen Sie sicher, dass keine fehlerhaften oder
beschädigten Teile montiert werden.
•Wenden Sie bei der Montage niemals Gewalt oder hohe
Kräfte an. Diese können das Produkt beschädigen.
•Prüfen Sie vor Montage die Eignung der vorgesehenen
Wand für das anzubringende Gewicht und vergewissern
Sie sich, dass sich an der Montagestelle in der Wand
keine elektrischen Leitungen, Wasser-, Gas- oder
sonstige Leitungen benden.
5.1. Basisstation
•Stellen Sie die Basisstation mithilfe des Standfußes (22) auf
einer ebenen Fläche auf.
•Alternativ können Sie die Basisstation mithilfe der
Aussparung (21) auf der Rückseite an einer Wand
montieren.
5.2. Messstation
•Sie können die Messstation mithilfe der Montageplatte
(25) waagerecht oder senkrecht an einer Außenwand
befestigen.
•Für eine waagerechte Anbringung der Messstation
befestigen Sie die Montageplatte (25) an der mittigen
Aussparung (27) mit Dübel, Schraube, etc. in der dafür
vorgesehenen Wand.
•Für eine senkrechte Anbringung der Messstation befestigen
Sie die Dübel, Schraube, Nagel, etc. in der dafür
vorgesehenen Wand und hängen die Montageplatte (25)
mit der Aussparung (26) daran ein.
•Drücken Sie die Messstation mit leichtem Druck bis zum
deutlichen Einrasten („Klick“) in die Clips (28) ein.
6. Betrieb
Hinweis – Eingabe
Halten Sie die ▲-Taste (16) oder die -Taste (14)
gedrückt, um die Werte schneller auswählen zu können
6.1. Verbindung zur Messstation
•Nach dem Einlegen der Batterien sucht die Basisstation
automatisch nach einer Verbindung zur Messstation und
führt die Ersteinrichtung durch.
Hinweis
•Die Ersteinrichtung dauert ca. 2 Minuten.
•Während dem Verbindungsversuch blinkt das
Funksymbol Messstation (1) auf.
•Vermeiden Sie in dieser Zeit jegliche Betätigung
der Tasten! Andernfalls können Fehler und
Ungenauigkeiten bei den Werten und deren
Übertragung entstehen.
•Der Vorgang ist beendet, sobald die Messdaten für
Innen- (4) und Außenbereich (3) angezeigt werden.
•Der Messwert wird vom Basisgerät etwa alle 45
Sekunden automatisch aktualisiert.
•Liegt der Temperaturwert außerhalb des Messbereichs,
wird in der Temperaturanzeige --.- (für Temperaturen
unterhalb des Messbereichs) bzw. --.- (für Temperaturen
oberhalb des Messbereichs) angezeigt.
•Wird wiederholt kein Signal von der Messstation
empfangen, drücken und halten Sie die -Taste (14) für
ca. 3 Sekunden, um die manuelle Suche nach dem Signal
zu starten.
Anzeige
Suche nach Signal von der
Messstation
Blinkende Anzeige
Aktiv
Dauerhafte Anzeige
Erfolgreich –
Signal wird empfangen
Dauerhafte Anzeige
Inaktiv –
Kein Signalempfang

12
13
Hinweis – fehlerhafte Übertragung
der Messwerte
•In einzelnen Fällen kann es aufgrund von Störsignalen
– z.B. durch ein WLAN-Netzwerk, Computer,
Fernseher, etc. – vorkommen, dass die Übertragung
der Messwerte zwischen Basis- und Messstation
fehlschlägt.
•Synchronisieren Sie dann die Stationen neu, indem Sie
die Batterien beider Stationen kurz herausnehmen und
erneut einsetzen.
•Sollten die Messwerte anschließend erneut nicht
übertragen werden, wechseln Sie die Batterien durch
neue aus.
•Wählen Sie ggfs. einen neuen Aufstellort für die
Basisstation, um die möglichen Störsignale zukünftig
zu umgehen.
6.2. Kanalauswahl/ Weitere Messstationen
Hinweis
•Sie können zusätzlich zu der mitgelieferten Messstation
zwei weitere Messstationen installieren. Achten Sie
hierbei auf die identische Kanaleinstellung an Basis-
und jeweiliger Messstation.
•Passende Messstationen nden Sie unter
www.hama.com
•Der Sendekanal der mitgelieferten Messstation lässt
sich nicht verändern/ einstellen (CH1).
•Drücken Sie wiederholt die CHANNEL-Taste (15), um
denselben Kanal wie an der jeweiligen Messstation
einzustellen. Es wird CH1, CH2 oder CH3 (2) angezeigt.
•Wählen Sie CH1 für den Fall, dass Sie nur die mitgelieferte
Messstation verwenden.
•Die Basisstation zeigt nun die gemessenen Daten (3) der
ausgewählten Messstation (2) an.
6.3. Grundeinstellungen und manuelle Einstellungen
Automatische Einstellung nach DCF-Signal
•Nach dem ersten Einschalten der Basisstation und
erfolgreicher Übertragung zwischen Basis- und
Messstation, beginnt die Uhr automatisch die Suche nach
einem DCF-Signal. Während des Suchvorgangs blinkt das
Funksymbol (5) auf.
Anzeige Suche nach DCF-Signal
Blinkende Anzeige
Aktiv
Keine Anzeige/
dauerhafte Anzeige
Inaktiv –
Kein Signalempfang
Dauerhafte Anzeige
Erfolgreich –
Signal wird empfangen
•Wird wiederholt kein Signal empfangen, drücken und
halten Sie die ▲-Taste (16) für ca. 3 Sekunden, um die
manuelle Suche nach dem DCF-Signal zu starten. Das
Funksymbol (5) beginnt zu blinken.
Hinweis – Uhrzeiteinstellung
•Der Suchvorgang dauert etwa 3-5 Minuten. Falls dieser
fehlschlägt, wird die Suche beendet und zur nächsten
vollen Stunde wiederholt. Das Funksymbol (5) erlischt.
•Sie können währenddessen eine manuelle Einstellung
von Uhrzeit und Datum vornehmen.
•Die Uhr sucht automatisch weiterhin stündlich nach
dem DCF-Signal. Bei erfolgreichem Signalempfang
werden die manuell eingestellte Uhrzeit und das Datum
überschrieben.
•Drücken und halten Sie die ▲-Taste (16) erneut für ca. 3
Sekunden, um den manuellen Suchvorgang zu beenden.
Das Funksymbol (5) erlischt.
Hinweis – Sommerzeit
•Die Uhrzeit stellt sich automatisch auf die Sommerzeit
um.
•Beachten Sie, dass für eine automatische Umstellung
das DCF-Signal erfolgreich empfangen werden muss.
Starten Sie ggfs. die manuelle Suche nach dem
DCF-Signal.
Manuelle Einstellung Datum/ Uhrzeit
Hinweis – Uhrzeit und Zeitzone
•Drücken Sie wiederholt die MODE-Taste (17), um
zwischen den verschiedenen Anzeigen zu wechseln:
•Uhrzeit mit Sekundenanzeige, Uhrzeit mit
Wochentaganzeige, zeitzonenversetzte Uhrzeit mit
Wochentaganzeige, zeitzonenversetzte Uhrzeit mit
Sekundenanzeige.
•Bei der zeitzonenversetzten Uhrzeit wird das Symbol
Zeitzone (6) angezeigt.
•Drücken und halten Sie die MODE-Taste (17) für ca.
3 Sekunden, um folgende Einstellungen nacheinander
vorzunehmen:
•Jahr (10)
•Monat (13)
•Tag (7)
•Anzeige D/M – M/D (7/13)
•12/24-Stunden-Format (10)
•Stunden (10)
•Minuten (10)
•Wochentag (11)
•Zeitzone (10)
•Temperatureinheit (°C/°F) (11)
•Drücken Sie zum Auswählen der einzelnen Werte die
▲-Taste (16) oder die -Taste (14) und bestätigen Sie die
jeweilige Auswahl durch Drücken der MODE-Taste (17).
•Drücken Sie direkt die MODE-Taste (17), um den
angezeigten Einstellungswert zu übernehmen und zu
überspringen.
•Erfolgt 2 Minuten keine Eingabe, wird der
Einstellungsmodus automatisch verlassen.
Hinweis – Wochentag
Sie können für die Wochentaganzeige die Sprachen
Deutsch (DE), Englisch (EN), Schwedisch (SW),
Niederländisch (DU), Spanisch (SP), Italienisch (IT) oder
Französisch (FR) wählen.
Hinweis – Zeitzone
•Das DCF-Signal kann weitläug empfangen werden,
entspricht jedoch immer der MEZ, die in Deutschland
gilt. Beachten Sie daher, dass Sie in Ländern mit
anderer Zeitzone die Zeitverschiebung beachten.
•Benden Sie sich in Moskau, ist es dort bereits 3
Stunden später als in Deutschland. Stellen Sie daher
bei der Zeitzone +3 ein. Die Uhr stellt sich dann immer
nach Empfang des DCF-Signals bzw. in Bezug auf die
manuell eingestellte Uhrzeit automatisch 3 Stunden
weiter.
Wecker
•Drücken Sie wiederholt die ALARM ON/OFF-Taste (18),
um die verschiedenen Alarme anzuzeigen.
•Es werden die jeweiligen Alarmsymbole (12) / /
und die entsprechende Weckzeit/ Zeitintervall bzw.
OFF angezeigt.
•Drücken und halten Sie die ALARM ON/OFF-Taste (18) für
ca. 3 Sekunden, um die Weckzeit des angezeigten Alarms
einzustellen. Die Stundenanzeige/ das Zeitintervall beginnt
zu blinken.
•Drücken Sie die ▲-Taste (16) oder die -Taste (14), um
die Stunden der Weckzeit/ das Zeitintervall auszuwählen
und bestätigen Sie die Auswahl durch Drücken der ALARM
ON/OFF-Taste (18).
•Die Minutenanzeige beginnt zu blinken.
•Der vorzeitige Alarm ist bereits nach Bestätigung des
Zeitintervalls aktiviert.
•Wiederholen Sie diesen Vorgang für die Minuten der
Weckzeit.
•Drücken Sie wiederholt die ALARM ON/OFF-Taste (18),
um den anderen Alarmmodus ebenfalls einzustellen oder
zurück zur Anzeige der Uhrzeit (10) zu gelangen.
•Erfolgt 2 Minuten keine Eingabe, wird der
Einstellungsmodus automatisch verlassen.

14
15
Hinweis – Wecker
•Der Alarm an Werktagen löst – wenn aktiviert – nur
an Wochentagen (Montag bis Freitag) ein Wecksignal
aus. Ist dieser Alarm aktiv, wird das Alarmsymbol (12)
angezeigt.
•Der einmalige Alarm löst – wenn aktiviert – nur
einmalig ein Wecksignal aus. Ist dieser Alarm aktiv,
wird das Alarmsymbol (12) anzeigt. Nach
erfolgtem Wecksignal wird dieser Alarm automatisch
deaktiviert.
•Der vorzeitige Alarm löst – wenn aktiviert und
Außentemperatur < 0°C/ 32°F – 15, 30, 45, 60 oder
90 Minuten vor dem eigentlichen Alarm ( und/
oder ) ein Wecksignal aus. Ist dieser Alarm aktiv,
wird das Alarmsymbol (12) angezeig
•Die eingestellte Weckzeit bezieht sich immer auf die
angezeigte (normale/ zeitzonenversetzte) Uhrzeit.
•Drücken Sie während der jeweiligen Anzeige die -Taste
(16) oder die -Taste (14), um den jeweiligen Alarm zu
aktivieren/ deaktivieren.
•Das Alarmsymbol (12) wird angezeigt/ nicht angezeigt.
Hinweis – Vorzeitiger Alarm
Der vorzeigte Wecksignal kann nur dann aktiviert werden,
wenn mindestens eine der beiden Weckfunktionen ( /
) bereits aktiviert ist.
•Wird der Wecker entsprechend ausgelöst, beginnt das
Alarmsymbol (12) zu blinken und ein Wecksignal ertönt.
•Drücken Sie die ALARM ON/OFF-Taste (18), um den Alarm
zu beenden. Andernfalls wird nach 2 Minuten automatisch
die Schlummerfunktion aktiviert.
Hinweis – Schlummerfunktion
•Drücken Sie während des Wecksignals die SNOOZE-
Taste (20), um die Schlummerfunktion zu aktivieren. Auf
dem Display beginnt das Alarmsymbol (12) zu blinken.
Das Wecksignal wird für 8 Minuten unterbrochen und
dann erneut ausgelöst.
•Die Schlummerfunktion kann dreimal hintereinander
ausgelöst werden.
6.4. Wetter
•Die Wetterstation gibt für Außentemperatur (8) und
Raumtemperatur (9) eine Tendenz an, wie sich diese
Werte wahrscheinlich für die nächsten Stunden entwickeln
werden.
Anzeige Tendenz
Steigend
Beständig
Fallend
6.5. Höchst- und Tiefstwerte der Temperatur
•Die Basisstation speichert die Höchst- und Tiefstwerte der
Temperatur im Außen- und Raumbereich automatisch ab.
•Drücken Sie wiederholt die MEM-Taste (19), um zwischen
der Anzeige von aktueller Temperatur, niedrigster
Temperatur (MIN) und höchster Temperatur (MAX) zu
wechseln.
•Die Höchst- und Tiefstwerte werden 10 Sekunden
angezeigt.
•Drücken und halten Sie die MEM-Taste (19) für ca. 3
Sekunden, um die abgespeicherten Höchst- und Tiefstwerte
zurückzusetzen.
6.6. Niedrige Batteriekapazität
Messstation
Wenn die Batterien ausgetauscht werden müssen, erscheint
neben der Außentemperaturanzeige des Basisgeräts das
Symbol für niedrigen Batteriestand
. Wechseln Sie die
Batterien umgehend aus.
Basisstation
Wenn die Batterien ausgetauscht werden müssen, erscheint
neben Uhrzeit/ Datum am Basisgerät das Symbol für niedrigen
Batteriestand . Wechseln Sie die Batterien umgehend aus.
Hinweis – Batteriewechsel
•Beachten Sie, dass Sie nach jedem Batteriewechsel an
Mess- oder Basisstation eine neue Synchronisation der
Stationen erfolgen muss.
•Nehmen Sie dazu die Batterien der anderen Station
heraus und setzen Sie erneut ein oder wechseln Sie
diese bei Bedarf ebenfalls aus.
7. Wartung und Pflege
Reinigen Sie dieses Produkt nur mit einem fusselfreien, leicht
feuchten Tuch und verwenden Sie keine aggressiven Reiniger.
Achten Sie darauf, dass kein Wasser in das Produkt eindringt.
8. Haftungsausschluss
Die Hama GmbH & Co. KG übernimmt keinerlei Haftung
oder Gewährleistung für Schäden, die aus unsachgemäßer
Installation, Montage und unsachgemäßem Gebrauch
des Produktes oder einer Nichtbeachtung der
Bedienungsanleitung und/oder der Sicherheitshinweise
resultieren.
9. Service und Support
Bitte wenden Sie sich bei Fragen zum Produkt gerne an die
Hama-Produktberatung.
Hotline: +49 9091 502-115 (Deu/Eng)
Weitere Supportinformationen nden sie hier:
www.hama.com
10. Technische Daten
Basisstation Messstation
Stromversorgung
3,0 V
2 x AA Batterie
3,0 V
2 x AAA Batterie
Messbereich
Temperatur
-5°C – +50°C/
23°F – 122°F
-10°C – +60°C/
14°F – 140°F
Messschritte
Temperatur
0,1°C / 0,2°F 0,1°C / 0,2°F
Messzyklus
Temperatur
~ 45 s~45 s
DCF-Funkuhr Ja Nein
Max. Anzahl
Messstationen
3
Frequenz 433 MHz
Reichweite ≤ 30 m
11. Entsorgungshinweise
Hinweis zum Umweltschutz:
Ab dem Zeitpunkt der Umsetzung der
europäischen Richtlinien 2002/96/EG und
2006/66/EG in nationales Recht gilt folgendes:
Elektrische und elektronische Geräte sowie
Batterien dürfen nicht mit dem Hausmüll entsorgt
werden. Der Verbraucher ist gesetzlich verpichtet, elektrische
und elektronische Geräte sowie Batterien am Ende ihrer
Lebensdauer an den dafür eingerichteten, öffentlichen
Sammelstellen oder an die Verkaufsstelle zurückzugeben.
Einzelheiten dazu regelt das jeweilige Landesrecht. Das
Symbol auf dem Produkt, der Gebrauchsanleitung oder der
Verpackung weist auf diese Bestimmungen hin. Mit der
Wiederverwertung, der stoichen Verwertung oder anderen
Formen der Verwertung von Altgeräten/Batterien leisten Sie
einen wichtigen Beitrag zum Schutz unserer Umwelt.
12. Konformitätserklärung
Hiermit erklärt Hama GmbH & Co. KG, dass sich
dieses Gerät in Übereinstimmung mit den
grundlegenden Anforderungen und den übrigen
einschlägigen Bestimmungen der Richtlinie 1999/5/EG
bendet. Die Konformitäts-erklärung nach der R&TTE
Richtlinie 99/5/EG nden Sie unter www.hama.com.

16
17
E Instrucciones de uso
Elementos de manejo e indicadores
A Estación base
1. Símbolo de radiofrecuencia estación de medición
2. Visualización del canal
3. Temperatura exterior
4. Temperatura ambiente
5. Símbolo de radiofrecuencia
6. Zona horaria
7. Día
8. Tendencia de la temperatura exterior
9. Tendencia de la temperatura ambiente
10. Hora
11. Día de la semana/segundo
12. Símbolo de alarma
13. Mes
14. Tecla
= Disminución del valor de ajuste actual /búsqueda
manual de la señal de la estación de medición
15. Tecla CHANNEL
= Selección de canal
16. Tecla
= Aumento del valor de ajuste actual / activación/
desactivación de la recepción manual de la señal de
radiofrecuencia
17. Tecla MODE
= Ajustes/conrmación del valor de ajuste/conmutación
entre la visualización de los segundos, el día de la
semana y la zona horaria
18. Tecla ALARM ON/OFF
= Visualización/ajuste de los modos de alarma
19. Tecla MEM
= Consulta/reseteo de los valores máximos/mínimos
almacenados
20. Tecla SNOOZE
= Interrupción de la señal del despertador
21. Abertura para el montaje en pared
22. Pie
23. Compartimento para pilas
B Estación de medición
24. Compartimento para pilas
25. Placa de montaje
26. Abertura para la jación vertical
27. Abertura para la jación horizontal
28. Clips
Le agradecemos que se haya decidido por un producto de
Hama.
Tómese tiempo y léase primero las siguientes instrucciones e
indicaciones. Después, guarde estas instrucciones de manejo
en un lugar seguro para poder consultarlas cuando sea
necesario. Si vende el aparato, entregue estas instrucciones
de manejo al nuevo propietario.
1. Explicación de los símbolos de aviso y de las
indicaciones
Aviso
Se utiliza para caracterizar las indicaciones de seguridad o
para llamar la atención sobre peligros y riesgos especiales.
Nota
Se utiliza para caracterizar informaciones adicionales o
indicaciones importantes.
2. Contenido del paquete
•Estación meteorológica EWS-165
(Estación base para interior/estación de medición para
el exterior)
•Pie
•2pilas AAA
•2pilas AA
•Estas instrucciones de manejo
3. Instrucciones de seguridad
• El producto es para el uso doméstico privado, no comercial.
• No opere el producto fuera de los límites de potencia
indicados en los datos técnicos.
• No utilice el producto en entornos húmedos y evite el
contacto con las salpicaduras de agua.
• No opere el producto en las inmediaciones de la
calefacción, de otras fuentes de calor o bajo la radiación
directa del sol.
• No utilice el producto en áreas donde no se permitan
aparatos electrónicos.
• No posicione el producto en las proximidades de campos
de interferencia, marcos de metal, ordenadores, televisores,
etc. Los dispositivos electrónicos y los marcos de las
ventanas afectan negativamente al funcionamiento del
producto.
• No deje caer el producto ni lo someta a sacudidas fuertes.
• No abra el producto y no lo siga operando de presentar
deterioros.
• No intente mantener o reparar el aparato por cuenta
propia. Encomiende cualquier trabajo de mantenimiento al
personal especializado competente.
• Mantenga el material de embalaje fuera del alcance de los
niños, existe peligro de asxia.
• Deseche el material de embalaje en conformidad con las
disposiciones locales sobre el desecho vigentes.
• No realice cambios en el aparato. Esto conllevaría la
pérdida de todos los derechos de la garantía.
Aviso – Pilas
• Retire y deseche de inmediato las pilas gastadas del
producto.
• Utilice exclusivamente pilas recargables (o pilas) que
sean del mismo tipo.
• No mezcle pilas viejas y nuevas, ni tampoco pilas de
tipos o fabricantes diferentes.
• Observe siempre la correcta polaridad (inscripciones
+ y -) de las pilas y coloque éstas de forma
correspondiente. La no observación de lo anterior
conlleva el riesgo de derrame o explosión de las pilas.
• No sobrecargue las pilas.
• Mantenga las pilas fuera del alcance de los niños.
• No cortocircuite las pilas recargables/baterías y
manténgalas alejadas de objetos metálicos.
4. Puesta en funcionamiento
4.1. Colocación de las pilas
Estación de medición
•Abra el compartimento para baterías (24) y retire el
separador de contacto. A continuación, cierre la cubierta
del compartimento para pilas.
Estación base
•Abra el compartimento para baterías (23) y retire el
separador de contacto. A continuación, cierre la cubierta
del compartimento para pilas.
4.2. Cambio de las pilas
Estación de medición
•Abra el compartimento de pilas (24), retire y deseche las
pilas gastadas y coloque dos pilas AAA nuevas atendiendo
a la correcta polaridad de las mismas. A continuación,
cierre la cubierta del compartimento para pilas.
Estación base
•Abra el compartimento de pilas (23), retire y deseche las
pilas gastadas y coloque dos pilas AA nuevas atendiendo a
la correcta polaridad de las mismas. A continuación, cierre
la cubierta del compartimento para pilas.
Nota
En la puesta en funcionamiento, es importante que
coloque las pilas en la estación de medición, en primer
lugar, y, seguidamente, en la estación base.
5. Montaje
Nota – Montaje
•Se recomienda colocar primero, sin montar, la estación
de base y la estación de medición, en los lugares de
instalación deseados y llevar a cabo todos los ajustes
tal y como se describe en 6. Funcionamiento.
•Proceda a montar la(s) estación(es) únicamente cuando
haya podido realizar correctamente los ajustes y cuente
con una conexión inalámbrica estable.

18
19
Nota
•El alcance de la transmisión por radio entre la estación
base y la estación de medición al aire libre es de
hasta 30 m.
•Antes de proceder al montaje, preste atención a que
la transmisión por radio no se vea inuida, entre otros,
por interferencias u obstáculos tales como edicios,
árboles, vehículos o líneas de alta tensión.
•Antes de proceder al montaje denitivo, asegúrese de
que cuenta con recepción suciente entre los lugares
de instalación deseados.
•Al montar la estación de medición, procure situarla de
manera que quede protegida de la radiación directa del
sol y de la lluvia.
•La altura estándar internacional para la medición de
la temperatura del aire es de 1,25 m (4 pies) sobre
el suelo.
Aviso
•Adquiera material de montaje especial o adecuado
en un comercio especializado para el montaje en la
pared prevista.
•Compruebe que no haya piezas deterioradas o
defectuosas.
•No ejerza nunca fuerza durante el montaje. El producto
podría verse dañado.
•Antes de empezar con el montaje, compruebe que la
pared puede soportar el peso que se va a montar y
asegúrese de que por el punto de montaje de la pared
no pasan cables eléctricos ni tuberías de agua, gas o
de otro tipo.
5.1. Estación base
•Coloque la estación base sobre una supercie plana
utilizando el pie (22).
•Obien fíjela a una pared utilizando la abertura (21) situada
en la parte posterior.
5.2. Estación de medición
•Puede jar la estación de medición vertical u
horizontalmente a una pared exterior mediante la placa
de montaje (25).
•Para jar la estación de medición horizontalmente, je la
placa de montaje (25) utilizando la abertura central (27) a
la pared prevista mediante taco, tornillo, etc.
•Para jar la estación de medición verticalmente, je el taco,
tornillo, clavo, etc. a la pared prevista y cuelgue de ellos la
placa de montaje (25) utilizando la abertura (26).
•Ejerza una ligera presión sobre la estación de medición
hasta que la oiga encajar en los clips (28) (mediante un
„clic”).
6. Funcionamiento
Nota – Introducción de datos
Mantenga pulsadas las teclas (16) o (14) para
seleccionar los valores más rápidamente.
6.1 Conexión con la estación de medición
•Realizados los ajustes previos, la estación base busca
automáticamente una conexión con la estación de
medición, realizando entonces el ajuste inicial.
Nota
•El ajuste inicial dura aprox. 2 minutos.
•Durante el intento de conexión, el símbolo de
radiofrecuencia comienza a parpadear (1).
•No pulse ninguna tecla mientras dure el ajuste. De lo
contrario, pueden producirse fallos o imprecisiones en
los valores y su transmisión.
•El proceso naliza en cuanto se visualizan los valores
de medición registrados para interior (4) y exterior (3).
•La unidad base actualiza los valores de medición cada
45 segundos aproximadamente.
•Si el valor de la temperatura se encuentra fuera
del rango de medición, en la visualización de
la temperatura se visualiza --.- (en el caso de
temperaturas por debajo del rango de medición) o
--.- (en el caso de temperaturas por encima del rango
de medición).
•Si no se recibe ninguna señal de la estación de medición
repetidamente, mantenga pulsada la tecla (14) durante
aprox. 3 segundos para iniciar la búsqueda manual de
la señal.
Visualización
Búsqueda de la señal de la
estación de medición
Parpadea
Activa
Visualización permanente
La búsqueda ha nalizado
con éxito, se recibe la señal
Visualización permanente
Inactiva –
Sin recepción de señal desde
Nota – transmisión incorrecta de los valores
de medición
•En algunos casos concretos, puede ocurrir que la
transmisión de los valores de medición entre la
estación base y la estación de medición falle debido
a interferencias, p. ej. las de una red WLAN, un
ordenador, un televisor, etc.,
•En tales casos, resincronice las estaciones retirando
brevemente las pilas de ambas estaciones y volviendo
a colocarlas.
•Si a continuación todavía no se transmitieran los
valores de medición, reemplace las pilas por unas
pilas nuevas.
•Puede ser necesario escoger un lugar de colocación
nuevo para la estación base, evitando posibles
interferencias.
6.2. Selección de canal/estaciones de medición
adicionales
Nota
•Además de la estación de medición suministrada,
puede instalar dos estaciones de medición adicionales.
Al hacerlo, preste atención a realizar ajustes de canal
idénticos en la estación de base y la estación de
medición correspondiente. Encontrará estaciones de
medición adecuadas en www.hama.com
•No es posible modicar/ajustar el canal de emisión de
la estación de medición suministrada (CH1).
•Pulse repetidamente la tecla CHANNEL (15) para
ajustar el mismo canal que en la estación de medición
correspondiente. Se visualiza CH1, CH2 o CH3 (2).
•Seleccione CH1 en caso de utilizar únicamente la estación
de medición suministrada.
•La estación base muestra ahora los datos medidos (3) en la
estación de medición seleccionada (2).
6.3. Ajustes básicos y ajustes manuales
Ajuste automático según la señal DCF
Encendida la estación base por primera vez y tras una
transmisión correcta entre la estación base y la estación de
medición, el reloj inicia automáticamente la búsqueda de
una señal DCF. El símbolo de radiofrecuencia (5) parpadea
durante el proceso de búsqueda.
Visualización Búsqueda de señal DCF
Parpadea
Activa
Visualización permanente/
Visualización permanente
Inactiva –
Sin recepción de señal en
Visualización permanente
La búsqueda ha nalizado con
éxito, se recibe la señal
•Si no se recibiera señal repetidamente, pulse y mantenga
pulsada la tecla (16) durante aprox. 3 segundos para
iniciar la búsqueda manual de la señal DCF. El símbolo de
radiofrecuencia (5) comienza a parpadear.
Nota – Ajuste de hora
•El proceso de búsqueda dura aproximadamente 3-5
minutos. Si la búsqueda falla, ésta se termina y se
repite a la siguiente hora en punto. El símbolo de
radiofrecuencia (5) se apaga.
•Mientras tanto, puede realizar un ajuste manual de la
hora y la fecha.
•Tenga en cuenta que para un ajuste automático es
necesario recibir correctamente la señal DCF. De ser
necesario, inicie una búsqueda manual de la señal DCF.

20
21
•Pulse y mantenga pulsada nuevamente la tecla (16)
durante aprox. 3 segundos para nalizar el proceso de
búsqueda manual. El símbolo de radiofrecuencia (5) se
apaga.
Nota – Horario de verano
•La hora se ajusta automáticamente al horario de
verano.
•Tenga en cuenta que para un ajuste automático es
necesario recibir correctamente la señal DCF. De ser
necesario, inicie una búsqueda manual de la señal DCF.
Ajuste manual de fecha/hora
Nota – Hora y zona horaria
•En pulse repetidamente la tecla MODE (17) para
alternar entre las diferentes visualizaciones:
•Hora con visualización de los segundos, hora con
visualización del día de la semana, hora en una
zona horaria diferente con visualización del día de
la semana, hora en una zona horaria diferente con
visualización de los segundos.
•Con la hora en una zona horaria diferente se muestra el
símbolo de zona horaria (6).
•Pulse y mantenga pulsada la tecla MODE (17) durante
aprox. 3 segundos para realizar los siguientes ajustes,
consecutivamente:
•Año (10)
•Mes (13)
•Día (7)
•Visualización D/M – M/D (7/13)
•Formato 12/24 horas (10)
•Horas (10)
•Minutos (10)
•Día de la semana (11)
•Zona horaria (10)
•Unidad para la temperatura (°C / °F) (11)
•Para seleccionar cada valor, pulse la tecla (16) o la tecla
(14) y conrme la selección correspondiente pulsando
la tecla MODE (20).
•Pulse directamente la tecla MODE (17) para aceptar y
saltar el valor de ajuste visualizado.
•Si no se introduce ningún dato en 2 minutos, se abandona
automáticamente el modo de ajuste.
Nota – Día de la semana
Para la visualización del día de la semana puede elegir
entre los idiomas alemán (DE), inglés (EN), sueco (SW),
neerlandés (DU), español (SP) o francés (FR).
Nota – Zona horaria
•La señal DCF puede recibirse a gran distancia,
correspondiéndose siempre con la HCE vigente
en Alemania. Por ello, tenga en cuenta la posible
diferencia horaria en países situados en otra zona
horaria.
•Si se encuentra en Moscú, la diferencia es de 3
horas de adelanto con respecto a Alemania. Por
ello, debe ajustar la zona horaria +3. Se sumarán
automáticamente 3 horas a la hora recibida o ajustada
manualmente tras la recepción de la señal DCF.
Despertador
•En pulse repetidamente la tecla ALARM ON/OFF (18) para
mostrar las diferentes alarmas.
Se visualizan los símbolos de alarma correspondientes
(12) / / así como la hora de alarma/el
intervalo de tiempo u OFF.
•Pulse y mantenga pulsada la tecla ALARM ON/OFF (18)
durante aprox. 3 segundos para ajustar la hora de alarma
de la alarma visualizada. La visualización de la hora/el
intervalo de tiempo comienza a parpadear.
•Pulse la tecla (16) o la tecla (14) para seleccionar
las horas de la hora de alarma/el intervalo de tiempo
y conrme la selección pulsando la tecla ALARM ON/
OFF (18).
La visualización de los minutos comienza a parpadear.
La alarma previa queda activa tras la conrmación del
intervalo de tiempo.
•Repita este proceso para los minutos de la hora de alarma
del despertador.
•Pulse repetidamente la tecla ALARM ON/OFF (18) para
ajustar igualmente el otro modo de alarma o retornar a la
visualización de la hora (10).
•Si no se introduce ningún dato en 2 minutos, se abandona
automáticamente el modo de ajuste.
Nota – Despertador
•La alarma 1 para días laborables activa, en caso de
estar activada, una señal de alarma solo en los días
laborables de la semana (de lunes a viernes). Si esta
alarma está activa se visualiza el símbolo de alarma
(12)
.
•La alarma puntual activa, de estar activada, una
señal de alarma una única vez. Si esta alarma está
activa se visualiza el símbolo de alarma (12) .
Efectuada la señal de alarma, esta alarma se desactiva
automáticamente.
•La alarma previa, de estar activada y darse una
temperatura exterior < 0°C/ 32°F, activa una señal de
alarma 15, 30, 45, 60 o 90 minutos antes de la alarma
correspondiente ( y/o ). Si esta alarma está
activa se visualiza el símbolo de alarma (12) .
•La hora de alarma ajustada siempre se reere a la hora
mostrada (normal/en una zona horaria diferente).
•Pulse, durante la visualización correspondiente, la tecla
(16) o la tecla (14) para activar/desactivar la alarma
correspondiente.
El símbolo de alarma (12) se visualiza/deja de visualizarse.
Nota – Alarma previa
La señal de alarma previa solo puede activarse de
encontrarse activa una de las funciones de despertador
( / ) como mínimo.
•Si se activa el despertador como corresponde, el símbolo
de alarma (12) comienza a parpadear y suena una señal
de alarma.
•Pulse la tecla ALARM ON/OFF (18) para cancelar la
alarma. De otro modo, ésta naliza automáticamente
pasados 2 minutos. De lo contrario, tras 2 minutos se
activará automáticamente la función de repetición de
alarma.
Nota – Función de repetición de alarman
•Pulse, mientras suena la señal de alarma, la tecla
SNOOZE (20) para activar la función de repetición de
alarma. En la pantalla comienza a parpadear el símbolo
de alarma (12). La señal de alarma se interrumpe
durante 8 minutos, disparándose a continuación de
forma automática.
•La función de repetición de alarma puede activarse
hasta tres veces consecutivas.
6.4 Meteorológica
•La estación meteorológica indica la tendencia que podrían
mostrar la temperatura exterior (8), la temperatura
ambiente (9) en las siguientes horas.
Visualización Tendencia
En aumento
Constante
En descenso
6.5. Valores máximos y mínimos de la temperatura
La estación base almacena automáticamente los valores
máximos y mínimos de la temperatura, tanto interiores como
exteriores.
•Pulse repetidamente la tecla MEM (19) para alternar entre
la visualización de la temperatura actuales, la temperatura
mínimas (MIN) y la temperatura máximas (MAX).
•Los valores máximos y mínimos se muestran durante 10
segundos.
•Pulse y mantenga pulsada la tecla MEM (19) durante
aprox. 3 segundos para poner a cero los valores máximos y
mínimos almacenados.
6.6. Capacidad de pilas baja
Estación de medición
Cuando es necesario cambiar las pilas, junto al indicador de
temperatura exterior de la unidad base se muestra el símbolo
de nivel bajo de batería
. Sustituya las pilas de forma
inmediata.

22
23
R Руководство по эксплуатации
Estación base
Cuando es necesario cambiar las pilas, junto a la hora de la
unidad base se muestra el símbolo de nivel bajo de batería
.
Sustituya las pilas de forma inmediata.
Nota – Cambio de pilas
•Tenga en cuenta que es necesario resincronizar las
estaciones tras realizar un cambio de pilas en la
estación de medición o base.
•Para ello, retire las pilas de la otra estación y vuelva a
colocarlas o, de ser necesario, proceda a sustituirlas.
7. Mantenimiento y cuidado
Limpie este producto sólo con un paño ligeramente
humedecido que no deje pelusas y no utilice detergentes
agresivos. Asegúrese de que no entre agua en el producto.
8. Exclusión de responsabilidad
Hama GmbH & Co KG no se responsabiliza ni concede
garantía por los daños que surjan por una instalación,
montaje o manejo incorrectos del producto o por la no
observación de las instrucciones de manejo y/o de las
instrucciones de seguridad.
9. Servicio y soporte
Si tiene que hacer alguna consulta sobre el producto, diríjase
al asesoramiento de productos Hama.
Línea directa: +49 9091 502-115 (Alemán/Inglés)
Encontrar más información de soporte aquí:
www.hama.com
10. Datos técnicos
Estación base
Estación de
medición
Alimentación de
corriente
3,0 V
2 pilas AA
3,0 V
2 pilas AAA
Rango de
medición
Temperatura
-5°C – +50°C/
23°F – 122°F
-10°C – +60°C/
14°F – 140°F
Intervalos de
medición
Temperatura
0,1°C / 0,2°F 0,1°C / 0,2°F
Ciclo de medición
de la temperatura
~ 45 s~45 s
Radiorreloj DCF Sí No
Número máx. de
estaciones de
medición
3
Frecuencia 433 MHz
Alcance ≤ 30 m
11. Instrucciones para desecho y reciclaje
Nota sobre la protección medioambiental:
Después de la puesta en marcha de la directiva
Europea 2002/96/EU y 2006/66/EU en el sistema
legislativo nacional, se aplicara lo siguiente: Los
aparatos eléctricos y electrónicos, así como las
baterías, no se deben evacuar en la basura
doméstica. El usuario está legalmente obligado a llevar los
aparatos eléctricos y electrónicos, así como pilas y pilas
recargables, al nal de su vida útil a los puntos de recogida
comunales o a devolverlos al lugar donde los adquirió. Los
detalles quedaran denidos por la ley de cada país. El símbolo
en el producto, en las instrucciones de uso o en el embalaje
hace referencia a ello. Gracias al reciclaje, al reciclaje del
material o a otras formas de reciclaje de aparatos/pilas
usados, contribuye Usted de forma importante a la protección
de nuestro medio ambiente.
12. Declaración de conformidad
Mediante la presente, Hama GmbH &Co. KG
declara que este aparato cumple con los requisitos
básicos y los demás reglamentos relevantes de la
directiva 1999/5/CE. La declaración de conformidad según la
directiva R&TTE 99/5/CE la encontrará en www.hama.com.
Органы управления и индикации
A Основной блок
1. Значок радиосигнала внешнего датчика
2. Канал
3. Наружная температура
4. Температура в помещении
5. Значок радиосигнала
6. Часовой пояс
7. Число месяца
8. Динамика изменения наружной
температуры
9. Динамика изменения температуры в помещении
10. Время
11. День недели / секунды
12. Значок будильника
13. Месяц
14. Кнопка
= уменьшение настраиваемого значения / включение
принудительного поиска сигнала внешнего датчика
15. Кнопка CHANNEL
= выбор канала
16. Кнопка
= увеличение настраиваемого значения / включение/
выключение принудительного приема радиосигнала
17. Кнопка MODE
= настройка / подтверждение ввода значения /
переключение индикации секунд, дня недели,
часового пояса
18. Кнопка ALARM ON/OFF
= индикация / настройка будильника
19. Кнопка MEM
= просмотр/сброс сохраненных макс. и миним.
значений
20. Кнопка SNOOZE
= функция автоповтора сигнала будильника
21. Отверстие для настенного монтажа
22. Подставка
23. Отсек батарей
B Блок внешнего датчика
24. Отсек батарей
25. Монтажная плата
26. Отверстие для вертикального крепления
27. Отверстие для горизонтального крепления
28. Зажимы
Благодарим за покупку изделия фирмы Hama.
внимательно ознакомьтесь с настоящей инструкцией.
Храните инструкцию в надежном месте для справок
в будущем. В случае передачи изделия другому лицу
приложите и эту инструкцию.
1. Предупредительные пиктограммы и инструкции
Внимание
Данным значком отмечены инструкции, несоблюдение
которых может привести к опасной ситуации.
Примечание
Дополнительная или важная информация.
2. Комплект поставки
•Метеорологический прибор EWS-165
(основной блок для контроля воздуха внутри
помещения, блок датчика внешних атмосферных
условий)
•Подставка
•2батареи ААА
•2батареи АА
•Настоящая инструкция
3. Техника безопасности
• Изделие предназначено только для домашнего
применения.
• Соблюдать технические характеристики.
• Беречь от влаги и брызг.
• Не эксплуатировать в непосредственной близости с
нагревательными приборами и беречь от прямых
солнечных лучей
• Не применять в запретных зонах.
• Не размещать рядом с магнитными полями,
металлическими рамками, компьютерами, окнами и
т.д. Электронные приборы и оконные рамы негативно
сказываются на работе изделия.
• Не ронять. Беречь от сильных ударов.
• Изделие не открывать. Запрещается эксплуатировать
неисправное изделие.
• Запрещается самостоятельно ремонтировать
устройство. Ремонт разрешается производить только
квалифицированному персоналу.

24
25
• Упаковку не давать детям: опасность асфиксии.
• Утилизировать упаковку в соответствии с местными
нормами.
• Запрещается вносить изменения в конструкцию.
В противном случае гарантийные обязательства
аннулируются.
Внимание – Техника безопасности
• Израсходованные батареи немедленно удалять из
прибора и утилизировать.
• Разрешается применять аккумуляторы только
указанного типа.
• Не применять различные типы или новые и старые
батареи вместе.
• Соблюдать полярность батарей (+ и -).
Несоблюдение полярности может стать причиной
взрыва батарей.
• Не подвергать аккумуляторы чрезмерной зарядке.
• Батареи хранить в безопасном месте и не давать
детям.
• Не закорачивать контакты батарей. Не хранить
рядом с металлическими объектами.
4. Ввод в эксплуатацию
4.1. Загрузка батарей
Блок внешнего датчика
•Откройте отсек батарей (24) и удалите изолятор.
Закройте крышку отсека батарей.
Основной блок
•Откройте отсек батарей (24) и удалите изолятор.
Закройте крышку отсека батарей.
4.2. Замена батареи
Блок внешнего датчика
•Откройте отсек батарей (23), удалите и утилизируйте
старые батареи. Вставьте новые батареи AАА,
соблюдая полярность. Закройте крышку отсека батарей.
Основной блок
•Откройте отсек батарей (23), удалите и утилизируйте
старые батареи. Вставьте новые батареи АА, соблюдая
полярность. Закройте крышку отсека батарей.
Примечание
При вводе в эксплуатацию всегда сначала вставляйте
батареи в блок наружного датчика, а затем в основной
блок.
5. Монтаж
Примечание. Монтаж
•Перед тем как монтировать блоки, рекомендуется
сначала завершить настройки в местах будущей
установки (см. 6). Смотрите описание работы
основного блока.
•Монтаж следует производить после того, как
правильные настройки обеспечат надежную
радиосвязь между блоками.
Примечание
•Максимально допустимое расстояние между
блоками составляет 30 метров.
•Монтируя блоки, следует учесть, что различные
препятствия (стены, деревья, автомобили,
высоковольтные линии и др.) создают помехи
радиосвязи между блоками.
•Перед монтажом убедитесь, что в местах
расположения блоков обеспечивается устойчивая
радиосвязь.
•Блок внешнего датчика должен размещаться
в месте, защищенном от воздействия прямых
солнечных лучей и осадков.
•Международный стандарт высоты для измерения
влажности воздуха составляет 1,25 метра (4 фута)
над землей.
Предупреждение
•Подготовьте монтажный материал (приобретается
отдельно), соответствующий свойствам стены.
•Перед началом эксплуатации убедитесь в отсутствии
дефектных или поврежденных деталей.
•При монтаже не применять чрезмерных усилий. В
противном случае можно повредить устройство.
•Убедитесь, что стена подходит для монтажа. В стене
на месте монтажа не должно быть электрической
проводки, газопровода, водопровода и других
трубопроводов.
5.1. Основной блок
•Спомощью подставки установите основной блок на
ровную поверхность (22).
•Основной блок также можно повесить на стену за
отверстие (21).
5.2. Блок внешнего датчика
•Блок датчика закрепляется на стене снаружи с
помощью монтажной платы (25) в вертикальном или
горизонтальном положении.
•Чтобы разместить внешний датчик в горизонтальном
положении, с помощью дюбеля и винта закрепите
монтажную (25) плату за среднее отверстие (27).
•Чтобы разместить внешний датчик в вертикальном
положении, подвесьте монтажную плату (25) за
отверстие (26).
•Прижмите блок датчика к монтажной плате так, чтобы
он вошел в зажимы (28).
6. Эксплуатация
Ввод данных
Чтобы ускорить изменение значения во время
настройки, удерживайтекнопку (16) или кнопку
(14).
6.1. Соединение с блоком внешнего датчика
•После загрузки батарей основной блок начинает
автоматический поиск сигнала внешнего датчика и
выполняет операцию ввода устройства в эксплуатацию.
Примечание
•Автоматическая настройка при вводе в
эксплуатацию длится ок. 2 минут.
•Во время поиска радиосигнала мигает значок
радиосвязи с внешним датчиком (1).
•Втечение этого времени не нажимайте кнопки
устройства! В противном случае может возникнуть
сбой точной настройки значений и передачи
сигнала.
•Автоматическая настройка завершена, когда на
дисплее начнут отображаться данные измерения
внутри помещения (4) и вне помещения (3).
•Данные на дисплее основного блока обновляются
автоматически приблизительно каждые 45 секунд.
•Если зафиксированная температура находится
ниже диапазона измерения прибора, то на дисплее
отображается значок --.-, а если выше диапазона
измерения прибора - значок --.-.
•Если сигнал автоматически принять не удается,
нажмите и ок. 3 секунд удерживайте кнопку (14),
чтобы включить поиск радиосигнала DCF вручную.
Индикация
Поиск радиосигнала
внешнего датчика
мигает
активный
горит непрерывно
сигнал принят успешно
горит непрерывно
Неактивный – прием
сигнала отсутствует более

26
27
Настройка календаря и часов вручную
Часы и часовой пояс. Примечание
•Врежиме часов нажимайте кнопку MODE (17),
чтобы переключать режимы индикации:
•время с секундами, время с днем недели, время
часового пояса с днем недели, время часового
пояса с секундами.
•При индикации времени часового пояса
отображается соответствующий значок (6).
•Нажмите и около 3 секунд удерживайте кнопку MODE
(17), чтобы настроить параметры в следующем
порядке:
•Год (10)
•Месяц (13)
•Число месяца (7)
•Формат Д/М - М/Д (13)
•Формат 12/24-ч. (10)
•Час (10)
•Минуты (10)
•День недели (10)
•Единица измерения температуры (°C/°F) (11)
•Кнопкой (16) или (14) установите значение
и нажмите кнопку MODE (17), чтобы подтвердить
настройку.
•Чтобы применить значение и перейти к следующему
параметру, нажмите кнопку MODE (17).
•Режим настройки выключается автоматически, если
нажатий на кнопки не производилось в течение 2
минут.
День недели. Примечание
Дни недели могут отображаться на следующих языках:
немецкий (DE), английский (EN), шведский (SW),
голландский (DU), испанский (SP), итальянский (IT),
французский (FR).
Часовой пояс. Примечание
•Радиосигнал точного времени DCF соответствует
среднеевропейскому времени. Если часы
эксплуатируются в другом часовом поясе, то их
необходимо настроить соответствующим образом.
•Например, разница во времени между Москвой
и Берлином составляет 3 часа. В Москве, таким
образом, необходимо сделать поправку в +3 часа. В
этом случае к показателю времени (установленному
автоматически по радиосигналу DCF или вручную)
часы автоматически будут прибавлять 3 часа.
Будильник
•Чтобы просмотреть время срабатывания будильников,
нажимайте кнопку ALARM ON/OFF (18).
На дисплее отображается соответствующие значки
будильников (12) / / , а также время/
интервал или значок OFF.
•Нажмите и около 3 секунд удерживайте кнопку ALARM
ON/OFF (18), чтобы настроить время срабатывания
будильника. Индикация времени/интервала начинает
мигать.
•Кнопкой (16) или (14) установите значение часа,
затем нажмите кнопку ALARM ON/OFF (18), чтобы
подтвердить настройку.
•Значение минут мигает.
Предупредительный будильник активируется после
подтверждения интервала.
•Настройте минуты.
•Нажмите кнопку ALARM ON/OFF (18)), чтобы
настроить второй будильник или перейти в режим
индикации времени (10).
•Режим настройки выключается автоматически, если
нажатий на кнопки не производилось в течение 2
минут.
Неправильная передача измеренных
значений. Примечание
•Иногда в случае помех (сеть WLAN, компьютеры,
телевизоры и др.) обмен данными между блоками
может нарушаться.
•Синхронизируйте блоки заново, выгрузив и снова
загрузив батареи.
•Если обмен данными не возобновиться, замените
батареи новыми.
•При необходимости установите основной блок в
другое место, чтобы предотвратить сбои в будущем.
6.2. Выбор канала / дополнительные внешние
датчики
Примечание
•Максимальное количество внешних датчиков: 3.
Чтобы установить соединение основной блок и
внешний датчик должны работать на одном канале.
Совместимые блоки внешних датчиков смотрите по
адресу www.hama.com.
•Передающий канал внешнего датчика из комплекта
поставки изменить невозможно (СН1).
•Несколько раз нажмите кнопку CHANNEL (15), чтобы
установить канал в соответствии с каналом внешнего
датчика. Отображается индикация CH1, CH2 или
CH3 (2).
•При использовании только внешнего датчика из
комплекта поставки установите канал СН1.
•Основной блок показывает измеренные данные (3),
которая измеряется в месте установки внешнего
датчика (2).
6.3 Основные параметры и ручные настройки
Автоматический прием радиосигнала DCF
После первого включения основного блока и установки
радиосвязи с блоком внешнего датчика часы прибора
автоматически начинают поиск радиосигнала точного
времени (DCF). Во время этого процесса на дисплее
мигает значок радиосигнала (5).
Индикация Поиск сигнала DCF
мигает
активный
горит непрерывно/
горит непрерывно
Неактивный -
сигнал отсутствует
горит непрерывно
сигнал принят успешно
•Если сигнал автоматически принять не удается,
нажмите и ок. 3 секунд удерживайте кнопку – (16),
чтобы включить поиск радиосигнала DCF вручную.
Значок радиосигнала (5) мигает.
Настройка часов. Примечания
•Поиск длится около 3-5 минут. Если сигнал принять
не удалось, операция завершается автоматически.
Повторная попытка будет произведена в
следующий полный час. Значок радиосигнала
точного времени (5) гаснет.
•При необходимости часы и календарь можно
настроить вручную.
•Режим поиска радиосигнала DCF включается
ежедневно автоматически. При успешном приеме
радиосигнала введенные вручную значения
времени и календаря заменяются.
•Чтобы принудительно завершить поиск радиосигнала,
нажмите и ок. 3 секунд удерживайте кнопку – (16).
Значок радиосигнала точного времени (5) гаснет.
Примечание — индикация летнего времени
•Переключение на летнее время происходит
автоматически.
•Обратите внимание, что обязательным условием
автоматического переключения является успешный
прием сигнала DCF. При необходимости запустите
поиск сигнала DCF вручную.

28
29
Будильник. Примечание
•Будильник рабочих дней включается только в будни
(понедельник-пятница). Если данный будильник
активный, отображается значок (12).
•Одноразовый будильник подает сигнал только
один раз. Если данный будильник активный,
отображается значок (12). После подачи
сигнала будильник автоматически деактивируется.
•Если устройство регистрирует наружную
температуру < 0°C/ 32°F, то предупредительный
будильник срабатывает перед основным
будильником ( и/или ) с учетом
установленного интервала (15, 30, 45, 60, 90
минут). Если данный будильник активный,
отображается значок (12)
•Заданное время будильника всегда связано с
отображаемым (стандартным/поясным) временем
•Чтобы включить/выключить будильник, перейдите в
режим его индикации, нажмите кнопку (16) или
(14) Значок (12) отображается или не отображается
в зависимости от того, включен или выключен
будильник.
Предупредительный будильник.
Примечание
Предупредительный будильник можно активировать,
если активирован хотя бы один из основных
будильников (
/ ).
•При срабатывании будильника мигает соответствующий
значок (12), и подается звуковой сигнал.
•Чтобы отключить подачу сигнала предупреждения,
нажмите кнопку ALARM ON/OFF (18). В противном
случае через 2 минуты будет автоматически
активирована функция автоповтора сигнала
будильника.
Примечание — функция автоповтора
сигнала будильника
•Во время подачи сигнала будильника нажмите
кнопку SNOOZE (20), чтобы включить функцию
автоповтора сигнала. На дисплее начнет
мигать значок будильника (12). Подача сигнала
прерывается на 8 минут, после чего сигнал
подается снова.
•Автоповтор может срабатывать три раз подряд.
•Прибор отображает прогноз изменений на несколько
часов для наружной температуры (8), температуры (9).
Индикация Динамика изменений
повышается
понижается
убывающий
6.5. Максимальные и минимальные значения
температуры
•Зафиксированные максимальные и минимальные
значения наружной и комнатной температуры, а также
влажности воздуха автоматически сохраняются в
памяти прибора.
•Нажимайте кнопку MEM (19), чтобы переключить
индикацию текущей температуры и влажности,
минимальной температуры и влажности (MIN), а также
максимальной температуры и влажности (MAX).
•Нажмите и ок. 3 секунд удерживайте кнопку MEM (19),
чтобы удалить сохраненные макс. и миним. значения.
6.6. Низкий заряд батарей
Блок внешнего датчика
При возникновении необходимости в замене батарей
рядом со значением наружной температуры начинает
отображаться значок низкого заряда батарей
. В этом
случае следует немедленно заменить батареи.
Основной блок
При возникновении необходимости в замене батарей
рядом со значением времени на основном блоке
начинает отображаться значок низкого заряда батарей
. В этом случае следует немедленно заменить батареи.
Замена батарей. Примечание
•После замены батарей основного блока и блока
внешнего датчика необходимо заново выполнить
синхронизацию блоков.
•Для этого необходимо удалить батареи в том числе
из другого блока, а затем снова загрузить их в
отсек батарей.
7. Уход и техническое обслуживание
Чистку изделия производить только безворсовой слегка
влажной салфеткой. Запрещается применять агрессивные
чистящие средства. Следите за тем, чтобы в устройство
не попала вода.
8. Отказ от гарантийных обязательств
Компания Hama GmbH & Co. KG не несет ответственность
за ущерб, возникший вследствие неправильного
монтажа, подключения и использования изделия не
по назначению, а также вследствие несоблюдения
инструкции по эксплуатации и техники безопасности.
9. Отдел техобслуживания
По вопросам ремонта или замены неисправных изделий
обращайтесь к продавцу или в сервисную службу
компании Hama.
Горячая линия отдела техобслуживания:
+49 9091 502-115 (немецкий, английский)
Подробнее смотрите здесь: www.hama.com
10. Технические характеристики
Основной блок
Блок внешнего
датчика
Питание
3,0 В
2 батареи AA
3,0 В
2 батареи ААА
Messbereich
Temperatur
-5°C – +50°C/
23°F – 122°F
-10°C – +60°C/
14°F – 140°F
Шаг шкалы
Температура
0,1°C / 0,2°F 0,1°C / 0,2°F
Цикл измерения
температуры
~ 45 s~45 s
Часы с коррекцией
по радиосигналу
точного времени
Да Нет
Макс. кол-во
внешних
датчиков
3
Частота:433 MHz
Дальность
действия
≤ 30 m
11. Инструкции по утилизации
Охрана окружающей среды:
С момента перехода национального
законодательства на европейские нормативы
2002/96/EU и 2006/66/EU действительно
следующее: Электрические и электронные
приборы, а также батареи запрещается
утилизировать с обычным мусором. Потребитель,
согласно закону, обязан утилизировать электрические и
электронные приборы, а также батареи и аккумуляторы
после их использования в специально предназначенных
для этого пунктах сбора, либо в пунктах продажи.
Детальная регламентация этих требований
осуществляется соответствующим местным
законодательством. Необходимость соблюдения данных
предписаний обозначается особым значком на изделии,
инструкции по эксплуатации или упаковке. При
переработке, повторном использовании материалов или
при другой форме утилизации бывших в употреблении
приборов Вы помогаете охране окружающей среды. В
соответствии с предписаниями по обращению с
батареями, в Германии вышеназванные нормативы
действуют для утилизации батарей и аккумуляторов.
12. Декларация производителя
Компания Hama GmbH & Co. KG настоящим
подтверждает, что данное изделие полностью
соответствует основным требованиям, а также
предписаниям и положениям нормативов 1999/5/EG.
Заявление о соответствии товара нормам R&TTE 99/5/EG
см. на вебузле www.hama.com.

30
31
I Istruzioni per l‘uso
• Non fare cadere il prodotto e non sottoporlo a forti
scossoni!
• Non aprire il prodotto e non utilizzarlo più se danneggiato.
• Non tentare di aggiustare o riparare l’apparecchio da soli.
Fare eseguire qualsiasi lavoro di riparazione al personale
specializzato competente.
• Tenere l’imballo fuori dalla portata dei bambini, pericolo
di soffocamento!
• Smaltire immediatamente il materiale d‘imballaggio
attenendosi alle prescrizioni locali vigenti.
• Non apportare modiche all’apparecchio per evitare di
perdere i diritti di garanzia.
Avvertenza – Batterie
• Rimuovere e smaltire immediatamente le batterie
scariche.
• Utilizzare unicamente accumulatori (o batterie)
conformi al tipo indicato.
• Non utilizzare batterie di tipi o costruttori diversi, né
mischiare batterie vecchie e nuove.
• Attenersi sempre alla corretta polarità (scritte + e -)
delle batterie e inserirle di conseguenza. La mancata
osservanza comporta la perdita di potenza o il rischio di
esplosione delle batterie.
• Non scaricare completamente le batterie.
• Conservare le batterie al di fuori della portata dei
bambini.
• Non cortocircuitare le batterie e tenerle lontano da
oggetti metallici.
4. Messa in esercizio
4.1. Inserimento delle batterie
Stazione di misurazione
•Aprire il vano batterie (24) e rimuovere l’interruttore di
contatto. Quindi chiudere il coperchio del vano batterie.
Stazione base
•Aprire il vano batterie (23) e rimuovere l’interruttore di
contatto. Quindi chiudere il coperchio del vano batterie.
4.2. Sostituzione delle batterie
Stazione di misurazione
•Aprire il vano batterie (24), rimuovere e smaltire le batterie
usate e inserire due batterie AAA nuove con la polarità
corretta. Quindi chiudere il coperchio del vano batterie.
Stazione base
•Aprire il vano batterie (23), rimuovere e smaltire le batterie
usate e inserire due batterie AA nuove con la polarità
corretta. Quindi chiudere il coperchio del vano batterie
Nota
Per mettere in servizio l‘apparecchio, inserire sempre
prima le batterie nella stazione di misura, quindi nella
stazione base.
5. Montaggio
Nota – Montaggio
•Si consiglia di collocare la stazione base e di misura
nel luogo di montaggio desiderato senza montarla
e di effettuare tutte le impostazioni come descritto
al capitolo
6. Esercizio.
•Montare la/le stazioni solo dopo avere effettuato
l‘impostazione corretta e un collegamento radio stabile.
Nota
•La portata della trasmissione radio tra la stazione base
e di misurazione all‘aperto è di max. 30m.
•Prima del montaggio prestare attenzione che la
trasmissione radio non venga impedita da segnali di
disturbo o ostacoli come edici, alberi, veicoli, linee di
alta tensione ecc.
•Prima del montaggio denitivo, accertarsi che tra i
luoghi di montaggio desiderati vi sia una ricezione
suciente.
•Durante il montaggio della stazione di misurazione,
accertarsi che il luogo d‘installazione sia protetto dalla
luce diretta del sole e dalla pioggia.
•L‘altezza standard internazionale per la misurazione
della temperatura dell‘aria è pari a 1,25 m (4 ft) dal
suolo.
Elementi di comando e indicazioni
Stazione base A
1. Simbolo radio stazione di misurazione
2. Indicazione canale
3. Temperatura esterna
4. Temperatura ambiente
5. Simbolo radio
6. Fuso orario
7. Ora
8. Tendenza temperatura esterna
9. Tendenza temperatura ambiente
10. Ora
11. Giorno della settimana / secondi
12. Simbolo allarme
13. Mese
14. Tasto
= diminuzione del valore impostato attuale / ricerca
manuale del segnale dalla stazione di misurazione
15. Tasto CHANNEL
= scelta canale
16. Tasto
= aumento del valore impostato attuale / attivazione/
disattivazione manuale della ricezione di segnale radio
17. Tasto MODE
= impostazioni / conferma del valore impostato /
Passaggio tra secondi, giorni della settimana e fuso
orario
18. Tasto ALARM ON/OFF
= indicazione / impostazione della modalità sveglia
19. Tasto MEM
= richiamo / reset dei valori massimi e minimi
memorizzati
20. Tasto SNOOZE
= interruzione del segnale di sveglia
21. Foro per montaggio a parete
22. Piedino di sostegno
23. Vano batterie
B Stazione di misura
24. Vano batterie
25. Piastra di montaggio
26. Apertura per ssaggio verticale
27. Apertura per ssaggio orizzontale
28. Clip
Grazie per avere acquistato un prodotto Hama!
Prima della messa in esercizio, leggete attentamente le
seguenti istruzioni e avvertenze, quindi conservatele in un
luogo sicuro per una eventuale consultazione. In caso di
cessione dell‘apparecchio, consegnate anche le presenti
istruzioni al nuovo proprietario.
1. Spiegazione dei simboli di avvertimento e delle
indicazioni
Attenzione
Viene utilizzato per contrassegnare le indicazioni di
sicurezza oppure per rivolgere l‘attenzione verso particolari
rischi e pericoli.
Avvertenza
Viene utilizzato per contrassegnare informazioni
supplementari o indicazioni importanti.
2. Contenuto della confezione
•Stazione meteo EWS-165
(stazione base per interni / stazione di misurazione per
esterni)
•Piedino di sostegno
•2batterie AAA
•2batterie AA
•Queste istruzioni per l’uso
3. Indicazioni di sicurezza:
• Il prodotto è concepito per l’uso domestico privato, non
commerciale.
• Non mettere in esercizio il prodotto al di fuori dei suoi limiti
di rendimento indicati nei dati tecnici.
• Non usare il prodotto in ambienti umidi ed evitare il
contatto con gli spruzzi.
• Evitare di mettere in esercizio il prodotto in prossimità di
riscaldamento, altre fonti di calore o la luce diretta del sole.
• Non utilizzare il prodotto in zone in cui non sono ammesse
le apparecchiature elettroniche.
• Non posizionare il prodotto nelle vicinanze di campi
di disturbo, telai metallici, computer, televisori ecc.
Gli apparecchi elettronici e gli inssi delle nestre
compromettono il funzionamento del prodotto.

32
33
Nota - trasmissione errata dei valori di
misurazione
•In singoli casi non si esclude che per via di segnali
di disturbo – riconducibili ad es. a una rete WLAN,
computer, televisione, ecc. – non abbia luogo la
trasmissione dei valori di misurazione tra la stazione
base e quella di misurazione.
•Procedere quindi a una nuova sincronizzazione delle
stazioni, estraendo brevemente le batterie di entrambe
le stazioni e inserendole nuovamente.
•Se anche questa volta non vengono trasmessi di valori
di misurazione, sostituire le batterie con batterie nuove.
•Optare eventualmente per un nuovo luogo di
installazione della stazione di base per evitare in futuro
possibili segnali di disturbo.
6.2. Scelta del canale/ altre stazioni di misurazione
Nota
•Oltre alla stazione di misurazione in dotazione, è
possibile installare altre due stazioni di misurazione.
Attenzione: è necessario impostare lo stesso canale
per la stazione base e la stazione di misurazione
corrispondente.
Le stazioni di misurazione idonee sono disponibili sul
sito www.hama.com
•Il canale emittente della stazione di misurazione in
dotazione non può essere modicato/impostato (CH1).
•Premere ripetutamente il tasto CHANNEL (15) per
selezionare lo stesso canale su cui trasmette la stazione di
misurazione. Viene visualizzato CH1, CH2 o CH3 (2).
•Scegliere CH1 nel caso in cui si utilizzi esclusivamente la
stazione di misurazione in dotazione.
•La stazione base mostra ora la temperatura misurata (3)
della stazione di misurazione selezionata (2).
6.3. Impostazioni di base e manuali
Impostazione automatica secondo il segnale DCF
Dopo la prima accensione della stazione base e la
trasmissione tra stazione base e di misurazione, l‘orologio
inizia automaticamente a cercare un segnale DCF. Durante il
processo di ricerca, il simbolo della radio (5) lampeggia.
Indicazione Ricerca del segnale DCF
Indicazione lampeggiante
Attivo
Nessuna indicazione/
Indicazione ssa
Inattivo -
nessun segnale
Indicazione ssa
Ricerca riuscita -
il segnale viene ricevuto
•Se per diverse volte non viene ricevuto alcun segnale,
tenere premuto il tasto – (16) per ca. 3 secondi, per
avviare la ricerca manuale del segnale DCF. Il simbolo radio
(5) inizia a lampeggiare.
Nota – Impostazione dell‘ora
•Questo procedimento dura circa 3-5 minuti. Se la
ricerca non ha successo, viene terminata e riprende alla
prossima ora piena. Il simbolo radio (5) si spegne.
•In questo lasso di tempo si può effettuare
un‘impostazione manuale di ora e data.
•L‘orologio continua a cercare automaticamente ogni
ora il segnale DCF. Se il tentativo di ricezione ha
successo, l‘ora e la data impostate manualmente
vengono sovrascritte. L‘orologio continua a cercare
automaticamente ogni ora il segnale DCF. Se il
tentativo di ricezione ha successo, l‘ora e la data
impostate manualmente vengono sovrascritte.
•Tenere premuto il tasto – (16) per ca. 3 secondi per
terminare la ricerca manuale.
Nota – Ora legale
•L'orario si regola automaticamente sull'ora legale.
•Anché la regolazione dell’ora avvenga in modo
automatico, il segnale DCF deve essere ricevuto
correttamente. Avviare la ricerca manuale del segnale
DCF.
Attenzione
•Procurarsi il materiale di installazione idoneo per il
montaggio alla parete prevista presso i rivenditori
specializzati.
•Vericare che non vengano montati pezzi difettosi o
danneggiati.
•Non usare troppa forza, né violenza durante il
montaggio per evitare di danneggiare il prodotto.
•Prima di procedere al montaggio, vericare che la
parete sia idonea per il peso da montare e accertarsi
che nel punto della parete dove si desidera appendere
l’apparecchio non vi siano cavi elettrici, né tubazioni di
acqua, gas o altro.
5.1. Stazione base
•Posizionare la stazione base con il piedino di sostegno (22)
su una supercie piana.
•In alternativa la stazione base si può ssare alla parete
mediante il foro (21) presente sul retro.
5.2. Stazione di misurazione
•La stazione di misurazione può essere ssata a una
parete esterna mediante una piastra di montaggio (25) in
orizzontale o in verticale.
•Per il montaggio orizzontale della stazione di misurazione,
ssare la piastra di montaggio (25) all’apertura centrale
(27) con tasselli, viti ecc. sulla parete prevista.
•Per il montaggio verticale della stazione di misurazione,
ssare tasselli, viti, chiodi ecc. alla parete prevista e
agganciarvi la piastra di montaggio (25) mediante
l’apertura (26).
•Premere la stazione di misurazione esercitando una leggera
pressione nché non scatta in sede (28) (si deve sentire
un „clic”).
6. Esercizio
Nota – Immissione
Tenere premuto il tasto
(16) o il tasto (14) per poter
selezionare più rapidamente i valori.
6.1. Connessione alla stazione di misurazione
•Dopo avere inserito le batterie, la stazione base ricerca
automaticamente la connessione alla stazione di
misurazione e avvia la prima congurazione.
Nota
•La prima congurazione dura ca. 2 minuti.
•Durante il tentativo di connessione, il simbolo della
radio della stazione di misurazione (1) lampeggia.
•Non premere alcun tasto in questo lasso di tempo
per evitare errori e imprecisioni dei valori e della loro
trasmissione.
•La procedura è conclusa non appena vengono
visualizzati i dati di misurazione per l‘interno (4) e
l‘esterno (3).
•Ivalori misurati vengono aggiornati automaticamente
dall'apparecchio base circa ogni 45 secondi.
•Se il valore di temperatura si trova all‘esterno
del campo di misurazione, nell‘indicazione della
temperatura viene visualizzato --.- (per temperature
al di sotto del campo di misurazione) oppure --.- (per
temperature al di sopra del campo di misurazione).
•Se per diverse volte non viene ricevuto alcun segnale,
tenere premuto il tasto (14) per ca. 3 secondi, per
avviare la ricerca manuale del segnale.
Indicazione
Ricerca manuale del segnale
dalla stazione di misurazione
Indicazione lampeggiante
Attivo
Indicazione ssa
Ricerca riuscita -
il segnale viene ricevuto
Indicazione ssa
Inattivo -
nessuna ricezione del segnale

34
35
Impostazione manuale data/ora
Nota - e del fuso orario
•In premere ripetutamente il tasto MODE (17) per
passare tra le diverse visualizzazioni:
•Ora con indicazione dei secondi, ora con indicazione
del giorno della settimana, ora con diverso fuso orario
con indicazione dei giorni della settimana, ora con
diverso fuso orario con indicazione dei secondi
•Per l’ora con diverso fuso orario viene visualizzato il
simbolo fuso orario (6).
•Tenere premuto il tasto MODE (17) per ca. 3 secondi per
effettuare in sequenza le seguenti impostazioni:
•Anno (10)
•Mese (13)
•Giorno (7)
•Indicazione G/M – M/G (7/13)
•Formato 12/24 ore (10)
•Ore (10)
•Minuti (10)
•Giorno della settimana (11)
•Fuso orario (10)
•Unità di temperatura (°C / °F) (11)
•Per selezionare i singoli valori, premere il tasto (16)
oppure il tasto – (14) e confermare la selezione
corrispondente premendo il tasto MODE (17).
•Se per 2 secondi non si effettua alcuna immissione, si esce
automaticamente dalla modalità d‘impostazione.
Nota – Giorno della settimana
I giorni della settimana si possono visualizzare nelle
lingue tedesco (DE), inglese (EN), svedese (SW),
olandese (DU), spagnolo (SP) italiano (IT) o francese
(FR).
Impostazione del fuso orario
Nota - fuso orario
•Il segnale DCF può essere ricevuto in tutto il mondo
ma corrisponde sempre al CET vigente in Germania.
Nei paesi con altri fusi orari deve essere considerata la
variazione dell‘ora.
•Se ci si trova a Mosca, dove l‘ora è spostata in avanti
di 3 ore rispetto alla Germania, occorre impostare per
il fuso orario +3. Dopo la ricezione del segnale DCF o
dell‘impostazione manuale, l‘orologio si porta quindi
sempre automaticamente 3 ore avanti.
Sveglia
•In premere ripetutamente il tasto ALARM ON/OFF (18),
per visualizzare i diversi allarmi.
Vengono visualizzati i simboli di allarme corrispondenti
(12) / / e l’or
a della sveglia / l’intervallo
temporale ovvero OFF.
•Tenere premuto il tasto ALARM ON/OFF (18) per ca. 3
secondi per impostare l’orario dell’allarme visualizzato.
L’indicazione delle ore / dell’intervallo di tempo inizia a
lampeggiare.
•Premere il tasto (16) o il tasto (14), per selezionare
le ore della sveglia/l’intervallo di tempo e confermare la
selezione premendo il tasto ALARM ON/OFF (18).
Le cifre dei minuti iniziano a lampeggiare.
L’allarme anticipato viene attivato già dopo aver
confermato l’intervallo di tempo.
•Ripetere questo procedimento per selezionare i minuti
della sveglia.
•Premere ripetutamente il tasto ALARM ON/OFF (18) per
impostare anche l’altra modalità allarme oppure ritornare
all’indicazione dell’ora (10).
•Se per 2 secondi non si effettua alcuna immissione, si esce
automaticamente dalla modalità d‘impostazione.
Nota – Sveglia
•La sveglia dei giorni lavorativi – se attivata – suona
soltanto dal lunedì al venerdì. Se questa sveglia è
attiva, viene visualizzato il simbolo dell’allarme
(12).
•La sveglia una tantum - se attivata - scatta una
sola volta. Se questa sveglia è attiva, viene
visualizzato il simbolo dell’allarme (12). Dopo il
segnale di sveglia, questo allarme viene disattivato
automaticamente.
•La sveglia anticipata suona – se attivata e con
temperatura esterna < 0°C/ 32°F – 15, 30, 45, 60 o
90 minuti prima della sveglia effettiva ( e/o ).
Se questa sveglia è attiva, viene visualizzato il simbolo
dell’allarme (12).
•L’orario della sveglia impostato si riferisce sempre
all’ora visualizzata (ora locale o con diverso fuso
orario).
•Durante l’indicazione corrispondente, premere il tasto
(16) o il tasto (14) per attivare/disattivare l’allarme
corrispondente.
Il simbolo della sveglia (12) viene visualizzato/non viene
visualizzato.
Nota – Sveglia anticipata
La sveglia anticipata può essere attivata solo se è attivata
almeno una delle due funzioni di sveglia ( / ).
•Se si attiva la sveglia, il simbolo corrispondente (12) inizia a
lampeggiare e viene emesso un segnale di sveglia.
•Premere il tasto ALARM ON/OFF (18), per spegnere la
sveglia. Diversamente, l‘allarme termina automaticamente
dopo 2 minuti. Altrimenti dopo 2 minuti si attiva
automaticamente la funzione snooze.
Nota – Funzione snooze
•Quando suona la sveglia, premere il tasto SNOOZE
(20) per attivare la funzione snooze. Sul display il
simbolo della sveglia (12) inizia a lampeggiare. La
sveglia viene disattivata per 8 minuti, quindi suona
nuovamente.
•La funzione snooze viene attivata per tre volte
consecutivamente.
6.4. Previsioni del tempo
•La stazione meteo indica per temperatura 8), temperatura
(9) una tendenza per il possibile sviluppo di questi valori
nelle ore successive.
Indicazione Tendenza
In aumento
Costante
discendente
6.5. Valori massimi e minimi di temperatura
La stazione base memorizza automaticamente i valori massimi
e minimi della temperatura e dell‘umidità dell‘aria esterna.
•Premere ripetutamente il tasto MEM (19) per passare tra
l’indicazione della temperatura e dell’umidità dell’aria
attuale, della temperatura e dell’umidità dell’aria più bassa
(MIN) e più alta (MAX).
•Ivalori massimi e minimi vengono visualizzati per 10
secondi.
•Tenere premuto il tasto MEM (19) per ca. 3 secondi per
ripristinare i valori massimi e minimi memorizzati.
6.6. Capacità ridotta delle batterie
Stazione di misurazione
Quando è necessario sostituire le batterie, sul display della
temperatura interna ed esterna viene visualizzato il simbolo
delle batterie scariche . Sostituire immediatamente le
batterie.
Stazione base
Quando è necessario sostituire le batterie, sull'apparecchio
base accanto all'ora viene visualizzato il simbolo delle batterie
scariche . Sostituire immediatamente le batterie.
Nota - Sostituzione della batteria
•Accertarsi che dopo ogni sostituzione delle batterie
sulla stazione di misurazione o sulla stazione base
avvenga una nuova sincronizzazione delle stazioni.
•Estrarre anche le batterie dall‘altra stazione e inserirle
nuovamente o, se necessario, sostituirle.

36
37
P Instrukcja obsługi
Elementy obsługi i sygnalizacji
A Stacja bazowa
1. Symbol sygnału radiowego stacji pomiarowej
2. Wskaźnik kanałów
3. Temperatura zewnętrzna
4. Temperatura w pomieszczeniu
5. Symbol sygnału radiowego
6. Strefa czasowa
7. Dzień
8. Trend zmiany temperatury zewnętrznej
9. Trend zmiany temperatury w pomieszczeniu
10. Godzina
11. Dzień tygodnia / sekunda
12. Symbol alarmowy
13. Miesiąc
14. Przycisk
= zmniejszanie aktualnie ustawionej wartości / ręczne
wyszukiwanie sygnału ze stacji pomiarowej
15. Przycisk CHANNEL
= wybór kanału
16. Przycisk
= zwiększanie aktualnie ustawionej wartości / włączanie/
wyłączanie ręcznego odbioru sygnału radiowego
17. Przycisk MODE
= ustawienia / potwierdzanie ustawionej wartości /
przełączanie między wskaźnikiem sekund, dnia tygodnia
i strefy czasowej
18. Przycisk ALARM ON/OFF
= wskaźnik / ustawianie trybów alarmowych
19. Przycisk MEM
= odczyt / resetowanie zapisanych najwyższych /
najniższych wartości
20. Przycisk SNOOZE
= przerywanie sygnału budzenia
21. Otwór do mocowania na ścianie
22. Podpórka
23. Schowek na baterie
B Stacja pomiarowa
24. Schowek na baterie
25. Płyta montażowa
26. Otwór do montażu w pionie
27. Otwór do montażu w poziomie
28. Zacisk
Dziękujemy za zakup naszego produktu!
Przed pierwszym użyciem należy dokładnie przeczytać
instrukcję obsługi. Instrukcję należy przechować, gdyż może
być jeszcze potrzebna.
1. Objaśnienie symboli ostrzegawczych i wskazówek
Ostrzeżenie
Używane w celu zwrócenia uwagi na szczególne
niebezpieczeństwo lub ryzyko.
Wskazówki
Używane w celu zwrócenia uwagi na szczególnie
przydatne informacje.
2. Zawartość opakowania
•stacja pogodowa EWS-165
(stacja bazowa do stosowania wewnątrz / stacja
pomiarowa do stosowania na zewnątrz)
•Podpórka
•2baterie AAA
•2baterie AA
•niniejsza instrukcja obsługi
3. Wskazówki bezpieczeństwa
• Produkt jest przeznaczony do prywatnego, niekomercyjnego
użytku domowego.
• Nie stosować produktu poza zakresem mocy podanym w
danych technicznych.
• Nie stosować produktu w wilgotnym otoczeniu i chronić go
przed bryzgami wody.
• Nie używać produktu w bezpośredniej bliskości ogrzewania,
innych źródeł ciepła ani nie wystawiać go na bezpośrednie
promieniowanie słoneczne.
• Nie używać produktu w miejscach, gdzie nie jest
dozwolone stosowanie urządzeń elektronicznych.
• Nie ustawiać produktu w pobliżu miejsc wywołujących
zakłócenia, metalowych ram, komputerów, telewizorów
itp. Urządzenia elektroniczne i futryny okienne wpływają
negatywnie na działanie produktu.
• Chronić produkt przed upadkiem i silnymi wstrząsami.
• Nie otwierać produktu i nie używać go, gdy jest
uszkodzony.
7. Cura e manutenzione
Pulire il prodotto unicamente con un panno che non lascia
pelucchi e appena inumidito e non ricorrere a detergenti
aggressivi. Fare attenzione a non fare penetrare acqua nel
prodotto.
8. Esclusione di garanzia
Hama GmbH & Co.KG non si assume alcuna responsabilità
per i danni derivati dal montaggio o l‘utilizzo scorretto del
prodotto, nonché dalla mancata osservanza delle istruzioni
per l‘uso e/o delle indicazioni di sicurezza.
9. Assistenza e supporto
In caso di domande sul prodotto, rivolgersi alla Consulenza
prodotto Hama.
Hotline: +49 9091 502-115 (ted./ing.)
Ulteriori informazioni sul supporto sono disponibili qui: www.
hama.com
10. Dati tecnici
Stazione base
Stazione di
misurazione
Alimentazione
elettrica
3,0 V
2 batterie AA
3,0 V
2 batterie AAA
Campo di
misurazione
Temperatura
-5°C – +50°C/
23°F – 122°F
-10°C – +60°C/
14°F – 140°F
Passi di
misurazione
Temperatura
0,1°C / 0,2°F 0,1°C / 0,2°F
Ciclo di
misurazione
temperatura
~ 45 s~45 s
Segnale orario via
radio DCF
Sì No
Max. numero
stazioni di
misurazione
3
Frequenza 433 MHz
Portata ≤ 30 m
11. Indicazioni di smaltimento
Informazioni per protezione ambientale:
Dopo l’implementazione della Direttiva Europea
2002/96/EU e 2006/66/EU nel sistema legale
nazionale, ci sono le seguenti applicazioni: Le
apparecchiature elettriche ed elettroniche e le
batterie non devono essere smaltite con i riuti
domestici. I consumatori sono obbligati dalla legge a restituire
I dispositivi elettrici ed elettronici e le batterie alla ne della
loro vita utile ai punti di raccolta pubblici preposti per questo
scopo o nei punti vendita. Dettagli di quanto riportato sono
deniti dalle leggi nazionali di ogni stato. Questo simbolo sul
prodotto, sul manuale d’istruzioni o sull’imballo indicano che
questo prodotto è soggetto a queste regole. Riciclando,
ri-utilizzando i materiali o utilizzando sotto altra forma i vecchi
prodotti/le batterie, darete un importante contributo alla
protezione dell’ambiente.
12. Dichiarazione di conformità
Hama GmbH & Co. KG dichiara che questo
apparecchio soddisfa i requisiti fondamentali ed è
conforme alle norme vigenti della direttiva 1999/5/
CE. La dichiarazione di conformità secondo la direttiva R&TTE
99/5/CE è disponibile sul sito www.hama.com.

38
39
Ostrzeżenie
•Nabyć w specjalistycznym sklepie odpowiednie
materiały montażowe do montażu na przewidzianej
ścianie.
•Sprawdzić, czy nie są montowane wadliwe bądź
uszkodzone części.
•Podczas montażu nigdy nie wywierać nadmiernej siły.
Może to spowodować uszkodzenie produktu.
•Przed montażem sprawdzić, czy przewidziana ściana
jest odporna na przyjęcie ciężaru mocowanego
produktu, i upewnić się, że w miejscu montażu na
ścianie nie są zainstalowane przewody elektryczne,
wodne, gazowe bądź inne przewody.
5.1. Stacja bazowa
•Za pomocą podpórki ustawić stację bazową na równym
podłożu (22).
•Alternatywnie stację bazową można zamontować na
ścianie za pomocą otworu (21) z tyłu stacji.
5.2. Stacja pomiarowa
•Za pomocą płyty montażowej (25) stację pomiarową można
zamocować pionowo lub poziomo na ścianie zewnętrznej.
•Aby zamocować poziomo stację pomiarową, należy
przymocować płytę montażową (25) w środkowym otworze
(27) za pomocą kołka rozporowego, śruby itp. na wybranej
ścianie.
•Aby zamocować pionowo stację pomiarową, należy
przymocować na wybranej ścianie kołek rozporowy, śrubę,
gwóźdź itp. i zawiesić płytę montażową (25) w otworze
(26).
•Lekko docisnąć stację pomiarową, aż słyszalnie zatrzasną
się („kliknięcie“) zaciski (28).
6. Obsługa
Wskazówka – wprowadzanie danych
Trzymać wciśnięty przycisk (16) lub (14), aby
przyspieszyć nastawę wartości.
6.1. Połączenie ze stacją pomiarową
•Po włożeniu baterii stacja bazowa automatycznie wyszukuje
połączenie ze stacją pomiarową i przeprowadza pierwszą
kongurację.
Wskazówka
•Pierwsza konguracja trwa ok. 2 minuty.
•Podczas próby nawiązania połączenia miga symbol
sygnału radiowego stacji pomiarowej (1).
•Nie naciskać w tym czasie żadnych przycisków! W
przeciwnym razie wartości i ich transmisja mogą
zawierać błędy i niedokładne dane.
•Proces jest zakończony, gdy wyświetlane są zmierzone
dane dla pomieszczenia (4) i na zewnątrz (3).
•Wartość pomiaru jest automatycznie aktualizowana
przez stację bazową co ok. 45 sekund.
•Jeżeli wartość temperatury zawiera się poza zakresem
pomiaru, wskaźnik temperatury wyświetla --.- (dla
wartości temperatury poniżej zakresu pomiaru) lub --.-
(dla wartości temperatury powyżej zakresu pomiaru).
•Jeżeli ze stacji pomiarowej ponownie nie zostanie
odebrany żaden sygnał, nacisnąć i trzymać wciśnięty przez
ok. 3 sekundy przycisk (14), aby rozpocząć ręczne
wyszukiwanie sygnału.
Wskaźnik
Wyszukiwanie sygnału stacji
pomiarowej
Migający wskaźnik
Aktywne
Stały wskaźnik
Proces powiódł się –
sygnał jest odbierany
Stały wskaźnik
Nieaktywne –
sygnał nie jest odbierany od
• Nie próbować naprawiać samodzielnie urządzenia.
Prace serwisowe zlecać wykwalikowanemu personelowi
fachowemu.
• Materiały opakowaniowe trzymać koniecznie z dala od
dzieci, istnieje niebezpieczeństwo uduszenia.
• Materiały opakowaniowe należy natychmiast poddać
utylizacji zgodnie z obowiązującymi przepisami
miejscowymi.
• Nie modykować urządzenia. Prowadzi to do utraty
wszelkich roszczeń z tytułu gwarancji.
Ostrzeżenie - baterie
• Natychmiast usunąć z produktu zużyte baterie i poddać
je utylizacji.
• Używać wyłącznie akumulatorów (lub baterii)
odpowiadających podanemu typowi.
• Nie mieszać starych i nowych baterii ani baterii różnych
typów lub producentów.
• Wkładając baterie, zwrócić koniecznie uwagę
na właściwe podłączenie biegunów (znak + i -).
Nieprzestrzeganie grozi wyciekiem lub wybuchem
baterii.
• Nie przeciążać baterii.
• Przechowywać baterie poza zasięgiem dzieci.
• Nie zwierać akumulatorów / baterii oraz trzymać je z
dala od odkrytych przedmiotów metalowych.
4. Uruchamianie
4.1. Wkładanie baterii
Stacja pomiarowa
Otworzyć schowek na baterie (24) i usunąć przerywacz
stykowy. Następnie zamknąć pokrywę schowka na baterie.
Stacja bazowa
Otworzyć schowek na baterie (23) i usunąć przerywacz
stykowy. Następnie zamknąć pokrywę schowka na baterie.
4.2. Wymiana baterii
Stacja pomiarowa
•Otworzyć schowek na baterie (24), wyjąć i zutylizować
zużyte baterie i włożyć dwie nowe baterie typu AAA
zgodnie z oznaczeniem biegunów. Następnie zamknąć
pokrywę schowka na baterie.
Stacja bazowa
Otworzyć schowek na baterie (23), wyjąć i zutylizować
zużyte baterie i włożyć dwie nowe baterie typu AA zgodnie
z oznaczeniem biegunów. Następnie zamknąć pokrywę
schowka na baterie.
Wskazówka
Przed uruchomieniem należy pamiętać, aby zawsze włożyć
najpierw baterie do stacji pomiarowej, a następnie do
stacji bazowej.
5. Montaż
Wskazówka - montaż
•Zaleca się ustawić najpierw w wybranym miejscu
stację bazową i stację pomiarową bez montażu i
skongurować wszystkie ustawienia – jak opisano w
punkcie 6. Obsługa .
•Zamontować stacje dopiero po prawidłowej konguracji
ustawień i znalezieniu stabilnej łączności radiowej.
Wskazówka
•Zasięg transmisji radiowej między stacją pomiarową i
stacją bazową wynosi na otwartym terenie maks. 30 m.
•Przed montażem zwrócić uwagę, aby żadne sygnały
zakłócające lub przeszkody, takie jak budynki, drzewa,
pojazdy, linie wysokiego napięcia itp., nie wpływały na
transmisję radiową.
•Przed ostatecznym montażem upewnić się, czy między
wybranymi miejscami ustawienia występuje dostateczny
odbiór radiowy.
•Podczas montażu stacji pomiarowej należy pamiętać,
aby zamontować ją w miejscu zabezpieczonym
przed bezpośrednim promieniowaniem słonecznym i
deszczem.
•Międzynarodowa standardowa wysokość dla pomiaru
temperatury powietrza wynosi 1,25 m (4 stopy) nad
ziemią.
Pagina se încarcă...
Pagina se încarcă...
Pagina se încarcă...
Pagina se încarcă...
Pagina se încarcă...
Pagina se încarcă...
Pagina se încarcă...
Pagina se încarcă...
Pagina se încarcă...
Pagina se încarcă...
Pagina se încarcă...
Pagina se încarcă...
-
 1
1
-
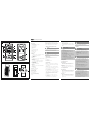 2
2
-
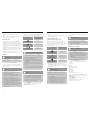 3
3
-
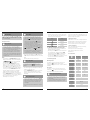 4
4
-
 5
5
-
 6
6
-
 7
7
-
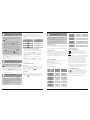 8
8
-
 9
9
-
 10
10
-
 11
11
-
 12
12
-
 13
13
-
 14
14
-
 15
15
-
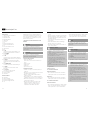 16
16
-
 17
17
-
 18
18
-
 19
19
-
 20
20
-
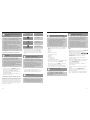 21
21
-
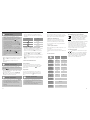 22
22
-
 23
23
-
 24
24
-
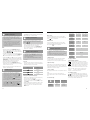 25
25
-
 26
26
-
 27
27
-
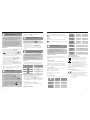 28
28
-
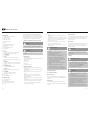 29
29
-
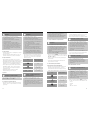 30
30
-
 31
31
-
 32
32


Hama 00092659 EWS-165 Operating Instructions Manual
- Categorie
- Ceasuri cu alarmă
- Tip
- Operating Instructions Manual
în alte limbi
- slovenčina: Hama 00092659 EWS-165
- polski: Hama 00092659 EWS-165
- italiano: Hama 00092659 EWS-165
Lucrări înrudite
-
Hama EWS Intro Weather Station Manual de utilizare
-
Hama 00186301 Manual de utilizare
-
-
-
-
-
-
Hama 186421 Manual de utilizare
-
Hama 00186312 Manual de utilizare
-
Hama 00186332 Manual de utilizare