Eizo MX315W Manualul proprietarului
- Categorie
- Televizoare
- Tip
- Manualul proprietarului

Important
Please read this “Installation Manual”, and “Instructions for Use”
(separate volume) carefully to familiarize yourself with safe and
effective usage.
•Refer to the “Instructions for Use” for information on the
installation / connection of the monitor.
•For the latest product information including the “Installation Manual”,
refer to our web site :
http://www.eizoglobal.com
Color LCD Monitor
Installation Manual

2
This product has been adjusted specically for use in the region to which it was originally shipped. If
operated outside this region, the product may not perform as stated in the specications.
No part of this manual may be reproduced, stored in a retrieval system, or transmitted, in any form or by
any means, electronic, mechanical, or otherwise, without the prior written permission of EIZO Corporation.
EIZO Corporation is under no obligation to hold any submitted material or information condential unless
prior arrangements are made pursuant to EIZO Corporation’s receipt of said information. Although every
effort has been made to ensure that this manual provides up-to-date information, please note that EIZO
monitor specications are subject to change without notice.

3
CONTENTS
CONTENTS
CONTENTS ............................................................. 3
Chapter 1
Basic Operation and Function List
... 4
1-1. Usage of Switches and Operation Guide ... 4
1-2. Basic Operation of the Setting Menu ......... 6
1-3. Function List .................................................. 8
Chapter 2 Adjusting the Screen ........................ 9
2-1. Compatible Resolutions .............................. 9
2-2. Setting Screen Layout (Single / Dual)
and Input Signal ............................................ 9
2-3. Displaying the Sub Window (PinP) ............10
●
Showing the icon for displaying / hiding
the PinP sub window in the operation guide
...10
●Displaying or hiding the PinP sub window .....11
●Setting the input signal for the PinP sub
window ...........................................................11
●Setting the display position of the PinP
sub window .....................................................11
●Setting display mode (CAL Switch
Mode) for the PinP sub window .....................11
2-4. Selecting Display Mode
(CAL Switch Mode) ......................................12
2-5. Adjusting Brightness / Colors ....................13
●Adjustment items for each mode ...................13
●Adjusting the brightness .................................13
●Adjusting the contrast ....................................14
●Adjusting the color temperature .....................14
●Adjusting the gamma .....................................15
●Adjusting the hue ...........................................15
●Adjusting the color saturation.........................15
●Adjusting the gain ...........................................16
2-6. Enabling or Disabling Sharpness
Recovery (the Function of Correcting
Image Clarity) ...............................................16
Chapter 3 Controlling Monitor Quality ........... 17
3-1. Using the SelfCalibration Function ...........17
●Executing SelfCalibration ...............................17
●Checking the SelfCalibration results ..............18
3-2. Using the Grayscale Check Function ........18
●Performing Grayscale Check .........................18
●Checking the Grayscale Check results ..........19
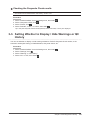
3-3. Setting Whether to Display / Hide
Warnings or QC History ..............................19
Chapter 4
Using the Monitor for a Long Time ...
20
4-1. Setting the Power Saving Mode ................ 20
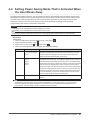
4-2. Setting Power Saving Mode That Is
Activated When the User Moves Away ......21
Chapter 5 Conguring Monitor Settings ........ 22
5-1. Specifying the Language ........................... 22
5-2. Showing the Icon for Switching the USB
Ports in the Operation Guide .................... 22
5-3. Switching PCs Used to Operate USB
Devices ......................................................... 22
5-4.
Setting the Signal Format of DisplayPort 1
... 23
●Switching the DisplayPort 1 version ............. 23
●Enabling or disabling daisy-chain
connection ..................................................... 23
5-5. Adjusting Brightness of the Power
Switch Indicator .......................................... 24
5-6. Skipping Unused Display Modes .............. 24
5-7. Enabling or Disabling DisplayPort
Communication in Power Saving Mode ... 24
5-8. Locking Operation Switches ..................... 25
5-9. Selecting the Input Signal for DDC
Communication ........................................... 25
5-10. Setting Whether to Display / Hide the
Grayscale Warning ..................................... 25
5-11. Acquiring Life Estimation Data ................. 26
5-12. Rotating the Setting Menu Display ........... 26
5-13. Setting Whether to Display / Hide the
EIZO Logo .................................................... 26
5-14. Viewing the Monitor Information .............. 27
5-15. Resetting to Defaults .................................. 27
●Resetting the color adjustment value ............ 27
●Resetting all settings ..................................... 27
Chapter 6 Troubleshooting .............................. 28
6-1. No Picture .................................................... 28
6-2. Imaging Problems ....................................... 29
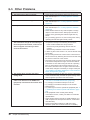
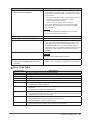
6-3. Other Problems ........................................... 30
●Error Code Table ............................................31
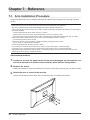
Chapter 7 Reference ........................................ 32
7-1. Arm Installation Procedure........................ 32
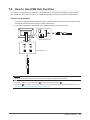
7-2. How to Use USB Hub Function .................. 33
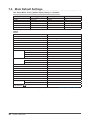
7-3. Main Default Settings ................................. 34
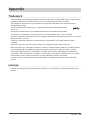
Appendix .............................................................. 35
Trademark ............................................................... 35
License .................................................................... 35
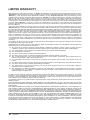
LIMITED WARRANTY ............................................. 36
Recycling Information ........................................ 37

4Chapter 1 Basic Operation and Function List
Chapter 1
Basic Operation and Function List
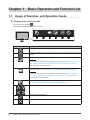
1-1. Usage of Switches and Operation Guide
1. Displaying the operation guide
Touch any switch (except ).
The operation guide appears on the screen.
Display Function
Turns the power on or off.
Displays the Setting menu. The Setting menu is used to congure advanced monitor
settings.
Displays or hides the PinP sub window.
Attention
• The operation guide does not display this item by default. See “Showing the icon
for displaying / hiding the PinP sub window in the operation guide” (page 10)
for information on how to display.
Switches PCs used to operate USB devices. For more information about how to
switch PCs, see “5-3. Switching PCs Used to Operate USB Devices” (page 22).
Attention
• The operation guide does not display this item by default. See “5-2. Showing
the Icon for Switching the USB Ports in the Operation Guide” (page 22) for
information on how to display.
Switches display modes. For more information about how to switch display modes,
see “2-4. Selecting Display Mode (CAL Switch Mode)” (page 12).
Selects an item.
Applies the selected content.
Cancels the selection.

5
Chapter 1 Basic Operation and Function List
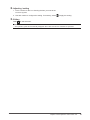
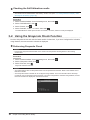
2.
Adjusting / setting
1. Touch a switch for the icon showing the item you want to set.
The menu appears.
2. Use each switch to congure the setting. If necessary, select to apply the setting.
3.
Exiting
Select to exit the menu.
Note
• The operation guide will automatically disappear after a few seconds if no switches are operated.

6Chapter 1 Basic Operation and Function List
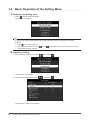
1-2. Basic Operation of the Setting Menu
1. Displaying the Setting menu
1. Select from the operation guide.
The Setting menu appears.
Note
• To adjust or set "Administrator Settings" items, display the Setting menu according to the following
procedure:
1. Select to turn off the monitor.
2. While touching the leftmost switch ( ), touch for more than two seconds to turn on the monitor.
"Administrator Settings" appears.
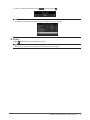
2.
Adjusting / setting
1. Select a menu to adjust / set using , then select .
The advanced menu appears.
2. Select an item to adjust / set using , then select .
The Adjustment / Setting menu appears.

7
Chapter 1 Basic Operation and Function List
3. Adjust / set the selected item using , and then select .
Note
• The settings for "Administrator Settings" items are applied by selecting "Apply".
3.
Exiting
Select several times to exit the Setting menu.
Note
• The menu for "Administrator Settings" items is exited by selecting "Apply".

8Chapter 1 Basic Operation and Function List
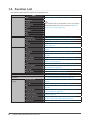
1-3. Function List
The following table shows the items in the Setting menu.
Main menu Item Reference
CAL Switch Mode Mode “2-5. Adjusting Brightness / Colors” (page 13)
Note
• The functions that can be adjusted or set in "CAL Switch
Mode" differ depending on the mode (see “Adjustment
items for each mode” (page 13)).
Brightness
Contrast
Temperature
Gamma
Hue
Saturation
Gain
Reset
RadiCS SelfQC SelfCalibration “3-1. Using the SelfCalibration Function” (page 17)
Grayscale Check “3-2. Using the Grayscale Check Function” (page 18)
LEA “5-11. Acquiring Life Estimation Data” (page 26)
Settings “3-3. Setting Whether to Display / Hide Warnings or QC
History” (page 19)
Preferences Input “2-2. Setting Screen Layout (Single / Dual) and Input Signal”
(page 9)
Power Save “4-1. Setting the Power Saving Mode” (page 20)
Indicator “5-5. Adjusting Brightness of the Power Switch Indicator”
(page 24)
Menu Rotation “5-12. Rotating the Setting Menu Display” (page 26)
USB Selection “5-2. Showing the Icon for Switching the USB Ports in the
Operation Guide” (page 22)
PinP “2-3. Displaying the Sub Window (PinP)” (page 10)
Presence Sensor “4-2. Setting Power Saving Mode That Is Activated When the
User Moves Away” (page 21)
Mode Skip “5-6. Skipping Unused Display Modes” (page 24)
Monitor Reset “5-15. Resetting to Defaults” (page 27)
Languages “5-1. Specifying the Language” (page 22)
Information “5-14. Viewing the Monitor Information” (page 27)
Administrator
Settings
On-Screen Logo “5-13. Setting Whether to Display / Hide the EIZO Logo”
(page 26)
Key Lock “5-8. Locking Operation Switches” (page 25)
DDC “5-9. Selecting the Input Signal for DDC Communication”
(page 25)
DP Power Save “5-7. Enabling or Disabling DisplayPort Communication in
Power Saving Mode” (page 24)
Grayscale Warning “5-10. Setting Whether to Display / Hide the Grayscale
Warning” (page 25)
Sharpness Recovery “2-6. Enabling or Disabling Sharpness Recovery (the
Function of Correcting Image Clarity)” (page 16)
Signal Format “5-4. Setting the Signal Format of DisplayPort 1” (page 23)

9
Chapter 2 Adjusting the Screen
Chapter 2 Adjusting the Screen
2-1. Compatible Resolutions
For information about the compatible resolutions of the monitor, see "Compatible Resolutions" in the
Instructions for Use. For information on how to set the resolution on a PC, refer to the manual of the PC.
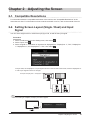
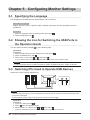
2-2.
Setting Screen Layout (Single / Dual) and Input
Signal
You can select single screen or dual screen (PbyP) mode, as well as the input signal.
Procedure
1. Select "Preferences" from the Setting menu, then select .
2. Select "Input", then .
3. Select a signal or combination of signals to be displayed from "DisplayPort 1", "DVI", "DisplayPort
1 / DisplayPort 2", and "DisplayPort 1 / DVI", then select .
In PbyP mode, the “DisplayPort 1” input signal is shown on the left side of the screen, and the “DisplayPort 2”
or “DVI” input signal is shown on the right.
Example of DisplayPort 1 / DisplayPort 2:
Note
• When the setting is complete, the input port names appear.

10 Chapter 2 Adjusting the Screen
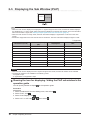
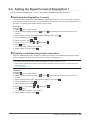
2-3. Displaying the Sub Window (PinP)
Main screen
Sub window
Note
• When the main screen displays the "DisplayPort 1" signal in single screen mode, the PinP sub window displays
the "DisplayPort 2" or "DVI" signal. Select a signal to be displayed on the PinP sub window. For more information
about how to select a signal, see “Setting the input signal for the PinP sub window” (page 11).
• When the main screen is in PbyP mode, the PinP sub window displays a signal that is not shown on the main
screen.
• Resolutions supported for the PinP sub window are as follows. The PinP sub window displays images in 8-bits.
√: Supported
Resolution (H x V) Vertical frequency
(Hz) DisplayPort DVI
720 × 400 70 √ √
640 × 480 60 √ √
800 × 600 60 √ √
1024 × 768 60 √ √
1280 × 1024 60 √ √
1600 × 1200 60 √ √
1920 × 1200 60 √ √
1200 × 1600 60 √ √
1200 × 1920 60 √ √
Attention
• When the main screen displays the "DVI" signal in single screen mode, the PinP sub window is not available.
• The PinP sub window is not available in the following cases:
- No signal is input.
- A signal that is not supported is input.
●Showing the icon for displaying / hiding the PinP sub window in the
operation guide
You can specify whether to display in the operation guide.
Procedure
1. Select "Preferences" from the Setting menu, then select .
2. Select "PinP", then .
3. Select "PinP Display", then .
4. Select “On” or “Off” using or , then select .

11
Chapter 2 Adjusting the Screen
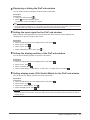
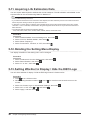
●Displaying or hiding the PinP sub window
You can select whether to display or hide the PinP sub window.
Procedure
1. Touch any switch (except ).
2. Select from the operation guide.
The PinP sub window is displayed or hidden.
Note
• By using RadiCS / RadiCS LE, you can display or hide the PinP sub window more easily using the mouse or
keyboard (Hide-and-Seek). Refer to RadiCS / RadiCS LE User’s Manual for details.
●Setting the input signal for the PinP sub window
Select a signal to be displayed on the PinP sub window when the main screen displays the
"DisplayPort 1" signal in single screen mode.
Procedure
1. Select "Preferences" from the Setting menu, then select .
2. Select "PinP", then .
3. Select "Input", then .
4. Select "DisplayPort 2" or "DVI", then .
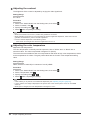
●Setting the display position of the PinP sub window
You can set the display position of the PinP sub window.
Procedure
1. Select "Preferences" from the Setting menu, then select .
2. Select "PinP", then .
3. Select "Position" then .
4. Select "Upper Right", "Lower Right", "Lower Left", or "Upper Left", then select .
●Setting display mode (CAL Switch Mode) for the PinP sub window
You can specify the display mode for the PinP sub window.
Procedure
1. Select "Preferences" from the Setting menu, then select .
2. Select "PinP", then .
3. Select "CAL Switch Mode", then .
4. Select a display mode, then .
Attention
• Medical images must be shown on the PinP main screen. We recommend that the sub window be used to
display text, etc.

12 Chapter 2 Adjusting the Screen
2-4. Selecting Display Mode (CAL Switch Mode)
The display mode can be selected according to the monitor application. For information on how to specify
the display mode for the PinP sub window, see “Setting display mode (CAL Switch Mode) for the PinP
sub window” (page 11).
Display Modes
√: Can be calibrated
Mode Purpose
1-DICOM Enables display using DICOM Part 14-compliant grayscale characteristics. √
2- CA L1 Displays the calibration status using calibration software. √
3-CAL2 √
4-Custom Select this mode to congure desired settings. -
5-sRGB Suitable for color matching with sRGB compatible peripherals. -
6-Text Suitable to display documents, spreadsheets, or other text. -
Procedure
1. Touch any switch (except ).
2. Select from the operation guide.
The Mode menu appears on the lower right.
1-DICOM
↓ ↑
2- CAL1
↓ ↑
3-CAL2
↓ ↑
4-Custom
↓ ↑
5-sRGB
↓ ↑
6-Text
Example:
3. Modes are changed in sequence each time you select .
You can also select or to change modes when the Mode menu is being displayed.
Note
• The Setting menu and Mode menu cannot be displayed at the same time.

13
Chapter 2 Adjusting the Screen
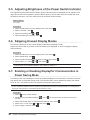
2-5. Adjusting Brightness / Colors
You can adjust brightness and colors for each mode, and save the settings.
Attention
• It takes about 15 minutes for the electrical parts in the product to become stable. Please wait 15 minutes or more
after the monitor power has been turned on or the monitor has recovered from the power saving mode before
performing adjustment.
• The same image may be observed in different colors on multiple monitors due to monitor-specic characteristics.
Make ne color adjustment visually when matching colors on multiple monitors.
Note
• Use a value shown in "%" or "K" only for reference.
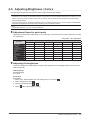
●Adjustment items for each mode
Adjustable functions differ depending on the mode type. (Functions that cannot be adjusted or set are
not selectable.)
√: Adjustable -: Not adjustable
Function CAL Switch Mode
1-DICOM 2-CAL1 3-CAL2 4-Custom 5-sRGB 6-Text
Brightness √√√√√√
Contrast ---√√√
Temperature ---√√√
Gamma ---√√√
Hue ---√√√
Saturation ---√√√
Gain ---√√√
Reset √√√√√√
●Adjusting the brightness
The screen brightness is adjusted by changing the brightness of the backlight (light source from the
LCD back panel).
Setting Range
0 to 100 %
Procedure
1. Select "CAL Switch Mode" from the Setting menu, then select .
2. Select "Brightness", then .
3. Specify the setting using or .
4. Select after completing the setting.

14 Chapter 2 Adjusting the Screen
●Adjusting the contrast
The brightness of the screen is adjusted by varying the video signal level.
Setting Range
0 to 100 %
Procedure
1. Select "CAL Switch Mode" from the Setting menu, then select .
2. Select "Contrast", then .
3. Specify the setting using or .
4. Select after completing the setting.
Note
• When the contrast is set to 100 %, all the color gradations are shown.
• When adjusting the monitor, it is recommended to perform brightness adjustment, which does not lose
gradation characteristics, prior to contrast adjustment.
• Perform contrast adjustment in the following cases.
- If the screen is too bright even when the brightness is set to 0 %
●Adjusting the color temperature
Adjust the color temperature.
The color temperature is normally used to express the hue of "White" and / or "Black" with a
numerical value. The value is expressed in degrees "K" (Kelvin).
The screen becomes reddish at low color temperatures and bluish at high color temperatures, similar
to the temperatures of a ame. The gain preset values are set for each color temperature setting
value.
Setting Range
Native, 6000 K to 15000 K (in increments of 100 K), sRGB
Procedure
1. Select "CAL Switch Mode" from the Setting menu, then select .
2. Select "Temperature" then .
3. Specify the setting using or .
4. Select after completing the setting.
Note
• "Gain" allows you to perform more advanced adjustment (see “Adjusting the gain” (page 16)).
• If set to "Native", the image is displayed in the preset color of the monitor (Gain: 100 % for each RGB
channel).
• When gain is changed, the color temperature is changed to “User”.

15
Chapter 2 Adjusting the Screen
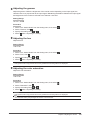
●Adjusting the gamma
Adjust the gamma. While the brightness of the monitor varies depending on the input signal, the
variation rate is not proportional to the input signal. Maintaining the balance between the input signal
and brightness of the monitor is referred to as "Gamma correction".
Setting Range
1.6 to 2.7, sRGB
Procedure
1. Select "CAL Switch Mode" from the Setting menu, then select .
2. Select "Gamma", then .
3. Specify the setting using or .
4. Select after completing the setting.
●Adjusting the hue
Adjust the hue.
Setting Range
-100 to 100
Procedure
1. Select "CAL Switch Mode" from the Setting menu, then select .
2. Select "Hue", then .
3. Specify the setting using or .
4. Select after completing the setting.
Attention
• Using this function may prevent some color gradations from being able to be displayed.
●Adjusting the color saturation
Adjust the color saturation.
Setting Range
-100 to 100
Procedure
1. Select "CAL Switch Mode" from the Setting menu, then select .
2. Select "Saturation", then .
3. Specify the setting using or .
4. Select after completing the setting.
Attention
• Using this function may prevent some color gradations from being able to be displayed.
Note
• The minimum value (-100) changes the screen to monochrome.

16 Chapter 2 Adjusting the Screen
●Adjusting the gain
The brightness of each color component (red, green, and blue) is called "gain". The hue of “white” can
be changed by adjusting the gain.
Setting Range
0 to 100 %
Procedure
1. Select "CAL Switch Mode" from the Setting menu, then select .
2. Select "Gain", then .
3. Select the color to be adjusted from "Red", "Green", and "Blue", then select .
4. Specify the setting using or .
5. Select after completing the setting.
Attention
• Using this function may prevent some color gradations from being able to be displayed.
Note
• The gain value changes according to the color temperature.
• When gain is changed, the color temperature is changed to “User”.
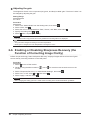
2-6. Enabling or Disabling Sharpness Recovery (the
Function of Correcting Image Clarity)
EIZO’s unique technology called “Sharpness Recovery” displays images that are true to the original
source data by correcting variations in the LCD panel.
Procedure
1. Select to turn off the monitor.
2. While touching the leftmost switch ( ), touch for more than two seconds to turn on the
monitor.
3. Select "Sharpness Recovery" in "Administrator Settings", then select .
4. Select "On" or "Off" using or , then select .
5. Select "Apply", and then select .
Attention
• After changing the setting, perform a visual check according to the medical standards / guidelines.

17
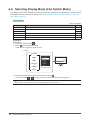
Chapter 3 Controlling Monitor Quality
Chapter 3 Controlling Monitor Quality
The monitor includes the Integrated Front Sensor, which enables you to perform calibration and Grayscale
Check independently.
Note
• Calibration can be performed periodically by using the schedule function of RadiCS LE that is attached to the
monitor. For more information about the setup procedure, refer to the RadiCS LE User’s Manual (stored on the CD-
ROM).
• RadiCS enables you to congure the schedule settings for Grayscale Check as well as for calibration. For more
information about the setup procedure, refer to the RadiCS User’s Manual.
• If you want to perform high-level quality control in compliance with medical standards / guidelines, use optional
quality control software kit "RadiCS UX1".
• Perform correlation using RadiCS / RadiCS LE to adjust the measurement results of the Integrated Front Sensor
to those of the EIZO UX1 sensor for reference. Periodical correlation enables the measurement accuracy of the
Integrated Front Sensor equivalent to that of the UX1 sensor. For details, refer to the RadiCS / RadiCS LE User’s
Manual.
3-1. Using the SelfCalibration Function
Execute SelfCalibration and view the latest results.
●Executing SelfCalibration
Procedure
1. Select "RadiCS SelfQC" from the Setting menu, then select .
2. Select "SelfCalibration" for "RadiCS SelfQC", then select .
3. Select "Execute", then .
SelfCalibration is executed.
Attention
• If the power to the PC is turned off or the input signal switches while SelfCalibration is running, the execution
will be canceled.
• After SelfCalibration is complete, perform Grayscale Check at the same room temperature and illuminance
as those in the actual working environment.
Note
• The following items can be set by using RadiCS / RadiCS LE. For more information about the setup
procedure, refer to the RadiCS / RadiCS LE User’s Manual.
-Calibration target
-SelfCalibration schedule
- If you have congured the schedule using RadiCS / RadiCS LE, the next execution schedule is displayed
in the advanced menu.
• The calibration target value can be conrmed by selecting the target mode in "CAL Switch mode" of the
Setting menu.

18 Chapter 3 Controlling Monitor Quality
●Checking the SelfCalibration results
Attention
• The results can be checked when "QC History" is set to "On" (see “3-3. Setting Whether to Display / Hide
Warnings or QC History” (page 19)).
Procedure
1. Select "RadiCS SelfQC" from the Setting menu, then select .
2. Select "SelfCalibration", then .
3. Select "Result", then .
4. Select "DICOM", "CAL1", or "CAL2", then select .
The SelfCalibration results (such as Max. Error Rate, Last Time, and Error Code) are displayed.
3-2. Using the Grayscale Check Function
Perform Grayscale Check and view the latest results. Furthermore, if you have congured the schedule
using RadiCS, the next execution schedule is displayed.
●Performing Grayscale Check
Attention
• Perform the Grayscale Check based on the actual color temperature and brightness of the working
environment.
Procedure
1. Select "RadiCS SelfQC" from the Setting menu, then select .
2. Select "Grayscale Check", then .
3. Select "Execute", then .
Grayscale Check is executed.
Attention
• The determination value for Grayscale Check can be specied from RadiCS. Refer to the RadiCS User’s
Manual for details.
• The Grayscale Check schedule can be congured using RadiCS. For more information about the setup
procedure, refer to the RadiCS User’s Manual. If you have congured the schedule using RadiCS, the next
execution schedule is displayed in the advanced menu.

19
Chapter 3 Controlling Monitor Quality
●Checking the Grayscale Check results
Attention
• The results can be checked when "QC History" is set to "On".
Procedure
1. Select "RadiCS SelfQC" from the Setting menu, then select .
2. Select "Grayscale Check", then .
3. Select "Result", then .
4. Select "DICOM", "CAL1", or "CAL2", then select .
Up to ve past Grayscale Check results (Passed, Failed, Canceled, or Error) are displayed.
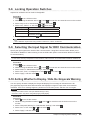
3-3. Setting Whether to Display / Hide Warnings or QC
History
You can set whether to display or hide warnings related to "Failed" Grayscale Check results, or the
execution results (QC History) of SelfCalibration, Grayscale Check, etc.
Procedure
1. Select "RadiCS SelfQC" from the Setting menu, then select .
2. Select "Settings", then .
3. Select "Warning" or "QC History".
4. Select "On" or "Off", then select .

20 Chapter 4 Using the Monitor for a Long Time
Chapter 4 Using the Monitor for a Long Time
The monitor can be set to enter the power saving mode according to the PC status or the user’s movement.
The life of the monitor backlight can be extended by setting the monitor to enter the power saving mode
when the monitor is not used.
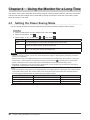
4-1. Setting the Power Saving Mode
You can specify whether the monitor enters the power saving mode according to the PC status.
Procedure
1. Select "Preferences" from the Setting menu, then select .
2. Select "Power Save", then .
3. Select "High", "Low", or "Off" using or , then select .
Setting Function
High Turns the backlight off. This provides the highest power saving effect.
Low Sets the backlight to the lowest lighting level. The time until operation stabilizes after
restoring from power saving mode can be reduced.
Off Does not enable the power saving mode. The backlight lights up irrespective of the PC
status. This setting may shorten the backlight life.
Attention
• When not using the monitor, you can turn off the main power supply or disconnect the power plug so that the
power is cut completely.
• Devices connected to the USB upstream port and downstream port still work when the monitor is in the power
saving mode or when the power is switched off using the power button ( ) of the monitor. For this reason,
power consumption of the monitor varies with connected devices even in the power saving mode.
• Regardless of whether the PinP sub window is displayed or not, the monitor may not enter the power saving
mode when a signal is input to the PinP sub window.
Note
• When the signal input from the PC is no longer detected, a message appears notifying the user of the transition
to the power saving mode. The monitor enters power saving mode ve seconds after the message appears.
• You can check the monitor status by viewing the power switch indicator.
PC status Monitor status Power indicator
On Normal operation mode Green
Power saving mode Power saving mode Orange
Power saving mode Normal operation mode (No input signal) Green
Pagina se încarcă ...
Pagina se încarcă ...
Pagina se încarcă ...
Pagina se încarcă ...
Pagina se încarcă ...
Pagina se încarcă ...
Pagina se încarcă ...
Pagina se încarcă ...
Pagina se încarcă ...
Pagina se încarcă ...
Pagina se încarcă ...
Pagina se încarcă ...
Pagina se încarcă ...
Pagina se încarcă ...
Pagina se încarcă ...
Pagina se încarcă ...
Pagina se încarcă ...
Pagina se încarcă ...
Pagina se încarcă ...
Pagina se încarcă ...
Pagina se încarcă ...
-
 1
1
-
 2
2
-
 3
3
-
 4
4
-
 5
5
-
 6
6
-
 7
7
-
 8
8
-
 9
9
-
 10
10
-
 11
11
-
 12
12
-
 13
13
-
 14
14
-
 15
15
-
 16
16
-
 17
17
-
 18
18
-
 19
19
-
 20
20
-
 21
21
-
 22
22
-
 23
23
-
 24
24
-
 25
25
-
 26
26
-
 27
27
-
 28
28
-
 29
29
-
 30
30
-
 31
31
-
 32
32
-
 33
33
-
 34
34
-
 35
35
-
 36
36
-
 37
37
-
 38
38
-
 39
39
-
 40
40
-
 41
41


Eizo MX315W Manualul proprietarului
- Categorie
- Televizoare
- Tip
- Manualul proprietarului
în alte limbi
- English: Eizo MX315W Owner's manual
Lucrări conexe
-
Eizo GX560 Manualul proprietarului
-
-
-
-
-
-
-
Eizo MDU5501WT Manual de utilizare
-
-