
LD48PRO+/LD44/LD40
EN Instructions for use
SV Bruksanvisning
DK Betjeningsvejledning
DE Gebrauchsanweisung
EL Οδηγίες χρήσης
ES Instrucciones de uso
ET Kasutusjuhend
FI Käyttöohje
FR Mode d’emploi
IS Notkunarleiðbeiningar
KO 사용 지침
LT Naudojimo instrukcija
LV Lietošanas instrukcija
NO Bruksanvisning
NL Gebruiksaanwijzing
PL Instrukcje użytkowania
RO Instrucțiuni de utilizare
DEHUMIDIFIER
Revision date: 05-Jul-2021Wood’s LD48 / LD44 / LD40
OPERATING INSTRUCTIONS FOR
DEHUMIDIFIER
OPERATING INSTRUCTIONS FOR:
Operating Instructions
Bruksanvisning
Bruksanvisning
Bedienungsanleitung
Betjeningsvejledning
Käyttöohjeet
GB
DE
SE
NO
DK
FI
SW45FB
Get 6 years warranty!
Register and follow the
instructions at
warranty-woods.com
Notkunarleiðbeiningar
IS
DEHUMIDIFIER
OPERATING INSTRUCTIONS FOR:
Operating Instructions
Bruksanvisning
Bruksanvisning
Bedienungsanleitung
Betjeningsvejledning
Käyttöohjeet
GB
DE
SE
NO
DK
FI
SW45FB
Get 6 years warranty!
Register and follow the
instructions at
warranty-woods.com
Notkunarleiðbeiningar
IS

02
EN OPERATION INSTRUCTIONS
GET 10 YEARS WARRANTY!
Register and follow the instructions at
warranty-woods.com
Registrera dig och hitta den senast
uppdaterade bruksanvisningen på
woods.se
Register and nd the latest
uppdated user manual at
woods.se

03
EN
OPERATION INSTRUCTIONS
English ......................................................................... 04
Swedish ........................................................................ 12
Danish .......................................................................... 20
German ........................................................................ 28
Greek ........................................................................... 36
Spanish ......................................................................... 44
Estonian ........................................................................ 52
Finnish ......................................................................... 60
French .......................................................................... 68
Icelandic ....................................................................... 76
Korean ......................................................................... 84
Lithuanian ..................................................................... 92
Latvian ....................................................................... 100
Norwegian ................................................................... 108
Dutch ......................................................................... 116
Polish......................................................................... 124
Romanian .................................................................... 132
CONTENT PAGE NO

04
EN OPERATION INSTRUCTIONS
INSTRUCTIONS FOR USE”
”Flammable material. This appliance
contains R290/Propane a flammable
refrigerant.
Refer operators manual.
Read technical manual
Read operators manual.
SAFETY INFORMATION
Before the installation and use of the
appliance, carefully read the supplied
instructions. The manufacturer is not
responsible if an incorrect installation and
use causes injuries and damages. Always
keep the instructions with the appliance
for future reference.
CHILDREN AND VULNERABLE PEOPLE
SAFETY
WARNING
Risk of injury or permanent disability.
This appliance can be used by children
aged 8 years and above and persons
with reduced physical, sensory or mental
capabilities or lack of experience and
knowledge if they have been given
supervision or instruction concerning
use of the appliance in a safe way and
understand the hazards involved. Do not
let children play with the appliance.
Children of less than 3 years should be
kept away unless continuously supervised.
Keep all packaging away from children.
Cleaning and user maintenance shall not
be made by children without supervision.
GENERAL SAFETY
This appliance is intended to be used in
household and similar applications such
as: – basements, crawl spaces; staff kitchen
areas in shops, offices and other working
environments. The rating plate is located
behind the water tank of the dehumidifier.
Keep ventilation openings clear of
obstruction.
Do not use mechanical devices or other
means to accelerate the defrosting
process, other than those recommended
by the manufacturer. The appliance shall
not be stored in a room where ignition
sources are operating continously (open
flames, working gas appliance, operation
electric heater, etc). Do not pierce or burn.
Be aware that refrigerants may not have an
odour. Do not use water spray and steam
to clean the appliance. Clean the appliance
with a moist soft cloth. Only use neutral
detergents. Do not use abrasive products,
abrasive cleaning pads, solvents or metal
objects. If the power cord is damaged, it
must be replaced by the manufacturer,
its authorized Service Centre or similarly
qualified persons in order to avoid a
hazard.
SAFETY INSTRUCTIONS
WARNING
Only a qualified person can install this
appliance.
Remove all packaging material. Do not
install or use a damaged appliance. The
appliance shall be installed, operated and
stored in a room with a floor area larger
than 4m². Strictly follow the installation
instruction supplied with the appliance.
Always be careful when you move the
appliance because it is heavy. Always wear
safety gloves.
Make sure the air can circulate around
the appliance. Wait at least 4 hours before
connecting the appliance to the power
outlet. This is to allow the oil to flow back
in the compressor. Do not install the
appliance close to radiators or other heat
sources. Do not install the appliance in
direct sunlight.
ELECTRICAL CONNECTION
WARNING
Risk of fire and electrical shock.
The appliance must be connected to
a grounded outlet. Make sure that the
electrical information on the rating label
is in accordance to the power supply. If
not, contact an electrician. Always use a
correctly installed shockproof socket. Do
not use multi-plug adapters and extension
cables. Make sure not to cause damage
to the electrical components (e.g. plug,
cable). ontact the authorized Service
Centre or an electrician to change the
electrical components. The cable must stay
below the level of the plug. Connect the
plug to the power socket only at the end
of the installation. Make sure that there is
access to the plug after the installation. Do
not pull the power cable to disconnect the
appliance. Always unplug the power cable
from the plug only.
USE
WARNING
Risk of injury, burns, electrical shock or fire.
Do not change the specification of this
appliance. Be careful not to cause damage
to the refrigerant circuit. It contains
propane (R290), a natural gas with a high
level of environmental compatibility. This
gas is flammable. If damage occurs to the
refrigerant circuit, make sure that there
are no flames and sources of ignition in
the room. Ventilate the room. Do not put
flammable products or items that are wet
with flammable products near or on the
appliance.
DISPOSAL
WARNING
Risk of injury.
Disconnect the appliance from the mains
supply. Cut off the mains cable and
discard it. The refrigerant circuit of this
appliance is ozone-friendly. Contact your
local authority for information on how to
discard the appliance correctly. Do not
cause damage to the part of the cooling
unit that is near the heat exchanger.”

05
EN
OPERATION INSTRUCTIONS
4 3 2 1
5 6 7 8 9
16
15
14
13
10 11
12
17
B.
A.
A A
B B
C C
D D
E E
F F
G G
H H
12
12
11
11
10
10
9
9
8
8
7
7
6
6
5
5
4
4
3
3
2
2
1
1
Denomination
Benämning
PRODMA AB
2019-10-10
NN
ISO 1101, ISO 8015, ISO 5459
material
APPROVED BY
SCALE
DERIVED FROM
DATE
DRAWN BY
DESIGN OWNER
WEIGHT/VOLUME
DRAFTING STANDARDS
MODEL/APPLICATION
TREATMENT
MATERIAL
00
NAME
LOCAL NAME
SHEET
DESCRIPTION
XXX XXX
1 / 1
1:5
DRAWING NUMBER
REV.
A2
Components reflected by this drawing must not contain substances or coatings of any of the substances
banned according to Dir.2002/95/EC,RoHS, or substances on the REACH candidate list published
on http://echa.europa.eu/. Upon request documentation demonstrating compliance with these
requirements shall be immediately provided by the supplier to Prodma.
This drawing contains confidential information and is the property of Prodma, without whose
permission it may not be copied, shown or handed to a third party or otherwise used and it is
to be returned promptly upon request to the design owner, who is responsible for the drawing.
B
0,5
C
A
-DO NOT MEASURE OFF DRAWING
-FOR MISSING DIMENSIONS, REFER
TO 3D MODEL
-GENERAL TOLERANCES
UNLESS STATED OTHERWISE
SHEET METAL COMPONENTS
BLANK POSITIONING ±0,1mm
FLANGE HEIGHT ±0,2mm
HOLE DIAMETER ±0,05mm
ANGLES ±1°
BURRS MAX 0,05mm
MACHINED COMPONENTS
ACCORDING TO ISO 2768-m
XX PRODUCTION INSPECTION DIMENSIONS
ACCORDING TO QI 1641 CLASS
2
5
1
3
4
den 19 april 2021 18:55:46 - Woods_manual_SW45FB_2019_04_25.pdf - Adobe Acrobat Reader DC (32-bit)

06
EN OPERATION INSTRUCTIONS
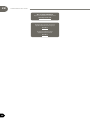
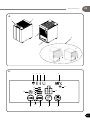
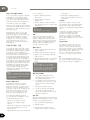
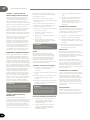
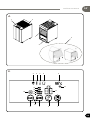
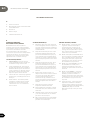
PRODUCT DESCRIPTION
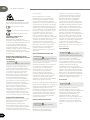
”A.
1. Control panel
2. Draught valve to open/close/aim the air
stream
3. Air filter
4. Water container
5. Change of air filter”
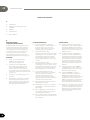
B.
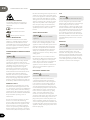
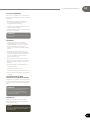
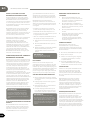
CONTROL PANEL
FUNCTION DESCRIPTION
Dehumidifiers in the LD series are equipped
with an intuitive control panel for simple and
convenient use. Note that the control panel
powers down to idle mode 20 seconds after
connection of mains voltage or after last input
and is revived by touching the area where the
function keys are located. All keystrokes are
confirmed with a beep
FUNCTION KEYS
1. On/OFF- Switches the dehumidifier on and
off. In off mode the energy consumption
equals 0.5 W.
2. Setting of the desired humidity - Only
active in program modes “Normal” and
“Fan”. Desired humidity can set between
35 - 75% in steps of 1 percentage point.
The set value is first displayed fixed and
then flashing before the actual value
reappears.
3. Mode selection - Selection of operating
program, refer points 13. - 16. below.
4. Fan speed - The speed of the fan may in
“Normal” and “Fan” mode be set at low or
high speed. Switching between the speeds
takes place with a few seconds delay.
ALARMS / INFORMATION
5. Defrost - If necessary, the cooling circuit
is defrosted automatically, whereby the
compressor is switched off and only the
fan is in operation. The symbol goes out
when the dehumidification process is
restarted.
6. Too high ambient temperature – If the
ambient temperature exceeds 35 ° C the
dehumidification process shuts off and
resumes automatically when the ambient
temperature falls below 35 °C. The symbol
is lit as long as the temperature is 35 ° C
or higher.
7. Low room temperature – if the ambient
temperature falls below2 ° C the
dehumidification process shuts off and
resumes automatically when the ambient
temperature rises above 2 °C. The symbol
is lit as long as the temperature is 2 ° C or
lower.
8. Condensate tank full – When the tank is
full an audible signal is activated for 20
seconds and the symbol is lit. When the
water tank is emptied and repositioned,
the reset is reset the operating program
automatically. Make sure that the float
hangs freely in the tank.
9. Room temperature – Displays the detected
ambient temperature.
10. Fan speed - Fan and dashes indicate high
speed and only fan indicates low speed.
11. Relative humidity - Shows current and
desired target values. The latter in
connection with target value setting.
12. WiFi - Indicates when WiFi is connected.
Applies only to models equipped with this
feature.
OPERATING MODES
13. Fan mode - Used if continuous air
circulation is desired. Fan speed and
target value for humidity can be set. When
the set target value is reached, only the
compressor is switched off to restart again
if the humidity rises.
14. Comfort mode (EASY) - The dehumidifier
aims for 50% relative humidity with the fan
set to low speed. When the target value is
reached, compressor and fan shuts off and
restarts if the humidity rises above 50%.
15. Laundry drying mode (LAUNDRY) - The
dehumidification process is in operation
with the fan at high fan speed until it
is turned off manually or the mode is
changed.
16. Normal Mode (NORMAL) – Used to
manually set the target value for humidity
and fan speed. When set target value is
reached, compressor and fan shuts off
and restarts if the humidity rise above the
target value.
17. Lock function - Used to prevent that
settings unintentionally are changed. The
lock function is operating the FAN and
MODE keys simultaneously for 3 seconds.
Disabling the lock function is done in the
same way.”

07
EN
OPERATION INSTRUCTIONS
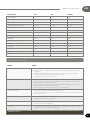
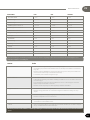
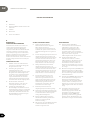
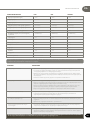
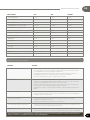
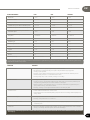
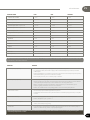
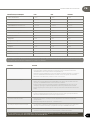
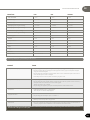
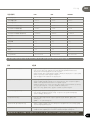
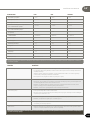
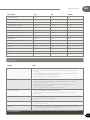
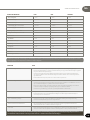
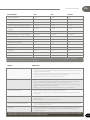
TECHNICAL DATA LD40 LD44 LD48PRO+
Max. working area 100 m2140 m2180 m2
Air flow step 1 200 m3/h 160 m3/h 160 m3/h
Air flow step 2 350 m3/h 300 m3/h 300 m3/h
Dehumidifying at 20˚C and 70% r.h. 7,5 L/24h 11 L/24h 16 L/24h
Dehumidifying at 30˚C and 80% r.h. 13 L/24h 19 L/24h 31 L/24h
Power at 20˚C and 70% r.h. 180 W 285 W 450 W
Energy consumption at 20˚ and 70% r.h. 4,3 kWh/24 h 8 kWh/24 h 9,1 kWh/24 h
Tank volume 11 l 11 l 11 l
Refrigerant R290 R290 R290
Regrigerant change 99 g 115 g 130 g
Voltage 230 V 230 V 230 V
Frequency 50 Hz 50 Hz 50 Hz
Fuse 10 A 10 A 10 A
IP-class X1 X1 X1
Dimensions (L x W x H) 460 x 345 x 575 mm 460 x 345 x 575 mm 460 x 345 x 575 mm
*Technical changes and improvements may occur. All values are approximate and may vary depending on external circumstances such as
temperature, ventilation and humidity
PROBLEM REMEDY
The dehumidifier does not start • Make sure that the dehumidifier is connected to the socket and that the fuse has not blown.
• If the symbol icon is lit, check that the water tank is empty and correctly seated in the dehumidifier. Make sure the
float hangs freely.
• Check that the value of the humidity in the machine's control panel is displayed by "waking up" the panel. The
dehumidifier must start within 5 minutes if this is higher than the set value.
• Unplug the power cord, wait 10 seconds and reconnect it.
The dehumidifier does not start • Make sure the fan wheel is spinning.
• Make sure that the air can flow freely through the dehumidifier. Air emissions and air filters must be clean and the
dehumidifier must be at least 20-30 cm from the wall.
• Listen if the compressor is running, but keep in mind that the dehumidifier may be defrosting cycle and then the
compressor will stop. Start by waiting for about 30 minutes.
• Check that a thick layer of ice does not form on the cooling coils / slats behind the filter.
High noise level/rattling • Increase the distance between the dehumidifier and surrounding surfaces.
• The cooling coils may make contact to each other and cause vibrations. Disconnect the dehumidifier from the electrical
outlet and separate the loops
No condensate water collected • Check that no dirt etc. is deposited on the drip tray underneath the cooling coils, clean if necessary.
• Check that the temperature is above 2 ° C or below 35 ° C.
Does not shut off when water tank is full. • It is important that the float hangs freely in the water tank. If it does not, it does not sense the water level is and can
therefore not ensure that the dehumidifier stops
Error code E2 • If E2 is shown in the display, the humidity sensor may be defective. Try unplugging the power cord, wait 10 seconds,
and reconnect it. If the error code persists, contact your dealer.
If you have a problem with your dehumidifier, refer the troubleshooting guide. If none of the above works, contact your dealer to get your
dehumidifier serviced.”

08
EN OPERATION INSTRUCTIONS
WOOD’S, THE WORLD’S LEADING
DEHUMIDIFIERS
Wood’s dehumidifier products have been
known as market leaders for many years. Our
dehumidifiers are suitable for use in the most
demanding climates, where dehumidifying
capacity is good even at lower temperatures
and humidity levels. They are used with good
results in premises that become damp such as
basements, garages or summer houses. They
also work great when drying washing without
wear on textiles, in pool areas and in laundry
rooms. They are efficient and have low
energy consumption They are also excellent for
drying laundry, attics, pool rooms and. Being
efficient and low in energy consumption.
The amount of moisture that the dehumidifier
removes depends on temperature, humidity
level and placement. The weather outdoors
also affects dehumidifier performance. In
cold weather the relative humidity indoors
drops, thus reducing the dehumidifier’s
moisture absorption from the air. Therefore,
the dehumidifier is adapted for use in the
temperature range + 2˚C to + 35˚C. Wood´s
dehumidifiers are safe and designed to operate
continuously for many years.
EXCESSIVE AIR HUMIDITY A
DANGER
Condensation occurs when the water vapor in
the air comes into contact with a cold surface
such as a ceiling, window or wall. When the
water vapor cools down condensation takes
place whereby water droplets form. At high
humidity, stale air can occur and mold is formed
which damages the house and its interior. This
environment can also lead to illnesses of the
inhabitants when, among other things, mites
thrive in a humid environment. A dehumidifier
with high performance creates a good and
healthy moisture level. To achieve the best
effect, doors and windows of the spaces to
be dehumidified should be kept closed. The
dehumidifier removes bad odor, dries wood
and removes moisture from sports equipment
for outdoor use etc. A dehumidifier can be
used in basements, laundry rooms, garages,
caravans, summer cottages and in boats. If
the dehumidifier is used colder environments,
take a closer look at the hints in the end of the
instructions for use.
NOTE!
When placed in a shower or bathing area,
the dehumidifier should be fixed in place.
It is mandatory to check and follow the
local bathroom electrical regulations
before use.
USE WOOD’S DEHUMIDIFIERS
If the dehumidifier is transported horizontally,
leave it standing upright for 4 hours before use.
It is very important for the oil to flow back into
the compressor, as the dehumidifier otherwise
may take serious damage. Wood’s dehumidifiers
are easy to move around when they are
equipped with wheels. All that is required is the
proximity to an electrical outlet for 220-240 V,
but keep in mind the following:
The dehumidifier should not be placed near
radiators or other heat sources and not exposed
to direct sunlight as it lowers performance.
• You can use a radiator or heating fan to keep
the temperature above + 2˚C.
• The dehumidifier should be placed at least 25
cm away from walls and other obstruction to
ensure maximum air flow.
• It is ideal to place the dehumidifier as centrally
in the room/area as possible.
1. Check that the water tank is correct
positioned.
2. Connect the dehumidifier to a grounded
electrical outlet.
3. Choose the desired humidity program or
humidity level using the control panel.
Refer the section on function description.
NOTE!
When the dehumidifier switches off, it
takes 5minutes before it restarts.
FLOAT
The float consists of a white plastic cylinder
suspended by two wires hanging in two arms.
The float is buoyant and when the water level
rises, the float is lifted up. When the float has
reached a certain height, the dehumidifier
detects this and turns off automatically to
prevent flooding. When the water tank is
emptied it should be put back in position the
following way:
EMPTYING WATER CONTAINERS
1. When the water tank is full, pull it gently
outwards and empty it into the drain.
2. Push the water container back in until it
touches the float.
3. Lift the bottom edge of the water tank to
incline the water tank slightly.
4. Push the water tank in last distance. The
float should now have ended up in the
water tank, instead of being clamped
behind it.
NOTE!
It is important that the float hangs freely,
because its purpose is to detect the water
level in the tank and ensure that the
dehumidifier switches off when the level
is high. An incorrectly positioned float can
cause the water tank to overflow.
DRAIN THE WATER TO THE SEWER
1. Disconnect the dehumidifier from the
electrical outlet and remove the water
tank to access the threaded connection
underneath the drip tray.
2. Attach the hose coupling to the threaded
connector and lead the hose to the drain.
Ensure that the hose postioned lower than
the the drip tray.
3. Insert the dehumidifier plug into the
socket.
4. Without hose and directly over the drain:
5. Place the dehumidifier directly over the
drain so that the condensed water can
drip through the hole in the bottom of the
dehumidifier and into the drain.
AUTOMATIC SHUTDOWN
When the water tank is full, the dehumidifier
shuts off automatically, signaling thatthe
water tank must be emptied before you can
use the dehumidifier again. Refer the function
description.
1. Disconnect the dehumidifier from the
electrical outlet.
2. Empty the water tank.
3. Replace the emptied water tank and make
sure the float hangs free, refer the Float
section.
4. Connect the dehumidifier to the electrical
outlet. The dehumidifier restarts in the
same mode as when disconnected.
AIR FILTER
The air filter on the back of the dehumidifier
ensures that the cooling coils are kept free of
dust. It is important that the filter is clean so that
the air can flow freelythrough the dehumidifier.
The filter should therefore be replaced when
needed.
The dehumidifier is equipped with an SMF filter
which improves the capacity of the dehumidifier
at the same time as it further purifies the air.
Refer instructions for changing the air filter. We
recommend at least one filter change per year.
To follow the warranty program Register your
dehumidifier at warranty-woods.com
AUTOMATIC DEFROST
Wood’s dehumidifiers are equipped with a
control systems ensuring that the cooling coils
are defrosted if necessary. The control system
switches off the compressor, which causes the
cooling of the loops to stop. The fan continues
to draw the room temperature air through the
dehumidifier and thus the ice melts and the
water flows down into the water tank. Note that
this control system allows the dehumidifier to
operate at temperature as low as + 2˚C”
FAN
The fan ensures that air flows through the
dehumidifier. Moist air is sucked in from
the back and through the evaporator and
condenser and released dry on the top of the
dehumidifier.

09
EN
OPERATION INSTRUCTIONS
CLEANING AND MAINTENANCE
Wood’s dehumidifiers require cleaning
and filter replacement to maintain its high
dehumidification capacity.
• The air outlet can be vacuumed or cleaned
with a brush. Use caution to prevent the slats
from being damaged.
• The cooling coils are best cleaned with a cloth
and warm water. Use caution.
• The fan motor is permanently lubricated and
requires no maintenance.
NOTE!
Unplug the power cord from the electrical
outlet before cleaning.
HINTS
• For maximum dehumidification capacity in
a room it is recommended that the supply
air from the outside and adjoining rooms are
minimized - close doors and valves. If possible,
place the dehumidifier in the middle of the
room.
• Raise the temperature in the room for faster
dehumidification. (Hot air can carry more
water). Use a frost guard if the temperature
drops below + 2 ° C
• The dehumidifier extracts more water during
the summer and autumn because the outdoor
air is warm and moist. (The absolute humidity
is normally higher).
• Recommended limits for use:
• Temp. SW + 2˚C to + 35˚C
• Relative humidity: 30% to 90%
• Recommended moisture level c.a. 50% RH
IF THE DEHUMIDIFIER REQUIRES
SERVICE
If the dehumidifier requires servicing, firstly
contact the retailer. For all warranty claims, a
proof of purchase is required.
NOTE!
Get a 10-year warranty! Register at
warranty-woods.com
Replace the SMF filter at least once a year.
Visit woods.se for more information
GUARANTEES
2 year´s guarantee against faults in
manufacturing. Please note that the guarantee
only is valid upon presentation of a purchase
receipt
IMPORTANT!
Wood’s dehumidifier shall be connected to a
grounded electrical outlet having a voltage of
220V-240V 50Hz.”

10
EN OPERATION INSTRUCTIONS
“GUARANTEE
TO GET AN EXTENDED WARRANTY, FROM
2 TO 10 YEARS, PLEASE FOLLOW THESE
STEPS.
1. Register your dehumidifier after your
purchase at warranty-woods.com
2. Replace the SMF filter in your dehumidifier
regularly, at least once a year. If you want,
we’ll send you a reminder when a filter
change is due. The reminder is, of course,
free of charge. You can find filters at your
local retailer, or distributor. Please visit
woods.se to locate your closest Wood’s
distributor.
NOTE!
There is no obligation to purchase filters
when you register your dehumidifier at
warrantywoods.com
SAVE YOUR RECEIPTS!
These will be required for any warranty claim
during the period.”

11
EN
OPERATION INSTRUCTIONS

12
SV BRUKSANVISNING
06
SV BRUKSANVISNING
SÄKERHETSVARNINGAR
Brännbart ämne. Denna maskin innehåller
R290/Propan – ett brännbart köldmedium.
Se denna bruksanvisning för
säkerhetsinformation.
Läs den tekniska manualen
Läs bruksanvisningen.
SÄKERHETSINFORMATION
Läs igenom de medföljande
instruktionerna noggrant före installation
och användning av apparaten. Tillverkaren
tar inget ansvar för felaktig installation
som orsakar personskador och materiella
skador. Förvara alltid instruktionerna
tillsammans med apparaten för framtida
referens.
Brandfarligt material. Denna apparat
innehåller R290/propan, ett brandfarligt
köldmedium.
BARN OCH UTSATTA PERSONERS
SÄKERHET
VARNING
Risk för skador och permanent invaliditet.
Risk för personskada eller permanent invaliditet.
Denna apparat kan användas av barn från 8 år
och uppåt och personer med nedsatt fysisk,
sensorisk eller mental förmåga eller bristande
erfarenhet och kunskap om de har fått tillsyn
eller instruktioner om användning av apparaten
på ett säkert sätt och förstå de faror som är
inblandade.
Låt inte barn leka med apparaten.
Barn som är yngre än 3 år bör hållas borta om
de inte övervakas kontinuerligt.
Förvara allt emballage utom räckhåll för barn.
Rengöring och underhåll får inte göras av barn
utan uppsikt.
ALLMÄN SÄKERHET
Denna apparat är avsedd att
användas i hushåll och liknande
användningsområden såsom: - källare,
kryputrymmen; personalkök i butiker,
kontor och andra arbetsmiljöer.
Märkskylten sitter på baksidan eller sidan
av avfuktaren.
Se till att ventilationsöppningarna inte är
blockerade.
Använd inte mekaniska anordningar
eller andra hjälpmedel för att påskynda
avfrostningen än de som rekommenderas
av tillverkaren.
Apparaten får inte förvaras i ett rum
med antändningskällor som är aktiva (till
exempel: öppen eld, gasdriven utrustning
eller en elektrisk värmare. Får inte
punkteras eller brännas.
Tänk på att köldmedier kan avge lukt.
Använd inte vattenspray och ånga för att
rengöra apparaten. Rengör apparaten
med en fuktig, mjuk trasa. Använd endast
neutrala rengöringsmedel. Använd
inte slipmedel, den slipande sidan
på kökssvampar, lösningsmedel eller
metallföremål.
Om nätsladden är skadad måste den
bytas ut av tillverkaren, dess auktoriserade
servicecenter eller liknande kvalificerade
personer för att undvika fara.
SÄKERHETSFÖRESKRIFTER
VARNING
Denna apparat får endast installeras av en
fackman.
Ta bort allt emballage.
Installera inte eller använd apparaten om den är
skadad. Apparaten ska installeras, användas och
förvaras i ett rum med en golvyta som är större
än 4 m². Följ installationsanvisningarna som
medföljer apparaten.
Var alltid försiktig när du flyttar apparaten
eftersom den är tung. Använd alltid
skyddshandskar.
Se till att luften kan cirkulera runt apparaten.
Vänta minst 4 timmar innan du ansluter
apparaten till strömförsörjningen. Detta
är för att oljan ska kunna rinna tillbaka in i
kompressorn.
Installera inte apparaten nära radiatorer eller
andra värmekällor.
Installera inte apparaten på en plats där den
utsätts för direkt solljus.
ANSLUTNING TILL ELNÄTET
VARNING
Risk för brand och elstötar.
Apparaten måste anslutas till ett jordat uttag.
Se till att den elektriska informationen
på märkskylten överensstämmer med
strömförsörjningen. Om inte, kontakta en
elektriker.
Använd alltid ett korrekt installerat,
stötsäkert uttag. Använd inte grenuttag och
förlängningskablar.
Se till att de elektriska komponenterna inte
skadas (t.ex. stickkontakt, nätsladd).
Kontakta det auktoriserade servicecentret
eller en elektriker för att byta ut elektriska
komponenter.
Nätsladden måste vara placerad på en nivå som
är under stickkontakten.
Anslut stickkontakten till eluttaget först när
installationen är klar.
Se till att det är enkelt att komma åt
stickkontakten efter installationen.
Dra inte i sladden när du ska koppla från
apparaten. Håll alltid i stickkontakten när du ska
dra ut sladden.
ANVÄNDA
VARNING
Risk för brännskador, elstötar eller brand.
Ändra inte specifikationen för denna apparat.
Var försiktig så att inte köldmediekretsen
skadas. Kretsen innehåller propan (R290), som är
en miljövänlig naturgas. Gasen är brandfarlig.
Om skador uppstår på köldmediekretsen,
får det inte finnas någon öppen låga eller
antändningskällor i rummet. Vädra ut gasen.
Placera inte brandfarliga produkter eller föremål
som är våta med brandfarliga produkter nära
apparaten.
BORTSKAFFNING
VARNING
Risk för brännskador, elstötar eller brand.
Risk för personskador.
Koppla bort apparaten från elnätet.
Klipp av nätsladden och släng den.
Köldmediekretsen i denna apparat är
ozonvänlig. Kontakta din kommun för
information om hur du kasserar apparaten
korrekt.
Det är viktigt att delen på kylaggregatet som är
närmast värmeväxlaren inte skadas.
BORTSKAFFNING
ANVÄNDA
SÄKERHETSVARNINGAR

13
SV
BRUKSANVISNING
4 3 2 1
5 6 7 8 9
16
15
14
13
10 11
12
17
B.
A.
A A
B B
C C
D D
E E
F F
G G
H H
12
12
11
11
10
10
9
9
8
8
7
7
6
6
5
5
4
4
3
3
2
2
1
1
Denomination
Benämning
PRODMA AB
2019-10-10
NN
ISO 1101, ISO 8015, ISO 5459
material
APPROVED BY
SCALE
DERIVED FROM
DATE
DRAWN BY
DESIGN OWNER
WEIGHT/VOLUME
DRAFTING STANDARDS
MODEL/APPLICATION
TREATMENT
MATERIAL
00
NAME
LOCAL NAME
SHEET
DESCRIPTION
XXX XXX
1 / 1
1:5
DRAWING NUMBER
REV.
A2
Components reflected by this drawing must not contain substances or coatings of any of the substances
banned according to Dir.2002/95/EC,RoHS, or substances on the REACH candidate list published
on http://echa.europa.eu/. Upon request documentation demonstrating compliance with these
requirements shall be immediately provided by the supplier to Prodma.
This drawing contains confidential information and is the property of Prodma, without whose
permission it may not be copied, shown or handed to a third party or otherwise used and it is
to be returned promptly upon request to the design owner, who is responsible for the drawing.
B
0,5
C
A
-DO NOT MEASURE OFF DRAWING
-FOR MISSING DIMENSIONS, REFER
TO 3D MODEL
-GENERAL TOLERANCES
UNLESS STATED OTHERWISE
SHEET METAL COMPONENTS
BLANK POSITIONING ±0,1mm
FLANGE HEIGHT ±0,2mm
HOLE DIAMETER ±0,05mm
ANGLES ±1°
BURRS MAX 0,05mm
MACHINED COMPONENTS
ACCORDING TO ISO 2768-m
XX PRODUCTION INSPECTION DIMENSIONS
ACCORDING TO QI 1641 CLASS
A A
B B
C C
D D
E E
F F
G G
H H
12
12
11
11
10
10
9
9
8
8
7
7
6
6
5
5
4
4
3
3
2
2
1
1
Denomination
Benämning
PRODMA AB
2019-10-10
NN
ISO 1101, ISO 8015, ISO 5459
material
APPROVED BY
SCALE
DERIVED FROM
DATE
DRAWN BY
DESIGN OWNER
WEIGHT/VOLUME
DRAFTING STANDARDS
MODEL/APPLICATION
TREATMENT
MATERIAL
00
NAME
LOCAL NAME
SHEET
DESCRIPTION
XXX XXX
1 / 1
1:5
DRAWING NUMBER
REV.
A2
Components reflected by this drawing must not contain substances or coatings of any of the substances
banned according to Dir.2002/95/EC,RoHS, or substances on the REACH candidate list published
on http://echa.europa.eu/. Upon request documentation demonstrating compliance with these
requirements shall be immediately provided by the supplier to Prodma.
This drawing contains confidential information and is the property of Prodma, without whose
permission it may not be copied, shown or handed to a third party or otherwise used and it is
to be returned promptly upon request to the design owner, who is responsible for the drawing.
B
0,5
C
A
-DO NOT MEASURE OFF DRAWING
-FOR MISSING DIMENSIONS, REFER
TO 3D MODEL
-GENERAL TOLERANCES
UNLESS STATED OTHERWISE
SHEET METAL COMPONENTS
BLANK POSITIONING ±0,1mm
FLANGE HEIGHT ±0,2mm
HOLE DIAMETER ±0,05mm
ANGLES ±1°
BURRS MAX 0,05mm
MACHINED COMPONENTS
ACCORDING TO ISO 2768-m
XX PRODUCTION INSPECTION DIMENSIONS
ACCORDING TO QI 1641 CLASS
2
5
1
3
4
den 19 april 2021 18:55:46 - Woods_manual_SW45FB_2019_04_25.pdf - Adobe Acrobat Reader DC (32-bit)

14
SV BRUKSANVISNING
PRODUKTBESKRIVNING
A.
1. Kontrollpanel
2. Reglage för att stänga/öppna/rikta
returluften
3. Luftfilter
4. Vattenbehållare
5. Byte av luftfilter
B.
KONTROLLPANEL
FUNKTIONSBESKRIVNING
Luftavfuktare i LD-serien är försedda med en
intuitiv kontrollpanel för enkel och bekväm
användning. Notera att kontrollpanelen går
ner i viloläge 20 sekunder efter anslutning
av nätspänning eller senaste inmatningen
och väcks genom att vidröra området
där knappfunktionerna är placerade. Alla
knapptryckningar bekräftas med en pipsignal.
KNAPPAR
1. På/av – Till- och frånkoppling av
avfuktaren. I frånslaget läge är
förbrukningen ungefär 0,5 W.
2. Inställning av önskad luftfuktighet –
Endast aktiv i programläge ”Normal”
och ”Fan”. Önskad luftfuktighet kan
ställas in mellan 35 – 75 % i steg om 1
procentenhet. Inställt värde visas först fast
och därefter blinkande innan faktiskt värde
återigen visas.
3. Programval – Val av driftprogram, se 13. –
16. nedan.
4. Fläkthastighet – Hastigheten hos fläkten
kan under programmen ”Normal” och
”Fan” kan ställas i låg- eller högfartsläge.
Omkoppling mellan hastigheterna sker
med några sekunders fördröjning.
LARM/INFORMATION
5. Avfrostning – Om behov föreligger
avfrostas kylkretsen automatiskt, varvid
kompressorn stängs av och endast
fläkten är i drift. Symbolen slocknar då
avfuktningsprocessen återstartats.
6. Hög rumstemperatur – Om
rumstemperaturen överstiger 35 °C stängs
avfuktningsprocessen av och återtas igen
automatiskt när temperaturen sjunker
under larmtemperaturen. Symbolen är
tänd så länge temperaturen är 35 °C eller
varmare.
7. Låg rumstemperatur – Om
rumstemperaturen understiger 2 °C stängs
avfuktningsprocessen av och återtas igen
automatiskt när temperaturen stiger över
larmtemperaturen. Symbolen är tänd så
länge temperaturen är 2 °C eller kallare.
8. Kondensvattenbehållare full – När
behållaren är full aktiveras en ljudsignal
under 20 sekunder och symbolen
tänds. När vattenbehållaren tömts
och återplacerats återtas det inställda
driftprogrammet automatiskt. Kontrollera
att flottören hänger fritt i tanken.
9. Rumstemperatur – Visning av maskinen
upplevd rumstemperatur.
10. Fläkthastighet – Fläkt och streck indikerar
hög hastighet och endast fläkt indikerar
låg hastighet.
11. Relativ luftfuktighet – Visar aktuellt och
önskat målvärde. Det senare i samband
med inställning av målvärde.
12. WiFi – Indikerar när WiFi är anslutet. Gäller
endast de modeller som är utrustade med
denna funktion.
PROGRAMVAL
13. Fläktläge – Används om kontinuerlig
luftcirkulation önskas. Fläkthastighet och
målvärde för luftfuktighet kan ställas in.
När inställt målvärde nåtts, stängs endast
kompressor av för att återstarta igen om
fuktigheten stiger.
14. Komfortläge (EASY) – Luftavfuktaren
styr mot 50 % relativ luftfuktighet med
låg fläkthastighet. Vid uppnått målvärde
stängs avfuktaren kompressor och fläkt
av för att återstarta igen om fuktigheten
stiger. Notera att kompressorn alltid är
avstängd minst 5 minuter efter frånslag
för att trycket i kylsystemet ska hinna
utjämnas.
15. Läge för torkning av tvätt (LAUNDRY)
– Avfuktningsprocessen är i drift med
hög fläkthastighet till dess den stängs av
manuellt eller byter program.
16. Normalläge (NORMAL) – Används
för att manuellt ställa in målvärde för
luftfuktighet och fläkthastighet. När
inställt målvärde nåtts, stängs kompressor
och fläkt av för att återstarta igen om
fuktigheten stiger. Notera att kompressorn
alltid är avstängd efter frånslag för att
trycket i kylsystemet ska hinna utjämnas.
17. Låsfunktion – Används för att förhindra att
inställningar oavsiktligt ändras. Aktiveras
genom att samtidigt hålla knapparna för
fläkthastighet och programval under 3
sekunder. Urkoppling av låsfunktionen
sker på samma sätt.

15
SV
BRUKSANVISNING
TEKNISK DATA LD40 LD44 LD48PRO+
Max. Arbetsområde 100 m2140 m2180 m2
Luftflöde Steg 1 200 m3/h 160 m3/h 160 m3/h
Luftflöde Steg 2 350 m3/h 300 m3/h 300 m3/h
Avfuktning vid 20˚C och 70% r.h. 7,5 L/24h 11 L/24h 16 L/24h
Avfuktning vid 30˚C och 80% r.h. 13 L/24h 19 L/24h 31 L/24h
Effekt vid 20˚C och 70% r.h. 180 W 285 W 450 W
Energiförbrukning vid 20˚C och 70% r.h. 4,3 kWh/24 h 8 kWh/24 h 9,1 kWh/24 h
Tankvolym 11 l 11 l 11 l
Köldsmedium R290 R290 R290
Fyllnadsmängd 99 g 115 g 130 g
Spänning 230 V 230 V 230 V
Frekvens 50 Hz 50 Hz 50 Hz
Säkring 10 A 10 A 10 A
IP-Klass X1 X1 X1
Dimensioner (L x B x H) 460 x 345 x 575 mm 460 x 345 x 575 mm 460 x 345 x 575 mm
*Tekniska förändringar och förbättringar kan förekomma. Alla värden är ungefärliga och kan variera beroende på yttre omständigheter såsom
temperatur, ventilation och luftfuktighet.
PROBLEM ÅTGÄRD
Avfuktaren startar inte. • Se till att avfuktaren är kopplad till eluttaget och att inte säkringen har gått.
• Om symbolikon lyser, kontrollera att vattenbehållaren är tom och sitter rätt placerad i avfuktaren. Se till att flottören
hänger fritt.
• Kontrollera att värdet på luftfuktigheten i maskinens kontrollpanel visas genom att "väcka" panelen. Avfuktaren ska
starta inom 5 min om detta är högre än inställt värde ställs i maxläget.
• Ta ur nätsladden, vänta 10 sekunder och koppla in den igen.
Enheten avfuktar inte. • Se till att fläkten snurrar.
• Se till att luften kan flöda fritt genom avfuktaren. Luftutsläpp och luftfilter ska vara rena och avfuktaren ska stå minst
20-30 cm från väggen.
• Lyssna om kompressorn är igång, men tänk på att avfuktaren kan vara inne i en avfrostningscykel och då stannar
kompressorn. Börja med att avvakta i ca 30 minuter.
• Kontrollera så att inte ett tjockt lager av is bildats på kylslingorna/lamellerna bakom filtret.
Hög ljudnivå/skrammel. • Öka avståndet mellan avfuktaren och omgivande ytor.
• Kylslingorna kan ligga intill varandra och orsaka vibrationer. Koppla bort avfuktaren från eluttaget och sära på
slingorna.
Inget vatten kommer i behållaren. • Kontrollera att ingen smuts mm ligger på dropptråget som är under kylslingorna, rengör vid behov.
• Kontrollera att temperaturen är över 2°C eller under 35°C.
Stänger inte av vid full vattenbehållare. • Det är viktigt att flottören hänger fritt i vattenbehållaren. Gör den inte det känner den inte av hur hög vattennivån är
och kan därför inte se till att avfuktaren stannar.
Felkod E2 • Om E2 visas i displayen kan fuktsensorn vara defekt. Prova med att dra ur nätsladden, vänta 10 sekunder och koppla in
den igen. Om felkoden kvarstår kontakta din återförsäljare.
Om du har problem med din avfuktare, se felsökningen. Om inget av ovanstående fungerar, kontakta din återförsäljare för att få din avfuktare
servad.

16
SV BRUKSANVISNING
OBS!
Det är viktigt att flottören hänger fritt,
eftersom dess syfte är att känna av
vattennivån i tanken och försäkra att
avfuktaren stängs av när nivån är hög. En
felaktigt placerad flottör kan medföra att
vattenbehållaren svämmar över.
AVLEDA VATTNET TILL AVLOPP
1. Koppla bort avfuktaren från eluttaget och
ta bort vattenbehållaren för att komma åt
dropptrågets gänga.
2. Fäst slangens koppling till avfuktarens
gänga och led slangen till avloppet. Se till
att slangen inte kommer högre än själva
dropptråget.
3. Sätt avfuktarens kontakt i eluttaget.
4. Utan slang direkt över avlopp:
5. Ställ avfuktaren direkt över avloppet så
att det kondenserade vattnet kan droppa
genom hålet i avfuktarens botten och
vidare ner i avloppet.
AUTOMATISK AVSTÄNGNING
När vattenbehållaren är full stängs avfuktaren
av automatiskt, varvid den signalerar att
vattenbehållaren måste tömmas innan
du kan använda avfuktaren igen. Se
funktionsbeskrivningen.
1. Koppla bort avfuktaren från eluttaget.
2. Töm vattenbehållaren.
3. Sätt tillbaka den tömda vattenbehållaren
och se till att flottören hänger fritt. Se
avsnittet Flottören.
4. Anslut avfuktaren till eluttaget. Avfuktaren
återstartar i samma läge som den kopplade
ur.
LUFTFILTER
Luftfiltret på avfuktarens baksida ser till att
kylslingorna hålls fria från damm. Det är viktigt
att filtret är rent så att luften kan flöda fritt
genom avfuktaren. Filtret bör därför bytas vid
behov.
Avfuktaren är utrustad med ett SMF-filter som
förbättrar kapaciteten hos avfuktaren samtidigt
som det ytterligare renar luften. Se instruktion
för byte av luftfilter. Vi rekommenderar minst ett
filterbyte per år. För att följa garantiprogrammet
registrera din avfuktare på warranty-woods.com
AUTOMATISK AVFROSTNING
Wood’s avfuktare är utrustade med styrsystem
som ser till att kylslingorna avfrostas vid behov.
Styrsystemet stänger av kompressorn, vilket
gör att kylningen av slingorna upphör. Fläkten
fortsätter att dra den rumstempererade luften
genom avfuktaren och på så sätt smälter isen
och vattnet rinner ner i behållaren. Notera att
detta styrsystem gör att avfuktaren fungerar vid
så låg temperatur som +2˚C
VÄRLDSLEDANDE AVFUKTARE FRÅN
WOOD’S
Wood’s är en av de världsledande tillverkarna
av avfuktare. Våra avfuktare är anpassade
för att användas i nordiskt klimat då
avfuktningskapaciteten är bra även vid lägre
temperaturer och fuktnivåer. De används med
gott resultat i utrymmen som lätt blir fuktiga,
såsom källare, garage eller sommarstugor.
De fungerar även utmärkt vid torkning av
tvätt utan slitage på textilier, i poolutrymmen
och i tvättstugor. De är effektiva och har låg
energiförbrukning.
Den mängd fuktighet som avfuktaren tar
bort beror på temperatur, fuktighetsnivå och
placering. Även vädret utomhus påverkar
avfuktarens prestanda. Vid kall väderlek sjunker
den relativa fuktigheten inomhus och därmed
minskar avfuktarens fuktuttag ur luften.
Därför är avfuktaren anpassad att användas i
temperaturintervallet +2˚C till +35˚C.
Wood´s avfuktare är säkra i drift och avsedda att
fungera kontinuerligt under många år.
FÖR HÖG LUFTFUKTIGHET EN
FARA
Kondens uppstår när luftens vattenånga
kommer i kontakt med en kall yta såsom tak,
fönster eller vägg. När vattenångan kyls ned
sker en kondensering varvid vattendroppar
bildas. Vid hög luftfuktighet kan unken luft
uppstå och mögel bildas vilket gör att huset och
dess inredning tar skada.
Denna miljö kan även leda till sjukdomar hos de
boende då bland annat kvalster trivs i en fuktig
miljö. En avfuktare med hög prestanda skapar
en bra och hälsosam fuktnivå. För att nå bästa
effekt skall dörrar och fönster hållas stängda till
de utrymmen som ska avfuktas.
Avfuktaren avlägsnar dålig lukt, torkar trä
och avlägsnar fukt från idrottsredskap för
utomhusbruk m.m.
En avfuktare kan användas bland annat i källare,
tvättstugor, garage, husvagnar, sommarstugor
och i båtar. Kommer avfuktaren att stå i kallare
miljöer bör du titta närmare på tipsen i slutet av
manualen.
OBS!
Om avfuktaren placeras i ett dusch- eller
badrum, bör avfuktaren skruvas fast. Det
är obligatoriskt att kontrollera och följa de
lokala bestämmelserna för installation i
våtrum före användning.
Om avfuktaren transporteras liggande, låt den
stå upprätt i 4 timmar före användning. Det
är mycket viktigt att oljan rinner tillbaka in i
kompressorn, eftersom avfuktaren annars kan ta
allvarlig skada.
ANVÄNDA WOOD’S AVFUKTARE
Wood’s avfuktare är lätta att flytta runt då de är
utrustade med hjul. Allt som krävs är närheten
till ett eluttag för 220-240 V, men tänk på
följande:
Avfuktaren bör inte ställas i närheten av element
eller andra värmekällor och inte utsättas för
direkt solljus då det sänker prestandan.
• Man kan med fördel använda ett
värmeelement eller värmefläkt för att hålla
temperaturen ovan +2˚C.
• Avfuktaren ska stå minst 25 cm från
väggen och andra hinder för att
luftgenomströmningen ska vara maximal.
• Det är idealiskt att placera avfuktaren så
centralt i rummet som möjligt.
1. Kontrollera att vattenbehållaren är rätt
placerad.
2. Anslut avfuktaren till ett jordat eluttag.
3. Ställ in önskat fuktighetsprogram eller
fuktnivå med hjälp av kontrollpanelen. Se
avsnittet om funktionsbeskrivning.
OBS!
När avfuktaren stängs av tar det minst 5
minuter innan den återstartar.
FLOTTÖR
Flottören består av en vit plastcylinder som
hänger i två armar. Flottören flyter och när
vattennivån stiger lyfts flottören upp. När
flottören kommit upp till en viss höjd, känner
avfuktaren av detta och stängs av automatiskt
för att förhindra översvämning.
När du tömt vattenbehållaren och den ska
sättas tillbaka i avfuktaren gör du enklast så här:
TÖMNING AV VATTENBEHÅLLARE
1. När vattenbehållaren är full dras den
försiktigt ut bakåt och töms i avloppet.
2. Skjut in vattenbehållaren tills den nuddar
flottören.
3. Lyft undertill i vattenbehållarens framkant
så att hela vattenbehållaren lutar något.
4. Skjut in vattenbehållaren den sista
biten. Flottören bör nu ha hamnat i
vattenbehållaren, istället för att bli
fastklämd bakom den.

17
SV
BRUKSANVISNING
FLÄKT
Fläkten ser till att luft strömmar genom
avfuktaren. Fuktig luft sugs in från baksidan och
går via förångaren och kondensorn för att sedan
komma ut torr på avfuktarens ovansida.
RENGÖRING OCH UNDERHÅLL
Wood’s avfuktare kräver rengöring och filterbyte
för att bibehålla sin höga avfuktningskapacitet.
• Luftutsläppet kan dammsugas eller rengöras
med en borste. Iakttag försiktighet så att
lamellerna inte skadas.
• Kylslingorna rengörs bäst med en trasa och
varmt vatten. Iakttag försiktighet
• Fläktmotorn är permanent smord och kräver
inget underhåll.
A A
B B
C C
D D
E E
F F
G G
H H
12
12
11
11
10
10
9
9
8
8
7
7
6
6
5
5
4
4
3
3
2
2
1
1
Denomination
Benämning
PRODMA AB
2019-10-10
NN
ISO 1101, ISO 8015, ISO 5459
material
APPROVED BY
SCALE
DERIVED FROM
DATE
DRAWN BY
DESIGN OWNER
WEIGHT/VOLUME
DRAFTING STANDARDS
MODEL/APPLICATION
TREATMENT
MATERIAL
00
NAME
LOCAL NAME
SHEET
DESCRIPTION
XXX XXX
1 / 1
1:5
DRAWING NUMBER
REV.
A2
Components reflected by this drawing must not contain substances or coatings of any of the substances
banned according to Dir.2002/95/EC,RoHS, or substances on the REACH candidate list published
on http://echa.europa.eu/. Upon request documentation demonstrating compliance with these
requirements shall be immediately provided by the supplier to Prodma.
This drawing contains confidential information and is the property of Prodma, without whose
permission it may not be copied, shown or handed to a third party or otherwise used and it is
to be returned promptly upon request to the design owner, who is responsible for the drawing.
OBS!
Koppla bort nätsladden från eluttaget
innan rengöring.
TIPS
• För maximal avfuktningskapacitet i ett rum
rekommenderas att tilluften från utsidan och
intilliggande rum minimeras – stäng dörrar
och ventiler.
• Placera avfuktaren om möjligt mitt i rummet.
• Höj temperaturen i rummet för snabbare
avfuktning. (Varm luft kan bära mer vatten).
• Använd en frostvakt om temperaturen faller
under +2°C
• Avfuktaren ger mer vatten under sommaren
och hösten eftersom utomhusluften är varm
och fuktig. (Den absoluta luftfuktigheten är
normalt högre).
Rekommenderade gränser för användning:
Temp. SW +2˚C to +35˚C
Relativ fuktighet: 30% to 90%
Rekommenderad fuktnivå c.a. 50% RH
VIKTIGT!
Wood’s avfuktaren måste anslutas till
ett jordat eluttag. Spänningen bör vara
220V-240V 50Hz
OM AVFUKTAREN BEHÖVER SERVICE
Om avfuktaren behöver service ska du i första
hand kontakta inköpsstället. För alla garantikrav
krävs ett inköpsbevis.
OBS!
Få 10 års garanti!
Registrera dig på warranty-woods.com
Byt SMF-filtret minst en gång per år. Besök
woods.se för mer information.
GARANTIER
2 års garanti mot tillverkningsfel. Notera att
garantin endast är giltig vid uppvisande av
inköpskvitto.

18
SV BRUKSANVISNING
GARANTI
FÖR ATT FÅ FÖRLÄNGD GARANTI, FRÅN 2
TILL 10 ÅR, VÄNLIGEN FÖLJ DESSA STEG.
1. Registrera din Wood’s avfuktare efter ditt
köp på warranty-woods.com
2. Byt ut SMF filtret i din avfuktare
regelbundet, minst 1 gång per år. Du får
påminnelse om filterbyte på e-mail och sms
när det är dags att byta filter. Om du vill
skickar vi ut en påminnelse på SMS och eller
e-mail när det är dags att byta filter. Detta
väljer du vid registreringen på
warranty-woods.com
Påminnelsen är givetvis kostnadsfri.
Nya Wood’s filter köper du hos din lokala
återförsäljare. Eller när du är inloggad på ditt
registrerade konto. Besök woods.se för att hitta
din närmaste Wood’s återförsäljare.
OBS!
Du förbinder dig inte till något köp av filter
när du registrerar din avfuktare på
warranty-woods.com
SPARA DINA KVITTON FÖR BÅDE
AVFUKTARE OCH UTBYTESFILTER.
De måste du kunna uppvisa vid eventuella
garantianspråk!

19
SV
BRUKSANVISNING

20
DK BETJENINGSVEJLEDNING
BETJENINGSVEJLEDNING
Brændbart materiale. Dette apparat
indeholder R290/propan, som er et
brændbart kølemiddel.
Se betjeningsvejledningen.
Læs den tekniske vejledning.
Læs betjeningsvejledningen.
SIKKERHEDSOPLYSNINGER
Læs de medfølgende instruktioner
omhyggeligt, inden apparatet installeres
og tages i brug. Producenten er ikke
ansvarlig, hvis forkert installation og brug
forårsager person- og tingskade. Opbevar
altid vejledningen sammen med apparatet
til fremtidig reference.
BØRNS OG UDSATTE PERSONERS
SIKKERHED
ADVARSEL
Risiko for personskade eller permanent
funktionsnedsættelse.
Dette apparat kan anvendes af børn i
alderen 8år og derover samt personer
med nedsatte fysiske, sensoriske eller
mentale evner eller manglende erfaring
og viden, hvis de superviseres eller har
fået instruktion i at bruge apparatet på
en sikker måde og forstår, hvilken fare
det indebærer. Lad ikke børn lege med
apparatet.
Børn under 3år skal holdes væk fra
apparatet, medmindre de hele tiden
overvåges.
Al emballage skal holdes væk fra børn.
Rengøring og brugervedligeholdelse må
ikke foretages af børn uden opsyn.
GENERELLE SIKKERHEDSFORSKRIFTER
Dette apparat er beregnet til brug i
husholdninger og til lignende anvendelser,
eksempelvis kældre og krybegange samt
personalekøkkener i butikker, på kontorer
og i andre arbejdsmiljøer. Mærkepladen
er placeret bag affugterens vandbeholder.
Ventilationsåbningerne må ikke blokeres.
Der må ikke anvendes mekaniske
anordninger eller andre midler til at
fremskynde afrimningsprocessen, bortset
fra dem, producenten anbefaler. Apparatet
må ikke opbevares i et lokale, hvor der
løbende anvendes antændingskilder
(åben ild, gasapparater, elektriske
varmeapparater mv.). Må ikke punkteres
eller brændes. Vær opmærksom på,
at kølemidler ikke nødvendigvis kan
lugtes. Brug ikke vand eller damp til at
rengøre apparatet. Rengør apparatet
med en fugtig, blød klud. Brug kun
neutrale rengøringsmidler. Brug ikke
slibemidler, slibende rengøringssvampe,
opløsningsmidler eller metalgenstande.
Hvis strømkablet er beskadiget, skal det
udskiftes af fabrikanten, et autoriseret
servicecenter eller en tilsvarende
kvalificeret person for at undgå fare.
SIKKERHEDSANVISNINGER
ADVARSEL
Dette apparat må kun installeres af en
kvalificeret person.
Fjern alt emballagemateriale. Apparatet
må ikke installeres eller anvendes, hvis det
er beskadiget. Apparatet skal installeres,
betjenes og opbevares i et lokale med
et gulvareal, der er større end 4m². Følg
nøje installationsvejledningen, der følger
med apparatet. Vær altid forsigtig, når du
flytter apparatet, da det er tungt. Brug altid
sikkerhedshandsker.
Sørg for, at luften kan cirkulere omkring
apparatet. Vent mindst 4timer, før
apparatet sluttes til stikkontakten. Dette
er for at give olien mulighed for at flyde
tilbage i kompressoren. Apparatet må ikke
installeres tæt på radiatorer eller andre
varmekilder. Apparatet må ikke installeres,
hvor der er direkte sollys.
ELEKTRISK TILSLUTNING
ADVARSEL
Risiko for brand og elektrisk stød.
Apparatet skal tilsluttes til en
jordet stikkontakt. Sørg for, at
strømoplysningerne på mærkepladen er i
overensstemmelse med strømforsyningen.
Hvis ikke, skal du kontakte en elektriker.
Brug altid en korrekt installeret og
stødsikker stikkontakt. Brug ikke adaptere
til flere stik og forlængerkabler. Sørg
for ikke at beskadige de elektriske
komponenter (f.eks. stik, kabel). Kontakt et
autoriseret servicecenter eller en elektriker,
hvis de elektriske komponenter skal
ændres. Kablet skal forblive under stikkets
niveau. Tilslut først stikket til stikkontakten
som det sidste i forbindelse med
installationen. Sørg for, at der er adgang
til stikket efter installationen. Træk ikke i
strømkablet for at frakoble apparatet. Tag
altid fat om selve stikket, når du frakobler
strømkablet.
ANVENDELSE
ADVARSEL
Risiko for personskade, forbrændinger,
elektrisk stød eller brand.
Du må ikke ændre specifikationen for
dette apparat. Pas på ikke at beskadige
kølemiddelkredsløbet. Det indeholder
propan (R290), som er en naturgas med
en høj grad af miljøvenlighed. Denne gas
er brændbar. Hvis der opstår skader på
kølemiddelkredsløbet, skal du sørge for, at
der ikke er flammer og antændelseskilder
i lokalet. Udluft lokalet. Placer ikke
brændbare produkter eller genstande, der
er gennemvædet med brændbare væsker,
i nærheden af eller på apparatet.
BORTSKAFFELSE
ADVARSEL
Risiko for personskade.
Træk apparatets stik ud af stikkontakten.
Fjern strømkablet, og kassér det.
Kølemiddelkredsløbet i dette apparat er
ozonvenligt. Kontakt kommunen for at få
oplysninger om korrekt bortskaffelse af
produktet. Den del af køleenheden, der
er i nærheden af varmeveksleren, må ikke
beskadiges.
Pagina se încarcă...
Pagina se încarcă...
Pagina se încarcă...
Pagina se încarcă...
Pagina se încarcă...
Pagina se încarcă...
Pagina se încarcă...
Pagina se încarcă...
Pagina se încarcă...
Pagina se încarcă...
Pagina se încarcă...
Pagina se încarcă...
Pagina se încarcă...
Pagina se încarcă...
Pagina se încarcă...
Pagina se încarcă...
Pagina se încarcă...
Pagina se încarcă...
Pagina se încarcă...
Pagina se încarcă...
Pagina se încarcă...
Pagina se încarcă...
Pagina se încarcă...
Pagina se încarcă...
Pagina se încarcă...
Pagina se încarcă...
Pagina se încarcă...
Pagina se încarcă...
Pagina se încarcă...
Pagina se încarcă...
Pagina se încarcă...
Pagina se încarcă...
Pagina se încarcă...
Pagina se încarcă...
Pagina se încarcă...
Pagina se încarcă...
Pagina se încarcă...
Pagina se încarcă...
Pagina se încarcă...
Pagina se încarcă...
Pagina se încarcă...
Pagina se încarcă...
Pagina se încarcă...
Pagina se încarcă...
Pagina se încarcă...
Pagina se încarcă...
Pagina se încarcă...
Pagina se încarcă...
Pagina se încarcă...
Pagina se încarcă...
Pagina se încarcă...
Pagina se încarcă...
Pagina se încarcă...
Pagina se încarcă...
Pagina se încarcă...
Pagina se încarcă...
Pagina se încarcă...
Pagina se încarcă...
Pagina se încarcă...
Pagina se încarcă...
Pagina se încarcă...
Pagina se încarcă...
Pagina se încarcă...
Pagina se încarcă...
Pagina se încarcă...
Pagina se încarcă...
Pagina se încarcă...
Pagina se încarcă...
Pagina se încarcă...
Pagina se încarcă...
Pagina se încarcă...
Pagina se încarcă...
Pagina se încarcă...
Pagina se încarcă...
Pagina se încarcă...
Pagina se încarcă...
Pagina se încarcă...
Pagina se încarcă...
Pagina se încarcă...
Pagina se încarcă...
Pagina se încarcă...
Pagina se încarcă...
Pagina se încarcă...
Pagina se încarcă...
Pagina se încarcă...
Pagina se încarcă...
Pagina se încarcă...
Pagina se încarcă...
Pagina se încarcă...
Pagina se încarcă...
Pagina se încarcă...
Pagina se încarcă...
Pagina se încarcă...
Pagina se încarcă...
Pagina se încarcă...
Pagina se încarcă...
Pagina se încarcă...
Pagina se încarcă...
Pagina se încarcă...
Pagina se încarcă...
Pagina se încarcă...
Pagina se încarcă...
Pagina se încarcă...
Pagina se încarcă...
Pagina se încarcă...
Pagina se încarcă...
Pagina se încarcă...
Pagina se încarcă...
Pagina se încarcă...
Pagina se încarcă...
Pagina se încarcă...
Pagina se încarcă...
Pagina se încarcă...
Pagina se încarcă...
Pagina se încarcă...
Pagina se încarcă...
Pagina se încarcă...
Pagina se încarcă...
Pagina se încarcă...
Pagina se încarcă...
-
 1
1
-
 2
2
-
 3
3
-
 4
4
-
 5
5
-
 6
6
-
 7
7
-
 8
8
-
 9
9
-
 10
10
-
 11
11
-
 12
12
-
 13
13
-
 14
14
-
 15
15
-
 16
16
-
 17
17
-
 18
18
-
 19
19
-
 20
20
-
 21
21
-
 22
22
-
 23
23
-
 24
24
-
 25
25
-
 26
26
-
 27
27
-
 28
28
-
 29
29
-
 30
30
-
 31
31
-
 32
32
-
 33
33
-
 34
34
-
 35
35
-
 36
36
-
 37
37
-
 38
38
-
 39
39
-
 40
40
-
 41
41
-
 42
42
-
 43
43
-
 44
44
-
 45
45
-
 46
46
-
 47
47
-
 48
48
-
 49
49
-
 50
50
-
 51
51
-
 52
52
-
 53
53
-
 54
54
-
 55
55
-
 56
56
-
 57
57
-
 58
58
-
 59
59
-
 60
60
-
 61
61
-
 62
62
-
 63
63
-
 64
64
-
 65
65
-
 66
66
-
 67
67
-
 68
68
-
 69
69
-
 70
70
-
 71
71
-
 72
72
-
 73
73
-
 74
74
-
 75
75
-
 76
76
-
 77
77
-
 78
78
-
 79
79
-
 80
80
-
 81
81
-
 82
82
-
 83
83
-
 84
84
-
 85
85
-
 86
86
-
 87
87
-
 88
88
-
 89
89
-
 90
90
-
 91
91
-
 92
92
-
 93
93
-
 94
94
-
 95
95
-
 96
96
-
 97
97
-
 98
98
-
 99
99
-
 100
100
-
 101
101
-
 102
102
-
 103
103
-
 104
104
-
 105
105
-
 106
106
-
 107
107
-
 108
108
-
 109
109
-
 110
110
-
 111
111
-
 112
112
-
 113
113
-
 114
114
-
 115
115
-
 116
116
-
 117
117
-
 118
118
-
 119
119
-
 120
120
-
 121
121
-
 122
122
-
 123
123
-
 124
124
-
 125
125
-
 126
126
-
 127
127
-
 128
128
-
 129
129
-
 130
130
-
 131
131
-
 132
132
-
 133
133
-
 134
134
-
 135
135
-
 136
136
-
 137
137
-
 138
138
-
 139
139
-
 140
140


Woods LD48PRO Instrucțiuni de utilizare
- Tip
- Instrucțiuni de utilizare
- Acest manual este potrivit și pentru
în alte limbi
- français: Woods LD48PRO Mode d'emploi
- eesti: Woods LD48PRO Kasutusjuhend
- Deutsch: Woods LD48PRO Bedienungsanleitung
- svenska: Woods LD48PRO Bruksanvisningar
- dansk: Woods LD48PRO Betjeningsvejledning
Lucrări înrudite
-
Woods ds28 Operating Instructions Manual
-
 Wood's SW38FX SILENT Manualul proprietarului
-
Woods MRD20 Manual de utilizare
-
-
-
-
-
-

