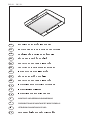
Gorenje DU611B Manual de utilizare
- Categorie
- Hote pentru aragaz
- Tip
- Manual de utilizare
Acest manual este potrivit și pentru

DU 611 DU 511
MONTAGE- UND GEBRAUCHSANWEISUNG
PRESCRIPTIONS DE MONTAGE ET MODE DEMPLOI
ISTRUZIONI DI MONTAGGIO E USO

DU 611… DU 511…

1DSDLPDL]KRG]D]UDN%QD]JRUQMLVWUDQL
1DQMSULWUGLWHHOHPHQW&6OLND
3UHYHULWHDOLMHVWLNDORQDQRWUDQMLVWUDQL*YSRORåDMX2GYRGQL
$6OLND
9SULPHUXGD GLPDLQSDUHNLQDVWDMDWDSULNXKDQMXQLPRJRþH
RGYDMDWLL]SURVWRUDODKNRQDSRXSRUDELWHYILOWUDFLMVNLL]YHGEL
=DWRMHWUHEDQDPHVWLWLRJOMHQLILOWHUNDWHUHJDRGYRGQDRGSUWLQDMH
QD VSUHGQML VWUDQL QDSH WLN QDG QDG]RUQR SORãþR SRNULWD ]
PUHåR3UHYHULWHDOLMHVWLNDOR*YSRORåDMX)6OLND
2SR]RULORRGYRGQRFHYMHWUHEDQDURþLWLSRVHEHM
3ULNOMXþLWHYQDHOHNWULþQRRPUHåMH
2PUHåQDQDSHWRVWPRUDXVWUH]DWLQDSHWRVWLQDYHGHQLQDQDSLVQL
WDEOLFLHWLNHWLVWHKQLþQLPLSRGDWNLNLVHQDKDMDQDQRWUDQMLVWUDQL
QDSHýHLPDQDSDYWLNDþMRSULNOMXþLWHSUHNRYWLþQLFHýHQDSD
QLPD YWLþD QDPHVWLWH GYRSROQR VWLNDOR NL XVWUH]D YDUQRVWQLP
SUHGSLVRPLQLPDUD]PLNPHGNRQWDNWLYVDMPP
1DPHVWLWHY
1DSD PRUD ELWL RG NXKDOQH SRYUãLQH RGGDOMHQD YVDM
FHQWLPHWURY SUL HOHNWULþQLK NXKDOQLNLK LQ YVDM FHQWLPHWURY SUL
SOLQVNLK DOL PHãDQLK NXKDOQLNLK 1DSR MH PRJRþH PRQWLUDWL QD
VWHQR DOL QD GQR YLVHþHJD NXKLQMVNHJD HOHPHQWD ýH MH QDSL
SULORåHQDãDEORQD+MRXSRUDELWHSULYUWDQMXOXNHQMýHãDEORQDQL
SULORåHQD QDVORQLWH QDSR QD VWHQR DOL QD GQR YLVHþHJD
NXKLQMVNHJD HOHPHQWD WHU R]QDþLWH PHVWD NMHU PRUDWH L]YUWDWL
OXNQMHSRWUHERYDOLERVWHYVDMOXNQMHSUHPHUDPP]DPRQWDåR
QD VWHQR DOL OXNQMH V SUHPHURP PP]D SULWUGLWHY QDYLVHþL
NXKLQMVNLHOHPHQW6OLND
0RQWDåDQDYLVHþLNXKLQMVNLHOHPHQW
1DSRSULWUGLWHVYLMDNLL]QRWUDQMHVWUDQLRPDULFH6OLND
0RQWDåDQDVWHQR
9 ]JRUQML L]YUWDQL OXNQML YVWDYLWH ]LGQD YORåND - LQ GYD YLMDND .
RGVWUDQLWH PUHåR LQ REHVLWH QDSR QD YLMDND 1DWR RG ]QRWUDM
YVWDYLWHWUHWMLYLMDN/LQYVHWULYLMDNHWUGQRSULYLMWH6OLND
2SR]RULOR
= QDSUDYR QDM XSUDYOMDMR OH RGUDVOL 1H GRYROLWH RWURNRP GD VH
GRWLNDMRQDG]RUQHSORãþHDOLLJUDMR]QDSUDYR
1H XSRUDEOMDMWH QDSH þH PUHåD QL SUDYLOQR PRQWLUDQD 9VHVDQL
]UDNQH VPHELWLXVPHUMHQYRGYRGQRFHY]D GLPLQSDURGUXJH
QDSUDYHNLVHQDSDMDL]YLUDHQHUJLMHNLQLHOHNWULþQL.DGDUQDSR
XSRUDEOMDWHKNUDWL ] QDSUDYDPLNLVHQDSDMDMR]GUXJLPLYUVWDPL
HQHUJLMH PRUDWH ]DJRWRYLWL XVWUH]QR R] ]DGRVWQR ]UDþHQMH
SURVWRUD 3RG QDSR MH VWURJR SUHSRYHGDQR SULSUDYOMDWL MHGL QD
RGSUWHP RJQMX QSU IODPELUDQMH 8SRUDED RGSUWHJD RJQMD
ãNRGXMH ILOWURP LQ ODKNR SRY]URþL SRåDU ]DWR VH MH L]RJLEDMWH
&YUWMHPRUDWHYHVþDVQDG]RURYDWLGDELSUHSUHþLOLPRUHELWHQYåLJ
YURþHJD ROMD 1DWDQþQR XSRãWHYDMWH WHKQLþQH LQ YDUQRVWQH
SUHGSLVHORNDOQLKRUJDQRYJOHGHL]ORþDQMDGLPD
'HORYDQMH
1DG]RUQDSORãþDVHQDKDMDQDVUHGLVSUHGQMHVWUDQLLQRPRJRþD
YNORSL]NORSQDSHWHUUD]OLþQHQDVWDYLWYHVHVDOQHPRþL
9 SULPHUX SUHYHOLNH NROLþLQHGLPDLQ SDUH L]EHULWHYHþMR VHVDOQR
PRþ 6YHWXMHPR YDP GD QDSR YNORSLWH PLQXW SUHG ]DþHWNRP
NXKDQMDLQMRSXVWLWHGHORYDWLSULEOLåQRPLQXWSRNRQFXSULSUDYH
KUDQH
9]GUåHYDQMH
1DSR SUHG NDNUãQLPLNROL Y]GUåHYDOQLPL XNUHSL L]NOMXþLWH L]
HOHNWULþQHJDRPUHåMD
0DãþREQLILOWHU
9QDSLMHQDPHãþHQHGHQRGQDVOHGQMLKWLSRYPDãþREQHJDILOWUD
$ 3DSLUQDWLILOWHUMHSRWUHEQR]DPHQMDWLHQNUDWPHVHþQRDOLþH
XSRUDEOMDWH ILOWHU ] REDUYDQLP ]JRUQMLP GHORP NR SRVWDQH
EDUYDYLGQDVNR]LPUHåR
% .RYLQVNL ILOWHU MH SRWUHEQR HQNUDW PHVHþQR URþQR DOL Y
SRPLYDOQHPVWURMXRþLVWLWL]EODJLPLGHWHUJHQWL9SULPHUXGD
þLVWLWH NRYLQVNL ILOWHU Y SRPLYDOQHP VWURMX QDVWDYLWH VWURM QD
QL]NRWHPSHUDWXURLQNUDWNRSUDQMH
.RYLQVNLILOWHU ODKNR RESUDQMXY SRPLYDOQHP VWURMXL]JXELQHNDM
EDUYHYHQGDUWRQHYSOLYDQDQMHJRYR]PRåQRVWILOWULUDQMD
9]GUåHYDQMHPDãþREQHJDILOWUD
1DSRL]NOMXþLWHL]HOHNWULþQHJDRPUHåMD
2GSULWH PUHåR DOL VQHPLWH VDPRVWRMHþL NRYLQVNL PDãþREQL
ILOWHUYWHPSULPHUXILOWHUWDNRMRþLVWLWH6OLNDDE
1DSD NL LPD OH SDSLUQDWL ILOWHU RGVWUDQLWH QDSUDYR NL GUåL
SDSLUQDWLILOWHUGUåDORILOWUD6OLNDH
2GVWUDQLWHXPD]DQLPDãþREQLILOWHU
.R VWH PDãþREQL ILOWHU QDGRPHVWLOL DOL RþLVWLOL RGYLVQR RG
PRGHOD JD SULWUGLWH QD]DM Y REUDWQHP YUVWQHP UHGX ]JRUDM
RSLVDQLK NRUDNRY 3UHSULþDMWH VH GD MH FHORWQD SRYUãLQD ]D
L]ORþHYDQMHGLPDLQSDUHSRNULWD
2JOMHQLRJHOQLILOWHU
7HJD ILOWUD QH PRUHWH RþLVWLWL DOL REQRYLWL 2JOMHQL ILOWHU ]DGUåXMH
QHSULMHWQH YRQMDYH NL QDVWDMDMR SUL NXKL =DPHQMDWL JD MH WUHED
YVDNHPHVHFH
2JOMHQLILOWHUMHWUHEDQDURþLWLSRVHEHM
1DPHVWLWHYDOLRGVWUDQLWHYRJOMHQHJDILOWUD
1DSRL]NOMXþLWHL]HOHNWULþQHJDRPUHåMD
2GSULWH PUHåR DOL VQHPLWH VDPRVWRMHþL PDãþREQL ILOWHU
RGYLVQRRGPRGHOD6OLNDDE
'DELGRVHJOLPHVWRQDNDWHUHPMHRJOMHQLILOWHUYSHW]DYUWLWH
JXPEH]DVWRSLQMLQRGSULWHSRNURY6OLNDJ
1DPHVWLWHRJOMHQLILOWHUYQMHJRYSULY]HWLSRORåDM6OLNDG
2EUQLWH JXPE ]D ]DNOHSDQMH RJOMHQHJD ILOWUD ]D VWRSLQM
SUHYHULWHþHMHILOWHUSULWUMHQþHQL]DYUWLWHJXPEãHQDSUHM
6OLNDH
=DSULWHSUHGHOHN]RJOMHQLPILOWURP
3RQRYQRQDPHVWLWHPUHåRDOLPDãþREQLILOWHU
ýH åHOLWH RJOMHQL ILOWHU RGVWUDQLWL SRQRYLWH SRVWRSNH Y REUDWQHP
YUVWQHPUHGX
0HQMDYDåDUQLFH
,]NOMXþLWHQDSRL]HOHNWULþQHJDRPUHåMD
2GSULWH PUHåR DOL VQHPLWH VDPRVWRMHþL PDãþREQL ILOWHU
RGYLVQRRGPRGHOD6OLNDDE
2GYLMWH QHGHOXMRþR åDUQLFR LQ MR QDGRPHVWLWH ] RYDOQR :
åDUQLFR(
ýHOXþ QHVYHWLVHSUHGHQSRNOLþHWHVHUYLVSUHSULþDMWHGD
VRåDUQLFHYRKLãMXSUDYLOQRQDPHãþHQH
ýLãþHQMH
1RWUDQMRVW LQ ]XQDQMRVW QDSH MH WUHED UHGQR þLVWLWL 8SRUDEOMDMWH
YODåQR NUSR ] QHYWUDOQLPL WHNRþLPL þLVWLOQLPL VUHGVWYL 1H
XSRUDEOMDMWH MHGNLK þLVWLOQLK VUHGVWHY 3UHG þLãþHQMHP YHGQR
L]NOMXþLWHQDSRL]HOHNWULþQHJDRPUHåMD
3RPDJDMWHVLVVOLNDPLQDSUYLKVWUDQHKWHNQMLåLFH
6OHGLWHQDYRGLORPYWHMNQMLåLFL
=DYUDþDPRYVDNUãQRRGJRYRUQRVW]DPRUHELWQHWHåDYH
SRãNRGEHDOLSRåDUHNLELELOLSRVOHGLFDQHXSRãWHYDQMDQDYRGLOY
WHMNQMLåLFL

* © ª
* ).
-5.
© ª
-
- .
/
© ª
-
–
© ª
6 (DE).
).

6 (DE).
J).
(G).
(
).
6 (DE).
).

ALB

CES

CRO

MAK

MAK

POL

POL

SLK

SRB

UA

UA

RO

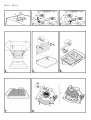
The cooker hood has an air outlet on the upper side(B2).
Fit element C on it. Fig. 1.
Check the mode switch on the inside (G) and ensure it is in pumping
position A. Fig. 2.
If it is impossible to install an exhaust tube, you can use the cooker hood
in filtration mode.
This means you have to install the carbon filter whose exhaust aperture
is covered with a grille on the front side of the hood, just above the
control panel. Make sure that the mode switch G is in position F. Fig. 3.
Note: The exhaust tube is not supplied. It has to be ordered separately.
Connecting to electrical line.
The line voltage must be the same as indicated on the technical data
label which is on the inside of the cooker hood. If a plug is provided, plug
it into an outlet. Otherwise, install a bipolar switch that adheres to safety
regulations and has the contacts at a distance of at least 3 mm.
Installation:
The distance between the cooker hood and the cooker should be at
least 50 cm with electric cookers and at least 65 cm with gas cookers or
combined electric/gas cookers. The cooker hood can be wall mounted
or installed in a cabinet. If the template H is included, use it to drill the
holes. If not, lean the cooker hood against the wall or the hanging cabi-
net and mark holes where you need them (you will need at least 3 x
8mm diameter holes for wall mounting and at least 4 x 2,5mm diameter
holes for installation in a hanging cabinet. Fig. 4-5.
Installing into a cabinet:
Fasten the cooker hood by the 4 screws M from inside the cabinet. Fig.
4.
Wall mounting:
Insert wall plugs J and two screws K into the two uppermost holes in the
wall, remove the grille and hang the cooker hood by the screws, then
insert the third screw L from inside the cooker hood and fasten all three
screws. Fig. 5.
Caution:
This appliance is designed to be operated by adults. Children
should not be allowed to tamper with the controls or play
with the appliance.
Do not use the cooker hood where the grill is not correctly
fixed! The suctioned air must not be conveyed in the same
channel used for fumes discharged by appliances powered
by other than electricity. The environment must always be
adequately aerated when the cooker hood and other
appliances powered by other than electricity are used at the
same time. Flambé cooking with a cooker hood is prohibited.
The use of a free flame is damaging to the filters and may
cause fire accidents, therefore free flame cooking must be
avoided. Frying of foods must be kept under close control
in order to avoid overheated oil catching fire. Carry out fumes
discharging in accordance with the regulations in force by
local laws for safety and technical restrictions.
Operating:
The control panel is on the front of the cooker hood, on its center side,
and allows you to select various power settings and to switch On and
OFF its lamp.
If smoke and vapour concentration is too high, choose a higher setting.
We recommend you turn on the cooker hood 5 minutes before starting
to cook and leave it on for another 15 minutes after you are done cook-
ing.
Maintenance:
Before doing any maintenance work, disconnect the cooker hood.
Grease filter
The cooker hood is fitted with one of the following type of grease filter:
A. The paper filter should be replaced monthly or (if you are using the
filter with the coloured upper side) once the colour becomes visible
through the grille.
B. The metal filter must be cleaned once a month using non aggressive
detergents, either by hand or in the dishwasher, which must be set to
a low temperature and a short cycle.
When washed in a dishwasher, the metal filter may discolour slightly,
but this does not affect its filtering capacity.
Grease filter maintenance:
1. Disconnect the electrical power supply.
2. Open the extractor grille or remove the self-supporting metal grease
filter (in this last case wash the filter immediately). Fig. 6 (a-b).
3. Hood with paper filter only: remove the device securing the paper
filter. Fig. 7 (e).
4. Remove the dirty grease filter.
5. After the grease filter has been replaced or cleaned (depending on
model), refit the parts in reverse order, making sure the entire extrac-
tion surface is covered.
Carbon filter (filtration mode only)
This filter is neither washable nor renewable. It is used to catch unpleas-
ant smells that develop when cooking. It should be replaced every 4
months.
The carbon filter is not supplied. It has to be ordered separately.
Fitting or removing the carbon filter:
1. Disconnect the electrical power supply.
2. Open the extractor grille or remove the self- supporting grease filter
(depending on model). Fig. 6 (a-b).
3. To access the carbon filter seat, rotate the knobs 90° and open the lid.
Fig. 8 (g).
4. Fit the shaped carbon filter in its default location. Fig. 8 (d).
5. Turn the carbon filter locking knob 90° (check that the filter is secured,
otherwise rotate it further). Fig. 8 (e).
6. Close the carbon filter compartment
7. Refit the extractor grille or grease filter.
To remove the carbon filter, proceed in reverse order.
Changing the lightbulb:
1. Disconnect the electrical power supply.
2. Open the extractor grille or remove the self- supporting grease filter
(depending on model). Fig. 6 (a-b).
3. Unscrew the broken lightbulb and replace it with an oval lightbulb with
maximum power 40W (E14).
If the lights do not work, make sure that the lamp are fitted properly
into its housing before you call for technical assistance.
Cleaning:
The cooker hood should be cleaned regularly on the outside as well as
inside. Use a damp cloth with neutral liquid cleaners. Do not use abrasive
cleaners. Always disconnect the hood before cleaning.
Fire hazard is increased if you do not adhere to the instructions for clean-
ing the cooker hood and replacing and cleaning the filter.
Use figures of the elements on the first few pages of this booklet as a
reference.
Follow the instructions in this booklet.
We are not responsible for any problems, injuries or fires which may occur
if the instructions in this booklet are not followed.
GB

Die Luftaustrittsöffnung der Dunstabzugshaube ist auf der oberen Seite
positioniert (B2)
Teil C darauf einsetzen. Abb. 1
Die sich innen befindende Abluftbetriebstaste ( G ) prüfen und sicherstellen,
daß sie sich in Position A befindet. Abb. 2
Der Umluftanschluß wird nur dann eingesetzt, wenn keine Möglichkeit besteht,
die Abluft nach außen zu leiten. Dabei ist ein Aktivkohlefilter benötigt; die
Lufteintrittsöffnung befindet sich auf der Vorderseite der Haube unterhalb
dem Steuerpult und ist von einem Gitter bedeckt. Stellen Sie sicher, daß die
Abluftbetriebstaste G sich in Position F befindet. Abb. 3.
Anmerkung: Werkseitig wird die Haube ohne Abluftrohr ausgeliefert.
Abluftröhre können Sie bei uns bestellen.
Elektrischer Anschluss
Vor dem elektrischen Anschluß ist zu prüfen, ob die auf dem Typenschild
angegebene Spannung mit der vorhandenen örtlichen Netzspannung
übereinstimmt. Ist die Haube mit Anschlußleitung und Stecker ausgeliefert
worden, stecken Sie den Stecker in die Steckdose. Ansonsten bringen Sie
einen den Sicherheitsvorschriften entsprechenden zweipoligen Schalter an,
die von den Anschlüssen wenigstens 3 mm absteht.
Befestigung der Haube
Aus Sicherheitsgründen muß der Abstand zwischen Haubenunterseite und
Kochfläche bei Elektrokochstellen 50 cm und bei Gaskochstellen bzw.
kombinierten Elektro-/Gaskochstellen mindestens 65 cm betragen. Die
Dunstabzugshaube ist entweder für Montage an Wand oder unter
Oberschrank geeignet. Zur Befestigung der Dunstabzugshaube die eventuell
mit ausgelieferte Bohrschablone H benutzen. Ansonsten sollen Sie die
Dunstabzugshaube an der Wand oder dem Küchenschrank anhalten und
die Borhlöcher an der hinteren Wand anzeichnen (wenigstens 3 Löcher mit
einem 8 mm Durchmesser für die Wandmontage und wenigstens 4 Löcher
mit einem 2,5 mm Durchmesser für die Montage im Schrank. Abbildungen 4-
5)
Befestigung im Schrank
Die Dunstabzugshaube im Schrank mit den 4 M. Schrauben befestigen.
Abbildung 4.
Befestigung an der Wand
Dübel J und die zwei Schrauben K in die höchsten Wandlöcher einsetzen,
Gitter abnehmen und die Dunstabzugshaube durch die angebrachten
Schrauben an die Wand hängen, die dritte Schraube L vom Innern der Haube
einsetzen. Schließlich alle drei Schrauben befestigen. Abb. 5
Zu beachten
Die Dunstabzugshaube ist ausschließlich für Erwachsene erdacht und
hergestellt. Die Dunstabzugshaube ist nicht zu gebrauchen, wenn der Gitter
nicht richtig befestigt worden ist! Die angesaugte Luft muß nicht in denselben
Kanal geführt werden, der zum Abzug von von nicht mit Spannung versorgten
Geräten stammenden Dünsten dient. Der Raum muß immer richtig belüftet
werden, wenn die Dunstabzugshaube gleichzeitig mit anderen elektrischen
Geräten verwendet wird. Flambieren unter Dunstabzugshaube ist wegen
Brandgefahr nicht erlaubt. Sonstige Arbeiten mit offener Flamme könnten
einen Brand auslösen und Filter beschädigen. Frittieren oder das Arbeiten
mit Ölen und Fetten unter der Dunstabzugshaube darf wegen Brandgefahr
unter ständiger Beaufsichtigung geschehen. Stellen Sie sicher, daß das
Dunstabzugssystem den festgelegten Vorschriften, den lokalen Maßstäben
und Verfahrensregeln entspricht.
Funktionsweise
Der Steuerpult befindet sich auf der Vorderseite der Dunstabzugshaube und
ermöglicht, die gewünschte Leistungsstufe zu wählen und die Lampen ein-
bzw. auszuschalten.
Die Leistung des Gerätes soll an die anfallenden Koch- und Bratdünste
angepasst werden, d.h. bei geringem Dunst soll eine geringe bzw. bei starkem
Dunst eine höhere Leistungsstufe gewählt werden. Bitte beachten Sie, daß
Sie das Gerät 5 Minuten vor der Kochstelle einschalten und noch 15 Minuten
nach dem Kochen nachlaufen lassen.
Sicherheitshinweise zur Wartung, Reinigung und Pflege
Bei allen Wartungs- und Reinigungsarbeiten Netzstecker ziehen.
Fettfilter
Die Dunstabzugshaube ist mit einem der folgenden Fettfilter versehen:
A. der synthetischer Filter muß einmal im Monat ausgetauscht werden
oder (wenn ein farbiger Filter verwendet wird) wenn die Farbe durch den
Rost sichtbar wird.
B. Der Metallfettfilter muß einmal im Monat mit milden Reingungsmitteln
gereinigt und von Hand oder in der Geschirrspülmaschine gereinigt
werden. In dem letzten Fall empfiehlt sich ein kurzer Spülvorgang bei
niedriger Wassertemperatur.
Beim Reinigen in der Geschirrspülmaschine können Farbveränderungen
auftreten. Diese haben keinen Einfluß auf die Filterfunktion.
Fettfilter reinigen
1. Netzstecker ziehen.
2. Gitter öffnen oder der selbsttragende Metallfettfilter abnehmen (in diesem
Fall ist der Filter umgehend zu waschen). Abb. 6 (a b)
3. Nur für mit synthetischen Filtern versehene Dunstabzugshauben:
Sicherheitsvorrichtung des synthetischen Filters entfernen. Abb. 7 ( e )
4. Den schmutzigen Fettfilter entfernen
5. Nachdem der FettFilter entweder ausgetauscht oder gereinigt (je nach
Modell) worden ist, setzen Sie die einzelnen Teile in umgekehrter
Reihenfolge wieder zusammen. Stelle Sie sicher, daß die
Abzugsoberfläche ganz bedeckt worden ist.
Aktivkohlefilter (nur bei Umluftbetrieb)
Der Aktivkohlefilter ist nicht waschbar und nicht regenerierbar. Beim
Umluftbetrieb wird der Dunst von Fettrückständen und Gerüchen befreit, die
entstehen, während man kocht. Es soll alle 4 Monate ausgetauscht werden
Werkseitig wird die Haube ohne Aktivkohlefilter ausgeliefert, d.h. sie ist für
Abluftbetrieb vorgesehen. Aktivkohlefilter können Sie bei uns bestellen.
Aktivkohlefilter austauschen
1. Netzstecker ziehen
2. Gitter öffnen oder der selbsttragende Metallfettfilter entnehmen (in diesem
Fall ist der Filter umgehend zu waschen). Abb. 6 (a b)
3. Drehknöpfe um 90 Grad drehen und Deckel entfernen. Abb. 8 ( g )
4. Aktivkohlefilter einrasten. Abb. 8 ( d )
5. Den Sicherheitsdrehknopf des Aktivkohlefilters um 90 Grad drehen (stellen
Sie sicher, daß der Filter richtig befestigt ist, ansonsten den Knopf
weiterdrehen). Abb. 8 (e)
6. Filterträger schließen
7. Gitter oder Fettfilter wieder einsetzen.
Um Aktivkohlefilter herauszunehmen, gehen Sie in umgekehrter Reihenfolge
vor.
Glühlampe austauschen:
1. Netzstecker ziehen.
2. Gitter öffnen oder der selbsttragende Metalfettfilter entfernen (je nach
Modell). Abb. 6 (a b)
3. Defekte Lampe heraus- und neue Ovallampe hineindrehen (max. 40 Watt)
(E14)
Sollte die Ersatzlampe nicht richtig funktionieren, stellen Sie sicher, daß sie
richtig eingesetzt worden ist, bevor Sie sich mit dem technischen Kundendienst
in Verbindung setzen.
Reinigung der Haube
Außen- und Innenflächen der Haube sollen regelmäßig gereinigt werden. Sie
können mit milden Reinigungsmitteln und einem weichen Tuch gereinigt werden.
Aggressive Reinigungsmittel beschädigen die Oberfläche der Haube. Vor
Reinigungsarbeiten Netzstecker immer ziehen.
Bei Nichtbeachtung der Wartungs- und Reinigungsarbeiten steigt das Risiko
der Brandgefahr
Die hier angegebene Gebrauchsanweisung und die darin enthaltenen
Abbildungen aufmerksam durchlesen und beachten.
Wir haften nicht für Mängel, Unfälle und Brände, die aus einer Nichteinhaltung
dieser gegebenen Hinweise entstehen.
D

La hotte a une sortie dair située sur la partie supérieure (B 2).
Placez-y lélément C . Fig. 1.
Contrôler linterrupteur de la modalité à lintérieur (G) et sassurer quil
sera positionné en modalité aspirante A. Fig.2.
Sil est impossible dutiliser un tuyau dévacuation dair, on peut utiliser
la hotte en modalité filtrante.
Cela signifie quil est nécessaire de monter le filtre à charbons actifs
dont le logement est couvert par une grille sur la partie frontale de la
hotte, juste en dessous du tableau des commandes.
Sassurer que linterrupteur de la modalité G sera positionné sur F.
Fig. 3.
Note: le tuyau dévacuation de lair nest pas fourni avec le produit.
Il doit être commandé séparément.
Raccordement au réseau électrique
Le voltage du réseau électrique doit être le même que celui indiqué
sur létiquette des données techniques placée à lintérieur du produit.
Si le produit est fourni avec une fiche, introduisez-la dans la prise.
Autrement, monter un interrupteur bipolaire qui doit être conforme aux
réglementations et avoir les contacts à une distance dau moins 3
mm.
Installation:
La distance minimum de la hotte par rapport au plan de cuisson doit
être dau moins 50 cm pour les cuisines électriques et dau moins 65
cm pour les cuisinières à gaz pour cuisinières électriques/à gaz en-
semble.
La hotte peut être montée sur paroi ou sous un meuble.
Si le gabarit de forage H a été fourni avec le produit, utilisez-le pour
effectuer les trous. Dans le cas contraire, poser la hotte sur le mur ou
sous le meuble et marquer les trous nécessaires pour linstallation
(pour linstallation sur paroi, 3 trous minimum sont nécessaires dun
diamètre de 8mm et pour linstallation sous meuble, 4 trous dun dia-
mètre de 2,5 mm). Fig. 4-5.
Installation sous meuble:
Fixer la hotte avec les 4 vis M de lintérieur du meuble. Fig. 4.
Installation sur parois:
Introduire les chevilles à mur J et les deux vis K dans les trous supé-
rieurs dans la paroi, enlever la grille et suspendre la hotte sur les vis,
insérer ensuite la troisième vis (L) de lintérieur de la hotte et serrer
toutes les trois vis.Fig. 5.
Attention:
Cet appareil doit être mis en fonction uniquement par des adultes. Il
ne doit pas être permis aux enfants de manipuler les commandes ou
de jouer avec lappareil.
Ne jamais utiliser la hotte si la grille nest pas bien placée.
Lair aspiré ne doit jamais être transporté vers le même canal déva-
cuation (cheminée) des fumées utilisées par des appareils qui utilisent
des sources dénergie autres que lélectricité !
Si lon utilise la hotte en même temps que des appareils qui utilisent
des sources dénergie autres que lélectricité, sassurer que la pièce
sera aérée de manière adéquate.
La cuisine flambée est interdite.
La flamme vive peut endommager les filtres et provoquer des incen-
dies, pour cette raison, il faut absolument éviter de cuisiner à feu vif.
En plus, il ne faut jamais laisser une friture sans surveillance mais elle
doit être surveillée pour contrôler que lhuile surchauffée ne com-
mence pas à brûler et puisse provoquer un incendie.
Effectuer lévacuation des fumées conformément avec les réglemen-
tations en vigueur selon la réglementation locale sur la sécurité et res-
trictions techniques.
Fonctionnement:
Le tableau des commandes est situé sur la partie antérieure de la
hotte, au centre, et permet de sélectionner les différentes vitesses de
fonctionnement et dallumer et éteindre lillumination. Dans le cas
dune concentration très élevée des fumées et vapeurs, choisir une
vitesse élevée.
Nous conseillons dallumer la hotte 5 minutes avant de commencer à
cuisiner et de la laisser allumée pendant 15 minutes après avoir fini
de cuisiner.
Manutention:
Avant deffectuer nimporte quel type dopération dentretien, déconnec-
ter toujours la hotte du réseau électrique.
Filtre à graisse:
La hotte est équipée avec les types de filtres à graisse suivants :
A. Le filtre synthétique fin doit être remplacé tous les mois ou (dans le
cas dutilisation dun filtre ayant la partie supérieure colorée) lorsque
la couleur est visible à travers la grille.
B. Le filtre métallique doit être nettoyé une fois par mois en utilisant des
détergents non agressifs, aussi bien à la main quen lave-vaisselle.
Si vous choisissez le lave-vaisselle, sélectionnez un cycle court à
basse température.
Si le filtre métallique est lavé en lave-vaisselle, il peut légèrement se
décolorer mais cela ne diminue pas son efficacité.
Entretien du filtre à graisse
1. Débrancher la hotte du réseau électrique.
2. Ouvrir la grille ou enlever le filtre à graisse métallique autoportant
(dans ce cas, laver immédiatement le filtre. Fig. 6 ( a-b )
3. Uniquement pour les hottes équipées avec un filtre synthétique fin:
enlever le dispositif qui tient le filtre synthétique fin. Fig. 7 ( e ).
4. Enlever le filtre à graisse sale.
5. Dès que le filtre à graisse a été remplacé ou lavé (selon le modèle
de la hotte), remonter les différentes parties en suivant la procédure
inverse en sassurant que la toute la surface daspiration sera cou-
verte.
Filtre aux charbons actifs (uniquement pour la version fil-
trante).
Ce filtre nest pas lavable ni renouvelable. Il est utilisé pour capturer les
mauvaises odeurs qui se produisent lors de la cuisson. Il doit être rem-
placé tous les 4 mois. Le filtre aux charbons actifs nest pas fourni avec
le produit mais il doit être commandé séparément comme accessoire.
Montage et démontage du filtre aux charbons actifs
1. Débrancher la hotte du réseau électrique
2. Ouvrir la grille ou enlever le filtre à graisse métallique autoportant
(selon les modèles Fig. 6 ( a-b )
3. Pour arriver au logement du filtre aux charbons actifs, tourner les
poignées de 90° et ouvrir le couvercle. Fig. 8 ( g ).
4. Mettre le filtre aux charbons actifs dans son logement. Fig. 8 ( d ).
5. Tourner la poignée de fixation du filtre aux charbons actifs de 90°
(sassurer que le filtre a bien été fixé, de manière sûre, sinon tourner
encore. Fig. 8 ( e ).
6. Fermer le logement du filtre aux charbons actifs
7. Remonter la grille ou le filtre à graisse.
Pour démonter le filtre aux charbons actifs, suivre la procédure inverse.
Remplacement de la lampe:
1. Débrancher la hotte du réseau électrique
2. Ouvrir la grille ou enlever le filtre à graisse métallique autoportant
(selon les modèles. Fig. 6 ( a-b )
3. Dévisser la lampe abîmée et remplacez-la avec une lampe ovale de
40 W maximum ( E14).
Si lillumination ne fonctionne pas, vérifier que la lampe a été fixée de
manière appropriée dans son logement avant dappeler le service
dassistance technique.
Nettoyage:
La hotte doit être nettoyée régulièrement aussi bien à lextérieur quà
lintérieur. Utiliser un chiffon humide et des détergents liquides neutres.
Ne pas utiliser dabrasifs. Débrancher toujours la hotte avant deffec-
tuer le nettoyage. Le risque dincendie augmente si on ne suit pas les
instructions pour le nettoyage, pour le remplacement et nettoyage du
filtre, illustrées dans ce manuel.
Comme référence, utiliser les figures des composants comme illustrées
dans les premières pages de ce manuel dinstruction.
Suivre les instructions contenues dans ce livret.
Le fabriquant nest pas retenu responsable pour des problèmes, acci-
dents ou incendies qui pourraient se produirent à cause de la non-
observationn des instructions contenues dans ce livret.
F
Pagina se încarcă...
Pagina se încarcă...
Pagina se încarcă...
Pagina se încarcă...
-
 1
1
-
 2
2
-
 3
3
-
 4
4
-
 5
5
-
 6
6
-
 7
7
-
 8
8
-
 9
9
-
 10
10
-
 11
11
-
 12
12
-
 13
13
-
 14
14
-
 15
15
-
 16
16
-
 17
17
-
 18
18
-
 19
19
-
 20
20
-
 21
21
-
 22
22
-
 23
23
-
 24
24


Gorenje DU611B Manual de utilizare
- Categorie
- Hote pentru aragaz
- Tip
- Manual de utilizare
- Acest manual este potrivit și pentru
în alte limbi
- français: Gorenje DU611B Manuel utilisateur
- slovenčina: Gorenje DU611B Používateľská príručka
- italiano: Gorenje DU611B Manuale utente