
4162.938 Edition 14
BLP 17M DC
USER AND MAINTENANCE BOOK
en
LIBRETTO USO E MANUTENZIONE
it
BEDIENUNGS- UND WARTUNGSANLEITUNG
de
MANUAL DE INSTRUCCIONES PARA EL USO Y MANTENIMIENTO
es
MANUEL D’UTILISATION ET DE MAINTENANCE
fr
HANDLEIDING VOOR GEBRUIK EN ONDERHOUD
nl
MANUAL DE USO E MANUTENÇÃO
pt
VEJLEDNING OM BRUG OG VEDLIGEHOLDELSE
da
KÄYTTÖ- JA HUOLTO-OHJE
HEFTE FOR BRUK OG VEDLIKEHOLD
no
ANVÄNDAR- OCH UNDERHÅLLSHANDBOK
sv
INSTRUKCJA OBSŁUGI I KONSERWACJI
pl
РУКОВОДСТВО ПО ЭКСПЛУАТАЦИИ И ТЕХНИЧЕСКОМУ ОБСЛУЖИВАНИЮ
ru
PŘÍRUČKA PRO POUŽITÍ A ÚDRŽBU
cs
HASZNÁLATI ÉS KARBANTARTÁSI KÉZIKÖNYV
hu
PRIROČNIK Z NAVODILI ZA UPORABO IN VZDRŽEVANJE
sl
KULLANIM VE BAKIM K
i
TAPÇIĞI
tr
KNJIŽICA O UPORABI I ODRŽAVANJU
hr
NAUDOJIMO IR PRIEŽIŪROS KNYGELĖ
lt
LIETOŠANAS UN TEHNISKĀS APKOPES GRĀMATIŅA
lv
KASUTUS- JA HOOLDUSJUHEND
et
LIVRET DE UTILIZARE ŞI ÎNTREŢINERE
ro
PRÍRUČKA PRE POUŽITIE A ÚDRŽBU
sk
НАРЪЧНИК ЗА ИЗПОЛЗВАНЕ И ПОДДРЪЖКА
bg
КЕРІВНИЦТВО З ЕКСПЛУАТАЦІЇ Й ТЕХНІЧНОГО ОБСЛУГОВУВАННЯ
uk
KNJIŽICOM O UPOTREBI I ODRŽAVANJU
bs
ΕΓΧΕΙΡΙΔΙΟ ΧΡΗΣΗΣ ΚΑΙ ΣΥΝΤΗΡΗΣΗΣ
el
使用和维护手册
zh
MCS Italy S.p.A.
Via Tione 12, -37010-
Pastrengo (VR), Italy
MCS Italy S.p.A.
Виа Тионе, 12, 37010
Пастренго (Верона), Италия
MCS Central Europe Sp. z o.o.
ul. Magazynowa 5A,
62-023 Gądki, Poland
MCS Central Europe Sp. z o.o.
ул. Магазинова, 5A,
62-023 Гадки, Польша
MCS Russia LLC
ul. Transportnaya - 22 ownership 2,
142802, STUPINO, Moscow region, Russia
ООО «ЭмСиЭс Россия»
Ул. Транспортная, владение 22/2,
142802, г.Ступино, Московская обл., РФ
MCS China LTD
Unit A1, No. 1515, Jinshao Rd.,
Baoshan Industrial Zone,
Shanghai, 200949, China
MCS China LTD
строение A1, № 1515, ул. Джиньшао,
промышленная зона Баошань,
Шанхай, 200949, Китай
4162.938 Edition 14 - Rev. 1

en
it
de
es
fr
nl
pt
da
no
sv
pl
ru
cs
hu
sl
tr
hr
lt
lv
et
ro
sk
bg
uk
bs
el
zh
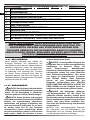
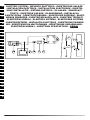
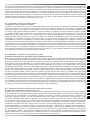
TECHNICAL DATA - DATI TECNICI - TECHNISCHE DATEN - DATOS TÉC-
NICOS - DONNÉES TECHNIQUES - TECHNISCHE GEGEVENS - DADOS
TÉCNICOS - TEKNISKE DATA - TEKNISET TIEDOT - TEKNISKE DATA
- TEKNISKA DATA - DANE TECHNICZNE - ТЕХНИЧЕСКИЕ ДАННЫЕ -
TECHNICKÉ ÚDAJE - MŰSZAKI ADATOK - TEHNIČNI PODATKI - TEKNİK
VERİLER - TEHNIČKI PODACI - TECHNINIAI DUOMENYS - TEHNISKIE
DATI - TEHNILISED ANDMED - DATE TEHNICE - TECHNICKÉ ÚDAJE -
ТЕХНИЧЕСКИ ДАННИ - ТЕХНІЧНІ ДАНІ - TEHNIČKI PODACI - ΤΕΧΝΙΚΑ
ΔΕΔΟΜΕΝΑ -
17M DC
12 V DC-В DC 0,4 A 5 W-Вт
H
2
O
MAX
16 kW-кВт
13.800 kcal/h-ккал/ч
54.800 Btu/h-БТЕ/ч
H
2
O
MIN
10 kW-кВт
8.600 kcal/h-ккал/ч
34.200 Btu/h-БТЕ/ч
1,16 kg/h-кг/ч
300 m³/h-м³/ч
700 mbar-мбар
70 kPa-кПа
L
P
G
I3B/P
ΔT 1,5m-м:<70K
IP 44

en
it
de
es
fr
nl
pt
da
no
sv
pl
ru
cs
hu
sl
tr
hr
lt
lv
et
ro
sk
bg
uk
bs
el
zh
TECHNICAL DATA - DATI TECNICI - TECHNISCHE DATEN - DATOS TÉC-
NICOS - DONNÉES TECHNIQUES - TECHNISCHE GEGEVENS - DADOS
TÉCNICOS - TEKNISKE DATA - TEKNISET TIEDOT - TEKNISKE DATA
- TEKNISKA DATA - DANE TECHNICZNE - ТЕХНИЧЕСКИЕ ДАННЫЕ -
TECHNICKÉ ÚDAJE - MŰSZAKI ADATOK - TEHNIČNI PODATKI - TEKNİK
VERİLER - TEHNIČKI PODACI - TECHNINIAI DUOMENYS - TEHNISKIE
DATI - TEHNILISED ANDMED - DATE TEHNICE - TECHNICKÉ ÚDAJE -
ТЕХНИЧЕСКИ ДАННИ - ТЕХНІЧНІ ДАНІ - TEHNIČKI PODACI - ΤΕΧΝΙΚΑ
ΔΕΔΟΜΕΝΑ -
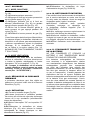
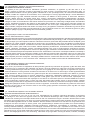
BATTERY: MCS BAT3
Cell Type: Li-ion 18650
Nominal Voltage: 14,4 V
Nominal Capacity: 3,0 Ah
Weight: 490 g
Charging: 0 °C ÷ 40 °C
Discharging: -20 °C ÷ 40 °C
POWER SUPPLY:
Nominal Input Voltage: ~100-240 V AC 50-60 Hz
Max. Input Current: 0,8 A
Nominal Output Voltage: 12 V DC
Max. Output Power: 24 W

en
it
de
es
fr
nl
pt
da
no
sv
pl
ru
cs
hu
sl
tr
hr
lt
lv
et
ro
sk
bg
uk
bs
el
zh
TECHNICAL DATA - DATI TECNICI - TECHNISCHE DATEN - DATOS TÉC-
NICOS - DONNÉES TECHNIQUES - TECHNISCHE GEGEVENS - DADOS
TÉCNICOS - TEKNISKE DATA - TEKNISET TIEDOT - TEKNISKE DATA
- TEKNISKA DATA - DANE TECHNICZNE - ТЕХНИЧЕСКИЕ ДАННЫЕ -
TECHNICKÉ ÚDAJE - MŰSZAKI ADATOK - TEHNIČNI PODATKI - TEKNİK
VERİLER - TEHNIČKI PODACI - TECHNINIAI DUOMENYS - TEHNISKIE
DATI - TEHNILISED ANDMED - DATE TEHNICE - TECHNICKÉ ÚDAJE -
ТЕХНИЧЕСКИ ДАННИ - ТЕХНІЧНІ ДАНІ - TEHNIČKI PODACI - ΤΕΧΝΙΚΑ
ΔΕΔΟΜΕΝΑ -
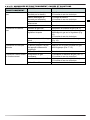
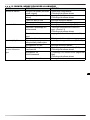
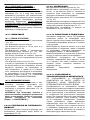
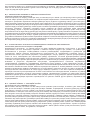
CHARGER: MCS CHA
Nominal Input Voltage: ~100-240 V AC 50-60 Hz
Max. Input Current: 1,3 A
Max. Input Power: 73 W
Charging Volt.: 16,35 V ± 0,25 V
Charging Current: 3 A ± 0,2 A
Temperature Function: -20 °C ÷ 55 °C
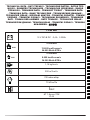
LED INDICATORS:
Idling: Green Light Flash 1 Hz
Pre-Charge: Red Light On
Full Charge: Green Light On
Out Temperature Function: Red Light Flash 1 Hz
Short-Circuit Error: Red Light Flash 3 Hz
Faulty Charger: Red Green Light Both Flash 3 Hz

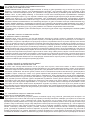
PICTURES - FIGURE - ABBILDUNGEN - FIGURAS - FIGURES - FIGUREN
- FIGURAS - FIGURER - KUVAT - FIGURER - FIGURER - ILUSTRACJE
- ИЛЛЮСТРАЦИИ - OBRÁZKY - ÁBRÁK - SLIKE - ŞEKİLLER - SLIKE -
ILIUSTRACIJOS - ATTĒLI - JoonisED - IMAGINI - OBRÁZKY - СХЕМИ -
МАЛЮНКИ - SLIKE - ΕΙΚΟΝΕΣ -
1 2
3
4
5 6
7 8
9
10
11 12
13
14
15
16
17 18
19 20
21
22
23 24
15 s
25 26
27
28
29 30
en
it
de
es
fr
nl
pt
da
no
sv
pl
ru
cs
hu
sl
tr
hr
lt
lv
et
ro
sk
bg
uk
bs
el
zh

en
it
de
es
fr
nl
pt
da
no
sv
pl
ru
cs
hu
sl
tr
hr
lt
lv
et
ro
sk
bg
uk
bs
el
zh
PICTURES - FIGURE - ABBILDUNGEN - FIGURAS - FIGURES - FIGUREN
- FIGURAS - FIGURER - KUVAT - FIGURER - FIGURER - ILUSTRACJE
- ИЛЛЮСТРАЦИИ - OBRÁZKY - ÁBRÁK - SLIKE - ŞEKİLLER - SLIKE -
ILIUSTRACIJOS - ATTĒLI - JoonisED - IMAGINI - OBRÁZKY - СХЕМИ -
МАЛЮНКИ - SLIKE - ΕΙΚΟΝΕΣ -
1 2
3
4
5 6
7 8
9
10
11 12
13
14
15
16
17 18
19 20
21
22
23 24
15 s
25 26
27
28
29 30

en
it
de
es
fr
nl
pt
da
no
sv
pl
ru
cs
hu
sl
tr
hr
lt
lv
et
ro
sk
bg
uk
bs
el
zh
NOTE:_____________________________________________________________________
____________________________________________________________________________
____________________________________________________________________________
____________________________________________________________________________
____________________________________________________________________________
____________________________________________________________________________
____________________________________________________________________________
____________________________________________________________________________
____________________________________________________________________________
____________________________________________________________________________
____________________________________________________________________________
____________________________________________________________________________
____________________________________________________________________________
____________________________________________________________________________
____________________________________________________________________________
____________________________________________________________________________
____________________________________________________________________________
____________________________________________________________________________
____________________________________________________________________________
____________________________________________________________________________
____________________________________________________________________________
____________________________________________________________________________
____________________________________________________________________________
____________________________________________________________________________
____________________________________________________________________________
____________________________________________________________________________
____________________________________________________________________________
____________________________________________________________________________
____________________________________________________________________________
____________________________________________________________________________
____________________________________________________________________________
____________________________________________________________________________
____________________________________________________________________________
____________________________________________________________________________
____________________________________________________________________________
____________________________________________________________________________
____________________________________________________________________________
____________________________________________________________________________
____________________________________________________________________________
____________________________________________________________________________
____________________________________________________________________________
____________________________________________________________________________
____________________________________________________________________________
____________________________________________________________________________
____________________________________________________________________________

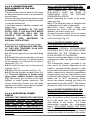
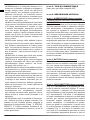
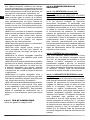
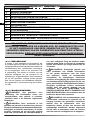
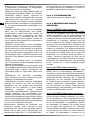
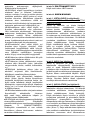
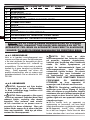
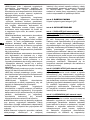
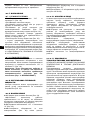
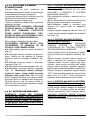
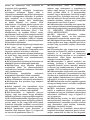
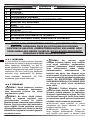
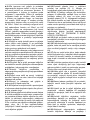
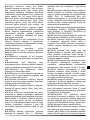
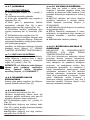
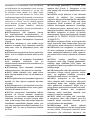
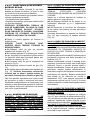
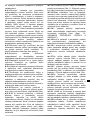
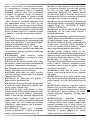
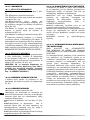
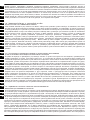
►►►1. DESCRIPTION
This is a portable air heater that operates
with liquid gas, featuring the total use of the
fuel, by heat exchange due to direct mixing of
the intake air and the combustion products.
It has a practical handle for easier transport
and handling. This heater can be powered by
means of a specic power supply or a set of
rechargeable batteries. It is manufactured in
compliance with the EN 1596 Standard.
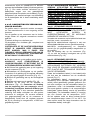
►►►2. WARNINGS
► IMPORTANT: Do not use to heat homes
or residential buildings; for use in public
buildings, refer to national regulations.
► IMPORTANT: This heater is not suitable
for use by persons (including children)
with reduced physical, sensory or mental
capacities or with lack of experience or
knowledge unless supervised by a person
responsible for their safety. Children must
be supervised to make sure they do not
play with the heater. Keep animals at a safe
distance from the heater.
► IMPORTANT: Improper use of this
heater can cause damage, injuries, burns,
explosions, electric shock or endanger
life. The rst symptoms of suffocation by
carbon monoxide are similar to those of
u with headache, light-headedness and/
or nausea. These symptoms could be
caused by the faulty functioning of the
heater. IF THESE SYMPTOMS OCCUR,
GO OUTDOORS IMMEDIATELY and have
the heater repaired by a technical support
centre.
► IMPORTANT: In order to prevent
any risk, even if power supply mains
disconnection is foreseen, all cleaning,
maintenance and repair operations
requiring access to dangerous parts, must
be carried out by the manufacturer, an
appointed technical assistance service, or
a similarly qualied person.
►2.1.For correct use of the heater and
for preservation of the fuel, follow all local
regulations and Standards in force.
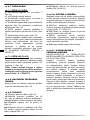
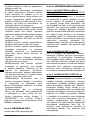
►2.2.The heater requires suitable fresh air in
order to function. It is therefore used outdoors
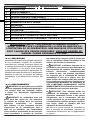
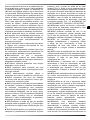
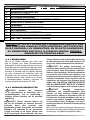
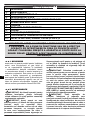
IMPORTANT: READ AND UNDERSTAND THIS OPERATIONAL
MANUAL BEFORE PERFORMING ASSEMBLY, COMMISSIONING OR
MAINTENANCE ON THIS HEATER. INCORRECT USE OF THE HEATER
CAN CAUSE SERIOUS INJURY. KEEP THIS MANUAL FOR FURTHER
REFERENCE.
PARAGRAPH SUMMARY
1... DESCRIPTION
2... WARNINGS
3... TYPE OF FUEL
4... DESCRIPTION OF ARTICLES
5... CONNECTION AND REPLACEMENT OF THE GAS CYLINDER
6... ELECTRICAL POWER SUPPLY
7... SWITCH-ON
8... HEAT CAPACITY REGULATION
9... SWITCH-OFF
10... CLEANING AND MAINTENANCE
11... STORAGE AND TRANSPORT OF THE BATTERY
12... TROUBLESHOOTING
en
it
de
es
fr
nl
pt
da
no
sv
pl
ru
cs
hu
sl
tr
hr
lt
lv
et
ro
sk
bg
uk
bs
el
zh

or in rooms with an assured and continuous
supply of fresh air. Good airing is supplied
when the volume of the room is calculated
on the heat capacity, using the formula of
1m³ every 100W of power. In no case is the
recommended volume of the room smaller
than 100m³. Good ventilation is guaranteed by
an opening that satises the formula stating
25cm² per kW of heat power, with minimum
of 250cm², equally divided between the
upper and lower part of the room. National
Standards in force are valid for installation,
including the Technical Standards and the
provisions regarding accident-prevention and
the prevention of res.
►2.3.The heater must only be used to heat air
(heating mode) or to circulate air (ventilation
mode). Follow these instructions scrupulously.
►2.4.The Manufacturer declines any liability
for damage/injury to property/persons deriving
from the improper use of the heater.
►2.5.Use only the type of fuel specied on
the data plate afxed to the heater.
►2.6.Make sure the heater is only connected
to a suitable electrical energy supply with a
differential switch and suitable earthing.
►2.7.Only use extensions with suitable
section, appropriately connected to earth.
►2.8.The heater must function on a stable,
re-proof, level surface, to prevent the risk of
re.
►2.9.It is prohibited to use the heater in
basements and rooms below ground level.
►2.10.The heater must not be used in places
where explosive dusts, fumes, gases, fuels,
solvents and paints are present.
►2.11.Whenever the heater is used near a
tarpaulin, awnings or similar covering materials,
additional protection is recommended, such
as re-proong. Make sure the hot parts of the
generator are kept a suitable distance from
inammable materials (fabric, paper, wood,
etc.) or thermolabile materials (including the
power supply cable, when applicable), which
in any case should never be less than 2,5m.
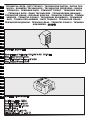
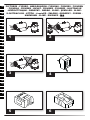
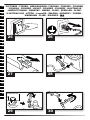
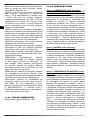
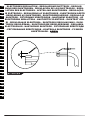
►2.12.Position the gas cylinder in a protected
area, behind the appliance (Fig. 1). The heater
must never face the gas cylinder (Fig. 2).
►2.13.The air vent (rear side) and/or the air
outlet vent (front side) must not be totally or
partially obstructed for any reason (Fig. 3). Do
not use any air ducting from or to the heater.
Make sure air intake slots, on the bottom of
the base, are not obstructed (for models using
this solution).
►2.14.If the heater does not switch on or
switch-on is anomalous, consult the relative
section (Par. “12. TROUBLESHOOTING”).
►2.15.The heater must never be moved,
handled or subjected to any maintenance
interventions when running.
►2.16.In any condition of use or heater
standstill, make sure that the exible gas
hose is not damaged (crushed, bent, twisted,
taught, etc.).
►2.17.If you smell gas, switch the heater
off immediately, close the gas cylinder,
disconnect the mains plug and/or remove the
rechargeable battery and then contact the
after-sales assistance.
►2.18.If the gas hose needs to be replaced,
only use the exible type suitable for the
pressure used, referring to national regulations.
The gas hose must measure 1,5m.
►2.19.When the heater is not used,
disconnect the mains plug and/or remove the
rechargeable battery, close the gas supply,
disconnect the gas hose from the heater and
plug the gas inlet on the heater.
►2.20.Ask the technical support service to
check that the heater is working properly at
least once a year and/or as required.
►2.21.Make sure that the heater is turned
off before connecting the mains plug and/or
inserting the rechargeable battery, in order to
avoid risks.
►2.22.Use only the original rechargeable
batteries recommended by the manufacturer.
The use of non-original rechargeable batteries
can cause damage, injuries, burns, explosions,
electric shocks, poisoning, or endanger life.
►2.23.Keep the disconnected rechargeable
battery at a safe distance from paper clips,
coins, keys, nails, screws and any other small
metal objects that could cause a short-circuit.
A short-circuit between the contacts of the
rechargeable battery can cause damage,
injuries, burns, explosions or endanger life.
►2.24.Incorrect use of the rechargeable
battery can cause the battery uid to leak.
Avoid all contact with the battery. In the event
of accidental contact, rinse yourself thoroughly
en
it
de
es
fr
nl
pt
da
no
sv
pl
ru
cs
hu
sl
tr
hr
lt
lv
et
ro
sk
bg
uk
bs
el
zh

with water. Seek immediate medical attention
if the uid comes into contact with your eyes.
The uid in the rechargeable battery can
cause skin irritation or burns.
►2.25.Incorrect use of the rechargeable
battery can cause the battery to release fumes.
Avoid inhaling these fumes at all costs. Ensure
a good ow of fresh air and seek immediate
medical attention in the event of accidental
inhalation of fumes. The fumes can irritate the
airways.
►2.26.In order to avoid serious risk, do
not attempt to open or disassemble the
rechargeable battery.
►2.27.In order to avoid serious risk, protect
the rechargeable battery against heat (for
example, constant direct sunlight or re) water,
humidity, etc.
►2.28.Use the specic rechargeable battery
only for this heater, in order to avoid hazardous
overloading.
►2.29.Use only original rechargeable
batteries with the voltage rating indicated on
the technical data plate afxed to the heater.
The use of other types of rechargeable battery
(like imitation batteries, regenerated batteries,
batteries from other brands, etc.) poses the
risk of injuries and/or explosions.
►2.30.Use only original battery chargers to
charge the rechargeable battery. Each battery
must be charged using its specic charger in
order to avoid the risks of re and explosion.
►2.31.Use only the power supply methods
recommended in this manual. To switch to
another power supply method, rst carry out
the switch-off procedure (Par. “9. SWITCH-
OFF”). It is prohibited to change the power
supply method when the heater is running, in
order to avoid serious damage.
►►►3. TYPE OF FUEL
Use only category I
3
B/P gas.
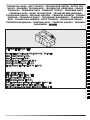
►►►4. DESCRIPTION OF ARTICLES
►►4.1. POWER SUPPLY UNIT (when
applicable):
THE POWER SUPPLY UNIT DOES NOT
CHARGE THE BATTERY.
(Fig. 4) The heater can be connected to the
mains using a device called the power supply
unit. The power supply unit receives single
phase alternating current from the mains
and converts it into direct current for running
the heater. The operating parameters for the
power supply unit (see the data plate afxed to
the power supply unit) must be observed. Use
the power supply unit in completely dry, dust-
free environments to power only this heater.
Check the power supply unit’s cable regularly
for wear, in order to avoid serious damage.
Observe all the warning messages relating to
the power supply unit in this manual.
►►4.2. BATTERY (when applicable):
(Fig. 5) The heater can operate autonomously
using an original Li-ion rechargeable battery,
without a mains connection. The rechargeable
battery is provided only partially charged.
It is advisable, therefore, to fully charge the
battery before initial use. Use only original
batteries to power the heater. Observe all the
warning messages relating to the battery in
this manual.
►►4.3. BATTERY CHARGER (when
applicable):
(Fig. 6) The battery charger is designed
to charge original rechargeable batteries.
The operating parameters for the battery
charger (see the data plate afxed on the
battery charger) must be observed. Use the
battery charger in completely dry, dust-free
environments to charge only the original
rechargeable batteries used to power this
heater. The battery charger is designed
to automatically charge the rechargeable
battery when connected (Fig. 7). A set of LED
lights on the battery charger provide detailed
diagnostics during the battery charging phase
(Fig. 8). Observe all the warning messages
relating to the battery charger in this manual.
en
it
de
es
fr
nl
pt
da
no
sv
pl
ru
cs
hu
sl
tr
hr
lt
lv
et
ro
sk
bg
uk
bs
el
zh

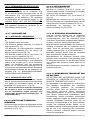
►►►5. CONNECTION AND
REPLACEMENT OF THE GAS
CYLINDER
The gas cylinder must be replaced in the open
air, away from heat sources, in an atmosphere
without ames.
Only the following accessories must be used
for connection of the gas cylinder to the heater:
•Liquid gas exible pipe.
•Liquid gas pressure regulator complete with
safety valve.
CHECK THE INTEGRITY OF THE GAS
SUPPLY PIPE. IF THE GAS HOSE NEEDS
TO BE REPLACED, ONLY USE THE
FLEXIBLE TYPE SUITABLE FOR THE
PRESSURE USED, REFERRING TO
NATIONAL REGULATIONS.
►To connect the heater to the gas cylinder:
CAUTION: ALL THREADING IS SINISTRAL,
I.E. THEY ARE TIGHTENED IN AN ANTI-
CLOCKWISE DIRECTION.
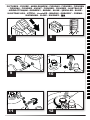
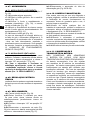
►5.1.Screw the gas hose on the heater tting
(Fig. 9).
►5.2.Install the pressure regulator on the gas
cylinder. Make sure there is a gasket present
on the regulator (if envisioned by the type of
connection) (Fig. 10).
►5.3.Connect the gas hose to the pressure
regulator (Fig. 11).
►5.4.Open the gas cylinder cock (Fig. 12).
►5.5.Press the regulator release button (Fig.
13). Check the tightness of ttings using
soapy water: bubbles indicate a gas leak
(Fig. 14). Several gas cylinders can be tted
together to obtain greater autonomy. The
correct functioning pressure (see data plate
applied to the heater) is given by the regulator
supplied or an equivalent model.
►►►6. ELECTRICAL POWER
SUPPLY
USE ONLY THE POWER SUPPLY METHODS
DESCRIBED BELOW. TO SWITCH TO
ANOTHER POWER SUPPLY METHOD,
FIRST CARRY OUT THE SWITCH-OFF
PROCEDURE (Par. “9. SWITCH-OFF”). IT
IS PROHIBITED TO CHANGE THE POWER
SUPPLY METHOD WHEN THE HEATER IS
RUNNING.
►►6.1. HEATER POWERED WITH THE
POWER SUPPLY UNIT (when applicable):
THE CONNECTION TO THE MAINS
ELECTRICITY MUST BE MADE IN
COMPLIANCE WITH THE NATIONAL
STANDARDS IN FORCE.
Before connecting the heater to the mains,
make sure that:
►6.1.1.The electricity mains is equipped with
a differential switch and suitable earth.
►6.1.2.The power supply voltage and
frequency are correct (see the data plate
afxed to the power supply unit).
Connect the power supply unit to the heater
(Fig. 15) and then connect the power supply
unit to the mains (Fig. 16).
►►6.2. HEATER POWERED WITH THE
RECHARGEABLE BATTERY (when
applicable):
USE ONLY ORIGINAL RECHARGEABLE
BATTERIES WITH THE VOLTAGE RATING
INDICATED ON THE TECHNICAL DATA
PLATE AFFIXED TO THE HEATER.
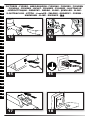
Insert the rechargeable battery in the battery
compartment under the base of the heater
(Fig. 17).
The rechargeable battery (provided in the
pack and/or on request, depending on the
model) is provided partially charged. In order
to guarantee the full power of the rechargeable
battery, charge it fully using the original battery
charger before initial use (each battery needs
its specic battery charger). The rechargeable
battery has an “NTC” temperature control
device that permits charging only within the
temperature range of 0 and 40°C. This ensures
the long life-span of the rechargeable battery.
►►6.3. HEATER POWERED WITH THE
POWER SUPPLY UNIT AND WITH THE
BATTERY INSERTED (when applicable):
Connect the power supply unit to the heater
(Fig. 15) and then connect the power supply
unit to the mains (Fig. 16) (see the data
plate afxed to the heater). The heater
automatically excludes the rechargeable
battery. THE POWER SUPPLY UNIT DOES
NOT CHARGE THE BATTERY, this means
that the rechargeable battery is not charged
up when the heater is connected to the mains.
en
it
de
es
fr
nl
pt
da
no
sv
pl
ru
cs
hu
sl
tr
hr
lt
lv
et
ro
sk
bg
uk
bs
el
zh

en
it
de
es
fr
nl
pt
da
no
sv
pl
ru
cs
hu
sl
tr
hr
lt
lv
et
ro
sk
bg
uk
bs
el
zh
►►►7. SWITCH-ON
►►7.1. HEATING MODE:
►7.1.1.Turn the “O/I” switch to position “I”
(Fig. 18).
►7.1.2.Wait a few seconds.
►7.1.3.Press the gas button fully home and
hold it down (Fig. 19).
►7.1.4.Activate the piezoelectric igniter fully
home and repeatedly (Fig. 20), keeping the
gas button pressed (Fig. 19).
►7.1.5.After ignition of the ame, hold the gas
button down for about 15 s (Fig. 21).
►7.1.6.Release the gas button (Fig. 22).
In the event of a power cut or if there is no gas
supply, the heater will switch off. The heater
does not switch back on automatically. It must
be switched on manually by repeating the
switch-on procedure. If the heater does not
switch on, consult the relative section (Par.
“12. TROUBLESHOOTING”).
►►7.2. VENTILATION MODE:
The heater can also be used as a fan. Connect
the generator to the mains electricity and/or
insert the rechargeable battery and turn the
“O/I” switch to position “I” (Fig. 18).
PLEASE NOTE: With the heater functioning
in heating mode, before passing to
ventilation mode, carry out the correct
switch off sequence (Par. “9. SWITCH-
OFF”).
►►►8. HEAT CAPACITY
REGULATION
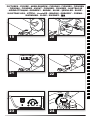
The heat capacity can be regulated with the
knob positioned on the base of the heater
(Fig. 23).
►►►9. SWITCH-OFF
►9.1.Close the gas cylinder (Fig. 24).
►9.2.Leave the fan to cool for about 60 s,
in order to prevent internal damage due to
overheating (heater internal cooling).
►9.3.Turn the “O/I” switch to position “O” (Fig.
25).
►9.4.Disconnect the heater from the mains
power supply (Fig. 26) and/or remove the
rechargeable battery from the mains or
disconnect the battery (Fig. 27).
►9.5.Disconnect the heater from the gas
supply pipe (Fig. 28-29-30).
►►►10. CLEANING AND
MAINTENANCE
Ask the technical support service to check that
the heater is working properly at least once a
year and/or as required. The heater must be
cleaned before it is put away after use.
►10.1.Before starting any type of maintenance,
care and repairs of the heater, carry out the
switch-off sequence (Par. “9. SWITCH-OFF”).
►10.2.Cleaning only concerns the air vent
(rear side) of the heater.
►10.3.When the heater is used again, check
the condition of the gas hose. If in doubt
regarding its condition, request assistance
from the technical after-sales service.
►10.4.Do not carry out any unauthorised
maintenance.
►►►11. STORAGE AND TRANSPORT
OF THE BATTERY
DO NOT KEEP AND STORE THE BATTERY
AT A LOW TEMPERATURE FOR A LONG
PERIOD OF TIME.
The Li-ion rechargeable batteries are subject
to the Dangerous Goods Regulations. The
user can transport the rechargeable batteries
by road without taking additional precautions.
In third party transportation case (e.g. by air
and/or freight forwarder), must be observed
the requirements according to the all local
regulations and standards in force. Ship the
rechargeable batteries only if their shell is not
damaged. Cover the exposed contacts with
adhesive tape and pack the rechargeable
battery in such a way that it cannot move in
its packaging. Please also observe any other
applicable domestic standards.

en
it
de
es
fr
nl
pt
da
no
sv
pl
ru
cs
hu
sl
tr
hr
lt
lv
et
ro
sk
bg
uk
bs
el
zh
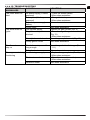
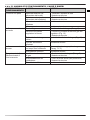
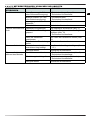
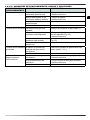
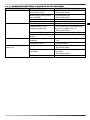
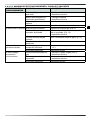
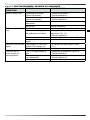
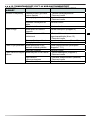
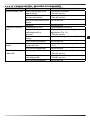
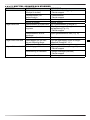
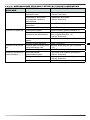
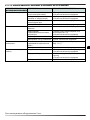
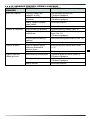
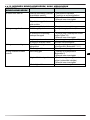
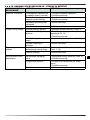
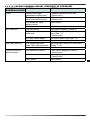
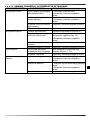
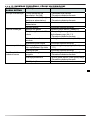
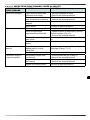
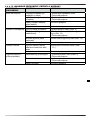
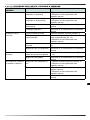
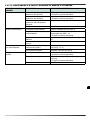
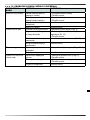
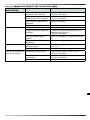
►►►12. TROUBLESHOOTING
FUNCTIONING
ANOMALIES
CAUSES SOLUTION
The motor does not
start
No power supply (if mains
powered)
1.Check the mains system
2.After-sales assistance
Battery low (if battery-
powered)
1.Charge the battery
2.After-sales assistance
Defective power supply or
battery
After-sales assistance
Faulty motor After-sales assistance
The ame does not
ignite
Gas cylinder empty Replace the gas cylinder (Par. 5)
Regulator safety valve
blocked
1.Press the regulator gas release button
(Fig. 13)
2.After-sales assistance
Gas cylinder cock closed Open the gas cylinder cock (Fig. 12)
Faulty ignition circuit After-sales assistance
The ame does not
stay on
Gas button not pressed for
long enough
Press the gas button for longer (Par.
7.1.5.)
Defective heater After-sales assistance
Flame goes out during
functioning
Insufcient gas supply 1.Replace the gas cylinder (Par. 5)
2.After-sales assistance
The heater overheats 1.Clean the air vent (rear side)
2.After-sales assistance
Defective heater After-sales assistance

IMPORTANTE: LEGGERE E COMPRENDERE QUESTO MANUALE
OPERATIVO PRIMA DI EFFETTUARE L’ASSEMBLAGGIO, LA MESSA
IN FUNZIONE O LA MANUTENZIONE DI QUESTO RISCALDATORE.
L’USO ERRATO DEL RISCALDATORE PUÒ CAUSARE LESIONI
GRAVI. CONSERVARE QUESTO MANUALE A TITOLO DI FUTURO
RIFERIMENTO.
en
it
de
es
fr
nl
pt
da
no
sv
pl
ru
cs
hu
sl
tr
hr
lt
lv
et
ro
sk
bg
uk
bs
el
zh
►►►1. DESCRIZIONE
Questo è un riscaldatore d’aria portatile fun-
zionante a gas liquido, caratterizzato dallo
sfruttamento totale del combustibile, mediante
scambio termico per miscelazione diretta tra l’a-
ria aspirata ed i prodotti della combustione. È
dotato di una pratica maniglia per facilitarne il
trasporto e la movimentazione. Questo riscal-
datore può essere alimentato tramite specico
alimentatore, oppure da un sistema di batterie
ricaricabili. È realizzato secondo la Norma EN
1596.
►►►2. AVVERTENZE
► IMPORTANTE: Non utilizzare per il ris-
caldamento delle aree abitabili di edici re-
sidenziali; per l’uso in edici pubblici, fare
riferimento ai regolamenti nazionali.
► IMPORTANTE: Questo riscaldatore non
è adatto all’uso da parte di persone (incluse
bambini) con capacità siche, sensoriali e
mentali ridotte, o inesperte, a meno che non
vengano supervisionate da una persona re-
ponsabile per la loro sicurezza. I bambini de-
vono essere controllati, per assicurarsi che
non giochino con il riscaldatore. Tenere gli
animali a distanza di sicurezza dal riscalda-
tore.
► IMPORTANTE: L’uso improprio di
questo riscaldatore può provocare danni o
pericolo di vita a persone, lesioni, ustioni,
esplosioni, elettroshock o avvelenamento. I
primi sintomi di asssia da ossido di carbonio
assomigliano a quelli dell’inuenza, con
cefalee, capogiri e/o nausea. Tali sintomi
potrebbero essere causati dal funzionamento
difettoso del riscaldatore. NEL CASO
SI PRESENTASSERO QUESTI SINTOMI,
USCIRE IMMEDIATAMENTE ALL’APERTO
e far riparare il riscaldatore dalI’assistenza
tecnica.
► IMPORTANTE: Tutte le operazioni di
pulizia, manutenzione e riparazione che
prevedano l’accesso a parti pericolose
devono essere svolte dal costruttore, dal
suo servizio di assistenza tecnica, da una
persona con qualica similare, in modo da
prevenire ogni rischio, anche se è prevista la
disconnessione dalla rete di alimentazione.
►2.1.Per un corretto uso del riscaldatore e per
la conservazione del combustibile, attenersi a
SOMMARIO PARAGRAFI
1... DESCRIZIONE
2... AVVERTENZE
3... TIPO DI COMBUSTIBILE
4... DESCRIZIONE ARTICOLI
5... COLLEGAMENTO E SOSTITUZIONE DELLA BOMBOLA GAS
6... ALIMENTAZIONE ELETTRICA
7... ACCENSIONE
8... REGOLAZIONE POTENZA TERMICA
9... SPEGNIMENTO
10... PULIZIA E MANUTENZIONE
11... CONSERVAZIONE E TRASPOSTO DELLA BATTERIA
12... ANOMALIE DI FUNZIONAMENTO, CAUSE E RIMEDI

tutte le ordinanze locali ed alla normativa vigen-
te.
►2.2.Il riscaldatore necessita per il
funzionamento di un adeguato ricambio di aria.
Pertanto esso va impiegato all’aperto o in stanze
con ricambio d’aria assicurato e continuo. Una
buona aerazione è assicurata quando il volume
della stanza è calcolato sulla potenza termica,
con la formula di 1m³ ogni 100W di potenza.
In nessun caso il volume raccomandato della
stanza deve essere minore di 100m³. Una buona
ventilazione è garantita da un’apertura che
soddis la formula di 25cm² per kW di potenza
termica, con un minimo di 250cm², equamente
diviso tra parte superiore e parte inferiore della
stanza. Per l’installazione, valgono le norme
nazionali vigenti, incluse le norme tecniche e
le disposizioni in materia antinfortunistica e di
prevenzione degli incendi.
►2.3.Il riscaldatore deve essere usato solamen-
te per riscaldare l’aria (modalità riscaldamento),
o per movimentare l’aria (modalità ventilazione).
Per l’utilizzo seguire scrupolosamente le presen-
ti istruzioni.
►2.4.Il costruttore declina ogni responsabilità
per danni a cose e/o persone derivanti dall’uso
improprio del riscaldatore.
►2.5.Alimentare il riscaldatore solamente con il
tipo di combustibile espressamente specicato
sulla targhetta dati applicata sul riscaldatore.
►2.6.Assicurarsi di collegare il riscaldatore solo
a reti elettriche opportunamente dotate di inter-
ruttore differenziale e di adeguata messa a terra.
►2.7.Usare solamente prolunghe di adeguata
sezione, con lo di messa a terra.
►2.8.Il riscaldatore deve funzionare su una su-
percie livellata, stabile e ignifuga, in modo da
evitare rischi di incendio.
►2.9.È assolutamente vietato usare il riscalda-
tore in locali seminterrati o sotto il livello del suo-
lo.
►2.10.Il riscaldatore non deve essere usato in
locali in cui sono presenti polveri esplosive, fumi,
gas, combustibili, solventi, vernici.
►2.11.Qualora il riscaldatore sia utilizzato in
prossimità di teloni, tende o materiali simili di co-
pertura, si consiglia di usare protezioni aggiun-
tive di tipo ignifugo. Avere cura di mantenere una
distanza adeguata, che in nessun caso deve es-
sere inferiore a 2,5m da materiali inammabili
(stoffa, carta, legno, ecc.) o termolabili (comp-
reso il cavo dell’alimentatore, se presente), dalle
parti calde del riscaldatore.
►2.12.Posizionare la bombola gas in posizione
protetta, dietro l’apparecchio (Fig. 1). Il riscal-
datore non deve mai essere orientato verso la
bombola del gas (Fig. 2).
►2.13.Per qualsiasi motivo è vietato ostruire
completamente, o parzialmente, la presa d’aria
(lato posteriore) e/o la bocca d’uscita aria (lato
anteriore) (Fig. 3). Evitare di utilizzare qualsiasi
canalizzazione aria dal/al riscaldatore. Assicu-
rarsi che non vengano ostruite le feritoie di aspi-
razione aria presenti sul fondo della base (per i
modelli che adottano questa soluzione).
►2.14.Nel caso di mancata accensione, o ac-
censione anomala del riscaldatore, consultare
l’apposita sezione (Parag. “12. ANOMALIE DI
FUNZIONAMENTO, CAUSE E RIMEDI”).
►2.15.Il riscaldatore quando è in funzione non
deve mai essere spostato, maneggiato, né sog-
getto ad alcun intervento di manutenzione.
►2.16.In qualsiasi condizione d’uso, o di sta-
zionamento del riscaldatore, fare attenzione che
il tubo gas essibile, non venga danneggiato
(schiacciato, piegato, torto, teso, ecc.).
►2.17.Se viene percepito odore di gas, spe-
gnere subito il riscaldatore, chiudere la bombola
gas, scollegare la spina dell’alimentatore dalla
rete e/o rimuovere la batteria ricaricabile e suc-
cessivamente contattare l’assistenza tecnica.
►2.18.In caso di sostituzione del tubo gas, uti-
lizzare solo tubi di tipo essibile adeguato alla
pressione di utilizzo, facendo riferimento alle re-
golamentazioni nazionali. Il tubo gas deve avere
una lunghezza di 1,5m.
►2.19.Quando il riscaldatore non è utilizzato,
scollegare la spina dell’alimentatore dalla rete
e/o rimuovere la batteria ricaricabile, chiudere
l’alimentazione gas, scollegare il tubo gas dal
riscaldatore e tappare l’entrata gas sul riscalda-
tore.
►2.20.Far vericare dall’assistenza tecnica al-
meno una volta all’anno e/o secondo l’esigenza,
il corretto funzionamento del riscaldatore.
►2.21.Assicurarsi che il riscaldatore sia
spento, prima di collegare la spina elettrica
dell’alimentatore e/o inserire la batteria ricarica-
bile, in modo da prevenire ogni rischio.
►2.22.Utilizzare solo ed esclusivamente batte-
rie ricaricabili originali esplicitamente previste.
L’uso di batterie ricaricabili non previste può
provocare danni o pericolo di vita a persone, le-
sioni, ustioni, esplosioni, elettroshock o avvele-
namento.
en
it
de
es
fr
nl
pt
da
no
sv
pl
ru
cs
hu
sl
tr
hr
lt
lv
et
ro
sk
bg
uk
bs
el
zh

►2.23.Mantenere un adeguata distanza di si-
curezza tra la batteria ricaricabile scollegata e
fermagli, monete, chiavi, chiodi, viti e altri piccoli
oggetti metallici che potrebbero provocare un
eventuale cortocircuito. Un eventuale cortocir-
cuito tra i contatti della batteria ricaricabile può
provocare danni o pericolo di vita a persone, le-
sioni, ustioni, esplosioni, ecc..
►2.24.L’errato impiego della batteria ricaricabile
può provocare fuoriuscita di liquido dalla batte-
ria. Evitarne assolutamente il contatto. In caso
di contatto accidentale, sciacquare accurata-
mente con acqua. Rivolgersi immediatamente
al medico, qualora il liquido dovesse entrare in
contatto con gli occhi. Il liquido fuoriuscito dalla
batteria ricaricabile potrà causare irritazioni cu-
tanee o ustioni.
►2.25.L’errato impiego della batteria ricarica-
bile può provocare fuoriuscita di vapori dalla bat-
teria. Evitarne assolutamente di inalare questi
vapori. Far entrare aria fresca e in caso di inala-
zione accidentale farsi visitare da un medico in
caso di disturbi. I vapori possono irritare le vie
respiratorie.
►2.26.Al ne di evitare gravi rischi non tentare
di aprire/smontare la batteria ricaricabile.
►2.27.Al ne di evitare gravi rischi proteggere
la batteria ricaricabile dal calore (per esempio
dall’irradiamento solare continuo, dal fuoco,
dall’acqua, dall’umidita, ecc.).
►2.28.Utilizzare la batteria ricaricabile specica
esclusivamente con questo riscaldatore al ne
di evitare sovraccarichi pericolosi.
►2.29.Utilizzare esclusivamente batterie ricari-
cabili originali dotate della tensione indicata sul-
la targhetta dati tecnici del riscaldatore. In caso
di impiego di altre batterie ricaricabili (per es-
empio batterie d’imitazione, batterie rigenerate,
batterie di concorrenza, ecc.) esiste il pericolo di
lesioni e/o esplosioni.
►2.30.Caricare la batteria ricaricabile solo ed
esclusivamente con caricabatteria originali.
Ogni batteria necessita dello specico carica-
batteria al ne di evitare rischi d’incendio e di
esplosione.
►2.31.Utilizzare solo le modalità di alimentazi-
one elettrica prevista in questo manuale. Per
passare da una modalità all’altra, eseguire la
sequenza di spegnimento (Parag. “9. SPEGNI-
MENTO”). È vietato cambiare modalità di ali-
mentazione a riscaldatore in funzione, al ne di
evitare gravi danni.
►►►3. TIPO DI COMBUSTIBILE
Usare solo gas della categoria I
3
B/P.
►►►4. DESCRIZIONE ARTICOLI
►►4.1. ALIMENTATORE (dove presente):
L’ALIMENTATORE NON HA FUNZIONE DI CA-
RICABATTERIA.
(Fig. 4) Il riscaldatore può funzionare collegato
alla rete elettrica tramite un dispositivo denomi-
nato alimentatore. L’alimentatore è progettato
per ricevere in ingresso la corrente alternata
monofase fornita dalla rete e convertirla in usci-
ta in corrente continua adatta al funzionamento
del riscaldatore. E’ necessario rispettare i para-
metri di funzionamento dell’alimentatore (vedi
targhetta dati applicata sull’alimentatore). Utiliz-
zare l’alimentatore in luoghi completamente as-
ciutti e protetti dalla polvere, per alimentare es-
clusivamente questo riscaldatore. Vericare pe-
riodicamente lo stato del cavo dell’alimentatore,
al ne di evitare gravi danni. Rispettare tutte le
avvertenze relative all’alimentatore riportate nel
presente manuale.
►►4.2. BATTERIA (dove presente):
(Fig. 5) Il riscaldatore può funzionare in modo
autonomo con una batteria ricaricabile originale
al Li-ion, senza dove essere collegato alla rete
elettrica. La batteria ricaricabile è fornita parzial-
mente carica e per questo si consiglia di esegui-
re un ciclo di ricarica completo prima dell’utilizzo
della batteria. Utilizzare solo batterie originali
per alimentare il riscaldatore. Rispettare tutte
le avvertenze relative alla batteria riportate nel
presente manuale.
►►4.3. CARICABATTERIA (dove presente):
(Fig. 6) Il caricabatteria è progettato per rica-
ricale le batterie ricaricabili originali. E’ neces-
sario rispettare i parametri di funzionamento
dell’caricabatteria (vedi targhetta dati applicata
sull’ caricabatteria). Utilizzare il caricabatteria
in luoghi completamente asciutti e protetti dalla
polvere, per caricare esclusivamente batterie
ricaricabili originali utilizzabili per alimentare
questo riscaldatore. Il caricabatteria è predis-
posto per gestire in automatico il corretto ciclo
di ricarica quando la batteria ricaricabile viene
collegata (Fig. 7). Una serie di indicatori lumi-
nosi posti sul caricabatteria permette di avere
una dettagliata diagnostica durante la fase di
en
it
de
es
fr
nl
pt
da
no
sv
pl
ru
cs
hu
sl
tr
hr
lt
lv
et
ro
sk
bg
uk
bs
el
zh

ricerca della batteria (Fig. 8). Rispettare tutte le
avvertenze relative alla caricabatteria riportate
nel presente manuale.
►►►5. COLLEGAMENTO E
SOSTITUZIONE DELLA BOMBOLA GAS
La bombola gas deve essere sostituita all’aria
aperta, lontana da fonti di calore, in atmosfera
priva di amme.
Per il collegamento della bombola gas al riscal-
datore, devono essere utilizzati solo i seguenti
accessori:
•Tubo essibile per gas liquido.
•Regolatore di pressione per gas liquido com-
pleto di valvola di sicurezza.
VERIFICARE L’INTEGRITÀ DEL TUBO GAS
DI ALIMENTAZIONE. NEL CASO NECESSITI
DI ESSERE SOSTITUITO, UTILIZZARE SOLO
TUBO DI TIPO FLESSIBILE, ADEGUATO
ALLA PRESSIONE DI UTILIZZO, FACENDO
RIFERIMENTO ALLE REGOLAMENTAZIONI
NAZIONALI.
►Per collegare il riscaldatore alla bombola gas:
ATTENZIONE: TUTTE LE FILETTATURE
SONO SINISTRORSE, CIOÈ VANNO SERRA-
TE IN SENSO ANTIORARIO.
►5.1.Avvitare il tubo gas al raccordo del riscal-
datore (Fig. 9).
►5.2.Installare il regolatore di pressione sulla
bombola gas. Assicurarsi che sul regolatore sia
presente la guarnizione (se il tipo di attacco la
prevede) (Fig. 10).
►5.3.Collegare il tubo gas al regolatore di pres-
sione (Fig. 11).
►5.4.Aprire il rubinetto della bombola gas (Fig.
12).
►5.5.Premere il pulsante sblocco regolatore
(Fig. 13). Vericare la tenuta dei raccordi con
acqua saponata: la comparsa di bolle segna-
lerà eventuali perdite di gas (Fig. 14). È pos-
sibile raccordare fra loro più bombole gas per
ottenere una maggiore autonomia. La corretta
pressione di funzionamento (vedi targhetta dati
applicata sul riscaldatore) è data dal regolatore
fornito in dotazione, o da modello equivalente.
►►►6. ALIMENTAZIONE ELETTRICA
UTILIZZARE SOLO LE MODALITÀ DI ALIMEN-
TAZIONE QUI DI SEGUITO DESCRITTE. PER
PASSARE DA UNA MODALITÀ ALL’ALTRA,
ESEGUIRE LA SEQUENZA DI SPEGNIMPEN-
TO (Parag. “9. SPEGNIMENTO”). È VIETATO
CAMBIARE MODALITÀ DI ALIMENTAZIONE
A RISCALDATORE IN FUNZIONE.
►►6.1. RISCALDATORE ALIMENTATO
DALL’ALIMENTATORE (dove presente):
IL COLLEGAMENTO ALLA RETE ELETTRICA
VA SVOLTO IN ACCORDO CON LE NORME
NAZIONALI VIGENTI.
Prima di collegare il riscaldatore alla rete elettri-
ca, assicurarsi che:
►6.1.1.La rete elettrica sia dotata di interruttore
differenziale e di adeguata messa a terra.
►6.1.2.La tensione e la frequenza di alimenta-
zione siano corrette (vedi targhetta dati applica-
ta sull’alimentatore).
Collegare l’alimentatore al riscaldatore (Fig. 15),
e successivamente collegare l’alimentatore alla
rete elettrica (Fig. 16).
►►6.2. RISCALDATORE ALIMENTATO
DALLA BATTERIA RICARICABILE (dove
presente):
UTILIZZARE ESCLUSIVAMENTE BATTERIE
RICARICABILI ORIGINALI DOTATE DELLA
TENSIONE INDICATA SULLA TAR GHETTA
DATI TECNICI DEL RISCALDATORE.
Inserire la batteria ricaricabile nel vano porta
batteria posizionato sotto la base del riscalda-
tore (Fig. 17).
La batteria ricaricabile (fornite nella confezione,
e/o optional a seconda del modello) viene forni-
ta parzialmente carica. Per garantire l’intera po-
tenza della batteria ricaricabile, prima del primo
impiego ricaricare completamente la batteria ri-
caricabile nel caricabatteria originale (ogni bat-
teria necessita dello specico caricabatteria).
La batteria ricaricabile è dotata di un controllo
della temperatura ”NTC” che consente una rica-
rica esclusivamente nel campo di temperatura
tra 0°C e 40°C. In questo modo viene ottenuta
un’elevata durata della batteria ricaricabile.
en
it
de
es
fr
nl
pt
da
no
sv
pl
ru
cs
hu
sl
tr
hr
lt
lv
et
ro
sk
bg
uk
bs
el
zh
Pagina se încarcă...
Pagina se încarcă...
Pagina se încarcă...
Pagina se încarcă...
Pagina se încarcă...
Pagina se încarcă...
Pagina se încarcă...
Pagina se încarcă...
Pagina se încarcă...
Pagina se încarcă...
Pagina se încarcă...
Pagina se încarcă...
Pagina se încarcă...
Pagina se încarcă...
Pagina se încarcă...
Pagina se încarcă...
Pagina se încarcă...
Pagina se încarcă...
Pagina se încarcă...
Pagina se încarcă...
Pagina se încarcă...
Pagina se încarcă...
Pagina se încarcă...
Pagina se încarcă...
Pagina se încarcă...
Pagina se încarcă...
Pagina se încarcă...
Pagina se încarcă...
Pagina se încarcă...
Pagina se încarcă...
Pagina se încarcă...
Pagina se încarcă...
Pagina se încarcă...
Pagina se încarcă...
Pagina se încarcă...
Pagina se încarcă...
Pagina se încarcă...
Pagina se încarcă...
Pagina se încarcă...
Pagina se încarcă...
Pagina se încarcă...
Pagina se încarcă...
Pagina se încarcă...
Pagina se încarcă...
Pagina se încarcă...
Pagina se încarcă...
Pagina se încarcă...
Pagina se încarcă...
Pagina se încarcă...
Pagina se încarcă...
Pagina se încarcă...
Pagina se încarcă...
Pagina se încarcă...
Pagina se încarcă...
Pagina se încarcă...
Pagina se încarcă...
Pagina se încarcă...
Pagina se încarcă...
Pagina se încarcă...
Pagina se încarcă...
Pagina se încarcă...
Pagina se încarcă...
Pagina se încarcă...
Pagina se încarcă...
Pagina se încarcă...
Pagina se încarcă...
Pagina se încarcă...
Pagina se încarcă...
Pagina se încarcă...
Pagina se încarcă...
Pagina se încarcă...
Pagina se încarcă...
Pagina se încarcă...
Pagina se încarcă...
Pagina se încarcă...
Pagina se încarcă...
Pagina se încarcă...
Pagina se încarcă...
Pagina se încarcă...
Pagina se încarcă...
Pagina se încarcă...
Pagina se încarcă...
Pagina se încarcă...
Pagina se încarcă...
Pagina se încarcă...
Pagina se încarcă...
Pagina se încarcă...
Pagina se încarcă...
Pagina se încarcă...
Pagina se încarcă...
Pagina se încarcă...
Pagina se încarcă...
Pagina se încarcă...
Pagina se încarcă...
Pagina se încarcă...
Pagina se încarcă...
Pagina se încarcă...
Pagina se încarcă...
Pagina se încarcă...
Pagina se încarcă...
Pagina se încarcă...
Pagina se încarcă...
Pagina se încarcă...
Pagina se încarcă...
Pagina se încarcă...
Pagina se încarcă...
Pagina se încarcă...
Pagina se încarcă...
Pagina se încarcă...
Pagina se încarcă...
Pagina se încarcă...
Pagina se încarcă...
Pagina se încarcă...
Pagina se încarcă...
Pagina se încarcă...
Pagina se încarcă...
Pagina se încarcă...
Pagina se încarcă...
Pagina se încarcă...
Pagina se încarcă...
Pagina se încarcă...
Pagina se încarcă...
Pagina se încarcă...
Pagina se încarcă...
Pagina se încarcă...
Pagina se încarcă...
Pagina se încarcă...
Pagina se încarcă...
Pagina se încarcă...
Pagina se încarcă...
Pagina se încarcă...
Pagina se încarcă...
Pagina se încarcă...
Pagina se încarcă...
Pagina se încarcă...
Pagina se încarcă...
Pagina se încarcă...
Pagina se încarcă...
Pagina se încarcă...
Pagina se încarcă...
Pagina se încarcă...
Pagina se încarcă...
Pagina se încarcă...
Pagina se încarcă...
Pagina se încarcă...
Pagina se încarcă...
Pagina se încarcă...
Pagina se încarcă...
Pagina se încarcă...
Pagina se încarcă...
Pagina se încarcă...
Pagina se încarcă...
Pagina se încarcă...
Pagina se încarcă...
Pagina se încarcă...
Pagina se încarcă...
Pagina se încarcă...
Pagina se încarcă...
Pagina se încarcă...
Pagina se încarcă...
Pagina se încarcă...
Pagina se încarcă...
Pagina se încarcă...
Pagina se încarcă...
Pagina se încarcă...
Pagina se încarcă...
Pagina se încarcă...
Pagina se încarcă...
Pagina se încarcă...
Pagina se încarcă...
Pagina se încarcă...
Pagina se încarcă...
Pagina se încarcă...
Pagina se încarcă...
Pagina se încarcă...
Pagina se încarcă...
Pagina se încarcă...
-
 1
1
-
 2
2
-
 3
3
-
 4
4
-
 5
5
-
 6
6
-
 7
7
-
 8
8
-
 9
9
-
 10
10
-
 11
11
-
 12
12
-
 13
13
-
 14
14
-
 15
15
-
 16
16
-
 17
17
-
 18
18
-
 19
19
-
 20
20
-
 21
21
-
 22
22
-
 23
23
-
 24
24
-
 25
25
-
 26
26
-
 27
27
-
 28
28
-
 29
29
-
 30
30
-
 31
31
-
 32
32
-
 33
33
-
 34
34
-
 35
35
-
 36
36
-
 37
37
-
 38
38
-
 39
39
-
 40
40
-
 41
41
-
 42
42
-
 43
43
-
 44
44
-
 45
45
-
 46
46
-
 47
47
-
 48
48
-
 49
49
-
 50
50
-
 51
51
-
 52
52
-
 53
53
-
 54
54
-
 55
55
-
 56
56
-
 57
57
-
 58
58
-
 59
59
-
 60
60
-
 61
61
-
 62
62
-
 63
63
-
 64
64
-
 65
65
-
 66
66
-
 67
67
-
 68
68
-
 69
69
-
 70
70
-
 71
71
-
 72
72
-
 73
73
-
 74
74
-
 75
75
-
 76
76
-
 77
77
-
 78
78
-
 79
79
-
 80
80
-
 81
81
-
 82
82
-
 83
83
-
 84
84
-
 85
85
-
 86
86
-
 87
87
-
 88
88
-
 89
89
-
 90
90
-
 91
91
-
 92
92
-
 93
93
-
 94
94
-
 95
95
-
 96
96
-
 97
97
-
 98
98
-
 99
99
-
 100
100
-
 101
101
-
 102
102
-
 103
103
-
 104
104
-
 105
105
-
 106
106
-
 107
107
-
 108
108
-
 109
109
-
 110
110
-
 111
111
-
 112
112
-
 113
113
-
 114
114
-
 115
115
-
 116
116
-
 117
117
-
 118
118
-
 119
119
-
 120
120
-
 121
121
-
 122
122
-
 123
123
-
 124
124
-
 125
125
-
 126
126
-
 127
127
-
 128
128
-
 129
129
-
 130
130
-
 131
131
-
 132
132
-
 133
133
-
 134
134
-
 135
135
-
 136
136
-
 137
137
-
 138
138
-
 139
139
-
 140
140
-
 141
141
-
 142
142
-
 143
143
-
 144
144
-
 145
145
-
 146
146
-
 147
147
-
 148
148
-
 149
149
-
 150
150
-
 151
151
-
 152
152
-
 153
153
-
 154
154
-
 155
155
-
 156
156
-
 157
157
-
 158
158
-
 159
159
-
 160
160
-
 161
161
-
 162
162
-
 163
163
-
 164
164
-
 165
165
-
 166
166
-
 167
167
-
 168
168
-
 169
169
-
 170
170
-
 171
171
-
 172
172
-
 173
173
-
 174
174
-
 175
175
-
 176
176
-
 177
177
-
 178
178
-
 179
179
-
 180
180
-
 181
181
-
 182
182
-
 183
183
-
 184
184
-
 185
185
-
 186
186
-
 187
187
-
 188
188
-
 189
189
-
 190
190
-
 191
191
-
 192
192
-
 193
193
-
 194
194
-
 195
195
-
 196
196
-
 197
197


Master BLP 17M DC Manualul proprietarului
- Tip
- Manualul proprietarului
- Acest manual este potrivit și pentru
în alte limbi
- slovenčina: Master BLP 17M DC Návod na obsluhu
Lucrări înrudite
-
Master BLP17M DC 4162.938 E19R07 Manualul proprietarului
-
-
-
-
MCS Master DC 61 Manualul proprietarului
-
MCS Master RS 40 Manualul proprietarului
-
-
-
Alte documente
-
Honeywell HW-223E Manual de utilizare
-
Epico 9915101100126 Manual de utilizare
-
 Raider Power Tools RD-EFH09 Manual de utilizare
-
 Raider Power Tools RD-EFH08 Manual de utilizare
-
 Raider Power Tools RD-EFH10 Manual de utilizare
-
 Raider Power Tools RD-EFH09 Manual de utilizare
-
 Raider Power Tools RD-GH40 Manual de utilizare


