EHEIM BEASTER180e Manualul proprietarului
- Categorie
- Curatatoare de inalta presiune
- Tip
- Manualul proprietarului

IT
MANUALE D’ISTRUZIONE - AVVERTENZE DI SICUREZZA
pag.
8
EN
INSTRUCTION MANUAL - SAFETY WARNINGS
pag.
14
FR
MANUEL D’INSTRUCTION - AVERTISSEMENTS DE SÉCURITÉ
page
20
DE
BEDIENUNGSANLEITUNG - SICHERHEITSANWEISUNGEN
Seite
26
ES
MANUAL DE INSTRUCCIONES - ADVERTENCIAS DE SEGURIDAD
pág.
32
NL
INSTRUCTIEHANDLEIDING - VEILIGHEIDSWAARSCHUWINGEN
blz.
38
PT
MANUAL DE INSTRUÇÕES - ADVERTÊNCIAS DE SEGURANÇA
pág.
44
CS
NÁVODU K POUŽÍVÁNÍ - BEZPEČNOSTNÍ NAŘÍZENÍ.
srt.
50
DA
INSTRUKTIONSMANUAL - SIKKERHEDSFORSKRIFTER
sd.
56
EL
ΕΓΧΕΙΡΙΙΟ ΟΗΓΙΝ - ΠΡΟΕΙΟΠΟΙΗΣΕΙΣ ΑΣΦΑΛΕΙΑΣ
σελ.
62
ET
JUHISED SEADME KASUTAMIST LÄBI. - OHUTUSNÕUDED
lk.
67
FI
OHJEKIRJA - TURVALLISUUSVAROITUKSET
sivu
72
HU
HASZNÁLATI KÉZIKÖNYV- BIZTONSÁGI FIGYELMEZTETÉSEK
old.
78
LT
NAUDOJIMA INSTRUKCIJAS SAUGOS NURODYMAI
psl.
83
LV
LIETOŠANAS ROKASGR MATU DROŠĪBAS BRĪDIN JUMI
Ipp.
88
MT
LISTRUZZJONIJIET L-UŻU - ATTENZJONI SIGURTÀ
paġ.
92
NO
BRUKSVEILEDNING - SIKKERHETSHÅNDBOKEN
side
97
PL
INSTRUKCJI OBSŁUGI - ZALECENIA DOTYCZĄCE BEZPIECZEŃSTWA
str.
102
RU
-
стр.
108
SK
NÁVOD NA POUŽITIE – BEZPEČNOSTNÉ UPOZORNENIA
str.
114
SL
PRIROČNIK Z NAVODILI – VARNOSTNA OPOZORILA
str.
119
SV
BRUKSANVISNING - SÄKERHETSANVISNINGAR
sid.
124
BG
–
стр.
129
HR
UPUTSTVA ZA KORIŠTENJE I ODRŽAVANJE-SIGURNOSNA UPOZORENJA
str.
135
RO
INSTRUCIUNILE DE FOLOSIRE AVERTISMENTE DE SIGURANTA
pag.
140
TR
KULLANIM KILAVUZU -GÜVENLIK UYARILARI
sf.
145
UK
стор
150
SR
Str.
155
163
167
صفحة
ﺔﻣﻼﺴﻠﻟ تاﺮﻳﺬﺤﺗ - ماﺪﺨﺘﺳﻼﻟ تﻴﻠﻌﺘﻟا
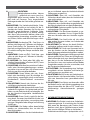
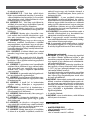
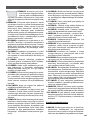
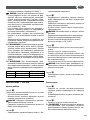
ATTENZIONE: leggere le
istruzioni prima dell’ utilizzo.
WARNING: read the instructions
carefully before use.
ATTENTION: lire attentivement
les istructions avant l’usage.
ACHTUNG: Die Anweisungen
bitte vor Gebrauch sorgfältig
lesen. ADVERTENCIA: leer
atentamente las advertencias antes
el uso de aparado. LET OP: vóór
gebruik de gebruiksaanwijzing
aandachtig lezen. ATENÇÃO:
ler atentamente as instruções
antes da utilização. POZOR:
před použitím si přečtěte návod
k obsluze. PAS PÅ! læs
instruktionsbogen før maskinen
tages i brug. ΠΡΟΣΟΧΗ:
διαβαστε τις οδηγιες πριν τη
χρηση. TÄHELEPANU: lugege
juhised enne seadme kasutamist
läbi. HUOMIO: lue ohjeet
ennen käyttöä. FIGYELEM:
használat előtt gyelmesen olvassa
el az utasításokat. DĖMESIO:
prieš naudojimą perskaitykite
instrukcijas. UZMANĪBU: pirms
lietošanas izlasiet rokasgr matu.
ATTENZJONI: aqra sew
listruzzjonijiet qabel l-użu.
ADVARSEL: les bruksanvisningen
før bruk. UWAGA: przed
użyciem przeczytać instrukcje.
ВНИМАНИЕ: перед
использованием прочитайте
инструкцию по эксплуатации.
UPOZORNENIE: pred použitím
zariadenia si prečítajte návod
na použitie. POZOR: pred
uporabo preberite navodila.
VIKTIGT! läs anvisningarna före
användning. ВНИМАНИЕ:
прочетете указанията преди
употреба. PAŽNJA: prije
upotrebe pročitajte upute.
ATENŢIE: citiţi instrucţiunile
înainte de folosire. DİKKAT:
makinayi kullanmadan önce
kullanim talimatlarini okuyunuz.
УВАГА: перед використанням
прочитайте інструкцію з
експлуатації. PAŽNJA: pre
upotrebe pročitajte uputstva.
ماﺪﺨﺘﺳﻻا ﻞﺒﻗ تﻴﻠﻌﺘﻟا أﺮﻗا :ﻪﻴﺒﻨﺗ

G
F
12A. 12B.
13A.
13B.
13C.
14.
15.
E
11A.
11B.
11C.
D
9.
15
30
45
60
8A.
8B.
8C.
1 min
A
B
C
IN IN
OUT
OUT
2A. 2B.
1A.
1B. 1C.
3A. 3B.
6.4. 5.
ON=
I
7.
5÷40°C
1/2 inch 13 mm
CLICK!
CLICK!
IN
CLICK
CLICK
2
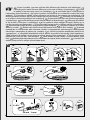
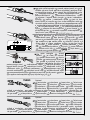
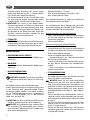
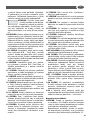
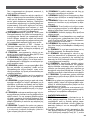
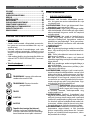
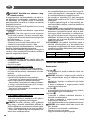
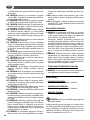
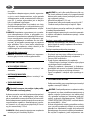
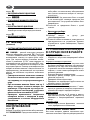
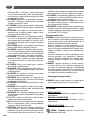
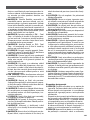
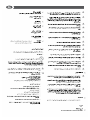
In base al modello si possono verificare delle differenze nella fornitura (vedi imballaggio).
Depending on the model, there are differences in the scopes of delivery (see packaging). Suivant
le modèle, la fourniture peut varier (voir l’emballage). Je nach Modell gibt es Unterschiede im
Lieferumfang (siehe Verpackung). Según el modelos, hay diferencias en el contenido suministrado (véase
embalaje). Consoante o modelo, existem diferenças no volume de fornecimento (ver embalagem).
Mallien varustetaso vaihtelee, katso kuvaus laatikon kyljestä (katso laatikon). Afhankelijk van het model zijn
er verschillen in de leveringspakketten (zie verpakking). Alt etter modell kan det være ulike leveringsomfang
(se emballasjen). Leveransomfånget varierar allt efter modell (se förpackningen). Afhængigt af modellen
er der forskelle i leveringen (se emballagen). Στο παραδοτέο υλικό υπάρχουν διαφορές ανάλογα με το
μοντέλο (ανατρέξτε στη συσκευασία). Ovisno o modelu postoje razlike u sadržaju isporuke (vidi ambalažu).
Glede na model prihaja do razlik v obsegu dobave (glejte embalažo). V závislosti na modelu se liší obsah
dodávky (viz obal). Modele bağlı olarak teslimat kapsamında farklar olabilir (Bkz. Ambalaj). В данном
руководстве по эксплуатации дано описание прибора с максимальной комплектацией. Комплектация
отличается в зависимости от модели (см. упаковку). A szállítási terjedelem modellenként eltérő (lásd a
csomagoláson) . Piegādātā komplektācija atšķiras atkarībā no putekļu sūcēja modeļa (skatīt iepakojumu).
W zależności od modelu istnieją różnice w zakresie dostawy (patrz opakowanie). În funcţie de model
pachetele de livrare pot diferi (vezi ambalajul). Podľa modelu existujú rozdiely v rozsahu dodávky (pozri
obal). В обема на доставка има разлики в зависимост от модела (вижте опаковката). U zavisnosti od
modela postoje razlike u sadržaju isporuke (види пакет).

G
F
12A. 12B.
13A.
13B.
13C.
14.
15.
E
11A.
11B.
11C.
D
9.
15
30
45
60
8A.
8B.
8C.
1 min
A
B
C
IN IN
OUT
OUT
2A. 2B.
1A.
1B. 1C.
3A. 3B.
6.4. 5.
ON=
I
7.
5÷40°C
1/2 inch 13 mm
CLICK!
CLICK!
IN
CLICK
CLICK
3

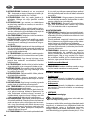
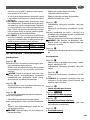
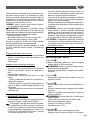
Click!
Click!
Click!
Click!
D
4
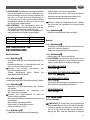
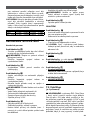
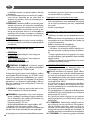
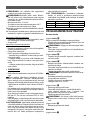
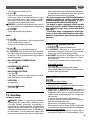
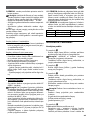
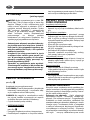
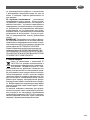
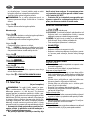
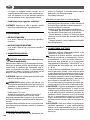
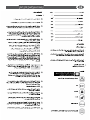
getto ventaglio spread pattern jet d’eau en eventail
großen Wasserstrahl chorro grandes waaiervormige
straal
jato grande vějířová tryska viftesprøjt
πιδακας βενταλια
waaiervormige straal viuhkamainen
suihku
vejárovitá prúdnica legyező alakú vízsugár
vėduoklinės čiurkšlės
vēdekļveida strūkla vifteformet
stråle
strumień wachlarzowy веерообразная струя
strumień wachlarzowy pahljačasti curek vode
solfjädersformad stråle
за ветрилообразна струя
mlaznica raspršivač
jet evantai jet fan струмінь
віялоподібний
sprej isključen
getto spillo/ventaglio spread pattern/pencil jet jet
variable
vario Duese chorro regulable dunne straal/
waaiervormige straal
jato variavel vějířová/přímá tryska
nålesprøjt/viftesprøjt πιδακας καρφιτσα/βενταλια
peenjoa/lehvikotsik
pistemäinen/viuhkamainen suihku
egyenes / legyező alakú vízsugár tiesios/ vėduoklinės
čiurkšlės
parasta / vēdekļveida strūkla ġett ta’ ilma
dirett/f’forma ta’ mrewħa
tynn stråle/vifteformet stråle
strumień szpilka/wachlarz
точечная/ веерообразная струя.
vejárovitá/priama prúdnica i glasti/pahljačasti curek vode
nål-/solfjädersformad stråle за права/ветрилообразна
струя
mlaznica-ni mlaz/raspršivač jet ac/ evantai jet
püskürtme/jet fan
точковий струмінь/ віялоподібний
sprej čvrsto / sprej isključen
H

Click!
Click!
Click!
Click!
D
5
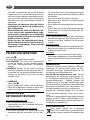
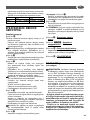
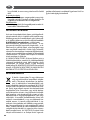
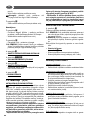
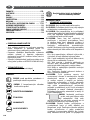
lancia turbo turbo lance lance turbo Turbo Lanze
lanza turbo turbo lans jturbo lança tryska turbo
turbolanse εκτοξευτηρας turbo turbo suihkuputki
turbo-lanse lanca turbo насадка турбо turbo
pištola
turbolans турбо струйник turbo mlaznica lance turbo turbo lans
turbootsik
szennymaró lándzsa turbo antgalis turbo smidzinātājs parti ta’ quddiem
tal-gan turbo
turbo prúdnica турбо-насадка Mlaznica visokog pritiska Turbo
parti ta’ quddiem
getto ventaglio spread
pattern
jet d’eau en eventail
großen Wasserstrahl chorro
grandes
waaiervormige straal
jato grande
vějířová tryska
viftesprøjt
πιδακας βενταλια
waaiervormige straal
viuhkamainen suihku vejárovitá prúdnica
legyező alakú vízsugár
vėduoklinės čiurkšlės vēdekļveida strūkla
vifteformet stråle
strumień wachlarzowy веерообразная струя
strumień wachlarzowy
pahljačasti curek vode solfjädersformad stråle
за ветрилообразна струя mlaznica raspršivač jet evantai jet fan
струмінь віялоподібний sprej isključen
getto spillo/ventaglio spread pattern/pencil jet jet
variable
vario Duese chorro regulable dunne straal/
waaiervormige straal
jato variavel vějířová/přímá tryska
nålesprøjt/viftesprøjt πιδακας καρφιτσα/βενταλια
peenjoa/lehvikotsik
pistemäinen/viuhkamainen suihku
egyenes / legyező alakú vízsugár tiesios/ vėduoklinės
čiurkšlės
parasta / vēdekļveida strūkla ġett ta’ ilma
dirett/f’forma ta’ mrewħa
tynn stråle/vifteformet stråle
strumień szpilka/wachlarz
точечная/ веерообразная струя.
vejárovitá/priama prúdnica i glasti/pahljačasti curek vode
nål-/solfjädersformad stråle за права/ветрилообразна
струя
mlaznica-ni mlaz/raspršivač jet ac/ evantai jet
püskürtme/jet fan
точковий струмінь/ віялоподібний
sprej čvrsto / sprej isključen
bassa pressione low pressure basse pression
nieder-druck-Lanze
baja presión lage druk baixa
pressao
nízkotlaká tryska lavt tryk χαμηλη πιεση
madalsurve matala paine alacsony nyomás
žemas slėgis
zema spiediena strūkla pressjoni baxxa
lavtrykk niskie ciśnienie низкое давление nizki
tlak
nízkotlaková prúdnica låg tryck ниско налягане
mlaznica-niski tlak joasă presiune alçak basinç
низький тиск
nizak pritiska
joasă presiune
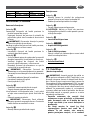
Optional
Optional
TURBO
TURBO

6
M
2. 1.
1.
2.
3.
Optional
Optional
CLICK!
CLICK!
Optional
I
J
K
3A.
3B.
3D.
4D.
CLICK!
4B.
4A.
CLICK!
4C.3C.
OFF
1. 2. 3. 4.
N
1A. 1B.
2.
3.
Optional
Optional
P
4.
.1
L
2B. 3B.
2A. 3A.
3C. 3C.
Optional
1.
2.
3.
4. 5.

7
M
2. 1.
1.
2.
3.
Optional
Optional
CLICK!
CLICK!
Optional
I
J
K
3A.
3B.
3D.
4D.
CLICK!
4B.
4A.
CLICK!
4C.3C.
OFF
1. 2. 3. 4.
N
1A. 1B.
2.
3.
Optional
Optional
P
4.
.1
L
2B. 3B.
2A. 3A.
3C. 3C.
Optional
1.
2.
3.
4. 5.
OPTIONAL

Istruzioni originali. Per favore fare riferimento al nostro sito web
www.lavorservice.com
IT
8
INTRODUZIONE
> UTILIZZO PREVISTO
•
L’apparecchio può essere usato per il lavaggio
di superci in ambienti esterni, ogni qualvolta
si richieda l’uso di acqua in pressione per
eliminare lo sporco.
- Con opportuni accessori opzionali si possono
svolgere lavori di schiumatura, sabbiatura e
lavaggi con spazzola rotativa da applicare alla
pistola.
- Le prestazioni e la semplicità d’uso
dell’apparecchio sono idonee ad un utilizzo
NON PROFESSIONALE.
> DATI TECNICI
(vedi targhetta dati tecnici)
SIMBOLI
ATTENZIONE: leggere le istruzioni
prima dell’ utilizzo.
ATTENZIONE! Prestare attenzione
per motivi di sicurezza.
IMPORTANTE
BLOCCATO
APERTO
SE PRESENTE (vedi imballo)
Doppio isolamento (SE PRESENTE): è una
protezione supplementare
dell’isolamento elettrico.
SICUREZZA
> AVVERTENZE GENERALI
01 ATTENZIONE: Apparecchio da utilizzare
solo all’aperto.
02 ATTENZIONE: Alla ne di ogni lavoro, scol-
legare sempre il collegamento elettrico e idri-
co.
03 ATTENZIONE: Non usare l’apparecchio se il
cavo elettrico o parti importanti dell’apparec-
chio risultano danneggiate, es. dispositivi di
sicurezza, tubo alta pressione pistola ecc.
04 ATTENZIONE: Questo apparecchio è stato
progettato per essere utilizzato con il deter-
gente fornito o prescritto dal costruttore, tipo
shampoo detergente neutro a base di tensio-
attivi biodegradabili anionici. L’impiego di altri
detergenti o sostanze chimiche può compro-
mettere la sicurezza dell’apparecchio.
05a ATTENZIONE: Non utilizzare l’apparec-
chio in prossimità di persone, salvo il caso in
cui queste indossino abiti protettivi.
05b - durante il lavoro non ammettete la pre
-
senza di persone o animali entro un raggio di 5
metri.
05c - operate sempre con abbigliamento ade
-
guato per proteggersi contro l’eventuale rim-
balzo di materiale asportato dal getto d’acqua
ad alta pressione.
05d - non toccare la spina elettrica e l’apparec
-
chio con le mani bagnate e a piedi nudi.
05e - indossate eventualmente occhiali di pro-
tezione e calzature con suola in gomma.
06 ATTENZIONE: Il getto della lancia non deve
essere indirizzato verso parti meccaniche con-
tenenti grasso lubricante: in caso contrario il
grasso verrà disciolto e disperso sul terreno. I
pneumatici e le valvole d’aria dei pneumatici
devono essere lavati mantenendo una distanza
minima di 30 cm; in caso contrario essi potreb
-
bero essere danneggiati dal getto d’acqua alta
pressione. Il primo segno di tale danneggia-
mento è dato dallo sbiadimento del pneuma-
tico. Pneumatici e valvole d’aria dei pneumatici
danneggiati sono pericolosi per la vita.
INDICE .........................................................................PAG
ILLUSTRAZIONI ............................................................... 2
INTRODUZIONE .............................................................. 8
SIMBOLI .......................................................................... 8
SICUREZZA ..................................................................... 8
USO ................................................................................. 10
INSTALLAZIONE / AVVIAMENTO ................................ 11
CURA E MANUTENZIONE ............................................. 12
RIMEDI IN CASO DI MALFUNZIONAMENTO ............. 12
CONDIZIONI DI GARANZIA ......................................... 12
SMALTIMENTO .............................................................. 13

IT
9
07ATTENZIONE: I getti ad alta
pressione possono essere peri-
colosi se usati impropriamente.
I getti non devono essere diretti verso le perso-
ne, gli animali, verso le apparecchiature elettri-
che vive oppure verso l’apparecchio stesso.
08 ATTENZIONE: I tubi essibili, gli accessori e
i raccordi per l’alta pressione, sono importan-
ti per la sicurezza dell’apparecchio. Utilizzare
solamente tubi essibili, accessori e raccordi
prescritti dal costruttore (è estremamente im
-
portante preservare l’integrità di questi com-
ponenti evitandone un uso improprio e preve-
nendoli da pieghe, urti, abrasioni).
09ATTENZIONE: Apparecchi non dotati di T.S.
– Total Stop : non devono rimanere in funzione
per più di 2 minuti a pistola rilasciata. L’acqua ri
-
ciclata aumenta notevolmente di temperatura
provocando gravi danni alla pompa.
10ATTENZIONE: Apparecchi dotati di T.S.–
Total Stop : è buona norma non lasciarli in
stand-by per più di 5 minuti.
11 ATTENZIONE: Spegnere completamente
l’apparecchio (interruttore generale in posizio-
ne (0)OFF) ogni qualvolta lo si lascia incustodi-
to.
12 ATTENZIONE: Ogni macchina viene col-
laudata nelle sue condizioni d’uso, per cui è
normale che alcune gocce d’acqua rimangano
presenti al suo interno.
13 ATTENZIONE: Fare attenzione a non dan-
neggiare il cavo elettrico. Se il cavo di alimen-
tazione è danneggiato deve essere sostituito
dal costruttore oppure dal servizio assistenza,
oppure da personale qualicato al ne di evita
-
re situazioni di pericolo.
13b ATTENZIONE: Non tirare mai o alzare
l’apparecchio utilizzando il cavo elettrico.
14 ATTENZIONE: Macchina con uido in pres-
sione. Impugnare la pistola saldamente per
prevenire la forza di reazione. Utilizzare solo
l’ugello di alta pressione in dotazione alla mac
-
china.
16 ATTENZIONE: l'utilizzo di questa mac-
china non è previsto per persone (bambini
inclusi) con ridotte capacità siche, sensoria-
li, mentali o mancanza di esperienza e cono-
scenza.
17 ATTENZIONE
: I bambini devono essere
sorvegliati per assicurarsi che non giochino
con l'apparecchio.
18 ATTENZIONE: Non mettere in funzione
l’idropulitrice prima di aver srotolato il tubo ad
alta pressione.
19 ATTENZIONE: Avvolgere e svolgere il tubo
avendo cura di non causare il ribaltamento
dell’idropulitrice.
20 ATTENZIONE: Quando si svolge o avvolge
il tubo, la macchina deve essere spenta ed il
tubo scarico dalla pressione (fuori servizio).
21 ATTENZIONE: Rischio di esplosione. Non
spruzzare liquidi inammabili.
22 ATTENZIONE: Per garantire la sicurezza
della macchina, usare solo pezzi di ricambio
originali presso il produttore o approvati dal
fabbricante.
23 ATTENZIONE: Non dirigere il getto verso
se stessi oppure verso altre persone per pulire
abiti o scarpe.
24
ATTENZIONE:
L'acqua che è passata attra-
verso i dispositivi antiriusso è considerata non
potabile.
XX
25
ATTENZIONE
:
Scollegare l'apparec-
chio dalla rete elettrica, staccando la spina
dalla presa elettrica, prima di eettuare
qualsiasi intervento di manutenzione e pulizia.
26 ATTENZIONE: Se i cavi non sono sucien-
temente lunghi, possono insorgere dei pericoli.
Se viene utilizzato un cavo di prolunga, assicu-
rarsi che sia adatto per l’uso all’esterno e il col-
legamento deve restare asciutto e lontano da
terra. A tal ne, si consiglia l’utilizzo di un rullo
avvolgicavo che mantenga la presa elettrica a
una distanza da terra non inferiore a 60 mm.
27 ATTENZIONE: Se viene utilizzata una pro-
lunga, la spina e la presa dovranno essere im-
permeabili all’acqua .
28 ATTENZIONE:Durante l’uso di idropulitrici
ad alta pressione possono formarsi degli aero-
sol. L’inalazione di aerosol può essere pericolo-
sa per la salute.
29 ATTENZIONE: A seconda dell'applicazio-
ne, è possibile utilizzare ugelli schermati per
la pulizia ad alta pressione, che ridurranno dra-
sticamente le emissioni di aerosol idrati. Tutta-
via, non tutte le applicazioni consentono l'uso
di tale dispositivo. Se gli ugelli schermati non
sono applicabili per la protezione dagli aero-
sol, potrebbe essere necessaria una maschera
respiratoria di classe FFP 2 o equivalente, a se-
conda dell'ambiente di pulizia.
> DISPOSITIVI DI SICUREZZA
ATTENZIONE:
La pistola è dotata di un fermo

IT
10
di sicurezza. Ogni qualvolta si interrompe l’uso
della macchina è importante azionare il fermo
di sicurezza per evitare aperture accidentali.
- Dispositivi di sicurezza: pistola dotata di fermo
di sicurezza, macchina dotata di protezione da
sovraccarichi elettrici (CL. I), pompa dotata di
valvola di by-pass o dispositivo di arresto.
- Il pulsante di sicurezza della pistola non serve al
bloccaggio della leva durante il funzionamento,
ma per evitarne aperture accidentali.
ATTENZIONE:
L'apparecchio è dotato di un
dispositivo di protezione motore: in caso di
intervento del dispositivo attendere qualche
minuto o in alternativa scollegare e ricollegare
l'apparecchio alla rete elettrica. In caso del
ripetersi del problema o della mancata
riaccensione, portare l'apparecchio presso il
più vicino Centro Assistenza,
> STABILITÀ
ATTENZIONE:
La macchina deve essere
sempre mantenuta su una base orizzontale, in
modo sicuro e stabile.
USO
> DESCRIZIONE DELL'APPARECCHIO
Vedere il "manuale delle istruzioni speciche"
fornito in dotazione.
> MONTAGGIO DELL'APPARECCHIO
Vedere il "manuale delle istruzioni speciche"
fornito in dotazione.
> ALIMENTAZIONE IDRICA
Collegamento idrico
ATTENZIONE (simbolo):
apparecchio non
adatto al collegamento alla rete dell'acqua po-
tabile.
L’idropulitrice può essere collegata diretta-
mente alla rete di distribuzione dell’acqua PO-
TABILE solamente se nella tubazione di alimen-
tazione è installato un dispositivo antiriusso
con svuotamento conforme alle normative
vigenti.
Assicurarsi che il tubo sia almeno Ø 13mm - 1/2
inch e che sia rinforzato, 5-25 m.
ATTENZIONE:
L'acqua che è passata attraver-
so i dispositivi antiriusso è considerata non
potabile.
IMPORTANTE: Aspirare solamente acqua
ltrata o pulita. Il rubinetto di prelievo acqua
deve garantire una erogazione pari al doppio
della portata massima della pompa.
- Portata minima: 15 l/ min.
- Temperatura massima dell’acqua in ingresso:
40°C
- Pressione massima dell’acqua in ingresso:
1Mpa
Collocare l’idropulitrice il più vicino possibile
alla rete idrica di approvvigionamento.
La non osservanza delle suddette condizioni
provoca gravi danni meccanici alla pompa non-
ché il decadimento della garanzia.
Alimentazione dalla conduttura dell’acqua
- Collegare un tubo essibile di alimentazione
(non compreso nella fornitura) al raccordo per
l’acqua dell’apparecchio ed all’alimentazione
dell’acqua.
- Aprire il rubinetto.
Alimentazione dell’acqua da un serbatoio
aperto
- Svitare il raccordo per l’alimentazione dell’ac-
qua.
- Avvitare il tubo di aspirazione con ltro (non
compreso nella fornitura) al raccordo per l’ac-
qua dell’apparecchio.
- Immergere il ltro nel serbatoio.
- Satare l’apparecchio prima dell’uso.
- Svitare il tubo essibile ad alta pressione dal
raccordo dell’alta pressione dell’apparecchio.
- Accendere l’apparecchio e farlo funzionare n
-
ché l’acqua esce priva di bolle dal raccordo ad
alta pressione.
- Spegnere l’apparecchio e riavvitare il tubo es-
sibile ad alta pressione.
> ALIMENTAZIONE ELETTRICA
- Il collegamento elettrico dell’apparecchio deve
essere conforme alla norma IEC 60364-1.
IMPORTANTE Prima di collegare l’apparec-
chio, accertarsi che i dati di targa siano corri-

IT
11
spondenti a quelli della rete elettrica e che la
presa sia protetta con un interruttore magne-
totermico dierenziale “SALVAVITA” con sensi-
bilità di intervento inferiore a 0,03 A - 30ms.
- In casi di incompatibilità tra la presa e la spina
dell’apparecchio, fare sostituire la presa con
altra di tipo adatto da personale professional-
mente qualicato.
- Non utilizzare l’apparecchio in caso di tempe-
ratura ambiente inferiore a 0°C, se esso è equi-
paggiato con cavo in PVC (H VV-F).
- Nessuna azione è necessaria per la regolazione
di macchine contrassegnate con doppio vol-
taggio e frequenza.
26 ATTENZIONE: Se i cavi non sono sucien-
temente lunghi, possono insorgere dei pericoli.
Se viene utilizzato un cavo di prolunga, assicu-
rarsi che sia adatto per l’uso all’esterno e il col-
legamento deve restare asciutto e lontano da
terra. A tal ne, si consiglia l’utilizzo di un rullo
avvolgicavo che mantenga la presa elettrica a
una distanza da terra non inferiore a 60 mm.
27
ATTENZIONE:
Se viene utilizzata una
prolunga, la spina e la presa dovranno essere
impermeabili all’acqua e il cavo deve avere le
dimensioni indicate nella tabella sottostante.
<16 A <25 A
<20 m ø 1,5 mm
2
- 14 AWG ø 2,5 mm
2
- 12 AWG
20 m - 50 m ø 2,5 mm
2
- 12 AWG ø 4,0 mm
2
- 10 AWG
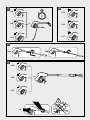
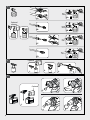
INSTALLAZIONE / AVVIAMENTO
Vedere g.
A
Collegare il tubo alta pressione alla
pistola a spruzzo
- Introdurre il tubo di alta pressione alla pistola a
spruzzo no al suo aggancio.
IMPORTANTE Vericare la corretta posizione
del nipplo di raccordo.
Accertarsi del corretto aggancio tirando il tubo
essibile di alta pressione.
Vedere g.
B
- Introdurre il tubo di alta pressione nel giunto
rapido.
Vedere g.
C
- Avvitare il giunto fornito sul collegamento
acqua dell'apparecchio.
- Inlare il tubo da giardino di mandata
dell'acqua sul giunto dell'attacco d'acqua.
IMPORTANTE Il tubo da giardino di
alimentazione non è in dotazione.
- Collegare il tubo da giardino all'alimentazione
idrica.
- Aprire completamente il rubinetto.
- Inserire la spina in una presa elettrica.
- Accendere l'apparecchio „I/ON“.
Vedere g.
D
- Sbloccare la leva della pistola a spruzzo.
- Tirare la leva e l'apparecchio si attiva.
- Fare funzionare l'apparecchio (max. 1 minuto),
nché l’acqua fuoriesce priva di bolle d’aria
dalla pistola a spruzzo manuale.
- Rilasciare la leva della pistola a spruzzo.
IMPORTANTE Quando si rilascia la leva,
l'apparecchio si spegne. L’alta pressione nel
sistema resta invariata.
Vedere g.
E
- Bloccare la leva della pistola a spruzzo.
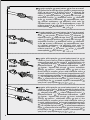
Funzionamento
Vedere g.
F
- Inserire la lancia sulla pistola a spruzzo e ssarla
con una rotazione di 90°.
- Sbloccare la leva della pistola a spruzzo.
Vedere g.
G
- Tirare la leva e l'apparecchio si attiva.
14 ATTENZIONE: Macchina con uido in pres-
sione. Impugnare la pistola saldamente per
prevenire la forza di reazione.
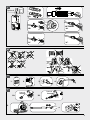
Vedere gura
H
> LANCE ALTA PRESSIONE
Vedere sequenza gura
IJKL
> ASPIRAZIONE DETERGENTE
Vedere g.
M
> TUBO ALTA PRESSIONE
Usare l’idropulitrice solo se il tubo è completa-
mente disteso.
Vedere g.
N
> FINE LAVORO

IT
12
T.S.
Total Stop
(se presente)
IMPORTANTE: (Total Stop ), il quale provvede
a spegnere l’idropulitrice durante la fase di
by-pass. Per avviare l’idropulitrice è perciò
necessario posizionare l’interruttore su
(I)“ON” quindi premere la leva della pistola,
l’T.S. provvederà ad avviare l’apparecchio
rispegnendolo automaticamente qualora
venga rilasciata la leva. Si consiglia perciò di
inserire la sicura posta sulla leva della pistola
ogni qualvolta si fermi la macchina, per evitare
accensioni accidentali.
· Spontanei avviamenti della macchina senza
intervenire sulla pistola sono imputabili
a fenomeni quali bolle d’aria nell’acqua o
altro e non a difettosità del prodotto.
· Non lasciare la macchina in stand-by senza
sorveglianza per più di 5 minuti. In caso
contrario è necessario, per la protezione
della macchina, riportare l’interruttore in
posizione (0)“OFF”.
· Vericare che l’accoppiamento del tubo alta
pressione con la macchina e con la pistola in
dotazione sia correttamente eseguito, vale
a dire senza perdita d’acqua.
CURA E MANUTENZIONE
Vedere g.
P
L'apparecchio non richiede manutenzione.
25 ATTENZIONE: Scollegare l'apparecchio
dalla rete elettrica, staccando la spina dalla
presa elettrica , prima di eettuare qualsiasi
intervento di manutenzione e pulizia.
ATTENZIONE Non spruzzare la macchina
con acqua e non usare detergenti o solventi
aggressivi. La macchina si potrebbe
danneggiare.
- Pulire la parte esterna della macchina con uno
straccio asciutto.
> STOCCAGGIO
Vedere g.
P
- Spostare l'apparecchio solo aerrando la
maniglia di trasporto
- Conservare l'apparecchio e gli accessori in un
luogo asciutto e sicuro, fuori dalla portata dei
bambini.
RIMEDI IN CASO DI
MALFUNZIONAMENTO
L'apparecchio non funziona
- Controllare la tensione di rete.
- Accertare eventuali danni al cavo di
alimentazione.
L'apparecchio non va in pressione
- Satare l'apparecchio: fare funzionare la pompa
senza il tubo ad alta pressione, nché l'acqua
esce senza bolle dall'uscita dell'alta pressione.
Riattaccare poi il tubo ad alta pressione.
- Pulire il ltro nell'attacco dell'acqua.
- Pulire il ltro nell'attacco del tubo alta pressione
(se presente).
- Controllare la quantità di alimentazione
dell'acqua.
- Accertare la tenuta o eventuali intasamenti in
tutti i tubi di alimentazione della pompa.
Forti oscillazioni di pressione
- Pulite l'ugello ad alta pressione. Con uno
spillo, togliete la sporcizia dal foro dell'ugello e
lavatelo dalla parte anteriore con acqua.
La pompa perde
- Sono ammesse no a 10 gocce al minuto. In
caso di perdita maggiore rivolgersi al servizio
assistenza autorizzato.
Ricambi
- Utilizzare esclusivamente ricambi originali
oppure ricambi approvati dal costruttore.
CONDIZIONI DI GARANZIA
Tutti i nostri apparecchi sono stati sottoposti ad ac-
curati collaudi e sono coperti da garanzia da difetti
di fabbricazione in conformità alle normative vigenti
applicabili nei vari Paesi.
La garanzia decorre dalla data di acquisto.
Sono esclusi dalla garanzia: le parti soggette a nor-
male usura, le parti in gomma, spazzole di carbone,
i ltri, gli accessori e gli optional; i danni accidentali,
per trasporto, per incuria o inadeguato trattamento,
per uso ed installazione errati o impropri.
La garanzia non contempla la pulizia degli organi
funzionanti, delle incrostazioni, dei ltri e ugelli in

IT
13
genere.
La macchina è destinata esclusivamente ad un uso
hobbystico e NON PROFESSIONALE:
La garanzia non copre l'uso diverso da quello priva-
to.
SMALTIMENTO
Quale proprietario di un apparecchio elettri-
co o elettronico, la legge (conformemente
alla direttiva EU 2012/19/EU sui riuti da ap-
parecchiature elettriche ed elettroniche e
alle legislazioni nazionali degli Stati membri UE che
hanno messo in atto tale direttiva) le vieta di smaltire
questo prodotto o i suoi accessori elettrici / elettro-
nici come riuto domestico solido urbano e le impo-
ne invece di smaltirlo negli appositi centri di raccol-
ta. E’ possibile smaltire il prodotto direttamente dal
distributore mediante l’acquisto di un prodotto nuo-
vo, equivalente a quello da smaltire. Abbandonando
il prodotto nell’ambiente si potrebbero creare gravi
danni all’ambiente stesso e alla salute umana.
Il simbolo in gura rappresenta il bidone dei riuti
urbani ed è tassativamente vietato riporre l’appa-
recchio in questi contenitori. La non ottemperanza
alle indicazioni della direttiva 2012/19/EU e ai decreti
attuativi dei vari Stati comunitari è sanzionabile am-
ministrativamente.

Translation of the original instructions. Please refer to our website at www.lavorservice.com
EN
14
supplementary insulation is applied to the basic
insulation to protect against electric shock in the
event of failure of the basic insulation.
SAFETY PRECAUTIONS
> WARNINGS
01WARNING: This appliance is for outdoor use
only.
02WARNING: Always disconnect the electricity
and water supplies on completion of every job.
03WARNING: Do not use the machine if a supply
cord or important parts of the machine are dam
-
aged, e.g. safety devices, high pressure hoses,
trigger gun.
04WARNING: This appliance has been designed
for use with the detergent provided or the de-
tergent specied by the manufacturer, such as a
neutral shampoo based on biodegradable ani-
onic surface active detergents. The use of other
detergents or chemicals may put the appliance’s
safety at risk.
05a WARNING: Do not use the machine within
range of persons unless they wear protective
clothing.
05b - Do not allow other people or animals within
a range of 5m when operating the machine.
05c - Always wear suitable protective clothing
in order to protect yourself against ricocheting
parts.
05d - Do not touch the plug and the appliance
with wet hands or when barefoot.
05e - Wear safety goggles and non-slip rubber
footwear.
06WARNING: Do not direct the nozzle toward
mechanical parts containing lubricant grease, as
the grease will dissolve and spread over the sur-
rounding ground. Vehicle tyres/tyre valves may
only be cleaned from a minimum distance of 30
cm, otherwise the vehicle tyre/tyre valve could
be damaged by the high-pressure jet. The rst
indication of this is a discoloration of the tyre.
Damaged vehicle tyres/tyre valves can be deadly
dangerous.
07WARNING: High pressure jets
can be dangerous if subject to
misuse. The jet must not be di-
rected at persons, animal, live electrical equip-
ment or the machine itself.
08WARNING: High pressure hoses, ttings
GENERAL INFORMATION
> INTENDED USE
- The appliance can be used for washing surfaces
outdoors, whenever pressurised water is required
to remove dirt.
- With special optional accessories, it can be used
for foaming and sandingblasting, and for washing
with a rotary brush for application to the gun.
- This appliance’s performance and userfriendliness
make it suitable for NON PROFESSIONAL use.
> TECHNICAL DATA
(see technical data plate)
SYMBOLS
WARNING:
read the instructions
carefully before use.
CAUTION! It is important to be careful of
the following items.
IMPORTANT
LOCKED
OPEN
IF PRESENT
Double insulated (IF PRESENT):
INDEX .........................................................................PAG.
PICTURES ......................................................................... 2
GENERAL INFORMATION............................................. 14
SYMBOLS ....................................................................... 14
SAFETY PRECAUTIONS ................................................ 14
USAGE ............................................................................ 16
PUT INTO SERVICE / STARTING UP ............................. 17
CARE AND MAINTENANCE .......................................... 18
TROUBLESHOOTING .................................................... 18
WARRANTY CONDITIONS ............................................ 18
DISPOSAL WEEE ........................................................ 19

EN
15
and couplings are important for the safety
of the machine. Use only hoses, ttings and
couplings recommended by the manufacturer.
(it is extremely important to protect these
components against damage by avoiding their
improper use and protecting them against
bending, knocks and scratches).
09WARNING: Appliances not equipped with
T.S. – Total Stop : must not be left in operation for
more than 2 minutes with the gun released. The
recycled water heats up considerably, seriously
damaging the pump.
10WARNING: Appliances equipped with T.S.–
Total Stop : these appliances should not be left in
standby for more than 5 minutes.
11WARNING: Switch the appliance o com
-
pletely (master switch on (0)OFF) whenever it is
left unattended.
12WARNING: Every machine is tested in its oper-
ating conditions, so it is normal for a few drops of
water to be left inside it.
13WARNING: Take care not damage the electric
cable. If the supply cord is damaged, it must be
replaced by the manufacturer, its service agent or
similarly qualied persons in order to avoid a haz
-
ard
13b WARNING: The power cord should not be
used to pull or lift the machine.
14WARNING: Appliance with uid under pres-
sure. Keep a rm hold on the gun and be pre-
pared to take the kickback pressure. Only use the
high pressure nozzle provided with the appli-
ance.
16WARNING: This appliance is not intended for
use by persons (including children) with reduced
physical, sensory or mental capabilities, or lack of
experience and knowledge.
17WARNING: Children should be supervised to
ensure that they do not play with the appliance.
18WARNING: Never start the high-pressure
cleaner without rst completely unwinding the
high-pressure hose.
19WARNING: When winding and unwinding the
pipe take care not to cause the high-pressure
cleaner to overturn.
20WARNING: Before unwinding or winding the
hose, switch the machine o and release the
pressure in the hose itself (switching o).
21WARNING: Risk of explosion — Do not spray
ammable liquids.
22WARNING: To ensure machine safety, use only
original spare parts from the manufacturer or ap-
proved by the manufacturer.
23WARNING: Do not direct the jet against your-
self or others in order to clean clothes or foot-
wear.
24 WARNING: Water that has own through
backow preventers is considered to be non-
potable.
25 WARNING: machine must be disconnected
from its power source during cleaning or main-
tenance and when replacing parts or when con-
verting the machine to another function.
26 WARNING: Improper extension cables can be
dangerous. If an extension cord is used, it must
be suitable for outdoor use, and the connection
must be kept dry and clear of the ground. It is
recommended that this be done using a cable
reel that holds the plug at least 60 mm from the
ground.
27 WARNING: If an extension cord is used, the
plug and socket must be of watertight construc-
tion.
28 WARNING: During the use of high pressure
cleaners, aerosols may form. Inhalation of aero-
sols can be dangerous to health.
29 WARNING: Depending on the application,
shielded nozzles can be used for high pressure
cleaning, which will drastically reduce the emis-
sion of hydrated aerosols. However, not all ap-
plications allow the use of such a device. If the
armored nozzles are not applicable for aerosol
protection, a respiratory mask of class FFP 2 or
equivalent may be necessary, depending on the
cleaning environment.
> SAFETY DEVICE
WARNING: the gun is tted with a safety catch.
Whenever use of the machine is interrupted it is
important to operate the safety catch to prevent
accidental activation of the jet.
- Safety features: gun equipped with safety locking
device, appliance equipped with (Class I) over-
load cutout, pump equipped with by-pass valve
or shutdown device.
- The safety button on the gun is not there to lock
the lever during operation, but to prevent its ac-
cidental operation.
WARNING: The appliance is equipped with a mo-
tor protection device: in case of device interven-
tion, wait some minutes or, in alternative, discon-
nect and re-connect the product to the electric

EN
16
system. In case this problem repeats again or if
the product does not start again, take the product
to the nearest After Sales Service Point
> STABILITY
WARNING: The machine must be always kept on hori-
zontal bases, in a safe and stable way.
USAGE
> DESCRIPTION OF THE MACHINE
See the specic instructions manual provided.
> ASSEMBLY INSTRUCTIONS
See the specic instructions manual provided.
> WATER SUPPLY
Water supply collection
Water supply from the water main
- Connect a supply hose (not included) to the water
inlet of the unit and to the water supply.
- Open the water supply.
WARNING: (symbol) machine not suitable for
connection to the potable water mains.
The cleaner can only be connected to the water
mains if the water mains is separated by a back-
ow preventer. Make sure that the hose is at least Ø
13mm-1/2 inch and that it is reinforced,
5-25 m
.
WARNING: Water that has own through
backow preventers is considered to be
nonpotable.
IMPORTANT: Only clean or ltered water should
be used for intake. The delivery of the water
intake tap should be equal to the double of the
maximum pump range.
- Minimum delivery rate: 15 l/ min.
- Maximum intake water temperature: 40°C
- Max inlet water pressure: 1Mpa
Place the cleaner as close to the water supply system
as possible.
Water supply from an open container
- Unscrew the coupling part for the water inlet.
- Screw the suction hose with lter (not included)
onto the water connection of the unit.
- Hang the lter in the container.
- Vent the unit before operation.
- Unscrew the high-pressure line at the high-
pressure outlet of the unit.
- Switch on the unit and let it run until water free of
bubbles emerges at the high-pressure outlet.
- Switch o the unit and screw on the high-pressure
hose again.
Failure to comply with the above conditions causes
serious mechanical damage to the pump and the
loss of warranty cover.
> ELECTRICITY SUPPLY
- The appliance’s electrical connection must
comply with the IEC 60364-1 standard.
IMPORTANT: Before connecting the
appliance, make sure that the nameplate data are
the same as those of the electrical mains and that
the socket is protected by a dierential security
breaker with tripping sensitivity below 0.03 A - 30
ms.
- If the appliance’s plug is not compatible with the
socket, have the socket replaced with another of
suitable type by professionally qualied sta.
- Never use the appliance in ambient temperatures
below 0° C if it is equipped with a PVC (H VV-F)
cable.
- No actions needed for adjusting machines
marked with dual voltage and frequency.
26 WARNING: Improper extension cables can be
dangerous. If an extension cord is used, it must
be suitable for outdoor use, and the connection
must be kept dry and clear of the ground. It is
recommended that this be done using a cable
reel that holds the plug at least 60 mm from the
ground.
27 WARNING: If an extension cord is used,
the plug and socket must be of watertight
construction.
Information for supply may also be obtained
from the plug manufacturer.
<16 A <25 A
<20 m ø 1,5 mm
2
- 14 AWG ø 2,5 mm
2
- 12 AWG
20 m - 50 m ø 2,5 mm
2
- 12 AWG ø 4,0 mm
2
- 10 AWG
> PLUG
HOW TO CONNECT THE CORD TO A U.K. PLUG:
IMPORTANT The wires in the mains lead are
coloured in accordance with the following code:
Blue Neutral
Brown Live
Yellow/Green Earth
Please read the instructions given below before con
-
necting the cord to a plug. If in doubt please consult

EN
17
a qualied electrician. As the colours of the wires in
the mains lead of this appliance may not correspond
with the coloured markings identifying the termi-
nals in your plug, proceed as follows:
The wires that is coloured Brown must be connected
to the terminal which is marked with the letter L or
coloured Red. The wire that is coloured Blue must be
connected to the terminal which is marked with the
letter N or coloured Black.
Safety points for rewireable or moulded plug:
The mains lead of this appliance may be already
tted with a BS1363 13A plug.
- If your socket outlet is not suitable for the plug,
then the plug must be removed (cut o if it is a
moulded on plug), the exible cord insulation
should be stripped back as appropriate and a
suitable 3 pin plug tted.
WARNING: Dispose
of a plug that has
been cut from
the power supply
cord, as such a
plug is hazardous
if inserted in a live
13A socket outlet
elsewhere in the
house.
- Should the fuse
need to be replaced
an ASTA marked fuse, approved to BS1362, of the
same rating must be used.
- Always replace the fuse cover after tting a fuse.
The plug must NOT be used if the cover is omitted
or lost until a replacement is obtained.
- Make certain that only the correct fuse cover is
used and tted.
- For plugs with detachable fuse cover the
replacement must be the same as the colour
insert in the base of the plug, or as directed by the
embossed wording on the base of the plug.
- If the detachable fuse cover is lost a replacement
may be purchased from a Service Centre.
PUT INTO SERVICE / STARTING
UP
See g. A
- Connect the high pressure hose to the trigger gun.
- Push the high pressure hose into the trigger gun.
Note: Make sure the connection nipple is aligned
correctly.
- Check the secure connection by pulling on the
high pressure hose.
See g. B
- Insert the high pressure hose tightly into the quick
coupling on the appliance
See g. C
- Screw the coupling element to the water
connection on the appliance.
- Attach the water supply hose to the coupling on
the water connection.
NOTE: The supply hose is not included.
- Connect the water supply hose to the water
supply.
- Completely open the water tap.
- Insert the mains plug into the socket.
- Turn on the appliance “I/ON”.
See g. D
- Unlock the lever on the trigger gun.
- Pull on the lever of the trigger gun; the device will
switch on.
- Switch the appliance on for a (max. of 1 minute)
and wait until the water exits at the hand spray
gun without bubbles.
- Release the lever on the trigger gun.
NOTE: Release the lever of the trigger gun; the
device will switch o again.
- High pressure remains in the system.
See g. E
- Lock the lever on the trigger gun.
Operation
See g. F
- Push the spray lance into the trigger gun and fasten
it by turning it through 90°.
- Unlock the lever on the trigger gun.
See g. G
- Pull on the lever of the trigger gun; the device will
switch on.
14WARNING: Appliance with uid under pres-
sure. Keep a rm hold on the gun and be prepared
to take the kickback pressure.
See g.H
> HIGH PRESSURE LANCE

EN
18
See g.IJ
K
L
> DETERGENT SUCTION
See g.M
> HIGH PRESSURE HOSE
Use the hydrocleaner only if the hose is completely
uncoiled and extended.
See g. N
> SWITCHING OFF
T.S. Total Stop ( if tted)
NOTE: Total Stop, which stops the machine
during the bypass phase. To start the water
cleaner, it is therefore necessary to set the switch
on position (I)“ON”; after that press the pistol
trigger: the Total Stop will start the machine
and will stop it automatically when the trigger is
released. It is advisable to put on the safety of the
pistol trigger whenever the machine is stopped,
in order to avoid unintentional starting.
- Any automatic start of the machine without
pressing the gun trigger is attributable to air
bubbles in the water or other similar phenomena
which do not imply the existence of any defects in
the machine.
- Do not leave the appliance unattended during
the standby for more than 5 minutes. Contrarily,
for the safety of the appliance it is necessary to
re-turn the switch into the (0) OFF position.
- Please check that the coupling of the high
pressure hose with the appliance and the gun
supplied as standard equipment made correctly,
that is to say without any water leak.
CARE AND MAINTENANCE
See g. P
The unit is maintenance-free.
25 WARNING: the machine shall be discon-
nected from its power source, by removing the
plug from the socket-outlet, during cleaning or
maintenance
WARNING: Do not spray the appliance with water
and do not use detergents or aggressive solvents.
Machine could be damaged.
- Clean the exterior part of the machine with a dry
cloth.
> STORAGE
See g. P
- Move the machine only by grasping the carrying
handle
- Store the appliance and the accessories in a frost-
safe room.
TROUBLESHOOTING
Appliance does not work
- Check whether the voltage shown on the rating
plate corresponds to that of the power source.
- Check the connector cable for damage.
Appliance does not reach operational pressure
- Vent the appliance: allow the pump to operate
without the high-pressure hose until water
appears at the high-pressure outlet without any
more bubbles. Then reattach the high-pressure
hose.
- Clean the strainer in the water connection.
- Clean the lter placed inside the hose coupling (if
set)
- Check the inlet water ow rate.
- Check all inlet pipes to the pump for leaks or
blockage.
Strong pressure uctuations
- Clean the high-pressure nozzle. Remove dirt from
the nozzle hole with a needle and then rinse out
with water from the front.
Pump leaks
- 10 drops per minute are permissible. In the case
of more serious leakage, you should contact the
authorized customer service.
Replacement parts
- Use only original spare parts or spare parts
suggested by the manufacturer.
WARRANTY CONDITIONS
All our machines are subjected to strict tests and are
covered against manufacturing defects in accord-
ance with applicable regulations. The warranty is
eective from the date of purchase.
The following are not included in the warran-
ty: - Parts subject to normal wear. - Rubber parts,
charcoal, lters and the accessories and optional

EN
19
accessories. - Accidental damage, caused by trans-
port, neglect or inadequate treatment, incorrect or
improper use and installation failing - The warranty
shall not cover any cleaning operations to which
the operative components may be subjected, such
as clogged nozzles and lter blocked due to lime-
stones. This machine is intended to be used for
domestic and hobby work: the warranty does not
cover any other dierent kind of use.
DISPOSAL WEEE
As the owner of electrical or electronic
equipment, the law (in accordance with
the EU Directive 2012/19/EU on waste from
electrical and electronic equipment and
the national laws of the EU Member States
that have implemented this Directive) prohibits
you from disposing of this product or its electrical /
electronic accessories as municipal solid waste and
obliges you to make use of the appropriate waste
collection facilities.The product can be disposed of
by returning it to the distributor when a new prod
-
uct is purchased. The new product must be equiva-
lent to that being disposed of. Disposing of the
product in the environment can cause great harm to
the environment itself and human health.
The symbol in the gure indicates the urban waste
containers and it is strictly prohibited to dispose of
the equipment in these containers. Non-compliance
with the regulations stipulated in the Directive
2012/19/EU and the decrees implemented in the
various EU Member States is administratively pun
-
ishable.

Traduction des instruction originales . Consultez notre site Web à l’adresse
www.lavorservice.com
FR
20
INDICATIONS GÉNÉRALES
> UTILISATION PRÉVUES
- L’appareil peut être utilisé pour le nettoyage
de surfaces dans des milieux extérieurs tout
les fois qu'on élimina la saleté par l’eau sous
pression.
- En utilisant les accessoires on peut eectuer
des travaux d’écumage, de sablage et des
lavages avec brosse rotative à appliquer sur la
pistolet.
- Les performances et la simplicité d’utilisation
de l’appareil en permettent un usage NON
PROFESSIONNEL.
> DONNÉES TECHNIQUES
(voir plaque données techniques)
SYMBOLES
ATTENTION:
lire attentivement les istruc-
tions avant l’usage
ATTENTION! Redoublez d’attention
pour des motifs de sécurité.
IMPORTANT
FERMÉ
OUVERT
SI INCLUE
Double isolation (si inclue): il s ' agit
d'une protection supplémentaire
pour l'isolation électrique
SÉCURITÉ
> AVERTISSEMENTS
01ATTENTION: Appareil ne devant être utilisé
qu’en plein air.
02ATTENTION: débrancher toujours l’alimen
-
tation électrique ainsi que le raccordement au
réseau de distribution d’eau à la n de chaque
utilisation.
03ATTENTION: Ne pas utiliser l’appareil si le
câble électrique ou des parties importantes de
l’appareil même sont détériorés (ex.: dispositifs
de sécurité, tube haute pression, pistolet, etc.).
04ATTENTION: Cet appareil a été conçu pour
être utilisé avec le détergent fourni ou préco
-
nisé par le fabricant, type shampooing neutre
à base de tensioactif biodégradables non
ioniques. Le recours à d’autres détergents ou
d’autres substances chimiques peut compro
-
mettre la sécurité de l’appareil.
05a ATTENTION: Avant d’utiliser l’appareil
s’assurer que toute personne se trouvant près
de celui-ci portent des vêtements de protec
-
tion, dans le cas contraire ne pas l’utiliser.
05b - pendant l’utilisation, éloigner toute per-
sonne ou animal situé dans un rayon de 5 m.
05c - travailler toujours avec des vêtements
appropriés pour se protéger contre le rebond
possible de matériau soulevé par le jet d’eau
haute pression.
05d - Ne touchez pas la che électrique et cet
appareil avec les mains mouillées et les pieds
nus.
05e - Porter des lunettes de protection et des
chaussures avec semelles en caoutchouc.
06ATTENTION:Le jet de la lance ne doit
pas être dirigé vers les parties mécaniques
contenant de la graisse lubriante: dans le cas
contraire la graisse sera dissoute et répandue
sur le terrain. Les pneus et valves de gonage
ne doivent être nettoyés qu’en maintenant le
jet à une distance de 30 cm minimum, sinon le
pneu/la valve risque d’être endommagé(e) par
le jet haute pression. Le premier symptôme est
SOMMAIRE ................................................................PAG.
ILLUSTRATIONS .............................................................. 2
INDICATIONS GÉNÉRALES .......................................... 20
SYMBOLES .....................................................................20
SÉCURITÉ ....................................................................... 20
UTILISATION .................................................................. 22
INSTALLATION / DEMARRAGE .................................... 23
NETTOYAGE ET ENTRETIEN ......................................... 24
PROBLÈMES ET SOLUTIONS ........................................ 24
CONDITIONS DE GARANTIE ........................................ 24
ÉLIMINATION ................................................................ 25
Pagina se încarcă...
Pagina se încarcă...
Pagina se încarcă...
Pagina se încarcă...
Pagina se încarcă...
Pagina se încarcă...
Pagina se încarcă...
Pagina se încarcă...
Pagina se încarcă...
Pagina se încarcă...
Pagina se încarcă...
Pagina se încarcă...
Pagina se încarcă...
Pagina se încarcă...
Pagina se încarcă...
Pagina se încarcă...
Pagina se încarcă...
Pagina se încarcă...
Pagina se încarcă...
Pagina se încarcă...
Pagina se încarcă...
Pagina se încarcă...
Pagina se încarcă...
Pagina se încarcă...
Pagina se încarcă...
Pagina se încarcă...
Pagina se încarcă...
Pagina se încarcă...
Pagina se încarcă...
Pagina se încarcă...
Pagina se încarcă...
Pagina se încarcă...
Pagina se încarcă...
Pagina se încarcă...
Pagina se încarcă...
Pagina se încarcă...
Pagina se încarcă...
Pagina se încarcă...
Pagina se încarcă...
Pagina se încarcă...
Pagina se încarcă...
Pagina se încarcă...
Pagina se încarcă...
Pagina se încarcă...
Pagina se încarcă...
Pagina se încarcă...
Pagina se încarcă...
Pagina se încarcă...
Pagina se încarcă...
Pagina se încarcă...
Pagina se încarcă...
Pagina se încarcă...
Pagina se încarcă...
Pagina se încarcă...
Pagina se încarcă...
Pagina se încarcă...
Pagina se încarcă...
Pagina se încarcă...
Pagina se încarcă...
Pagina se încarcă...
Pagina se încarcă...
Pagina se încarcă...
Pagina se încarcă...
Pagina se încarcă...
Pagina se încarcă...
Pagina se încarcă...
Pagina se încarcă...
Pagina se încarcă...
Pagina se încarcă...
Pagina se încarcă...
Pagina se încarcă...
Pagina se încarcă...
Pagina se încarcă...
Pagina se încarcă...
Pagina se încarcă...
Pagina se încarcă...
Pagina se încarcă...
Pagina se încarcă...
Pagina se încarcă...
Pagina se încarcă...
Pagina se încarcă...
Pagina se încarcă...
Pagina se încarcă...
Pagina se încarcă...
Pagina se încarcă...
Pagina se încarcă...
Pagina se încarcă...
Pagina se încarcă...
Pagina se încarcă...
Pagina se încarcă...
Pagina se încarcă...
Pagina se încarcă...
Pagina se încarcă...
Pagina se încarcă...
Pagina se încarcă...
Pagina se încarcă...
Pagina se încarcă...
Pagina se încarcă...
Pagina se încarcă...
Pagina se încarcă...
Pagina se încarcă...
Pagina se încarcă...
Pagina se încarcă...
Pagina se încarcă...
Pagina se încarcă...
Pagina se încarcă...
Pagina se încarcă...
Pagina se încarcă...
Pagina se încarcă...
Pagina se încarcă...
Pagina se încarcă...
Pagina se încarcă...
Pagina se încarcă...
Pagina se încarcă...
Pagina se încarcă...
Pagina se încarcă...
Pagina se încarcă...
Pagina se încarcă...
Pagina se încarcă...
Pagina se încarcă...
Pagina se încarcă...
Pagina se încarcă...
Pagina se încarcă...
Pagina se încarcă...
Pagina se încarcă...
Pagina se încarcă...
Pagina se încarcă...
Pagina se încarcă...
Pagina se încarcă...
Pagina se încarcă...
Pagina se încarcă...
Pagina se încarcă...
Pagina se încarcă...
Pagina se încarcă...
Pagina se încarcă...
Pagina se încarcă...
Pagina se încarcă...
Pagina se încarcă...
Pagina se încarcă...
Pagina se încarcă...
Pagina se încarcă...
Pagina se încarcă...
Pagina se încarcă...
Pagina se încarcă...
Pagina se încarcă...
Pagina se încarcă...
Pagina se încarcă...
Pagina se încarcă...
-
 1
1
-
 2
2
-
 3
3
-
 4
4
-
 5
5
-
 6
6
-
 7
7
-
 8
8
-
 9
9
-
 10
10
-
 11
11
-
 12
12
-
 13
13
-
 14
14
-
 15
15
-
 16
16
-
 17
17
-
 18
18
-
 19
19
-
 20
20
-
 21
21
-
 22
22
-
 23
23
-
 24
24
-
 25
25
-
 26
26
-
 27
27
-
 28
28
-
 29
29
-
 30
30
-
 31
31
-
 32
32
-
 33
33
-
 34
34
-
 35
35
-
 36
36
-
 37
37
-
 38
38
-
 39
39
-
 40
40
-
 41
41
-
 42
42
-
 43
43
-
 44
44
-
 45
45
-
 46
46
-
 47
47
-
 48
48
-
 49
49
-
 50
50
-
 51
51
-
 52
52
-
 53
53
-
 54
54
-
 55
55
-
 56
56
-
 57
57
-
 58
58
-
 59
59
-
 60
60
-
 61
61
-
 62
62
-
 63
63
-
 64
64
-
 65
65
-
 66
66
-
 67
67
-
 68
68
-
 69
69
-
 70
70
-
 71
71
-
 72
72
-
 73
73
-
 74
74
-
 75
75
-
 76
76
-
 77
77
-
 78
78
-
 79
79
-
 80
80
-
 81
81
-
 82
82
-
 83
83
-
 84
84
-
 85
85
-
 86
86
-
 87
87
-
 88
88
-
 89
89
-
 90
90
-
 91
91
-
 92
92
-
 93
93
-
 94
94
-
 95
95
-
 96
96
-
 97
97
-
 98
98
-
 99
99
-
 100
100
-
 101
101
-
 102
102
-
 103
103
-
 104
104
-
 105
105
-
 106
106
-
 107
107
-
 108
108
-
 109
109
-
 110
110
-
 111
111
-
 112
112
-
 113
113
-
 114
114
-
 115
115
-
 116
116
-
 117
117
-
 118
118
-
 119
119
-
 120
120
-
 121
121
-
 122
122
-
 123
123
-
 124
124
-
 125
125
-
 126
126
-
 127
127
-
 128
128
-
 129
129
-
 130
130
-
 131
131
-
 132
132
-
 133
133
-
 134
134
-
 135
135
-
 136
136
-
 137
137
-
 138
138
-
 139
139
-
 140
140
-
 141
141
-
 142
142
-
 143
143
-
 144
144
-
 145
145
-
 146
146
-
 147
147
-
 148
148
-
 149
149
-
 150
150
-
 151
151
-
 152
152
-
 153
153
-
 154
154
-
 155
155
-
 156
156
-
 157
157
-
 158
158
-
 159
159
-
 160
160
-
 161
161
-
 162
162
-
 163
163
-
 164
164
-
 165
165
-
 166
166
-
 167
167
-
 168
168


EHEIM BEASTER180e Manualul proprietarului
- Categorie
- Curatatoare de inalta presiune
- Tip
- Manualul proprietarului
în alte limbi
- slovenčina: EHEIM BEASTER180e Návod na obsluhu
Lucrări înrudite
Alte documente
-
Lavor Tucson Manual de utilizare
-
-
EINHELL RT-HP 1545 Original Operating Instructions
-
-
Defort DPW-1850 Manualul proprietarului
-
Defort DPW-1800-SC Manual de utilizare
-
-
Kärcher K 855 HS Manualul proprietarului
-
Nilfisk-ALTO SC DUO Operating Instructions Manual
-