Ferm CDM1138 Manual de utilizare
- Categorie
- Unelte electrice
- Tip
- Manual de utilizare

WWW.FERM.COM
EN
NL
RO
SR
BS
Original instructions 04
Vertaling van de oorspronkelijke gebruiksaanwijzing 12
Traducere a instrucţiunilor originale 21
Prevod originalnog uputstva 29
Prevod originalnog uputstva 29
CDM1138

2
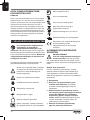
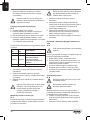
Fig. A
Fig. B
7 12
12
13
13 9
15
10
11
1
17
3
42 5
14

3
Fig. C
Fig. D Fig. E
7
32
16
15
2
6
1
2

4
EN
CORDLESS COMBI DRILL
BRUSHLESS
CDM1138
Thank you for buying this FERM product. By doing
so you now have an excellent product, delivered
by one of Europe’s leading suppliers. All products
delivered to you by Ferm are manufactured
according to the highest standards of performance
and safety. As part of our philosophy we also
provide an excellent customer service, backed
by our comprehensive warranty. We hope you will
enjoy using this product for many years to come.
1. SAFETY INSTRUCTIONS
Read the enclosed safety warnings,
the additional safety warnings and the
instructions. Failure to follow the safety
warnings and the instructions may result in
electric shock, fire and/or serious injury. Save the
safety warnings and the instructions for future
reference.
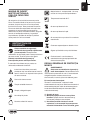
The following symbols are used in the user
manual or on the product:
Denotes risk of personal injury, loss of life
or damage to the tool in case of non-
observance of the instructions in this
manual.
Risk of electric shock
Variable electronic speed
Rotation, left/right
Do not use in rain
Indoor use only
Class II machine - Double insulation - You
don’t need any earthed plug.
Max temperature 40
0
C
Do not throw the battery into fire
Do not throw the battery into water
Do not dispose of the product in
unsuitable containers.
Separate collection for Li-ion battery.
Time-lag miniature fuse-link.
The product is in accordance with the
applicable safety standards in the
European directives.
GENERAL POWER TOOL SAFETY
WARNINGS
WARNING!
Read all safety warnings and all
instructions. Failure to follow the
warnings and instructions may result in electric
shock, fire and/or serious injury.
Save all warnings and instructions for future
reference.
The term “power tool” in the warnings refers
to your mains-operated (corded) power tool or
battery-operated (cordless) power tool.
1) Work area safety
a) Keep work area clean and well lit. Cluttered
or dark areas invite accidents.
b) Do not operate power tools in explosive
atmospheres, such as in the presence of
flammable liquids, gases or dust. Power
tools create sparks which may ignite the dust
or fumes.
c) Keep children and bystanders away while
operating a power tool. Distractions can
cause you to lose control.
2) Electrical safety
a) Power tool plugs must match the outlet.
Never modify the plug in any way. Do
not use any adapter plugs with earthed
(grounded) power tools.

5
EN
and matching outlets will reduce risk of
electric shock.
b) Avoid body contact with earthed or
grounded surfaces, such as pipes,
radiators, ranges and refrigerators. There is
an increased risk of electric shock if your body
is earthed or grounded.
c) Do not expose power tools to rain or wet
conditions. Water entering a power tool will
increase the risk of electric shock.
d)
Do not abuse the cord. Never use the cord
for carrying, pulling or unplugging the power
tool. Keep cord away from heat, oil, sharp
edges or moving parts. Damaged or entangled
cords increase the risk of electric shock.
e) When operating a power tool outdoors, use
an extension cord suitable for outdoor use.
Use of a cord suitable for outdoor use reduces
the risk of electric shock.
f) If operating a power tool in a damp location
is unavoidable, use a residual current device
(RCD) protected supply. Use of an RCD
reduces the risk of electric shock.
3) Personal safety
a) Stay alert, watch what you are doing and
use common sense when operating a
power tool. Do not use a power tool while
drugs, alcohol or medication. A moment of
inattention while operating power tools may
result in serious personal injury.
b) Use personal protective equipment. Always
wear eye protection. Protective equipment
such as dust mask, non-skid safety shoes, hard
hat, or hearing protection used for appropriate
conditions will reduce personal injuries.
c) Prevent unintentional starting. Ensure
the switch is in the off-position before
connecting to power source and/or battery
pack, picking up or carrying the tool.
switch or energising power tools that have the
switch on invites accidents.
d) Remove any adjusting key or wrench before
turning the power tool on. A wrench or a key
left attached to a rotating part of the power tool
may result in personal injury.
e)
Do not overreach. Keep proper footing and
balance at all times. This enables better control
of the power tool in unexpected situations.
f) Dress properly. Do not wear loose clothing
or jewellery. Keep your hair, clothing and
gloves away from moving parts. Loose
clothes, jewellery or long hair can be caught in
moving parts.
g) If devices are provided for the connection
of dust extraction and collection facilities,
ensure these are connected and properly
used. Use of dust collection can reduce dust
related hazards.
h) Do not let familiarity gained from frequent
use of tools allow you to become
complacent and ignore tool safety
principles. A careless action can cause
severe injury within a fraction of a second.
4) Power tool use and care
a) Do not force the power tool. Use the
correct power tool for your application. The
correct power tool will do the job better and
safer at the rate for which it was designed.
b) Do not use the power tool if the switch
does not turn it on and off. Any power tool
that cannot be controlled with the switch is
dangerous and must be repaired.
c) Disconnect the plug from the power source
and/or the battery pack from the power
tool before making any adjustments,
changing accessories, or storing power
tools. Such preventive safety measures
reduce the risk of starting the power tool
accidentally.
d) Store idle power tools out of the reach
of children and do not allow persons
unfamiliar with the power tool or these
instructions to operate the power tool.
Power tools are dangerous in the hands of
untrained users.
e) Maintain power tools. Check for
misalignment or binding of moving parts,
breakage of parts and any other condition
that may affect the power tool’s operation.
If damaged, have the power tool repaired
before use. Many accidents are caused by
poorly maintained power tools.
f) Keep cutting tools sharp and clean.
Properly maintained cutting tools with sharp
cutting edges are less likely to bind and are
easier to control.
g) Use the power tool, accessories and
tool bits etc. in accordance with these

6
EN
instructions, taking into account the
working conditions and the work to
be performed. Use of the power tool for
operations different from those intended could
result in a hazardous situation.
h) Keep handles and grasping surfaces dry,
clean and free from oil and grease. Slippery
handles and grasping surfaces do not allow
for safe handling and control of the tool in
unexpected situations.
5) Battery tool use and care
a)
by the manufacturer. A charger that is
suitable for one type of battery pack may
battery pack.
b)
designated battery packs. Use of any other
c) When battery pack is not in use, keep it
away from other metal objects, like paper
clips, coins, keys, nails, screws or other
small metal objects that can make a
connection from one terminal to another.
Shorting the battery terminals together may
d) Under abusive conditions, liquid may be
ejected from the battery; avoid contact.
water. If liquid contacts eyes, additionally
seek medical help. Liquid ejected from the
battery may cause irritation or burns.
e) Do not use a battery pack or tool that is
batteries may exhibit unpredictable behaviour
f) Do not expose a battery pack or tool to
Exposure to
explosion.
g) Follow all charging instructions and do not
charge the battery pack or tool outside
instructions. Charging improperly or at
damage the battery and increase the risk of
6) Service
a) Have your power tool serviced by a
replacement parts. This will ensure that the
safety of the power tool is maintained.
b) Never service damaged battery packs.
Service of battery packs should only be
performed by the manufacturer or authorized
service providers.
Additional safety warnings for drills
and screw drivers
a) Wear ear protectors when impact drilling.
Exposure to noise can cause hearing loss.
b) Use auxiliary handle(s), if supplied with the
tool. Loss of control can cause personal injury.
c) Hold power tool by insulated gripping
surfaces, when performing an operation
where the cutting accessory may contact
hidden wiring or its own cord. Cutting
accessory contacting a “live” wire may make
exposed metal parts of the power tool “live”
and could give the operator an electric shock.
d) Do not use a battery pack or tool that is
damaged or modified. Damaged or modified
batteries may exhibit unpredictable behaviour
resulting in fire, explosion or risk of injury.
e) Do not expose a battery pack or tool to
fire or excessive temperature. Exposure to
f) Follow all charging instructions and do not
charge the battery pack or tool outside
the temperature range specified in the
instructions. Charging improperly or at
temperatures outside the specified range may
damage the battery and increase the risk of
fire.
g) Apply pressure only in direct line with the bit
and do not apply excessive pressure. Bits
can bend causing breakage or loss of control,
resulting in personal injury.
For the charger
Intended use
Charge only CDA1130 type rechargeable battery
packs. Other types of batteries may burst causing
personal injury and damage.
a) The appliance is not to be used by persons
(including children) with reduced physical,

7
EN
sensory or mental capabilities, or lack of
experience and knowledge, unless they
have been given supervision or instruction
b) Children being supervised not to play with
the appliance
c) Do not recharging non-rechargeable batteries!
d) During charging, batteries must be placed in
the well ventilated area!
Residual risks
Even when the power tool is used as
prescribed it is not possible to eliminate all
residual risk factors. The following hazards
may arise in connection with the power tool’s
construction and design:
a) Health defects resulting from vibration
emission if the power tool is being used
over longer period of time or not adequately
managed and properly maintained.
b) Injuries and damage to property to due to
broken accessories that are suddenly dashed.
Warning! This power tool produces an
electromagnetic field during operation.
This field may under some circumstances
interfere with active or passive medical
implants. To reduce the risk of serious or
fatal injury, we recommend persons with
medical implants to consult their physician
and the medical implant manufacturer
before operating this power tool.
Power cord replacement
If the supply cord is damaged, it must be replaced
by the manufacturer, its service agent or similarly
qualified persons in order to avoid a hazard.
2. MACHINE INFORMATION
Intended use
The machine is intended for driving in and
loosening screws as well as for drilling in wood,
metal, ceramic and plastic and for impact drilling
in brick, brickwork and masonry.
Technical specifications
Model No CDM1138
Charger CDA1129
Input of charger
230-240V~ 50Hz
Max. 65W
Output of charger 21.5V DC 2.4A
Rechargeable battery pack 20V Li-ion 2.0Ah
Battery charging time 1 hour
Chuck capacity 13 mm
Torque settings
25 + Drill mode + Impact
drill mode
No load speed
Position 1:
Position 2:
0-550 /min
0-2000 /min
No load impact rate
Position 1:
Position 2:
0-8250 /min
0-30000 /min
Sound pressure level L
PA
78.9 dB(A) K=3 dB(A)
Sound power level L
WA
89.9 dB(A) K=3 dB(A)
Hand-arm vibration a
h
(Impact drilling in concrete)
7.7 m/s
2
K=1.5 m/s
2
Hand-arm vibration a
h,D
(Drilling into metal)
<2.5 m/s
2
K=1.5 m/s
2
Vibration level
The vibration emission level stated in this
instruction manual has been measured in
accordance with a standardized test given in
EN62841; it may be used to compare one tool
with another and as a preliminary assessment of
exposure to vibration when using the tool for the
applications mentioned.
• Using the tool for different applications, or with
different or poorly maintained accessories,
may significantly increase the exposure level.
•
The times when the tool is switched off or when
it is running but not actually doing the job, may
significantly reduce the exposure level.
Protect yourself against the effects of vibration by
maintaining the tool and its accessories, keeping
your hands warm, and organizing your work
patterns.
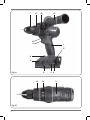
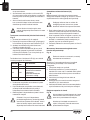
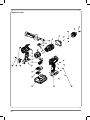
Description
The numbers in the text refer to the diagrams on
pages 2 - 3
1. Machine
2. Battery
3. Battery unlock button
4. Battery LED indicators
5. Battery LED indicators button
6. Charger
7. Charger LED indicators

8
EN
8. Chuck
9. Gear selection switch
10. Direction switch
11. On / off switch
12. Torque adjustment ring
13. Operation mode ring
14. Work light
15. Side handle
16. Side handle clamp
17. Belt hook
3. OPERATING
Before any work on the power tool,
remove the battery.
The battery must be charged before first
use.
Removing the battery from the machine
Fig. D
1. Hold the machine (1) firmly with one hand
2. Push down the battery unlock button (3)
located on the rear side of the battery (2) with
the other hand.
3. Keep pushing this button (3) down and slide
the battery backwards out of the machine, like
shown in Fig. D.
Inserting the battery into the machine
Fig. D
Ensure that the exterior of the battery is
clean and dry before connecting to the
charger or machine.
1. Hold the machine (1) firmly with one hand
2. Insert the battery (2) into the base of the
machine as shown in Fig. D.
3. Push the battery further forward until it clicks
into place.
Checking the battery charging status
Fig. A
• To check the battery charge status, push and
hold the button (5) on battery.
• The battery has 3 LED lights (4) indicating the
charge level, the more lights that burn, the
more charge the battery has left.
• When the lights are not burning it means
the battery is empty and must be charged
immediately.
When the machine is not being used over
a longer period of time it is best to store
the battery in charged condition.
Charging the battery with the charger
Fig. E
1. Take the battery (2) from the machine.
2. Turn the battery (2) to upside down position
and slide it onto the charger (6) as shown in
Fig. E.
3. Push the battery (2) until it is fully pushed into
the slot.
4. Plug the charger (6) into an electrical outlet and
wait for a while. The LED indicators (7) on the
charger will lighten up and show the charger
status.
The charger has 2 LED indicators (7) which
indicate the status of the charging process:
Red LED
Status
Green LED
status
Charger status
Off Off No power
Off On
Standby mode:
- No battery is inserted or,
- Battery inserted but charging
has finished
On Off Battery charging in Progress
• Fully charging the battery may take up to 60
minutes.
• After the battery is fully charged remove the
charger plug from the outlet and remove the
battery from the charger.
• The battery can be stored or directly installed
on the machine.
Lithium-Ion cells can be stored for a long
period without losing much of their
charge. When the machine is not being
used over a longer period of time it is
best to store the battery in charged
condition.
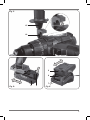
Assembling the side handle (15)
Fig. C
The side handle (15) can be mounted on the left or
right side of the machine and will provide extra
control when drilling or screw driving.

9
EN
Only tighten the handle by hand. Do not
overtighten; this may damage the handle
or its holder
1.
Turn the side handle’s (15) handgrip
anticlockwise a few times so the holder can be
moved over the chuck and placed on the metal
part just behind the torque adjustment ring (12).
2. Make sure the small gap of the handle
aligns with the notch of the metal part on the
machine, as shown on figure C.
3. Turn the handle clockwise to fix it in position.
Fitting and removing drills or screwdriver bits
Fig. A
Always remove the battery before
mounting an accessory.
The drill chuck (7) is suitable for drills and
screwdriver bits with round shaft as well as
hexagonal shaft.
1. Hold the machine firmly with one hand.
2.
Open the drill chuck (7) by rotating the chuck
with your other hand in clockwise direction until
it is opened far enough for the bit to slide in.
3. Insert the shaft of the drill or screwdriver bit.
4. Tighten the drill chuck again by firmly rotating
the chuck (7) counterclockwise.
5. Check if the bit is centered well by shortly
activating the machine´s on/off switch.
Adjusting the gears
Fig. B
Never switch gears when the motor is
running, this will damage your machine.
Never put switch in the middle between
both positions, this will damage your
machine.
The machine has 2 drill speeds, which can be
adjusted by sliding the gear switch (9) forward
or backwards. The number on the gear switch (9)
shows which position is chosen.
• Position 1: For slow drilling, large drilling
diameter or screw driving. The machine has
high power at a low speed.
• Position 2: For fast drilling or small drilling
diameter.
Adjusting the direction of rotation
Fig. A
• Set the direction switch (10) to „“ position in
order to drive screws or to use it for drilling.
• Set the direction switch (10) to „“ position in
order to remove screws.
Switching the machine on and off
Fig. A
The on/off switch (11) is used for activating the
machine and adjusting rotation speed.
• Pressing the on/off switch (11) will activate
the machine, the further the switch is being
pushed, the faster the drill will turn.
• Releasing the on/off switch (11) will stop the
machine.
• Move the direction reversing switch (10) to the
middle position to lock the movement of the
on/off switch.
Only lay down the machine when it has
stopped running completely. Do not
place it on a dusty surface as particles of
dust could get into the mechanism.
Adjusting the torque and activating the impact
(hammer) mode
Fig. B
The machine has 25 different torque settings
and a special drill mode to set the power being
transmitted to the chuck. Next to that, a hammer
mode is available for impact drilling in masonry
and other stone-like materials.
Adjusting the torque setting for Screw driving
By rotating the torque adjustment ring (12),
screws can be driven to a predetermined depth,
which is ideal for repetitive work. The higher the
number, the more torque will be transmitted.
• Select a low setting for small screws or soft
work material.
• Select a high setting for large screws, hard
work materials and when removing screws.
• You should preferably choose a setting as
low as possible when driving screws. Select
a higher setting if the motor slips before the
screw is fully tightened.
Adjusting the torque setting for Drilling
•
For drilling, turn the torque adjustment ring (13)
to the setting for drilling ( ). The motor will

10
EN
not slip and all power will be available for drilling.
• Make sure the gear switch (9) is set to position
2 to get maximum drill speed.
Adjusting the torque setting for impact drilling
The impact (hammer) function can be used for
drilling in masonry and other stone-like materials.
This function enables faster drilling in masonry
and stone-like materials.
• For impact drilling, turn the torque adjustment
ring (13) to the setting for impact drilling ( ).
The impact function will be activated when
drilling into the material.
• Make sure the gear switch (9) is set to position
2 to get maximum drill speed.
always set to„“ during drilling.
The machine is equipped with electronic
overload protection function. When the
machine gets overloaded it will shut
down automatically. When this happens,
please wait for a few seconds to let the
overload protection reset itself.
Work light (14)
Fig. A
The machine is equipped with a work light to
illuminate the work location.
• It automatically switches on when the on/off
switch (11) is being pressed.
• It automatically switches off when the on/off
switch (11) is released again.
Belt hook (17)
Fig. A
The machine is equipped with a belt hook for
hanging the machine to your belt during use.
middle position to avoid accidental
startup of the machine.
• The belt hook (17) can be assembled on the
left or right side of the machine.
• It can easily be mounted by attaching it with
the screw mounted on the machine.
• It can be removed by simply removing the
screw on the hook and taking it off.
Optimum use
When driving screws into wood, metal and other
materials:
• Before using the appliance check if the drill or
screw bit is properly fitted and centered inside
the drill chuck.
• Screw bits are available in several shapes and
dimensions. When unsure, always try if the bit
fits on the screw head without any free play
before using the machine.
• Make sure the machine is not running when
it contacts the screw. A rotating bit may slip.
This could result in damage to the work piece.
When drilling into wood, metal and other
materials:
• With small diameter drills use a high drill
speed. For large diameter drills use a low drill
speed.
• For hard materials, select a low drill speed, for
soft materials select a high drill speed.
• Fix the work piece properly, preferably by
using a clamp or vice.
• During drilling draw back the drill out of the
hole frequently so swarf or drill dust will be
removed.
When drilling in metal:
• Use a metal drill (HSS). For the best results you
should cool the bit with oil.
• Metal (HSS) drills can also be used drilling into
plastic.
When drilling in stone or masonry:
• Always use drills for concrete or masonry
drilling
• Apply force to the machine to let the hammer
action work at its best, but always make sure
the machine maintains its rotation speed.
Machine will wear out faster, and drilling will
take more time.
• When drilling pull back the drill every few
seconds. Drill dust is being removed out of the
hole and drilling is done faster.
4. MAINTENANCE
Before cleaning and maintenance, always
switch off the machine and remove the
battery pack from the machine.

11
EN
Clean the machine casings regularly with a soft
cloth, preferably after each use. Make sure that
the ventilation openings are free of dust and
dirt. Remove very persistent dirt using a soft
cloth moistened with soapsuds. Do not use any
solvents such as gasoline, alcohol, ammonia,
etc. Chemicals such as these will damage the
synthetic components.
WARRANTY
FERM products are developed to the highest
quality standards and are guaranteed free of
defects in both materials and workmanship for the
period lawfully stipulated starting from the date
of original purchase. Should the product develop
any failure during this period due to defective
material and/or workmanship then contact your
FERM dealer directly.
The following circumstances are excluded from
this guarantee:
• Repairs and or alterations have been made
or attempted to the machine by unauthorized
service centers.
• Normal wear and tear.
• The tool has been abused, misused or
improperly maintained.
• Non-original spare parts have been used
This constitutes the sole warranty made by
company either expressed or implied. There are
no other warranties expressed or implied which
extend beyond the face hereof, herein, including
the implied warranties of merchantability and
fitness for a particular purpose. In no event shall
FERM be liable for any incidental or consequential
damages. The dealers remedies shall be limited
to repair or replacement of nonconforming units
or parts.
ENVIRONMENT
Faulty and/or discarded electrical or
electronic apparatus have to be collected
at the appropriate recycling locations.
Only for EC countries
Do not dispose of power tools into domestic
waste. According to the European Guideline
2012/19/EC for Waste Electrical and Electronic
Equipment and its implementation into national
right, power tools that are no longer usable must
be collected separately and disposed of in an
environmentally friendly way.
The product and the user manual are subject
to change. Specifications can be changed
without further notice.

12
NL
ACCU COMBI-BOORMACHINE,
KOOLBORSTELLOOS
CDM1138
Dank u voor het aanschaffen van dit Ferm product.
Hierdoor bent u nu in het bezit van een uitstekend
product, geleverd door een van de toonaangevende
leveranciers van Europa. Alle door Ferm aan u
geleverde producten zijn vervaardigd conform de
hoogste prestatie- en veiligheidsnormen. Deel van
onze filosofie is de uitstekende klantenservice die
wordt ondersteund door onze uitgebreide garantie.
Wij hopen dat u dit product gedurende vele jaren
met plezier zult gebruiken.
1. VEILIGHEIDS VOOR SCHRIFTEN
Lees de bijgesloten veiligheidswaar-
schu wingen, de aanvullende
veiligheids waar schu wingen en de
instructies. Het niet opvolgen van de veilig heids-
waarschuwingen kan elektrische schokken, brand
en/of ernstig letsel tot gevolg hebben. Bewaar de
veiligheids waar schuwingen en instructies als
naslagwerk voor later.
De volgende symbolen worden gebruikt in de
gebruikershandleiding of op het product:
Gevaar voor lichamelijk letsel, overlijden
of schade aan de machine wanneer de
instructies in deze handleiding niet
worden opgevolgd.
Gevaar voor elektrische schokken
Variabele elektronische snelheid
Draairichting, links/rechts
Niet gebruiken in regen
Alleen binnenshuis gebruiken
Klasse II apparaat - Dubbel geïsoleerd -
Een geaarde stekker is niet noodzakelijk.
Max. temperatuur 40°C
Accu niet verbranden
Accu niet in het water gooien
Werp het product niet weg in
ongeschikte containers.
Aparte inzameling van Li-ion-accu’s.
Miniatuurzekering met vertragingstijd
Het product is in overeenstemming met
de van toepassing zijnde
veiligheidsnormen in de Europese
richtlijnen.
ALGEMENE VEILIGHEIDSVOOR-
SCHRIFTEN
WAARSCHUWING!
Lees alle veiligheidswaarschuwingen
en alle instructies. Het niet opvolgen
van onderstaande instructies kan leiden tot een
letsel.
Bewaar deze instructies.
De term “elektrisch gereedschap” in onder-
staande waarschuwingen heeft betrekking op
zowel apparatuur met een vaste elektriciteits-
kabel als op apparatuur met een accu (draadloze
apparatuur).
1) Werkgebied
a) Zorg voor een opgeruimde en goed
verlichte werkomgeving. Rommelige
en donkere werkomgevingen leiden tot
ongelukken
b)
Gebruik elektrisch gereedschap nooit in
een omgeving waar explosiegevaar bestaat,
vloeistoffen, gassen, dampen of andere
stoffen. Elektrische gereedschappen kunnen
vonken veroorzaken, die deze stoffen tot
ontbranding kunnen brengen.
c) Wanneer u elektrisch gereedschap
gebruikt, houd dan kinderen en

13
NL
omstanders op afstand. Wanneer u
wordt afgeleid, kunt u de controle over het
gereedschap verliezen.
2) Elektrische veiligheid
a) Stekkers van elektrische gereedschappen
moeten probleemloos passen op het
aan in of aan de stekker. Gebruik geen
adapters voor geaarde elektrische
gereedschappen. Standaardstekkers en
passende stopcontacten verkleinen de kans
op een elektrische schok.
b)
leidingen, radiatoren, fornuizen en koel-
kasten. Wanneer uw lichaam geaard is, wordt
de kans op een elektrische schok groter.
c) Stel elektrische gereedschappen nooit
bloot aan regen of vocht. Wanneer er water
binnendringt in een elektrisch gereedschap,
wordt de kans op een elektrische schok groter.
d) Gebruik het snoer niet om het elektrisch
gereedschap te dragen, te verplaatsen
of de stekker uit het stopcontact te
trekken. Bescherm het snoer tegen olie,
warmte, scherpe randen en bewegende
delen. Beschadigde of vastzittende snoeren
vergroten de kans op een elektrische schok.
e) Wanneer u elektrische gereedschappen
buiten gebruikt, gebruik dan een
verlengkabel die geschikt is voor
buitengebruik. Door een kabel te gebruiken
die geschikt is voor buitengebruik, wordt de
kans op een elektrische schok kleiner.
f) Gebruik een aardlekbeveiliging (RCD) als
niet te voorkomen is dat een powertool
moet worden gebruikt in een vochtige
omgeving. Gebruik van een RCD vermindert
het risico van elektrische schokken.
3) Persoonlijke veiligheid
a)
gebruik uw gezonde verstand wanneer
u een elektrisch gereedschap gebruikt.
Gebruik geen elektrische gereedschappen
wanneer u moe bent, of drugs, alcohol of
Eén moment van
gereed schappen kan ernstige verwondingen
tot gevolg hebben.
b)
Een gepast gebruik van veiligheids voor-
zieningen, zoals een stof masker, speciale
werkschoenen met antislipzolen, een
veiligheidshelm en gehoor bescherming
c) Voorkom dat het gereedschap per ongeluk
wordt gestart. Zorg dat de schakelaar op
de UIT positie staat, voordat u de stekker
in het stopcontact steekt. Draag elektrisch
gereedschap nooit met uw vinger op de
schakelaar en steek ook nooit de stekker van
ingeschakelde elektrische gereedschappen in
het stopcontact: dit leidt tot ongelukken.
d)
het elektrisch gereedschap voordat u hem
inschakelt. Instel en andere sleutels aan een
ronddraaiend onderdeel van het elektrisch
gereedschap kunnen tot verwondingen leiden.
e) Zorg dat u nooit uw evenwicht kunt
op de vloer. Hierdoor kunt u het elektrisch
gereedschap in on verwachte situaties beter
onder controle houden.
f) Zorg dat u geschikte kleding draagt. Draag
geen loshangende kleding of sieraden.
Houd uw haar, kleding en handschoenen
uit de buurt van bewegende delen. Loshan-
gende kleding, sieraden en lang haar kunnen
vast komen te zitten in bewegende delen.
g)
aansluiting van stofafzuiginstallaties,
aangesloten en gebruikt. Gebruik van deze
voorzieningen vermindert de gevaren die door
stof worden veroorzaakt.
h) Denk niet dat doordat u gereedschap vaak
gebruikt, u wel weet hoe het allemaal
werkt en dat u de veiligheidsbeginselen
voor het gebruik van het gereedschap wel
kunt negeren. Een onbezonnen actie kan in
een fractie van een seconde ernstig letsel tot
gevolg hebben.
4) Gebruik en onderhoud van elektrisch
gereedschap
a) Oefen geen overmatige kracht uit op
elektrisch gereedschap. Gebruik het
toepassing. Met het juiste elektrische

14
NL
gereedschap voert u de taak beter en veiliger
uit wanneer dit op de snelheid gebeurt
waarvoor het apparaat is ontworpen.
b) Gebruik nooit elektrisch gereedschap
waarvan de AAN/UIT schakelaar niet werkt.
Ieder elektrisch gereedschap dat niet kan
worden in en uitgeschakeld met de schakelaar
c) Trek de stekker uit het stopcontact voordat
gereedschappen, accessoires verwisselt
of het elektrisch gereedschap opbergt.
Wanneer u zich aan deze preventieve
veiligheidsmaatregelen houdt, beperkt u het
risico dat het gereedschap per ongeluk wordt
gestart.
d) Berg elektrisch gereedschap dat niet in
ge bruik is op buiten bereik van kinderen
met het gereedschap of deze instructies
het apparaat niet gebruiken. Elektrisch
ongeoefende gebruikers.
e) Zorg voor een goed onderhoud van
elektrisch gereedschap. Controleer of
vastgezet. Controleer ook of er geen
beschadigingen repareren vóór gebruik.
Veel ongelukken worden veroorzaakt door
slecht onderhoud van het gereedschap.
f)
zaagwerktuigen met scherpe randen zullen
onder controle te houden.
g) Gebruik alle elektrische gereedschappen,
accessoires, bitjes etc., zoals
aangegeven in deze instructies en op
werkomstandigheden en de uit te voeren
taak. Gebruik van elektrisch gereedschap
waarvoor het apparaat is ontworpen kunnen
h)
Houd handgrepen en greepoppervlakken
. Gladde
handgrepen en greepoppervlakken maken
veilig werken en controle over het gereedschap
in onverwachte situaties onmogelk.
5) Gebruik en onderhoud accugereedschap
a) Laad alleen op met de lader die door de
Een lader die
voor een bepaalde accu geschikt is, kan brand
veroorzaken wanneer deze met een andere
accu wordt gebruikt.
b) Gebruik elektrisch gereedschap alleen
met de speciaal hiervoor bedoelde accu’s.
Gebruik van andere accu’s kan kans op letsel
en brand geven.
c) Wanneer de accu niet in gebruik is,
houd deze dan uit de buurt van andere
metalen voorwerpen zoals paperclips,
andere kleine metalen voorwerpen die
een verbinding tussen twee polen kunnen
maken. Kortsluiting tussen de accupolen kan
brandwonden of brand veroorzaken.
d) Wanneer de accu niet juist wordt gebruikt,
kan er vloeistof uit lopen; raak dit niet aan.
Wanneer dit per ongeluk wel gebeurt, spoel
dan met water. Wanneer de vloeistof in de
ogen komt, moet u een arts raadplegen.
De vloeistof uit de accu kan irritaties of
brandwonden veroorzaken.
e) Gebruiken niet een accu of gereedschap
kunnen onvoorspelbaar gedrag vertonen, wat
brand, explosie of een risico van letsel met
zich meebrengt.
f) Stel een accu over het gereedschap niet
hoge temperatuur. Blootstelling aan vuur of
explosie veroorzaken. NB De temperatuur
g) Houd u aan alle instructies voor het laden
en laad de accu of het gereedschap niet
op buiten het temperatuurbereik dat in
de instructies wordt aangeduid. Op een
buiten het aangeduide bereik kan de accu
beschadigen en het risico van brand doen
toenemen.

15
NL
6) Service
a) Laat uw gereedschap onderhouden door
die alleen gebruikmaakt van identieke
vervangingsonderdelen. Dit zorgt ervoor dat
b) Voer nooit servicewerkzaamheden uit aan
beschadigde accu’s. Alleen de fabrikant
of geautoriseerde service-providers mogen
servicewerkzaamheden aan accu’s uitvoeren.
Aanvullende veiligheidswaar schu-
wingen voor boormachines en
schroevendraaiers
a) Draag gehoorbescherming bij gebruik van
de slagfunctie. Blootstelling aan lawaai kan
gehoorverlies veroorzaken.
b) Gebruik de extra handgreep(grepen), als
die bij het gereedschap zijn geleverd. Verlies
van controle kan persoonlijk letsel tot gevolg
hebben.
c) Houd het elektrische gereedschap vast
aan de geïsoleerde handgrepen wanneer
u werkzaamheden uitvoert waarbij het
zaagaccessoire in contact kan komen
met verborgen bedrading of het eigen
snoer. Zaagaccessoires die bedrading onder
spanning raken, kunnen het gereedschap
onder stroom zetten en de gebruiker een
elektrische schok geven.
d) Gebruik niet accu’s of gereedschap
die beschadigd of gemodificeerd zijn.
Beschadigd of gemodificeerd Gebruik
niet accu of gereedschap die beschadigd
of gemodificeerd zijn. Beschadigde of
gemodificeerde accu’s kunnen onvoorspelbaar
gedrag vertonen, wat brand, explosie of een
risico van letsel met zich meebrengt.
e) Stel een accu of het gereedschap niet
bloot aan open vuur of een uitzonderlijk
hoge temperatuur. Blootstelling aan vuur of
explosie veroorzaken. NB De temperatuur
f) Houd u aan alle instructies voor het laden
en laad de accu of het gereedschap niet
op buiten het temperatuurbereik dat in de
instructies wordt aangeduid. Op een onjuiste
wijze laden of laden bij temperaturen buiten het
aangeduide bereik kan de accu beschadigen
en het risico van brand doen toenemen.
g) Oefen uitsluitend druk uit in een directe lijn
met de bit en oefen niet al te veel druk uit.
Bits kunnen doorbuigen wat breuk of verlies
van controle veroorzaakt, wat persoonlijk letsel
tot gevolg zal hebben.
Ten aanzien van de acculader
Bedoeld gebruik
Laad uitsluitend herlaadbare accupacks van het
type CDA1130.
Andere typen accu’s kunnen exploderen, wat
lichamelijk letsel en schade kan veroorzaken.
a) Het apparaat dient niet te worden gebruikt
door personen (inclusief kinderen) met
verminderde fysieke, zintuiglijke of mentale
functies of personen zonder enige ervaring
en kennis, tenzij zij onder toezicht staan of
zijn geïnstrueerd
b) Laat kinderen onder toezicht niet met het
apparaat spelen
c) Laad niet-herlaadbare accu’s niet opnieuw op!
d) Plaats de accu’s tijdens het opladen in een
goed geventileerde ruimte!
Overblijvende risico’s
Zelfs wanneer de powertool op de
voorschreven wijze wordt gebruikt, is het niet
mogelijk alle overblijvende risicofactoren
weg te nemen. De volgende risico’s kunnen
optreden in verband met de constructie en het
ontwerp van de powertool:
a) Gezondheidsklachten die het gevolg zijn
van de trillingsemissie bij langdurig of
onjuist gebruik of onjuist onderhoud van de
powertool.
b) Letsel en schade aan eigendommen vanwege
kapotte hulpstukken die opeens losschieten.
Waarschuwing! Deze powertool
produceert een elektromagnetisch veld
tijdens zijn werking. Dit veld kan onder
bepaalde omstandigheden storend
werken op actieve of passieve medische
implantaten. Ter verkleining van het risico
van ernstig of dodelijk letsel raden wij
personen met medische implantaten aan
om hun arts of de fabrikant van het
medisch implantaat te raadplegen voordat
zij deze powertool gaan gebruiken.

16
NL
Vervanging van het netsnoer
Als het voedingssnoer beschadigd is, moet
het door de fabrikant, een door deze erkend
servicebedrijf of vergelijkbaar gekwalificeerde
personen worden vervangen ter vermijding van
risico’s.
2. MACHINE INFORMATION
Bedoeld gebruik
De machine is bedoeld voor het in- en uitdraaien
van schroeven, maar ook voor het boren in hout,
metaal, keramische materialen en kunststoffen
en voor gebruik als slagboor in baksteen en
metselwerk.
Technische specificaties
Model Nr CDM1138
Lader CDA1129
Voeding van lader
230-240V~ 50Hz
Max. 65W
Rendement van lader 21,5V DC 2,4A
Oplaadbare accu 20V
Li-ion 2,0Ah
Laadtijd van accu 1 uur
Capaciteit boorkop 13 mm
Aanhaalmoment-instellingen
25 + stand Boren +
stand Slagboren
Onbelast toerental
Positie 1:
Positie 2:
0 - 550 /min
0 - 2000 /min
Onbelaste slagfrequentie
Positie 1:
Positie 2:
0 - 8250 /min
0 - 30000 /min
Geluidsdrukniveau L
PA
78,9 dB(A), K=3 dB(A)
Geluidsvermogenniveau L
WA
89,9 dB(A), K=3 dB(A)
Hand-armtrilling a
h
(Slagboren in beton)
7,7 m/s
2
K=1,5 m/s
2
Hand-armtrilling a
h,D
(Boren in metaal)
< 2,5 m/s
2
k=1,5 m/s
2
Trillingsniveau
Het trillingsemissieniveau dat in deze
gebruiksaanwijzing wordt vermeld, is gemeten
conform een gestandaardiseerde test in EN
62841; deze mag worden gebruikt om twee
machines met elkaar te vergelijken en als
voorlopige beoordeling van de blootstelling
aan trilling bij gebruik van de machine voor de
vermelde toepassingen.
• Het gebruik van de machine voor andere
toepassingen, of met andere of slecht
onderhouden accessoires, kan het
blootstellingsniveau aanzienlijk verhogen.
• Wanneer de machine is uitgeschakeld of
wanneer deze loopt maar geen werk verricht,
kan dit het blootstellingsniveau aanzienlijk
reduceren.
Bescherm uzelf tegen de gevolgen van
trilling door de machine en de accessoires te
onderhouden, uw handen warm te houden en uw
werkwijze te organiseren.
Beschrijving
De nummers in de tekst verwijzen naar de
diagrammen op pagina 2 – 3
1. Machine
2. Accu
3. Ontgrendelknop accu
4. LED-indicatielampjes accu
5. Knop LED-indicatielampjes accu
6. Acculader
7. Led-controlelampjes acculader
8. Boorkop
9. Keuzeschakelaar overbrenging
10. Richtingsschakelaar
11. Schakelaar Aan / Uit
12. Instelring koppel
13. Ring bedrijfsstand
13. Werklamp
14. Riemclip
15. Zijhandgreep
16. Klem zijhandgreep
17. Riemclip
3. BEDIENING
Verwijder de accu voordat u
werkzaamheden aan het elektrisch
gereedschap gaat uitvoeren.
De accu moet voor het eerste gebruik
worden opgeladen.
De accu van de machine verwijderen
Afb. D
• Houd de machine (1) stevig vast met één hand
• Duw de ontgrendelknop van de accu (3) die
zich op de achterkant van de accu (2) bevindt,
naar beneden met de andere hand.

17
NL
• Houd deze knop (3) naar beneden gedrukt en
schuif de accu naar achteren uit de machine,
zoals is weergegeven in Afb. D.
De accu in de machine plaatsen
Afb. D
Zorg ervoor dat het oppervlak van de
accu schoon en droog is voordat u deze
op de acculader of de machine aansluit.
1. Houd de machine (1) stevig vast met één hand
2. Plaats de accu (2) in de onderkant van de
machine, zoals is weergegeven in Afb. D.
3. Duw de accu verder naar voren tot deze
vastklikt.
De laadstatus van de accu controleren
Afb. A
• U kunt de laadstatus van de accu controleren
door de knop (5) op de accu in te duwen en
ingedrukt te houden.
•
De accu heeft 3 LED-lampjes (4) die de
laadstatus aanduiden, hoe meer lampjes er
branden, des te meer lading heeft de accu nog.
• Wanneer de lampjes niet branden, betekent
dat dat de accu leeg is en dat de accu
onmiddellijk moet worden opgeladen.
Wanneer de machine gedurende langere
tijd niet wordt gebruikt, kunt u de accu
het beste in geladen toestand opbergen.
De accu laden (met de acculader)
Afb. E
1. Haal de accu (2) uit de machine
2. Draai de accu (2) ondersteboven en
schuif deze op de acculader (3), zoals is
weergegeven in Afb. E.
3. Duw op de accu (2) tot deze volledig in de sleuf
zit.
4. Steek de stekker (6) van de acculader in een
stopcontact en wacht even. De Led-lampjes
op de acculader (7) gaan branden en tonen de
status van de lader.
De acculader heeft 2 led-controlelampjes (6) die
de status van het laadproces aangeven:
Status
rode led:
Status
groene led:
Status van acculader:
Uit Uit Geen stroom
Uit Aan
Stand-bymodus:
- Geen accu geplaatst, of
- Accu is geplaatst maar het laden
is voltooid
Aan Uit Bezig met opladen
• Het kan tot 60 minuten duren voordat de accu
volledig is opgeladen.
• Verwijder, als de accu volledig is opgeladen,
de stekker van de acculader uit het
stopcontact en haal de accu uit de acculader.
• U kunt de accu opslaan of direct op de
machine zetten.
Lithium-ion-accu‘s kunnen gedurende
een lange tijd worden opgeslagen zonder
veel van hun lading te verliezen. Wanneer
deze machine gedurende een langere tijd
niet wordt gebruikt, is het raadzaam de
accu te bewaren in opgeladen toestand.
De zijhandgreep (15) monteren
Afb. C
De zijhandgreep (15) kan aan de linker- of aan de
rechterzijde van de machine worden gemonteerd,
en geeft extra controle bij het boren of het in- of
uitdraaien van schroeven.
Zet de handgreep alleen met de hand
vast. Zet de handgreep niet te vast;
hierdoor zou de handgreep of de houder
beschadigd kunnen raken
1. Draai de greep van de zijhandgreep (15)
enkele malen naar links zodat de houder over
de boorkop kan worden gehaald en op het
metalen gedeelte vlak achter de instelring
(12) voor het aanhaalmoment kan worden
geplaatst.
2. Controleer dat de kleine opening van de
handgreep uitkomt tegenover de nok van het
metalen gedeelte op de machine, zoals wordt
getoond in afbeelding C.
3. Draai de handgreep naar rechts en zet de
handgreep op z’n plaats vast.

18
NL
Boren en schroefbits monteren en verwijderen
Afb. A
Verwijder altijd de accu voordat u een
hulpstuk monteert.
De boorkop (7) is geschikt voor boortjes en
schroefbits met zowel ronde als zeskantige assen.
1. Houd de machine stevig vast met één hand
2. Open de boorkop (7) door de huls van de
boorkop (7) met de andere hand rechtsom
te draaien tot deze ver genoeg is geopend
om het boortje/de schroefbit erin te kunnen
schuiven.
3. Plaats de as van het boortje/de schroefbit erin
4. Draai de boorkop weer vast door de huls van
de boorkop (7) stevig linksom te draaien.
5. Controleer of het boortje/de schroefbit goed
in het midden zit door de machine met de
schakelaar Aan / Uit kort in te schakelen.
De overbrenging instellen
Afb. B
Schakel nooit naar een andere
overbrenging terwijl de motor draait. Dit
is schadelijk voor de machine.
Zet de schakelaar nooit tussen de twee
standen in. Dit is schadelijk voor de
machine.
De machine heeft 2 boorsnelheden, die u kunt
instellen door de overbrengingsschakelaar (9)
naar voren of naar achteren te schuiven. Het
nummer op de overbrengingsschakelaar (9) geeft
de gekozen stand aan.
• Stand 1: Voor langzaam boren, een grote
boordiameter of voor schroeven. De machine
beschikt over een hoog vermogen bij een laag
toerental.
• Stand 2: Voor snel boren of een kleine
Boordiameter
De draairichting instellen
Afb. A
• Stel de draairichtingsschakelaar (10) in op de
stand “” om schroeven aan te draaien of de
machine te gebruiken voor boren.
• Stel de draairichtingsschakelaar (10) in op de
stand “” voor het verwijderen van schroeven
De machine in- en uitschakelen
Afb. A
De schakelaar Aan / Uit (11) wordt gebruikt om de
machine in te schakelen en de draaisnelheid in te
stellen.
• U schakelt de machine in door op de
schakelaar Aan / Uit (11) te drukken; hoe
verder u de schakelaar indrukt, des te sneller
de boormachine gaat draaien.
• U stopt de machine door de schakelaar Aan /
Uit (11) los te laten.
• Zet de draairichtingsschakelaar (10) in de
middelste stand om de schakelaar Aan / Uit te
vergrendelen.
Leg de machine pas neer wanneer deze
volledig stilstaat. Leg de machine niet op
een stoffige ondergrond. Stofdeeltjes
kunnen in het mechanisme terecht
komen.
Het aanhaalmoment afstellen en de slagfunctie
(stand Slagboor) activeren
Afb. B
De machine beschikt over 25 verschillende
koppelinstellingen en een speciale boormodus,
waarin het totaalvermogen op de boorkop
wordt overgebracht. Daarnaast is er een
stand Hamerboor beschikbaar voor een
hamerboorfunctie in metselwerk en andere met
steen te vergelijken materialen.
De aanhaalmoment-instelling aanpassen voor
het in- en uitdraaien van schroeven
U kunt door de instelring voor het koppel (12) te
draaien schroeven tot een vooraf bepaalde diepte
indraaien, hetgeen ideaal is voor repetitief werk.
Hoe hoger het getal, des te meer koppel wordt
overgebracht.
• Kies een lage instelling voor kleine schroeven
of zacht werkmateriaal.
• Kies een hoge instelling voor grote schroeven,
hard werkmateriaal en voor het verwijderen
van schroeven.
• Kies bij voorkeur een zo laag mogelijke stand
om schroeven in te draaien. Kies een hogere
instelling als de motor slipt voordat de schroef
volledig is vastgedraaid.

19
NL
De aanhaalmoment-instelling aanpassen voor
boren
• Draai voor de functie Boren de ring (13) voor
instelling van het aanhaalmoment naar de
instelling voor boren ( ). De motor zal niet
slippen en alle vermogen zal beschikbaar zijn
voor het boren.
• Controleer dat de versnellingsschakelaar (9) in
positie 2 staat voor de maximale boorsnelheid.
De aanhaalmoment-instelling aanpassen voor
de slagboorfunctie
Met de functie slagboren (hamerboren) kunt u
boren in metselwerk en andere op steen lijkende
materialen. Met de functie kunt u sneller boren in
metselwerk en in op steen lijkende materialen.
• Draai voor de functie Slagboren de ring (13)
voor instelling van het aanhaalmoment naar
de instelling voor slagboren ( ). De functie
Slagboren wordt ingeschakeld wanneer u in
het materiaal boort.
• Controleer dat de versnellingsschakelaar (9) in
positie 2 staat voor de maximale boorsnelheid.
bij boren altijd op „“ staat ingesteld.
De machine is voorzien van een
elektronische beveiligingsfunctie tegen
overbelasting. Als de machine overbelast
wordt, slaat deze automatisch af. Wanneer
dit gebeurt, wacht dan enkele seconden
en laat de overbelastingsbeveiliging
zichzelf resetten.
Werklamp (14)
Afb. A
De machine is voorzien van een werklamp voor
verlichting van de werklocatie.
• Deze wordt automatisch ingeschakeld als u de
schakelaar Aan / Uit indrukt.
• Deze wordt automatisch uitgeschakeld als u
de schakelaar Aan / Uit weer loslaat.
Riemclip (17)
Afb. A
De machine is voorzien van een riemclip waarmee
u de machine aan uw riem kunt ophangen tijdens
gebruik.
in de middelste stand om onbedoeld
inschakelen van de machine te
voorkomen.
• De riemhaak (17) kan aan de linker- of aan
de rechterzijde van de machine worden
gemonteerd.
• U kunt de riemhaak gemakkelijk monteren
door deze te bevestigen met de schroef die op
de machine is gemonteerd.
• U kunt de riemhaak gemakkelijk verwijderen
door de schroef van de haak los te draaien en
de haak los te nemen.
Optimaal gebruik
Wanneer u schroeven in hout, metaal en ander
materiaal draait:
• Controleer vóór u het apparaat gebruikt of
het boortje of de schroefbit correct en in het
midden van de boorkop is gemonteerd.
• Er zijn schroefbits verkrijgbaar in verschillende
vormen en afmetingen. Probeer bij twijfel
altijd of het schroefbit zonder speling op de
schroefkop past voordat u de machine gaat
gebruiken.
• Zorg ervoor dat de machine niet draait
wanneer deze contact maakt met de schroef.
Een draaiende schroefbit kan doorschieten.
Hierdoor kan het werkstuk beschadigen.
Wanneer u in hout, metaal en ander materiaal
boort:
• Voor boortjes met een kleine diameter is het
beter om een hoge boorsnelheid te gebruiken.
Voor boortjes met een grote diameter is het
beter om een lage boorsnelheid te gebruiken.
• Kies voor hard materiaal een lage
boorsnelheid en voor zacht materiaal een hoge
boorsnelheid.
• Zet het werkstuk naar behoren vast, bij
voorkeur met behulp van een klem of
bankschroef.
• Haal tijdens het boren de boor regelmatig uit
het gat om slijpsel of boorstof te verwijderen.
Wanneer u in metaal boort:
• Gebruik een metaalboor (HSS). Koel het
boortje met olie voor het beste resultaat.
• U kunt metaalboren (HSS) tevens gebruiken
om in plastic te boren.

20
NL
Wanneer u boort in steen of metselwerk:
• Gebruik altijd boortjes voor het boren in beton
of metselwerk
• Oefen druk uit op de machine zo dat de haan
naar boor zodat de hamerboorfunctie optimaal
kan werken, maar let er altijd wel op dat de
machine de rotatiesnelheid kan aanhouden.
De machine zal sneller slijten en het boren zal
meer tijd in beslag nemen.
• Trek tijdens het borende boor steeds na enkele
seconden terug. Het boorstof wordt uit het gat
verwijderd en het boren verloopt sneller.
4. ONDERHOUD
Schakel, voordat u met de reiniging en
het onderhoud begint, altijd de machine
uit en haal het accupack uit de machine.
Reinig de machinebehuizing regelmatig met een
zachte doek, bij voorkeur iedere keer na gebruik.
Zorg dat de ventilatiesleuven vrij van stof en
vuil zijn. Gebruik bij hardnekkig vuil een zachte
doek bevochtigd met zeepwater. Gebruik geen
oplosmiddelen als benzine, alcohol, ammonia,
etc. Dergelijke stoffen beschadigen de kunststof
onderdelen.
GARANTIE
FERM producten zijn ontworpen volgens de
hoogste kwaliteitsstandaarden en gegarandeerd
vrij van defecten, zowel materieel als
fabrieksfouten, tijdens de wettelijk vastgestelde
garantieperiode vanaf de eerste aankoopdatum.
Mocht het product tijdens deze periode gebreken
vertonen veroorzaakt door defecte materialen en/
of fabrieksfouten, neem dan rechtstreeks contact
op met uw FERM dealer.
De volgende situaties vallen niet onder de
garantie:
• Er zijn reparaties of aanpassingen aan
de machine uitgevoerd, of er is een
poging daartoe ondernomen, door een
nietgeautoriseerd servicecentrum.
• Normale slijtage.
• De machine is misbruikt, verkeerd gebruikt of
slecht onderhouden.
MILIEU
Defecte en/of afgedankte elektrische of
elektronische gereedschappen dienen ter
verwerking te worden aangeboden aan
een daarvoor verantwoordelijke instantie.
Uitsluitend voor EG-landen
Werp elektrisch gereedschap niet weg bij het
huisvuil. Conform de Europese Richtlijn 2012/19/
EU voor Afgedankte Elektrische en Elektronische
Apparatuur en de implementatie ervan in
nationaal recht moet niet langer te gebruiken
elektrisch gereedschap gescheiden worden
verzameld en op een milieuvriendelijke wijze
worden verwerkt.
Het product en de gebruikershandleiding zijn
onderhevig aan wijzigingen. Specificaties
kunnen zonder opgaaf van redenen worden
gewijzigd.
Pagina se încarcă...
Pagina se încarcă...
Pagina se încarcă...
Pagina se încarcă...
Pagina se încarcă...
Pagina se încarcă...
Pagina se încarcă...
Pagina se încarcă...
Pagina se încarcă...
Pagina se încarcă...
Pagina se încarcă...
Pagina se încarcă...
Pagina se încarcă...
Pagina se încarcă...
Pagina se încarcă...
Pagina se încarcă...
Pagina se încarcă...
Pagina se încarcă...
Pagina se încarcă...
Pagina se încarcă...
-
 1
1
-
 2
2
-
 3
3
-
 4
4
-
 5
5
-
 6
6
-
 7
7
-
 8
8
-
 9
9
-
 10
10
-
 11
11
-
 12
12
-
 13
13
-
 14
14
-
 15
15
-
 16
16
-
 17
17
-
 18
18
-
 19
19
-
 20
20
-
 21
21
-
 22
22
-
 23
23
-
 24
24
-
 25
25
-
 26
26
-
 27
27
-
 28
28
-
 29
29
-
 30
30
-
 31
31
-
 32
32
-
 33
33
-
 34
34
-
 35
35
-
 36
36
-
 37
37
-
 38
38
-
 39
39
-
 40
40


Ferm CDM1138 Manual de utilizare
- Categorie
- Unelte electrice
- Tip
- Manual de utilizare
în alte limbi
- English: Ferm CDM1138 User manual
- italiano: Ferm CDM1138 Manuale utente
- Nederlands: Ferm CDM1138 Handleiding
Lucrări înrudite
Alte documente
-
Ingersoll-Rand IQV12 Manual de utilizare
-
Ryobi RY18PCA Cordless Patio Cleaner Instrucțiuni de utilizare
-
Hikoki DV18DGAL 18v Cordless Combi Drill Manual de utilizare
-
Hitachi DV 18DL2 Handling Instructions Manual
-
-
Panasonic EY37C3 Instrucțiuni de utilizare
-
Tryton TDW710A Manual de utilizare
-
-
-