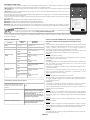
Candy FCP602X E0 /E/1 Manual de utilizare
- Categorie
- Microunde
- Tip
- Manual de utilizare

POKYNY PRO UŽIVATELE
TROUBY
PEĆNICE
KORIŠTENJE PRIRUČNIK
NAVODILO ZA UPORABO
VEČNAMENSKE VGRADNE PEČICE
ΦΟYPNOI
OΔHГIEΣ XPHΣHΣ
CZ
HR
SL
GR
62
74
86
98
UPUTSTVA ZA KORISNIKE
RERNE
HASZNALATI UTASITASA
SUTŐK
SRB
HU
110
122
PIEKARNIKI DO ZABUDOWY
INSTRUKJA OBSŁUGI
PL
134
BRUKERINSTRUKSJONER
OVNER
NO
146
USER INSTRUCTIONS
OVENS
EN
02
CANDY HOOVER GROUP S.R.L. • Via Comolli 16 • 20861 Brugherio (MB) - Italy
BRUGSANVISNING
OVNES
DK
14
KÄYTTÖOHJEET
UUNIT
FI
26
ANVÄNDARINSTRUKTIONER
UGNAR
SV
38
INSTRUCŢIUNI DE UTILIZARE
CUPTOARE
RO
50

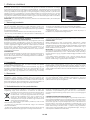
General Warnings
• During cooking, moisture may condense inside
the oven cavity or on the glass of the door. This is a
normal condition. To reduce this effect, wait 10-
15 minutes after turning on the power before
putting food inside the oven. ln any case, the
condensation disappears when the oven reaches
the cooking temperature.
• Cook the vegetables in a container with a lid
instead of an open tray.
• Avoid leaving food inside the oven after cooking
for more than 15/20 minutes.
• WARNING: the appliance and accessible parts
become hot during use. Be careful not to touch
any hot parts.
• WARNING: the accessible parts can become hot
when the grill is in use. Children should be kept at
a safe distance.
• WARNING: ensure that the appliance is
switched off before replacing the bulb, to avoid
the possibility of electric shocks.
• WARNING: in order to avoid any danger caused
by the accidental resetting of the thermal
interruption device, the appliance should not be
powered by an external switching device, such as
a timer, or be connected to a circuit that is
regularly switched on and off.
• Children under 8 should be kept at a safe
distance from the appliance if not continuously
supervised.
• Children should not play with the appliance.
• The appliance can be used by those aged 8 or
over and by those with limited physical, sensorial
or mental capacities, without experience or
knowledge of the product, only if supervised or
provided with instruction as to the operation of
the appliance, in a safe way with awareness of the
possible risks.
• Cleaning and maintenance should not be carried
out by unsupervised children.
• Do not use rough or abrasive materials or sharp
metal scrapers to clean the oven door glasses, as
they can scratch the surface and cause the glass to
shatter.
• The oven must be switched off before removing
the removable parts. After cleaning, reassemble
them according the instructions.
• Only use the meat probe recommended for this
oven.
• Do not use a steam cleaner for cleaning
operations.
• Connect a plug to the supply cable that is able to
bear the voltage, current and load indicated on
the tag and having the earth contact. The socket
must be suitable for the load indicated on the tag
and must have ground contact connected and in
operation. The earth conductor is yellow-green in
colour. This operation should be carried out by a
suitably qualified professional. ln case of
incompatibility between the socket and the
appliance plug, ask a qualified electrician to
substitute the socket with another suitable type.
The plug and the socket must be conformed to the
current norms of the installation country.
Connection to the power source can also be made
by placing an omnipolar breaker between the
appliance and the power source that can bear the
maximum connected load and that is in line with
current legislation. The yellow-green earth cable
should not be interrupted by the breaker. The
socket or omnipolar breaker used for the
connection should be easily accessible when the
appliance is installed.
• The disconnection may be achieved by having
the plug accessible or by incorporating a switch in
the fixed wiring in accordance with the wiring
rules.
• lf the power cable is damaged, it should be
substituted with a cable or special bundle
available from the manufacturer or by contacting
the customer service department. The type of
power cable must be H05V2V2-F. This operation
should be carried out by a suitably qualified
professional. The earth conductor (yellow-green)
must be approximately 10 mm longer than the
other conductors. For any repairs, refer only to
the Customer Care Department and request the
use of original spare parts.
• Failure to comply with the above can
compromise the safety of the appliance and
invalidate the guarantee.
• Any excess of spilled material should be
removed before cleaning.
EN 02

• A long power supply failure during an occurring
cooking phase may cause a malfunction of the
monitor. ln this case contact customer service.
• The appliance must not be installed behind a
decorative door in order to avoid overheating.
• When you place the shelf inside, make sure that
the stop is directed upwards and in the back of the
cavity. The shelf must be inserted completely into
the cavity.
• WARNING: Do not line the oven walls with
aluminium foil or single-use protection available
from stores. Aluminium foil or any other
protection, in direct contact with the hot enamel,
risk melting and deteriorating the enamel of the
insides.
• WARNING: Never remove the oven door seal.
• CAUTION: Do not refill the cavity bottom with
water during cooking or when the oven is hot.
• No additional operation/setting is required in
order to operate the appliance at the rated
frequencies.
EN 03

General Instructions
5
1.1 Safety indications
1.2 Electrical safety
1.3 Recommendations
1.4 Installation
1.5 Waste management
1.6 Declaration of compliance
2.1 Overview
2.2 Accessories
2.3 First use
Product Description
6
3.1 Display description
3.2 Cooking modes
Use of the Oven
7
4.1 General notes on cleaning
4.2 Aquactiva Function
4.3 Maintenance
• Instructıon for removal and cleanıng of the
sıde racks
• Removal of the oven window
• Removal and cleaning of the glass door
• Changing the bulb
Oven Cleaning and Maintenance
11
5.1 F.A.Q.
Troubleshooting
13
Summary
EN 04

1. General Instructions
We thank you for choosing one of our products. For the best results with your oven, you should read
this manual carefully and retain it for future reference. Before installing the oven, take note of the serial
number so that you can give it to customer service staff if any repairs are required. Having removed the
oven from its packaging, check that it has not been damaged during transportation. If you have doubts,
do not use the oven and refer to a qualified technician for advice. Keep all of the packaging material
(plastic bags, polystyrene, nails) out of the reach of children. When the oven is switched on for the first
time, strong smelling smoke can develop, which is caused by the glue on the insulation panels
surrounding the oven heating for the first time. This is absolutely normal and, if it occurs, you should
wait for the smoke to dissipate before putting food in the oven. The manufacturer accepts no
responsibility in cases where the instructions contained in this document are not observed.
NOTE: the oven functions, properties and accessories cited in this manual will vary, depending on the
model you have purchased.
1.1 Safety Indications
Only use the oven for its intended purpose, that is only for the cooking of
foods; any other use, for example as a heat source, is considered improper
and therefore dangerous. The manufacturer cannot be held responsible for
any damage resulting from improper, incorrect or unreasonable usage.
The use of any electrical appliance implies the observance of some
fundamental rules:
- do not pull on the power cable to disconnect the plug from the socket;
- do not touch the appliance with wet or damp hands or feet;
- in general the use of adaptors, multiple sockets and extension cables is not
recommended;
- in case of malfunction and/or poor operation, switch off the appliance and
do not tamper with it.
1.2 Electrical Safety
ENSURE THAT AN ELECTRICIAN OR QUALIFIED TECHNICIAN MAKES THE
ELECTRICAL CONNECTIONS. The power supply to which the oven is
connected must conform with the laws in force in the country of
installation. The manufacturer accepts no responsibility for any damage
caused by the failure to observe these instructions. The oven must be
connected to an electrical supply with an earthed wall outlet or a
disconnector with multiple poles, depending on the laws in force in the
country of installation. The electrical supply should be protected with
suitable fuses and the cables used must have a transverse section that can
ensure correct supply to the oven.
CONNECTION
The oven is supplied with a power cable that should only be connected to
an electrical supply with 220-240 Vac power between the phases or
between the phase and neutral. Before the oven is connected to the
electrical supply, it is important to check:
- power voltage indicated on the gauge;
- the setting of the disconnector.
The grounding wire connected to the oven's earth terminal must be
connected to the earth terminal of the power supply.
WARNING
Before connecting the oven to the power supply, ask a qualified electrician
to check the continuity of the power supply's earth terminal. The
manufacturer accepts no responsibility for any accidents or other
problems caused by failure to connect the oven to the earth terminal or by
an earth connection that has defective continuity.
NOTE: as the oven could require maintenance work, it is advisable to keep
another wall socket available so that the oven can be connected to this if it
is removed from the space in which it is installed. The power cable must
only be substituted by technical service staff or by technicians with
equivalent qualifications.
1.3 Recommendations
After each use of the oven, a minimum of cleaning will help keep the oven
perfectly clean.
Do not line the oven walls with aluminium foil or single-use protection
available from stores. Aluminium foil or any other protection, in direct contact
with the hot enamel, risks melting and deteriorating the enamel of the insides.
In order to prevent excessive dirtying of your oven and the resulting strong
smokey smells, we recommend not using the oven at very high temperature. It
is better to extend the cooking time and lower the temperature a little. In
addition to the accessories supplied with the oven, we advise you only use
dishes and baking moulds resistant to very high temperatures.
1.4 Installation
The manufacturers have no obligation to carry this out. If the assistance of the
manufacturer is required to rectify faults arising from incorrect installation,
this assistance is not covered by the guarantee. The installation instructions
for professionally qualified personnel must be followed. Incorrect installation
may cause harm or injury to people, animals or belongings. The manufacturer
cannot be held responsible for such harm or injury.
The oven can be located high in a column or under a worktop. Before fixing,
you must ensure good ventilation in the oven space to allow proper
circulation of the fresh air required for cooling and protecting the internal
parts. Make the openings specified on last page according to the type of
fitting.
1.5 Waste management and environmental protection
This appliance is labelled in accordance with European Directive
2012/19/EU regarding electric and electronic appliances (WEEE). The
WEEE contain both polluting substances (that can have a negative effect on
the environment) and base elements (that can be reused). It is
important that the WEEE undergo specific treatments to
correctly remove and dispose of the pollutants and recover all
the materials. Individuals can play an important role in
ensuring that the WEEE do not become an environmental
problem; it is essential to follow a few basic rules:
- the WEEE should not be treated as domestic waste;
- the WEEE should be taken to dedicated collection areas managed by the
town council or a registered company.
In many countries, domestic collections may be available for large WEEEs.
When you buy a new appliance, the old one can be returned to the vendor
who must accept it free of charge as a one-off, as long as the appliance is of
an equivalent type and has the same functions as the purchased appliance.
SAVING AND RESPECTING THE ENVIRONMENT
Where possible, avoid pre-heating the oven and always try to fill it. Open
the oven door as infrequently as possible, because heat from the cavity
disperses every time it is opened. For a significant energy saving, switch off
the oven between 5 and 10 minutes before the planned end of the cooking
time, and use the residual heat that the oven continues to generate. Keep
the seals clean and in order, to avoid any heat dispersal outside of the
cavity. If you have an electric contract with an hourly tariff, the "delayed
cooking" programme makes energy saving more simple, moving the
cooking process to start at the reduced tariff time slot.
EN 05

2
3
4
5
6
1
1.6 Declaration of compliance
• By placing the mark on the appliance, we are confirming compliance
to all relevant European safety, health and environmental requirements
which are applicable in legislation for this product.
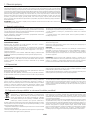
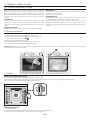
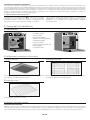
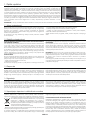
2. Product Description
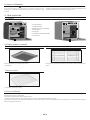
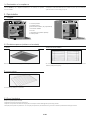
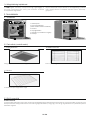
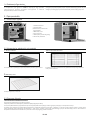
2.1 Overview
1. Control panel
2. Shelf positions
(lateral wire grid if included)
3. Metal grill
4. Drip pan
5. Fan (behind the steel plate)
6. Oven door
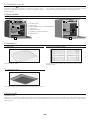
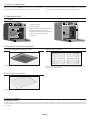
2.2 Accessories (According to model)
Drip pan
1
Collects the residues that drip during the cooking of foods on the grills.
Lateral wire grids
3
It located at both sides of the oven cavity. It holds metal grills and drip pans.
2
3
5
4
6
1
2.3 First Use
PRELIMINARY CLEANING
Clean the oven before using for the first time. Wipe over external surfaces with a damp soft cloth. Wash all accessories and wipe inside the oven with a
solution of hot water and washing up liquid. Set the empty oven to the maximum temperature and leave on for about 1 hour, this will remove any lingering
smells of newness.
EN 06
Metal grill
2
Holds baking trays and plates.
• Hereby, Candy Hoover Group Srl declares that the radio equipment is in
compliance with Directive 2014/53/EU. The full text of the EU declaration
of conformity is available at the following internet address:
www.candy-group.com.

10
1
3
4
7
8
6
5
2 9
3. Use of the Oven (According to model)
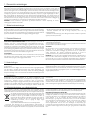
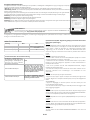
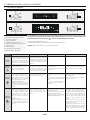
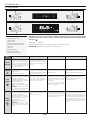
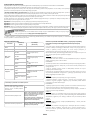
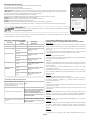
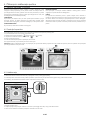
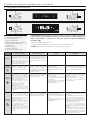
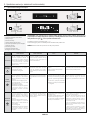
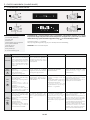
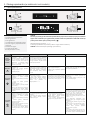
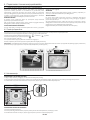
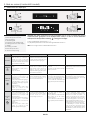
3.1 Display description
WARNING : the first operation to carry out after the oven has been installed or following the interruption
of power supply (this is recognizable the display pulsating and showing ) is setting the correct time. 12:00
The bottom right LED flashes at the same time ( ). This is achieved as follows.
•Set time with buttons."-" "+"
•Push the Menu button or wait 5 seconds than the clock is setted.
ATTENTION: The oven will only operate setting the clock
1. Thermostat selector knob
2. Thermostat signal lamp
3. End of cooking
4. Cooking time
5. Temperature or clock display
6. LCD display adjustment controls
7. Minute minder
8. Clock setting
9. Wifi signal lamp
10. Function selector knob
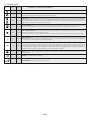
FUNCTION HOW TO DEACTIVATE WHAT IT DOES
NOTE
HOW TO USE
KEY LOCK
•Child Lock function is activated by
touching Set (+) for a minimum of 5
seconds. From this moment on all
other function are locked and the
display will flash 3 sec intervals STOP
and preset time intermittently.
•Child Lock function is deactivated by
touching touchpad Set (+) again for a
minimum of seconds. From this 5
moment on all functions are
selectable again.
•Push the central button 3 times
•Press the buttons "-" "+" to set
the required time
•Release all the buttons
•When the set time has elapsed, an
audible alarm is full stop after
activated this alarm will stop on its
own, however it can be stopped
immediately by pressing any button.
•Sounds an alarm at the end of the
set time.
•During the process, the display
shows the remaining time.
•Allows to use the oven as alarm clock
(could be activated either with operating
the oven or with out operating the oven)
•Select the cooking function with the
oven function knob, the temperature
you want to cook with the thermostat
knob.
• Push the central button 1 times
• Press the buttons "-" or "+"to set the
lenght of cooking required
• Release all buttons
NOTE: If the oven is switched off or
the lamp is functioning, the cooking
time schedule function will not work.
• It allows to preset the cooking time
required for the recipe chosen.
• To check how long is left to run press
the MENU button 1 time.
• To alter/change the preset time press
MENU and "-" "+" buttons.
•Push any button to stop the signal.
Push the central button to return to
the clock function.
•At the end of the program the program
gives 3 warning signals and “End” appears
on the display.
Set the function selector switch to "0" to
return to the clock function.
•At the time set, the oven will switch
off. To switch off manually, turn the
oven function selector to position O.
•Enables you to set the end of
cooking time
•To check the preset time push the
central button 2 times
•To modify the preset time press
buttons MENU + "-" "+"
•Select the cooking function with the
oven function knob, the temperature
you want to cook with the thermostat
knob.
•Push the central button times 2
•Press the buttons "-" "+" to set the
time at which you wish the oven to
switch off
•Release the buttons
NOTE: If the oven is switched off or
the lamp is functioning, the cooking
time schedule function will not work.
•This function is typically used with
“cooking time” function.
For example if the dish has to be cooked for
45 minutes and needs to be ready by
12:30, simply select the required
function, set the cooking time to 45
minutes and the end of cooking time to
12:30.
•At the end of the cooking set time, the
oven will switch off automatically and an
audible alarm will ring.
•Cooking will start automatically at 11:45
(12:30 minus 45 mins) and will continue
until the pre-set end-of-cooking-time,
when the oven will switch itself off
automatically.
END OF
COOKING
COOKING
TIME
MINUTE
MINDER
EN 07
10
1
2 9

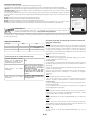
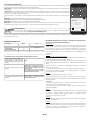
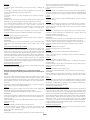
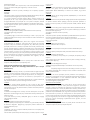
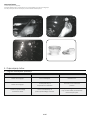
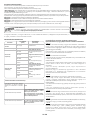
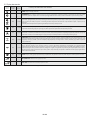
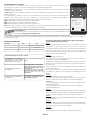
1. Program selection / 2. Program duration / 3. Cooking start setting / 4- Dedicated recipes selection / 5. Offline and vocal assistant /
6. Tips, suggestions and online user manual
1 2
3 4
6
5
ELETTRONICA ZERO WIFI FUNCTION
For all the details related to the link between app and product, refer to the Quick Guide.
The Quick Guide is available on: go.candy-group.com/candy-ov
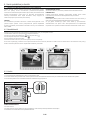
Wi Fi has two different positions on the cooking selector:
• Wi Fi on: Wi Fi is switched on only if the oven is already enrolled to your device. In this position the oven will be only controlled by
remote.
• Wi Fi reset: After leaving the selector on Wi Fi reset for 30”, Bluetooth will switch on and you will be able to enroll the oven to your
device within 5’.
If the enrollment is successful, the oven will be controlled by remote and the Wi Fi icon will switch on. If the enrollment is unsuccessful,
Wi Fi will switch off and the oven will be reset.
To proceed with a new enrollment the cooking program selector has to be turned out from Wi Fi reset position and moved again on it.
Note: Install the App on your device before starting enrolling
Note: The device where the App is installed must have Bluetooth activated
Note: For both Wi Fi positions, the touch buttons do not work.
Note: It is important to establish a good Wi-Fi signal strength between the home router and the appliance. When the oven is trying to
connect to router the icon will blink 3” on and 1” off, when it is already connected the icon will switch on.
EN 08
CANDY SIMPLY-FI:
For detailed information about HOW TO CONNECT your simply-Fi appliance and HOW TO USE it at its
best, go to http://www.candysimplyfi.com
WIRELESS PARAMETERS
Product information for networked equipment
power consumption of the product in
networked standby if all wired network
ports are connected and all wireless
network ports are activated:
2,0 W
How to activate wireless network port:
Starting from an oven that is not
enrolled, putting the right knob on the
Reset position. Wifi module is
switched on after 30".
If oven is enrolled with WiFi off, putting
the right knob on WiFi position the WiFi
module is switched on.
How to deactivate wireless network
port:
If oven is enrolled, putting the right
knob on Reset position the WiFi
module is switched off.
Quick Guide Candy OVEN - Enrollment on App
Procedure for devices with Bluetooth 4.0 (or higher)
IMPORTANT
This quick guide illustrates the steps to follow to enroll your appliance on
the App Candy simply-Fi, using a device with Bluetooth 4.0 (or higher)
technology. In this case, the procedure is simplified and faster (Easy
Enrollment). If you are using a device without Bluetooth technology (or less
than 4.0), please follow the instructions described on the other side of this
guide.
STEP 1
• Mark down the appliance Serial Number.
• Mark down the Wi-Fi Name and Password (WPA/WEP Key) which are
normally placed on the back of your Wi-Fi router.NOTES
• The frequency of the home Wi-Fi network has to be set on the 2.4 GHz
band. You cannot configure the appliance if your home network is set to the
5 GHz band.
• If you are having trouble locating the WPA/WEP Password, please contact
your Internet Provider.
• Please make sure your smartphone is connected to the same Wi-Fi
network and has the Bluetooth enabled within the “Settings”. Refer to the
manual for more details.
STEP 2
• Download the Candy simply-Fi App from the Store.
• Open the Candy simply-Fi App and create your user profile by taping on
“Register”. Accept the privacy policy and fill in the required fields.
NOTES
• The App is available for Android (version 4.4 or higher) and iOS (version
8.0 or higher) devices.
• If you already have a Candy simply-Fi user profile, you can login using your
credentials.
STEP 3
• In the homepage, tap on the icon with the three bars on the top left to
enter your profile, then tap on “REGISTER NEW APPLIANCE” and select the
name of the product that you want to enroll.
STEP 4
• Insert the purchase date of your appliance (DD/MM/YYYY), then tap on
“Proceed”.
STEP 5
• Insert the 16 digits of the serial number or scan the QR code on the
appliance. Tap on “Next”. Check data correctness of the data and tap on
“Confirm”. Once the system has recognized the product, tap on “Next”.
STEP 6
On the appliance:
1) Turn the knob to the WI-FI RESET program and wait 30 seconds.
2) When the Wi-Fi indicator starts blinking quickly, Bluetooth will come on
for 5' and you can proceed with enrollment within 5 minutes.
IEEE 802.11b/g/n
2401÷2483
100
Standard
Frequency Band(s) [MHz]
Maximum Power [mW]
Technology
Wi-Fi
Bluetooth v4.2, BR/EDR, BLE
2402÷2480
10
BLE

In App:
• Tap on “Confirm”. Wait for APP to connect to the appliance.
NOTES
• In case of any issue, tap “Retry”, making sure you have enabled Bluetooth
on your device (smartphone / tablet). If the process has not been
completed correctly yet, tap on “Proceed with Standard Enrollment”.
• To ensure correct data transfer, we recommend you to stay with the
device close to the appliance.
STEP 7
• Insert the password of your home Wi-Fi network.
• Select the type of password (WEP or WPA), then tap on “Confirm”.
• The enrollment process is now finished.
NOTES
• If this is not automatically synchronised by the App, please insert the
name of your home Wi-Fi network in the first box; pay attention to the
difference between lowercase and uppercase.
IF THE SET UP IS NOT SUCCESSFUL
It's important to establish a good Wi-Fi signal strength between the home
router and the appliance: low Wi-Fi signal strength would cause the failure
of the final stage of the set up. To assess if this is the case, start the
connection process again from Step 1; when you get to Step 6, when you
get to Step 6, place your device (smartphone or tablet) next to the router
and search for “WIFIOVEN-xyzk” net generated by the appliance. If this
does not come up as an option, it means that the router cannot see the
appliance. In this case, we highly recommend you to bring the router near
the appliance (if possible) or contact your internet provider to purchase a
compatible “Wi-Fi Range Extender” to increase the signal strenght.
Remote control mode
• Turn the program selection knob to the WI-FI position: the wifi light will
turn on and you can now control the oven remotely.
NOTES
• Warning, if the enrolled oven is left on the WI-FI RESET position for more
than 5 minutes, the oven will be reset and you will have to proceed with a
new enrollment.
Quick Guide Candy OVEN - Enrollment on App
Procedure for devices without Bluetooth 4.0 (or less than 4.0)
IMPORTANT
This quick guide outlines the steps you should follow to enroll your
appliance using the App Candy simply-Fi, utilizing a device without
Bluetooth technology. We recommend you to proceed with a
smartphone/tablet equipped with this technology to make the procedure
simpler.
If you are using a device with Bluetooth technology (or higher than 4.0),
please follow the instructions described on the other side of this guide.
STEP 1
• Make a note of the appliance Serial Number and Wi-Fi Name and
Password (WPA/WEP Key), which are normally found on the back of your
Wi-Fi router.
• Please make sure that your smartphone/ tablet is connected to the same
Wi-Fi network.
NOTES
• The frequency of the home Wi-Fi network has to be set on the 2.4 GHz
band. You can not configure the appliance if your home network is set to
the 5 GHz band.
• If you are having trouble locating the WPA/WEP Password, please contact
your Internet Provider.
STEP 2
• Download the Candy simply-Fi App from the Store.
• Open the Candy simply-Fi App and create your user profile by taping on
“Register”. Accept the privacy policy and fill in the required fields.
NOTES
• The App is available for Android (version 4.4 or higher) and iOS (version
8.0 or higher) devices.
• If you already have a Candy simply-Fi user profile, you can login using your
credentials.
STEP 3
• In the homepage, tap on the icon with the three bars on the top left to
enter your profile, then tap on “REGISTER NEW APPLIANCE” and select the
name of the product that you want to enroll.
STEP 4
• Insert the purchase date of your appliance (DD/MM/YYYY), then tap on
“Proceed”.
STEP 5
• Insert the 16 digits of the serial number or scan the QR code on the
appliance. Tap on “Next”. Check data correctness and tap on “Confirm”.
Once the system has recognized the product, tap on “Next”.
STEP 6
• On the appliance - Turn the knob to the WI-FI RESET program and wait 5
minutes. The countdown will appear on the App, after which you can
complete enrollment.
• In App - Tap on “Confirm”.
NOTES
• To ensure correct data transfer, we recommend that you stay with the
device close to the appliance.
STEP 7
• Exit the Candy simply-Fi App.
• Go to your device Wi-Fi settings.
STEP 8
• In the list of available Wi-Fi networks, select “WIFIOVEN-xyzk”.
NOTES
• If you do not find it, wait few more seconds or proceed with a new scan.
STEP 9
• Exit from the settings of your device.
• Return to the Candy simply-Fi App and wait for the App to detect the
appliance.
• Once the “Wi-Fi Network is active” screen appears, tap on “Next”.
STEP 10
• Insert the password of your home Wi-Fi network.
• Select the type of password (WEP or WPA), then tap on “Confirm”.
NOTES
• If this is not automatically synchronised by the App, please insert the
name of your home Wi-Fi network in the first box; pay attention to the
difference between lowercase and uppercase.
STEP 11
• Wait until the end of the data transfer process between the App and the
product, then tap on “Confirm”. “CONNECTED” appears on the appliance
display and then “REMOTE CONTROL ON”.
• The enrollment process is now finished.
IF THE SET UP IS NOT SUCCESSFUL
It's important to establish a good Wi-Fi signal strength between the home
router and the appliance: low Wi-Fi signal strength would cause the failure
of the final stage of the set up. To assess if this is the case, start the
connection process again from Step 1; when you get to Step 6, place your
device (smartphone or tablet) next to the router and search for
“WIFIOVEN-xyzk” net generated by the appliance. If this does not come up
as an option, it means that the router cannot see the appliance. In this case,
we highly recommend you to bring the router near the appliance (if
possible) or contact your internet provider to purchase a compatible “Wi-Fi
Range Extender” to increase the signal strenght.
Remote control mode
• Turn the program selection knob to the WI-FI position: the wifi light will
turn on and you can now control the oven remotely.
NOTES
• Warning, if the enrolled oven is left on the WI-FI RESET position for more
than 5 minutes, the oven will be reset and you will have to proceed with a
new enrollment.
EN 09

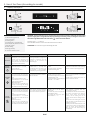
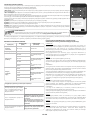
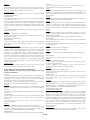
T °C
Suggested
180
210
230
Function
Dial
Function (Depends on the oven model)
LAMP: Turns on the oven light.
220
220
190
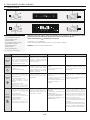
3.2 Cooking Modes
*
*Tested in accordance with the EN 60350-1 for the purpose of energy consumption declaration and energy class.
GRILL: use the grill with the door closed.
The top heating element is used alone and you can adjust the temperature. Five minutes preheating is required to get the
elements red-hot. Success is guaranteed for grills, kebabs and gratin dishes. White meats should be put at a distance from the
grill; the cooking time is longer, but the meat will be tastier. You can put red meats and fish fillets on the shelf with the drip tray
underneath. The oven has two grill positions: Grill: 2140 W Barbecue: 3340 W
MULTI-LEVEL: We recommend you use this method for poultry, pastries, fish and vegetables. Heat penetrates into the food
better and both the cooking and preheating times are reduced. You can cook different foods at the same time with or without
the same preparation in one or more positions. This cooking method gives even heat distribution and the smells are not mixed.
Allow about ten minutes extra when cooking foods at the same time.
DEFROST: When the dial is set to this position. The fan circulates air at room temperature around the frozen food so that it
defrosts in a few minutes without the protein content of the food being changed or altered.
FAN + LOWER ELEMENT: The bottom heating element is used with the fan circulating the air inside the oven. This method is
ideal for juicy fruit flans, tarts, quiches and pâté.
It prevents food from drying and encourages rising in cakes, bread dough and other bottom-cooked food.
Place the shelf in the bottom position.
CONVENTIONAL: Both top and bottom heating elements are used. Preheat the oven for about ten minutes. This method is
ideal for all traditional roasting and baking. For seizing red meats, roast beef, leg of lamb, game, bread, foil wrapped food
(papillotes), flaky pastry. Place the food and its dish on a shelf in mid position.
PIZZA: With this function hot air circulated in the oven to ensure perfect result for dishes such as pizza or cake.
COOK LIGHT: This function allows to cook in a healthier way, by reducing the amount of fat or oil required. The combination of
heating elements with a pulsating cycle of air ensures a perfect baking result.
WIFI ON: Oven allows wifi connection.
WIFI RESET: It allows wifi connection to be restarted.
EN 10
*
T °C
Range
50 ÷ MAX
50 ÷ MAX
50 ÷ MAX
50 ÷ MAX
50 ÷ MAX
50 ÷ MAX

4. Oven cleaning and maintenance
4.1 General notes on cleaning
The lifecycle of the appliance can be extended through regular cleaning.
Wait for the oven to cool before carrying out manual cleaning operations.
Never use abrasive detergents, steel wool or sharp objects for cleaning, so
as to not irreparably damage the enamelled parts. Use only water, soap or
bleach-based detergents (ammonia).
GLASS PARTS
It is advisable to clean the glass window with absorbent kitchen towel after
every use of the oven. To remove more obstinate stains, you can use a
detergent-soaked sponge, well wrung out, and then rinse with water.
OVEN WINDOW SEAL
If dirty, the seal can be cleaned with a slightly damp sponge.
ACCESSORIES
Clean accessories with a wet, soapy sponge before rinsing and drying them:
avoid using abrasive detergents.
DRIP PAN
After using the grill, remove the pan from the oven. Pour the hot fat into a
container and wash the pan in hot water, using a sponge and washing-up
liquid.
If greasy residues remain, immerse the pan in water and detergent.
Alternatively, you can wash the pan in the dishwasher or use a commercial
oven detergent. Never put a dirty pan back into the oven.
EN 11
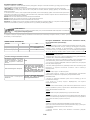
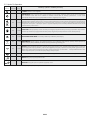
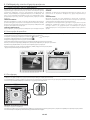
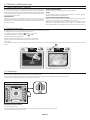
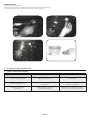
4.2 Aquactiva Function
The Aquactiva procedure uses steam to help remove remaining fat and food particles from the oven.
1. Pour 300 ml of water into the Aquactiva container at the bottom of the oven.
2. Set the oven function to Static ( )or Bottom ( )heater
3. Set the temperature to the Aquactiva icon
4. Allow the program to operate for 30 minutes.
5. After 30 minutes switch off the program and allow the oven to cool down.
6. When the appliance is cool, clean the inner surfaces of the oven with a cloth.
Warning: Make sure that the appliance is cool before you touch it.
Care must be taken with all hot surfaces as there is a risk of burns.
Use distilled or drinkable water.
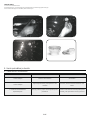
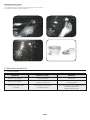
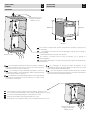
INSTRUCTION FOR REMOVAL AND CLEANING OF THE SIDE RACKS
1. Remove the wire racks by pulling them in the direction of the arrows (see below)
2. To clean the wire racks either put them in the dishwasher or use a wet sponge, ensuring that they are dried afterwards.
3. After the cleaning process install the wire racks in reverse order.
4.3 Maintenance
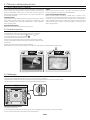
REMOVAL OF THE OVEN WINDOW
1. Open the front window.
2. Open the clamps of the hinge housing on the right and left side of the front window by pushing them downwards.
3. Replace the window by carrying out the procedure in reverse.
300 ml

LOW-E
1
2
3
1.
2.
3.
4.
5.
6.
7.
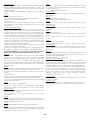
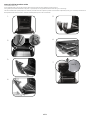
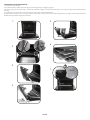
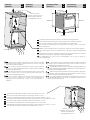
REMOVAL AND CLEANING OF THE GLASS DOOR
1. Open the oven door.
2.3.4. Lock the hinges, remove the screws and remove the upper metal cover by pulling it upwards.
5.6. Remove the glass, carefully extracting it from the oven door (NB: in pyrolytic ovens, also remove the second and third glass (if present)).
7. At the end of cleaning or substitution, reassemble the parts in reverse order.
On all glass, the indication "Low-E" must be legible and positioned on the left side of the door, close to the left-hand lateral hinge. In this way, the printed
label of the first glass will be inside the door.
EN 12

CHANGING THE BULB
1. Disconnect the oven from the mains supply.
2. Undo the glass cover, unscrew the bulb and replace it with a new bulb of the same type.
3. Once the defective bulb is replaced, replace the glass cover.
5. Troubleshooting
5.1 FAQ
PROBLEMĂ POSSIBLE CAUSE SOLUTION
The oven does not heat up
The clock is not set Set the clock
A cooking function and
temperature has not been set
Ensure that the necessary
settings are correct
The oven does not heat up
Steam and condensation on
the user interface panel
Clean with a microfiber cloth the user
interface panel to remove the
condensation layer
No reaction of the touch
user interface
EN 13

Generelle advarsler
• Under tilberedning kan fugt kondensere inde i
ovnrummet eller på lågens glas. Dette er helt
normalt. For at reducere denne effekt skal man
vente 10 til 15 minutter efter at ovnen er blevet
tændt med at komme fødevarer i den. Kondensen
forsvinder i alle tilfælde, når ovnen når
tilberedningstemperaturen.
• Tilbered grøntsager i en beholder med låg i
stedet for i en åben bakke.
• Undgå at efterlade mad inde i ovnen længere
end 15/20 minutter efter at den er færdig.
• ADVARSEL: apparatet og dets tilgængelige dele
bliver varme under brug. Vær forsigtig; undlad at
røre varme dele.
• ADVARSEL: De tilgængelige dele kan blive
varme, når grillen er i brug. Børn skal opholde sig
på sikker afstand.
• ADVARSEL: Sørg for, at apparatet er slukket,
inden pæren udskiftes, for at undgå elektrisk stød.
• ADVARSEL: For at undgå en fare som følge af
utilsigtet nulstilling af afbryderen, må apparatet
ikke strømforsynes via en ekstern skifterenhed,
såsom en timer eller tilsluttet et kredsløb, der
regelmæssigt tændes og slukkes.
• Børn under 8 skal holdes på sikker afstand fra
apparatet, hvis de ikke er under konstant opsyn.
• Børn må ikke lege med enheden.
• Apparatet må kun bruges af personer på 8 år
eller ældre, og af personer med begrænset fysisk,
sensorisk eller mental kapacitet, uden erfaring
eller kendskab til produktet, hvis de overvåges
eller instrueres om apparatets funktion på en
sikker måde og gøres bekendt med de mulige
risici.
• Rengøring og vedligeholdelse må ikke udføres af
børn uden opsyn.
• Brug ikke ru eller slibende materialer eller
skarpe metalskrabere til at rengøre ovnlågens
glas, da de kan ridse overfladen og få glasset til at
gå i stykker.
• Ovnen skal slukkes, før de aftagelige dele tages
ud. Efter rengøring skal de samles som beskrevet i
brugsanvisningen.
• Brug kun kødsonden anbefalet til denne ovn.
• Brug ikke en damprenser til rengøring.
• Elkablet med et stik, som er egnet til den
spænding, strøm og belastning, der er angivet på
typeskiltet. Kablet skal være jordet. Stikkontakten
skal være egnet til den belastning, som er angivet
på typeskiltet, og jordkontakten skal være
tilsluttet og aktiveret. Jordlederen er gul/grøn.
Denne handling skal udføres af en kvalificeret
fagperson. Kontakt en kvalificeret elektriker, hvis
stikkontakten og apparatets stik ikke passer
sammen, for at få udskiftet stikkontakten til en
anden passende type. Stikket og stikkontakten
skal opfylde de aktuelle standarder i
installationslandet. Tilslutning til strømkilden kan
også ske ved at placere en alpolet afbryder
mellem apparatet og strømkilden. Afbryderen
skal være egnet til den maks. tilsluttede
belastning og opfylde kravene i den gældende
lovgivning. Afbryderen må ikke omfatte det
gul/grønne jordkabel. Der skal være nem adgang
til stikkontakten eller den alpolede afbryder, som
benyttes til forbindelsen, når apparatet er
installeret.
• Frakoblingen kan ske ved at have adgang til
stikket eller ved at indbygge en afbryder i den
faste kabelføring i overensstemmelse med
retningslinjerne for kabelføring.
• Hvis strømkablet er beskadiget , skal det
udskiftes med et kabel eller specialbundt, som fås
ved producenten eller ved at kontakte
kundeserviceafdelingen. Strømkablet skal være af
typen H05V2V2-F. Denne handling skal udføres af
en kvalificeret fagperson. Jordlederen (gulgrøn)
skal være ca. 10 mm længere end de andre ledere.
I forbindelse med reparationer skal du kontakte
kundeserviceafdelingen og udelukkende anvende
originale reservedele.
• Manglende overholdelse af ovennævnte kan
forringe apparatets sikkerhed og medføre
bortfald af garantien.
• Stort spild skal fjernes inden rengøring.
• Et langvarigt strømforsyningssvigt under en
opstående kogefase kan forårsage en fejl i
monitoren. I dette tilfælde skal du kontakte
kundeservice.
• Apparatet må ikke installeres bag en låge.
Herved undgås overophedning.
DK 14

• Ved anbringelse af den indvendige rist skal man
sørge for, at stoppet vender opad og er placeret
bagest i ovnrummet. Risten skal sættes helt ind i
ovnrummet.
• ADVARSEL: Beklæd ikke ovnens vægge med
aluminiumsfolie eller engangsbeskyttelse som
kan købes i butikker. Aluminiumsfolie eller anden
beskyttelse, som kommer i direkte kontakt med
varm emalje, risikerer at smelte og ødelægge
emaljen indvendigt i ovnen.
• ADVARSEL: Fjern aldrig ovnlågens tætning.
• FORSIGTIG: Fyld ikke bunden af ovnrummet
med vand under tilberedning eller mens ovnen er
varm.
• Ingen yderligere betjening/indstilling er
nødvendig for at betjene apparatet ved de
nominelle frekvenser.
DK 15

DK 16
Generelle anvisninger
17
1.1 Sikkerhedsanvisninger
1.2 Elektrisk sikkerhed
1.3 Anbefalinger
1.4 Installation
1.5 Affaldshåndtering
1.6 Overensstemmelseserklæring
2.1 Oversigt
2.2 Tilbehør
2.3 Første brug
Produktbeskrivelse
18
3.1 Beskrivelse af display
3.2 Tilberedningsfunktioner
Brug af ovnen
19
4.1 Overordnede bemærkninger om
rengøring
4.2 Aquactiva-funktion
4.3 Vedligeholdelse
• Anvisninger til afmontering og rengøring
af sidestativer
• Fjernelse af ovnvinduet
• Fjernelse og rengøring af glasdøren
• Udskiftning af pæren
Rengøring Aog vedligeholdelse af ovnen
23
5.1 Ofte stillede spørgsmål
Fejlfinding
25
Opsummering

DK 17
1. Generelle anvisninger
Vi takker dig for, at du har valgt et af vores produkter. For at få de bedste resultater med din ovn, bør du
læse denne vejledning omhyggeligt og gemme den til senere brug. Før du installerer ovnen, skal du
notere serienummeret, så du kan give det til kundeservicepersonale, hvis der er behov for reparationer.
Efter at have taget ovnen ud af emballagen, skal du kontrollere, at den ikke er blevet beskadiget under
transporten. Hvis du er i tvivl, må du ikke bruge ovnen, og du skal kontakte en kvalificeret tekniker for at
få rådgivning. Opbevar alt emballagemateriale (plastposer, polystyren, negle) utilgængeligt for børn.
Når ovnen tændes for første gang, kan der udvikles stærkt ildelugtende røg, som skyldes limen på
isoleringspladerne, der omgiver ovnen, bliver varmet op for første gang. Dette er helt normalt, og hvis
det sker, skal du vente på, at røgen spredes, før du kommer mad i ovnen. Producenten fralægger sig
ethvert ansvar i tilfælde, hvor instruktionerne i dette dokument ikke overholdes.
BEMÆRK: Ovnens funktioner, egenskaber og tilbehør beskrevet i denne vejledning vil variere,
afhængigt af modellen du har købt.
1.1 Sikkerhedsanvisninger
Brug kun ovnen til det tilsigtede formål, hvilket er madlavning. Enhver
anden anvendelse, som f.eks. varmekilde betragtes som ukorrekt og derfor
farlig. Fabrikanten kan ikke holdes ansvarlig for eventuelle skader som følge
af forkert, ukorrekt eller uacceptabel brug. Anvendelsen af ethvert elektrisk
apparat indebærer overholdelsen af nogle grundlæggende regler:
- Træk ikke strømkablet ud for at afbryde stikket fra stikkontakten.
- Rør ikke apparatet med våde eller fugtige hænder eller fødder.
- Generelt anbefales det ikke at bruge adaptere, flere stik og
udvidelseskabler.
- I tilfælde af funktionsfejl og / eller dårlig drift skal du slukke for apparatet
og ikke prøve at reparere det.
1.2 Elektrisk Sikkerhed
SØRG FOR AT EN ELEKTRIKER ELLER EN KVALIFICERET TEKNIKER
FORETAGER STRØMFORBINDELSERNE. Strømforsyningen, som ovnen er
tilsluttet, skal være i overensstemmelse med gældende lovgivning i
installationslandet. Producenten fralægger sig ethvert ansvar for skader
forårsaget af manglende overholdelse af disse instruktioner. Ovnen skal
tilsluttes en elforsyning via en jordet stikkontakt eller en afbryder med flere
poler afhængigt af gældende lovgivning i installationslandet. Elforsyningen
skal beskyttes med passende sikringer, og de anvendte kabler skal have et
tværsnit, som kan sikre korrekt strømforsyning af ovnen.
TILSLUTNING
Ovnen leveres med et strømkabel, der kun må tilsluttes en elforsyning med
220-240 Vac 50 Hz mellem faserne eller mellem fase og nul. Før ovnen
tilsluttes elforsyningen, er det vigtigt at kontrollere:
- Strømspænding angivet på måleren.
- Indstillingen af afbryderen.
Jordforbindelsesledningen forbundet til ovnens jordklemme skal tilsluttes
jordforbindelsen på strømforsyningen.
ADVARSEL
Før du tilslutter ovnen til strømforsyningen, skal du bede en autoriseret
elektriker om at kontrollere kontinuiteten på strømforsyningens
jordklemme. Fabrikanten fralægger sig ethvert ansvar for ulykker eller
andre problemer, der skyldes manglende tilslutning af ovnen til
jordklemmen eller til en jordforbindelse, der har defekt kontinuitet.
BEMÆRK: da ovnen kan kræve vedligeholdelsesarbejde, anbefales det at
have en anden stikkontakt til rådighed, så ovnen kan tilsluttes, hvis den
fjernes fra det rum, hvor den er installeret. Strømkabel må kun udskiftes af
teknisk servicepersonale eller af teknikere med tilsvarende kvalifikationer.
1.3 Anbefalinger
Efter hver brug af ovnen vil et minimum af rengøring hjælpe med at holde
ovnen helt ren.
Beklæd ikke ovnens vægge med aluminiumsfolie eller engangsbeskyttelse
som kan købes i butikker. Aluminiumsfolie eller anden beskyttelse, som
kommer i direkte kontakt med varm emalje, risikerer at smelte og ødelægge
emaljen indvendigt i ovnen. For at forhindre overdreven tilsmudsning af ovnen
og den deraf følgende stærke røglugt anbefaler vi, at ovnen ikke bruges ved
meget høj temperatur. Det er bedre at forlænge tilberedningstiden og sænke
temperaturen lidt. Ud over det tilbehør, der leveres med ovnen, anbefaler vi
kun at bruge beholdere og bageforme, der er modstandsdygtige over for
meget høje temperaturer.
1.4 Installation
Producenten har ingen forpligtelse til at udføre installationen. Hvis
producentens hjælp er påkrævet for at afhjælpe fejl som følge af ukorrekt
installation, dækkes denne assistance ikke af garantien.
Installationsvejledningen til fagligt kvalificeret personale skal følges. Forkert
installation kan medføre skade eller personskade på mennesker, dyr eller
ejendele. Producenten kan ikke holdes ansvarlig for sådanne skader eller
personskader.
Ovnen kan placeres højt i en søjle eller under et køkkenbord. Før fastgørelsen
skal du sørge for god ventilation i ovnrummet for at muliggøre korrekt
cirkulation af den friske luft, der kræves til afkøling og beskyttelse af de indre
dele. Lav åbningerne angivet på sidste side i henhold til typen af montering.
1.5 Affaldshåndtering og miljøbeskyttelse
Dette apparat er mærket i overensstemmelse med europæisk direktiv
2012/19/EU om affald af elektrisk og elektronisk udstyr (WEEE). Apparatet
indeholder både forurenende stoffer (der kan have negative indvirkninger
på miljøet) og basiskomponenter (der kan genanvendes). Det
er vigtigt, at apparatet gennemgår specifikke behandlinger for
korrekt at fjerne og bortskaffe forurenende stoffer og
genindvinde alle brugbare materialer. Personer kan spille en
vigtig rolle i forhold til at sikre, at apparatet ikke bliver et
miljømæssigt problem; det er vigtigt at følge nogle
grundlæggende regler:
- Apparatet må ikke behandles som husholdningsaffald.
- Apparatet skal afleveres på en genbrugsstation administreret af
kommunen eller af en godkendt virksomhed.I mange lande er afhentning
af storskrald en mulighed. Når du køber et nyt apparat, kan du aflevere det
brugte til forhandleren, der tager gratis imod det,så længe apparatet er af
tilsvarende type eller har de samme funktioner, som det nye apparat.
BESPARELSE OG RESPEKT FOR MILJØET
Undgå så vidt muligt at foropvarme ovnen og forsøg altid at fylde den. Åbn
ovnlågen så sjældent som muligt, fordi varme fra ovnrummet undslipper,
hver gang den åbnes. For en betydelig energibesparelse kan du slukke for
ovnen mellem 5 og 10 minutter før den planlagte afslutning af
tilberedningen, og bruge den resterende varme, som ovnen fortsætter
med at generere. Hold tætningerne rene og i god stand for at undgå at
varme slipper ud af ovnrummet. Hvis du har en kontrakt med
elforsyningsselskabet med en tarif som afhænger af tidspunktet, gør
programmet "Forsinket madlavning" det nemmere at spare energi, da du
kan flytte madlavningsprocessen, så den går i gang med den reducerede
tarif.

DK 18
2
3
4
5
6
1
1.6 Overensstemmelseserklæring
Ved at placere -mærket på dette produkt bekræfter vi, at det
overholder alle de relevante europæiske sikkerhedsanvisninger samt de
krav til sundhed og miljø, der er gældende for dette produkt.
2. Produktbeskrivelse
2.1 Oversigt
1. Kontrolpanel
2. Hyldepositioner
(vandret ledningsnet hvis inkluderet)
3. Metalrist
4. Drypbakke
5. Ventilator (bag stålpladen)
6. Ovnlåge
2.2 Tilbehør (efter model)
Drypbakke
1
Indsamler de safter der drypper af, når mad tilberedes med grill-
funktionerne.
Trådstativer i siden
3
Sidder i begge sider af ovnrummet. De holder metalriste og bageplader.
2
3
5
4
6
1
2.3 Inden første brug
INDLEDENDE RENGØRING
Rengør ovnen, før du bruger den for første gang. Tør ydre overflader med en fugtig, blød klud. Vask alt tilbehør og tør ovnens indvendige dele med en
opløsning af varmt vand og opvaskemiddel. Indstil den tomme ovn til den maksimale temperatur og lad den stå i ca. 1 time, dette fjerner den nye ovns
vedvarende lufte.
Metalrist
2
Holder bakker og plader
Candy Hoover Group Srl erklærer herved, at radioudstyret er i
o v e r e n s s t e m m e l s e m e d d i r e k t i v 2 0 1 4 / 5 3 / E U . E U -
overensstemmelseserklæringens fulde ordlyd findes på følgende
internetadresse: www.candy-group.com.

DK 19
10
1
3
4
7
8
6
5
2 9
3. Brug af ovnen (i henhold til model)
3.1 Beskrivelse af display
ADVARSEL: Den første handling der skal udføres, efter at ovnen er installeret eller efter afbrydelse af
strømforsyningen (dette kan ses ved at displayet blinker og viser 12:00) er, at
indstille den korrekte tid. Nederste højre LED blinker samtidig ( ). Det gøres på følgende måde.
• Indstil tiden med "-" "+" knapperne.
• Tryk på Menuknappen eller vent 5 sekunder på at uret indstilles.
VIGTIGT: Ovnen virker kun, hvis uret er indstillet.
1. Termostatvælgerknap
2. Termostatsignallampe
3. Sluttidspunkt for tilberedning
4. Tilberedningstid
5. Temperatur- eller urvisning
6. LCD-displayets justeringsknapper
7. Minutur
8. Indstilling af ur
9. Wi-fi-signallampe
10. Funktionsvælgerknap
FUNKTION SÅDAN DEAKTIVERER DU HVAD GØR DEN
BEMÆRK
SÅDAN BRUGES
TASTLÅS
• Børnesikringsfunktionen aktiveres
ved at trykke på Indstil (+) i mindst 5
sekunder. Fra dette øjeblik er alle
andre funktioner låst, og displayet
blinker STOP og forudindstillet tid på
skift i 3 sekunders intervaller.
• Børnesikringsfunktionen
deaktiveres ved at trykke på Indstil
(+) igen i mindst 5 sekunder. Fra
dette øjeblik er alle funktioner igen
tilgængelige.
• Tryk på den midterste knap 3
gange. Tryk på ”- ” eller ”+ ”
knapperne for at indstille tiden.
• Slip alle knapperne.
•Når den indstillede tid er gået,
aktiveres en akustisk alarm for fuldt
stop. Denne alarm stopper af sig selv,
men den kan stoppes straks ved at
trykke på en vilkårlig knap.
•Afgiver et lydsignal ved slutningen af
en indstillet tid.
•Under processen viser displayet den
resterende tid.
• Giver mulighed for at bruge ovnen som
vækkeur (kan aktiveres enten ved
betjening af ovnen eller uden betjening
af ovnen)
• Vælg tilberedningsfunktionen med
ovnfunktionsknappen og d en
temperatur, du vil tilberede på med
termostatknappen.
• Tryk på den midterste knap 1 gange.
• Tryk på knapperne "-" eller "+"for at
indstille længden af den ønskede
madlavning
• Slip alle knapper. BEMÆRK: Hvis
ovnen er slukket, eller lampen
fungerer, fungerer funktionen til
tilberedningstid ikke.
• Det giver mulighed for at indstille den
tilberedningstid, der kræves for den
valgte opskrift.
• For at kontrollere hvor lang tid der er
tilbage, tryk på knappen MENU 1 gang.
•For at skifte/ændre den indstillede
tid, tryk på MENU og "-" "+" knapperne.
•Tryk på en vilkårlig knap for at
stoppe signalet. Tryk på den
midterste knap for at vende tilbage
til urfunktionen.
•Efter programmets afslutning giver
programmet 3 advarselssignaler, og “End”
(Slut) vises på displayet.
Indstil funktionsvælgerknappen til "0" for
at vende tilbage til urfunktionen.
•På det indstillede tidspunkt slukkes
ovnen. Drej funktionsvælgeren til
position O for at slukke manuelt.
• Lader dig indstille slutningen på
tilberedningstiden.
• Tryk på den centrale knap 2 gange
f o r a t k o n t r o l l e r e d e n
forudindstillede tid
• Tryk på knapperne MENU + "-" og
"+” for at ændre den indstillede tid.
• Vælg tilberedningsfunktionen med
ovnfunktionsknappen og d en
temperatur, du vil tilberede på med
termostatknappen.
• Tryk på den midterste knap 2 gange.
• Tryk på knapperne "-" "+” for at
indstille det tidspunkt, du vil have at
ovnen skal slukke på.
• Slip knapperne.
BEMÆRK: Hvis ovnen er slukket, eller
l a m p e n f u n g e r e r, f u n g e r e r
funktionen til tilberedningstid ikke.
• Denne funktion bruges normalt med
funktionen ”tilberedningstid”. Hvis retten
fx skal tilberedes i 45 minutter og skal være
klar kl. 12:30, skal du blot vælge den
ø n s k e d e f u n k t i o n , i n d s t i l l e
tilberedningstiden til 45 minutter og
slutningen af tilberedningstiden til 12:30.
•Ved slutningen af tilberedningstiden
slukker ovnen automatisk, og der afspilles
en lydalarm.
•Tilberedningen starter automatisk kl.
11:45 (12:30 minus 45 min) og fortsætter
til den forindstillede afslutningstid, hvor
ovnen automatisk slukker.
SLUTTIDSP
UNKT FOR
TILBERED-
NING
TILBERED-
NINGSTID
MINUTUR
10
1
2 9

DK 20
1. Programvalg / 2. Programvarighed / 3. Indstilling af tilberedningsstart/4- Dedikeret opskriftsvalg/5. Offline og stemmeassistent/6. Tips, forslag og
online brugervejledning
1 2
3 4
6
5
ELEKTRONIK NUL WIFI-FUNKTION
Se hurtigguiden for alle oplysninger vedrørende linket mellem app og produkt.
Hurtigvejledningen er tilgængelig på: go.candy-group.com/candy-ov Wi-Fi har to forskellige positioner på tilberedningsvælget:
• Wi-fi til: Wi-fi er kun tændt, hvis ovnen allerede er registreret på din enhed. I denne position styres ovnen kun med fjernbetjening.
• Nulstilling af Wi-Fi: Når du har ladet vælgeren stå på Wi-Fi nulstilling til 30”, vil Bluetooth tænde, og du vil være i stand til at tilmelde
ovnen til din enhed inden for 5'.
Hvis registreringen udføres korrekt, styres ovnen med fjernbetjening, og Wi-fi-ikonet tændes. Hvis tilmeldingen mislykkes, WiFi slukkes,
og ovnen nulstilles. For at gå videre med en ny registrering skal tilberedningsprogramvælgeren drejes væk fra wi-fi reset-position og over
på den igen.
Bemærk: Installer appen på din enhed, inden du begynder registreringen.
Bemærk: Enheden, hvor appen er installeret, skal have Bluetooth aktiveret.
Bemærk: Det gælder for begge Wi-fi-positioner, berøringsknapperne ikke fungerer.
Bemærk: Det er vigtigt at etablere en god Wi-fi-signalstyrke mellem hjemme-routeren og apparatet. Når ovnen prøver at oprette
forbindelse til routeren, vil ikonet blinke 3 sekunder tændt og 1 sekund slukket, når den allerede er tilsluttet, tændes ikonet.
CANDY SIMPLY-FI:
Du kan finde detaljerede oplysninger om, HVORDAN du TILSLUTTER dit simply-Fi-apparat, og
HVORDAN du BRUGER det bedst muligt, på http://www.candysimplyfi.com
TRÅDLØSE PARAMETRE
Produktoplysninger til netværksforbundet udstyr
produktets strømforbrug i netværks-
standby, hvis alle kabelforbundne
netværksporte er tilsluttet og alle
trådløse netværksporte er aktiveret:
2,0 W
Sådan aktiveres den trådløse
netværksport:
Start fra en ovn, der ikke er tilmeldt, og
s æ t d e n h ø j r e k n a p i
nulstillingspositionen. Wifi-modulet
tændes efter 30 sekunder.
Hvis ovnen er tilmeldt med WiFi
slukket, skal du sætte den højre knap
på WiFi-position for at tænde WiFi-
modulet.
Sådan inaktiveres den trådløse
netværksport:
Hvis ovnen er tilmeldt, slukkes WiFi-
modulet ved at sætte den højre knap på
nulstillingsposition.
Quick Guide Candy OVN - Tilmelding til app-procedure for enheder med
Bluetooth 4.0 (eller højere)
VIGTIGT
Denne hurtige vejledning illustrerer de trin, der skal følges for at tilmelde
dit apparat til App Candy simply-Fi ved hjælp af en enhed med Bluetooth
4.0 (eller højere) teknologi. I dette tilfælde er proceduren forenklet og
hurtigere (nem tilmelding). Hvis du bruger en enhed uden Bluetooth-
teknologi (eller mindre end 4.0), skal du følge instruktionerne beskrevet på
den anden side af denne vejledning.
TRIN 1
• Skriv apparatets serienummer ned.
• Marker Wi-Fi-navn og adgangskode (WPA/WEP-nøgle), som normalt er
placeret på bagsiden af din Wi-Fi-router.
BEMÆRKNINGER
• Hjemmets Wi-Fi-netværks frekvens skal indstilles på 2,4 GHz-båndet. Du
kan ikke konfigurere apparatet, hvis dit hjemmenetværk er indstillet til 5
GHz-båndet.
• Hvis du har problemer med at finde WPA/WEP-adgangskoden, bedes du
kontakte din internetudbyder.
• Sørg for, at din smartphone er tilsluttet det samme Wi-Fi-netværk og har
Bluetooth aktiveret under “Indstillinger”. Se manualen for yderligere
oplysninger.
TRIN 2
• Download Candy simply-Fi-appen fra butikken.
• Åbn Candy simply-Fi App og opret din brugerprofil ved at tape på
“Register”. Accepter privatlivspolitikken og udfyld de påkrævede felter.
BEMÆRKNINGER
• Appen er tilgængelig for Android (version 4.4 eller nyere) og iOS (version
8.0 eller højere) enheder.
• Hvis du allerede har en Candy simply-Fi-brugerprofil, kan du logge ind
med dine legitimationsoplysninger.
TRIN 3
• Tryk på ikonet med de tre bjælker øverst til venstre på startsiden for at
indtaste din profil, tryk derefter på "REGISTRER NYT APPARAT” og vælg
navnet på det produkt, du ønsker at tilmelde dig.
TRIN 4
• Indsæt købsdatoen for dit apparat (DD/MM/åååå), og tryk derefter på
“Fortsæt”.
TRIN 5
• Indsæt de 16 cifre i serienummeret, eller scan QR-koden på apparatet.
Tryk på “Næste”. Kontroller dataenes korrekthed, og tryk på “Bekræft”. Tryk
på “Næste”, når systemet har genkendt produktet.
TRIN 6
På apparatet:
1) Drej knappen til WI-FI NULSTILLINGSPROGRAMMET og vent 30
sekunder.
IEEE 802.11b/g/n
2401÷2483
100
Standard
Frekvensbånd [Mhz]
Maksimumseffekt [mW]
Teknologi
Wi-Fi
Bluetooth v4.2, BR/EDR, BLE
2402÷2480
10
BLE
Pagina se încarcă ...
Pagina se încarcă ...
Pagina se încarcă ...
Pagina se încarcă ...
Pagina se încarcă ...
Pagina se încarcă ...
Pagina se încarcă ...
Pagina se încarcă ...
Pagina se încarcă ...
Pagina se încarcă ...
Pagina se încarcă ...
Pagina se încarcă ...
Pagina se încarcă ...
Pagina se încarcă ...
Pagina se încarcă ...
Pagina se încarcă ...
Pagina se încarcă ...
Pagina se încarcă ...
Pagina se încarcă ...
Pagina se încarcă ...
Pagina se încarcă ...
Pagina se încarcă ...
Pagina se încarcă ...
Pagina se încarcă ...
Pagina se încarcă ...
Pagina se încarcă ...
Pagina se încarcă ...
Pagina se încarcă ...
Pagina se încarcă ...
Pagina se încarcă ...
Pagina se încarcă ...
Pagina se încarcă ...
Pagina se încarcă ...
Pagina se încarcă ...
Pagina se încarcă ...
Pagina se încarcă ...
Pagina se încarcă ...
Pagina se încarcă ...
Pagina se încarcă ...
Pagina se încarcă ...
Pagina se încarcă ...
Pagina se încarcă ...
Pagina se încarcă ...
Pagina se încarcă ...
Pagina se încarcă ...
Pagina se încarcă ...
Pagina se încarcă ...
Pagina se încarcă ...
Pagina se încarcă ...
Pagina se încarcă ...
Pagina se încarcă ...
Pagina se încarcă ...
Pagina se încarcă ...
Pagina se încarcă ...
Pagina se încarcă ...
Pagina se încarcă ...
Pagina se încarcă ...
Pagina se încarcă ...
Pagina se încarcă ...
Pagina se încarcă ...
Pagina se încarcă ...
Pagina se încarcă ...
Pagina se încarcă ...
Pagina se încarcă ...
Pagina se încarcă ...
Pagina se încarcă ...
Pagina se încarcă ...
Pagina se încarcă ...
Pagina se încarcă ...
Pagina se încarcă ...
Pagina se încarcă ...
Pagina se încarcă ...
Pagina se încarcă ...
Pagina se încarcă ...
Pagina se încarcă ...
Pagina se încarcă ...
Pagina se încarcă ...
Pagina se încarcă ...
Pagina se încarcă ...
Pagina se încarcă ...
Pagina se încarcă ...
Pagina se încarcă ...
Pagina se încarcă ...
Pagina se încarcă ...
Pagina se încarcă ...
Pagina se încarcă ...
Pagina se încarcă ...
Pagina se încarcă ...
Pagina se încarcă ...
Pagina se încarcă ...
Pagina se încarcă ...
Pagina se încarcă ...
Pagina se încarcă ...
Pagina se încarcă ...
Pagina se încarcă ...
Pagina se încarcă ...
Pagina se încarcă ...
Pagina se încarcă ...
Pagina se încarcă ...
Pagina se încarcă ...
Pagina se încarcă ...
Pagina se încarcă ...
Pagina se încarcă ...
Pagina se încarcă ...
Pagina se încarcă ...
Pagina se încarcă ...
Pagina se încarcă ...
Pagina se încarcă ...
Pagina se încarcă ...
Pagina se încarcă ...
Pagina se încarcă ...
Pagina se încarcă ...
Pagina se încarcă ...
Pagina se încarcă ...
Pagina se încarcă ...
Pagina se încarcă ...
Pagina se încarcă ...
Pagina se încarcă ...
Pagina se încarcă ...
Pagina se încarcă ...
Pagina se încarcă ...
Pagina se încarcă ...
Pagina se încarcă ...
Pagina se încarcă ...
Pagina se încarcă ...
Pagina se încarcă ...
Pagina se încarcă ...
Pagina se încarcă ...
Pagina se încarcă ...
Pagina se încarcă ...
Pagina se încarcă ...
Pagina se încarcă ...
Pagina se încarcă ...
Pagina se încarcă ...
Pagina se încarcă ...
Pagina se încarcă ...
Pagina se încarcă ...
Pagina se încarcă ...
Pagina se încarcă ...
Pagina se încarcă ...
-
 1
1
-
 2
2
-
 3
3
-
 4
4
-
 5
5
-
 6
6
-
 7
7
-
 8
8
-
 9
9
-
 10
10
-
 11
11
-
 12
12
-
 13
13
-
 14
14
-
 15
15
-
 16
16
-
 17
17
-
 18
18
-
 19
19
-
 20
20
-
 21
21
-
 22
22
-
 23
23
-
 24
24
-
 25
25
-
 26
26
-
 27
27
-
 28
28
-
 29
29
-
 30
30
-
 31
31
-
 32
32
-
 33
33
-
 34
34
-
 35
35
-
 36
36
-
 37
37
-
 38
38
-
 39
39
-
 40
40
-
 41
41
-
 42
42
-
 43
43
-
 44
44
-
 45
45
-
 46
46
-
 47
47
-
 48
48
-
 49
49
-
 50
50
-
 51
51
-
 52
52
-
 53
53
-
 54
54
-
 55
55
-
 56
56
-
 57
57
-
 58
58
-
 59
59
-
 60
60
-
 61
61
-
 62
62
-
 63
63
-
 64
64
-
 65
65
-
 66
66
-
 67
67
-
 68
68
-
 69
69
-
 70
70
-
 71
71
-
 72
72
-
 73
73
-
 74
74
-
 75
75
-
 76
76
-
 77
77
-
 78
78
-
 79
79
-
 80
80
-
 81
81
-
 82
82
-
 83
83
-
 84
84
-
 85
85
-
 86
86
-
 87
87
-
 88
88
-
 89
89
-
 90
90
-
 91
91
-
 92
92
-
 93
93
-
 94
94
-
 95
95
-
 96
96
-
 97
97
-
 98
98
-
 99
99
-
 100
100
-
 101
101
-
 102
102
-
 103
103
-
 104
104
-
 105
105
-
 106
106
-
 107
107
-
 108
108
-
 109
109
-
 110
110
-
 111
111
-
 112
112
-
 113
113
-
 114
114
-
 115
115
-
 116
116
-
 117
117
-
 118
118
-
 119
119
-
 120
120
-
 121
121
-
 122
122
-
 123
123
-
 124
124
-
 125
125
-
 126
126
-
 127
127
-
 128
128
-
 129
129
-
 130
130
-
 131
131
-
 132
132
-
 133
133
-
 134
134
-
 135
135
-
 136
136
-
 137
137
-
 138
138
-
 139
139
-
 140
140
-
 141
141
-
 142
142
-
 143
143
-
 144
144
-
 145
145
-
 146
146
-
 147
147
-
 148
148
-
 149
149
-
 150
150
-
 151
151
-
 152
152
-
 153
153
-
 154
154
-
 155
155
-
 156
156
-
 157
157
-
 158
158
-
 159
159
-
 160
160


Candy FCP602X E0 /E/1 Manual de utilizare
- Categorie
- Microunde
- Tip
- Manual de utilizare
în alte limbi
- čeština: Candy FCP602X E0 /E/1 Uživatelský manuál
- English: Candy FCP602X E0 /E/1 User manual
- suomi: Candy FCP602X E0 /E/1 Ohjekirja
- polski: Candy FCP602X E0 /E/1 Instrukcja obsługi
- svenska: Candy FCP602X E0 /E/1 Användarmanual
- dansk: Candy FCP602X E0 /E/1 Brugermanual
Lucrări conexe
-
Candy FCS 100 X /E Manual de utilizare
-
-
-
-
-
-
-
-
-
Alte documente
-
Tesla CS5400SX Manual de utilizare
-
Tesla MW2391MB Manual de utilizare
-
Whirlpool CG65SG3 X UA /HA S Manualul utilizatorului
-
Haier HWO60SM5T5BH Manual de utilizare
-
-
 Wood s Milan Manualul utilizatorului
-
 Glamox heating H40/H60 DT thermostat 230/400V Manual de utilizare

