Pagina se încarcă...

DOC022.98.80155
sensION
™
+ DL Portable Meter
07/2017, Edition 2
User Manual
Bedienungsanleitung
Manuale dell'utente
Manuel d'utilisation
Manual del usuario
Manual do utilizador
Uživatelská příručka
Brugsanvisning
Gebruikershandleiding
Instrukcja obsługi
Bruksanvisning
Käyttäjän käsikirja
Ръководство на потребителя
Használati útmutató
Manual de utilizare
Naudotojo vadovas
Руководство пользователя
Kullanım Kılavuzu
Návod na obsluhu
Navodila za uporabo
Korisnički priručnik
Εγχειρίδιο λειτουργίας
Kasutusjuhend

English...................................................................................................................................................................................................3
Deutsch...............................................................................................................................................................................................20
Italiano................................................................................................................................................................................................. 40
Français.............................................................................................................................................................................................. 59
Español............................................................................................................................................................................................... 79
Português.......................................................................................................................................................................................... 98
Čeština.............................................................................................................................................................................................. 117
Dansk.................................................................................................................................................................................................135
Nederlands...................................................................................................................................................................................... 153
Polski................................................................................................................................................................................................. 174
Svenska............................................................................................................................................................................................ 193
Suomi.................................................................................................................................................................................................211
български....................................................................................................................................................................................... 229
Magyar.............................................................................................................................................................................................. 249
Română............................................................................................................................................................................................ 268
lietuvių kalba...................................................................................................................................................................................286
Русский............................................................................................................................................................................................ 304
Türkçe................................................................................................................................................................................................324
Slovenský jazyk............................................................................................................................................................................ 341
Slovenski.......................................................................................................................................................................................... 359
Hrvatski............................................................................................................................................................................................. 377
Ελληνικά........................................................................................................................................................................................... 395
eesti keel.......................................................................................................................................................................................... 415
2

Table of Contents
Specifications on page 3
General information on page 4
Installation on page 5
User interface and navigation on page 6
Startup on page 10
Operation on page 10
Data logger on page 13
Data transfer on page 14
Maintenance on page 15
Troubleshooting on page 16
Replacement parts and accessories on page 17
Standard solutions on page 18
Salinity values for dissolved oxygen meters on page 19
Specifications
Specifications are subject to change without notice.
Specification Details
Dimensions 18.6 x 7.3 x 3.8 cm (7.32 x 2.87 x 1.5 in.)
Weight 300 g (0.66 lb)
Meter enclosure IP67
Power requirements
(internal)
AA Alkaline or rechargeable Nickel Metal Hydride
(NiMH) batteries (3); battery life: over 500 hours
Input connectors MP-5 or MP-8 connector for sensION+ probes
Meter protection class Class III
Storage temperature –15 to +65 °C (5 to +149 °F)
Operating temperature 0 to 50 °C (32 to 122 °F)
Operating humidity 80% (non-condensing)
Specification Details
Datalog Maximum 500 data points, automatic or manual
save
Wireless data transfer USB-RF device, maximum operation distance 10 m
RF Output power RF Dongle: -16.01 dBm (tolerance -4 to +2 dBm)
Instruments: -4,01 dBm (tolerance -4 to +2 dBm)
Instrument range pH: –2.00 to 19.99; ORP: ±1999 mV
Conductivity: 0.01 to 500 mS/cm; TDS: 0 to 500 g/L;
Salinity: 0.0 to 1999 mg/L, 2.0 to 50.0 g/L
DO: 0.00 to 19.99 mg/L and 20.0 to 22.0 mg/L
(25°C), 0.0 to 199.9% and 200 to 250% (25°C)
Resolution pH: 0.01 pH; ORP: 1 mV (0.1 mV from –199.9 to
199.9 mV)
DO: 0.1% (1% if ≥ 200%); 0.01 mg/L (0.1 mg/L if ≥
20 mg/L)
Conductivity: changes with range (auto-ranging)
Temperature: 0.1 °C (0.1°F)
Measuring error (± 1 digit) pH: ≤ 0.01 pH; ORP: ≤ 1 mV
DO: ≤ 0.5% of the measured value
Conductivity: ≤ 0.5% (0.01 µS/cm to 19.99 mS/cm);
≤ 1% (≥ 20.0 mS). Salinity/TDS: ≤ 0.5%
Temperature: ≤ 0.2 °C (≤ 0.4 °F)
Reproducibility (± 1 digit) pH: ± 0.01 pH; ORP ± 1 mV
DO: ≤ 0.2 of the measured value
Conductivity/Salinity/TDS: ± 0.1%
Temperature ± 0.1 °C (± 0.1 °F)
Reference temperature
(RT)
Conductivity: 20 or 25 °C (68 or 77 °F) (factory
settings: 25 °C (77 °F))
English 3

Specification Details
Temperature coefficient
(TC)
Conductivity: 0.00 to 5.00%/°C (factory settings: 2%/
°C)
TDS conversion factor Conductivity: 0.00 to 4.44 (factory settings: 0.64)
Energy management Automatic power off after 5 minutes of inactivity
Certification EU: CE and NB (wireless) and FCC/IC (wireless)
General information
Revised editions are found on the manufacturer’s website.
Safety information
N O T I C E
The manufacturer is not responsible for any damages due to misapplication or
misuse of this product including, without limitation, direct, incidental and
consequential damages, and disclaims such damages to the full extent permitted
under applicable law. The user is solely responsible to identify critical application
risks and install appropriate mechanisms to protect processes during a possible
equipment malfunction.
Please read this entire manual before unpacking, setting up or operating
this equipment. Pay attention to all danger and caution statements.
Failure to do so could result in serious injury to the operator or damage
to the equipment.
Make sure that the protection provided by this equipment is not impaired.
Do not use or install this equipment in any manner other than that
specified in this manual.
Use of hazard information
D A N G E R
Indicates a potentially or imminently hazardous situation which, if not avoided, will
result in death or serious injury.
W A R N I N G
Indicates a potentially or imminently hazardous situation which, if not avoided,
could result in death or serious injury.
C A U T I O N
Indicates a potentially hazardous situation that may result in minor or moderate
injury.
N O T I C E
Indicates a situation which, if not avoided, may cause damage to the instrument.
Information that requires special emphasis.
Precautionary labels
Read all labels and tags attached to the instrument. Personal injury or
damage to the instrument could occur if not observed. A symbol on the
instrument is referenced in the manual with a precautionary statement.
This symbol, if noted on the instrument, references the instruction
manual for operation and/or safety information.
Electrical equipment marked with this symbol may not be disposed of
in European public disposal systems after 12 August of 2005. In
conformity with European local and national regulations (EU Directive
2002/96/EC), European electrical equipment users must now return
old or end-of-life equipment to the Producer for disposal at no charge
to the user.
Note: For return for recycling, please contact the equipment producer or supplier
for instructions on how to return end-of-life equipment, producer-supplied
electrical accessories, and all auxiliary items for proper disposal.
Regulatory device approval
sensION
™
+ meter
• Contains FCC ID: VIC-C0553
• Contains IC ID: 6149A-C0553
portCom DL USB-RF device
4
English

• FCC ID: VIC-C0554
• IC ID: 6149A-C0554
This device complies with Part 15 of the FCC Rules and Industry
Canada license-exempt RSS standard(s). Operation is subject to the
following two conditions:
(1) this device may not cause interference, and
(2) this device must accept any interference, including interference that
may cause undesired operation of the device.
Warning - Unauthorized modification or changes to this wireless
communication equipment will void the right to use it. Changes or
modifications to this unit not expressly approved by the party responsible
for compliance will void the user's authority to operate the equipment.
Any change to the equipment will void the Industry Canada certification
and FCC grant.
Product overview
The sensION
™
+ series meters are used with sensION+ probes to
measure various parameters in water. Primarily for field use, the portable
meter operates on three AA batteries.
The sensION
™
+ series meters are available in 5 models:
• sensION
™
+ EC5 DL—conductivity, TDS, salinity and temperature
meter
• sensION
™
+ MM150 DL—pH, ORP (Redox), conductivity, TDS and
temperature meter
• sensION
™
+ MM110 DL—pH, ORP (Redox) and temperature meter
• sensION
™
+ MM156 DL—pH, conductivity, salinity, dissolved oxygen
and temperature meter
• sensION
™
+ pH1 DL—pH meter
• sensION
™
+ DO6 DL—dissolved oxygen (concentration and %
saturation) and temperature meter
Installation
Install the batteries
W A R N I N G
Explosion hazard. Incorrect battery installation can cause the release of explosive
gases. Be sure that the batteries are of the same approved chemical type and
are inserted in the correct orientation. Do not mix new and used batteries.
N O T I C E
The battery compartment is not waterproof. If the battery compartment becomes
wet, remove and dry the batteries and dry the interior of the compartment. Check
the battery contacts for corrosion and clean them if necessary.
N O T I C E
When using nickel metal hydride (NiMH) batteries, the battery icon will not
indicate a full charge after freshly charged batteries have been inserted (NiMH
batteries are 1.2 V versus 1.5 V for alkaline batteries). Even though the icon does
not indicate complete charge, 2300 mAH NiMH batteries will achieve 90% of
instrument operation lifetime (before recharge) versus new alkaline batteries.
N O T I C E
To avoid potential damage to the meter from battery leakage, remove the meter
batteries prior to extended periods of non-use.
The meter can be powered with AA alkaline or rechargeable NiMH
batteries. To conserve battery life, the meter will power off after
5 minutes of inactivity. This time can be changed in the Display Options
menu.
English 5

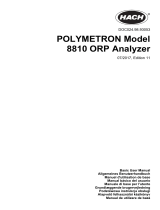
For battery installation, refer to Figure 1.
Note: A tool such as a flat screwdriver may be necessary the first time the cover is
removed.
Make sure that the cover is tightly closed to maintain the IP67 enclosure
rating.
Figure 1 Battery installation
Connect a probe
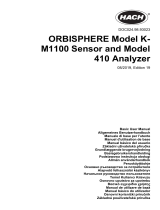
1. Plug the probe into the meter (Figure 2).
2. Push the connector so that the alignment pin goes into the groove on
the female connector.
Note: Do not turn the connector.
Figure 2 Probe connection
User interface and navigation
User interface
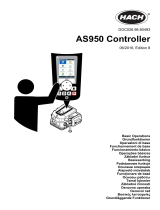
Figure 3 Keypad description
1 DISPLAY LIGHT key 5 DOWN key
2 DATALOG key 6 ON/OFF
3 UP key 7 CALIBRATION key
4 MEASUREMENT key
6 English

Display description
The display shows 3 types of screens:
• Measure—the most recent parameter measurement is shown with the
temperature and stabilization time.
• Calibration—the calibration standard values and temperature are
shown during a calibration.
• Standby—the screen is empty except for the measurement timer at
the bottom.
Figure 4 PH1 DL screen display
1 Data transfer icon 4 Measurement time (hh:mm:ss)
2 Measurement units 5 Temperature
3 Battery indicator 6 Measurement value (pH or ORP)
Figure 5 DO6 DL screen display
1 Data transfer icon 4 Measurement time (hh:mm:ss)
2 Measurement units 5 Temperature
3 Battery indicator 6 Measurement value (DO)
English 7

Figure 6 MM110 DL screen display
1 Data transfer icon 5 Temperature
2 Measurement units 6 Measurement value (ORP)
3 Battery indicator 7 Measurement value (pH)
4 Measurement time (hh:mm:ss)
Figure 7 MM150 DL screen display
1 Data transfer icon 6 Temperature
2 Measurement value (pH) 7 Measurement value (TDS, ORP)
3 Measurement units 8 Reference temperature
4 Battery indicator 9 Measurement value (conductivity)
5 Measurement time (hh:mm:ss)
8 English

Figure 8 MM156 DL screen display
1 Data transfer icon 6 Temperature
2 Measurement value (pH) 7 Measurement value (DO, salinity)
3 Measurement units 8 Reference temperature
4 Battery indicator 9 Measurement value (conductivity)
5 Measurement time (hh:mm:ss)
Figure 9 EC5 DL screen display
1 Data transfer icon 5 Measurement time (hh:mm:ss)
2 Measurement units 6 Measurement value (conductivity,
salinity, TDS)
3 Temperature 7 Reference temperature
4 Battery indicator
Navigation
Use the calibrate key to calibrate the probe. Use the measure key
to take a sample measurement. Use the arrow keys to scroll to
other options or to change a value. Use the datalog key
to save or
view data or to send data to a computer.
Some options require that a key be pushed and held or that multiple
keys be pushed at the same time. Be sure to look at the display during
tasks as the screens change quickly. Refer to each task for specific
instructions.
English
9

Startup
Turn the meter on and off
N O T I C E
Make sure that the probe is connected to the meter before the meter is turned on.
Push and hold to turn on or turn off the meter. If the meter does not
turn on, make sure that the batteries are properly installed.
Note: The meter is set to automatically power off after 5 minutes of inactivity to
maximize the battery life.
Operation
D A N G E R
Chemical exposure hazard. Obey laboratory safety procedures and
wear all of the personal protective equipment appropriate to the
chemicals that are handled. Refer to the current safety data sheets
(MSDS/SDS) for safety protocols.
W A R N I N G
Pacemaker precautions. If electromagnetic interference (EMI) occurs,
it can either:
• Stop the stimulating pulses from the pacemaker that control the
rhythm of the heart.
• Cause the pacemaker to supply the pulses irregularly.
• Cause the pacemaker to ignore the rhythm of the heart and supply
pulses at a set interval.
Current research shows that cellular devices are not a significant
health problem for most pacemakers wearers. However, persons with
pacemakers should use precautions to make sure that their device
does not cause a problem. Keep the device a minimum of 20 cm
(7.9 in.) from the user.
C A U T I O N
Electromagnetic radiation hazard. Make sure that the antenna is kept at
a minimum distance of 20 cm (7.9 in.) from all personnel in normal use.
The antenna cannot be co-located or operated in conjunction with any
other antenna or transmitters.
Setup for pH
The meter is ready for pH or ORP calibration without additional setup.
Setup for dissolved oxygen
Before a calibration or a measurement for dissolved oxygen, the probe
must be polarized and the settings for atmospheric pressure and salinity
must be entered.
Polarize the electrode
If the probe or batteries are disconnected, connect the probe or install
the batteries and wait for polarization:
Disconnect time Polarization time
< 5 minutes 10 minutes
5 to 15 minutes 45 minutes
> 15 minutes 6 hours
10 English

Change the settings
The settings for dissolved oxygen measurements can be changed when
a dissolved oxygen probe is used. Push to view the current settings.
1. Push . The first setting is shown.
2. Quickly use the arrow keys to change the value. Wait for the next
setting to be shown and change any additional values:
Option Description
Atmospheric pressure in mbar (default: 1013 mbar)
SAL Salinity in g/L NaCl (default: 0 g/L)
Aut: automatic (only in model MM156)
Note: The salinity value can be found from a conductivity measurement. Refer
to Table 3 on page 19.
Setup for conductivity
The settings for conductivity measurements can be changed when a
conductivity probe is used. Push to view the current settings.
1. Push . The first setting is shown.
2. Quickly use the arrow keys to change the value. Wait for the next
setting to be shown and change any additional values:
Option Description
CEL Electrode type: platinum (default) or titanium.
Note: This option is not available on all meters.
CAL The number of standards for conductivity calibration. Select one
standard (default). Select the standard nearest to the expected
measurement range.
tC Temperature compensation: 0 to 9.99%/°C (default: 2%/°C)
tr Reference temperature: 20 or 25 °C (default: 25 °C)
F TDS calculation factor: 0.01 to 4.44 (default: 0.64)
The new settings are automatically stored in the meter.
Calibration
W A R N I N G
Chemical exposure hazard. Obey laboratory safety procedures and wear all of
the personal protective equipment appropriate to the chemicals that are handled.
Refer to the current material safety data sheets (MSDS) for safety protocols.
Calibration procedure
This procedure is for general use with liquid calibration solutions. Refer
to the documents that are included with each probe for additional
information.
1. Pour the buffers or calibration solution into the labeled calibration
tubes.
2. Rinse the probe with deionized water and put the probe into the
appropriate calibration tube. Make sure that there are no air bubbles
under the probe tip.
3. Push . The parameter flashes.
4. Use the arrow keys to change the parameter, if applicable.
5. Push to select the parameter.
6. Push the arrow keys to select the appropriate standard solution. For
pH, the buffers are automatically recognized.
7. Push to measure the calibration solution.
Note: For pH, the next calibration solution is shown. For conductivity, use one
calibration point. Select the standard nearest to the expected measurement
range.
8. Rinse the probe with deionized water and put the probe into the
second calibration tube, if applicable. Make sure that there are no air
bubbles under the probe tip.
9. Push to measure the second calibration solution, if applicable.
The next calibration solution is shown.
10. Rinse the probe with deionized water and put the probe into the third
calibration tube. Make sure that there are no air bubbles under the
probe tip.
11. Push to measure the third calibration solution, if applicable.
English
11

When the calibration is good, the display briefly shows OK and then
goes to the standby mode.
Note: To calibrate with only 1 or 2 standards when additional standards are
supplied, push after the first or second standard is measured.
View the calibration data
Data from the most recent calibration can be shown for pH, ORP and
conductivity.
1. Push .
2. Use the arrow keys to change the parameter, if necessary, and push
.
3. Push and at the same time. The calibration data is shown:
• pH—the slope and offset values are shown alternating with the
deviation (in %) and calibration temperature.
• ORP—the measured mV value and calibration temperature are
shown.
• Conductivity—the cell constant and calibration temperature for
each standard are shown.
Restore the factory calibration
The user calibration can be erased and the factory calibration restored
for pH, ORP and conductivity.
1. Push . The parameter flashes.
2. Use the arrow keys to change the parameter, if necessary.
3. Push and hold until OFF is shown.
The factory calibration for the selected parameter is restored.
Adjust the calibration
The instrument can be adjusted to read a specified solution value for pH,
ORP and conductivity.
1. Rinse the probe. Put the probe in the solution.
2. Push to read the value of the solution.
3. Push . The parameter flashes.
4. Use the arrow keys to select the parameter, if necessary.
5. Push and hold and then push .
The measured value flashes.
6. Use the arrow keys to change the value.
7. Push . The display shows OK.
Adjust the temperature
The temperature measurement can be adjusted at 25 °C (77 °F) and/or
85 °C (185 °F) to increase accuracy for pH, ORP and conductivity.
Note: Refer to the probe documentation to find the temperature limits for the probe
that is used.
1. Put the probe and a reference thermometer in a container of water at
approximately 25 °C and allow the temperature to stabilize.
2. Compare the temperature read by the meter with that of the
reference thermometer. The difference is the adjustment value for
the meter.
Example: reference thermometer: 24.5 °C; meter: 24.3 °C.
Adjustment value: 0.2 °C.
3. Enter the adjustment value for the 25 °C reading:
a. Push . The parameter flashes.
b. Use the arrow keys to select tEn.
c. Push . 25 °C is shown.
d. Push and then use the arrow keys to enter the adjustment
value for 25 °C. Push . 85 °C is shown.
4. Put the probe and a reference thermometer in a container of water at
approximately 85 °C and allow the temperature to stabilize.
5. Compare the temperature from the meter with that of the reference
thermometer. The difference is the adjustment value for the meter.
6. Push and then use the arrow keys to enter the adjustment value
for the 85 °C reading. Push .
About sample measurements
Each probe has specific preparation steps and procedures for taking
sample measurements. For step-by-step instructions, refer to the
documents that are included with the probe.
12
English

Push to take a sample measurement. During measurements, the
parameter flashes and the timer shows the stabilization time. To change
the measurement parameter (if applicable), push and hold .
To measure the sample continuously, push
2 times. The parameter
flashes to indicate the continuous measurement mode.
Change the temperature units
The temperature units can be changed when the measurement screen is
shown.
1. Make sure that a stable measurement reading is shown.
2. Push
and at the same time. The temperature units change to °C
or °F.
Disable the auto-shutoff option
The meter is set to automatically power off after 5 minutes of inactivity to
maximize the battery life. This option can be temporarily disabled.
1. Make sure that the meter is powered off.
2. Push and hold until the display shows OFF and no. The power
remains on indefinitely.
3. To power off the meter, push and hold until the display shows
OFF.
Note: The auto-shutoff option is enabled again when the meter is powered on
normally.
Set the backlight time
The display is illuminated when
is pushed. The user can set the
length of time that the backlight stays on.
Note: The battery life is decreased when the backlight time is increased.
1. Make sure that the instrument is powered on.
2. Push and immediately push 2 times. The backlight time
flashes.
3. Push or to change the backlight time (range: 3 seconds to
2 minutes).
Data logger
Set the date and time
Each data point is saved with the time and date of the measurement.
1. From the standby screen, push .
2. When the display shows rt, push . The display shows dAt and the
date (DD-MM-YY).
3. When the values flash, use the arrow keys to set the current year,
month and day. After the date is set, the display shows tin and the
time (HH:MM:SS).
4. When the values flash, use the arrow keys to set the current hour,
minute and second.
Save data manually
To save data manually, push when a measurement is complete or at
any time during a continuous measurement. The display shows DL and
OK each time a data point is saved.
Save data automatically
When the instrument is set to measure continuously, data can be saved
at regular time intervals.
1. From the standby screen, push
.
2. When the display shows Fr, push . The display shows Fr and
OFF.
3. Push . The time interval in HH:MM:SS is shown.
4. Use the arrow keys to set the interval when data will be automatically
saved (range: 5 s to 1 min 30 s).
5. Start a continuous measurement. Data will be saved at the specified
interval. The display shows DL and OK each time a data point is
saved.
English
13

View data
A data point includes the measurement value(s) and the time and date of
the measurement. Data points are saved with a related number. The
most recent data point has the highest number.
Note: For calibration data, refer to View the calibration data on page 12.
1. From the standby screen, push . The display shows DL and the
number of the most recent data point. The screen changes to show
the value of the data and the related time and date.
2. Use the arrow keys to see other data points.
3. To exit the datalog, push .
Erase data
N O T I C E
Data will be erased permanently. Make sure to save the data to a computer first,
then erase the data in the instrument.
All of the data in the instrument datalog can be erased. Individual data
points cannot be erased.
1. From the standby screen, push .
2. When the display shows CLr dL, push . CLr flashes.
3. Push to erase all of the data in the instrument datalog.
Data transfer
Setup for data transfer
Data can be sent from the instrument to a computer through wireless
transmission. The portCom application and the USB-RF device must be
installed on the computer.
1. Install portCom and the USB-RF device driver. Refer to Figure 10.
During the driver installation, select the option to install from a
specific location: C:\Program Files\portCom.
2. Open portCom. Use the Setup menu to change one of the options:
Option Description
Decimal Changes the decimal type (. ,)
Language Changes the language of the user interface
Figure 10 Install portCom and the USB-RF driver
Send data to a computer
Data that is saved in the datalog can be sent to a computer and then
saved to a user-specified location. A spreadsheet application can be
used to view the data.
1. Put the USB-RF device into a USB port.
Note: The USB-RF device must be used even when the computer has wireless
capability.
2. Open portCom.
3. Push 2 times. The display shows Snd. The newest data is shown
on the top row in the portCom window. Refer to Figure 11.
Note: All of the data in the instrument datalog is sent to the computer.
4. Click Save.
14
English

5. Select a folder location and give the data set a file name.
6. Select the type of file (.txt or .csv), then click Save.
Figure 11 Send data to a computer
Maintenance
Clean the instrument
N O T I C E
Never use cleaning agents such as turpentine, acetone or similar products to
clean the instrument including the display and accessories.
N O T I C E
Make sure that all meter connectors stay dry. Use a dry towel to remove liquid
from the connectors.
Clean the exterior of the instrument with a moist cloth and a mild soap
solution.
Store the instrument
W A R N I N G
Explosion hazard. Expired batteries can cause hydrogen gas buildup
inside the instrument. Replace the batteries before they expire and do
not store the instrument for long periods with the batteries installed.
N O T I C E
To avoid potential damage to the meter from battery leakage, remove the meter
batteries prior to extended periods of non-use.
Replace the batteries
W A R N I N G
Explosion hazard. Incorrect battery installation can cause the release of explosive
gases. Be sure that the batteries are of the same approved chemical type and
are inserted in the correct orientation. Do not mix new and used batteries.
English 15

For battery replacement, refer to Figure 12. Make sure that the cover is
tightly closed to maintain the IP67 enclosure rating.
Figure 12 Battery replacement
Troubleshooting
Refer to the following table for common problem messages or
symptoms, possible causes and corrective actions.
Error/Warning Description Solution
Measurement out
of range.
• Insert the probe into the appropriate
standard and read again.
• Clean the probe and the membrane.
• Make sure that there are no air
bubbles in the membrane.
• Disconnect the probe and then
connect the probe again.
• Connect a different probe to verify if
problem is with probe or meter.
Battery is low. Insert new batteries.
E1 Unstable reading
during a stability
measurement or
during calibration.
Make sure that the probe is properly
immersed in the sample.
E2 Probe current:
exceeded upper
limit during
measurement ≥
250 nA.
• Clean the probe and the membrane.
• Make sure that there are no air
bubbles in the membrane.
• Disconnect the probe and then
connect the probe again.
• Connect a different probe to verify if
problem is with probe or meter.
E2 pH probes
sensitivity out of
range (accepted
values 70–105%).
• Make sure that the correct probe is
connected to the meter.
• Connect a new probe.
16 English

Error/Warning Description Solution
E2 During calibration,
the difference
between the
constants gets >
30%.
• Insert the probe into the appropriate
standard and read again.
• Clean the probe and the membrane.
• Make sure that there are no air
bubbles in the membrane.
• Disconnect the probe and then
connect the probe again.
• Connect a different probe to verify if
problem is with probe or meter.
• Connect a new probe.
E3 During calibration,
the cell constant
gets < 0.05 cm
-1
.
• Insert the probe into the appropriate
standard and read again.
• Clean the probe and the membrane.
• Make sure that there are no air
bubbles in the membrane.
• Disconnect the probe and then
connect the probe again.
• Connect a different probe to verify if
problem is with probe or meter.
E3 Slope out of range
(accepted values ±
58 mV).
Connect a new probe.
E4 Buffer solution not
recognized.
• Clean the probe and the membrane.
• Make sure that there are no air
bubbles in the membrane.
• Disconnect the probe and then
connect the probe again.
• Connect a different probe to verify if
problem is with probe or meter.
• Make sure that the buffer used
matches the buffer specified in
configuration.
• Replace the buffer solution.
• Make sure of the temperature
specification in configuration.
Error/Warning Description Solution
E4 Salinity cannot be
calculated TC=0
Modify TC
E5 Same buffer
solutions.
• Clean the probe and the membrane.
• Make sure that there are no air
bubbles in the membrane.
• Disconnect the probe and then
connect the probe again.
• Connect a different probe to verify if
problem is with probe or meter.
• Make sure that the buffer used
matches the buffer specified in
configuration.
• Replace the buffer solution.
• Make sure of the temperature
specification in configuration.
E6 The calibration
solutions have
different
temperatures.
Make sure that the calibration solutions
have the same temperature.
ErA (only
MM156)
Salinity is set to
automatic and
measured value >
50 g/L.
Modify TC
E7 The datalog is
empty.
Save data to the datalog.
E8 The datalog is full. Erase data from the datalog.
E9 The data transfer
failed.
Make sure that the USB-RF device is
installed and that portCom is open.
Replacement parts and accessories
Note: Product and Article numbers may vary for some selling regions. Contact the
appropriate distributor or refer to the company website for contact information.
English
17

Replacement parts
Description Item no.
Batteries, Alkaline AA 1938004
Carrying case LZW9990.99
Accessories
Description Item no.
Wireless data transfer kit (portCom software with USB-RF
device)
LZW2598.99.0002
Electrolyte for DO probe 51 20, 25 mL LZW9811.99
Electrolyte for DO probe 51 30, 50 ml 2759126
Tube for DO probe calibration LZW5123.99
Service kit for 51 30 DO probe (contains 2 membrane
modules and DO filling solution)
5196800
Replacement DO membrane for DO probe 51 20 LZW5125.99
147 μS/cm standard solution (at 25 °C, 77 °F), 125 mL
bottle
LZW9701.99
1413 μS/cm standard solution (at 25 °C, 77 °F), 125 mL
bottle
LZW9711.99
12.88 mS/cm standard solution (at 25 °C, 77 °F), 125 mL
bottle
LZW9721.99
Set of calibration tubes, 147 μS/cm, 1413 μS/cm and
12.88 mS/cm
LZW9138.99
220 mV standard solution, 125 mL LZW9402.99
Buffer solution pH 4.01, 125 mL LZW9460.99
Buffer solution pH 7.00, 125 mL LZW9461.97
Buffer solution pH 10.01, 125 mL LZW9470.99
Electrolyte solution, KCI 3M, 50 mL LZW9509.99
Accessories (continued)
Description Item no.
Calibration tubes pH 4.01, pH 7.00 and pH 10.01 LZW9137.97
Tube for ORP standard calibration 220 mV LZW9136.99
Work protector for electrodes 50 51 T and 50 52 T LZW9162.99
Standard solutions
Technical buffer solutions (DIN 19267)
Refer to Table 1 pH and ORP (mV) values of specific buffer sets at
varying temperatures.
Table 1 pH, ORP (mV) and temperature values
Temperature pH mV
°C °F
0 32 2.01 4.01 7.12 9.52 10.30 —
10 50 2.01 4.00 7.06 9.38 10.17 245
20 68 2.00 4.00 7.02 9.26 10.06 228
25 77 2.00 4.01 7.00 9.21 10.01 220
30 86 2.00 4.01 6.99 9.16 9.96 212
40 104 2.00 4.03 6.97 9.06 9.88 195
50 122 2.00 4.06 6.97 8.99 9.82 178
60 140 2.00 4.10 6.98 8.93 9.76 160
70 158 2.01 4.16 7.00 8.88 — —
80 176 2.01 4.22 7.04 8.83 — —
90 194 2.01 4.30 7.09 8.79 — —
Conductivity standard solutions
Refer to Table 2 for conductivity values of standard solutions at varying
temperatures.
18
English

Table 2 Conductivity and temperature values
Temperature Conductivity (EC)
°C °F µS/cm µS/cm mS/cm mS/cm
15.0 59 119 1147 10.48 92.5
16.0 60.8 122 1173 10.72 94.4
17.0 62.6 125 1199 10.95 96.3
18.0 64.4 127 1225 11.19 98.2
19.0 66.2 130 1251 11.43 100.1
20.0 68 133 1278 11.67 102.1
21.0 69.8 136 1305 11.91 104.0
22.0 71.6 139 1332 12.15 105.4
23.0 73.4 142 1359 12.39 107.9
24.0 75.2 145 1386 12.64 109.8
25.0 77 147 1413 12.88 111.8
26.0 78.8 150 1440 13.13 113.8
27.0 80.6 153 1467 13.37 115.7
28.0 82.4 156 1494 13.62 —
29.0 84.2 159 1522 13.87 —
30.0 86 162 1549 14.12 —
31.0 87.8 165 1581 14.37 —
32.0 89.6 168 1609 14.62 —
33.0 91.4 171 1638 14.88 —
34.0 93.2 174 1667 15.13 —
35.0 95 177 1696 15.39 —
Salinity values for dissolved oxygen meters
Table 3 can be used to convert conductivity values to salinity for
dissolved oxygen meters.
Table 3 Conversion from conductivity to salinity
Conductivity (mS/cm) Salinity (g/L NaCl)
1.9 1.0
3.7 2.0
7.3 4.0
10.9 6.0
17.8 10.1
25.8 15.1
33.6 20.2
41.2 25.4
48.9 30.6
56.3 35.8
62.2 40.0
69.4 45.3
75.7 50.0
English 19

Inhaltsverzeichnis
Technische Daten auf Seite 20
Allgemeine Informationen auf Seite 21
Installation auf Seite 23
Benutzeroberfläche und Navigation auf Seite 24
Inbetriebnahme auf Seite 27
Durchführung einer Messung auf Seite 27
Datenlogger auf Seite 31
Datenübertragung auf Seite 32
Wartung auf Seite 33
Fehlerbehebung auf Seite 34
Ersatzteile und Zubehör auf Seite 37
Standardlösungen auf Seite 38
Salinitätswerte für DO-Messgeräte auf Seite 39
Technische Daten
Änderungen vorbehalten.
Technische Daten Details
Abmessungen 18,6 x 7,3 x 3,8 cm (7,32 x 2,87 x 1,5 Zoll)
Gewicht 300 g (0,66 lb)
Gerätegehäuse IP67
Spannungsversorgung
(intern)
Alkalibatterien (AA/LR6) oder aufladbare
Nickelmetallhydrid-Akkus (NiMH) (3);
Lebensdauer des Akkus: mehr als 500 Stunden
Eingangsanschlüsse MP-5- oder MP-8-Anschluss für sensION+-
Sonden
Schutzklasse des
Messgerätes
Class III
Lagertemperatur –15 bis +65 °C
Betriebstemperatur 0 bis 50 °C (32 bis 122 °F)
Technische Daten Details
Luftfeuchtigkeit bei Betrieb maximal 80% (nicht-kondensierend)
Datalog Maximal 500 Datenpunkte, automatische oder
manuelle Speicherung
Wireless-Datenübertragung USB-RF-Gerät, maximale Einsatzentfernung
10 m
HF-Ausgangsleistung HF-Dongle: -16,01 dBm (Toleranz von -4 bis
+2 dBm)
Geräte: -4,01 dBm (Toleranz von -4 bis +2 dBm)
Messbereich pH: –2,00 bis 19,99; ORP: ±1999 mV
Leitfähigkeit: 0,01 bis 500 mS/cm; TDS: 0 bis
500 g/L; Salzgehalt: 0,0 bis 1999 mg/L, 2,0 bis
50,0 g/L
DO: 0,00 bis 19,99 mg/L und 20,0 bis 22,0 mg/L
(25 °C), 0,0 bis 199,9% und 200 bis 250%
(25 °C)
Auflösung pH: 0,01 pH; ORP: 1 mV (0,1 mV von –199.9 bis
199,9 mV)
DO: 0,1% (1% wenn ≥ 200%); 0,01 mg/L
(0,1 mg/L wenn ≥ 20 mg/L)
Leitfähigkeit: ändert sich mit Bereich
(automatische Bereichseinstellung)
Temperatur: 0,1 °C (0,1 °F)
Messfehler (± 1 Stelle) pH: ≤ 0,01 pH; ORP: ≤ 1 mV
DO: ≤ 0,5 % des gemessenen Werts
Leitfähigkeit: ≤ 0,5 % (0,01 µS/cm bis
19,99 mS/cm); ≤ 1 % (≥ 20,0 mS).
Salzgehalt/TDS: ≤ 0,5 %
Temperatur: ≤ 0,2 °C (≤ 0,4 °F)
20 Deutsch
1/434