

1
Printed: 23.04.2018 | Doc-Nr: PUB / 5070537 / 000 / 05

2
3
4
5
Printed: 23.04.2018 | Doc-Nr: PUB / 5070537 / 000 / 05

6
7
8
Printed: 23.04.2018 | Doc-Nr: PUB / 5070537 / 000 / 05

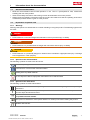
SCW 70
WSC 7.25-S
en Original operating instructions . . . . . . . . . . . . . . . . . . . . . . . . . . . . . . . . . . . . . . . 1
sl Originalna navodila za uporabo . . . . . . . . . . . . . . . . . . . . . . . . . . . . . . . . . . . . . 11
hr Originalne upute za uporabu . . . . . . . . . . . . . . . . . . . . . . . . . . . . . . . . . . . . . . . 20
ru Оригинальное руководство по эксплуатации . . . . . . . . . . . . . . . . . . . . . . . . . . . 30
kk Түпнұсқа пайдалану бойынша нұсқаулық . . . . . . . . . . . . . . . . . . . . . . . . . . . . . 41
bg Оригинално Ръководство за експлоатация . . . . . . . . . . . . . . . . . . . . . . . . . . . . 52
ro Manual de utilizare original . . . . . . . . . . . . . . . . . . . . . . . . . . . . . . . . . . . . . . . . 63
ar ﺩﻟﻴﻞﺍﻻﺳﺘﻌﻤﺎﻝﺍﻷﺻﻠﻲ . . . . . . . . . . . . . . . . . . . . . . . . . . . . . . . . . . . . . . . . . . 73
ja オリジナル取扱説明書 . . . . . . . . . . . . . . . . . . . . . . . . . . . . . . . . . . . . . . . . . . . . 84
ko 오리지널 사용 설명서 . . . . . . . . . . . . . . . . . . . . . . . . . . . . . . . . . . . . . . . . . . . . . 94
zh 原始操作說明 . . . . . . . . . . . . . . . . . . . . . . . . . . . . . . . . . . . . . . . . . . . . . . . . . . 103
cn 原版操作说明 . . . . . . . . . . . . . . . . . . . . . . . . . . . . . . . . . . . . . . . . . . . . . . . . . . 111
Printed: 23.04.2018 | Doc-Nr: PUB / 5070537 / 000 / 05

Printed: 23.04.2018 | Doc-Nr: PUB / 5070537 / 000 / 05

*2022068*
2022068 English 1
1 Information about the documentation
1.1 About this documentation
• Read this documentation before initial operation or use. This is a prerequisite for safe, trouble-free
handling and use of the product.
• Observe the safety instructions and warnings in this documentation and on the product.
• Always keep the operating instructions with the product and make sure that the operating instructions
are with the product when it is given to other persons.
1.2 Explanation of symbols used
1.2.1 Warnings
Warnings alert persons to hazards that occur when handling or using the product. The following signal words
are used:
DANGER
DANGER !
▶ Draws attention to imminent danger that will lead to serious personal injury or fatality.
WARNING
WARNING !
▶ Draws attention to a potential threat of danger that can lead to serious injury or fatality.
CAUTION
CAUTION !
▶
Draws attention to a potentially dangerous situation that could lead to slight personal injury or damage
to the equipment or other property.
1.2.2 Symbols in the documentation
The following symbols are used in this document:
Read the operating instructions before use.
Instructions for use and other useful information
Dealing with recyclable materials
Do not dispose of electric equipment and batteries as household waste
1.2.3 Symbols in the illustrations
The following symbols are used in illustrations:
These numbers refer to the corresponding illustrations found at the beginning of these operating
instructions
The numbering reflects the sequence of operations shown in the illustrations and may deviate
from the steps described in the text
Item reference numbers are used in the overview illustrations and refer to the numbers used in
the product overview section
This symbol is intended to draw special attention to certain points when handling the product.
Wireless data transfer
Printed: 23.04.2018 | Doc-Nr: PUB / 5070537 / 000 / 05

2 English 2022068
*2022068*
1.3 Product information
Hilti products are designed for professional use and may be operated, serviced and maintained only by
trained, authorized personnel. This personnel must be informed of any particular hazards that may be
encountered. The product and its ancillary equipment can present hazards if used incorrectly by untrained
personnel or if used not in accordance with the intended use.
The type designation and serial number are stated on the rating plate.
▶ Write down the serial number in the table below. You will be required to state the product details when
contacting Hilti Service or your local Hilti organization to inquire about the product.
Product information
Circular saw SCW 70 | WSC 7.25-S
Generation 01 | 02
Serial no.
1.4 Declaration of conformity
We declare, onour sole responsibility, that the product described here complies with the applicable directives
and standards. A copy of the declaration of conformity can be found at the end of this documentation.
The technical documentation is filed and stored here:
Hilti Entwicklungsgesellschaft mbH | Tool Certification | Hiltistrasse 6 | 86916 Kaufering, Germany
2 Safety
2.1 General power tool safety warnings
WARNING Read all safety warnings, instructions, illustrations and specifications provided with this
power tool. Failure to follow all instructions listed below may result in electric shock, fire and/or serious injury.
Save all warnings and instructions for future reference.
The term "power tool" in the warnings refers to your mains-operated (corded) power tool or battery-operated
(cordless) power tool.
Work area safety
▶ Keep work area clean and well lit. Cluttered or dark areas invite accidents.
▶ Do not operate power tools in explosive atmospheres, such as in the presence of flammable
liquids, gases or dust. Power tools create sparks which may ignite the dust or fumes.
▶ Keep children and bystanders away while operating a power tool. Distractions can cause you to lose
control.
Electrical safety
▶ Power tool plugs must match the outlet. Never modify the plug in any way. Do not use any adapter
plugs with earthed (grounded) power tools. Unmodified plugs and matching outlets will reduce risk of
electric shock.
▶ Avoid body contact with earthed or grounded surfaces, such as pipes, radiators, ranges and
refrigerators. There is an increased risk of electric shock if your body is earthed or grounded.
▶ Do not expose power tools to rain or wet conditions. Water entering a power tool will increase the
risk of electric shock.
▶ Do not abuse the cord. Never use the cord for carrying, pulling or unplugging the power tool. Keep
cord away from heat, oil, sharp edges or moving parts. Damaged or entangled cords increase the
risk of electric shock.
▶ When operating a power tool outdoors, use an extension cord suitable for outdoor use. Use of a
cord suitable for outdoor use reduces the risk of electric shock.
▶ If operating a power tool in a damp location is unavoidable, use a residual current device (RCD)
protected supply. Use of an RCD reduces the risk of electric shock.
Personal safety
▶ Stay alert, watch what you are doing and use common sense when operating a power tool. Do
not use a power tool while you are tired or under the influence of drugs, alcohol or medication. A
moment of inattention while operating power tools may result in serious personal injury.
▶ Use personal protective equipment. Always wear eye protection. Protective equipment such as a
dust mask, non-skid safety shoes, hard hat or hearing protection used for appropriate conditions will
reduce personal injuries.
Printed: 23.04.2018 | Doc-Nr: PUB / 5070537 / 000 / 05

*2022068*
2022068 English 3
▶ Prevent unintentional starting. Ensure the switch is in the off-position before connecting to power
source and/or battery pack, picking up or carrying the tool. Carrying power tools with your finger on
the switch or energising power tools that have the switch on invites accidents.
▶ Remove any adjusting key or wrench before turning the power tool on. A wrench or a key left
attached to a rotating part of the power tool may result in personal injury.
▶ Do not overreach. Keep proper footing and balance at all times. This enables better control of the
power tool in unexpected situations.
▶ Dress properly. Do not wear loose clothing or jewellery. Keep your hair and clothing away from
moving parts. Loose clothes, jewellery or long hair can be caught in moving parts.
▶ If devices are provided for the connection of dust extraction and collection facilities, ensure these
are connected and properly used. Use of dust collection can reduce dust-related hazards.
▶ Do not let familiarity gained from frequent use of tools allow you to become complacent and ignore
tool safety principles. A careless action can cause severe injury within a fraction of a second.
Power tool use and care
▶ Do not force the power tool. Use the correct power tool for your application. The correct power tool
will do the job better and safer at the rate for which it was designed.
▶ Do not use the power tool if the switch does not turn it on and off. Any power tool that cannot be
controlled with the switch is dangerous and must be repaired.
▶ Disconnect the plug from the power source and/or remove the battery pack, if detachable, from
the power tool before making any adjustments, changing accessories, or storing power tools.
Such preventive safety measures reduce the risk of starting the power tool accidentally.
▶ Store idle power tools out of the reach of children and do not allow persons unfamiliar with the
power tool or these instructions to operate the power tool. Power tools are dangerous in the hands
of untrained users.
▶ Maintain power tools and accessories. Check for misalignment or binding of moving parts,
breakage of parts and any other condition that may affect the power tool’s operation. If damaged,
have the power tool repaired before use. Many accidents are caused by poorly maintained power
tools.
▶ Keep cutting tools sharp and clean. Properly maintained cutting tools with sharp cutting edges are
less likely to bind and are easier to control.
▶ Use the power tool, accessories and tool bits etc. in accordance with these instructions, taking
into account the working conditions and the work to be performed. Use of the power tool for
operations different from those intended could result in a hazardous situation.
▶ Keep handles and grasping surfaces dry, clean and free from oil and grease. Slippery handles and
grasping surfaces do not allow for safe handling and control of the tool in unexpected situations.
Service
▶ Have your power tool serviced by a qualified repair person using only identical replacement parts.
This will ensure that the safety of the power tool is maintained.
2.2 Safety instructions for all saws
Cutting procedures
▶
DANGER: Keep hands away from cutting area and the blade. Keep your second hand on
auxiliary handle or motor housing. If both hands are holding the saw, they cannot be cut by the blade.
▶ Do not reach underneath the workpiece. The guard cannot protect you from the blade below the
workpiece.
▶ Adjust the cutting depth to the thickness of the workpiece. Less than a full tooth of the blade teeth
should be visible below the workpiece.
▶ Never hold the workpiece in your hands or across your leg while cutting. Secure the workpiece
to a stable platform. It is important to support the work properly to minimise body exposure, blade
binding, or loss of control.
▶ Hold the power tool by insulated gripping surfaces, when performing an operation where the
cutting tool may contact hidden wiring or its own cord. Contact with a "live" wire will also make
exposed metal parts of the power tool "live" and could give the operator an electric shock.
▶ When ripping, always use a rip fence or straight edge guide. This improves the accuracy of cut and
reduces the chance of blade binding.
▶ Always use blades with correct size and shape (diamond versus round) of arbour holes. Blades
that do not match the mounting hardware of the saw will run off-centre, causing loss of control.
▶ Never use damaged or incorrect blade washers or bolt. The blade washers and bolt were specially
designed for your saw, for optimum performance and safety of operation.
Printed: 23.04.2018 | Doc-Nr: PUB / 5070537 / 000 / 05

4 English 2022068
*2022068*
Kickback causes and related warnings
• kickback is a sudden reaction to a pinched, jammed or misaligned saw blade, causing an uncontrolled
saw to lift up and out of the workpiece toward the operator;
• when the blade is pinched or jammed tightly by the kerf closing down, the blade stalls and the motor
reaction drives the unit rapidly back toward the operator;
• if the blade becomes twisted or misaligned in the cut, the teeth at the back edge of the blade can dig
into the top surface of the wood causing the blade to climb out of the kerf and jump back toward the
operator.
Kickback is the result of saw misuse and/or incorrect operating procedures or conditions and can be avoided
by taking proper precautions as given below.
▶ Maintain a firm grip with both hands on the saw and position your arms to resist kickback forces.
Position your body to either side of the blade, but not in line with the blade. Kickback could cause
the saw to jump backwards, but kickback forces can be controlled by the operator, if proper precautions
are taken.
▶ When blade is binding, or when interrupting a cut for any reason, release the trigger and hold the
saw motionless in the material until the blade comes to a complete stop. Never attempt to remove
the saw from the work or pull the saw backward while the blade is in motion or kickback may
occur. Investigate and take corrective actions to eliminate the cause of blade binding.
▶ When restarting a saw in the workpiece, centre the saw blade in the kerf so that the saw teeth are
not engaged into the material. If a saw blade binds, it may walk up or kickback from the workpiece as
the saw is restarted.
▶ Support large panels to minimise the risk of blade pinching and kickback. Large panels tend to sag
under their own weight. Supports must be placed under the panel on both sides, near the line of cut and
near the edge of the panel.
▶ Do not use dull or damaged blades. Unsharpened or improperly set blades produce narrow kerf
causing excessive friction, blade binding and kickback.
▶ Blade depth and bevel adjusting locking levers must be tight and secure before making the cut. If
blade adjustment shifts while cutting, it may cause binding and kickback.
▶ Use extra caution when sawing into existing walls or other blind areas. The protruding blade may
cut objects that can cause kickback.
Lower guard function
▶ Check the lower guard for proper closing before each use. Do not operate the saw if the lower
guard does not move freely and close instantly. Never clamp or tie the lower guard into the open
position. If the saw is accidentally dropped, the lower guard may be bent. Raise the lower guard with
the retracting handle and make sure it moves freely and does not touch the blade or any other part, in all
angles and depths of cut.
▶ Check the operation of the guard return spring. If the guard and the spring are not operating
properly, they must be serviced before use. Lower guard may operate sluggishly due to damaged
parts, gummy deposits, or a build-up of debris.
▶ The lower guard may be retracted manually only for special cuts such as "plunge cuts" and
"compound cuts". Raise the lower guard by the retracting handle and as soon as the blade enters
the material, the lower guard must be released. For all other sawing, the lower guard should operate
automatically.
▶ Always observe that the lower guard is covering the blade before placing the saw down on bench
or floor. An unprotected, coasting blade will cause the saw to walk backwards, cutting whatever is in its
path. Be aware of the time it takes for the blade to stop after switch is released.
2.3 Additional safety instructions for circular saws
▶ Bring the saw blade into contact with the workpiece only when the circular saw is switched on.
◁ The path of the saw must be free of obstructions above and below the workpiece. Do not saw into
screws, nails or similar objects.
▶ Never work overhead with a circular saw.
▶ Never attempt to brake the saw blade by applying lateral pressure.
▶ Avoid overheating the tips of the saw blade teeth.
▶ Always use a saw blade that is suitable for the material you are going to saw.
▶ Use only saw blades recommended by Hilti that comply with the EN 847-1 standard.
Printed: 23.04.2018 | Doc-Nr: PUB / 5070537 / 000 / 05

*2022068*
2022068 English 5
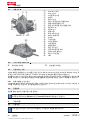
3 Description
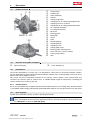
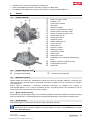
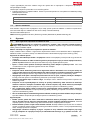
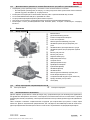
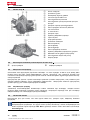
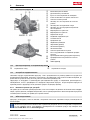
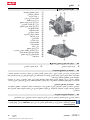
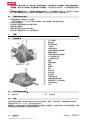
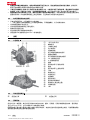
3.1 Product overview 1
@
On/off switch
;
Auxiliary grip
=
Arbor lockbutton
%
Hex key
&
Cutting angle scale
(
Clamping lever for cutting angle adjustment
)
Clamping screw for rip fence
+
Clamping lever for cutting depth adjustment
§
45° cutting line indicator
/
0° cutting line indicator
:
Rip fence
∙
Pivoting guard
$
Base plate
£
Guard
|
Arbor
¡
Mounting flange
Q
Clamping flange
W
Clamping screw
E
Cutting depth scale
R
Pivoting guard operating lever
T
Hose connector (vacuum cleaner)
Z
Cutting angle setting
U
LED
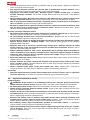
3.2 Overview of the guide rail adapter 2
I
Rear retaining lug
O
Front retaining lug
3.3 Intended use
The product described is a circular saw. It is designed for cutting wood or wood-like materials, plastics,
gypsum plasterboard, gypsum fiberboard and composite materials, up to a cutting depth of 70 mm (2.75 in),
and for miter cuts at angles up to 56 °.
The circular saw has a removable connector for an optional vacuum cleaner / dust removal hose; this
connector fits common types of suction hose. A suitable adapter might be required for connecting the
vacuum-cleaner hose to the circular saw.
3.3.1 Possible misuse
Do not use saw blades not compliant with the technical data and do not use cutting discs, abrasive wheels
or saw blades made of highly alloyed high speed steel (HSS steel). Do not use this power tool to saw metal.
3.4 Items supplied
Circular saw, saw blade, hex key, rip fence, operating instructions.
To help ensure safe and reliable operation, use only genuine Hilti spare parts and consumables. Spare
parts, consumables and accessories approved by Hilti for use with the product can be found at your
local Hilti Store or online at: www.hilti.group
Printed: 23.04.2018 | Doc-Nr: PUB / 5070537 / 000 / 05

6 English 2022068
*2022068*
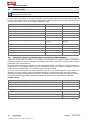
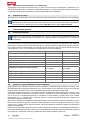
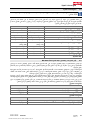
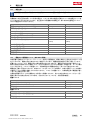
4 Technical data
4.1 Technical data
For rated voltage, frequency, current and input power, please refer to the country-specific type
identification plate.
If the device is powered by a generator or transformer, the generator or transformer’s power output must be
at least twice the rated input power shown on the rating plate of the device. The operating voltage of the
transformer or generator must always be within +5 % and -15 % of the rated voltage of the device.
SCW 70 WSC 7.25S
Weight in accordance with EPTA procedure 01
5.1 kg 5.1 kg
Dimensions (L x W x H)
317 x 236 x 269 mm 317 x 236 x 269 mm
Base plate
290 x 170 mm 290 x 170 mm
Saw blade diameter
184 mm … 190 mm 184 mm … 190 mm
Saw blade disc thickness
1.1 mm … 1.5 mm 1.1 mm … 1.5 mm
Kerf width
1.7 mm … 2.3 mm 1.7 mm … 2.3 mm
Saw blade arbor size
30 mm
(1.2 in)
15.9 mm
(5/8 in)
Cutting depth at 0°
0 mm … 67 mm 0 mm … 67 mm
Cutting depth at 45°
0 mm … 49 mm 0 mm … 49 mm
Cutting depth at 56°
0 mm … 38 mm 0 mm … 38 mm
No-load speed
5,800 /min 5,800 /min
Protection class
II II
4.2 Noise information and vibration values in accordance with EN 62841
The sound pressure and vibration values given in these instructions were measured in accordance with a
standardized test and can be used to compare one power tool with another. They can also be used for a
preliminary assessment of exposure.
The data given represent the main applications of the power tool. However, if the power tool is used for
different applications, with different accessory tools, or is poorly maintained, the data can vary. This can
significantly increase exposure over the total working period.
An accurate estimation of exposure should also take into account the times when the tool is switched off, or
when it is running but not actually being used for a job. This can significantly reduce exposure over the total
working period.
Identify additional safety measures to protect the operator from the effects of noise and/or vibration, for
example: maintaining the power tool and accessory tools, keeping the hands warm, organization of work
patterns.
Noise information
SCW 70
Sound power level (L
WA
)
107 dB(A)
Sound pressure level (L
pA
)
96 dB(A)
Uncertainty
3 dB(A)
Vibration information
SCW 70
Triaxial vibration value when cutting wood (a
h
)
≈ 2.5 m/s²
Uncertainty (K)
1.5 m/s²
Printed: 23.04.2018 | Doc-Nr: PUB / 5070537 / 000 / 05

*2022068*
2022068 English 7
5 Operation
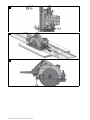
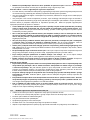
5.1 Removing the saw blade 3
WARNING
Risk of burning injury. A hot accessory tool, clamping flange or clamping screw and the sharp edges of the
saw blade present hazards.
▶
Wear protective gloves when changing saw blades.
1. Disconnect the supply cord plug from the power outlet.
2. Press the arbor lockbutton.
3. Turn the saw blade clamping screw with the hex key until the arbor lockbutton engages fully.
4. Use the hex key to slacken the clamping screw by turning it counter-clockwise.
5. Remove the clamping screw from the outer clamping flange.
6. Open the pivoting guard by swinging it clear and remove the saw blade.
5.2 Fitting the saw blade
CAUTION
Risk of damage Unsuitable or incorrectly fitted saw blades may damage the saw.
▶ Only use blades which are suitable for this saw. Observe the direction-of-rotation arrow on the saw
blade.
1. Disconnect the supply cord plug from the power outlet.
2. Clean the mounting flange and the clamping flange.
3. Fit the mounting flange.
4. Open the pivoting guard.
5. Fit the new saw blade.
6. Fit the outer clamping flange.
7. Secure the clamping flange with the clamping screw by turning it clockwise. At the same time, use one
hand to hold down the arbor lockbutton.
8. Before using the power tool, check that the saw blade is correctly seated and tightened securely.
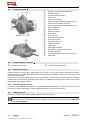
5.3 Adjusting the cutting depth 4
1. Disconnect the supply cord plug from the power outlet.
2. Rest the circular saw on a flat surface.
3. Release the cutting depth adjustment clamping lever.
4. Lift the circular saw in a scissoring movement and set the cutting depth.
◁ The cutting depth is shown on the cutting depth scale.
For a clean-edged cut, set cutting depth to the thickness of the material plus 2 mm.
5. Secure the cutting depth adjustment clamping lever.
5.4 Setting the miter cut angle 5
1. Disconnect the supply cord plug from the power outlet.
2. Release the cutting angle adjustment clamping lever.
3. Pivot the base plate to the desired miter cut angle.
◁ The miter cutting angle is shown on the miter cut angle scale.
4. Tighten the cutting angle adjustment clamping lever.
5.5 Selecting a miter cut angle presetting
1. Disconnect the supply cord plug from the power outlet.
2. Release the cutting angle adjustment clamping lever.
3. Pivot the base plate to the 0° position.
Printed: 23.04.2018 | Doc-Nr: PUB / 5070537 / 000 / 05

8 English 2022068
*2022068*
4. Set the angle indicator to the desired presetting for the miter cut.
There are three possible presettings: 22.5°, 45° and 56°.
5. Pivot the base plate to the stop.
6. Tighten the cutting angle adjustment clamping lever.
5.6 Cutting line indicator
At the front edge of the base plate of the circular saw is a line indicator for straight cuts and miter cuts (0°
and 45°). This permits accurate cutting at the desired miter angle. The edge of the line indicator corresponds
to the inside of the saw blade. There is a cutting line indicator at the opening for the saw blade at the front
end of the base plate.
5.6.1 Sawing along a line
Secure the workpiece to prevent movement.
Position the workpiece so that the saw blade is free to rotate beneath it.
Check that the on/off switch on the product is in the “off” position.
Position the forward section of the circular saw’s base plate on the workpiece but do not bring the
blade into contact with the workpiece.
1. Switch on the circular saw.
2. Guide the circular saw along the cutting line on the workpiece at a suitable speed.
5.7 Sawing with the rip fence
The single-arm rip fence enables precision cuts to be made parallel with a straight edge of the workpiece or
strips of uniform width to be cut. The rip fence can be fitted on either side of the base plate.
5.7.1 Fitting / adjusting the rip fence 6
1. Disconnect the supply cord plug from the power outlet.
2. Slide the rip fence guide under the clamping screw.
3. Set the fence to the correct width for the cut.
4. Tighten the clamping screw.
5.8 Sawing with the guide rail. 7
Sawing with the guide rail can reduce the risk of kickback.
5.8.1 Inserting into / removing from the guide rail adapter
1. Remove the rip fence, if one is fitted.
2. Fit the front edge of the base plate into the front retaining lugs on the guide rail adapter.
3. Swing the rear edge of the base plate down fully into the guide rail adapter. The base plate must engage
fully with the rear retaining lug.
4. To remove, pull the rear retaining lug back slightly and remove the circular saw from the guide rail
adapter.
5.8.2 Longitudinal cuts at 0°
▶ Place the circular saw on the guide rail so that the rib fits into the groove in the adapter.
5.8.3 Longitudinal cuts at miter angles up to 56°
▶ Guide the circular saw with the outer edge of the guide rail adapter along the rib of the guide rail, as
otherwise the saw blade will contact the guide rail.
5.8.4 Cuts angled across the workpiece
The cutting angle indicated is the angle of deviation from a straight, right-angled cut.
Printed: 23.04.2018 | Doc-Nr: PUB / 5070537 / 000 / 05

*2022068*
2022068 English 9
1. Position the guide rail with the zero mark at the edge of the workpiece and then pivot the rail until the
desired angle shown on the angle scale is opposite the zero mark.
2. Secure the guide rail with the two screw clamps.
5.8.5 Sawing offcuts
1. Secure the guide rail from below with two screw clamps.
The saw must be placed on the guide rail behind the workpiece. Make sure that the saw blade is
not in contact with the workpiece.
2. Position the circular saw on the guide rail a short distance from the starting point of the cut.
3. Switch on the circular saw.
4. Push the saw at a steady speed across the workpiece. The pivoting guard opens as it contacts the
actuating edge of the guide rail and closes again at the end of the rail.
5.9 Sawing with or without sawdust extraction
The circular saw has a connector that fits common types of vacuum cleaner hose with a diameter of 27 mm.
A suitable adapter might be required for connecting the vacuum-cleaner hose to the circular saw.
If possible, always use a suitable mobile dust removal system for wood and wood and mineral materials.
If you are working without a sawdust extractor, turn the ejector so that the sawdust is directed away from you.
Always use a filter class P2 dust mask and always ensure adequate ventilation to help minimize
exposure to dust.
6 Care and maintenance
6.1 Checks after cleaning and maintenance
After cleaning or maintenance, check that all safety devices are fitted and that they function faultlessly.
▶ To check the pivoting guard, open the guard fully by moving the guard operating lever.
◁ The pivoting guard must close quickly and completely when the guard operating lever is released.
6.2 Cleaning the ejector 8
1. Disconnect the supply cord plug from the power outlet.
2. Remove the screw at the rear underside of the guard and remove the vacuum cleaner hose connector.
3. Clean the ejector and the hose connector.
4. Refit the hose connector to the ejector and secure it with the screw.
5. Check that moving parts are in full working order and do not jam and make sure there are no parts that
are broken or damaged in such a way as to impair operation of the power tool.
6.3 Cleaning the guard
1. Remove the saw blade. → page 7
2. Clean the parts of the guard carefully with a dry brush.
3. Use a suitable tool to remove deposits or cuttings from the inside surfaces of the parts of the guard.
4. Fit the saw blade. → page 7
7 Disposal
Most of the materials from which Hilti tools and appliances are manufactured can be recycled. The
materials must be correctly separated before they can be recycled. In many countries, your old tools,
machines or appliances can be returned to Hilti for recycling. Ask Hilti Service or your Hilti representative
for further information.
▶ Do not dispose of power tools, electronic equipment or batteries as household waste!
Printed: 23.04.2018 | Doc-Nr: PUB / 5070537 / 000 / 05

10 English 2022068
*2022068*
8 Manufacturer’s warranty
▶ Please contact your local Hilti representative if you have questions about the warranty conditions.
Printed: 23.04.2018 | Doc-Nr: PUB / 5070537 / 000 / 05

*2022068*
2022068 Slovenščina 11
1 Informacije o dokumentaciji
1.1 O tej dokumentaciji
• Pred začetkom uporabe preberite to dokumentacijo. To je pogoj za varno delo in nemoteno uporabo.
• Upoštevajte varnostna navodila in opozorila v tej dokumentaciji in na izdelku.
• Navodila za uporabo vedno hranite ob izdelku in vedno priložite ta navodila, če izdelek posredujete
drugim osebam.
1.2 Legenda
1.2.1 Opozorila
Opozorila opozarjajo na nevarnosti pri delu z izdelkom. Uporabljajo se naslednje signalne besede:
NEVARNOST
NEVARNOST !
▶ Za neposredno grozečo nevarnost, ki lahko pripelje do težjih telesnih poškodb ali do smrti.
OPOZORILO
OPOZORILO !
▶ Za morebitno grozečo nevarnost, ki lahko povzroči težke telesne poškodbe ali smrt.
PREVIDNO
PREVIDNO !
▶ Označuje možno nevarno situacijo, ki lahko pripelje do lažjih telesnih poškodb ali materialne škode.
1.2.2 Simboli v dokumentaciji
V navodilih za uporabo se pojavljajo naslednji simboli:
Pred uporabo preberite navodila za uporabo
Navodila za uporabo in druge uporabne informacije
Ravnanje z materiali, ki jih je mogoče znova uporabiti
Električnih orodij in akumulatorskih baterij ne odstranjujte s hišnimi odpadki
1.2.3 Simboli na slikah
Na slikah so uporabljeni naslednji simboli:
Te številke označujejo slike na začetku teh navodil
Oštevilčenje na slikah prikazuje postopek po korakih in se lahko razlikuje od delovnih korakov v
besedilu
Na sliki Pregled so uporabljene številke položajev, ki se nanašajo na številke v legendi poglavja
Pregled izdelka
Ta znak opozarja, da morate biti pri uporabi izdelka še posebej pozorni.
Brezžičen prenos podatkov
1.3 Informacije o izdelku
Izdelki Hilti so namenjeni profesionalnim uporabnikom; uporablja, vzdržuje in servisira jih lahko le poobla-
ščeno in poučeno osebje. To osebje je treba dodatno poučiti o nevarnostih, ki se pojavljajo pri delu. Izdelek
in njegovi pripomočki so lahko nevarni, če jih nepravilno uporablja neusposobljeno osebje in če se upora-
bljajo v nasprotju z namembnostjo.
Printed: 23.04.2018 | Doc-Nr: PUB / 5070537 / 000 / 05

12 Slovenščina 2022068
*2022068*
Tipska oznaka in serijska številka sta navedeni na tipski ploščici.
▶ Serijsko številko prepišite v naslednjo preglednico. Podatke o izdelku potrebujete v primeru morebitnih
vprašanj za našega zastopnika ali servis.
Informacije o izdelku
Krožna žaga SCW 70 | WSC 7.25-S
Generacija 01 | 02
Serijska št.
1.4 Izjava o skladnosti
Z izključno odgovornostjo izjavljamo, da tukaj opisan izdelek ustreza naslednjim direktivam in standardom.
Kopijo izjave o skladnosti si lahko ogledate na koncu te dokumentacije.
Tehnična dokumentacija je na voljo tukaj:
Hilti Entwicklungsgesellschaft mbH | Zulassung Geräte | Hiltistraße 6 | 86916 Kaufering, DE
2 Varnost
2.1 Splošna varnostna opozorila za električna orodja
OPOZORILO preberite vsa varnostna opozorila, navodila, slike in tehnične podatke, priložene temu
električnemu orodju. Posledice neupoštevanja naslednjih opozoril so lahko električni udar, požar in/ali hude
telesne poškodbe.
Vsa varnostna opozorila in navodila shranite za v prihodnje.
Pojem "električno orodje", ki smo ga uporabili v varnostnih opozorilih, se nanaša na električno orodje
za priklop na električno omrežje (s priključnim kablom) ali na električno orodje na baterijski pogon (brez
priključnega kabla).
Varnost na delovnem mestu
▶ Poskrbite, da bo vaše delovno mesto vedno čisto in dobro osvetljeno. Nered ali neosvetljena delovna
območja lahko povzročijo nezgode.
▶ Prosimo, da električnega orodja ne uporabljate v okolju, kjer je nevarnost eksplozije in v katerem
se nahajajo gorljive tekočine, plini ali prah. Električna orodja povzročajo iskrenje, zato se gorljiv prah
ali pare lahko vnamejo.
▶ Ne dovolite otrokom in drugim osebam, da bi se med delom približale električnemu orodju. Druge
osebe lahko odvrnejo vašo pozornost in izgubili boste nadzor nad orodjem.
Električna varnost
▶ Priključni vtič električnega orodja mora ustrezati vtičnici. Vtiča pod nobenim pogojem ne smete
spreminjati. Uporaba adapterskih vtičev v kombinaciji z zaščitenim ozemljenim električnim
orodjem ni dovoljena. Nespremenjen vtič in ustrezna vtičnica zmanjšujeta nevarnost električnega udara.
▶ Izogibajte se telesnemu stiku z ozemljenimi površinami, na primer s cevmi, grelci, štedilniki in
hladilniki. Če je ozemljeno tudi vaše telo, obstaja povečano tveganje električnega udara.
▶ Zavarujte električno orodje pred dežjem in vlago. Vstop vode v električno orodje povečuje nevarnost
električnega udara.
▶ Električnega kabla ne uporabljajte za prenašanje ali obešanje električnega orodja ali za vlečenje
vtiča iz vtičnice. Električni kabel zavarujte pred vročino, oljem, ostrimi robovi ali stikom s
premikajočimi se deli orodja. Poškodovan ali zavozlan električni kabel povečuje nevarnost električnega
udara.
▶
Če električno orodje uporabljate na prostem, uporabljajte samo podaljške, ki so primerni tudi za
delo na prostem. Uporaba podaljševalnega kabla, ki je primeren za uporabo na prostem, zmanjšuje
nevarnost električnega udara.
▶
Če se ne morete izogniti uporabi orodja v vlažnem okolju, uporabite zaščitno stikalo okvarnega
toka. Uporaba zaščitnega stikala okvarnega toka zmanjša tveganje električnega udara.
Varnost oseb
▶ Bodite zbrani in pazite, kaj delate. Dela z električnim orodjem se lotite razumno. Nikoli ne
uporabljajte orodja, če ste utrujeni ali pod vplivom drog, alkohola ali zdravil. Trenutek nepazljivosti
pri uporabi električnega orodja lahko privede do resnih poškodb.
▶ Uporabljajte osebno zaščitno opremo in vedno nosite zaščitna očala. Uporaba osebne zaščitne
opreme, na primer protiprašne maske, nedrsečih zaščitnih čevljev, zaščitne čelade in glušnikov, odvisno
od vrste in načina uporabe električnega orodja, zmanjšuje tveganje telesnih poškodb.
Printed: 23.04.2018 | Doc-Nr: PUB / 5070537 / 000 / 05

*2022068*
2022068 Slovenščina 13
▶ Preprečite nenameren zagon orodja. Preden električno orodje priključite na električno omrežje
in/ali akumulatorsko baterijo, ga dvignete ali nosite, se prepričajte, da je izključeno. Če med
prenašanjem električnega orodja prst držite na stikalu oziroma če na električno omrežje priključite
vklopljeno orodje, lahko pride do nezgode.
▶ Preden vklopite električno orodje, z njega odstranite nastavitvena orodja ali vijačni ključ. Orodje ali
ključ na vrtečem se delu orodja lahko privedeta do poškodb.
▶ Izogibajte se neobičajni telesni drži. Poskrbite za varno stojišče in ohranite ravnotežje. Tako boste
lahko v nepričakovani situaciji bolje obvladali električno orodje.
▶ Nosite primerna oblačila. Ne nosite širokih oblačil ali nakita. Lasje, oblačila in rokavice ne smejo
priti v stik s premikajočimi se deli orodja. Ne nosite ohlapne obleke ali nakita, ker ju lahko zagrabijo
premikajoči se deli orodja.
▶
Če je na orodje možno namestiti priprave za odsesavanje in prestrezanje prahu, se prepričajte,
da so le-te priključene in jih uporabljate na pravilen način. Uporaba priprav za odsesavanje prahu
zmanjšuje ogroženost zaradi prahu.
▶ Ne podcenjujte nevarnosti in vedno upoštevajte varnostna navodila za električna orodja, tudi, če
ste po večkratni uporabi nanje že dobro navajeni. Neprevidno ravnanje lahko v delčku sekunde
povzroči hude poškodbe.
Uporaba električnega orodja in ravnanje z njim
▶ Ne preobremenjujte orodja. Uporabljajte samo električno orodje, ki je predvideno za opravljanje
vašega dela. Z ustreznim električnim orodjem boste delali bolje in varneje v predvidenem območju
zmogljivosti.
▶ Ne uporabljajte električnega orodja, ki ima pokvarjeno stikalo. Električno orodje, ki ga ni možno
vklopiti ali izklopiti, je nevarno in ga je treba popraviti.
▶ Pred nastavljanjem orodja, menjavo opreme in odlaganjem orodja izvlecite vtič iz vtičnice in/ali
snemite odstranljivo akumulatorsko baterijo iz orodja. Ta previdnostni ukrep onemogoča nepredviden
zagon električnega orodja.
▶ Električna orodja, ki jih ne uporabljate, shranjujte izven dosega otrok. Orodja ne smejo uporabljati
osebe, ki niso seznanjene z njegovim delovanjem oziroma niso prebrale teh navodil za uporabo.
Električna orodja so nevarna, če jih uporabljajo neizkušene osebe.
▶ Skrbno vzdržujte električna orodja in pribor. Preverite, ali premikajoči se deli delujejo brezhibno
in se ne zatikajo, oziroma ali kakšen del orodja ni zlomljen ali poškodovan do te mere, da bi oviral
delovanje električnega orodja. Pred ponovno uporabo je treba poškodovan del orodja popraviti.
Vzrok za številne nezgode so prav slabo vzdrževana električna orodja.
▶ Rezalna orodja naj bodo ostra in čista. Skrbno negovana rezalna orodja z ostrimi robovi se manj
zatikajo in so bolje vodljiva.
▶ Električno orodje, pribor, nastavke itd. uporabljajte v skladu s temi navodili. Pri tem upoštevajte
delovne pogoje in vrsto dela, ki ga nameravate opravljati. Uporaba električnega orodja v druge,
nepredvidene namene, lahko privede do nevarnih situacij.
▶ Ročaji in njihove površine morajo biti suhi, čisti ter brez olja in maščobe. Če so ročaji in njihove
površine spolzki, z orodjem ni mogoče varno rokovati in ga v primeru nepredvidljivih situacij obdržati pod
nadzorom.
Servis
▶ Električno orodje lahko popravlja samo usposobljen strokovnjak, in to izključno z originalnimi
nadomestnimi deli. Le tako bo tudi v prihodnje zagotovljena varna raba električnega orodja.
2.2 Varnostna opozorila za vse žage
Postopek žaganja
▶
NEVARNOST: Z rokama ne segajte v območje žaganja in v bližino žaginega lista. Z drugo
roko držite dodatni ročaj ali ohišje motorja. Če držite žago z obema rokama, ju žagin list ne more
poškodovati.
▶ Ne segajte v območje pod obdelovancem. Zaščitni pokrov vas pod obdelovancem ne more zaščititi
pred žaginim listom.
▶ Globino reza prilagodite debelini obdelovanca. Žagin list sme segati pod obdelovanec za največ eno
polno višino zoba.
▶ Obdelovanca, ki ga žagate, nikoli ne držite z roko in ga ne opirajte na nogo. Obdelovanec pritrdite
na stabilno vpenjalo. Pomembno je, da obdelovanec dobro pritrdite in s tem kar najbolj zmanjšate
tveganje stika s telesom, zagozditve žaginega lista in izgube nadzora.
▶ Pri izvajanju del, pri katerih lahko pride do stika električnega orodja s skritimi električnimi vodi ali
z lastnim priključnim kablom, orodje prijemajte samo za izolirane prijemalne površine. Pri stiku z
Printed: 23.04.2018 | Doc-Nr: PUB / 5070537 / 000 / 05

14 Slovenščina 2022068
*2022068*
vodnikom pod napetostjo pride napetost tudi na kovinske dele električnega orodja in povzroči električni
udar.
▶ Pri vzdolžnih rezih vedno uporabljajte prislon ali raven vodilni rob. S tem boste izboljšali natančnost
reza in zmanjšali možnost zagozditve žaginega lista.
▶ Uporabljajte samo žagine liste prave velikosti in z ustrezno odprtino (npr. zvezdasto ali okroglo).
Žagini listi, ki ne ustrezajo sistemu pritrjevanja žage, se vrtijo neenakomerno in povzročijo izgubo nadzora.
▶ Nikoli ne uporabljajte poškodovanih ali napačnih podložk in vijakov za žagine liste. Podložke in
vijaki žaginih listov so izdelani posebej za optimalno zmogljivost in varno obratovanja vaše žage.
Povratni udarec – vzroki in ustrezna varnostna navodila
• Povratni udarec je trenutna reakcija zatikajočega se, stisnjenega ali nepravilno uravnoteženega žaginega
lista. Posledica tega je lahko nekontroliran sunek žage iz obdelovanca v smeri uporabnika;
• kadar se žagin list zagozdi ali stisne v zapirajoči se delovni reži, se list zagozdi, sila motorja pa sune žago
v smeri uporabnika;
• če se žagin list v rezu zvije ali če ni pravilno naravnan, se lahko zobje zadnjega dela žaginega lista
zataknejo za površino obdelovanca, zaradi česar žagin list izskoči iz reže in žago potisne nazaj v smeri
uporabnika.
Povratni udarec je posledica napačne oziroma neustrezne uporabe žage. Izogniti se mu je mogoče s
primernimi varnostnimi ukrepi, ki so opisani v nadaljevanju.
▶
Žago primite trdno z obema rokama in dajte roki v položaj, v katerem boste lahko prestrezali
sile povratnih udarcev. Postavite se ob stran žaginega lista, tako da ta nikoli ne bo v ravni liniji
z vašim telesom. V primeru povratnega udarca lahko krožna žaga odskoči nazaj. Uporabnik lahko z
upoštevanjem določenih varnostnih ukrepov vseeno obvlada silo povratnega udarca.
▶
Če se žagin list zatakne ali ko prekinete delo, izklopite žago in jo držite v obdelovancu toliko časa,
da se žagin list ustavi. Dokler se žagin list vrti, nikoli ne poskušajte odstraniti žage iz obdelovanca
ali je vleči nazaj. V nasprotnem primeru lahko nastopi povratni udarec. Ugotovite in odpravite vzroke
zatikanja žaginega lista.
▶
Če želite ponovno zagnati žago, ki tiči v obdelovancu, centrirajte žagin list v reži in preverite, ali
se zobje žage niso zataknili v obdelovancu. Zataknjen žagin list se lahko ob ponovnem zagonu žage
premakne iz obdelovanca ali povzroči povratni udarec.
▶ Velike plošče podprite, da zmanjšate tveganje povratnega udarca zaradi zatikanja žaginega lista.
Velike plošče se lahko ukrivijo pod lastno težo. Ploščo je treba podpreti na obeh straneh – tako v bližini
reže kakor tudi ob robu.
▶ Ne uporabljajte topih ali poškodovanih žaginih listov. Žagini listi s topimi ali nepravilno naravnanimi
zobmi zaradi preozke reže povzročijo povečano trenje, zagozditev žaginega lista in povratni udarec.
▶ Pred žaganjem pritegnite omejevala za nastavitev globine in kota reza. Če se nastavitve med
žaganjem spremenijo, se lahko žagin list zatakne in nastopi povratni udarec.
▶
Še posebej previdni bodite pri žaganju v obstoječe stene ali v območja s skritimi napeljavami.
Žagin list lahko pri potopnem žaganju blokirajo skriti predmeti, ki povzročijo povratni udarec.
Funkcija spodnjega zaščitnega pokrova
▶
Pred vsako uporabo preverite, ali se spodnji zaščitni pokrovbrezhibno zapira. Žage ne uporabljajte,
če spodnji zaščitni pokrov niprostopomičen in če sene zapre takoj. Spodnjegazaščitnegapokrova
nikoli ne poskušajte zadrževati ali pritrjevati v odprtem položaju. Če vam žaga nehote pade na tla,
se lahko spodnji zaščitni pokrov skrivi. S pomočjo ročice odprite zaščitni pokrov in se prepričajte, ali je
pokrov prosto pomičen in da se pri nobenem kotu in globini reza ne dotika žaginega lista ali drugih delov.
▶
Preverite funkcijo vzmeti spodnjega zaščitnega pokrova. Če spodnji zaščitni pokrov in vzmet ne
delujeta brezhibno, morate žago pred uporabo popraviti. Poškodovani deli, lepljive obloge ali sprijete
iveri upočasnjujejo delovanje spodnjega zaščitnega pokrova.
▶
Spodnji zaščitni pokrov odpirajte ročno samo pri izdelavi posebnih rezov, kot so npr. potopni in
kotni rezi. Z ročico odprite spodnji zaščitni pokrov in ga izpustite, takoj ko žagin list prodre v
obdelovanec. Pri vseh drugih opravilih mora spodnji zaščitni pokrov delovati avtomatsko.
▶
Žage ne odlagajte na delovno mizo ali na tla, če spodnji zaščitni pokrov ne pokriva žaginega lista.
Nezaščiten žagin list, ki se zaustavlja, potiska žago v nasprotni smeri reza in prežaga vse, kar mu je na
poti. Upoštevajte čas zaustavljanja žage.
2.3 Dodatna varnostna opozorila za krožne žage
▶ Ročna krožna žaga mora biti vklopljena, ko jo položite na obdelovanec.
◁ Na liniji reza zgoraj in spodaj ne sme biti ovir. Ne žagajte vijakov, žebljev in podobnega.
▶ S krožno žago nikoli ne delajte nad glavo.
▶ Žaginega lista ne zaustavljajte s pritiskanjem od strani.
Printed: 23.04.2018 | Doc-Nr: PUB / 5070537 / 000 / 05
Pagina se încarcă...
Pagina se încarcă...
Pagina se încarcă...
Pagina se încarcă...
Pagina se încarcă...
Pagina se încarcă...
Pagina se încarcă...
Pagina se încarcă...
Pagina se încarcă...
Pagina se încarcă...
Pagina se încarcă...
Pagina se încarcă...
Pagina se încarcă...
Pagina se încarcă...
Pagina se încarcă...
Pagina se încarcă...
Pagina se încarcă...
Pagina se încarcă...
Pagina se încarcă...
Pagina se încarcă...
Pagina se încarcă...
Pagina se încarcă...
Pagina se încarcă...
Pagina se încarcă...
Pagina se încarcă...
Pagina se încarcă...
Pagina se încarcă...
Pagina se încarcă...
Pagina se încarcă...
Pagina se încarcă...
Pagina se încarcă...
Pagina se încarcă...
Pagina se încarcă...
Pagina se încarcă...
Pagina se încarcă...
Pagina se încarcă...
Pagina se încarcă...
Pagina se încarcă...
Pagina se încarcă...
Pagina se încarcă...
Pagina se încarcă...
Pagina se încarcă...
Pagina se încarcă...
Pagina se încarcă...
Pagina se încarcă...
Pagina se încarcă...
Pagina se încarcă...
Pagina se încarcă...
Pagina se încarcă...
Pagina se încarcă...
Pagina se încarcă...
Pagina se încarcă...
Pagina se încarcă...
Pagina se încarcă...
Pagina se încarcă...
Pagina se încarcă...
Pagina se încarcă...
Pagina se încarcă...
Pagina se încarcă...
Pagina se încarcă...
Pagina se încarcă...
Pagina se încarcă...
Pagina se încarcă...
Pagina se încarcă...
Pagina se încarcă...
Pagina se încarcă...
Pagina se încarcă...
Pagina se încarcă...
Pagina se încarcă...
Pagina se încarcă...
Pagina se încarcă...
Pagina se încarcă...
Pagina se încarcă...
Pagina se încarcă...
Pagina se încarcă...
Pagina se încarcă...
Pagina se încarcă...
Pagina se încarcă...
Pagina se încarcă...
Pagina se încarcă...
Pagina se încarcă...
Pagina se încarcă...
Pagina se încarcă...
Pagina se încarcă...
Pagina se încarcă...
Pagina se încarcă...
Pagina se încarcă...
Pagina se încarcă...
Pagina se încarcă...
Pagina se încarcă...
Pagina se încarcă...
Pagina se încarcă...
Pagina se încarcă...
Pagina se încarcă...
Pagina se încarcă...
Pagina se încarcă...
Pagina se încarcă...
Pagina se încarcă...
Pagina se încarcă...
Pagina se încarcă...
Pagina se încarcă...
Pagina se încarcă...
Pagina se încarcă...
Pagina se încarcă...
Pagina se încarcă...
Pagina se încarcă...
Pagina se încarcă...
Pagina se încarcă...
-
 1
1
-
 2
2
-
 3
3
-
 4
4
-
 5
5
-
 6
6
-
 7
7
-
 8
8
-
 9
9
-
 10
10
-
 11
11
-
 12
12
-
 13
13
-
 14
14
-
 15
15
-
 16
16
-
 17
17
-
 18
18
-
 19
19
-
 20
20
-
 21
21
-
 22
22
-
 23
23
-
 24
24
-
 25
25
-
 26
26
-
 27
27
-
 28
28
-
 29
29
-
 30
30
-
 31
31
-
 32
32
-
 33
33
-
 34
34
-
 35
35
-
 36
36
-
 37
37
-
 38
38
-
 39
39
-
 40
40
-
 41
41
-
 42
42
-
 43
43
-
 44
44
-
 45
45
-
 46
46
-
 47
47
-
 48
48
-
 49
49
-
 50
50
-
 51
51
-
 52
52
-
 53
53
-
 54
54
-
 55
55
-
 56
56
-
 57
57
-
 58
58
-
 59
59
-
 60
60
-
 61
61
-
 62
62
-
 63
63
-
 64
64
-
 65
65
-
 66
66
-
 67
67
-
 68
68
-
 69
69
-
 70
70
-
 71
71
-
 72
72
-
 73
73
-
 74
74
-
 75
75
-
 76
76
-
 77
77
-
 78
78
-
 79
79
-
 80
80
-
 81
81
-
 82
82
-
 83
83
-
 84
84
-
 85
85
-
 86
86
-
 87
87
-
 88
88
-
 89
89
-
 90
90
-
 91
91
-
 92
92
-
 93
93
-
 94
94
-
 95
95
-
 96
96
-
 97
97
-
 98
98
-
 99
99
-
 100
100
-
 101
101
-
 102
102
-
 103
103
-
 104
104
-
 105
105
-
 106
106
-
 107
107
-
 108
108
-
 109
109
-
 110
110
-
 111
111
-
 112
112
-
 113
113
-
 114
114
-
 115
115
-
 116
116
-
 117
117
-
 118
118
-
 119
119
-
 120
120
-
 121
121
-
 122
122
-
 123
123
-
 124
124
-
 125
125
-
 126
126
-
 127
127
-
 128
128


în alte limbi
- 日本語: Hilti SCW 70 取扱説明書
Lucrări înrudite
-
Hilti SCW 70 Instrucțiuni de utilizare
-
Hilti SC 55W Instrucțiuni de utilizare
-
-
Hilti QTG WSC 85 Manualul utilizatorului
-
Hilti SC 70W-A22 Instrucțiuni de utilizare
-
Hilti SCW 22-A Instrucțiuni de utilizare
-
Hilti SJD 6 Instrucțiuni de utilizare
-
-
Hilti WSC 85 Instrucțiuni de utilizare
-
Alte documente
-
Skil 5740 CA Manual de utilizare
-
Worx WU433 Fișa cu date
-
Makita SP6000 Manual de utilizare
-
Makita LF1000 Manual de utilizare
-
Makita LH1040 Manual de utilizare
-
Parkside PHKS 1350 A1 Translation Of Original Operation Manual
-
Makita 5104 Manual de utilizare
-
Candy CFT610/5X Manual de utilizare
-