Philips QG3371/16 Manual de utilizare
- Categorie
- Aparate de tuns
- Tip
- Manual de utilizare

User manual
QG3371

1


4
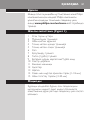
Introduction
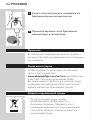
Congratulations on your purchase and welcome to
Philips! To fully benet from the support that Philips
offers, register your product at
www.philips.com/welcome.
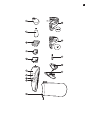
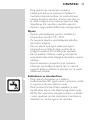
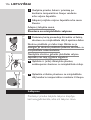
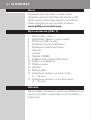
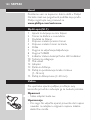
General description (Fig. 1)
1 Mini foil shaver
2 Nose/ear hair trimmer
3 Hair clipper
4 Full metal precision trimmer
5 Full metal beard trimmer
6 Handle
7 On/off button
8 TURBO button
9 Battery status indicator/Turbo LED
10 Storage pouch
11 Small plug
12 Adapter
13 Cleaning brush
14 Beard and moustache comb (1-18mm)
15 Hair clipping comb (3-20mm)
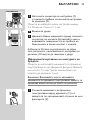
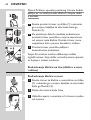
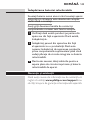
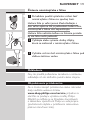
Important
Read this user manual carefully before you use the
appliance and save it for future reference.
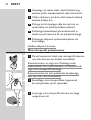
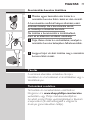
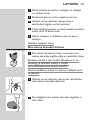
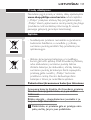
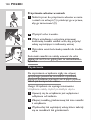
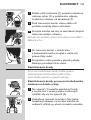
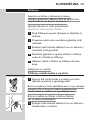
Danger
- Keep the adapter dry.
Warning
- Check if the voltage indicated on the adapter
corresponds to the local mains voltage before you
connect the appliance.
ENGLISH

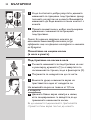
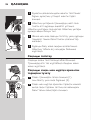
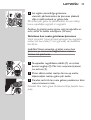
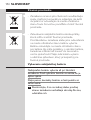
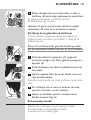
- The adapter contains a transformer. Do not cut
off the adapter to replace it with another plug,
as this causes a hazardous situation.
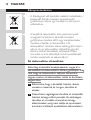
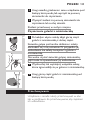
- This appliance is not intended for use by persons
(including children) with reduced physical,
sensory or mental capabilities, or lack of experience
and knowledge, unless they have been given
supervision or instruction concerning use of the
appliance by a person responsible for their safety.
- Keep the appliance and its cord out of the reach
of children.
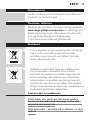
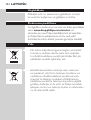
Caution
- Use, charge and store the appliance at a
temperature between 5°C and 35°C.
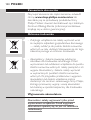
- Only use the adapter supplied to charge the
appliance.
- If the appliance is subjected to a major change in
temperature, pressure or humidity, let the appliance
acclimatise for 30 minutes before you use it.
- If the adapter is damaged, always have it replaced
with one of the original type in order to avoid a
hazard.
- Always check the appliance before you use it.
Do not use the appliance if any of its parts is
damaged or broken, as this may cause injury.
Compliance with standards
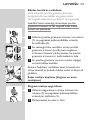
- This appliance complies with the internationally
approved IEC Safety regulations and can be safely
cleaned under the tap.
- This Philips appliance complies with all standards
regarding electromagnetic elds (EMF). If handled
properly and according to the instructions in this
user manual, the appliance is safe to use based on
scientic evidence available today.
ENGLISH 5

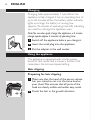
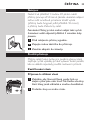
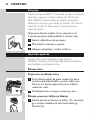
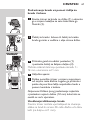
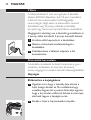
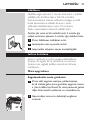
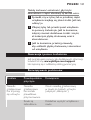
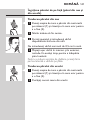
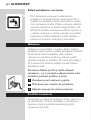
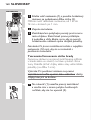
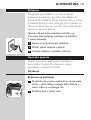
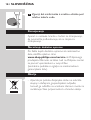
Charging
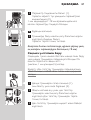
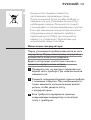
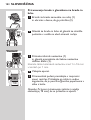
Charging takes approximately 1 hour. When the
appliance is fully charged, it has an operating time of
up to 50 minutes. When the battery status indicator
lights up orange, the battery is running low
(approx. 10 minutes of operating time left) indicating
you need to recharge the appliance soon.
Note: You can also quick charge the appliance, a 5 minute
charge equals approx. 5 minutes of operating time.
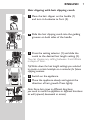
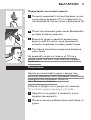
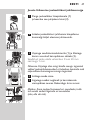
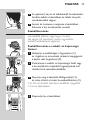
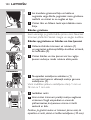
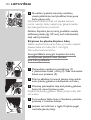
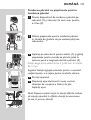
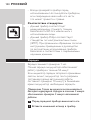
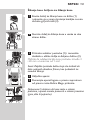
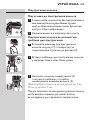
1 Switch off the appliance before you charge it.
2 Insert the small plug into the appliance.
3 Put the adapter in the wall socket.
The appliance is equipped with a turbo power
boost for fast results and a memory function that
remembers the last used speed setting.
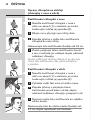
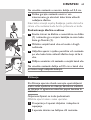
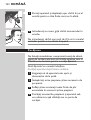
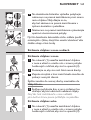
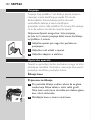
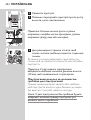
Hair clipping
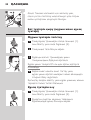
Preparing for hair clipping
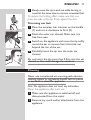
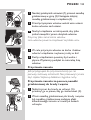
1 Make sure that the head of the person whose
hair you intend to cut is at the same level as
your chest. This ensures that all parts of the
head are clearly visible and within easy reach.
2 Comb the hair in the growth direction.
ENGLISH6

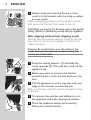
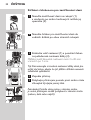
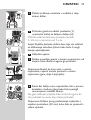
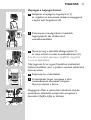
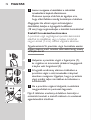
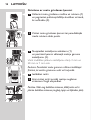
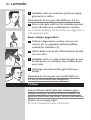
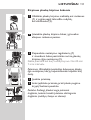
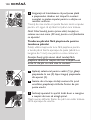
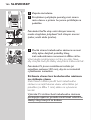
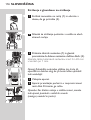
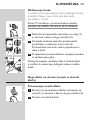
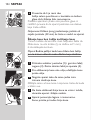
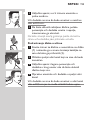
Hair clipping with hair clipping comb
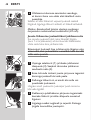
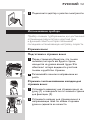
1 Place the hair clipper on the handle (1)
and turn it clockwise to x it (2).
2 Slide the hair clipping comb into the guiding
grooves on both sides of the handle.
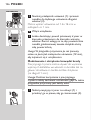
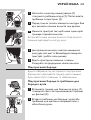
3 Press the setting selector (1) and slide the
comb to the desired hair length setting (2).
You can choose any setting between 3 and 20mm
in steps of 1mm.
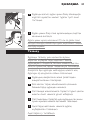
Tip: Write down the hair length settings you selected
to create a certain hairstyle as a reminder for future
clipping sessions.
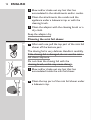
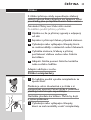
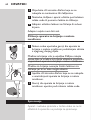
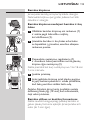
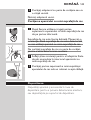
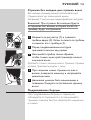
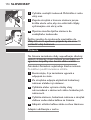
4 Switch on the appliance.
5 Move the appliance slowly and against the
direction of hair growth. Press lightly.
Note: Since hair grows in different directions,
you need to move the appliance in different directions
as well (upward, downward or across).
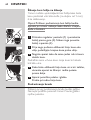
ENGLISH 7

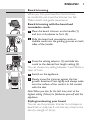
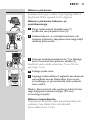
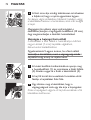
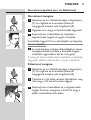
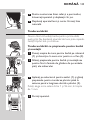
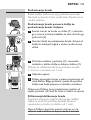
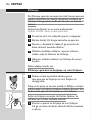
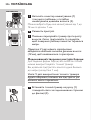
6 Always make sure that the at part of the
comb is in full contact with the scalp to obtain
an even result.
Make overlapping passes over the head to ensure
that you cut all the hair that needs to be cut.
Note: When you trim for the rst time, start at the highest
setting (20mm) to familiarise yourself with the appliance.
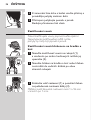
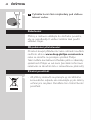
Hair clipping without hair clipping comb
You can use the trimmer without comb to clip hair
very close to the skin (to a length of 1mm) or to
create contours.
Caution: Be careful when you clip without the
comb because the trimmer removes every hair it
comes in contact with.
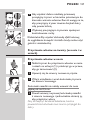
1 Press the setting selector (1) and slide the
comb upwards (2). Then pull the comb off the
appliance (3).
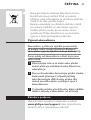
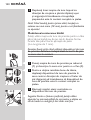
2 Before you start to contour the hairline
around the ears, comb the hair ends over the
ears.
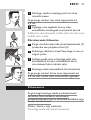
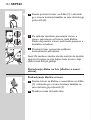
3 Tilt the appliance in such a way that only one
edge of the trimmer touches the hair.
Only cut the hair ends. The hairline should be close
to the ear.
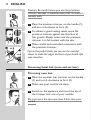
4 To contour the neckline and sideburns, turn
the appliance and make downward strokes.
5 Move the appliance slowly and smoothly.
Follow the natural hairline.
ENGLISH8

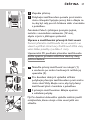
Beard trimming
When you trim your beard for the rst time,
be careful. Do not move the trimmer too fast.
Make smooth and gentle movements.
Beard trimming with the beard and
moustache comb
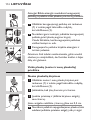
1 Place the beard trimmer on the handle (1)
and turn it clockwise to x it (2).
2 Slide the beard and moustache comb or
stubble comb into the guiding grooves on both
sides of the handle.
3 Press the setting selector (1) and slide the
comb to the desired hair length setting (2).
You can choose any setting between 1 and 18mm in
steps of 1mm.
4 Switch on the appliance.
5 Slowly move the trimmer against the hair
growth direction. Press lightly and always make
sure the surface of the comb is in full contact
with the skin.
Note: When you trim for the rst time, start at the
highest setting (18mm) to familiarise yourself with the
appliance.
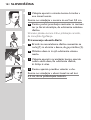
Styling/contouring your beard
You can use the precision trimmer to cut shapes in
beard hair or scalp hair. It cuts hair very close to the
skin (to a length of 1mm).
ENGLISH 9

Caution: Be careful when you use the precision
trimmer because it removes every hair it comes in
contact with.
1 Place the precision trimmer on the handle (1)
and turn it clockwise to x it (2).
2 To achieve a good cutting result, move the
precision trimmer against the direction of
hair growth. Always make sure the precision
trimmer is in full contact with the skin.
3 Make careful and controlled movements with
the precision trimmer.
Tip: For the perfect nish, you can use the mini foil
shaver to make the edges and lines of your beard style
even smoother.
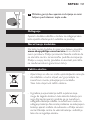
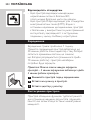
Grooming facial hair (nose and ear hair)
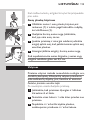
1 Place the nose/ear hair trimmer on the handle
(1) and turn it clockwise to x it (2).
2 Make sure your nostrils are clean.
3 Switch on the appliance and insert the tip of
the trimmer into one of your nostrils.
Do not insert the tip more than 0.5cm into your
nostril.
ENGLISH10

4 Slowly move the tip in and out while turning it
round at the same time to remove unwanted hair.
To reduce the tickling effect, make sure that you
press the side of the tip rmly against the skin.
1 Place the nose/ear hair trimmer on the handle
(1) and turn it clockwise to x it (2).
2 Clean the outer ear channel. Make sure it is
free from wax.
3 Switch on the appliance and move the tip softly
round the ear to remove hairs that stick out
beyond the rim of the ear.
4 Carefully insert the tip into the outer ear
channel.
Do not insert the tip more than 0.5cm into the ear
channel as this could damage the eardrum.
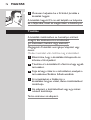
Cleaning
Never use compressed air, scouring pads, abrasive
cleaning agents or aggressive liquids such as petrol
or acetone to clean the appliance.
Note: The appliance does not need any lubrication.
Clean the appliance after each use.
1 Make sure the appliance is switched off and
disconnected from the mains.
2 Remove any comb and/or attachment from the
appliance.
ENGLISH 11

3 Blow and/or shake out any hair that has
accumulated in the attachments and/or combs.
4 Clean the attachments, the combs and the
appliance under a lukewarm tap or with the
cleaning brush.
5 Clean the adapter with the cleaning brush or a
dry cloth.
Keep the adapter dry.
Cleaning the mini foil shaver
1 After each use, pull the top part of the mini foil
shaver off the bottom part.
The shaving foil is very delicate. Handle it carefully.
If the shaving foil is damaged, do not use the mini
foil shaver anymore.
Do not clean the shaving foil with the
cleaning brush, as this may cause damage.
2 Blow and/or shake out any hair that has
accumulated inside the mini foil shaver.
3 Clean the top part of the mini foil shaver under
a lukewarm tap.
ENGLISH12

Storage
Store the appliance and attachments in the storage
pouch to prevent damage, or store it on the
storage stand.
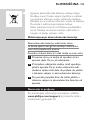
Ordering accessories
To buy accessories or spare parts, visit
www.shop.philips.com/service or go to your
Philips dealer. You can also contact the
Philips Consumer Care Centre in your country
(see the worldwide guarantee leaet for contact details).
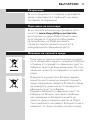
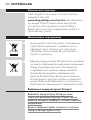
Environment
- Do not throw away the appliance with the normal
household waste at the end of its life, but hand it in
at an ofcial collection point for recycling. By doing
this, you help to preserve the environment.
- The built-in rechargeable battery contains
substances that may pollute the environment.
Always remove the battery before you discard
and hand in the appliance at an ofcial collection
point. Dispose of the battery at an ofcial
collection point for batteries. If you have trouble
removing the battery, you can also take the
appliance to a Philips service centre. The staff of
this centre will remove the battery for you and
will dispose of it in an environmentally safe way.
ENGLISH 13

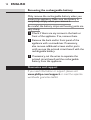
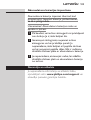
Removing the rechargeable battery
Only remove the rechargeable battery when you
discard the appliance. Make sure the battery is
completely empty when you remove it.
Be careful, the battery strips and housing parts are
very sharp.
1 Check if there are any screws in the back or
front of the appliance. If so, remove them.
2 Remove the back and/or front panel of the
appliance with a screwdriver. If necessary,
also remove additional screws and/or parts
until you see the printed circuit board with the
rechargeable battery.
3 If necessary, cut the wires to separate the
printed circuit board and the rechargeable
battery from the appliance.
Guarantee and support
If you need information or support, please visit
www.philips.com/support or read the separate
worldwide guarantee leaet.
ENGLISH14

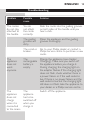
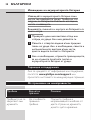
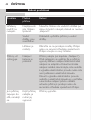
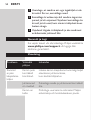
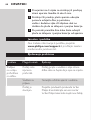
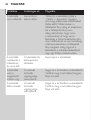
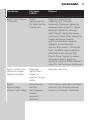
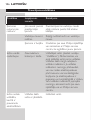
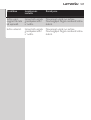
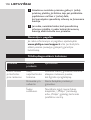
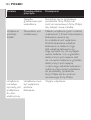
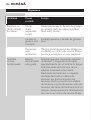
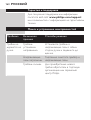
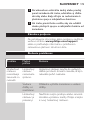
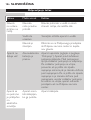
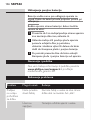
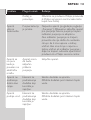
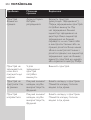
Problem Possible
cause
Solution
The combs
do not stay
attached to
the handle.
You do
not attach
the comb
correctly.
Slide the comb into the guiding grooves
on both sides of the handle until you
hear a click.
The guiding
grooves are
dirty.
Clean the appliance and the guiding
grooves thoroughly.
The comb is
broken.
Go to your Philips dealer or contact a
Philips service centre to purchase a new
comb.
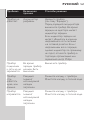
The
appliance
does not
work
anymore.
The
rechargeable
battery is
empty.
Charge the appliance (see chapter
‘Charging’). Make sure you switch off
the appliance before you charge it.
During charging, the charging light on
the adapter ashes. If the charging light
does not ash, check whether there is
a power failure or if the wall socket is
live. If there is no power failure and the
wall socket is live but the charging light
still does not ash, take the appliance to
your dealer or a Philips service centre.
The
appliance
does not
charge
when it is
connected
to the mains.
The
appliance
has to be
switched off
when you
charge it.
Switch off the appliance.
ENGLISH 15

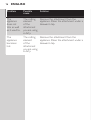
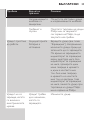
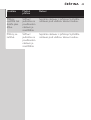
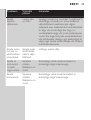
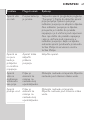
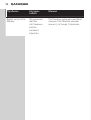
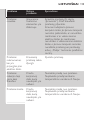
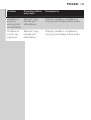
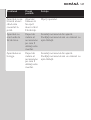
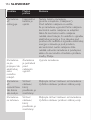
Problem Possible
cause
Solution
The
appliance
does not
trim as well
as it used to.
The cutting
element
of the
attachment
you are using
is dirty.
Remove the attachment from the
appliance. Clean the attachment under a
lukewarm tap.
The
appliance
becomes
hot.
The cutting
element
of the
attachment
you are using
is dirty.
Remove the attachment from the
appliance. Clean the attachment under a
lukewarm tap.
ENGLISH16

17
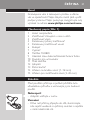
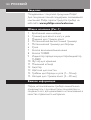
Поздравления за вашата покупка и добре дошли във
Philips! За да се възползвате изцяло от предлаганата
от Philips поддръжка, регистрирайте продукта си на
адрес www.philips.com/welcome.
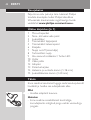
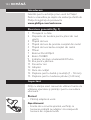
1 Самобръсначка с минипластина
2 Машинка за подстригване на нос и уши
3 Машинка за подстригване
4 Широка метална машинка за прецизно
подстригване
5 Широка метална машинка за подстригване на
брада
6 Дръжка
7 Бутон за вкл./изкл.
8 Бутон TURBO
9 Светодиоден индикатор за батерията/Turbo
10 Торбичка за съхранение
11 Малък жак
12 Адаптер
13 Четка за почистване
14 Гребен за брада и мустаци (1-18 мм)
15 Гребен за подстригване на коса (3-20 мм)
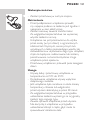
Преди да използвате уреда, прочетете
внимателно това ръководство за потребителя и
го запазете за справка в бъдеще.
- Пазете адаптера сух.

- Преди да свържете уреда, проверете дали
напрежението, посочено върху адаптера,
отговаря на това на местната електрическа мрежа.
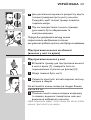
- В адаптера има трансформатор. Не отрязвайте
адаптера, за да го замените с друг щепсел,
тъй като това крие опасности.
- Този уред не е предназначен за ползване от
хора (включително деца) с намалени физически
възприятия или умствени недъзи или без опит
и познания, ако са оставени без наблюдение и
не са инструктирани от страна на отговарящо
за тяхната безопасност лице относно начина
на използване на уреда.
- Пазете уреда и кабела далече от достъп на
деца.
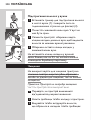
- Използвайте, зареждайте и съхранявайте
уредите при температура между 5°C и 35°C.
- За зареждане на уреда използвайте само
доставения с него адаптер.
- Ако уредът е бил подложен на значителни
промени в температурата, налягането или
влажността, изчакайте да се климатизира за 30
минути, преди да го използвате.
- С оглед на предотвратяване на злополука,
винаги заменяйте повредения адаптер само с
оригинален такъв.
- Винаги проверявайте уреда, преди да го
използвате. Не използвайте уреда, ако някоя от
частите му е повредена или счупена, тъй като
това може да причини нараняване.
18

- Този уред съответства на международно
одобрената нормативна уредба за безопасност
IEC и може да се почиства безопасно под
чешмата.
- Този уред Philips е в съответствие с
всички стандарти по отношение на
електромагнитните излъчвания (EMF).
Ако се употребява правилно и съобразно
инструкциите в това ръководство за
потребителя, уредът е безопасен за използване
според наличните досега научни факти.
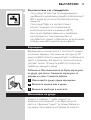
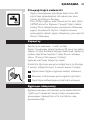
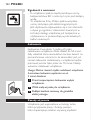
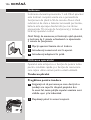
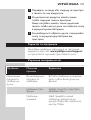
Зареждането отнема около 1 час. Когато уредът
е напълно зареден, той може да осигури до 50
минути работа. Когато индикаторът за батерията
свети в оранжево, батерията е почти изтощена
(остават около 10 минути работа) и скоро ще
трябва да заредите уреда.
Забележка: Има възможност за бързо зареждане
на уреда, при което 5-минутно зареждане се
равнява на около 5 минути работа.
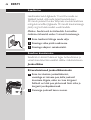
1 Изключвайте уреда преди зареждане.
2 Включете малкия жак в уреда.
3 Включете адаптера в контакта.
Уредът е снабден с турбо скорост за
допълнителна мощност и по-бърз резултат,
както и с функция “памет” за запаметяване на
последно използваната настройка за скорост.
19

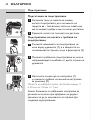
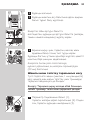
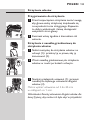
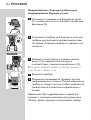
1 Застанете така, че главата на човека,
когото подстригвате, да е на нивото на
гърдите ви - така всички части на главата му
ще се виждат добре и ще са лесно достъпни.
2 Срешете косата по посоката на растежа.
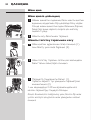
1 Сложете машинката за подстригване на
коса върху дръжката (1) и я завъртете по
часовниковата стрелка, за да я фиксирате (2).
2 Плъзнете гребена за подстригване на коса в
направляващите жлебове от двете страни на
дръжката.
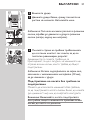
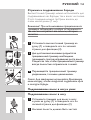
3 Натиснете селектора за настройка (1)
и плъзнете гребена на желаната настройка
за дължина (2).
Можете да изберете всяка настройка между 3
и 20 мм на стъпки от 1 мм.
Съвет: Запишете си избраните настройки за
дължина на косата при оформяне на дадена
прическа, за да ги използвате за справка при
следващи подстригвания.
20
Pagina se încarcă...
Pagina se încarcă...
Pagina se încarcă...
Pagina se încarcă...
Pagina se încarcă...
Pagina se încarcă...
Pagina se încarcă...
Pagina se încarcă...
Pagina se încarcă...
Pagina se încarcă...
Pagina se încarcă...
Pagina se încarcă...
Pagina se încarcă...
Pagina se încarcă...
Pagina se încarcă...
Pagina se încarcă...
Pagina se încarcă...
Pagina se încarcă...
Pagina se încarcă...
Pagina se încarcă...
Pagina se încarcă...
Pagina se încarcă...
Pagina se încarcă...
Pagina se încarcă...
Pagina se încarcă...
Pagina se încarcă...
Pagina se încarcă...
Pagina se încarcă...
Pagina se încarcă...
Pagina se încarcă...
Pagina se încarcă...
Pagina se încarcă...
Pagina se încarcă...
Pagina se încarcă...
Pagina se încarcă...
Pagina se încarcă...
Pagina se încarcă...
Pagina se încarcă...
Pagina se încarcă...
Pagina se încarcă...
Pagina se încarcă...
Pagina se încarcă...
Pagina se încarcă...
Pagina se încarcă...
Pagina se încarcă...
Pagina se încarcă...
Pagina se încarcă...
Pagina se încarcă...
Pagina se încarcă...
Pagina se încarcă...
Pagina se încarcă...
Pagina se încarcă...
Pagina se încarcă...
Pagina se încarcă...
Pagina se încarcă...
Pagina se încarcă...
Pagina se încarcă...
Pagina se încarcă...
Pagina se încarcă...
Pagina se încarcă...
Pagina se încarcă...
Pagina se încarcă...
Pagina se încarcă...
Pagina se încarcă...
Pagina se încarcă...
Pagina se încarcă...
Pagina se încarcă...
Pagina se încarcă...
Pagina se încarcă...
Pagina se încarcă...
Pagina se încarcă...
Pagina se încarcă...
Pagina se încarcă...
Pagina se încarcă...
Pagina se încarcă...
Pagina se încarcă...
Pagina se încarcă...
Pagina se încarcă...
Pagina se încarcă...
Pagina se încarcă...
Pagina se încarcă...
Pagina se încarcă...
Pagina se încarcă...
Pagina se încarcă...
Pagina se încarcă...
Pagina se încarcă...
Pagina se încarcă...
Pagina se încarcă...
Pagina se încarcă...
Pagina se încarcă...
Pagina se încarcă...
Pagina se încarcă...
Pagina se încarcă...
Pagina se încarcă...
Pagina se încarcă...
Pagina se încarcă...
Pagina se încarcă...
Pagina se încarcă...
Pagina se încarcă...
Pagina se încarcă...
Pagina se încarcă...
Pagina se încarcă...
Pagina se încarcă...
Pagina se încarcă...
Pagina se încarcă...
Pagina se încarcă...
Pagina se încarcă...
Pagina se încarcă...
Pagina se încarcă...
Pagina se încarcă...
Pagina se încarcă...
Pagina se încarcă...
Pagina se încarcă...
Pagina se încarcă...
Pagina se încarcă...
Pagina se încarcă...
Pagina se încarcă...
Pagina se încarcă...
Pagina se încarcă...
Pagina se încarcă...
Pagina se încarcă...
Pagina se încarcă...
Pagina se încarcă...
Pagina se încarcă...
Pagina se încarcă...
Pagina se încarcă...
Pagina se încarcă...
Pagina se încarcă...
Pagina se încarcă...
Pagina se încarcă...
Pagina se încarcă...
Pagina se încarcă...
Pagina se încarcă...
Pagina se încarcă...
Pagina se încarcă...
Pagina se încarcă...
Pagina se încarcă...
Pagina se încarcă...
Pagina se încarcă...
Pagina se încarcă...
Pagina se încarcă...
Pagina se încarcă...
Pagina se încarcă...
Pagina se încarcă...
Pagina se încarcă...
Pagina se încarcă...
Pagina se încarcă...
Pagina se încarcă...
Pagina se încarcă...
Pagina se încarcă...
Pagina se încarcă...
Pagina se încarcă...
Pagina se încarcă...
Pagina se încarcă...
Pagina se încarcă...
Pagina se încarcă...
Pagina se încarcă...
Pagina se încarcă...
Pagina se încarcă...
Pagina se încarcă...
Pagina se încarcă...
Pagina se încarcă...
Pagina se încarcă...
Pagina se încarcă...
Pagina se încarcă...
Pagina se încarcă...
Pagina se încarcă...
Pagina se încarcă...
Pagina se încarcă...
Pagina se încarcă...
Pagina se încarcă...
Pagina se încarcă...
Pagina se încarcă...
Pagina se încarcă...
Pagina se încarcă...
Pagina se încarcă...
Pagina se încarcă...
Pagina se încarcă...
Pagina se încarcă...
Pagina se încarcă...
Pagina se încarcă...
Pagina se încarcă...
Pagina se încarcă...
Pagina se încarcă...
Pagina se încarcă...
Pagina se încarcă...
Pagina se încarcă...
Pagina se încarcă...
Pagina se încarcă...
Pagina se încarcă...
Pagina se încarcă...
Pagina se încarcă...
Pagina se încarcă...
-
 1
1
-
 2
2
-
 3
3
-
 4
4
-
 5
5
-
 6
6
-
 7
7
-
 8
8
-
 9
9
-
 10
10
-
 11
11
-
 12
12
-
 13
13
-
 14
14
-
 15
15
-
 16
16
-
 17
17
-
 18
18
-
 19
19
-
 20
20
-
 21
21
-
 22
22
-
 23
23
-
 24
24
-
 25
25
-
 26
26
-
 27
27
-
 28
28
-
 29
29
-
 30
30
-
 31
31
-
 32
32
-
 33
33
-
 34
34
-
 35
35
-
 36
36
-
 37
37
-
 38
38
-
 39
39
-
 40
40
-
 41
41
-
 42
42
-
 43
43
-
 44
44
-
 45
45
-
 46
46
-
 47
47
-
 48
48
-
 49
49
-
 50
50
-
 51
51
-
 52
52
-
 53
53
-
 54
54
-
 55
55
-
 56
56
-
 57
57
-
 58
58
-
 59
59
-
 60
60
-
 61
61
-
 62
62
-
 63
63
-
 64
64
-
 65
65
-
 66
66
-
 67
67
-
 68
68
-
 69
69
-
 70
70
-
 71
71
-
 72
72
-
 73
73
-
 74
74
-
 75
75
-
 76
76
-
 77
77
-
 78
78
-
 79
79
-
 80
80
-
 81
81
-
 82
82
-
 83
83
-
 84
84
-
 85
85
-
 86
86
-
 87
87
-
 88
88
-
 89
89
-
 90
90
-
 91
91
-
 92
92
-
 93
93
-
 94
94
-
 95
95
-
 96
96
-
 97
97
-
 98
98
-
 99
99
-
 100
100
-
 101
101
-
 102
102
-
 103
103
-
 104
104
-
 105
105
-
 106
106
-
 107
107
-
 108
108
-
 109
109
-
 110
110
-
 111
111
-
 112
112
-
 113
113
-
 114
114
-
 115
115
-
 116
116
-
 117
117
-
 118
118
-
 119
119
-
 120
120
-
 121
121
-
 122
122
-
 123
123
-
 124
124
-
 125
125
-
 126
126
-
 127
127
-
 128
128
-
 129
129
-
 130
130
-
 131
131
-
 132
132
-
 133
133
-
 134
134
-
 135
135
-
 136
136
-
 137
137
-
 138
138
-
 139
139
-
 140
140
-
 141
141
-
 142
142
-
 143
143
-
 144
144
-
 145
145
-
 146
146
-
 147
147
-
 148
148
-
 149
149
-
 150
150
-
 151
151
-
 152
152
-
 153
153
-
 154
154
-
 155
155
-
 156
156
-
 157
157
-
 158
158
-
 159
159
-
 160
160
-
 161
161
-
 162
162
-
 163
163
-
 164
164
-
 165
165
-
 166
166
-
 167
167
-
 168
168
-
 169
169
-
 170
170
-
 171
171
-
 172
172
-
 173
173
-
 174
174
-
 175
175
-
 176
176
-
 177
177
-
 178
178
-
 179
179
-
 180
180
-
 181
181
-
 182
182
-
 183
183
-
 184
184
-
 185
185
-
 186
186
-
 187
187
-
 188
188
-
 189
189
-
 190
190
-
 191
191
-
 192
192
-
 193
193
-
 194
194
-
 195
195
-
 196
196
-
 197
197
-
 198
198
-
 199
199
-
 200
200
-
 201
201
-
 202
202
-
 203
203
-
 204
204
-
 205
205
-
 206
206
-
 207
207
-
 208
208
-
 209
209
-
 210
210
-
 211
211
-
 212
212
-
 213
213


Philips QG3371/16 Manual de utilizare
- Categorie
- Aparate de tuns
- Tip
- Manual de utilizare
în alte limbi
- slovenčina: Philips QG3371/16 Používateľská príručka
- eesti: Philips QG3371/16 Kasutusjuhend
Lucrări înrudite
-
Philips QC5315/15 Informații importante
-
Philips QG3340 Manual de utilizare
-
Philips QG3150/30 Manual de utilizare
-
Philips BT7210/15 Manual de utilizare
-
Philips QC5370/32 Manual de utilizare
-
-
Philips MG5720 Manual de utilizare
-
-
-
Philips MG5720/15 Manual de utilizare
Alte documente
-
ARESA AR-1816 Manual de utilizare
-
Silvercrest 298864 Operation And Safety Notes Translation Of The Original Instructions
-
Silvercrest SHBS 600 A1 Operation and Safety Notes
-
-
Rowenta WET & DRY PRECISION Manualul proprietarului
-