
MENU
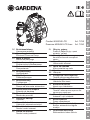
Comfort 5000/5E LCD Art. 1759
Premium 6000/6E LCD Inox Art. 1760
LV LT ET SQ BG TR RO UK
SR /
BS
HR SL RU EL SK CS HU PL PT ES IT NO FI DA SV NL FR EN DE
DE Betriebsanleitung
Hauswasserautomat
EN Operating Instructions
Electronic Pressure Pump
FR Mode d’emploi
Station de pompage
NL Gebruiksaanwijzing
Elektronische hydrofoorpomp
SV Bruksanvisning
Pumpautomat
DA Brugsanvisning
Husvandværk
FI Käyttöohje
Painevesipumppu
NO Bruksanvisning
Trykkpumpe
IT Istruzioni per l’uso
Pompa ad intervento automatico
ES Instrucciones de empleo
Estación de bombeo
PT Manual de instruções
Bomba de pressão
PL Instrukcja obsługi
Hydrofor
HU Használati utasítás
Háztartási automata szivattyú
CS Návod k obsluze
Domácí vodní automat
SK Návod na obsluhu
Domáci vodný automat
EL Οδηγίες χρήσης
Συσκευή παραγωγής νερού
οικιακής χρήσης
RU Инструкция по эксплуатации
Автоматический напорный
насос
SL Navodilo za uporabo
Hišna vodni avtomat
HR Upute za uporabu
Kućni automat za vodu
SR / Uputstvo za rad
BS Hidropak
UK Інструкція з експлуатації
Помпа напірна автоматична
RO Instrucţiuni de utilizare
Hidroforul Electronic
TR Kullanma Kılavuzu
Konut suyu hidroforları
BG Инструкция за експлоатация
Помпа с електронен пресостат
за високо налягане
SQ Manual përdorimi
Automati i ujit i shtëpisë
ET Kasutusjuhend
Pump-veeautomaat
LT Eksploatavimo instrukcija
Buitinis automatinis slėgimo
siurblys
LV Lietošanas instrukcija
Elektroniskais ūdens sūknis

1. Safety Instructions
Electrical safety
DANGER! Electric shock!
Risk of injury due to electric shock!
v Always unplug your pump before filling,
after operation, before troubleshooting
and before carrying out any maintenance
work.
The pump must be supplied through a residual
current device (RCD) having a rated residual
operating current not exceeding 30 mA.
1. Safety Instructions ....................18
2. Function ............................20
3. Installation ..........................20
4. Operation ...........................22
5. Menu settings .......................24
6. Storage ............................26
7. Maintenance ........................27
8. Troubleshooting .....................28
9. Available accessories .................32
10. Technical Data .......................32
11. Service / Warranty ....................33
Original instructions.
Never operate the product when you are tired,
ill or under the influence of alcohol, drugs or
medicine.
This product may be used under
supervision, or if instruction
regarding the safe use of the
product has been provided and the
resulting dangers have been under-
stood, by children aged 8 and above,
as well as by persons with physical,
sensory or mental disabilities or a lack
of experience and knowledge. Children
must not be allowed to play with the
product. Cleaning and user maintenance
must not be performed by children with-
out supervision. The use of this product
by young people under the age of 16 is
not recommended.
Intended use:
GARDENA Electronic Pressure Pumps have been
designed for
private use around the house and
garden. Electronic Pressure Pumps are predomi-
nantly used for operating watering systems
and systems in private gardens.
When using the pump for pressure intensifi-
cation, the maximum permissible internal
pressure of 6 bar (on the delivery side) must
not be exceeded. The delivery pressure to
be increased and the pump pressure have to
be added together.
• Example: pressure at the tap = 1.0 bar,
maximum pressure of the Electronic Pressure
Pump Comfort 5000/5E LCD = 4.5 bar, total
pressure = 5.5 bar.
Liquids pumped:
The GARDENA Electronic Pressure Pump can
be used for pumping rainwater, tap water and
chlorinated water.
IMPORTANT! The GARDENA Electronic Pres-
sure Pump is not suitable for continuous oper-
ation (e. g. industrial applications, continuous
circulating operation). Corrosive, easily com-
bustible, aggressive or explosive liquids (such
as gasoline, petroleum or nitrothinner), salt-
water and food intended for consumption
must not be pumped. The temperature of the
liquid must not exceed 35 °C. Before the
beginning of the frost period, the Electronic
Pressure Pump must be drained and placed in
frost-proof storage (see 6. Storage).
GARDENA Electronic Pressure Pump
Comfort 5000/5E LCD /
Premium 6000/6E LCD Inox
18
EN

The pump must be located on solid, even
ground, protected from flooding. Take care
that the pump cannot fall into water.
As an additional safety device an approved
safety switch can be used.
v Please ask your electrician for his advice.
When connecting the pump to the water supply
system, the country-specific sanitary regula-
tions must be observed to prevent water not of
drinking water quality being drawn back in.
DANGER! Electric shock!
The pump must not be used when people are
in water.
Make sure that the electrical plug and socket
connections are fitted in an area which cannot
be flooded.
Protect the power plug from moisture.
DANGER! Electric shock!
With a cut off mains plug, moisture can get into
electrical parts via the mains cable and cause
a short circuit.
Do not cut the mains plug off (e. g. to feed
through a wall).
Do not use the power cable for plugging off.
v If the supply cord is damaged, it must be
replaced by the manufacturer, its service
agent or similarly qualified persons in order
to avoid a hazard.
Extension cables
Data indicated on the type plate must match
the technical data of the mains supply.
Following DIN VDE 0620 the power cable as
well as any extension cable must not have
a smaller diameter than rubber sheathed cables
described with letter symbols H07RN-F.
v If the supply cord is damaged, it must be
replaced by the manufacturer, its service
agent or similarly qualified persons in order
to avoid a hazard.
Protect the power cable from heat, oil and
sharp edges.
v Do not use the power cable for carrying the
pump or for unplugging.
In Austria
In Austria the electrical connection must sat-
isfythe ÖVE-EM 42, T2 (2000)/1979 § 22 to
§ 2022.1. This requires that pumps used for
swimming pools and garden ponds may only
be powered through an isolating trans former.
v Please ask your electrician for his advice.
In Switzerland
In Switzerland portable devices that are
used outdoors must be connected through
a resid ual-current device.
General Information
DANGER!
Scalding from hot water!
The water can get very hot during operation
(particularly if only small quantities are
drawn).
v Before carrying out any work on the
pump, allow it to cool down (for at least
30 minutes).
Visual check
v Before operating the pump, first make
a visual check to ensure there is no damage
to the pump (especially regarding power
cable and plug).
A damaged pump must not be used.
v In case of damage, please have the pump
checked by our GARDENA Service Centre
or by an authorised electrician.
Safety in operation
Protect the pump from rain. Do not use the
pump in a wet or moist area.
In order to avoid dry-running of the pump,
take care that the end of the suction hose is
always submerged into the water.
v Before each operation, fill the pump to
overflowing with approx. 2 to 3 l of water
to be pumped!
Very fine sand can pass through the integrated
filter (mesh size 0.45 mm) and cause accelera-
ted wear in the hydraulic parts.
v For sandy water, you should additionally use
the GARDENA pump pre-filter, art. no. 1730
(mesh size 0.1 mm).
Please ensure that no unauthorised persons
or children are within reach of the pump and the
pumped medium without supervision.
When using the pump for domestic water
supply, please adhere to the local water and
sewerage regulations. In addition observe
the regulations of DIN 1988.
19
EN

v If necessary, contact your local water
authority.
DANGER! This product makes an electromag-
netic field while it operates. This field may under
some conditions interfere with active or passive
medical implants. To decrease the risk of condi-
tions that can possibly injure or kill, we recom-
mend persons with medical implants to speak
with their physician and the medical implant
manufacturer before you operate the product.
DANGER! Small parts can be easily swallowed.
There is also a risk that the polybag can suffo-
cate toddlers. Keep toddlers away when you
assemble the product.
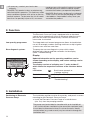
2. Function
The Electronic Pressure Pump is equipped with an electronic
control which automatically turns on the pump when the cut-in
pressure has fallen and automatically switches off when no
more water is extracted.
Low quantity programme: The integrated small amount programme allows for trouble-free
use of, for example, modern washing machines or drip irrigation
systems even with low water flow.
Error diagnosis system: The pump has an error diagnosis system which shows
different fault statuses and their remedies via the display
(see 8. Troubleshooting).
MENU
ß
II
ß
I
Display
Updated information on the operating conditions can be
shown depending on the display, and various settings can be
undertaken.
The display consists of a display area
ß
I
and a toolbar
ß
II
,
which states the respective functions of the 3 buttons below
e.g.:
Left button
Scroll menu upwards to
“Leakage warning”.
Centre button
Call up the “Turn on pressure” menu.
Right button
Scroll menu down to
“Troubleshooting”.
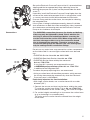
3. Installation
Positioning of Electronic
Pressure Pump:
The installation position must be firm and dry, and permit a secure
mounting for the Electronic Pressure Pump.
v Install the Electronic Pressure Pump at a safe distance
(min. 2 m) from the pumping medium.
The pump must be installed in a location with an air humidity of
< 80 % and sufficient ventilation in the area of the ventilation slots.
It must be at a distance of at least 5 cm from the walls. No dirt
contamination (e. g. sand or earth) may be sucked in through the
ventilation slots.
20
EN

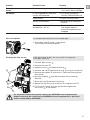
1
Set up the Electronic Pressure Pump so that it is prevented from
slipping and that an appropriately large collecting vessel for
draining the pump or the system can be placed under the drain
screw
1
.
If possible, install the Electronic Pressure Pump higher than the
surface of the water to be pumped. If this is not possible, install
a vacuum-resistant shut-off device between the Electronic
Pressure Pump and the suction hose, for example for cleaning
the integrated filter.
If the system is being installed permanently, please fit suitable
shut-off devices on both the intake and delivery sides. Important
for maintenance and cleaning work on the Electronic Pressure
Pump or for shutdown, for example.
Connections: The GARDENA connection pieces on the intake and delivery
sides may only be tightened by hand. Check whether the
seal ring is present and undamaged before screwing the
suction hose onto the suction inlet. When using metal con-
nections, damage could occur on the connection thread
due to inappropriate assembly. Therefore, screw on the
connection fittings with the upmost care. Use sealing tape
only for sealing metallic connection fittings.
Suction inlet:
Art. 1723
/
Art. 1724
4
3
2
Do not use any water hose snap connection system components
on the intake side! A vacuum-tight suction hose must be used
e. g.:
• GARDENA Suction Hose Art. no. 1411 / 1418
• GARDENA Bore Hole Suction Hose Art. no. 1729
• GARDENA Suction Hose sold by the metre and
Art. no. 1723 / 1724.
If very fine dirt is present, we recommend the use of
a
GARDENA pump preliminary filter
Art. no. 1730 / 1731
in addition to the integrated filter.
To reduce the pump repriming time, we recommend:
• Using a suction hose with backflow preventer, which prevents
the suction hose emptying automatically when the Electronic
Pressure Pump is switched off.
Particularly important for fixed installation:
• With larger suction heads, use a suction hose with a smaller
diameter (3/4").
1. Connect the vacuum resistant suction hose, sold by the metre
2
, using the suction hose fitting
3
(e. g. Art. no. 1723/1724)
with the connector on the suction side
4
and screw on airtight.
2. For suction heights exceeding 4 m also secure the suction hose
(e. g. by fastening it to a wooden post).
The pump and the suction hose are relieved from the weight
of the water.
21
EN

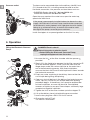
Pressure outlet:
Art. 1752
5
7
8
6
The hose can be connected either to the delivery side 33.3 mm
(G 1)-thread of the 120° swivelling connection and / or of the
horizontal connection. Use pressure-resistant hoses such as:
• GARDENA Garden Hose (3/4") Art. no. 18113 with
GARDENA Connection Set Art. no. 1752.
Open the spray nozzle at the water hose, open the water tap,
operate the toilet flush.
If the pump is permanently installed indoors for domestic water
supply, the Electronic Pressure Pump should not be connected
to the domestic water pipework with rigid pipes but with flexible
tubing (e. g. reinforced hoses), to reduce noise and to avoid
damage to the pump caused by pressure blows.
Install fixed pipes at an upward gradient on the first 2 m only.
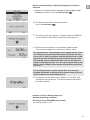
4. Operation
Filling the Electronic Pressure
Pump:
DANGER! Electric shock!
Risk of injury due to electric shock!
v Before filling the Electronic Pressure Pump,
unplug the equipment from the mains.
0
9
ß
A
MENU
q
9
ß
A
0
a
1. Unscrew the lid
9
of the filter chamber with the spanner
ß
A
provided.
2. Slowly fill in the liquid to be pumped via the filler connection
0
up to the overflow (approx. 2 to 3 l) until the water level no
longer drops under the suction side inlet or the water flows
outat the horizontal connector. With fixed installations,
unscrew the black lid
r
and fill with liquid until it flows towards
the horizontal connector.
3. Empty any water remaining in the delivery hose so that the air
can escape during filling and priming.
4. Open any shut-off devices in the delivery line (watering acces-
sories, tap, etc.) so that air can escape before the priming
procedure begins. If the delivery line cannot be emptied due
to fixed installation, unscrew the black lid. Considerable
amounts of liquid may escape. Please keep a sufficiently large
receptacle at hand for collection.
5. Tighten the lid
9
of the filter chamber up to the stopper
<
.
6. Lift up the delivery hose just behind the pressure outlet.
7. Insert mains plug into a 230 V / 50 Hz AC socket.
8. Change the switch
q
to I.
The switch is illuminated.
22
EN

During commissioning, the display language must first be
selected.
9. Select the required display language using the right or left
button and confirm with the centre button .
10. The display now reads “Start pump now?”
Press the left button .
11. The pump starts after approx. 2 seconds and the GARDENA
sun will rotate in the display during the suction process.
12. Close the shut-off devices in the delivery pipeline again
when the pump begins to continuously convey water.
The specified max. self-priming suction height (see 10. Tech-
nical Data) is only achieved if the pump is filled via the filler
connection
0
until it overflows and the delivery hose is held
high enough just behind the pressure outlet during the first
self-priming that no pumped medium can escape from the
pump via the delivery hose. It is not necessary to hold up the
delivery hose if filled suction hoses with backflow preventer
are used.
The suction process can take up to 6 min. If no water is
pumped afterwards, the Electronic Pressure Pump will shut
down automatically and display Error 2.
13. The pump turns off automatically approx. 10 seconds after
closing the shut-off device. The normal operation (Standby)
has been reached.
Displays in the LC display during the
different operating conditions
Suction process (GARDENA sun rotates).
The suction process runs.
23
EN

The pump conveys water.
The current flow and the current pressure during operation are
shown.
The Electronic Pressure Pump is ready for operation.
“Sleep mode”, no water removal.
Delivery capacities (“Volume Counter”)
The total delivery capacity (since commissioning) and
partial delivery capacity (“Temp. Volume”) (since last reset)
are shown.
The “Volume Counter” display can be called up from the
“Flow / Pressure” display or from the “Standby” display by
pressing the right button (display for approx. 5 seconds).
Frost warning
The temperature in the pump was or is below 4 °C.
Put pump out of operation (see 6. Storage).
By pressing the right button
and then confirming with the
centre button
, the normal operating display can be called
up again.
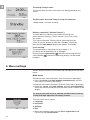
5. Menu settings
Various pump functions can be called up and adjusted in the main
menu.
Main menu
Call up the main menu (Electronic Pressure Pump in operation):
v Press the centre and right buttons simultaneously, until the
main menu is shown in the display.
Call up the main menu (Electronic Pressure Pump not in operation):
v Keep the centre and right buttons pressed simultaneously,
switch on the pump and wait until the main menu is shown in the
display.
As long as the main menu is opened, the Electronic Pressure
Pump interrupts operation for safety reasons.
The main menu has 4 menus:
1. Language
2. Info menu
3. Settings
4. Exit
v Select the required menu with the left or right button and
call up with the centre button.
24
EN

1. Language
The display language can be selected in the “Language” menu.
v Select the language with the left or right button and
confirm with the centre button.
2. Info menu
The “Info menu” has 3 submenus:
2.1. Overview
2.2. Reset
2.3. Main menu
2.1. Overview In the “Overview” submenu, the total delivery capacity, the partial
delivery capacity (“Temp. Volume”), the turn on pressure, the
leakage warning, the diagnosis system and the pump temperature
are shown.
2.2. Reset In the “Reset” submenu, the partial delivery capacity
(“Temp. Volume”) can be reset to 0 and / or the min. / max.
pump temperature (Reset).
2.3. Main menu Leads back to main menu.
3. Settings
The “Settings” menu has 5 submenus:
3.1. Leakage warning
3.2. Turn on pressure
3.3. Troubleshooting
3.4. Factory settings
3.5. Main menu
3.1. Leakage warning
(Low quantity programme)
In the “Leakage warning” submenu, the alert time of the leakage
warning can be set. The leakage warning can be triggered
after either 60 minutes or 2 minutes. The leakage warning can
be switched off under “Off”.
The set leakage warning parameters have a direct influence on
operation in the low quantity programme. Connecting devices
(e. g. modern washing machines, drip irrigation systems, etc.) with
low water consumption can be operated as follows:
25
EN

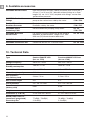
Settings Use Operating duration
“ON (60 min)” As Low quantity programme
for consumers with low water
consumption (e. g. washing
machines, drip irrigation
systems).
v Up to 60 minutes
(Leakage warning is,
if applicable, triggered
after 60 minutes).
“ON (2 min)” As maximum protection against
drip water leakages.
v Drip water alert after
2 minutes.
“OFF” As Small amount programme
for consumers with low water
consumption (e. g. washing
machines, drip irrigation
systems).
v Unlimited
(Note: No leakage warning
in this mode).
Note: The cyclical activation and deactivation of the Electronic
Pressure Pump in small amount mode is due to the system
design and does not have any impact on pump life.
3.2. Turn on pressure In the “Turn on pressure” submenu, the cut-in pressure is set to
the maximum value at the factory. It can be reduced in 0.2 bar
steps to 2.0 bar.
3.3. Troubleshooting In the “Troubleshooting” menu, the troubleshooting can be
switched on and off. When the troubleshooting is switched on,
the most frequent causes and their remedies are shown directly
in the display. When the troubleshooting is switched off, only the
error code will appear on the display. Under “8. Troubleshooting”,
the appropriate causes and remedies can be found.
3.4. Factory settings All settings can be reset to the delivery status in the
“Factory settings” submenu. On reset, the leakage warning
is set to 60 minutes, the cut-in pressure (“Turn on pressure”)
is set to the maximum value and the troubleshooting to “On”.
3.5. Main menu Leads back to main menu.
4. Exit
Closes the main menu.
The pump can now be restarted.
6. Storage
To put into storage:
1
MENU
q
lf there is a risk of frost, the Electronic Pressure Pump must be
emptied and stored where it will not become frozen.
Store out of the reach of children.
1. Change the switch
q
to O.
2. Unplug the mains connection for the pump.
3. Open the delivery side consumer.
4. Remove the connected hoses on the pressure and suction
sides.
5. Unscrew drain bolt
1
.
6. Tilt the pump to the suction and pressure side until water is
no longer discharged from either side.
7. Store the pump in a frost-free, dry place.
26
EN

Disposal:
(in accordance with
RL2012/19/EC)
The product must not be disposed of to normal household waste.
It must be disposed of in line with local environmental regulations.
v Dispose of the product through or via your municipal recycling
collection centre.
7. Maintenance
Danger! Electric shock!
Risk of injury due to electric shock!
v Pull out mains plug before undertaking any
maintenance.
Clean built-in filter:
w
e
9
ß
A
MENU
q
1. Change the switch
q
to O.
2. Disconnect mains plug.
3. If necessary, close all the
shut-off devices on the intake
side.
4. Unscrew the lid
9
of the filter
chamber with the spanner
ß
A
provided.
5. Draw out filter unit
w e
vertically upwards.
6. Hold cup
w
firmly, turn
filter
e
anti-clockwise 1 and
draw out 2 (bayonet fitting).
7. Hold cup
w
under running water and clean the filter
e
e. g. with a soft brush.
8. Refit filter again in reverse order.
9. Switch Electronic Pressure Pump on again (see 4. Operation).
1
2
w
e
Cleaning the check valve:
t
r
MENU
q
1. Change the switch
q
to O.
2. Disconnect mains plug.
3. If necessary, close all valves on the intake side.
4. Open all tapping points so that the pressure side is depres-
surised. Then close the tapping points again in order to prevent
the connected lines running empty via the Electronic Pressure
Pump.
5. Screw out the cover
r
of the check valve using asuitable tool.
6. Remove the valve body
t
and wash it under running water.
7. Refit check valve again in reverse order.
8. Verify that the check valve is able to move freely.
9. Switch Electronic Pressure Pump on again (see 4. Operation).
CAUTION!
Do not operate the pump without the check valve.
27
EN

8. Troubleshooting
DANGER! Electric shock!
v Unplug the cable at the mains before
troubleshooting.
Work on the electrical parts must only be carried out
by GARDENA Service Centres.
Error diagnosis system
In case of a fault, the error diagnosis system shows the
appropriate fault statuses and their remedies via different
display images.
Problem during commissioning.
(In case of fault, display appears 30 seconds after the
Electronic Pressure Pump is switched on)
Problem during commissioning.
(In case of fault, display appears 6 minutes after the
Electronic Pressure Pump is switched on)
Problem during running operation.
(In case of fault, display appears 30 seconds after the
Electronic Pressure Pump is switched on)
Problem during running operation.
(In case of fault, display appears, depending on the setting,
2 or 60 minutes after the Electronic Pressure Pump is switched on)
If one of the 4 errors has occurred, the most frequent causes and
their remedies can be called up in the display under “ACTION”.
Please note:
Prior to searching for a fault, the Electronic Pressure Pump must
always be disconnected from the mains. However, the error
display is retained even after switching the Electronic Pressure
Pump off and on again, so that further remedy displays can be
called up. After inspection of each suggested remedy measure,
the error display can be reset by pressing “RESET” and the
Electronic Pressure Pump can be restarted.
28
EN

Problem Possible Cause Remedy
The pump sucks nothing up Pump was not sufficiently filled
with liquid to be pumped.
v Fill and secure the pump
so that water does not drain
out on the pressure side
during the suctioning
process (see 4. Operation).
Air cannot escape on the pres-
sure side, because the pressure
side outlets are closed.
v Open the pressure side
outlets (see 4. Operation).
Pump motor does not start Thermal circuit breaker
activated and the pump
housing is heated.
1. Change the switch to O.
2. Open possible existing
shut-off device in the pres-
sure line (release pressure).
3. Ensure sufficient ventilation
and allow the pump to cool
for approx. 20 min.
4. Restart the pump
(see 4. Operation).
Pump is blocked. v Manually remove the
blockage (see “loosen
impellers”).
v Allow the pump to cool down
for 20 minutes.
Flow Sensor signal faulty Flow Sensor blocked. v Clean Flow Sensor
(see “Clean Flow Sensor”).
The pump sucks nothing up Problem on pump side. v Immerse suction hose end
under water,
v eliminate any leak on the
suction side,
v clean check valve on the
suction line and check the
mounting direction,
v clean suction filter on the
suction hose end,
v clean filter lid seal and
screw lid until the stopper
(see 7. Maintenance),
v clean fine-mesh filter in the
pump.
29
EN

Problem Possible Cause Remedy
The pump sucks nothing up Suction hose deformed. v Use a new suction hose.
Pump motor does not start Thermal circuit breaker activated
(motor overheated).
v Allow the pump to cool
down for 20 minutes.
Water supply disrupted on
the suction side
Problem on pump side. v Immerse suction hose end
under water,
v eliminate leak on the suction
side,
v clean check valve on the
suction line and check the
mounting direction,
v clean suction filter on the
suction hose end,
v clean filter lid washer and
screw lid until the stop
(see 7. Maintenance),
v clean fine-mesh filter in the
pump.
Suction hose bent. v Use a new suction hose.
Flow Sensor signal faulty Flow Sensor blocked. v Clean Flow Sensor
(see “Clean Flow Sensor”).
Pump motor does not start
anymore
Thermal circuit breaker activated
(motor overheated).
v Allow the pump to cool
down for 20 minutes.
Leakage warning activated Leak on pressure side
(e. g. dripping tap).
v Eliminate leak on pressure
side.
Maximum operating time of set
leakage warning/low quantity
programme exceeded.
v Change “Water drip alert”
settings.
v Increase water consumption.
Check valve contaminated. v
Clean check valve in pump
(see 7. Maintenance).
Flow meter contaminated. v
Clean flow meter in pump
(see 7. Maintenance).
Pump motor does not start
or stops suddenly during
operation
Switch is not turned to I. v Restart the pump
(see 4. Operation).
Mains plug not plugged in. v Insert mains plug into
a mains socket (230 V AC).
Power failure. v Check fuse and cables.
30
EN

Problem Possible Cause Remedy
Remedy measures are not
shown
Troubleshooting not activated. v Switch Troubleshooting to
“On” (see 5. Menu settings).
No display FI was triggered because fault
current was detected.
v Disconnect pump and
contact GARDENA Service.
Power failure. v Check fuse and cables.
Electrical interruption. v Send pump to GARDENA
Service.
Direct sun irradiation (display
temperature > 65 °C).
v The function is retained.
The display appears
once the temperature has
dropped.
Free the impeller:
z
An impeller blocked by dirt can be freed again.
v Turn motor shaft
z
using a screw driver.
This will free the blocked impeller.
Cleaning the flow sensor:
i
u
p
s
a
o
If the flow sensor is dirty, this may result in wrong error
messages (Info-LED).
1. Unscrew both screws
u
.
2. Remove the cover
i
.
3. Undo the screw
o
and detach the clip
p
.
4. Unscrew the cap
a
anticlockwise (e. g. by using a screwdriver).
5. Remove the impeller
s
and clean it. Clean the housing of the
flow sensor.
6. Re-fit the impeller
s
with the metal part in the mounting
direction.
7. Screw the cap
a
into place clockwise.
8. Secure the cap
a
by way of the clip
p
using the screw
o
.
9. First insert the cover
i
at the top and then tighten the
two screws
u
at the bottom.
For any other malfunctions please contact the GARDENA service department.
Repairs must only be carried out by GARDENA service departments or specialist
dealers authorised by GARDENA.
31
EN

9. Available accessories
GARDENA Suction Hoses Kink and vacuum-resistant, sold by the metre with 19 mm (3/4"),
25 mm (1") or 32 mm (5/4") diameter without fittings or in fixed
lengths Art. no. 1411 / 1418, complete with fittings, suction filter
and backflow preventer.
GARDENA Suction Hose
Fittings
For vacuum-resistant connection of the
pump to the suction hose sold by the metre.
Art. no.
1723 / 1724
Suction Filter with
Backflow Preventer
To equip suction hoses with Backflow
Preventer sold by the metre.
Art. no.
1726 / 1727
GARDENA Pump
Preliminary Filter
Recommended for pumping sandy water. Art. no.
1730 / 1731
GARDENA Bore Hole
Suction Hose
For vacuum-resistant connection of the pump to
boreholes or pipe networks. Length 0.5 m. With
33.3 mm (G1) female thread at both ends.
Art. no. 1729
GARDENA Connection Set Connection Set for 1/2" Pressure Hoses Art. no. 1750
GARDENA Connection Set Connection Set for 3/4" Pressure Hoses Art. no. 1752
10. Technical Data
Type Comfort 5000/5E LCD
(Art. no. 1759)
Premium 6000/6E LCD Inox
(Art. no. 1760)
Voltage/Frequency 230 V AC / 50 Hz 230 V AC / 50 Hz
Rated power /
Standby consumption
1300 W / 1.5 W 1300 W / 1.5 W
Connection cable 1.5 m H07RN-F 1.5 m H07RN-F
Max. delivery capacity 5000 l/h 6000 l/h
Max. pressure /
max. delivery head
5.0 bar / 50 m 5.5 bar / 55 m
Max. suction height 8 m 8 m
Cut-in pressure 2.0 – 2.8 ± 0.2 bar 2.0 – 3.2 ± 0.2 bar
Perm. internal pressure
(delivery side)
6 bar 6 bar
Weight 13.3 kg 15.2 kg
Dimensions (L x W x H) 47 cm x 26 cm x 34 cm 47 cm x 26 cm x 34 cm
Sound power level L
WA
1)
(measured / guaranteed)
Uncertainty K
WA
1)
77 dB(A) / 79 dB(A)
2.19 dB(A)
73 dB(A) / 76 dB(A)
2.58 dB(A)
1)
Measuring process complying with RL 2000/14/EG
32
EN

Service:
Please contact the address on the back page.
Warranty:
In the event of a warranty claim, no charge is
levied to you for the services provided.
GARDENA Manufacturing GmbH offers a two-
year warranty (effective as of the date of
purchase) for this product. This warranty includes
all significant defects of the product that can be
proved to be material or manufacturing faults.
This warranty is fulfilled by supplying a fully func-
tional replacement product or by repairing the
faulty product sent to us free of charge; we reser-
ve the right to choose between these options.
This service is subject to the following provisions:
• The product was used for its intended purpose
as per the recommendations in the operating
instructions.
• Neither the purchaser nor a third party has
attempted to repair the product.
This manufacturer’s warranty does not affect
warranty entitlements against the dealer / retailer.
If problems arise with this product, please
contact our Service department or send the
defective product along with a brief description
of the fault to GARDENA Manufacturing GmbH,
making sure to have sufficiently covered
any shipping costs and to have followed the
relevant postage and packaging guidelines.
A warranty claim must be accompanied by
a copy of the proof of purchase.
Consumables:
The impellers, filter and jet nozzles, which are
subject to wear, are excluded from the warranty.
11. Service / Warranty
33
EN

DE Produkthaftung
Wir weisen ausdrücklich darauf hin, dass wir in Übereinstimmung mit dem Produkthaftungsgesetz nicht für Schäden
haften, die durch unsere Produkte entstehen, wenn diese unsachgemäß und nicht durch einen von uns autorisierten
Servicepartner repariert wurden oder wenn keine Original GARDENA Teile oder von uns zugelassene Teile verwen-
det wurden.
EN Product liability
In accordance with the German Product Liability Act, we hereby expressly declare that we accept no liability for
damage incurred from our products where said products have not been properly repaired by a GARDENA-approved
service partner or where original GARDENA parts or parts authorised by GARDENA were not used.
FR Responsabilité
Conformément à la loi relative à la responsabilité du fait des produits défectueux, nous déclarons expressément
par la présente que nous déclinons toute responsabilité pour les dommages résultant de nos produits, si lesdits
produits n‘ont pas été correctement réparés par un partenaire d‘entretien agréé GARDENA ou si des pièces
d’origine GARDENA ou des pièces agréées GARDENA n‘ont pas été utilisées.
NL Productaansprakelijkheid
Conform de Duitse wet inzake productaansprakelijkheid verklaren wij hierbij uitdrukkelijk dat wij geen aansprakelijk-
heid aanvaarden voor schade ontstaan uit onze producten waarbij deze producten niet zijn gerepareerd door
een GARDENA-erkende servicepartner of waarbij geen originele GARDENA-onderdelen of onderdelen die door
GARDENA zijn goedgekeurd zijn gebruikt.
SV Produktansvar
I enlighet med tyska produktansvarslagar förklarar vi härmed uttryckligen att vi inte åtar oss något ansvar för skador
som orsakas av våra produkter där produkterna inte har genomgått korrekt reparation från en GARDENA-godkänd
servicepartner eller där originaldelar från GARDENA eller delar godkända av GARDENA inte använts.
DA Produktansvar
I overensstemmelse med den tyske produktansvarslov erklærer vi hermed udtrykkeligt, at vi ikke påtager os
noget ansvar for skader på vores produkter, hvis de pågældende produkter ikke er blevet repareret korrekt af en
GARDENA-godkendt servicepartner, eller hvor der ikke er brugt originale GARDENA-reservedele eller godkendte
reservedele fra GARDENA.
FI Tuotevastuu
Saksan tuotevastuulain mukaisesti emme ole vastuussa laitteiden vaurioista, jos korjauksia ei ole tehnyt GARDENAn
hyväksymä huoltoliike tai jos niiden syynä on muiden kuin alkuperäisten GARDENA-varaosien tai GARDENAn hyväk-
symien varaosien käyttö.
IT Responsabilità del prodotto
In conformità con la Legge tedesca sulla responsabilità del prodotto, con la presente dichiariamo espressamente
che decliniamo qualsiasi responsabilità per danni causati dai nostri prodotti qualora non siano stati correttamente
riparati presso un partner di assistenza approvato GARDENA o laddove non siano stati utilizzati ricambi originali
o autorizzati GARDENA.
ES Responsabilidad sobre el producto
De acuerdo con la Ley de responsabilidad sobre productos alemana, por la presente declaramos expresamente
que no aceptamos ningún tipo de responsabilidad por los daños ocasionados por nuestros productos si dichos
productos no han sido reparados por un socio de mantenimiento aprobado por GARDENA o si no se han utilizado
piezas originales GARDENA o piezas autorizadas por GARDENA.
PT Responsabilidade pelo produto
De acordo com a lei alemã de responsabilidade pelo produto, declaramos que não nos responsabilizamos por
danos causados pelos nossos produtos, caso os tais produtos não tenham sido devidamente reparados por
um parceiro de assistência GARDENA aprovado ou se não tiverem sido utilizadas peças GARDENA originais ou
peças autorizadas pela GARDENA.
PL Odpowiedzialność za produkt
Zgodnie z niemiecką ustawą o odpowiedzialności za produkt, niniejszym wyraźnie oświadczamy, że nie ponosimy
żadnej odpowiedzialności za szkody poniesione na skutek użytkowania naszych produktów, w przypadku gdy
naprawa tych produktów nie była odpowiednio przeprowadzana przez zatwierdzonego przez firmę GARDENA part-
nera serwisowego lub nie stosowano oryginalnych części GARDENA albo części autoryzowanych przez tę firmę.
439

HU Termékszavatosság
A németországi termékszavatossági törvénnyel összhangban ezennel nyomatékosan kijelentjük, hogy nem vállalunk
felelősséget a termékeinkben keletkezett olyan károkért, amelyek valamely GARDENA által jóváhagyott szervizpartner
által nem megfelelően végzett javításból adódtak, vagy amely során nem eredeti GARDENA alkatrészeket vagy
a GARDENA által jóváhagyott alkatrészeket használtak fel.
CS Odpovědnost za výrobek
V souladu s německým zákonem o odpovědnosti za výrobek tímto výslovně prohlašujeme, že nepřijímáme žádnou
odpovědnost za poškození vzniklá na našich výrobcích, kdy zmíněné výrobky nebyly řádně opraveny schváleným
servisním partnerem GARDENA nebo kdy nebyly použity originální náhradní díly GARDENA nebo náhradní díly auto-
rizované společností GARDENA.
SK Zodpovednosť za produkt
V súlade s nemeckými právnymi predpismi upravujúcimi zodpovednosť za výrobok týmto výslovne prehlasujeme,
že nenesieme žiadnu zodpovednosť za škody spôsobené našimi výrobkami, v prípade ktorých neboli náležité
opravy vykonané servisným partnerom schváleným spoločnosťou GARDENA alebo neboli použité diely spoločnosti
GARDENA alebo diely schválené spoločnosťou GARDENA.
EL Ευθύνη προϊόντος
Σύμφωνα με τον γερμανικό νόμο περί Ευθύνης για τα Προϊόντα, με το παρόν δηλώνουμε ρητώς ότι δεν
αποδεχόμαστε καμία ευθύνη για τυχόν ζημίες που προκύπτουν από τα προϊόντα μας εάν αυτά δεν έχουν
επισκευαστεί σωστά από κάποιον εγκεκριμένο συνεργάτη επισκευών της GARDENA ή εάν δεν έχουν
χρησιμοποιηθεί αυθεντικά εξαρτήματα GARDENA ή εξαρτήματα εγκεκριμένα από την GARDENA.
SL Odgovornost proizvajalca
V skladu z nemškimi zakoni o odgovornosti za izdelke,izrecno izjavljajo, da ne sprejemamo nobene odgovornosti
za škodo, ki jo povzročijo naši izdelki, če teh niso ustrezno popravili GARDENINI odobreni servisni partnerji ali pri tem
niso bili uporabljeni originalni GARDENINI nadomestni deli ali GARDENINIMI homologiranimi nadomestnimi deli.
HR Pouzdanost proizvoda
Sukladno njemačkom zakonu o pouzdanosti proizvoda, ovime izričito izjavljujemo kako ne prihvaćamo nikakvu
odgovornost za oštećenja na našim proizvodima nastala uslijed neispravnog popravka od strane servisnog partnera
kojeg odobrava GARDENA ili uslijed nekorištenja originalnih GARDENA dijelova ili dijelova koje odobrava GARDENA.
RO Răspunderea pentru produs
În conformitate cu Legea germană privind răspunderea pentru produs, declarăm în mod expres prin prezentul
document că nu acceptăm nicio răspundere pentru defecţiunile suferite de produsele noastre atunci când acestea
nu au fost reparate în mod corect de un atelier de service partener, aprobat de GARDENA, sau când nu au fost
utilizate piese GARDENA originale sau piese autorizate de GARDENA.
BG Отговорност за вреди, причинени от стоки
Съгласно германския Закон за отговорността за вреди, причинени от стоки, с настоящото изрично
декларираме, че не носим отговорност за щети, причинени от нашите продукти, ако те не са били
правилно ремонтирани от одобрен от GARDENA сервиз или ако не са използвани оригинални части
на GARDENA или части, одобрени от GARDENA.
ET Tootevastutus
Vastavalt Saksamaa tootevastutusseadusele deklareerime käesolevaga selgesõnaliselt, et me ei kanna mingisugust
vastutust meie toodetest tingitud kahjude eest, kui need tooted ei ole korrektselt parandatud GARDENA heakskii-
detud hoolduspartneri poolt või kui parandamisel ei ole kasutatud GARDENA originaalosi või GARDENA volitatud
osi.
LT Gaminio patikimumas
Mes aiškiai pareiškiame, kad, atsižvelgiant į Vokietijos gaminių patikimumo įstatymą, neprisiimame atsakomybės
dėl bet kokios žalos, patirtos dėl mūsų gaminių, jeigu jie buvo netinkamai taisomi arba jų dalys buvo pakeistos
neoriginaliomis GARDENA dalimis ar nepatvirtintomis dalimis, arba jeigu remonto darbai buvo atliekami ne
GARDENA techninės priežiūros centro specialistų.
LV Atbildība par produkcijas kvalitāti
Saskaņā ar Vācijas likumu par atbildību par produkcijas kvalitāti ar šo mēs paziņojam, ka neuzņemamies atbildību
par bojājumiem, kas radušies, lietojot mūsu izstrādājumus, kuru remontu nav veicis uzņēmuma GARDENA
apstiprināts apkopes partneris vai kuru remontam netika izmantotas oriģinālās GARDENA detaļas vai detaļas,
kuru lietošanu apstiprinājis uzņēmums GARDENA.
440

DE EU-Konformitätserklärung
Der Unterzeichner, Husqvarna AB, 561 82 Huskvarna, Schweden, bescheinigt
hiermit, dass die nachstehend aufgeführten Geräte bei Verlassen des Werks die
harmonisierten EU-Leitlinien, EU-Normen für Sicherheit und besondere Normen
erfüllen. Dieses Zertifikat verliert seine Gültigkeit, wenn die Geräte ohne unsere
Genehmigung verändert werden.
EN EC Declaration of Conformity
The undersigned, Husqvarna AB, 561 82 Huskvarna, Sweden, hereby certifies
that, when leaving our factory, the units indicated below are in accordance with
the harmonised EU guidelines, EU standards of safety and product specific
standards. This certificate becomes void if the units are modified without our
approval.
FR Déclaration de conformité CE
Le constructeur, soussigné : Husqvarna AB, 561 82 Huskvarna, Suède, déclare
qu’à la sortie de ses usines le matériel neuf désigné ci-dessous était conforme
aux prescriptions des directives européennes énoncées ciaprès et conforme
aux règles de sécurité et autres règles qui lui sont applicables dans le cadre de
l’Union européenne. Toute modification apportée à cet appareil sans notre
accord annule la validité de ce certificat.
NL EG-conformiteitsverklaring
De ondergetekende, Husqvarna AB, 561 82 Huskvarna, Zweden, verklaart
hierbij dat de producten die hieronder staan vermeld, wanneer ze onze fabriek
verlaten, in overeenstemming zijn met de geharmoniseerde Europese richtlijnen,
EU-normen voor veiligheid en productspecifieke normen. Dit certificaat vervalt
als de producten worden aangepast zonder onze toestemming.
SV EG-försäkran om överensstämmelse
Undertecknad firma Husqvarna AB, 561 82 Huskvarna, Sverige, intygar härmed
att nedan nämnda produkter, när de lämnar vår fabrik, överensstämmer med
EU:s riktlinjer, EU:s säkerhetsstandarder och produktspecifika standarder.
Detta intyg skall ogiltigförklaras om produkten ändras utan vårt godkännande.
DA EU-overensstemmelseserklæring
Undertegnede, Husqvarna AB, 561 82 Huskvarna, Sverige erklærer hermed, at
nedenfor anførte enheder er i overensstemmelse med de harmoniserede EUret-
ningslinjer, EU-standarder for sikkerhed og produktspecifikke standarder, når de
forlader fabrikken. Denne erklæring ugyldiggøres, hvis enhederne ændres uden
vores godkendelse.
FI EY-vaatimustenmukaisuusvakuutus
Husqvarna AB, 561 82 Huskvarna, Ruotsi, vakuuttaa täten, että alla mainitut lait-
teet ovat tehtaalta lähtiessään yhdenmukaistettujen EU-säännösten, EU:n turva-
standardien ja tuotekohtaisten standardien mukaisia. Tämä vakuutus mitätöityy,
jos laitteita muokataan ilman hyväksyntäämme.
IT Dichiarazione di conformità CE
La sottoscritta Husqvarna AB, 561 82 Huskvarna, Svezia, certifica che il prodotto
qui di seguito indicato, nei modelli da noi commercializzati, è conforme alle
direttive armonizzate UE nonché agli standard di sicurezza UE e agli standard
specifici di prodotto. Qualunque modifica apportata al prodotto senza nostra
specifica autorizzazione invalida la presente dichiarazione.
ES Declaración de conformidad CE
El abajo firmante, Husqvarna AB, 561 82 Huskvarna, Suecia, certifica por la
presente que, cuando salen de la fábrica, las unidades indicadas a continuación
cumplen las normas de armonización de la UE, las normas de la UE sobre
seguridad y las normas específicas del producto. Este certificado quedará sin
efecto si se modifican las unidades sin nuestra autorización.
PT Declaração de conformidade CE
O abaixo-assinado, Husqvarna AB, 561 82 Huskvarna, Suécia, certifica por este
meio que, ao sair da nossa fábrica, as unidades indicadas acima estão em
conformidade com as diretrizes uniformizadas da UE, os padrões de segurança
da UE e os padrões específicos do produto. Este certificado deixa de ser válido
se as unidades forem modificadas sem a nossa aprovação.
PL Deklaracja zgodności WE
Niżej podpisany przedstawiciel firmy Husqvarna AB, 561 82 Huskvarna, Szwecja,
niniejszym oświadcza, że podane poniżej wyroby opuszczające fabrykę są zgodne
ze zharmonizowanymi normami UE oraz z obowiązującymi w UE przepisami
bezpieczeństwa i normami dotyczącymi danego produktu. Modyfikacja wyrobów
bez naszej zgody powoduje unieważnienie niniejszego certyfikatu.
HU EK megfelelőségi nyilatkozat
Alulírott Husqvarna AB, 561 82 Huskvarna, Svédország ezzel tanúsítja, hogy az
alábbiakban leírt egységek a gyár elhagyásakor megfeleltek a harmonizált uniós
előírásoknak és biztonsági és termékspecifikus szabványoknak. Ez a tanúsítvány
érvényét veszti, ha az egységeket jóváhagyásunk nélkül átalakítják.
CS Prohlášení o shodě ES
Níže uvedená společnost Husqvarna AB, 561 82 Huskvarna, Švédsko, tímto
potvrzuje, že při opuštění naší továrny jsou jednotky uvedené níže v souladu
s harmonizovanými pokyny EU, standardy EU ohledně bezpečnosti a specifickými
produktovými standardy. Tento certifikát pozbývá platnosti, pokud dojde k úpravě
jednotek bez našeho schválení.
SK EÚ vyhlásenie o zhode
Dolu podpísaná spoločnosť Husqvarna AB, 561 82 Huskvarna, Švédsko týmto
osvedčuje, že nižšie uvedené jednotky boli v súlade s harmonizovanými usmerne-
niami EÚ, normami EÚ v oblasti bezpečnosti a špecifickými normami týkajúcimi
sa produktu v čase opustenia výrobného závodu. Toto osvedčenie stráca platnosť,
ak boli jednotky zmenené bez nášho súhlasu.
EL Δήλωση Συμμόρφωσης ΕΚ
Η υπογεγραμμένη εταιρεία, Husqvarna AB, 561 82 Huskvarna, Σουηδία, πιστο-
ποιεί ότι, κατά την έξοδο από το εργοστάσιο, οι μονάδες που αναφέρονται κατω-
τέρω συμμορφώνονται με τις εναρμονισμένες οδηγίες ΕΕ, τα πρότυπα ασφαλείας
της ΕΕ και τα συγκεκριμένα πρότυπα προϊόντος. Αυτό το πιστοποιητικό καθίστα-
ταιάκυρο εάν οι μονάδες έχουν τροποποιηθεί χωρίς την έγκρισή μας.
SL Izjava ES o skladnosti
Spodaj podpisana, Husqvarna AB, 561 82 Huskvarna, Švedska, s to izjavo
potrjuje, da je bila spodaj navedena enota ob izhodu iz tovarne skladna z usklaje-
nimi smerni cami EU, standardi EU za varnost in standardi, specifičnimi za
izdelek. Izjava postane neveljavna v primeru neodobrene spremembe enote.
HR Izjava o usklađenosti EZ
Niže potpisana Husqvarna AB, 561 82 Huskvarna, Švedska, ovime potvrđuje
kako su u nastavku navedene jedinice prilikom napuštanja tvornice bile u skladu
s usklađenim smjernicama EU, EU sigurnosnim standardima i standardima
specifičnima za proizvod. Ova certifikacija poništava se ako se jedinice izmjenjuju
bez odobrenja.
RO Declaraţie de conformitate CE
Subscrisa, Husqvarna AB, 561 82 Husqvarna, Suedia, certifică prin prezenta că,
la momentul ieşirii din fabrica noastră, unităţile indicate mai jos sunt în conformi-
tate cu directivele UE armonizate, cu standardele UE de siguranţă şi cu standar-
dele specifice ale produsului. Prezentul certificat devine nul dacă unităţile sunt
modificate fără aprobarea noastră.
BG Декларация за съответствие на ЕО
С настоящото долуподписаната, Husqvarna AB, 561 82 Huskvarna, Швеция,
удостоверява, че при напускане на фабриката модулите, посочени по-
долу, са в съответствие с хармонизираните директиви на ЕС, стандартите
на ЕС за безопасност и специфичните за продукта стандарти. Този
сертификат става невалиден, ако модулите са променени без нашето
одобрение.
ET EÜ vastavusdeklaratsioon
Allakirjutanu Husqvarna AB, 561 82 Huskvarna, Rootsi, kinnitab käesolevaga,
et tehasest väljumisel vastavad allpool nimetatud seadmed harmoneeritud EL-i
suunis tele, EL-i ohutusstandarditele ja tootele eriomastele standarditele.
See vastavuskinnitus kaotab kehtivuse, kui seadet muudetakse ilma meie
heakskiiduta.
LT EB atitikties deklaracija
Husqvarna AB, 561 82 Huskvarna, Sweden, garantuoja, kad iš gamyklos
siunčiami toliau nurodyti įrenginiai atitinka suderintus EB reikalavimus,
EB saugos ir konkretaus gaminio standartus. Pakeitus gaminį be mūsų
patvirtinimo, nutraukiamas šio sertifi kato galiojimas.
LV EK atbilstības deklarācija
Uzņēmums Husqvarna AB, 561 82 Huskvarna, Zviedrija, ar parakstu apliecina,
ka tālāk minētās vienības, pametot rūpnīcu, atbilst saskaņotajām ES vadlīnijām,
ES drošības standartiem un izstrādājumam specifiskajiem standartiem.
Šis sertifikāts tiek anulēts, ja šīs vienības tiek modificētas bez mūsu
apstiprinājuma.
441
Pagina se încarcă...
Pagina se încarcă...
Pagina se încarcă...
-
 1
1
-
 2
2
-
 3
3
-
 4
4
-
 5
5
-
 6
6
-
 7
7
-
 8
8
-
 9
9
-
 10
10
-
 11
11
-
 12
12
-
 13
13
-
 14
14
-
 15
15
-
 16
16
-
 17
17
-
 18
18
-
 19
19
-
 20
20
-
 21
21
-
 22
22
-
 23
23


în alte limbi
- English: Gardena 1759 User manual
Lucrări înrudite
-
Gardena 1759 Manual de utilizare
-
-
-
Gardena 1732 Manual de utilizare
-
Gardena 1757 Manual de utilizare
-
-
-
-
-