Gorenje BO6737E02BG Manualul proprietarului
- Tip
- Manualul proprietarului

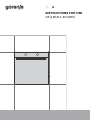
INSTRUCTIONS FOR USE
OF A BUILT-IN OVEN

Vă mulţumim pentru încredere şi pentru achiziţionarea aparatului!
Acest manual de instrucţiuni detaliat este oferit pentru a face mai accesibilă utilizarea
acestui produs. Instrucţiunile ar trebui să vă permită să aflaţi totul despre noul
dumneavoastră aparat, mult mai repede.
Asiguraţi-vă că aţi primit un aparat nedeteriorat. Dacă există deteriorări în urma
transportului, contactaţi vânzătorul de la care aţi achiziţionat aparatul sau depozitul
local de unde a fost furnizat. Numărul de telefon poate fi găsit pe factură sau nota de
livrare.
Instructions for installation and connection are supplied on a separate sheet.
Instructions for use, installation and connection are also available at our website:
http://www.gorenje.com
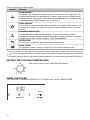
Următoarele simboluri sunt folosite pe tot cuprinsul manualului și au următoarele sensuri:
INFORMAŢIE!
Informație, aviz, sfat, sau recomandare
ATENŢIE!
Avertisment – pericol general
Este important să citiți instrucțiunile cu atenție.

Cuprins
4Precauții de siguranță ............................................................................................................
7Other important safety warnings ...........................................................................................
8Built-in oven ............................................................................................................................
8Appliance description ...............................................................................................................
9Appliance equipment ................................................................................................................
12Utilizarea aparatului ................................................................................................................
12Înainte de prima utilizare ...........................................................................................................
12Switching on for the first time ...................................................................................................
13Selectarea setărilor ...................................................................................................................
18Începerea procesului de gătit ...................................................................................................
18End of cooking and switching off the oven ..............................................................................
19General tips and advice for baking .......................................................................................
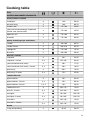
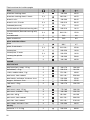
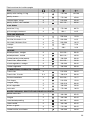
21Cooking table ..........................................................................................................................
25Cooking with a temperature probe ......................................................................................
26Recommended doneness levels for different types of meat ....................................................
27Întreținere & curățare .............................................................................................................
28Folosirea programului Aqua Clean pentru curățarea cuptorului ...............................................
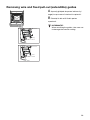
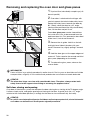
29Removing wire and fixed pull-out (extendible) guides ..............................................................
30Removing and replacing the oven door and glass panes ........................................................
31Înlocuirea becului ......................................................................................................................
32Tabel depanare și erori ...........................................................................................................
32Avertismente speciale şi raportare erori ...................................................................................
33Evacuare ..................................................................................................................................
3

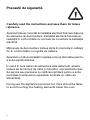
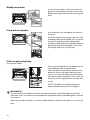
Precauții de siguranță
Carefully read the instructions and save them for future
reference
Aparatul trebuie conectat la instalaţia electrică fixă care dispune
de elemente de deconectare. Instalaţia electrică fixă trebuie
realizată în conformitate cu normele de conectare la instalaţia
electrică.
Mijloacele de deconectare trebuie să fie încorporate în cablajul
fix, în conformitate cu regulile de cablare.
Aparatul nu trebuie instalat în spatele unei uşi decorative pentru
a evita supraîncălzirea.
În cazul în care cablul de alimentare este deteriorat, acesta
trebuie să fie înlocuit de către producător, reprezentantul său
de service sau persoane cu calificare similară pentru a evita
pericolele (numai pentru aparatele furnizate cu cablu de
alimentare).
During use the appliance becomes hot. Care should be taken
to avoid touching the heating elements inside the oven.
4

This appliance can be used by children aged 8 years and above,
and by persons with reduced physical, sensory or mental
capabilities or lack of experience and knowledge, if they have
been given supervision or instruction concerning the use of the
appliance in a safe way, and if they understand the hazards
involved. Children shall not play with the appliance. Cleaning
and user maintenance shall not be done by children without
supervision.
AVERTISMENT: Piesele accesibile pot deveni fierbinți în timpul
utilizării. Mențineți copiii mici la distanță.
WARNING: The appliance and some of its accessible parts
may become very hot during use. Care should be taken to avoid
touching heating elements. Children less than 8 years of age
shall be kept away unless continuously supervised.
Aparatul nu este destinat a fi controlat prin temporizatori externi
sau prin sisteme speciale de comandă de la distanţă.
Only use the temperature probe recommended for use in this
oven.
Do not use harsh abrasive cleaners or sharp metal scrapers to
clean the oven door glass/ the glass of hinged lids of the hob
(as appropriate), since they can scratch the surface, which may
result in shattering of the glass.
Do not use steam cleaners or high-pressure cleaners to clean
the appliance as this may result in an electric shock.
AVERTISMENT: Înainte de a înlocui becul, asiguraţi-vă că
aparatul a fost deconectat de la reţeaua de alimentare cu
energie pentru a preveni pericolul de şoc electric.
5

Never pour water directly on the bottom of the oven cavity.
Temperature differences could result in damage to the enamel
coating.
6

Other important safety warnings
The appliance is intended for household use. Do not use it for any other purpose, such as room heating
or drying of pets or other animals, paper, fabrics, herbs etc., as this may lead to injury or fire hazard.
Aparatul trebuie conectat la instalaţia electrică fixă care dispune de elemente de deconectare. Instalaţia
electrică fixă trebuie realizată în conformitate cu normele de conectare la instalaţia electrică.
Do not lift the appliance by holding it by the door handle.
Oven door hinges may be damaged when under excessive load. Do not stand or sit on the open oven
door, and do not lean against it. Also, do not place any heavy objects onto the oven door.
If the power cords of other appliances placed near this appliance get entangled in the oven door, they
can be damaged, which in turn can result in a short circuit. Therefore, make sure the power cords of
other appliances are always at a safe distance.
Oven door becomes very hot during operation. A third glass is installed for extra protection, reducing
the temperature of the outside surface (only with some models).
Asiguraţi-vă că gurile de ventilaţie nu sunt acoperite sau obstrucţionate.
Do not line the oven cavity with aluminium foil, and do not place any baking trays or other cookware
on the oven bottom. This would obstruct and reduce air circulation in the oven, slow down the baking
process, and destroy the enamel coating.
We recommend you avoid opening the oven door during baking, as this increases power consumption
and increases condensate accumulation.
At the end of the baking process, and during baking, be careful when opening the oven door, as there
is danger of scalding.
To prevent limescale accumulation, leave the oven door open after baking or using the oven, to allow
the oven cavity to cool down to room temperature.
Clean the oven when it has completely cooled down.
Eventualele neconcordanţe între culorile diferitelor aparate sau componente dintr-o singură linie de
proiectare pot să apară din cauza diferiţilor factori, cum ar fi unghiurile diferite în care sunt observate
aparatele, fundalurile diferite, materialele și iluminarea camerei.
Never pour water onto the oven cavity bottom. Temperature differences could result in damage to the
enamel coating.
ATENŢIE!
Citiţi cu atenţie instrucţiunile înainte de a conecta aparatul. Orice reparaţie ce rezultă din
conectarea sau utilizarea incorectă a aparatului nu va fi acoperită de garanţie.
7

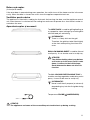
Built-in oven
Appliance description
INFORMAŢIE!
Appliance functions and equipment depend on the model.
Basic equipment of your appliance includes wire guides, shallow baking sheet, and a grid.
5 Guides – cooking levels1 Control unit
6 Rating plate2 Door switch
7 Oven door3 Lighting
8 Door handle4 Temperature probe socket
Rating plate – product information
A rating plate with basic information about the appliance is attached to the edge of the oven. Precise
information on appliance type and model can also be found on the warranty sheet.
5 Model1 Serial number
6 Technical information2 Code/ID
7 Compliance indications/symbols3 Type
4 Brand
8

Unitatea de control
(în funcţie de model)
1. Butonul selectorului sistemului de gătit
2. Gratin key (gratin)
3. Value decrease key
4. Timer function and settings key
5. Value increase key
6. Start/stop key to start or pause a program
7. Temperature settings knob
8. Display unit
INFORMAŢIE!
For better key response, touch the keys with a larger area of your fingertip. Each time you press
a key, this will be acknowledged by a short acoustic signal.
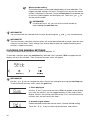
Push-pull knobs
Împingeţi uşor butonul până când sare, apoi rotiţi-l.
ATENŢIE!
După fiecare utilizare, rotiţi butonul înapoi în poziţia "off" şi împingeţi-l la loc. Butonul de
împingere şi tragere poate fi împins înapoi, doar atunci când butonul este în poziţia "off".
Appliance equipment
Lumini de control
Oven light: turns on when a cooking system is selected.
Guides
• The guides allow cooking or baking on 5 rack levels.
• The height levels of guides into which the racks can be inserted, shall be counted from bottom
up.
• Guide levels 4 and 5 are intended for grilling/broiling.
• When inserting equipment, it should be correctly rotated.
• Always push the equipment all the way into the appliance.
9

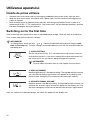
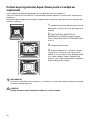
Ghidaje de sârmă
In case of wire guides, always insert the wire
(grid) rack and the baking sheets into the slot
between the upper and lower part of each guide
level.
Fixed pull-out guides
Pull-out guides may be fitted for the 2nd and
4th level.
IN case of fixed pull-out guides, place the rack
or baking sheet onto the guide. You can place
the wire rack directly onto a baking sheet
(shallow or deep all-purpose baking sheet) and
place both onto the same guide; in this case,
the baking sheet acts as a drip tray.
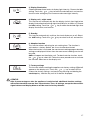
Click-on pull-out guides
(în funcţie de model)
Click-on pull-out guides can be attached in any
space between two wire guide levels.
Place the guides symmetrically onto the wire
guides on the left and right side of the oven
cavity. First, hook the upper clip of the guide
onto the wire of the wire guide. Then, press the
lower clip into the right position until you hear
a click.
NOTE: The guides can be attached to any
height between two levels of wire guides.
INFORMAŢIE!
The click-on pull-out guides cannot be mounted onto guides with fixed double-level partial
extension. They can, however, be mounted on to single-level partially extendible guides, to levels
3–4 and 4–5.
Make sure the pull-out guide is correctly rotated and that it extends outwards, i.e. out from the
oven.
10

Buton uşă cuptor
(în funcţie de model)
If the oven door is opened during oven operation, the switch turns off the heater and fan in the oven
cavity. When the door is closed, the switch turns the appliance operation back on.
Ventilator pentru răcire
The appliance is fitted with a cooling fan that cools the housing, the door, and the appliance control
unit. After the oven is switched off, the cooling fan continues to operate for a short while in order to
cool down the oven.
Aparatură cuptor și accesorii
The WIRE RACK is used for grilling/broiling or
as support for a pan, baking tray or baking dish
with the food you are baking.
INFORMAŢIE!
There is a safety latch on the grid.
Therefore, the grid has to be lifted slightly
at the front when pulling it out from the
oven.
SHALLOW BAKING SHEET is used for flat and
small pastry. It can also be used as a drip tray.
ATENŢIE!
The shallow baking sheet may deform
as it heats up in the oven. Once it cools
down, it returns to the initial shape.
Such deformation does not affect its
function.
The ALL-AROUND DEEP BAKING TRAY is
used for roasting vegetables and baking moist
pastry. It can also be used as a drip tray.
INFORMAŢIE!
Never insert the all-purpose (or universal)
deep baking tray into the first guide during
baking.
Temperature PROBE( BAKESENSOR).
ATENŢIE!
The appliance and some of the accessible parts tend to heat up during cooking.
11

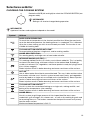
Utilizarea aparatului
Înainte de prima utilizare
• Remove oven accessories and any packaging (cardboard, polystyrene foam) from the oven.
• Wipe the oven accessories and interior with a damp cloth. Do not use abrasive or aggressive
cloths or cleaners.
• Heat an empty oven for approximately one hour with the top and bottom heater system at a
temperature of 250 °C. The characteristic "new oven scent" will be released; therefore, ventilate
the room thoroughly during this process.
Switching on for the first time
After connecting your appliance or after an extended power outage, 12:00 will flash on the display.
First, choose and confirm the basic settings.
INFORMAŢIE!
To change them, touch the keys or . Confirm the desired setting by pressing the multi
time or start/stop key. The next setting can be adjusted once you have set and confirmed the
preceding one.
1. CLOCK SETTING
Set the clock/time of day. First, set and confirm the minutes; then set
and confirm the hours. If you press and hold the value adjustment key,
the rate at which the set value is being changed will increase.
INFORMAŢIE!
To set or adjust the clock later on, see chapter Extra functions.
2. DISPLAY DIMMER
Medium light intensity is the default setting. The sign brh and the currently
set value for the display light intensity will appear on the display unit.
Use the value setting keys to increase or decrease light intensity.
3. ACOUSTIC SIGNAL VOLUME
Medium volume is the default setting. The sign Vol and the currently set
value for the acoustic signal volume will appear on the display unit. Use
the value setting keys to increase or decrease the acoustic signal volume.
After you confirm the selected settings, the clock will appear on the display unit.
12

Selectarea setărilor
CHOOSING THE COOKING SYSTEM
Rotate the KNOB (left and right) to select the COOKING SYSTEM (see
program table).
INFORMAŢIE!
Settings can also be changed during operation.
INFORMAŢIE!
Appliance functions and equipment depend on the model.
UtilizareSymbol
RAPID OVEN PREHEATING
To reach the set temperature in the shortest possible time. When the oven heats
up to the desired temperature, the heating process is completed. This is followed
up by the system setting you wish to use to cook your food. This function is not
suitable for cooking food.
TOP AND BOTTOM HEATER WITH FAN
1)
For even baking of food on a single rack, and for making soufflés.
LARGE GRILL WITH FAN
1)
For roasting poultry and larger cuts of meat under a broiler.
INTENSIVE BAKING (AIR FRY)
1) 2)
This cooking method results in a crunchy crust without added fat. This is a healthy
version of fast-food frying, with fewer calories in the cooked food. Suitable for
smaller cuts of meat, fish, vegetables, and frozen products ready for frying (French
fries, chicken nuggets).
Steam injection results in better browning and more crunchiness of the surface..
HOT AIR
1) 2)
Hot air allows better flow of hot air around the food. This way, it dries out the surface
and creates a thicker crust. Use this system to cook meat, pastry and vegetables,
and to dry food on a single rack or multiple racks simultaneously. Steam injection
results in better browning and more crunchiness of the surface.
Steam injection results in better browning and more crunchiness of the surface.
TOP AND BOTTOM HEATER
1) 2)
Use this system for conventional baking on a single rack, making soufflés, and
baking at low temperatures (slow cooking).
Steam injection results in better browning and more crunchiness of the surface.
LARGE GRILL
1)
Use this system to grill large amounts of flat-shaped food like toast, open
sandwiches, grill sausages, fish, skewers etc., as well as for cooking au gratin and
for browning the crust. The heaters mounted on the top of the oven cavity evenly
heat the entire surface.
Maximum allowed temperature is 240 °C.
13

Tabel continuat de la ultima pagina
UtilizareSymbol
SLOW BAKING
3)
For gentle, slow and even cooking of meat, fish and pastry on a single rack. This
cooking method will leave the meat with a higher water content, making it juicier
and more tender, while pastry will be evenly browned/baked. This system is used
in the temperature range between 140 °C and 220 °C
PIZZA SYSTEM
1)
This system is optimal for baking pizza and pastry with higher water content. Use
it to bake on a single rack, when you want the food to be done faster and to be
crunchy.
BAKING FROZEN FOOD
1)
This method allows baking frozen food in a shorter period of time without
pre-heating. Optimum for pre-baked frozen products (bakery products, croissants,
lasagne, French fries, chicken nuggets), meat and vegetables.
DEFROSTING
This system is suitable for gentle defrosting of frozen food.
AQUA CLEAN
This program makes it easier to remove any stains from inside the oven.
1)
In these systems, it is possible to use the gratin function (see chapter Starting the cooking process).
2)
You can use steam injection with these systems (see chapter General Tips and Advice for Baking).
3)
Este folosit pentru a obţine o clasă de eficienţă energetică în conformitate cu standardul EN 60350-1.
SETTING THE COOKING TEMPERATURE
Rotiţi butonul pentru a seta TEMPERATURA dorită.
TIMER FUNCTIONS
First, rotate the COOKING SYSTEM SELECTOR KNOB; then, set the TEMPERATURE.
14

Timed cooking
In this mode, you can specify the duration of oven operation (cooking
time).
Touch the multi time key. Symbol will appear on the display unit.
Touch the or to set the desired operating time. Touch the
start/stop key to confirm the settings.
Hold the start/stop key to start oven operation.
Setarea începerii întârziate
INFORMAŢIE!
Delayed start cannot be set for the grill and grill with fan systems.
Use this function when you wish to start cooking the food in the oven
after a certain period of time. Place the food into the oven, then set the
system and temperature. Then, set the program duration and the time
when you wish your food done.
Exemplu:
Ora curentă: prânz
Timp de gătire: 2 ore
Finalizare proces de gătit: 18:00
Touch the multi time key. The cooking duration symbol will appear on
the display unit. Touch the or to set program (cooking) duration
(in our case, this is 2:00). Confirm the setting by pressing the start/stop
key. Double-tap the multi time again to set the time when you wish your
food done (in our case, this is 18:00, or 6 p.m.). Desired cooking end
time will appear on the display unit (18:00). Touch the start/stop key to
confirm the settings.
Hold the start/stop key to start oven operation.
While waiting to start operation, the oven is in a partial standby mode.
The display is dimmed, and the fan system and oven lighting are on the
entire time. The oven will switch on with the selected settings
automatically (in our case at 16:00, or 4 p.m.). The oven will switch off
at the set time (in our case, this is 18:00, or 6 p.m.).
INFORMAŢIE!
Cooking end time and the clock will alternate on the display unit.
After the set time expires, the oven will automatically stop operating.
Signs End and 00:00 will alternate on the display unit. An acoustic signal
will be emitted, which you may turn off by touching any key. After one
minute, the acoustic signal will be switched off automatically.
ATENŢIE!
This function is not suitable for food requiring a preheated oven.
Perishable food should not be kept in the oven for a long time.
Before using this mode, check whether the clock on the
appliance is accurately set.
15

Minute minder setting
The minute minder can be used independently of oven operation. The
longest possible setting is 24 hours. During the last minute, the minute
minder is displayed in seconds. Touch the multi time twice (double-tap
it) until the symbol appears on the display unit. Touch the or to
set the minute minder.
INFORMAŢIE!
If a delayed start is set, you can set the minute minder by
triple-tapping the multi time key.
INFORMAŢIE!
You can terminate the selected timer function by touching the and key simultaneously.
INFORMAŢIE!
The most recently used timer function values will be stored and offered as preset values the next
time you use the timer. These settings may also be deactivated (see chapter Selecting extra
functions, Adaptive function).
CHOOSING THE GENERAL SETTINGS
Turn the COOKING SYSTEM SELECTOR KNOB to position "0".
To activate a function, press the multi time key and hold it for 3 seconds. SEtt will appear on the
display unit for a few seconds. Then, the extra functions menu will appear.
INFORMAŢIE!
Use the or keys to navigate the menu. Confirm the setting by pressing the start/stop key.
To exit the extra functions menu, touch the gratin key.
1. Clock displayed
Use the and keys to set the clock. CLoc will appear on the display
unit. After you confirm, you can toggle between 12-hour and 24-hour
display. Confirm, the set the clock/time of day. First, set and confirm the
minutes; then set and confirm the hours.
2. Acoustic signal volume
Choose between three beep volume levels. Choose the Vol setting.
Touch the or key to select the desired level, and confirm.
16

3. Display illumination
Choose between three levels of display light intensity. Choose the brh
setting. Touch the or key to select the desired level, and confirm.
Use the value setting keys to increase or decrease light intensity.
4. Display unit – night mode
This function will automatically dim the display (switch from high to low
display illumination level) during night time (8:00 p.m. to 6:00 a.m.) Choose
the nGht setting. Touch the or key to select the desired night-time
display illumination, and confirm.
5. Standby
This function automatically switches the clock display on or off. Select
the hidE setting. Touch the or key to select on or off, and confirm.
6. Adaptive function
This function allows adjusting the set cooking time. The function is
activated as a factory default, but it can also be deactivated.
When the function is activated, the most recent cooking program duration
settings are displayed. Values from the most recent cooking session will
be used.
AdPt will appear on the display unit. To deactivate the function, touch
the or key to select off. Follow the same procedure to re-activate
the function. Select on on the display unit.
7. Factory settings
This function allows resetting the appliance to factory settings. FAct will
appear on the display unit. Touch the or key to select rES to
choose the factory settings, and confirm by pressing and holding the
start/stop key. Hold the key until all lit dashes disappear.
ATENŢIE!
After a power outage or after the appliance is switched off, additional function settings
will remain stored for no more than a few minutes. Then, all settings, except for the acoustic
signal volume and display dimmer will be reset to factory defaults.
17

Începerea procesului de gătit
The dash above the start/stop key is partially lit. Start the set program
by long pressing this key.
Until the oven reaches the set temperature for the first time, the dash
above the start/stop key will flash. During program operation, the key
will be brighter (it is fully lit).
INFORMAŢIE!
If no timer function is selected, cooking time will appear on the display unit. A short acoustic
signal is emitted when the oven reaches the selected temperature.
Extra gratin
The function can only be started after 10 minutes of oven operation (the
dash above the gratin key will be partly/dimly lit). When the function is
confirmed, cooking time 10 minutes (10:00) will appear on the display
unit. Touch the or key to set the gratin duration.
The function can also be deactivated by long-pressing the gratin key.
The function is used in the last stage of baking or after the baking process
when you add sauce (wet rub) or dry rub onto the food, or when you
wish to additionally brown the crust. A golden-brown crust will form on
the dish during the gratin process, which protects the food from drying
out, while also imparting a more pleasant appearance and better flavour.
End of cooking and switching off the oven
Long press the start/stop key to pause the cooking process. End appears on display unit an acoustic
signal is emitted.
Turn the COOKING SYSTEM SELECTOR KNOB to position "0".
INFORMAŢIE!
After the cooking process, all timer settings are also stopped and deleted, except for the minute
minder. Time of day (clock) will be displayed.
After the use of the oven, some water may be left in the condensate channel (underneath the
door). Wipe the channel with a sponge or a cloth.
18

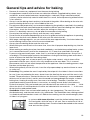
General tips and advice for baking
• Remove all unnecessary equipment from the oven during baking
• Use equipment made of heat-resistant non-reflective materials (supplied baking sheets, trays,
and dishes, enamel-coated cookware, tempered glass cookware). Bright-coloured materials
(stainless steel or aluminium) materials reflect heat. As a result, thermal processing of food in them
is less effective.
• Always insert the baking sheets and trays to the end of the guides. When baking on the wire rack,
place the baking dishes or trays in the middle of the rack.
• For optimum food preparation, we recommend observing the guidelines specified in the cooking
table. Choose the lower specified temperature and the shortest specified cooking time. When this
time expires, check the results and then adjust the settings as necessary.
• Unless it is absolutely necessary, do not open the oven door during baking.
• Do not place the baking trays directly onto the oven cavity bottom.
• Do not use the all-purpose deep baking tray on the 1st guide level while the appliance is operating.
• Do not cover the oven cavity bottom or the wire rack with aluminium foil.
• With longer cooking programs, you can switch off the oven approximately 10 minutes before the
end of cooking time to make use of the accumulated heat.
• Always place the baking dishes onto the wire rack.
• When baking on several levels at the same time, insert the all-purpose deep baking tray into the
lower level.
• When cooking according to recipes from older cookbooks, use the bottom and top heater system
(as in conventional ovens) and set the temperature 10 °C lower than specified in the recipe.
• If you are using parchment paper, make sure it is resistant to high-temperatures. Always trim it
accordingly. Parchment paper prevents the food from sticking to the baking sheet and makes it
easier to remove the food from the baking sheet.
• When cooking larger cuts of meat or pastry with higher water content, a lot of steam will be
generated inside the oven, which in turn may condense on the oven door. This is a normal
phenomenon which will not affect the operation of the appliance. After the cooking process, wipe
the door and the door glass dry.
• When baking directly on the wire rack, insert the all-purpose deep tray one level lower to serve
as a drip tray.
• Preheating: Only preheat the oven if required by the recipe of in the tables in these instructions
for use. If you are preheating the oven, do not insert the food into the oven until the oven is fully
heated. Temperature has a substantial effect on the final result. Preheating is recommended for
delicate cuts of meat (sirloin), and for yeast-leavened and sponge dough that require a shorter
baking time. Heating an empty oven consumes a lot of energy. Therefore, if possible, we
recommend cooking several dishes in succession, or making several dishes simultaneously.
Dishes that require a fully pre-heated oven are indicated with one asterisk in the table * , while
dishes for which a 5-minute preheat will suffice are indicated with two asterisks ** . In this case,
do not use the rapid preheat mode.
• GentleBake: Allows slow and controlled cooking at a low temperature. The meat juices are
distributed evenly, and the meat remains juicy and tender. The GentleBake slow cooking method
is suitable for delicate boneless meat cuts. Before slow cooking, sear the meat thoroughly from
all sides in a frying pan.
In systems with steam injection, insert the shallow baking sheet in the
first-level guide, while the oven is still cool. Pour a maximum of 2 dl of
water onto the baking sheet. Place the food to be cooked on the second
level and start the system.
19

INFORMAŢIE!
If you are using a deep baking tray, insert it one level higher than
specified in the recommended settings table.
For optimum operation of the function, do not open the oven door
and do not add water during the cooking process.
20
Pagina se încarcă...
Pagina se încarcă...
Pagina se încarcă...
Pagina se încarcă...
Pagina se încarcă...
Pagina se încarcă...
Pagina se încarcă...
Pagina se încarcă...
Pagina se încarcă...
Pagina se încarcă...
Pagina se încarcă...
Pagina se încarcă...
Pagina se încarcă...
Pagina se încarcă...
-
 1
1
-
 2
2
-
 3
3
-
 4
4
-
 5
5
-
 6
6
-
 7
7
-
 8
8
-
 9
9
-
 10
10
-
 11
11
-
 12
12
-
 13
13
-
 14
14
-
 15
15
-
 16
16
-
 17
17
-
 18
18
-
 19
19
-
 20
20
-
 21
21
-
 22
22
-
 23
23
-
 24
24
-
 25
25
-
 26
26
-
 27
27
-
 28
28
-
 29
29
-
 30
30
-
 31
31
-
 32
32
-
 33
33
-
 34
34


Gorenje BO6737E02BG Manualul proprietarului
- Tip
- Manualul proprietarului
în alte limbi
- English: Gorenje BO6737E02BG Owner's manual
Lucrări înrudite
-
Gorenje BO6735E02X Manualul proprietarului
-
-
-
-
-
-
Alte documente
-
Candy FCDIEN536X Manual de utilizare
-
Tefal GC740B30 Manual de utilizare
-
Russell Hobbs 28270-56 Manual de utilizare
-
-
-
Whirlpool AKZM 656/IX/01 Manualul utilizatorului
-
-
Tefal GC722834 Manual de utilizare
-
-
Whirlpool AKZM 794/IX Manualul utilizatorului