Tesy CN 06 200 EА CLOUD AS W Manual de utilizare

Tip
Manual de utilizare
www.tesy.com
is a registered trade mark of Tesy ltd.
CN 06 EA [CLOUD] [AS] W [GL]
230V~ 50Hz 600/1000/1400/2000W
206697-v0.2
QUICK START 2-11
EN ELECTRIC PANEL HEATER 12-19
Operation and Storage Manual of Panel Heater
BG ЕЛЕКТРИЧЕСКИ КОНВЕКТОР 20-27
Инструкция за експлоатация и съхранение на панелен конвектор
RO CONVECTOR ELECTRIC 28-35
Instrucţiuni de utilizare şi depozitare а convectorului de panou
RU
ЕКТРИЧЕСКИЙ КОНВЕКТОР
36-41
Инструкция по эксплуатации и сохранению панельного конвектора
UA
ЕЛЕКТРИЧНИЙ КОНВЕКТОР
42-47
Інструкція про порядок застосування і зберігання панельного конвектора
HR ELEKTRIČNI KONVEKTOR 48-55
Upute za uporabu i pohranu panelnog konvektora
RS ЕЛЕКТРИЧНИ КОНВЕКТОР 56-61
Упутства за употребу и складиштење панелног конвектора
MK ЕЛЕКТРИЧНИ КОНВЕКТОР 62-67
Упатство за употреба и чување на панелниот конвектор
SK ELEKTRICKÝ KONVEKTOR 68-75
Návod na použitie a údržbu panelového konvektora
SL ELEKTRIČNI KONVEKTOR 76-83
Navodila za uporabo in shranjevanje konvekotrja
PL KONWEKTOR ELEKTRYCZNY 84-91
Instrukcja użytkowania i przechowywania konwektora płytowego
HU ELEKTROMOS KONVEKTOR 92-99
Használati utasítás a fali konvektor üzembentartására és védelmére
GR ΗΛΕΚΤΡΙΚΟΣ ΘΕΡΜΟΠΟΜΠΟΣ/CONVECTOR 100-107
Οδηγίες χρήσης και αποθήκευσης Πάνελ - Θερμοπομπού
ES CONVECTOR ELÉCTRICO 108-115
Instrucciones para el uso y mantenimiento de panel convector
DE
ELEKTRISCHER KONVEKTOR
116-123
Bedienungs und Aufbewahrungsanleitung des Panelkonvektors
DK ELEKTRISK KONVEKTOR RADIATOR 124-131
Brugermanual til panel-konvektor
LT ELEKTRINIS KONVEKTORIUS 132-139
Panelinio konvektoriaus su MICA šildytuvu eksploatavimo ir saugojimo instrukcija
LV ELEKTRISKAIS KONVEKTORS 140-147
Paneļa tipa konvektora lietošanas un uzglabāšanas instrukcija
NL ELEKTRISCHE CONVECTOR 148-155
Gebruikers en opslaghandleiding van paneelconvector
SE ELEKTRILINE KONVEKTOR 156-163
Paneelkonvektori kasutus ja hoidmise juhend
NO ELEKTRISK KONVEKTOR 164-171
Bruks- og oppbevaringshåndbok for panelvarmer
AR 172-177 ابرهك نخسم
    
HE 178-186 

AM

187-194

2 Operation and Storage Manual of Panel Heater
COMFORT
21oC
DEVICE INFO
Comfort mode
Activation/Активиране/Activarea/Активация/Активація/Aktiviranje/Активирање/Aktivovať/Aktywacja/Aktiválás/Ενεργοποίηση/Activar/
Deactivation/Деактивиране/Dezactivarea/Деактивировать/Деактивувати/Deaktiviranje/Деактивирање/Deaktivovať/Dezaktywacja/Deaktiválás/Απενεργοποίηση
/
1,5 sec or/или/sau/или/чи/ili/или/alebo/albo/vagy/ή/o/oder/
3 sec
3 sec
Full menu/Пълно меню/Meniu complet/Полное меню/
Повне меню/Prošireni izbornik/Комплетан мени/
Kompletná ponuka/Pełne menu/Teljes menü/Πλήρες μενού/
Menú completo/Hauptmenü/Fuld menu/Pilnas meniu/
Pilna izvēlne/Volledig menu/Fullständig meny/Full meny/
Целосно мени/Celoten meni/ ﺔﻠﻣﺎﻛ ﺔﻣﺋﺎﻗ /אלמ טירפת/
Լրիվ ցուցակ
/
1 sec
Quick menu/Conrmation / Бързо меню/Потвърждение /
Meniu rapid/Conrmare / Быстрое меню/Подтверждение /
Швидке меню/Підтвердження / Brzi izbornik/Potvrđivanje /
Брзи мени/Потврђивање / Rýchla ponuka/Potvrdenie/
Szybkie menu/Potwierdzenie / Gyorsmenü/Megerősítés
Γρήγορο μενού/Επιβεβαίωση / Menú rápido/Conrmación/
Schnellmenü/Bestätigung / Hurtig menu/Bekræftelse/
Greitas meniu/Patvirtinimas / Ātrā izvēlne/apstiprināt/
Snelmenu/Bevestiging / Snabbmeny/Bekräftelse/
Hurtigmeny/Bekreftelse / Брзо мени / Потврдување/
Hitri meni / Potrditev/ دﯾﻛﺄﺗﻟا / ﺔﻌﯾرﺳﻟا ﺔﻣﺋﺎﻘﻟا /רושיא / ריהמ טירפת/
Արագ ցուցակ / Հաստատել
1.5 sec ON/OFF/вкл./изкл./porni/a opri/вкл./выкл./uklj./вкл./вим./isklj./укљ./искљ./zapnuté/vypnuté/wł./wył./bekapcsolt /kikapcsolt/eνεργοποίηση/
aπενεργοποίηση/encender/apagar/ein/aus/tænd sluk/Įjungti /išjungti./Ieslēgts/izslēgts/aan/uit/på/av/på av/вкл./иск./vklop/ izklop/فﺎﻘﯾإ / لﯾﻐﺷﺗ /ױבכ קלוד/
Միաց./Անջատ./
1 sec Step back / Стъпка назад / Pas înapoi /Шаг назад/ Крок назад/Korak nazad / Корак назад / Krok späť/Krok wstecz/Vissza lépés/Βήμα προς τα πίσω /
Paso atrás/Schritt zurück/Træd tilbage/Žingsnis atgal/Atgriezties/Stap terug/Ta ett steg tillbaka/Gå tilbake/Чекор назад/Korak nazaj/ فﻠﺧﻠﻟ ةوطﺧ /הרוחא דעצ/
Քայլ ետև /
22
23 45
Predened functions / Предварително зададени програмни режими / Moduri de program presetate / Заранее заданные программные режимы/
režimy/Wcześniej zadany tryb programowy/Előre beállított programmódok/Προκαθορισμένες λειτουργίες προγράμματος / Modos de programa
PROGRAM
MODE
Predened functions Basic modes Quick menu
Quick start
move up/нагоре/sus/вверх/вгору/gore/горе /hore/w górę/felfele/επάνω /
arriba/nach oben/op/aukštyn/uz augšu/omhoog/upp/opp/горе/gor/ﻰﻠﻋﻷا ﻰﻟإ /הלעמל/Վերև /
1 sec
move down/надолу/jos/вниз/вниз/dolje/доле/dolu/wł/lefele/κάτω/
abajo/nach unten/ned/žemyn/uz leju/omlaag/ner/ned/долу/dol/لﻔﺳﻷا ﻰﻟإ/הטמ/Ներքև/
1 sec
OFF choose different mode
Unaprijed programirani načini rada/Заздалегідь задані програмні режими/ Унапред подешени програмски режими/Prednastavené programovacie
preestablecidos/Vorgegebene Betriebsarten/Forudindstillede programtilstande/Iš anksto nustatyti programos režimai/Iepriekš iestatīti programmas
Einschalten/Aktivering/Įjungti/Aktivizēt/Activeren/Aktivering/Aktivering/Активирање/Aktiviraj/طﯾﺷﻧﺗﻟا /הלעפה//
Ակտիվացում
Desactivar/Ausschalten/Deaktiver/Išjungti/Deaktivizēt/Deactiveren/Avaktivera/Deaktiver/Деактивирање/Deaktiviraj/لﯾطﻌﺗﻟا /תבשה//
Ապաակտիվացում
eller/arba/vai/of/eller/eller/или/oz/وأ /וא/կամ
režīmi/Vooraf ingestelde programmamodi/Förinställda programlägen/Forhåndsinnstilte programmoduser/ Претходно поставени програмски
ً
програмски режими/Prednastavljeni programski načini/ﺎﻘﺑﺳﻣ ةددﺣﻣﻟا ﺞﻣﺎﻧرﺑﻟا عﺎﺿوأ /שארמ םירדגומ תינכות יבצמ/ Նախապես տրված
ծրագրային ռեժիմներ /
Operation and Storage Manual of Panel Heater 3English
ECO
SLEEP
DELAY ST.
MINUTES
07:30
HOURS
07:00
18oC
ECO
ECO
SLEEP
Eco mode
Sleep mode
HOURS
07:00
MINUTES
07:45
19
23 45
18
23 45
3 sec
PROGRAM
MODE
3 sec
PROGRAM
MODE
1,5 sec OFF choose different mode
( 00.00 - 24.00 )
( 00.00 - 24.00 )
Activation/Активиране/Activarea/Активация/Активація/Aktiviranje/Активирање/Aktivovať/Aktywacja/Aktiválás/Ενεργοποίηση/Activar/
Einschalten/Aktivering/Įjungti/Aktivizēt/Activeren/Aktivering/Aktivering/Активирање/Aktiviraj/طﯾﺷﻧﺗﻟا /הלעפה// Ակտիվացում
Deactivation/Деактивиране/Dezactivarea/Деактивировать/Деактивувати/Deaktiviranje/Деактивирање/Deaktivovať/Dezaktywacja/Deaktiválás/Απενεργοποίηση
/
Desactivar/Ausschalten/Deaktiver/Išjungti/Deaktivizēt/Deactiveren/Avaktivera/Deaktiver/Деактивирање/Deaktiviraj/لﯾطﻌﺗﻟا /תבשה//
Ապաակտիվացում
or/или/sau/или/чи/ili/или/alebo/albo/vagy/ή/o/oder/
eller/arba/vai/of/eller/eller/или/oz/وأ /וא/կամ
or/или/sau/или/чи/ili/или/alebo/albo/vagy/ή/o/oder/
eller/arba/vai/of/eller/eller/или/oz/وأ /וא/կամ
Activation/Активиране/Activarea/Активация/Активація/Aktiviranje/Активирање/Aktivovať/Aktywacja/Aktiválás/Ενεργοποίηση/Activar/
Einschalten/Aktivering/Įjungti/Aktivizēt/Activeren/Aktivering/Aktivering/Активирање/Aktiviraj/طﯾﺷﻧﺗﻟا /הלעפה// Ակտիվացում
Deactivation/Деактивиране/Dezactivarea/Деактивировать/Деактивувати/Deaktiviranje/Деактивирање/Deaktivovať/Dezaktywacja/Deaktiválás/Απενεργοποίηση
/
Desactivar/Ausschalten/Deaktiver/Išjungti/Deaktivizēt/Deactiveren/Avaktivera/Deaktiver/Деактивирање/Deaktiviraj/لﯾطﻌﺗﻟا /תבשה//
Ապաակտիվացում
Predened functions / Предварително зададени програмни режими / Moduri de program presetate / Заранее заданные программные режимы/
režimy/Wcześniej zadany tryb programowy/Előre beállított programmódok/Προκαθορισμένες λειτουργίες προγράμματος / Modos de programa
Unaprijed programirani načini rada/Заздалегідь задані програмні режими/ Унапред подешени програмски режими/Prednastavené programovacie
preestablecidos/Vorgegebene Betriebsarten/Forudindstillede programtilstande/Iš anksto nustatyti programos režimai/Iepriekš iestatīti programmas
režīmi/Vooraf ingestelde programmamodi/Förinställda programlägen/Forhåndsinnstilte programmoduser/ Претходно поставени програмски
ً
програмски режими/Prednastavljeni programski načini/ﺎﻘﺑﺳﻣ ةددﺣﻣﻟا ﺞﻣﺎﻧرﺑﻟا عﺎﺿوأ /שארמ םירדגומ תינכות יבצמ/ Նախապես տրված
ծրագրային ռեժիմներ /
4 Operation and Storage Manual of Panel Heater
14 H
DELAY
START
SLEEP
DELAY ST.
W.SCHEDU
DELAY
START
21 oC
14 H
DELAY
START
Heating mode
1,5 sec OFF
1,5 sec
Delay start function
1,5 sec
ON
heating
Heating mode ON
23 46
25
23 46
25
21
11 35
Heating mode ON
23 46
25
3 sec
PROGRAM
MODE
Basic modes / Основни режими / Moduri de bază / Основные режимы/Основні режими/Osnovni načini rada /Основни режими / Základné režimy/
set hour has expired
Tryby podstawowe/Alap módok/Κύριοι τρόποι λειτουργίας / Modos básicos/Hauptbetriebsarten/Basistilstande/Pagrindiniai režimai/Pamatrežīmi/
Basismodi/Grundläggande lägen/Basismoduser/Основни режими/Osnovni načini/ﺔﯾﺳﺎﺳﻷا عﺎﺿوﻷا /םײסיסב םיבצמ/ Հիմնական ռեժիմներ/
Activation/Активиране/Activarea/Активация/Активація/Aktiviranje/Активирање/Aktivovať/Aktywacja/Aktiválás/Ενεργοποίηση/Activar/
Einschalten/Aktivering/Įjungti/Aktivizēt/Activeren/Aktivering/Aktivering/Активирање/Aktiviraj/طﯾﺷﻧﺗﻟا /הלעפה// Ակտիվացում
Deactivation/Деактивиране/Dezactivarea/Деактивировать/Деактивувати/Deaktiviranje/Деактивирање/Deaktivovať/Dezaktywacja/Deaktiválás/Απενεργοποίηση
/
Desactivar/Ausschalten/Deaktiver/Išjungti/Deaktivizēt/Deactiveren/Avaktivera/Deaktiver/Деактивирање/Deaktiviraj/لﯾطﻌﺗﻟا /תבשה//
Ապաակտիվացում
or/или/sau/или/чи/ili/или/alebo/albo/vagy/ή/o/oder/
eller/arba/vai/of/eller/eller/или/oz/وأ /וא/կամ
Operation and Storage Manual of Panel Heater 5English
TEMP.COR.
Anti-frost mode
W.SCHEDU
W.SCHEDU
t ° < 5 °C
3 sec
PROGRAM
MODE
3 sec
PROGRAM
MODE
4
Anti-frost
Temperature correction
3 sec
PROGRAM
MODE
TEMP.COR.
3 sec
PROGRAM
MODE 0
Activation/Активиране/Activarea/Активация/Активація/Aktiviranje/Активирање/Aktivovať/Aktywacja/Aktiválás/Ενεργοποίηση/Activar/
Einschalten/Aktivering/Įjungti/Aktivizēt/Activeren/Aktivering/Aktivering/Активирање/Aktiviraj/طﯾﺷﻧﺗﻟا /הלעפה//
Ակտիվացում
Deactivation/Деактивиране/Dezactivarea/Деактивировать/Деактивувати/Deaktiviranje/Деактивирање/Deaktivovať/Dezaktywacja/Deaktiválás/Απενεργοποίηση
/
Desactivar/Ausschalten/Deaktiver/Išjungti/Deaktivizēt/Deactiveren/Avaktivera/Deaktiver/Деактивирање/Deaktiviraj/لﯾطﻌﺗﻟا /תבשה//
Ապաակտիվացում
Deactivation/Деактивиране/Dezactivarea/Деактивировать/Деактивувати/Deaktiviranje/Деактивирање/Deaktivovať/Dezaktywacja/Deaktiválás/Απενεργοποίηση
/
Desactivar/Ausschalten/Deaktiver/Išjungti/Deaktivizēt/Deactiveren/Avaktivera/Deaktiver/Деактивирање/Deaktiviraj/لﯾطﻌﺗﻟا /תבשה//
Ապաակտիվացում
Activation/Активиране/Activarea/Активация/Активація/Aktiviranje/Активирање/Aktivovať/Aktywacja/Aktiválás/Ενεργοποίηση/Activar/
Einschalten/Aktivering/Įjungti/Aktivizēt/Activeren/Aktivering/Aktivering/Активирање/Aktiviraj/طﯾﺷﻧﺗﻟا /הלעפה//
Ակտիվացում
Basic modes / Основни режими / Moduri de bază / Основные режимы/Основні режими/Osnovni načini rada /Основни режими / Základné režimy/
Tryby podstawowe/Alap módok/Κύριοι τρόποι λειτουργίας / Modos básicos/Hauptbetriebsarten/Basistilstande/Pagrindiniai režimai/Pamatrežīmi/
Basismodi/Grundläggande lägen/Basismoduser/Основни режими/Osnovni načini/ﺔﯾﺳﺎﺳﻷا عﺎﺿوﻷا /םײסיסב םיבצמ/
Հիմնական ռեժիմներ
/
6 Operation and Storage Manual of Panel Heater
Adaptive start
3 sec
PROGRAM
MODE
Reset
3 sec
PROGRAM
MODE
3 sec
PROGRAM
MODE
Keyboard lock
3 sec
+
3 sec
+
Unlocked
Locked
Activation/Активиране/Activarea/Активация/Активація/Aktiviranje/Активирање/Aktivovať/Aktywacja/Aktiválás/Ενεργοποίηση/Activar/
Einschalten/Aktivering/Įjungti/Aktivizēt/Activeren/Aktivering/Aktivering/Активирање/Aktiviraj/طﯾﺷﻧﺗﻟا /הלעפה//
Ակտիվացում
Deactivation/Деактивиране/Dezactivarea/Деактивировать/Деактивувати/Deaktiviranje/Деактивирање/Deaktivovať/Dezaktywacja/Deaktiválás/Απενεργοποίηση
/
Desactivar/Ausschalten/Deaktiver/Išjungti/Deaktivizēt/Deactiveren/Avaktivera/Deaktiver/Деактивирање/Deaktiviraj/لﯾطﻌﺗﻟا /תבשה//
Ապաակտիվացում
Activation/Активиране/Activarea/Активация/Активація/Aktiviranje/Активирање/Aktivovať/Aktywacja/Aktiválás/Ενεργοποίηση/Activar/
Einschalten/Aktivering/Įjungti/Aktivizēt/Activeren/Aktivering/Aktivering/Активирање/Aktiviraj/طﯾﺷﻧﺗﻟا /הלעפה//
Ակտիվացում
Deactivation/Деактивиране/Dezactivarea/Деактивировать/Деактивувати/Deaktiviranje/Деактивирање/Deaktivovať/Dezaktywacja/Deaktiválás/Απενεργοποίηση
/
Desactivar/Ausschalten/Deaktiver/Išjungti/Deaktivizēt/Deactiveren/Avaktivera/Deaktiver/Деактивирање/Deaktiviraj/لﯾطﻌﺗﻟا /תבשה//
Ապաակտիվացում
Basic modes / Основни режими / Moduri de bază / Основные режимы/Основні режими/Osnovni načini rada /Основни режими / Základné režimy/
Tryby podstawowe/Alap módok/Κύριοι τρόποι λειτουργίας / Modos básicos/Hauptbetriebsarten/Basistilstande/Pagrindiniai režimai/Pamatrežīmi/
Basismodi/Grundläggande lägen/Basismoduser/Основни режими/Osnovni načini/ﺔﯾﺳﺎﺳﻷا عﺎﺿوﻷا /םײסיסב םיבצמ/
Հիմնական ռեժիմներ
/
Operation and Storage Manual of Panel Heater 7English
DAY TIME
Open window
Day and time settings
Day of the week
3 sec
PROGRAM
MODE
DAY TIME
3 sec
PROGRAM
MODE
3 sec
PROGRAM
MODE
DAY TIME
WI-FI
DAY OF THE
WEEK
MONDAY
TUESDAY
WEDNESDAY
TIME
DAY OF THE
WEEK
TIME
HOURS
11 :16
MINUTES
12:45
3 sec
PROGRAM
MODE
DAY TIME
WI-FI
Time
( 00.00 - 24.00 )
Activation/Активиране/Activarea/Активация/Активація/Aktiviranje/Активирање/Aktivovať/Aktywacja/Aktiválás/Ενεργοποίηση/Activar/
Einschalten/Aktivering/Įjungti/Aktivizēt/Activeren/Aktivering/Aktivering/Активирање/Aktiviraj/طﯾﺷﻧﺗﻟا /הלעפה//
Ակտիվացում
Deactivation/Деактивиране/Dezactivarea/Деактивировать/Деактивувати/Deaktiviranje/Деактивирање/Deaktivovať/Dezaktywacja/Deaktiválás/Απενεργοποίηση
/
Desactivar/Ausschalten/Deaktiver/Išjungti/Deaktivizēt/Deactiveren/Avaktivera/Deaktiver/Деактивирање/Deaktiviraj/لﯾطﻌﺗﻟا /תבשה//
Ապաակտիվացում
Basic modes / Основни режими / Moduri de bază / Основные режимы/Основні режими/Osnovni načini rada /Основни режими / Základné režimy/
Tryby podstawowe/Alap módok/Κύριοι τρόποι λειτουργίας / Modos básicos/Hauptbetriebsarten/Basistilstande/Pagrindiniai režimai/Pamatrežīmi/
Basismodi/Grundläggande lägen/Basismoduser/Основни режими/Osnovni načini/ﺔﯾﺳﺎﺳﻷا عﺎﺿوﻷا /םײסיסב םיבצמ/
Հիմնական ռեժիմներ
/
8 Operation and Storage Manual of Panel Heater
Weekly program (24h/7h)
1,5 sec 1 sec
OFF Heating mode ON
CREATE PROGRAM
ERASE PROGRAM
VIEW PROGRAM
3 sec
PROGRAM
MODE
DAY OF THE
WEEK
MONDAY
TUESDAY
WEDNESDAY
3 sec
PROGRAM
MODE
3 sec
PROGRAM
MODE
Activation/Активиране/Activarea/Активация/Активація/Aktiviranje/Активирање/Aktivovať/Aktywacja/Aktiválás/Ενεργοποίηση/Activar/
Einschalten/Aktivering/Įjungti/Aktivizēt/Activeren/Aktivering/Aktivering/Активирање/Aktiviraj/طﯾﺷﻧﺗﻟا /הלעפה//
Ակտիվացում
Deactivation/Деактивиране/Dezactivarea/Деактивировать/Деактивувати/Deaktiviranje/Деактивирање/Deaktivovať/Dezaktywacja/Deaktiválás/Απενεργοποίηση
/
Desactivar/Ausschalten/Deaktiver/Išjungti/Deaktivizēt/Deactiveren/Avaktivera/Deaktiver/Деактивирање/Deaktiviraj/لﯾطﻌﺗﻟا /תבשה//
Ապաակտիվացում
or/или/sau/или/чи/ili/или/alebo/albo/vagy/ή/o/oder/
eller/arba/vai/of/eller/eller/или/oz/وأ /וא/կամ
Basic modes / Основни режими / Moduri de bază / Основные режимы/Основні режими/Osnovni načini rada /Основни режими / Základné režimy/
Tryby podstawowe/Alap módok/Κύριοι τρόποι λειτουργίας / Modos básicos/Hauptbetriebsarten/Basistilstande/Pagrindiniai režimai/Pamatrežīmi/
Basismodi/Grundläggande lägen/Basismoduser/Основни режими/Osnovni načini/ﺔﯾﺳﺎﺳﻷا عﺎﺿوﻷا /םײסיסב םיבצמ/
Հիմնական ռեժիմներ
/
Operation and Storage Manual of Panel Heater 9English
Air Safe
3 sec
PROGRAM
MODE
3 sec
PROGRAM
MODE
Tip-over switch
TILT
3 sec
PROGRAM
MODE
Sound
WI-FI
SOUND 5
SOUND
DEVICE INFO
3 sec
PROGRAM
MODE
WI-FI
SOUND 0
SOUND
DEVICE INFO
Device info
SOUND
DEVICE INFO
3 sec
PROGRAM
MODE
VER 4.73
CN06AS
3C:71:BF:B5:CD:00
Activation/Активиране/Activarea/Активация/Активація/Aktiviranje/Активирање/Aktivovať/Aktywacja/Aktiválás/Ενεργοποίηση/Activar/
Einschalten/Aktivering/Įjungti/Aktivizēt/Activeren/Aktivering/Aktivering/Активирање/Aktiviraj/طﯾﺷﻧﺗﻟا /הלעפה//
Ակտիվացում
Deactivation/Деактивиране/Dezactivarea/Деактивировать/Деактивувати/Deaktiviranje/Деактивирање/Deaktivovať/Dezaktywacja/Deaktiválás/Απενεργοποίηση
/
Desactivar/Ausschalten/Deaktiver/Išjungti/Deaktivizēt/Deactiveren/Avaktivera/Deaktiver/Деактивирање/Deaktiviraj/لﯾطﻌﺗﻟا /תבשה//
Ապաակտիվացում
Deactivation/Деактивиране/Dezactivarea/Деактивировать/Деактивувати/Deaktiviranje/Деактивирање/Deaktivovať/Dezaktywacja/Deaktiválás/Απενεργοποίηση
/
Desactivar/Ausschalten/Deaktiver/Išjungti/Deaktivizēt/Deactiveren/Avaktivera/Deaktiver/Деактивирање/Deaktiviraj/لﯾطﻌﺗﻟا /תבשה//
Ապաակտիվացում
Activation/Активиране/Activarea/Активация/Активація/Aktiviranje/Активирање/Aktivovať/Aktywacja/Aktiválás/Ενεργοποίηση/Activar/
Einschalten/Aktivering/Įjungti/Aktivizēt/Activeren/Aktivering/Aktivering/Активирање/Aktiviraj/طﯾﺷﻧﺗﻟا /הלעפה//
Ակտիվացում
Basic modes / Основни режими / Moduri de bază / Основные режимы/Основні режими/Osnovni načini rada /Основни режими / Základné režimy/
Tryby podstawowe/Alap módok/Κύριοι τρόποι λειτουργίας / Modos básicos/Hauptbetriebsarten/Basistilstande/Pagrindiniai režimai/Pamatrežīmi/
Basismodi/Grundläggande lägen/Basismoduser/Основни режими/Osnovni načini/ﺔﯾﺳﺎﺳﻷا عﺎﺿوﻷا /םײסיסב םיבצמ/
Հիմնական ռեժիմներ
/
10 Operation and Storage Manual of Panel Heater
Wi-Fi
3 sec
PROGRAM
MODE WI-FI
SOUND
DAY TIME
WI-FI ON
WI FI LOCAL-
WI FI OFF-
22
23 45
Wi-Fi ON
STARTING WI-FI
WI-FI
CONNECTED
YOURNETWORK
WI-FI
SOUND
DAY TIME
WI-FI
3 sec
PROGRAM
MODE WI-FI
SOUND
DAY TIME
WI-FI ON
WI-FI LOCAL
WI FI OFF-
22
23 45
Wi-Fi Local
ON
WI-FI WI-FI
CONFIG
OK
WI-FI
SOUND
DAY TIME
WI-FI LOCAL
AP MODE
192.168.4.1
3 sec
PROGRAM
MODE WI-FI
SOUND
DAY TIME
WI-FI ON
WI-FI LOCAL
WI-FI OFF
22
23 45
WI-FI
SOUND
DAY TIME
Activation/Активиране/Activarea/Активация/Активація/Aktiviranje/Активирање/Aktivovať/Aktywacja/Aktiválás/Ενεργοποίηση/Activar/
Deactivation/Деактивиране/Dezactivarea/Деактивировать/Деактивувати/Deaktiviranje/Деактивирање/Deaktivovať/Dezaktywacja/Deaktiválás/Απενεργοποίηση
Einschalten/Aktivering/Įjungti/Aktivizēt/Activeren/Aktivering/Aktivering/Активирање/Aktiviraj/طﯾﺷﻧﺗﻟا /הלעפה// Ակտիվացում
Desactivar/Ausschalten/Deaktiver/Išjungti/Deaktivizēt/Deactiveren/Avaktivera/Deaktiver/Деактивирање/Deaktiviraj/لﯾطﻌﺗﻟا /תבשה//
Ապաակտիվացում
Basic modes / Основни режими / Moduri de bază / Основные режимы/Основні режими/Osnovni načini rada /Основни режими / Základné režimy/
Tryby podstawowe/Alap módok/Κύριοι τρόποι λειτουργίας / Modos básicos/Hauptbetriebsarten/Basistilstande/Pagrindiniai režimai/Pamatrežīmi/
Basismodi/Grundläggande lägen/Basismoduser/Основни режими/Osnovni načini/ﺔﯾﺳﺎﺳﻷا عﺎﺿوﻷا /םײסיסב םיבצמ/
Հիմնական ռեժիմներ/
Operation and Storage Manual of Panel Heater 11English
Quick menu/Бързо меню/Meniu rapid/Быстрое меню/Швидке меню/Brzi izbornik/Брзи мени/Rýchla ponuka/Szybkie menu/Gyors menü/Γρήγορο
22
23 45
Comfort mode
Eco mode
SLEEP
18
23 45
Sleep mode
19
23 45
SLEEP
DELAY ST.
18
11 35
SLEEP
DELAY ST.
DELAY ST.
Weekly program (24h/7h)
Delay start function
μενού /Menú rápido/Schnellmenü/Hurtig Menu/Greitas meniu/Ātrā izvēlne/Snelmenu/Snabbmeny/Hurtigmeny/Брзо мени/Hitri meni/ﺔﻌﯾرﺳﻟا ﺔﻣﺋﺎﻘﻟا /
ריהמ טירפת/
/
Արագ ցուցակ
EN
12 Operation and Storage Manual of Panel Heater
IMPORTANT SAFETY MEASURES AND INSTRUCTIONS:
WARNING!
Please read this manual before operating the appliance and keep it at a
safe place for future reference. In case the appliance is obtained by a new
owner, it should be transferred together with its manual.
CAUTION: Children under 3 years of age should be kept away from the
appliance unless they are under constant supervision.
Children from 3 to 8 years of age are allowed to operate the on/off button
ONLY, provided that the appliance is installed and ready for operation and
such children have been supervised and instructed in safe operation of the
appliance and they understand all related risks.
Children from 3 to 8 years of age MUST NOT: connect the plug to power
sockets, make adjustments, clean it or carry out user maintenance
operations.
This appliance can be used by children older than 8 years of age and
by people with reduced physical, sensor and mental capabilities, as well
as by people with insufficient experience and knowledge provided they
are supervised or instructed in safe operation of the appliance and
understand the related risks. Children should not be allowed to play with
the appliance. Cleaning and user maintenance operations must not be
carried out by children without supervision.
CAUTION: Some of the appliance parts may get very hot during operation
and thus cause burns to users. In case there are children and vulnerable
people in the room, special attention should be paid.
WARNING: Do not cover the appliance in order to
prevent overheating!
The appliance must not be placed right under a socket box!
If the supply cord is damaged, it must be replaced by the manufacturer, its
service agent or similarly qualified persons in order to avoid a hazard.
Before connecting the appliance to the mains, check if the voltage
indicated on its technical plate corresponds to the voltage of the
electricity, supplied to your house.
This appliance shall be used only for the purpose it has been designed
and intended for, i.e. heating of domestic premises. The appliance is not
intended for commercial/industrial application. Every other use is to be
considered improper, and therefore dangerous. The manufacturer doesnt
bear responsibility for damages arising from improper and irrational use.
Non-adherence to these instructions would render the warranty invalid!
Do not leave your home while the heater is operating: make sure that the
power switch is in OFF position (panel heaters with mechanical control).
Keep inflammable objects, such as furniture, pillows, bedding, paper,
clothes, curtains etc. at a safe distance of at least 100 cm away from the
panel heater.
Do not operate the appliance in areas of use or storage of combustible
substances. Do not operate the appliance in areas of combustible media
(for example in close proximity to inflammable gases or aerosols) – there is
great risk of explosion and fire!
Do not insert and do not allow foreign objects to enter the ventilation
openings (inlet and outlet) because this will cause electric shock, fire or will
damage the appliance.
The appliance is not suitable for animal breeding. The panel heater is
intended for domestic/indoor operation only.
When positioning the appliance, do not cover the safety grilles; do not
hamper the incoming and outgoing air flow. All objects must be at a safe
distance of at least 1 meter away from the appliance front and sides.
The most common reason for overheating is dust and fluff deposits in the
appliance. Clean the ventilation openings on a regular basis with a vacuum
cleaner, but before that it is very important to disconnect the heater from
the mains.
Never touch the appliance with wet or moist hands – there is risk for your life!
The power socket should be accessible all the time in order to disconnect
the power plug when needed as fast as possible! Never pull the power
cord or the appliance itself in order to disconnect it from the mains.
PAY ATTENTION! Outgoing air gets heated during appliance operation (up
to more than 100°С).
If you decide to stop using an appliance of this kind, it is recommended to make
it unusable by cutting its power cord after you have disconnected it from the
mains. It is advisable all possible risks related to the appliance to be secured,
especially in relation to children that may play with out-of-use appliances.
Warning: Do not use this appliance with a programmer, counter or any
other mechanism which could automatically turn on the heater – if the
appliance is covered or positioned incorrectly there is a risk of fire.
Position the power cord in such a way that it does not obstruct the free
movement of people and cannot be stepped on! Use only approved extension
cords, which are suitable for this appliance, i.e. they have a compliance sign!
Never move the appliance by pulling its power cord; do not use the power
cord for carrying other objects!
Do not bend the power cord and do not pull it against sharp edges; do not
place the power cord on hot surfaces or open fire!
The scattered UVA light emitted by the device is harmless to the eyes.
Looking directly and continuously at UVA light is not recommended and
poses risks to your vision.
PACKING
After unpacking the appliance, check if its contents are intact and if it has
not been damaged during transportation! In case a damage or incomplete
delivery is found, contact your authorized retailer!
Do not dispose of the original packing box! It could be used for storage and
transportation purposes in order to avoid damages during transportation!
Disposal of packing material should be done in the appropriate way!
Children must be prevented from playing with polyethylene bags!
INSTALLATION INSTRUCTIONS
This panel heater is designed to be used indoors, mounted on a wall.
Important: In premises bigger than 45 m3, it is recommended to use a
combination of 2 or more panel heaters.
Do not position the panel heater under a power socket or electricity
connection box.
DO NOT install/operate the panel heater:
1. in places where a draught is present, which could influence the
control settings;
2. right under a power socket;
3. in Volume 1” for bathrooms;
4. in Volume 2” if the control board can be reached by a person who is in
a shower or in a bathtub;
for the wall-mounting of the panel heater, only the wall braces must be
used which are delivered together with the appliance. When installing the
panel heater, minimum safe distances must be observed
- Select position, and then select 3 points, from the suggested dimensions of
the position for drilling (from the attached mounting template), then drill with
a suitably drill bit holes in the marked locations on the wall.
EN
Operation and Storage Manual of Panel Heater 13English
Insert plastic dowels into the holes.
Screw the screws into the dowels, and let them be submitted at least 5 mm.
Attach the unit on the screws.
Move slightly to the left of the appliance and then lower the down to make
sure that the screws are right at the top of the channels.
Second installation option:
Place the enclosed mounting template on the box, drill the holes on the
top flap of the box, marked with +, in the direction shown in the figure
below.
Open the box and place it on the wall as shown in the figure below.
Transfer the marked holes to the wall.
BATHROOM OPERATION
The panel heater must be installed in accordance with the normal trade
practices and in compliance with the national legislation (EU electricity
directives and regulations concerning special installations and places of
operation including bathrooms, shower cabins HD60364-7-701(IEC 60364-
7-701:2006)).
In case this panel heater is to be used in a bathroom or other similar room,
the following installation requirements must be observed: the panel heater
is with IP24 protection (water drops protection). Hence it can be installed in
“Volume 2” (see the diagram below) in order to avoid the risk of the control
board (power switch and thermo regulator) being reached by a person who
is in a shower or a bathtub. The minimum distance between the appliance
and a water source should be not less than 1 meter and it is compulsory the
appliance to be wall-mounted! If you do not feel sure about the installation
of this panel heater in a bathroom, we recommend you to consult a
professional electrician.
Note: If the above-mentioned instructions cannot be implemented, it is
recommended to install the appliance in “VOLUME 3”.
In wet premises the power source must be installed at a height of at least
25 cm above the floor (bathrooms and kitchens).
The installation must be equipped with a safety fuse, and the distance
between the fuse contacts in disconnected condition should be at least 3 mm.
Thank you for choosing CN06 panel heater. This is a product providing
heating in winter depending on the consumers needs for comfortable room
temperature. If operated and taken care of properly in accordance with these
instructions, the appliance will provide you with many years of useful operation.
OPERATION INSTRUCTIONS
1. Predefined functions:
Comfort mode ; Eco mode ; Sleep mode
1.1. Comfort mode - with On/Off option - allows the user to set a desired
temperature when being at home. After once set it and the function is
switched On, the appliance will keep the same room temperature each time of
usage. This temperature to be set at 23°C by default.
Activation and deactivation of Comfort mode - /Quick start A1/
When the convector is in „Heating mode„ ,sign „sun„ appears on
the display.
1.2. Eco mode - with On/Off option - allows the user to set a desired
temperature when being out of home. After once set it and the function is
switched On, the appliance will keep the same room temperature each time of
usage. This temperature will be set at 18°C by default. User could also set the
time when the appliance to switch to Comfort mode.
Activation and deactivation of Eco mode - /Quick start A2/
When the set time has elapse, the appliance going to Comfort mode !
1.3. Sleep mode with On/Off option – two hours after activation, the
convector decreases the set temperature with -3°C under the set temperature
in Comfort mode. User could set the time range for operating in Sleep mode
then the appliance switches to Comfort mode. By default: 6 hours.
EN
14 Operation and Storage Manual of Panel Heater
Activation and deactivation of Sleep mode - /Quick start A3/
When the set time has elapse, the appliance going to Comfort mode!
2. Basic modes
“Heating” mode
Activation and deactivation of Heating mode - /Quick start B1/
The set temperature is indicating in the right. If the room temperature is lower
than the set one, the heater will switch automatically on, and a heating sign
will appear on the display.
Temperature adjustment
By pushing any of the buttons: or the user enters Temperature
adjustment” mode and the user can change the temperature settings in
the desired direction. The new settings are saved and the heater goes
automatically into “Heating” mode . If any of or buttons get
pressed longer than 0.5 sec., the temperature settings will start automatically
increase or decrease at a rate of 6 units per second. The range of available
temperature settings is from 10 up to 30 degrees.
Delay start function
The delay start function allows the user to set the time at which the convector will
switch on and start heating.
Activation and deactivation of Delay start function - /Quick start B2/
When the set time has elapse, the appliance going to Heating mode!
Initially a setting of 12 hours is set by default
If any of
or buttons is held for more than 0.5 seconds, the time and
temperature settings start automatically increase or decrease at a rate of 4
units per second. Confirm with “Mode” button or don’t press any button
for 3 seconds.
If user enters time – 00, this mode will not be implemented. If the “Delay start”
mode is already enabled and user selects the “Delay Start mode again, it can
be changed the remaining time in both possible directions. You can exit this
mode by pushing the “On/Off button. Then panel heater will go into
“Heating” mode. The “Delay start” needs to be set from 0 to 96 hours.
Anti-frost mode
If the room temperature falls below 5°C and the panel heater is off, the heater
will turn on automatically in order to prevent freezing of the area. Indication –
in left top corner - only when work the anti-frost mode
Factory settings of the function is ON (switched On).
Activation and deactivation of Anti-frost mode
/Quick start B3/
“Temperature correction for the sensor” function
Due to the specifics of the temperature profile in some premises there may
be difference from the temperature shown on the display and the actually
measured temperature in the various locations of the heating appliance in the
room.
See the temperature shown on the display of the appliance
Measure the temperature at a place where the temperature is
comfortable” enough for you (usually at a height of 60 cm from the floor,
in sitting positon). If you find a difference within a range of ±4°С, you can
set the necessary correction in the convector’s menu (It is important to
note that this function can be set only after the temperature has become
the same all around the room, and depending on the room type, the
minimum required time is 7 hours) by entering the temperature difference
resulting between the value on the display and the actually measured
temperature.
Note: This function is used with the purpose of providing better temperature
comfort and energy saving for the user of the electric convector in the room
which it is in. A temperature difference greater than ±4 °C from the measured
temperature in a specific location in the room indicates that the room where you
use the convector in is not well insulated or the temperature is not the same all
around the room.
Example: a convector in a room on a stone floor – the convector displays 18°С
(the set temperature is 22°С), the actually measured temperature (feeling of
reached comfort temperature) is 22°С at a height of 60 cm from the floor - > in
this case the convector continues to overheat the room (this is a direct energy
loss, but the convector cannot reach the set temperature because it measures the
temperature at a low height close to the floor) and it will never switch off. In this
case a temperature correction of +4°С needs to be applied to the sensor, thus the
convector will display 22°С and it will start switching off, and eventually it will
maintain the set temperature of 22°С).
The normal status of the function is 0°C by default
Activation and deactivation of Temperature correction - /Quick start B4/
If the factory reset function is used, the temperature correction has to be set
again. The factory setting of its value is 0°C.
Function Adaptive start
Adaptive start is a function which predicts and initiates the optimal start of
heating in order to reach the set-point temperature at the desired time;
Test according to user instruction / documentation. The function is tested in a room
with a continuous heat demand of 50 - 60% with reference to the wattage of the
test device. The product is working at a comfort temperature 23°C ± 3°C setpoint
until stable conditions. This temperature is the reference comfort temperature “Ct”.
Activate a set-back period of 7h +2h/-0h per 24h with a set-back of 4°C ± 1°C . The
comfort period being 17 -2h/+0h hours. With the adaptive control activated - let
the heater thermostat working during 4 periods (4 x 24 hours) of comfort and low
setback cycles. After the latest low setback period finishes the comfort temperature
“Ct” should be reached within ± 30 minutes deviation to the time target - with a
maximal difference of ± 1⁰C from the reference comfort temperature “Ct”.
- Factory settings of the function is ‘’ON”
Activation and deactivation of Adaptive start - /Quick start B5/
RESET to default settings
If the customer wants reset the convector to factory settings.
Visualization on Display in “RESET” settings /Quick start B6/
After using the reset function, the following functions will be re-set:
- clock time
- temperature correction value 0⁰C
- function Anti-frost mode is activated
- adaptive start is activated
- weekly program – 24/7 is reset.
Open window/door function
Room temperature control with open window detection - the product is
equipped with an integrated electronic device that reduces the heat output
when detects an open window or door. A sensor is used to detect eventual
drop in the room temperature. If the temperature falls more than 5˚C, the
convector will switch off by itself. Within 15 min the open window detection
should turn the appliance off. When the room temperature rises by at least
0.5°C and the difference from the initial set point is below 5°C, the convector
switches itself on with the settings already made. If the temperature does
not rise for more than 60 minutes, the convector enters Standby mode. The
function is allowed to be cancelled manually.
The function can be switched Off manually.
Activation and deactivation of Open window/door function - /Quick start
B8/
Note: When the “Open window” function is enabled, the “Anti-frost” function
does not work!
Keyboard lock (Protection from children)
When user turns on this function, all keys of the control panel remain locked.
Activation and deactivation of Keyboard lock - /Quick start B7/
Day and time – settings /Quick start B9/
First step or use after factory reset function
EN
Operation and Storage Manual of Panel Heater 15English
Weekly program (timer) 24hours/7days
Min 300 sets of time periods
Electronic thermoregulator with weekly program (timer) 24/7 - electronic room
temperature control plus weekly timer means the product is equipped with
an electronic device, either integrated or external, which allows the product
automatically to vary its heat output over a certain time period. In relation
with a certain required level of indoor heating comfort. It allows the setting
of timing and temperature levels for a full week. During the 7-day period the
settings must allow a variation on a day-to-day basis;
Activation and deactivation of Weekly program - /Quick start B10/
There have three options /Quick start B10/:
CREATE PROGRAM
ERASE PROGRAM
VIEW PROGRAM
The temperature of 22 ˚C started at 12.30 to 15.00 on Sunday. The convector
will heat till reach the settings of the next given point.
If the TIME PERIOD is empty (no time set) – visualization should be
OFF .
- One step back – with single pushing of ON/OFF button .
- No limit of time periods – step is 0.5 hour (30 minutes).
- Adaptive start function is switched on by default.
Function AirSafe – only for models CN 06 xxx EА CLOUD AS W, CN 06 xxx EА
AS W and CN 06 140 EА CLOUD AS W GL
Function Air Safe
The Air safe function Is a result of working together of the module, composed
of UVA LEDs and the convector heater.
Advantages of the function:
1. Better air hygiene and a healthier environment, thanks to the bactericidal
effect of the function.
2. Safe operation, even in the presence of people and animals - the light
emitted by the module is UVA, which is 95% of the UV light passing through
the atmosphere. The reflected UV light in the volume of the housing in which
the heater is located has a very low intensity and energy and has no harmful
effects on humans, plants and animals.
3. Without generation of ozone, hydrogen peroxide, organic or inorganic
molecules or ions
4. High degree of reduction of bacteria and fungi
5. Extremely long service life - over 50,000 hours (over 12 years).
6. Quite working mode – natural air flow, through the convector heater
Principle of work of Air safe function
The Air Safe function can be switched on and off by the user through the
convector control menu. In order to work, it is necessary the convector to
be switched on and heated (the set temperature is higher than the ambient
temperature).
When the temperature of the heater rises, the natural air flow starts in the
room.
Colder air enters through the lower openings of the convector and passes by
the UVA LEDs.
Due to this movement, the molecules of gases, bacteria, micromycetes (fungi)
and other microorganisms contained in or carried by the air are irradiated by
the combined effect of UVA LED radiation and the infrared radiation of the
heater. The continuous passage of the air flow through the volume of the
convector provides enough energy to break the connections supporting the
structure of harmful microorganisms carried by the air.
As a result of natural convection, after a certain period of time, the air
contained in the room completely passes through the volume of the
convector, which leads to a reduction of the bacteria and micromycetes
contained in it.
Function Air Safe is a protection against harmful organisms such bacteria and
fungi. Provides better air hygiene and benefits to а healthier environment.
The function can be switched Off manually.
Activation and deactivation of Air Safe function - /Quick start B11/
Operation of Air Safe must continue for 2 minutes after stopping the heating
element, and then turn off.
Built in tip-over switch /Quick start B12/– if the convector tilts with more
than 45° or falls down, the power must switch Off and indicate on display
‘’tilt’. After restoring the device to its normal position, operation of the last set
function must continue.
Function Wi-Fi – only for models CN 06 xxx EA CLOUD AS W, CN 06 xxx
EA CLOUD W and CN 06 140 EА CLOUD AS W GL
Function Wi-Fi
Activation and deactivation of Wi-Fi Function and Wi-Fi Local Function - /
Quick start B15/
Work mode of display:
When pressed - backlight intensity - 100%; after 5s – OFF
Sound option
Activation and deactivation of sound function - /Quick start B14/
Device info
Visualization on Display in “Device info
/Quick start B13/
- ID
- MAC address
- Firmware version
Quick menu /Quick start C 1 -5/
Push the “Mode” button to start quick already configured program.
Content function:
- Comfort
- Eco
- Sleep
- Delay start
- Weekly schedule
Exit from the any mode – with single pushing of ON/OFF button .
Errors mode:
If the display shows t1” or t2“, this means that the self-diagnostic system has
found a problem with the temperature sensor. t1” indicates a disconnected
cable at the sensor, while “t2” indicates short circuit at the sensor. In this case
the electric convector will be automatically switched off and it can be switched
on again only after the problem has been fixed. The problem has to be handled
by a qualified specialist.
DISCONNECTION FROM THE POWER SUPPLY:
If the electric convector is disconnected from the mains, this will not affect
the set temperature and the mode of operation which has been active prior
to its disconnection. If for example the convector has been in “Heating” mode,
after it has been disconnected and reconnected to the mains, it will continue
operating in the same mode with the same set temperature.
The principle of operation of the electric convector with energy-independent
memory is to store the settings for 120 minutes guaranteed, and up to 180
minutes not guaranteed.
If the time is more than 120 min the appliance going to Stand by mode.
EN
16 Operation and Storage Manual of Panel Heater
PROTECTION
The appliance is equipped with a safety thermo turn-off device, which
automatically turns the heater off in cases of extreme temperature of the
panel heater /i.e. overheating of the appliance/.
The safety thermo turn-off device will automatically restore the heater
operation when the temperature of the appliance falls below the
permissible ultimate values.
CLEANING
It is compulsory first to turn off the appliance through its power
switch and to disconnect it from the power socket. Before starting the
cleaning session you should wait until the panel heater cools down in a
disconnected state.
Clean the heater body with damp cloth, vacuum cleaner or a brush.
Never immerse the appliance into water – there is danger for your life
from electric shock!
Never use gasoline, thinner or hard abrasive products to clean the
appliance, because they will damage the appliance coating.
STORAGE
Before putting the panel heater away let it cool down after you have
disconnected it from the power socket
Use the appliance original packing to store it, if the panel heater will not
be in use for a long period of time. By storing the product in its original
packing you protect it from excessive dirt and dust accumulation.
Never put a hot panel heater in its packing!
It is necessary the product to be stored at a dry and dark place, protected
from direct sun light.
It is explicitly forbidden to store the panel heater in damp and wet premises.
MAINTENANCE OPERATIONS OF THE APPLIANCE
In case of appliance malfunction, please contact the authorized service
center closest to your location. /service centers are indicated in appliance
warranty documents/.
Important: In case of a claim and/or violation of your consumer rights,
please contact the supplier of this appliance at the indicated locations or
via the Internet page of the company: www.tesy.com
DIMENSIONS OF HEATED VOLUME AND HEATED AREA OF A ROOM /
APPLIANCE MODELS
Model Heated volume Heated area
CN 06 060 EA [CLOUD] [AS] W - 600W 10* - 23 m34* - 9 m2
CN 06 100 EA [CLOUD] [AS] W - 1000W 24* - 33 m310* - 13 m2
CN 06 140 EA [CLOUD] [AS] W [GL]- 1400W 34* - 45 m314* - 18 m2
CN 06 200 EA [CLOUD] [AS] W - 2000W 46* - 65 m319* - 26 m2
* Minimum guaranteed heated volume (area) for heating at an average capacity of heat transmission
factor λ=0.5 W/(m2K) for a heated room. Higher values of heated volume (area) can be achieved at an
average value of λ=0.35 W/ (m2K). Standard height of heated rooms – 2.5 meters.
CN 06 yyz EA [CLOUD] [AS] W
CN 06 140 EA [CLOUD] [AS] W GL
1400W
Environment protection instructions
Obsolete electric appliances contain valuable materials and consequently they
should not be treated as domestic waste! We ask for your cooperation and your
active contribution to protect the resources and the environment. Please submit
your out-of-use appliances to the organized buy-back stations (if there are such).
EN
Operation and Storage Manual of Panel Heater 17English
TABLE 2: INFORMATION REQUIREMENTS FOR ELECTRIC LOCAL SPACE HEATERS
Model identifier(s): 1.CN06 060 EA W; 2. CN06 100 EA W; 3. CN06 140 EA W; 4. CN06 200 EA W 230V~ 50Hz
Item
Symbol
Value 1
Value 2
Value 3
Value 4
Unit
Item
Unit
Heat output Type of heat input for electric storage local space heaters only (select one)
Nominal heat output Pnom 0.60 1.00 1.40 2.00 kW Manual heat charge control, with integrated thermostat [no]
Minimum heat output (indicative) Pmin 0.00 0.00 0.00 0.00 kW Manual heat charge control, with room and/or outdoor temperature feedback [no]
Maximum continuous heat output
(indicative)
Pmax,C 0.60 1.00 1.40 2.00 kW Electric heat charge control, with room and/or outdoor temperature feedback heat charge
control, with integrated thermostat
[no]
Auxiliary electricity consumption Fan assisted heat output [no]
At nominal heat output elmax 0.57 0.92 1.32 1.93 kW Type of heat output/room temperature control (select one) -
At minimum heat output elmin 0.00 0.00 0.00 0.00 kW Single stage heat output and no room temperature control [no]
In standby mode el SB 0.0002 kW Two or more manual stages, no room temperature control [no]
With mechanic thermostat room temperature control [no]
With electronic room temperature control [no]
With electronic room temperature control plus day timer [no]
With electronic room temperature control plus week timer [yes]
Other control options (multiple selections possible)
Room temperature control, with presence detection [no]
Room temperature control, with open window detection [yes]
With distance control option [no]
With adaptive start control [yes]
With working time limitation [no]
With black bulb sensor [no]
Model identifier(s): 1. CN06 060 EA AS W; 2. CN06 100 EA AS W; 3. CN06 140 EA AS W; 4. CN06 200 EA AS W 230V~ 50Hz
Item
Symbol
Value 1
Value 2
Value 3
Value 4
Unit
Item
Unit
Heat output Type of heat input for electric storage local space heaters only (select one)
Nominal heat output Pnom 0.60 1.00 1.40 2.00 kW Manual heat charge control, with integrated thermostat [no]
Minimum heat output (indicative) Pmin 0.00 0.00 0.00 0.00 kW Manual heat charge control, with room and/or outdoor temperature feedback [no]
Maximum continuous heat output
(indicative)
Pmax,C 0.60 1.00 1.40 2.00 kW Electric heat charge control, with room and/or outdoor temperature feedback heat charge
control, with integrated thermostat
[no]
Auxiliary electricity consumption Fan assisted heat output [no]
At nominal heat output elmax 0.58 0.93 1.34 1.94 kW Type of heat output/room temperature control (select one) -
At minimum heat output elmin 0.00 0.00 0.00 0.00 kW Single stage heat output and no room temperature control [no]
In standby mode el SB 0.0002 kW Two or more manual stages, no room temperature control [no]
With mechanic thermostat room temperature control [no]
With electronic room temperature control [no]
With electronic room temperature control plus day timer [no]
With electronic room temperature control plus week timer [yes]
Other control options (multiple selections possible)
Room temperature control, with presence detection [no]
Room temperature control, with open window detection [yes]
With distance control option [no]
With adaptive start control [yes]
With working time limitation [no]
With black bulb sensor [no]
TESY Ltd
48 Madara Blvd,
Shumen, 9700,
Bulgaria
EN
18 Operation and Storage Manual of Panel Heater
TABLE 2: INFORMATION REQUIREMENTS FOR ELECTRIC LOCAL SPACE HEATERS
Model identifier(s): 1. CN06 060 EA CLOUD W; 2. CN06 100 EA CLOUD W; 3. CN06 140 EA CLOUD W; 4. CN06 200 EA CLOUD W 230V~ 50Hz
Item
Symbol
Value 1
Value 2
Value 3
Value 4
Unit
Item
Unit
Heat output Type of heat input for electric storage local space heaters only (select one)
Nominal heat output Pnom 0.60 1.00 1.40 2.00 kW Manual heat charge control, with integrated thermostat [no]
Minimum heat output (indicative) Pmin 0.00 0.00 0.00 0.00 kW Manual heat charge control, with room and/or outdoor temperature feedback [no]
Maximum continuous heat output
(indicative)
Pmax,C 0.60 1.00 1.40 2.00 kW Electric heat charge control, with room and/or outdoor temperature feedback heat charge
control, with integrated thermostat
[no]
Auxiliary electricity consumption Fan assisted heat output [no]
At nominal heat output elmax 0.57 0.92 1.32 1.93 kW Type of heat output/room temperature control (select one) -
At minimum heat output elmin 0.00 0.00 0.00 0.00 kW Single stage heat output and no room temperature control [no]
In standby mode el SB 0.00054 kW Two or more manual stages, no room temperature control [no]
With mechanic thermostat room temperature control [no]
With electronic room temperature control [no]
With electronic room temperature control plus day timer [no]
With electronic room temperature control plus week timer [yes]
Other control options (multiple selections possible)
Room temperature control, with presence detection [no]
Room temperature control, with open window detection [yes]
With distance control option [yes]
With adaptive start control [yes]
With working time limitation [no]
With black bulb sensor [no]
Model identifier(s): 1. CN06 060 EA CLOUD AS W; 2. CN06 100 EA CLOUD AS W; 3. CN06 140 EA CLOUD AS W/ CN 06 140 EА CLOUD AS W GL; 4. CN06 200 EA
CLOUD AS W 230V~ 50Hz
Item
Symbol
Value 1
Value 2
Value 3
Value 4
Unit
Item
Unit
Heat output Type of heat input for electric storage local space heaters only (select one)
Nominal heat output Pnom 0.60 1.00 1.40 2.00 kW Manual heat charge control, with integrated thermostat [no]
Minimum heat output (indicative) Pmin 0.00 0.00 0.00 0.00 kW Manual heat charge control, with room and/or outdoor temperature feedback [no]
Maximum continuous heat output
(indicative)
Pmax,C 0.60 1.00 1.40 2.00 kW Electric heat charge control, with room and/or outdoor temperature feedback heat charge
control, with integrated thermostat
[no]
Auxiliary electricity consumption Fan assisted heat output [no]
At nominal heat output elmax 0.58 0.94 1.34 1.96 kW Type of heat output/room temperature control (select one) -
At minimum heat output elmin 0.00 0.00 0.00 0.00 kW Single stage heat output and no room temperature control [no]
In standby mode el SB 0.00054 kW Two or more manual stages, no room temperature control [no]
With mechanic thermostat room temperature control [no]
With electronic room temperature control [no]
With electronic room temperature control plus day timer [no]
With electronic room temperature control plus week timer [yes]
Other control options (multiple selections possible)
Room temperature control, with presence detection [no]
Room temperature control, with open window detection [yes]
With distance control option [yes]
With adaptive start control [yes]
With working time limitation [no]
With black bulb sensor [no]
TESY Ltd
48 Madara Blvd,
Shumen, 9700,
Bulgaria
EN
Operation and Storage Manual of Panel Heater 19English
TROUBLESHOOTING
Prior to contacting the Customer Service Center, please check the items in the table below.
PROBLEM CAUSE SOLUTION
The appliance doesn‘t work No power supply from the grid.
Be sure that the product is plugged in and that the electrical
outlet is working.
Plug into the power outlet and check position of the ON/OFF
switch.
The temperature may be set too low. Set the temperature to a higher position.
The “Protection from children may be activated. See the section “Protection from children in the user manual.
The delayed start is working. Press the Turn ON button from control board.
Room does not get warm enough
although the appliance is hot
Appliance overheating. High limit safety cut-out limits heating
output.
Eliminate the cause (cover, dirt or obstructions at the air inlet or
outlet).Observe minimum clearances according to mounting
instructions.
Check the Temperature correction for the sensor See the temperature shown on the display of the appliance.
Measure the temperature at a place where the temperature is
comfortable enough for you. If you find a difference within
a range of ±4°С, you can set the necessary correction in the
convector’s menu by entering the temperature difference
resulting between the value on the display and the actually
measured temperature.
The heat demand of the room is higher than the appliance
output.
Remove heat losses (Close windows and doors. Avoid constant
venting.)
Check if the power of your device is adapted to the size of your
room.
Recommended an average of 100 W/m2 for a ceiling height of
2,50m or 30W/m3
Open window/door detection does not
respond
Appliance does not detect a pronounced temperature drop due
to venting. (Open window/door detection requires previously
stable room temperature.)
Avoid obstructions that may prevent normal air exchange
between the appliance and the indoor air.
Open window/door detection is not enabled Switch on open window/door detection.
„Adaptive start“ function does not work
as required
This function works only in weekly mode. Switch on Adaptive start function.
Severely fluctuating room temperature or the appliance learning
procedure has not been completed.
Wait a few days for behavior to stabilize.
Adaptive start function is not enabled. Switch on the „Adaptive start“ function in the menu.
Display shows “t1” or “t2“ The self-diagnostic system has found a problem with the
temperature sensor
“t1” indicates a disconnected cable at the sensor
“t2” indicates short circuit at the sensor
In this case the electric convector will be automatically switched
off and it can be switched on again only after the problem has
been fixed by the authorized service representatives.
Contact the authorized service center or the retailer you bought
the product from.
Dirty marks appear on the wall around
the device
The dirty marks come as a result of air contamination. Make sure that some fresh air enters the room regularly,
especially if it is used for smoking.
The device does not follow internal
programming commands
The date and time are not set correctly. Check the set date and time.
The appliance is under Open window/door detection. Switch off the Open window/door detection.
Sounds/Noises Emitting faint noises during the heating process and shortly
after the set temperature is reached, is not something unusual.
Such effect is in result of the natural materials expansions during
the rapid temperature increase and following cooling of the
metals used for the product manufacturing.
Yellowish stains on the grid Such stains could be in result of covering the product with wet
clothes.
Do not cover the product! Such actions are not allowed, because
they block the air convection and will damage the product
irreparably, leading to serious risk for your health and properties.
BG
20 Инструкция за експлоатация и съхранение на панелен конвектор
ВАЖНИ ПРЕДПАЗНИ МЕРКИ И ИНСТРУКЦИИ ЗА БЕЗОПАСНОСТ:
ВНИМАНИЕ!
Прочетете настоящите инструкции преди да използвате този уред
и съхранявайте тези указания за бъдещо ползване. При смяна на
собственика, инструкцията за експлоатация трябва да се предава
заедно с уреда.
ВНИМАНИЕ: Деца на по-малко от 3 години, трябва да се държат на
разстояние, освен ако не са под непрекъснато наблюдение.
Деца на възраст от 3 години до 8 години могат само да използват
бутона вкл./изкл. на уреда, при условие, че уреда е инсталиран и е
готов за нормална работа и са били наблюдавани и инструктирани
относно използването му по безопасен начин и разбират, че може да е
опасно.
Деца на възраст от 3 години до 8 години не трябва да включват
уреда в контакта, да го настройват, да го почистват или да извършват
потребителска поддръжка.
Този уред може да се използва от деца на възраст над 8 години и
лица с ограничени физически, сетивни или умствени способности,
или с недостатъчен опит и познания, ако те са наблюдавани или
инструктирани относно безопасното използване на уреда и разбират
опасностите. Децата не трябва да си играят с уреда. Почистване
и потребителска поддръжка не трябва да се прави от деца без
наблюдение.
ВНИМАНИЕ: Някои части на този продукт може да станат много
горещи и да предизвикат изгаряния. Там където, присъстват деца и
уязвими хора,трябва да бъде предоставено специално внимание
ПРЕДУПРЕЖДЕНИЕ: За да се избегне прегряване,
не покривайте уреда!
Уреда не трябва да се поставя непосредствено под щепселна кутия!
Когато захранващият шнур се повреди, той трябва да се замени
от производителя или негов сервизен представител, или подобно
квалифицирано лице, за да се избегне опасност.
Преди да включите уреда – проверете дали посоченото
напрежение върху типовата табелка съответства на напрежението
доставяно до дома Ви.
Този уред трябва да се използва само по предназначението, за
което е бил предвиден, т.е. да отоплява битови помещения. Уреда
не е предназначен за търговски цели. Всяка различна употреба да
се счита за неправилна и следователно опасна. Производителят не
може да носи отговорност за повреди, произтичащи от неправилна и
неразумна употреба. Неспазване на информацията за безопасност ще
направи невалидна поетата гаранция за уреда!
Не напускайте дома си, докато уреда е включен: уверете се, че ключa е в
изключено положение(отнася се за конвектор с механично управление).
Дръжте запалими предмети, като мебели, възглавници, спално
бельо, хартия, дрехи, пердета и т.н. на разстояние от поне 100 см
далеч от конвектора.
Не използвайте уреда,където се използват или съхраняват запалими
вещества (например: в близост до запалими газове или аерозоли) -
съществува много голяма опасност от експлозия и пожар!
Не вкарвайте и не допускайте чужди тела да попаднат в отворите за
вентилация(входящи или изходящи), тъй като това ще причини токов
удар, пожар или повреда в конвектора.
Уреда не е подходящ за отглеждане на животни, и същия е предвиден
само за домашно ползване!
Не покривайте предпазните решетки, не блокирайте влизането или
излизането на въздушния поток ,като поставяте уреда срещу дадена
повърхност. Всички предмети трябва да са на разстояние поне 1 метър
от уреда отпред и странично.
Най-често срещаната причина за прегряване е натрупването на мъх и
прах в уреда. Редовно почиствайте с прахосмукачка вентилационните
отвори, като преди това задължително изключите уреда от
електрическата мрежа.
Никога не пипайте уреда с мокри или влажни ръце- съществува
опасност за живота!
Контакта трябва да бъде достъпен по всяко време, за да може щепсела
да бъде освобождаван при нужда възможно най-бързо ! Никога не
теглете захранващия шнур или самия уред при изключване от мрежата.
Обърнете внимание! Изходящия въздух се загрява по време на работа
(до повече от 100°С).
Ако решите да престанете да използвате уред от този тип, препоръчва
се да го направите неизползваем, като срежете шнура, след като сте го
изключили от мрежата. Препоръчва се още всички опасности, свързани
с уреда да бъдат обезопасени, особено за деца, които биха могли да
използват амортизираното устройство(уреда) за игра.
Внимание: Не използвайте този уред с програматор, брояч или друг
уред който автоматично го включва тъй като, ако уреда е покрит или
неправилно поставен съществува опасност от пожар.
Поставете захранващия шнур, така че да не пречи на движението на
хората и да не бъде настъпван ! Използвайте само одобрени удължители,
които са подходящи за уреда, т.е. имат знак за съответствие!
Никога не премествайте уреда, като го дърпате за шнура както и не
използвайте шнура за пренасяне на предмети!
Не пречупвайте шнура и не го дърпайте през остри ръбове и не го
поставяйте върху горещи плочи или открит огън!
Разпръсната UVA светлина, излъчвана от уреда, е безвредна за очите.
Директното и продължително гледане към UVA светлината не е
препоръчително и крие рискове за вашето зрение
ОПАКОВКА
След разопаковане на уреда, проверете дали при транспортирането
не е увреден и дали е напълно окомплектован! В случай че бъде
констатирана повреда или непълна доставка, свържете се с Вашия
упълномощен продавач!
Не изхвърляйте оригиналната кутия! Тя би могла да се използва за
съхранение и транспортиране, за да се избегнат повреди от превозването!
Изхвърлянето на опаковъчния материал трябва да става по подходящ
начин! Децата трябва да се пазят да не си играят с полиетиленовите торби!
ИНСТРУКЦИЯ ЗА МОНТАЖ
Този конвектор е проектиран за ползване в закрити помещения,
монтиран на стена.
Важно: При помещения с обем над 45 м3 е препоръчително
използването на комбинация от 2 и повече конвектора
Не поставяйте конвектора под електрически контакт или свързваща кутия.
Не монтирайте/използвайте конвектора
1. на място, където има тяга, за да не се въздейства на
контролните настройки
2. непосредствено под електрически контакт;
3. в пространство 1 (volume 1) за бани;
4. в пространство 2 (volume 2), ако контролното табло може да бъде
достигнато от човек, който е под душа или във ваната;
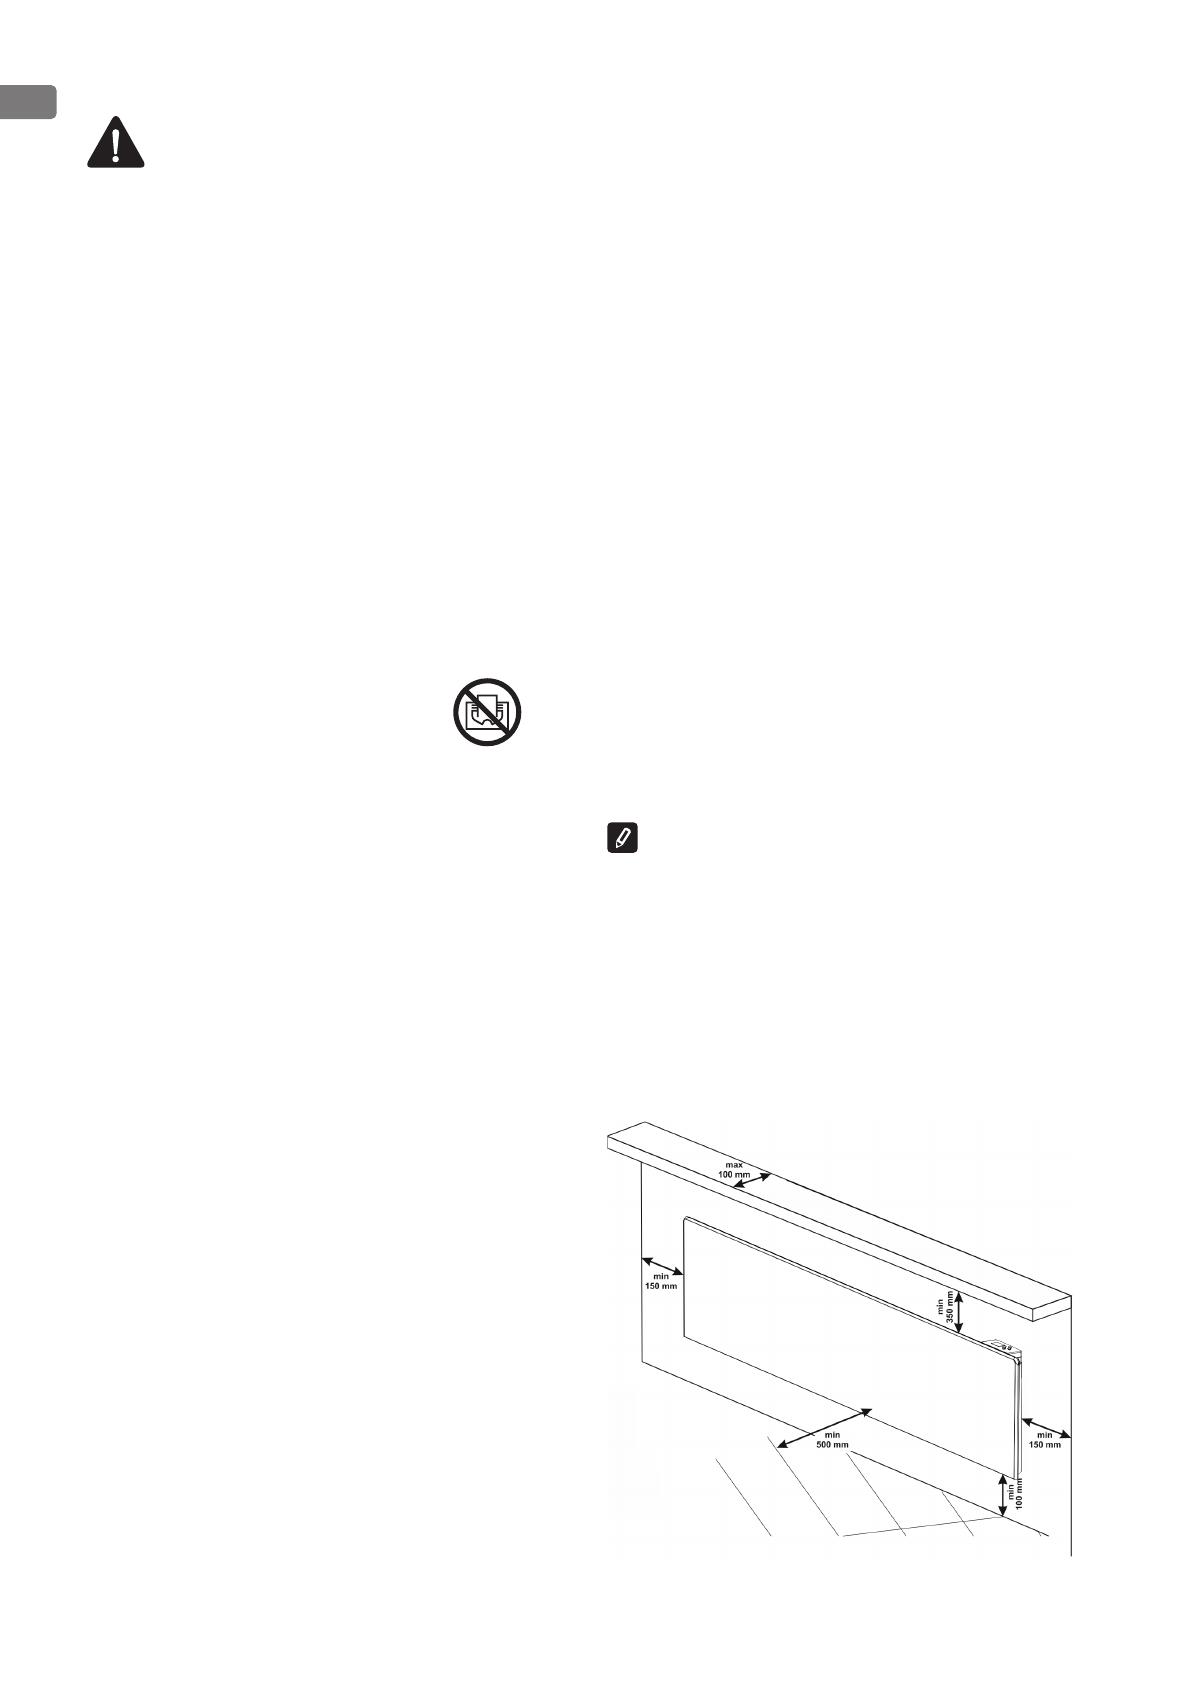
За монтирането на конвектора на стена трябва да се използват само
скобите за стена, доставени заедно с конвектора. При монтажа на
конвектора трябва да се спазват минималните отстояния от уреда.
Изберете позиция, след което маркирайте 3 точки, от предложените
  • Page 1 1
  • Page 2 2
  • Page 3 3
  • Page 4 4
  • Page 5 5
  • Page 6 6
  • Page 7 7
  • Page 8 8
  • Page 9 9
  • Page 10 10
  • Page 11 11
  • Page 12 12
  • Page 13 13
  • Page 14 14
  • Page 15 15
  • Page 16 16
  • Page 17 17
  • Page 18 18
  • Page 19 19
  • Page 20 20
  • Page 21 21
  • Page 22 22
  • Page 23 23
  • Page 24 24
  • Page 25 25
  • Page 26 26
  • Page 27 27
  • Page 28 28
  • Page 29 29
  • Page 30 30
  • Page 31 31
  • Page 32 32
  • Page 33 33
  • Page 34 34
  • Page 35 35
  • Page 36 36
  • Page 37 37
  • Page 38 38
  • Page 39 39
  • Page 40 40
  • Page 41 41
  • Page 42 42
  • Page 43 43
  • Page 44 44
  • Page 45 45
  • Page 46 46
  • Page 47 47
  • Page 48 48
  • Page 49 49
  • Page 50 50
  • Page 51 51
  • Page 52 52
  • Page 53 53
  • Page 54 54
  • Page 55 55
  • Page 56 56
  • Page 57 57
  • Page 58 58
  • Page 59 59
  • Page 60 60
  • Page 61 61
  • Page 62 62
  • Page 63 63
  • Page 64 64
  • Page 65 65
  • Page 66 66
  • Page 67 67
  • Page 68 68
  • Page 69 69
  • Page 70 70
  • Page 71 71
  • Page 72 72
  • Page 73 73
  • Page 74 74
  • Page 75 75
  • Page 76 76
  • Page 77 77
  • Page 78 78
  • Page 79 79
  • Page 80 80
  • Page 81 81
  • Page 82 82
  • Page 83 83
  • Page 84 84
  • Page 85 85
  • Page 86 86
  • Page 87 87
  • Page 88 88
  • Page 89 89
  • Page 90 90
  • Page 91 91
  • Page 92 92
  • Page 93 93
  • Page 94 94
  • Page 95 95
  • Page 96 96
  • Page 97 97
  • Page 98 98
  • Page 99 99
  • Page 100 100
  • Page 101 101
  • Page 102 102
  • Page 103 103
  • Page 104 104
  • Page 105 105
  • Page 106 106
  • Page 107 107
  • Page 108 108
  • Page 109 109
  • Page 110 110
  • Page 111 111
  • Page 112 112
  • Page 113 113
  • Page 114 114
  • Page 115 115
  • Page 116 116
  • Page 117 117
  • Page 118 118
  • Page 119 119
  • Page 120 120
  • Page 121 121
  • Page 122 122
  • Page 123 123
  • Page 124 124
  • Page 125 125
  • Page 126 126
  • Page 127 127
  • Page 128 128
  • Page 129 129
  • Page 130 130
  • Page 131 131
  • Page 132 132
  • Page 133 133
  • Page 134 134
  • Page 135 135
  • Page 136 136
  • Page 137 137
  • Page 138 138
  • Page 139 139
  • Page 140 140
  • Page 141 141
  • Page 142 142
  • Page 143 143
  • Page 144 144
  • Page 145 145
  • Page 146 146
  • Page 147 147
  • Page 148 148
  • Page 149 149
  • Page 150 150
  • Page 151 151
  • Page 152 152
  • Page 153 153
  • Page 154 154
  • Page 155 155
  • Page 156 156
  • Page 157 157
  • Page 158 158
  • Page 159 159
  • Page 160 160
  • Page 161 161
  • Page 162 162
  • Page 163 163
  • Page 164 164
  • Page 165 165
  • Page 166 166
  • Page 167 167
  • Page 168 168
  • Page 169 169
  • Page 170 170
  • Page 171 171
  • Page 172 172
  • Page 173 173
  • Page 174 174
  • Page 175 175
  • Page 176 176
  • Page 177 177
  • Page 178 178
  • Page 179 179
  • Page 180 180
  • Page 181 181
  • Page 182 182
  • Page 183 183
  • Page 184 184
  • Page 185 185
  • Page 186 186
  • Page 187 187
  • Page 188 188
  • Page 189 189
  • Page 190 190
  • Page 191 191
  • Page 192 192
  • Page 193 193
  • Page 194 194
  • Page 195 195
  • Page 196 196

Tesy CN 06 200 EА CLOUD AS W Manual de utilizare

Tip
Manual de utilizare