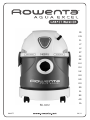
Rowenta AQUA EXCEL CARPET WASHER Manualul proprietarului
- Tip
- Manualul proprietarului

RU-6312
902877 30/11
FR
EN
PL
LT
LV
ET
CS
SK
HU
RU
UK
BG
HR
RO
SR
SL
BS
AR
FA

1
2
3
4
5
6
7
8
9
10
11
12
13
14
15
16
17
18
19
35
34
33
32
31
30
27
2829
26
25
24
23
22
21
20
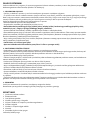
ref. ZR816
ref. RS-RB8489

fig. 1 fig. 2
fig. 3 fig. 4
fig. 5 fig. 6
fig. 7
fig. 12 fig. 13 fig. 14
fig. 15 fig. 16
fig. 17 fig. 18
fig. 8 fig. 9 fig. 10 fig. 11

fig. 19 fig. 20
fig. 21
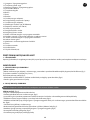
f
ig. 2
2
f
i
g. 30
f
ig.
28
f
i
g
.
29
fig.
2
5
fig.
2
6
fig. 27
f
i
g. 24
fig. 23
f
ig.
31
f
ig. 32
fig. 33
1
2

1
CONSEILS DE SÉCURITÉ
Pour votre sécurité, cet appareil est conforme aux normes et réglementations applicables (Directives
Basse Tension, Compatibilité Electromagnétique, Environnement, …).
1 • CONDITIONS D’UTILISATION
• Votre aspirateur est un appareil électrique : il doit être utilisé dans des conditions normales d’utilisation.
• Cet appareil n’est pas prévu pour être utilisé par des personnes (y compris les enfants) dont les capa-
cités physiques, sensorielles ou mentales sont réduites, ou des personnes dénuées d’expérience ou de
connaissance, sauf si elles ont pu bénéficier, par l’intermédiaire d’une personne responsable de leur sé-
curité, d’une surveillance ou d’instructions préalables concernant l’utilisation de l’appareil.
Il convient de surveiller les enfants pour s’assurer qu’ils ne jouent pas avec l’appareil.
• Ne laissez jamais l’appareil fonctionner sans surveillance.
• Ne tenez pas le suceur ou l’extrémité du tube à portée des yeux et des oreilles.
• N’aspirez pas de substances chaudes (braises), de gros débris tranchants (verre), de produits nocifs
(solvants, décapants), inflammables et explosifs (à base d’essence, d’alcool).
• Ne plongez jamais l’appareil dans l’eau, ne projetez pas d’eau sur l’appareil et ne l’entreposez pas à
l’extérieur.
• N’utilisez pas l’appareil : s’il est tombé et présente des détériorations visibles ou des anomalies de
fonctionnement. Dans ce cas, n’ouvrez pas l’appareil mais envoyez-le au Centre Service Agréé le plus
proche ou contactez le service consommateurs Rowenta (voir les coordonnées en dernière page).
• En cas de difficultés pour obtenir les accessoires et les filtres pour cet aspirateur, contactez le service
consommateurs Rowenta (voir les coordonnées en dernière page).
• Vérifiez que tous les filtres sont bien en place.
• Ne faites jamais fonctionner votre aspirateur sans mousse : filtre de protection du moteur.
2 • ALIMENTATION ÉLECTRIQUE
• Vérifiez que la tension d’utilisation (voltage) de votre aspirateur corresponde bien à celle de votre ins-
tallation.
• Débranchez l’appareil en retirant la prise de courant, sans tirer le cordon : immédiatement après utili-
sation, avant chaque changement d’accessoires, avant chaque nettoyage, entretien ou changement de
filtre.
• N’utilisez pas l’appareil si le cordon est défectueux.
• Le cordon de votre aspirateur doit être remplacé impérativement par un Centre Service Agréé car des
outils spéciaux sont nécessaires pour effectuer toute réparation afin d’éviter un danger.
• Avant chaque utilisation, le cordon doit être déroulé complètement. Ne le coincez pas et ne le passez
pas sur des arêtes tranchantes.
• Si vous utilisez une rallonge électrique, assurez-vous qu’elle est en parfait état et de section adaptée à
la puissance de votre aspirateur.
• Ne débranchez jamais l’appareil en tirant sur le cordon.
• Ne déplacez pas l’aspirateur en tirant sur le cordon, l’appareil doit-être déplacé par sa poignée de
transport.
• N’utilisez pas le cordon ni le flexible pour soulever et transporter l’appareil.
• Arrêtez et débranchez votre aspirateur après chaque utilisation.
• Arrêtez et débranchez toujours votre aspirateur avant l’entretien ou le nettoyage.
• Gardez le shampooing hors de portée des enfants. Ne l’avalez pas. Evitez tout contact avec les yeux et
les muqueuses. En cas de projections accidentelles, lavez abondamment à l’eau claire.
3 • RÉPARATIONS
Les réparations ne doivent être effectuées que par des spécialistes avec des pièces détachées d’origine.
Réparer un appareil soi même peut constituer un danger pour l’utilisateur et annule la garantie.
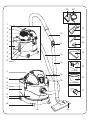
DESCRIPTION
1. Poignée de transport escamotable
2. Cordon d’alimentation
3. Grille de sortie d’air
4. Ouverture/ fermeture pour ajout d’eau
5. Bouton de sélection nettoyage à l’eau ou au shampoing
FR

2
6. Réservoir d’eau
7. Indicateur du niveau d’eau et du shampoing
8. Tuyau
9. Raccord du tuyau à liquide
10. Berceau support roulettes
11. Interrupteur marche/arrêt
12. Ouverture pour ajout de produit
13. Interrupteur marche/arrêt de la pompe
14. Pattes de fixation
15. Réservoir shampoing
16. Cuve
17. Roues
18. Roulettes
19. Adaptateur d’aspiration
20. Brosse universelle double fonction
21. Adaptateur d’aspiration
22. Sac en tissu (ref. RS-RB8489)
23. Sac en papier (ref. ZR816)
24. Accessoires de lavage de vitres
25. Suceur ameublement
26. Suceur fente
27. Petit suceur d’extraction avec tuyau de raccordement
28. Tuyau d'eau avec clips de fixation et levier de soupape
29. Suceur large d’extraction avec tuyau de raccordement
30. Crosse
31. Régulateur coulissant mécanique d’aspiration
32. Flexible
33. Tuyaux d’aspiration
34. Bloc moteur
35. Vanne de liquide (28)
AVANT LA PREMIÈRE UTILISATION
DÉBALLAGE
Déballez votre appareil, conservez votre bon de garantie et lisez attentivement le mode d’emploi avant
la première utilisation de votre appareil.
UTILISATION
1 • ASSEMBLAGE DES ÉLÉMENTS DE L’APPAREIL
Installez les roulettes.
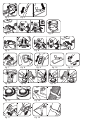
• Mettez l’adaptateur d’aspiration dans l’ouverture d’aspiration, poussez et tournez à fond dans le sens
des aiguilles d’une montre (fig.1)
• Assemblez les tubes et reliez-les au flexible.
• Choisissez le bon accessoire. (fig.2)
• Déverrouillez les pattes de fixation,retirez le bloc moteur, sortez le réservoir et retournez la cuve.(fig.3)
• Clipsez les roulettes directement sur le fond de la cuve.
2 • ASPIRER DE LA POUSSIÈRE SÈCHE
ATTENTION Le sac en papier ne doit être utilisé que pour aspirer des poussières sèches.
Mettez en place le sac (fig.4).
• Pliez légèrement les bords du sac papier.
• Relevez la poignée loin de l’ouverture d’aspiration (fig.5).
• Glisser et engagez à fond la cartonnette du sac papier ou la plaquette du sac textile.
FR

3
• Branchez l'adaptateur d'aspiration et tournez pour verrouiller (fig.5)
• Remettez le bloc moteur en place, le bouton marche/arrêt doit être situé au dessus de l’ouverture
d’aspiration, verrouiller les pattes de fixation (fig.6).
• Insérer le flexible d’aspiration dans l’orifice d’aspiration.
• Tenir le cordon d'alimentation par la prise, tirer et le brancher dans la prise de courant (fig.7).
• Appuyer sur l'interrupteur marche / arrêt pour mettre l’appareil en marche (fig.8).
• Régler la puissance d’aspiration (fig.9).
• Choisir l’accessoire adapté au type de sol.
Pour les sols lisses
: Mettez le suceur combiné en position brosse sortie.
Pour les tapis et moquettes
: Utilisez le suceur combiné en position brosse rentrée (fig.10).
3 • ASPIRER DE LA POUSSIÈRE HUMIDE ET DES LIQUIDES
• Aspirer avec l’accesoire relié au tube (fig.11).
IMPORTANT Vérifier qu'il n'y a pas de sac en tissu dans la cuve et que le régulateur d'aspiration sur la
crosse soit en position fermée.
• Tenir le cordon d'alimentation par la prise, tirer pour obtenir la longueur requise et le brancher dans la
prise de courant (fig.7).
• Appuyer sur l'interrupteur marche / arrêt pour mettre l’appareil en marche (fig.8)
• Fermer le régulateur d’aspiration pour éviter que les liquides ne s’échappent (fig.9).
• Une flotteur empêche la cuve de trop se remplir de liquide. L’augmentation du bruit du moteur in-
dique que le flotteur s’est déclenché. Si cela se produit, éteignez l'aspirateur et vider la cuve (fig.12).
• Si l'aspirateur s’arrête en cours d'utilisation, la soupape de sécurité va briser le flux d'air. Si cela se
produit, allumer et éteignez l’appareil pendant une courte durée.
4 • LAVER
Avant de laver une surface, bien aspirer pour enlever toute particule de saleté.
IMPORTANT Avant le nettoyage, vous devez vous assurer que la surface du plancher est adapté pour le
nettoyage humide. Tester une partie discrète de votre tapis ou les meubles rembourrés pour s'assurer
qu'il sont inaltérables.
La cuve ne doit pas contenir un sac en tissu pendant le nettoyage. Le régulateur d'aspiration de la
crosse doit rester fermé.
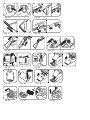
• Retirez le bouchon du réservoir d'eau propre en le tournant dans le sens de la flèche.
Remplir le réservoir avec de l'eau propre. Le réservoir peut contenir jusqu’à 4 litres d’eau.
Le réservoir peut également être retiré pour le remplissage.
Reboucher le réservoir après le remplissage (fig.13).
• Retirer le capuchon du réservoir à shampoing en le tournant dans le sens de la flèche.
Remplir le réservoir de shampoing. Le réservoir peut contenir jusqu’à 4 litres de liquide (fig.14).
Ce liquide de nettoyage se compose de 50 ml de shampoing (ref ZS0650) versé par litre d’eau.
Éviter de créer de grandes quantités de mousse.
Mettre le bouchon sur le réservoir après le remplissage.
Quatre litres de liquide de nettoyage suffisent pour le nettoyage d'une surface d'environ 10 mètres carrés
(fig.14).
• Connectez le tuyau à l’adaptateur d’aspirateur.
a) Pour le liquide de nettoyage, tournez le bouton de sélection dans le sens horaire (fig.15).
b) Pour rincer à l’eau, tournez le bouton de sélection dans le sens anti-horaire (fig.15).
• Fixez le tuyau d'eau à la vanne de liquide sur le devant de l'aspirateur (fig.16).
• Fixez le tuyau d'eau au flexible en utilisant les pattes de fixation (fig.16).
• Fixez la gachette et le dessous de la poignée à l'aide des clips (fig.17).
• Retirer le levier du robinet de la poignée en le déplaçant dans le sens de la flèche (fig.17).
FR

4
• Connectez le suceur d’extraction au tuyau d'aspiration (point 27 du descriptif).
• Fixez le tuyau d'eau au milieu du tuyau d'aspiration en utilisant les clips de fixation (fig.18).
• Branchez le tuyau d'eau et le tuyau de raccord à côté de l'interrupteur de pression en tournant
(fig.18).
• Mettre l’aspirateur en marche (fig.19).
• Mettez la pompe en marche. Vous entendrez un bruit de vibration pendant quelques secondes jusqu'à
ce que la pompe commence à aspirer le liquide. Ce bruit est normal et indique que la pompe fonctionne
(fig.19).
• Tournez le levier du robinet jusqu'à ce que le liquide commence à s'écouler jusqu’au suceur d’extrac-
tion dans une ligne droite vers la surface à nettoyer (fig.20).
• Relâchez le levier de la gachette pour arrêter le jet de pulvérisation.
• Dans le but d'enlever autant de liquide que possible de la surface, répéter le processus d'aspiration
jusqu'à ce que la zone entière soit nettoyée.
• Arrêter la pompe à la fin de la procédure de nettoyage afin d'éliminer toute l'eau restante dans le
tuyau d'eau en appuyant sur la gachette.
ATTENTION S’il n’y a pas assez d’eau ou de produit pour nettoyer, éteindre l’appareil et remplir le ou
les réservoirs.
5 • ACCESSOIRES POUR LAVER
Grand suceur de pulvérisation ou d'extraction
Pour le nettoyage de grandes surfaces, comme les tapis ou les planchers durs.
Bavette
Petit suceur de pulvérisation d'extraction
Pour le nettoyage de petites surfaces, comme les sofas, fauteuils etc.
Accessoires de lavage de vitres
Pour le nettoyage des surfaces en verre, telles que fenêtres, miroirs etc.
S’utilise comme la petite buse de pulvérisation.
IMPORTANT Pour le nettoyage des sols durs et l’absorption des liquides sur les sols durs il est recom-
mandé d’utiliser le suceur d’extraction (point 27 et 28 du descriptif) avec ou sans bavette.
• Faites glisser la bavette sur le grand suceur d’extraction dans le sens de la flèche (fig.21).
• Nettoyez les surfaces (fig.21).
Il est recommandé de ne pas marcher sur un sol dur après nettoyage afin d’éviter les traces.
ATTENTION Il y a un risque accru de glissade sur le sols immédiatement après qu'ils aient été nettoyés.
Pour les surfaces très sales
Utiliser un liquide de nettoyage uniquement pour le premier nettoyage sur les surfaces très sales. Pour
éviter des changements sur les tapis, utiliser uniquement du liquide de nettoyage sur une zone limitée.
Ensuite arrêter la pompe, allumer l'aspirateur et aspirer l'eau sale.
• Débrancher le tuyau d'eau côté vanne de liquide et côté gachette ainsi que le tuyau de raccord à côté
de l'interrupteur de pression en tournant dans le sens de la flèche (fig.22).
• Débrancher la crosse du flexible (fig.22).
• Fixer le petite suceur de pulvérisation à la crosse (fig.23).
• Connecter le connecteur du tuyau à la gachette (fig.23).
• Nettoyer les surfaces (fig.23).
NETTOYAGE ET MAINTENANCE
Eteignez l'aspirateur et débranchez le cordon d'alimentation. Tirez légérement sur le cordon d'alimenta-
tion pour désactiver le freinage. Le câble s’enroule alors automatiquement. Ranger le fil uniquement s’il
est sec (fig.24).
FR

5
1 • APRÈS ABSORPTION DE SALETÉS HUMIDES, DES LIQUIDES OU APRÈS UN LAVAGE
• Aspirez de l'eau propre afin de nettoyer les accessoires.
• Débranchez le tuyau à liquide de l’orifice d’aspiration.
• Retirez le porte-réservoir à partir de la base.
• Vider et sécher le support du réservoir (fig.25).
• Appuyez sur le bouton au dessus de la vanne à liquide et déconnectez le tuyau d'eau de l'aspirateur.
• Retirez le flexible de l'aspirateur et l'accrocher pour le faire sécher.
• Retirez le bloc moteur de la cuve et déposez-le sur le côté (voir Figure 3).
• Videz et séchez le tambour (fig.26).
IMPORTANT Pour éviter une odeur désagréable de se propager, tous les composants de
l'aspirateur doivent être propres et secs avant d’être rangés. Ne gardez pas l'aspirateur à
l'extérieur ou à une température en dessous de zéro.
2 • NETTOYER LE SAC EN TISSU (ref. RS-RB8489)
ATTENTION Le sac en tissu ne doit être utilisé que pour aspirer de la poussière sèche.
Si l’aspiration diminue sensiblement et il n'y a aucune obstruction du flexible, le flexible d'aspiration et / ou
le suceur combiné d’aspiration, le sac en tissu doit être nettoyé ou le sac en papier changé. Il est essen-
tiel de changer le sac en papier en raison du type de saleté qu'il contient, même si le sac en papier n'est
pas encore complètement plein.
Nettoyage du sac en tissu (ref. RS-RB8489)
• Éteignez l'aspirateur et débranchez le cordon d’alimentation du secteur.
• Retirez le bloc moteur (fig.3).
• Retirez le sac en tissu sale et videz-le soigneusement.
• Le sac en tissu peut être lavé à l'eau chaude et séché.
• Placez le sac en tissu dans la cuve (fig.4).
• Remontez le bloc moteur et verrouillez les pattes de fixation.
3 • NETTOYAGE DU FILTRE
Il y a deux filtres en mousse (fig.32, I et II) placés à l'intérieur du cadre de sortie d'air principale.
- Pour le nettoyage ou le remplacement de ce filtre, (I) sortez le de sous la grille de sortie d’air (fig.31).
• Après avoir placé le filtre en mousse (I) (fig.32), fixer la grille de sortie d'air.
• Pour l'attacher, placez d'abord le côté en bas puis poussez la partie supérieure à travers le carter du
moteur jusqu'à ce que vous entendiez le son « clic ».
IMPORTANT Remplacez les filtres endommagés ou déchirés. Ne jamais utiliser l'aspirateur sans
mousse de protection du moteur.
ATTENTION
• Ne retirez jamais le filtre en mousse (II).
• Laver le filtre avec un détergent doux sous l'eau courante.
• Remplacez les filtres endommagés ou déchirés immédiatement. Les filtres de rechange sont disponi-
bles auprès de votre revendeur.
4 • FONCTION SOUFFLEUR
Cette fonction est utilisée pour le soufflage au lieu d’aspirer à l'aide de la pression de sortie d'air, et ceci
avec les mêmes accessoires utilisés pour aspirer (tuyau flexible).
Pour mettre l’appareil en mode souffleur :
- Détacher la grille de la sortie d’air principale en appuyant sur le loquet situé surcelle-ci (fig.31).
- Retirez le filtre en mousse (I) (fig.32).
FR

DÉPANNAGE
Le sac* est plein ou saturé par des poussières fines :
• Remplacez le sac.
Le variateur mécanique de puissance* à la crosse est ouvert :
• Fermez le variateur mécanique de puissance.
Votre filtre permanent* est colmaté :
• Nettoyez-le en tapotant.
Si le suceur est difficile à déplacer
• Ouvrez le variateur mécanique de puissance* à la crosse.
Si un problème persiste, confiez votre aspirateur au Centre Service Agréé Rowenta le plus proche.
Consultez la liste des Centres Service Agréés Rowenta ou contactez le service consommateurs Ro-
wenta (voir les coordonnées en dernière page).
GARANTIE
• Cet appareil est uniquement réservé à un usage ménager et domestique ; en cas d’utilisation non ap-
propriée ou non conforme au mode d’emploi, aucune responsabilité ne peut engager la marque et la
garantie est annulée.
• Lisez attentivement le mode d’emploi avant la première utilisation de votre appareil : une utilisation
non conforme au mode d’emploi dégagerait Rowenta de toute responsabilité.
ENVIRONNEMENT
Conformément à la réglementation en vigueur, tout appareil hors d’usage doit être rendu définitive-
ment inutilisable : débranchez et coupez le cordon avant de jeter l’appareil.
Participons à la protection de l’environnement !
Votre appareil contient de nombreux matériaux valorisables ou recyclables.
Confiez celui-ci dans un point de collecte pour que son traitement soit effectué.
6
* Selon modèles : il s’agit d’équipements spécifiques à certains modèles ou d’accessoires disponibles en option.
FR

7
SAFETY ADVICE
For your safety, this appliance complies with the applicable standards and regulations (Low Voltage,
Electromagnetic compatibility, Environment Directives, …).
1 • OPERATING CONDITIONS
• Your vacuum cleaner is an electrical appliance: it must be used under normal operating conditions.
• This appliance is not intended for use by persons (including children) with reduced physical, sensory
or mental capacities or by persons lacking experience or knowledge unless they are supervised or given
prior instructions concerning the use of the appliance by a person responsible for their safety.
Children must be supervised to ensure they do not play with the appliance.
• Never leave the appliance running without surveillance.
• Do not hold the nozzle or the end of the tube near the eyes or the ears.
• Do not suck up warm substances (embers), large sharp fragments (glass), harmful products (solvents,
scouring agents), inflammable and explosive (based on petrol, alcohol) substances.
• Never immerse the appliance into water, throw water on the device or store it outdoors.
• Do not use the appliance: if it fell and it presents visible damage marks or operation faults. In this case,
do not unscrew the appliance but send it to the nearest Approved Service Centre or contact the Rowenta
customer service department (see the contact information on the last page).
• In case you encounter problems in obtaining the attachments and the filters for this vacuum cleaner,
contact the Rowenta customer service department (see the contact information on the last page).
• Check that all the filters are well positioned.
• Never operate your vacuum cleaner without foam material: motor protection filter.
2 • POWER SUPPLY
• Check if the operating voltage (tension) of your vacuum cleaner corresponds to that of your electrical
installation.
• Unplug the appliance by removing the socket, without pulling the cord: immediately after use, before
each attachment change, before each cleaning, maintenance or filter changing operation.
• Do not use the device if the cord is faulty. The cord of your vacuum cleaner must be replaced only by
an Approved Service Centre because special tools are necessary to carry out any repairing operation in
order to avoid any danger.
• Before each use, the cord must be fully unrolled.
• Do not wedge the cord and do not pass it over cutting edges.
• If you are using an electrical extension tube, ensure that it is in good condition and it has the section
adapted to the power of your vacuum cleaner.
• Never unplug the appliance by pulling the cord.
• Do not move the vacuum cleaner by pulling the cord; the appliance must be moved using its carrying handle.
• Do not use the cord or the hose to lift and transport the appliance.
• Stop and unplug your vacuum cleaner after each use.
• Always stop and unplug your vacuum cleaner before its maintenance or cleaning.
• Keep the shampoo out of the reach of children. Do not swallow. Avoid contact with the eyes and
mucous membranes. In the event of any accidental spray, wash abundantly with fresh water.
3 • REPAIRING WORKS
The repairing works must only be performed by specialists using original spare parts. Repairing the ap-
pliance by yourself can be dangerous for the user and cancels the warranty.
DESCRIPTION
1. Foldaway carrying handle
2. Power cord
3. Air ventilation cover
4. Opening/ closing system for adding water
5. Button for selecting cleaning with water or shampoo
6. Water reservoir
7. Water and shampoo level indicator
8. Pipe
EN

8
9. Liquids pipe connection
10. Caster support cradle
11. Stop/start switch
12. Opening for adding product
13. Pump stop/start switch
14. Fastening tabs
15. Shampoo reservoir
16. Tank
17. Wheels
18. Caster
19. Vacuuming adaptor
20. Double function universal brush
21. Vacuuming adaptor
22. Cloth bag (ref. RS-RB8489)
23. Paper bag (ref. ZR816)
24. Accessories for washing windows
25. Upholstery nozzle
26. Crevice tool
27. Little extraction nozzle with connection pipe
28. Water pipe with fastening clips and valve lever
29. Wide extraction nozzle with connection pipe
30. Power nozzle
31. Mechanical vacuum sliding control
32. Flexible hose
33. Vacuuming pipes
34. Motor unit
35. Liquid valve (28)
BEFORE USING YOUR CARPET WASHER FOR THE FIRST TIME
1 • UNPACKING YOUR CARPET WASHER
Unpack your carpet washer, keep your guarantee form and read the instructions carefully before using
your carpet washer for the first time.
HOW TO USE
1 • ASSEMBLING THE PARTS OF THE CARPET WASHER
Fitting the casters.
• Put the vacuuming adaptor in the vacuuming opening and turn it clockwise as far as it will go. (fig.1)
• Assemble the tubes and connect them to the flexible hose.
• Choose the accessory you need. (fig.2)
• Unlock the fastening tabs, remove the motor unit, take out the reservoir and turn the tank over.(fig.3)
• Clip the wheels directly on to the bottom of the tank.
2 • VACUUMING DRY DUST
IMPORTANT The paper bag must only be used for vacuuming dry dust
Fit the bag (fig.4).
• Gently fold the edges of the paper bag.
• Lift the handle so that it is well away from the vacuuming opening. (fig.5)
• Slide and push the card holder for the paper bag or the plate for the cloth bag as far as they will go.
• Plug in the vacuuming adaptor and lock it by turning it. (fig.5)
• Put the motor unit back in place, the stop/start button must be located above the vacuuming opening,
lock the fastening tabs.(fig.6)
• Insert the vacuuming flexible hose in the vacuuming opening.
• Holding the power lead by the plug, pull on it and plug into a power socket. (fig.7)
EN

9
• Press on the stop/start switch to turn on the appliance. (fig.8)
• Adjust the vacuuming power. (fig.9)
• Choose the accessory which is appropriate for the type of floor.
For smooth floors
: Put the combined nozzle in the advanced brush nozzle position.
For rugs and carpets
: Use the combined nozzle in the retracted brush nozzle position (fig.10).
3 • VACUUMING MOIST DUST AND LIQUIDS
• Vacuuming with the accessory connected to the tube (fig.11)
IMPORTANT Check that the cloth bag is not in the tank and that the vacuuming control on the power
nozzle in the closed position.
• Holding the power cord by the plug, pull on it to obtain the required length and then plug into the
power socket (fig.7).
• Press on the stop / start switch to turn on the appliance (fig.8).
• Close the vacuum control to avoid liquids escaping (fig.9).
• A ball cock prevents the tanks from filling up with too much liquid. The motor will make more noise
when the ball cock has been activated. If this happens, turn off your carpet washer and empty the tank.
(fig.12).
• If the carpet washer stops during use, the safety valve will interrupt the air flow. If this happens, turn
on and then shortly afterwards turn off the appliance.
4 • WASHING
Before you wash any surface, make sure you vacuum it thoroughly so as to remove all the particles of
dirt.
IMPORTANT Before cleaning, you must make sure that the floor surface is suitable for wet cleaning. Try
this out on a part of your rug that you wouldn’t notice or on padded furniture to make sure that their ap-
pearance is not altered during wet cleaning.
The tank must not contain a cloth bag during cleaning. The power nozzle’s vacuuming control must re-
main closed.
• Remove the clean water reservoir plug by turning it in the direction of the arrow.
Fill the reservoir with clean water. The reservoir can contain up to 4 litres of water.
The reservoir can also be removed when you need to fill it up.
Re-plug the reservoir after it has been filled up (fig.13).
• Remove the shampoo reservoir cap by turning it in the direction of the arrow.
Fill the reservoir with shampoo. The reservoir can contain up to 4 litres of liquid (fig.14).
This cleaning liquid is made up of 50 ml de shampoo (ref ZS0650) added per litre of water.
Avoid creating large quantities of foam.
Put the plug into the reservoir after it has been filled up.
Four litres of cleaning liquid are all that are needed for cleaning a surface area of around 10 square me-
tres. (fig.14)
• Connect the pipe to the carpet washer adaptor.
a) For the cleaning liquid, turn the selection knob clockwise. (fig.15)
b) To rinse with water, turn the selection knob anti-clockwise. (fig.15)
• Attach the water pipe to the liquid valve on the front of the carpet washer. (fig.16)
• Attach the water pipe to the flexible hose using the fastening tabs. (fig.16)
• Attach the trigger and the bottom of the handle using the clips. (fig.17)
• Remove the handle tap lever by moving it in the direction of the arrow. (fig.17)
• Connect the extraction nozzle to the vacuuming pipe. (point 27 in the description)
• Attach the water pipe to the middle of the vacuuming pipe by using the fastening clips. (fig.18)
• Plug in and turn the water pipe and the connector pipe next to the pressure switch. (fig.18)
EN

10
• Turn the carpet washer on. (fig.19)
• Switch on the pump. You will hear a vibration noise for a few seconds until the pump starts va-
cuuming the liquid. This noise is normal and indicates that the pump is working. (fig.19)
• Turn the tap lever until the liquid starts to flow up to the extraction nozzle in a straight line towards the
surface that is to be cleaned. (fig.20)
• Release the trigger’s lever to stop the spray jet.
• So as to remove as much liquid as possible from the surface, repeat the vacuuming process until
whole area has been cleaned.
• Stop the pump at the end of the cleaning procedure by pressing on the trigger in order to remove all
the water remaining in the water pipe.
IMPORTANT If there is not enough water or cleaning product to do the cleaning, switch off the carpet
washer and fill the reservoir(s).
5 • ACCESSORIES FOR WASHING
Large spray or extraction nozzle
For cleaning large surfaces, such as rugs or hard floors.
Flap
Small spray extraction nozzle
For cleaning small surfaces, like sofas, armchairs etc.
Accessories for cleaning glass surfaces
For cleaning glass surfaces, such as windows, mirrors etc.
It is used like the little spraying nozzle.
IMPORTANT When cleaning hard floors and for absorbing liquids on hard floors, we recommend you
use the extraction nozzle (points 27 and 28 in the description) with or without the flap.
• Slide the flap over the large extraction nozzle in the direction of the arrow. (fig.21)
• Clean the surfaces. (fig.21).
We recommend you don’t walk on a hard floor which has just been cleaned in order to avoid leaving
marks.
IMPORTANT The risk of slipping over on floors is greater when they have just been cleaned.
For very dirty surfaces
Only use a cleaning liquid when you are cleaning very dirty surfaces for the very first time. To avoid de-
figuring rugs, only use cleaning liquid on a limited area. Next, stop the pump, switch on the carpet wa-
sher and vacuum the dirty water.
• Unplug the water pipe on the side of the liquid valve and the trigger side as well as the connection
tube next to the pressure switch by turning it in the direction of the arrow. (fig.22).
• Unplug the flexible hose’s power nozzle (fig.22).
• Attach the small spray nozzle to the power nozzle. (fig.23).
• Connect the pipe’s connector to the trigger. (fig.23).
• Clean the surfaces. (fig.23).
CLEANING AND SERVICING
Turn off the carpet washer and unplug the power cord. Gently pull on the power cord to deactivate the
braking. The cable then winds in automatically. Only put the cable away if it is dry. (fig.24).
1 • AFTER ABSORBING WET DIRT, LIQUIDS OR AFTER WASHING
• Vacuum clean water in order to clean the accessories.
• Unplug the liquids pipe from the vacuum opening.
• Remove the reservoir holder from the base.
EN

11
• Empty and dry the reservoir support (fig.25).
• Press the button above the liquids valve and disconnect the carpet washer’s water pipe.
• Remove the carpet washer’s flexible hose and hang it up somewhere where it can dry.
• Remove the tank’s motor unit and place it on the side (see Figure 3).
• Empty and dry the drum.(fig.26).
IMPORTANT To avoid any unpleasant smells, all the components of the carpet washer must be clean
and dry before being put away. Do not leave the carpet washer outside or in temperatures beneath 0°C.
2 • CLEANING THE CLOTH BAG (ref RS-RB8489)
IMPORTANT The cloth bag must only be used for vacuuming dry dust.
If the vacuuming power drops significantly and there is no obstruction to the flexible hose, the vacuu-
ming flexible hose and /or the combined vacuuming nozzle, the cloth bag must be cleaned or in the
case of a paper bag it must be changed. It is essential to change the paper bag because of the type of
dirt that it contains, even if the paper bag still isn’t completely full.
Cleaning the cloth bag (ref RS-RB8489)
• Turn off the carpet washer and unplug the power cord from the mains.
• Remove the motor unit. (fig.3).
• Remove the dirty cloth bag and empty it carefully.
• The cloth bag can be washed with hot water and dried.
• Place the cloth bag in the tank. (fig.4).
• Lift up the motor unit and lock the fastening tabs.
3 • CLEANING THE FILTER
There are two foam filters (fig.32, I and II) placed inside the main air outlet frame.
- To clean or replace this filter, (I) take it out from underneath the air outlet grill. (fig.31).
• Once you’ve fitted the foam filter (I) (fig.32), attach the air outlet grill.
• To attach it, fit the bottom side first then push the top part across the casing of the motor until you
hear a “click” sound.
IMPORTANT Damaged or torn filters must be replaced. Never use the carpet washer without the
motor’s protection foam.
IMPORTANT
• Never remove the foam filter (II).
• Wash the filter with a mild detergent under running water.
• Replace the damaged or torn filters immediately. Spare filters are available in most stores which sell
the carpet washer.
4 • BLOWER FUNCTION
This function is used for blowing rather than vacuuming, using the pressure of the air coming out, and
with the same accessories which are used for vacuuming (flexible hose).
To switch the appliance on to blower mode:
- Detach the main air outlet grill by pressing on the latch which is located on the grill. (fig.31).
- Remove the foam filter (I) (fig.32).
REPAIRS
The bag* is full or saturated with fine dust particles:
• Replace the bag.
The adjustable manual power switch* on the power nozzle is in the “on” position:
• Turn the adjustable manual power switch to the “off” position.
EN
* Depending on the model: equipment specific to certain models or attachments available as option.

Your permanent filter* is clogged:
• Clean it by tapping it.
If the nozzle is difficult to move.
• Turn the adjustable manual power switch* on the power nozzle to the “on” position.
If a problem persists, take your vacuum cleaner to the nearest Rowenta Approved Service Centre.
Consult the list of Rowenta Approved Service Centres or contact the Rowenta customer service depart-
ment (see the contact information on the last page).
WARRANTY
• This appliance is only intended for domestic use; in case of inadequate or non compliant use with the
operating instructions, no responsibility can be binding upon the brand and the warranty is cancelled.
• Carefully read the operating instructions before the first use of your appliance: a use that is not com-
pliant with the operating instructions shall hold Rowenta harmless of any responsibility.
ENVIRONMENT
According to the regulations in force, any appliance that is worn out must be rendered entirely unusa-
ble: unplug and cut the power cord before throwing the appliance.
Taking part in environmental protection!
Your appliance contains many materials which can be recovered or recycled.
Leave it at a waste collection point so that it can be processed.
12
EN
* Depending on the model: equipment specific to certain models or attachments available as option.

13
ZASADY BEZPIECZEŃSTWA
Aby zapewnić bezpieczeństwo użytkowania, urządzenie jest zgodne z normami i obowiązującymi przepisami (dy-
rektywami dotyczącymi niskiego napięcia, kompatybilności elektromagnetycznej, środowiskowymi,...).
1 • SPOSÓB UŻYCIA
• Odkurzacz jest sprzętem elektrycznym: powinien być używany w normalnych warunkach użytkowania.
• Urządzenie nie powinno być użytkowane przez osoby (w tym dzieci), które są upośledzone fizycznie lub umysłowo, jak
również przez osoby nieposiadające doświadczenia i wiedzy, z wyjątkiem przypadków, kiedy znajdują się one pod opieką
osoby odpowiedzialnej za ich bezpieczeństwo lub zostały przez nią poinstruowane w zakresie użytkowania urządzenia.
Należy dopilnować, aby dzieci nie używały urządzenia do zabawy.
• Nie należy pozostawiać działającego urządzenia bez nadzoru.
• Nie należy trzymać ssawki lub zakończenia rury w zasięgu oczu lub uszu.
• Nie należy odkurzać gorących substancji (gorący popiół), dużych ostrych kawałków (szkło), produktów szkod-
liwych (rozpuszczalniki, środki trawiące...), agresywnych (kwasy, środki czyszczące...), palnych i wybuchowych
(na bazie benzyny lub alkoholu).
• Nigdy nie zanurzać urządzenia w wodzie, nie polewać urządzenia wodą oraz nie przechowywać go na zewnątrz.
• Nie stosować urządzenia: jeśli zostało upuszczone i posiada widoczne uszkodzenia lub nie działa prawidłowo. W takim
przypadku nie należy otwierać urządzenia, lecz dostarczyć go do najbliższego autoryzowanego punktu serwisowego lub
skontaktować się z działem obsługi klienta firmy Rowenta (patrz dane teleadresowe na ostatniej stronie).
• W przypadku trudności z zakupem akcesoriów i filtrów do tego odkurzacza należy skontaktować się z działem klienta
firmy Rowenta (patrz dane teleadresowe na ostatniej stronie).
• Sprawdzić, czy wszystkie filtry znajdują się na właściwym miejscu.
• Nie należy używać odkurzacza bez filtra piankowego ochrony silnika.
2 • ZASILANIE ELEKTRYCZNE
• Sprawdzić, czy napięcie pracy odkurzacza jest zgodne z napięciem domowej instalacji elektrycznej.
• Odłączyć urządzenie, wyciągając wtyczkę z gniazda sieciowego: natychmiast po użyciu, przed każdą zmianą akcesoriów,
przed każdym czyszczeniem, konserwacją lub wymianą filtra.
• Nie używać urządzenia, jeżeli przewód jest uszkodzony.•
• Aby uniknąć wszelkiego zagrożenia, zwijarka przewodu oraz przewód odkurzacza mogą być wymieniane jedynie przez
autoryzowany serwis, ponieważ każda naprawa wymaga użycia specjalnych narzędzi. Przed każdym użyciem przewód
powinien być całkowicie rozwinięty.
• Nie wolno dopuścić, aby był on zakleszczony lub przeciągany przez ostre krawędzie.
• W razie stosowania przedłużaczy elektrycznych należy upewnić się, że są one w idealnym stanie, a ich przekrój jest dos-
tosowany do mocy odkurzacza.
• Nie wolno odłączać urządzenia od sieci, ciągnąc tylko za kabel.
• Nie wolno przenosić odkurzacza, ciągnąc za kabel; urządzenie należy przenosić, trzymając za uchwyt.
• Nie należy podnosić ani przenosić urządzenia za przewód lub rurę.
• Każdorazowo po zakończeniu użytkowania wyłączyć odkurzacz i odłączyć go od prądu.
• Przed konserwacją lub czyszczeniem należy każdorazowo wyłączyć odkurzać i odłączyć go od prądu.
• Szampon do mycia trzymać z dala od dzieci. Ne połykać go. Unikać kontaktu z oczami i błonami śluzowymi. Jeśli płyn
zostanie przypadkowo rozpylony, zmyć obficie czystą wodą.
3 • NAPRAWY
Naprawy powinny być wykonywane jedynie przez wyspecjalizowany personel za pomocą oryginalnych części zamien-
nych. Samodzielna naprawa może być niebezpieczna dla użytkownika i powoduje utratę gwarancji.
OPIS
1. Składany uchwyt do przenoszenia
2. Przewód zasilający
3. Kratka wylotu powietrza
4. Wlew wody
5. Przycisk wyboru czyszczenia wodą lub szamponem
6. Zbiornik czystej wody
7. Wskaźnik poziomu wody i szamponu
8. Rura
9. Złączka rury do płynów
PL

14
10. Zawieszenie rolek
11. Włącznik
12. Wlew płynu piorącego
13. Włącznik pompy
14. Klamry zaczepowe
15. Zbiornik szamponu
16. Zbiornik brudnej wody
17. Koła
18. Rolki
19. Adapter ssania
20. Uniwersalna, dwufunkcyjna szczotka
21. Adapter ssania
22. Worek tekstylny (ref. RS-RB8489)
23. Worek papierowy (ref. ZR816)
24. Akcesoria do mycia szyb
25. Ssawka do mebli
26. Ssawka do szczelin
27. Mała ssawka ekstrakcyjna ze złączką
28. Rura doprowadzająca wodę z zaczepami i dźwigienką zaworu
29. Duża ssawka ekstrakcyjna ze złączką
30. Kolanko
31. Regulacja mechaniczna ssania
32. Wąż giętki
33. Rura ssąca
34. Zespół silnika
35. Zawór odcinający ciecz (28)
PRZED PIERWSZYM UŻYCIEM
1 • ODPAKOWANIE
Odpakować odkurzacz, zachować kartę gwarancyjną i przed pierwszym użyciem uważnie przeczytać instrukcję obsługi
urządzenia.
OBSŁUGA
1 • MONTAŻ ELEMENTÓW URZĄDZENIA
Montowanie rolek.
• Umieścić adapter ssania we wlocie, docisnąć i dokręcić do oporu zgodnie ze wskazówkami zegara. (fig.1)
• Złączyć rury i podłączyć je do węża.
• Dobrać odpowiednie akcesoria. (fig.2)
• Odczepić klamry zaczepowe, usunąć zespół silnika, następnie wyciągnąć zbiornik i odwrócić zbiornik brudnej wody. (fig.3)
• Doczepić rolki bezpośrednio do spodu zbiornika brudnej wody.
2 • ODKURZANIE SUCHYCH PYŁÓW
UWAGA Papierowych worków można używać jedynie do odkurzania suchych pyłów
Zakładanie worka (fig.4)
• Lekko zagiąć brzegi papierowego worka.
• Odciągnąć uchwyt daleko od wlotu ssania. (fig.5)
• Wprowadzić i dosunąć do końca tekturkę worka papierowego lub płytkę worka tekstylnego.
• Podłączyć adapter ssania i przekręcić go w celu zaczepienia. (fig.5)
• Umieścić z powrotem silnik, włącznik powinien znajdować się pod wylotem powietrza, zamknąć zaczepy. (fig.6)
• Wprowadzić wąż do otworu ssania.
• Trzymając przewód za wtyczkę, rozwinąć go i podłączyć do gniazda zasilania. (fig.7)
• Żeby włączyć urządzenie, należy nacisnąć włącznik. (fig.8)
• Ustawić siłę ssania. (fig.9)
• Wybrać odpowiednie akcesorium do typu powierzchni.
PL

15
Do podłóg gładkich: założyć ssawkę z wyciągniętą szczotką.
Do dywanów i wykładzin
: używać ssawki ze schowaną szczotką. (fig.10)
3 • ODKURZANIE PYŁÓW MOKRYCH I PŁYNÓW
• Odkurzać przy pomocy elementów podłączonych do rury. (fig.11)
WAŻNE! Należy sprawdzić, czy w zbiorniku brudnej wody nie znajduje się worek tekstylny a regulator ssania znaj-
dujący się na kolanku jest zamknięty.
• Trzymając przewód za wtyczkę, rozwinąć go do odpowiedniej długości i podłączyć do gniazda zasilania. (fig.7)
• Żeby włączyć urządzenie, należy nacisnąć włącznik. (fig.8)
• Aby uniknąć wydostawania się płynu na zewnątrz, należy zamknąć regulator ssania. (fig.9)
• Pływak uniemożliwia przepełnienie się zbiornika płynem. Głośna praca silnika wskazuje na włączenie się pływaka. W
takim przypadku należy wyłączyć odkurzacz i opróżnić zbiornik brudnej wody. (fig.12)
• Jeśli odkurzacz wyłączy się podczas pracy, zawór bezpieczeństwa odetnie dopływ powietrza. W takim przypadku
należy na krótko włączyć i wyłączyć urządzenie.
4 • MYCIE
Przed przystąpieniem do mycia należy dobrze odkurzyć powierzchnię, aby usunąć z niej resztki brudu.
WAŻNE! Przed przystąpieniem do pracy, należy upewnić się, że powierzchnia nadaje się do czyszczenia na mokro.
Sprawdzić w niewidocznym miejscu dywanu lub tapicerki, czy nie ulegną one zniszczeniu.
Zbiornik brudnej wody w trakcie czyszczenia na mokro nie może mieć założonego worka tekstylnego. Regulator ssa-
nia na kolanku musi być zamknięty.
• Wyciągnąć korek zbiornika czystej wody, przekręcając go zgodnie z kierunkiem strzałki.
Napełnić zbiornik czystą wodą. Zbiornik może pomieścić 4 litry wody.
Do napełnienia wodą zbiornik można również wyciągnąć.
Zamknąć zbiornik po napełnieniu. (fig.13)
• Usunąć pokrywkę zbiornika na szampon, przekręcając go zgodnie z kierunkiem strzałki.
Napełnić zbiornik szamponem. Zbiornik może pomieścić do 4 litrów płynu. (fig.14)
Płyn do czyszczenia składa się z 50 ml szamponu (ref ZS0650) zmieszanego z litrem wody.
Unikać tworzenia się nadmiernej ilości piany.
Zamknąć zbiornik po jego napełnieniu.
Cztery litry płynu wystarczają do oczyszczenia powierzchni około 10 metrów kwadratowych. (fig.14)
• Połączyć rurę z adapterem ssania.
Żeby użyć płynu do czyszczenia, przekręcić pokrętło wyboru zgodnie ze wskazówkami zegara. (fig.15)
b) Żeby zmyć wodą, przekręcić pokrętło wyboru w przeciwnym kierunku do ruchu wskazówek zegara. (fig.15)
• Zamontować rurę na wodę do zaworu odcinającego płyn znajdującego się z przodu odkurzacza. (fig.16)
• Zamontować rurę na wodę do węża przy pomocy zaczepów. (fig.16)
• Umocować spust i spód uchwytu przy pomocy klamer. (fig.17)
• Odciągnąć dźwigienkę kranu od uchwytu, przesuwając zgodnie z kierunkiem strzałki. (fig.17)
• Podłączyć ssawkę ekstrakcyjną do rury ssącej. (punkt 27 opisu)
• Zamocować rurę na wodę pośrodku rury ssącej przy pomocy klamer zaczepowych. (fig.18)
• Podłączyć rurę na wodę i złączkę obok włącznika ciśnienia poprzez przekręcanie. (fig.18)
• Włączyć odkurzacz (fig.19)
• Włączyć pompę. Przez kilka sekund słychać wibracje, aż do momentu, gdy pompa zacznie zasysać płyn. Taki dźwięk jest
prawidłowy i oznacza, że pompa pracuje. (fig.19)
• Przekręcić dźwigienkę kranu aż do momentu, gdy płyn zacznie lecieć przez ssawkę ekstrakcyjną prosto na powierzchnię
do czyszczenia. (fig.20)
• Poluźnić dźwigienkę spustu, aby zatrzymać rozpylanie.
• Aby usunąć jak największą ilość płynu z powierzchni, powtarzać czynność zasysania aż do momentu całkowitego oc-
zyszczenia miejsca.
• Naciskając na spust, wyłączyć pompę po zakończeniu czyszczenia, aby usunąć resztę wody znajdującej się w rurze.
PL

16
UWAGA Jeśli nie ma wystarczającej ilości wody lub płynu czyszczącego, wyłączyć urządzenie i napełnić
zbiornik lub zbiorniki.
5 • AKCESORIA DO MYCIA
Duża ssawka do natrysku lub ekstrakcji
Do oczyszczania dużych powierzchni jak na przykład dywany czy twarde podłogi
Osłona
Mała ssawka do natrysku lub ekstrakcji
Do oczyszczania małych powierzchni jak na przykład kanapy, fotele itp.
Akcesoria do mycia szyb
Do czyszczenia powierzchni szklanych jak na przykład okna, lustra itp.
Używa się jak małej dyszy do rozpylania
WAŻNE Do oczyszczania twardej powierzchni i odsysania płynów z twardej powierzchni zaleca się używania ssawki
ekstrakcyjnej (punkt 27 i 28 opisu) z osłoną lub bez niej.
• Nałożyć osłonę na dużą ssawkę ekstrakcyjną zgodnie z kierunkiem strzałki. (fig.21)
• Oczyścić powierzchnię. (fig.21)
Aby uniknąć pozostawienia śladów, nie należy wchodzić na podłogę tuż po jej oczyszczeniu.
UWAGA Istnieje zwiększone ryzyko poślizgnięcia się na świeżo oczyszczonej podłodze.
Powierzchnie mocno zanieczyszczone
Do bardzo zabrudzonych powierzchni podczas pierwszego mycia zastosować płyn do czyszczenia. Aby uniknąć odbar-
wień na dywanie używać płynu do czyszczenia tylko w ograniczonych miejscach. Następnie wyłączyć pompę, włączyć
odkurzacz i odessać brudną wodę.
• Odłączyć rurę na wodę od strony zaworu odcinającego płyn i spustu oraz złączkę od strony włącznika ciśnienia poprzez
przekręcanie ich zgodnie z kierunkiem strzałki. (fig.22)
• Odłączyć kolanko węża. (fig.22)
• Zamontować małą ssawkę rozpylającą na kolanko. (fig.23)
• Podłączyć łącznik rury ze spustem. (fig.23)
• Oczyścić powierzchnię. (fig.23)
CZYSZCZENIE I KONSERWACJA
Wyłączyć odkurzacz i odłączyć przewód zasilający. Pociągnąć lekko za przewód, żeby odblokować hamulec. Przewód
zwija się automatycznie. Przewód zwijać, tylko jeśli jest suchy. (fig.24)
1 • PO ODSYSANIU MOKRYCH PYŁÓW, PŁYNÓW LUB PO MYCIU
• Odessać czystą wodę, aby wyczyścić akcesoria.
• Odłączyć rurę na wodę od otworu zasysania
• Wyciągnąć część trzymającą zbiornik za podstawę.
• Opróżnić i wysuszyć podpórkę zbiornika. (fig.25)
• Nacisnąć przycisk znajdujący się na spodzie zaworu odcinającego płyn i odłączyć od odkurzacza rurę na wodę.
• Wyciągnąć wąż z odkurzacza i odwiesić go do wysuszenia.
• Wyciągnąć zespół silnika ze zbiornika i odłożyć go na bok. (patrz fig.3)
• Opróżnić i wysuszyć bęben. (fig.26)
WAŻNE Aby uniknąć nieprzyjemnych zapachów, wszystkie elementy odkurzacza chować dopiero po ich wyczyszcze-
niu i przeschnięciu. Nie przechowywać odkurzacza na zewnątrz lub w temperaturze poniżej zera.
PL
Pagina se încarcă...
Pagina se încarcă...
Pagina se încarcă...
Pagina se încarcă...
Pagina se încarcă...
Pagina se încarcă...
Pagina se încarcă...
Pagina se încarcă...
Pagina se încarcă...
Pagina se încarcă...
Pagina se încarcă...
Pagina se încarcă...
Pagina se încarcă...
Pagina se încarcă...
Pagina se încarcă...
Pagina se încarcă...
Pagina se încarcă...
Pagina se încarcă...
Pagina se încarcă...
Pagina se încarcă...
Pagina se încarcă...
Pagina se încarcă...
Pagina se încarcă...
Pagina se încarcă...
Pagina se încarcă...
Pagina se încarcă...
Pagina se încarcă...
Pagina se încarcă...
Pagina se încarcă...
Pagina se încarcă...
Pagina se încarcă...
Pagina se încarcă...
Pagina se încarcă...
Pagina se încarcă...
Pagina se încarcă...
Pagina se încarcă...
Pagina se încarcă...
Pagina se încarcă...
Pagina se încarcă...
Pagina se încarcă...
Pagina se încarcă...
Pagina se încarcă...
Pagina se încarcă...
Pagina se încarcă...
Pagina se încarcă...
Pagina se încarcă...
Pagina se încarcă...
Pagina se încarcă...
Pagina se încarcă...
Pagina se încarcă...
Pagina se încarcă...
Pagina se încarcă...
Pagina se încarcă...
Pagina se încarcă...
Pagina se încarcă...
Pagina se încarcă...
Pagina se încarcă...
Pagina se încarcă...
Pagina se încarcă...
Pagina se încarcă...
Pagina se încarcă...
Pagina se încarcă...
Pagina se încarcă...
Pagina se încarcă...
Pagina se încarcă...
Pagina se încarcă...
Pagina se încarcă...
Pagina se încarcă...
Pagina se încarcă...
Pagina se încarcă...
Pagina se încarcă...
Pagina se încarcă...
Pagina se încarcă...
Pagina se încarcă...
Pagina se încarcă...
Pagina se încarcă...
Pagina se încarcă...
Pagina se încarcă...
Pagina se încarcă...
Pagina se încarcă...
Pagina se încarcă...
Pagina se încarcă...
Pagina se încarcă...
Pagina se încarcă...
Pagina se încarcă...
Pagina se încarcă...
Pagina se încarcă...
Pagina se încarcă...
Pagina se încarcă...
Pagina se încarcă...
Pagina se încarcă...
Pagina se încarcă...
Pagina se încarcă...
Pagina se încarcă...
Pagina se încarcă...
Pagina se încarcă...
Pagina se încarcă...
Pagina se încarcă...
Pagina se încarcă...
Pagina se încarcă...
-
 1
1
-
 2
2
-
 3
3
-
 4
4
-
 5
5
-
 6
6
-
 7
7
-
 8
8
-
 9
9
-
 10
10
-
 11
11
-
 12
12
-
 13
13
-
 14
14
-
 15
15
-
 16
16
-
 17
17
-
 18
18
-
 19
19
-
 20
20
-
 21
21
-
 22
22
-
 23
23
-
 24
24
-
 25
25
-
 26
26
-
 27
27
-
 28
28
-
 29
29
-
 30
30
-
 31
31
-
 32
32
-
 33
33
-
 34
34
-
 35
35
-
 36
36
-
 37
37
-
 38
38
-
 39
39
-
 40
40
-
 41
41
-
 42
42
-
 43
43
-
 44
44
-
 45
45
-
 46
46
-
 47
47
-
 48
48
-
 49
49
-
 50
50
-
 51
51
-
 52
52
-
 53
53
-
 54
54
-
 55
55
-
 56
56
-
 57
57
-
 58
58
-
 59
59
-
 60
60
-
 61
61
-
 62
62
-
 63
63
-
 64
64
-
 65
65
-
 66
66
-
 67
67
-
 68
68
-
 69
69
-
 70
70
-
 71
71
-
 72
72
-
 73
73
-
 74
74
-
 75
75
-
 76
76
-
 77
77
-
 78
78
-
 79
79
-
 80
80
-
 81
81
-
 82
82
-
 83
83
-
 84
84
-
 85
85
-
 86
86
-
 87
87
-
 88
88
-
 89
89
-
 90
90
-
 91
91
-
 92
92
-
 93
93
-
 94
94
-
 95
95
-
 96
96
-
 97
97
-
 98
98
-
 99
99
-
 100
100
-
 101
101
-
 102
102
-
 103
103
-
 104
104
-
 105
105
-
 106
106
-
 107
107
-
 108
108
-
 109
109
-
 110
110
-
 111
111
-
 112
112
-
 113
113
-
 114
114
-
 115
115
-
 116
116
-
 117
117
-
 118
118
-
 119
119
-
 120
120


Rowenta AQUA EXCEL CARPET WASHER Manualul proprietarului
- Tip
- Manualul proprietarului
în alte limbi
Lucrări înrudite
Alte documente
-
Thomas Bravo 20 Manualul proprietarului
-
Philips FC6844/01 Manual de utilizare
-
Siemens VS06G2511/03 Manual de utilizare
-
Siemens VS05G2510/03 Manual de utilizare
-
Bosch BSGL2MOV31/09 Manual de utilizare
-
-
Siemens VS08G1623/14 Manual de utilizare
-
Bosch BSD3081/13 Manual de utilizare
-
Numatic NHL15 Owner Instructions
-
Philips FC7070/11 Ghid de inițiere rapidă