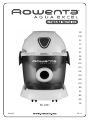
Rowenta AQUA EXCEL WATER FILTRATION Manualul proprietarului
- Categorie
- Accesorii mixer / robot de bucătărie
- Tip
- Manualul proprietarului

RU-6201
902876 30/11
FR
EN
PL
LT
LV
ET
CS
SK
HU
RU
UK
BG
HR
RO
SR
SL
BS
AR
FA

6
2
4
5
1
3
11
10
7
8
9
c
b
a
d e
f g
i
h

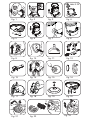
fig. 1 fig. 2
fig. 8
fig. 9
fig. 14
2
1
fig. 21
1
2
fig. 22
fig. 23
fig. 10 fig. 12
fig. 13
fig. 17 fig. 18 fig. 19
fig. 3
fig. 6 fig. 7
fig. 11
fig. 16fig. 15
fig. 20
fig. 4
max 2.0L
fig. 5
B

1
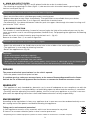
CONSEILS DE SÉCURITÉ
Pour votre sécurité, cet appareil est conforme aux normes et réglementations applicables (Directives
Basse Tension, Compatibilité Electromagnétique, Environnement, …).
1 • CONDITIONS D’UTILISATION
• Votre aspirateur est un appareil électrique : il doit être utilisé dans des conditions normales d’utilisation.
• Cet appareil n’est pas prévu pour être utilisé par des personnes (y compris les enfants) dont les capa-
cités physiques, sensorielles ou mentales sont réduites, ou des personnes dénuées d’expérience ou de
connaissance, sauf si elles ont pu bénéficier, par l’intermédiaire d’une personne responsable de leur sé-
curité, d’une surveillance ou d’instructions préalables concernant l’utilisation de l’appareil.
Il convient de surveiller les enfants pour s’assurer qu’ils ne jouent pas avec l’appareil.
• Ne laissez jamais l’appareil fonctionner sans surveillance.
• Ne tenez pas le suceur ou l’extrémité du tube à portée des yeux et des oreilles.
• N’aspirez pas de substances chaudes (braises), de gros débris tranchants (verre), de produits nocifs
(solvants, décapants), inflammables et explosifs (à base d’essence, d’alcool).
• Ne plongez jamais l’appareil dans l’eau, ne projetez pas d’eau sur l’appareil et ne l’entreposez pas à
l’extérieur.
• N’utilisez pas l’appareil : s’il est tombé et présente des détériorations visibles ou des anomalies de
fonctionnement. Dans ce cas, n’ouvrez pas l’appareil mais envoyez-le au Centre Service Agréé le plus
proche ou contactez le service consommateurs Rowenta (voir les coordonnées en dernière page).
• En cas de difficultés pour obtenir les accessoires et les filtres pour cet aspirateur, contactez le service
consommateurs Rowenta (voir les coordonnées en dernière page).
2 • ALIMENTATION ÉLECTRIQUE
• Vérifiez que la tension d’utilisation (voltage) de votre aspirateur corresponde bien à celle de votre ins-
tallation.
• Débranchez l’appareil en retirant la prise de courant, sans tirer le cordon : immédiatement après utilisa-
tion, avant chaque changement d’accessoires, avant chaque nettoyage, entretien ou changement de filtre.
• N’utilisez pas l’appareil si le cordon est défectueux.
• Le cordon de votre aspirateur doit être remplacé impérativement par un Centre Service Agréé car des
outils spéciaux sont nécessaires pour effectuer toute réparation afin d’éviter un danger.
3 • RÉPARATIONS
Les réparations ne doivent être effectuées que par des spécialistes avec des pièces détachées d’origine.
Réparer un appareil soi-même peut constituer un danger pour l’utilisateur et annule la garantie.
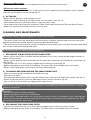
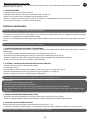
DESCRIPTION
1. Bloc moteur
2. Interrupteur marche/arrêt
3. Cuve
4. Ouverture d’aspiration
5. Berceau support roulettes
6. Poignée de transport escamotable
7. Sortie d’air
8. Cordon d’alimentation
9. Crochet d’enroulement du cordon d’alimentation
10. Pattes de fixation
11. Roulettes
ACCESSOIRES
a. Crosse avec régulateur mécanique de débit d’air et flexible*
b. Brosse universelle double fonction*
c. Suceur fente*
d. Suceur ameublement*
e. Outil de positionnement du tube*
f. Brosse à meubles*
* Selon modèles : il s’agit d’équipements spécifiques à certains modèles ou d’accessoires disponibles en option.
FR

2
g. Brosse à chauffage/radiateur*
h. Adaptateur de l’ouverture d’aspiration*
i. Tubes rallonge*
AVANT LA PREMIÈRE UTILISATION
DÉBALLAGE
Déballez votre appareil, conservez votre bon de garantie et lisez attentivement le mode d’emploi avant
la première utilisation de votre appareil.
IMPORTANT Ne jamais aspirer d'eau.
UTILISATION DE L'ASPIRATEUR
1 • MONTAGE DE L'APPAREIL
Déballez votre appareil et débarrassez-vous de toutes les étiquettes. Conservez votre carte de garantie
et de lisez attentivement la notice d'utilisation avant d'utiliser votre appareil pour la première fois.
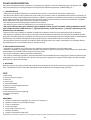
• Ouvrez les clips de fixation (Fig. 1), détachez le logement du moteur (Fig.2) et placez-le à l'envers.
• Retirez le cône au-dessus du tambour (Fig. 3).
• Remplissez le tambour avec un maximum de 2 litres d'eau douce à l'aide du cône (Fig.4).
• Vérifiez que le filtre du cône (B) est bien positionné (Fig.5).
• Replacez le cône dans le tambour (Fig. 6).
• Fixez le logement du moteur et fermez les clips de fixation.
• Raccordez le bout le plus large du tuyau flexible à l'orifice d'aspiration (Fig.7).
• Fixez l'accessoire souhaité sur les tubes d'extension et fixez les accessoires non utilisés sur l'empatte-
ment (Fig. 8).
• Tirez sur le cordon (Fig. 9) et branchez l'appareil sur une prise électrique.
IMPORTANT Le crochet du cordon d'alimentation ne doit pas être fixé à l'aspirateur pendant que l'appa-
reil est en fonctionnement.
• Allumez l'appareil (Fig 10).
Pendant le nettoyage, la poussière et les saletés sont stockées dans le tambour. Les autres matériaux,
tels que les poudres fines, sont filtrés au moyen de filtres spéciaux. Après chaque nettoyage, videz la
cuve et nettoyez-la.
2 • ACCESSOIRES ET NETTOYAGE
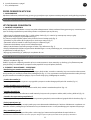
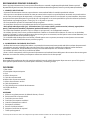
• Brosse universelle double fonction (b)
La brosse universelle possède une articulation qui permet un pivotement à 360°, et peut être utilisée
pour nettoyer aussi bien les tapis que les sols durs (Fig. 11). Pour les surfaces dures, appuyez sur le
bouton du suceur universel pour utiliser la brosse.
• Suceur plat (c)
Ce suceur est particulièrement utile pour nettoyer les coins difficiles et les crevasses (Fig. 12).
• Suceur pour meubles (d)
Ce suceur est adapté pour les meubles, les vêtements, les sièges auto, etc. (Fig. 12).
• Brosse pour meubles (e)
La brosse pour meubles peut être utilisée pour le nettoyage des tables, des meubles, des rideaux, des
étagères, etc. (Fig. 12).
• Brosse pour chauffages-radiateurs (f)
Utilisez cet accessoire pour nettoyer les appareils de chauffage, les revêtements chauffants, etc. (Fig 12).
Par la fixation d'une « brosse pour radiateurs de chauffage ».
* Selon modèles : il s’agit d’équipements spécifiques à certains modèles ou d’accessoires disponibles en option.
FR

3
• Outil de position de repos (g)
Cet accessoire est utilisé sur la partie porte-accessoires. Le suceur universel est accroché avec les
tubes d'extension et le flexible lorsque l'appareil est rangé.
• Tubes d'extension (h)
Fixez les tubes d'extensions. Tous les suceurs peuvent être montés directement sur le tuyau flexible ou
sur les tubes d'extensions. Vous pouvez utiliser au choix un seul ou deux tubes. Il est possible d'utiliser
le tuyau flexible et les tubes sans utiliser de suceur.
• La partie porte-accessoires
La partie porte-accessoires est conçue pour placer les accessoires non utilisés (Fig. 8).
• Régulateur d'aspiration mécanique
La poignée du tuyau flexible dispose d'un régulateur d'aspiration mécanique. La puissance d'aspiration
peut ainsi être modifiée en déplaçant la glissière du régulateur d'aspiration (Fig 13).
3 • APRÈS UTILISATION
• Éteignez l'appareil et débranchez le cordon.
• Ramassez le cordon et accrochez-le au crochet. Assurez-vous que le cordon est sec (Fig 14).
• Après avoir démonté les pièces de la cuve intérieure, videz l'eau sale.
• Nettoyez et remontez toutes les pièces et la cuve (voir : Nettoyage et remontage des pièces de la cuve
intérieure.)
• Fixez le logement du moteur et fermez les clips de fixation.
NETTOYAGE ET ENTRETIEN
IMPORTANT Arrêtez et débranchez toujours votre aspirateur après le nettoyage.
• Le tambour, le logement du moteur, l'empattement et les accessoires doivent être nettoyés de temps
en temps et l'appareil doit être vérifié régulièrement pour éviter tout blocage.
• Le tambour et les pièces du tambour interne peuvent être lavés à l'eau tiède quand ils sont très sales
et doivent être séchés avec un chiffon propre avant d'être réutilisés.
ATTENTION N'utilisez jamais de produits de nettoyage abrasifs.
1 • REMPLACEMENT DU FILTRE D'ASPIRATION EN MOUSSE DU MOTEUR
• Le filtre d'aspiration en mousse du moteur doit être nettoyé régulièrement. Cela permettra de prolon-
ger la durée de vie du moteur et d'augmenter sa puissance.
• La grille d'aspiration du moteur doit être retirée de son emplacement par un tournevis ou un autre dis-
positif en la tirant par le côté supérieur (Fig. 15).
• Tapotez sur le filtre s'il n'est que légèrement bouché (après le nettoyage de la saleté)(Fg 16).
• Remplacez les filtres endommagés ou déchirés immédiatement. Des filtres de rechange sont disponi-
bles auprès de votre revendeur.
• Fixez correctement la grille d'aspiration du moteur sur son emplacement situé sur le logement du mo-
teur.
2 • NETTOYAGE ET REMONTAGE DES PIÈCES DU TAMBOUR INTERNE
• Ouvrez les clips de fixation et détachez le logement du moteur.
• Éjectez le cône (Fig 3).
• Retirez le coude avec le disque pulvérisateur de la glissière qui est placée sur le côté intérieur de l'ori-
fice d'aspiration (Fig 17).
• Détachez le disque pulvérisateur du coude en tournant dans le sens antihoraire (Fig 16).
• Vous pouvez laver toutes ces pièces en appliquant les étapes inverses.
FR

4
IMPORTANT Vérifiez que le joint en caoutchouc qui est monté sur l'entrée du disque
pulvérisateur est bien positionné (Fig 19).
AVERTISSEMENT
• Vérifiez toutes les pièces et les filtres régulièrement.
• Remplacez les filtres endommagés ou déchirés immédiatement.
• Lorsqu'il y a une baisse notable de la puissance d'aspiration, vérifiez qu'il n'y a pas de blocage dans le
chemin de circulation de l'air.
• Lorsque l'eau de nettoyage est sale, même si le nettoyage n'est pas encore terminé, remplacez l'eau
sale avec, au maximum, 2 litres d'eau douce.
3 • REMPLACEMENT DU FILTRE EN MOUSSE DU CÔNE
• Tapotez sur le filtre en mousse du cône s'il n'est que légèrement bouché (après avoir nettoyé toute la
saleté) (Fig 20).
• Remplacez les filtres endommagés ou déchirés immédiatement. Des filtres de rechange sont disponi-
bles auprès de votre revendeur.
4 • FILTRE DE SORTIE D'AIR PRINCIPAL
Il y a deux filtres en mousse (Fig 22- I et II) placés à l'intérieur de la structure de sortie d'air principale.
• Pour le nettoyage ou le remplacement de ce filtre (Fig 22- I), sortez la structure de sortie d'air princi-
pale en appuyant sur son loquet et tirez (Fig 21).
AVERTISSEMENT N'enlevez jamais le filtre en mousse (II) représenté sur la figure 22.
• Lavez le filtre à l'eau courante avec un détergent doux.
• Remplacez les filtres endommagés ou déchirés immédiatement. Des filtres de rechange sont disponi-
bles auprès de votre revendeur.
• Après avoir placé le filtre en mousse (I) comme indiqué sur la figure 22, installez la structure de sortie d'air.
• Pour la fixer, placez d'abord le côté inférieur, puis poussez la partie supérieure dans le logement du
moteur jusqu'à ce que vous entendiez un « clic ».
5 • FONCTION DE SOUFFLAGE
Cette fonction est utilisée pour le soufflage au lieu de l'aspiration, à l'aide de la pression de sortie d'air,
avec les mêmes accessoires que ceux utilisés pour l'aspiration (tuyau flexible).
Afin de préparer l'appareil pour la fonction de soufflage :
- Libérez la structure de sortie d'air principale en appuyant sur le loquet situé sur celle-ci (Fig. 21).
- Retirez le filtre en mousse (I) comme indiqué sur la figure 22.
AVERTISSEMENT Ne retirez jamais le filtre en mousse (II) (Fig 22).
• Raccordez le bout le plus large du tuyau flexible au trou situé au milieu de l'ouverture de sortie (Fig 23).
• L'appareil est maintenant prêt pour la fonction de soufflage.
• Allumez l'appareil (Fig 10).
AVERTISSEMENT
• Vérifiez toutes les pièces et les filtres régulièrement.
• Remplacez les filtres endommagés ou déchirés immédiatement.
• Des filtres de rechange sont disponibles auprès de votre revendeur.
• Lorsqu'il y a une baisse notable de la puissance d'aspiration, vérifiez qu'il n'y a pas de blocage dans le
chemin de circulation de l'air.
• Pour ranger l'appareil, vérifiez que toutes les pièces, le tambour et les accessoires sont propres et secs.
FR

5
* Selon modèles : il s’agit d’équipements spécifiques à certains modèles ou d’accessoires disponibles en option.
DÉPANNAGE
Le variateur mécanique de puissance* à la crosse est ouvert :
• Fermez le variateur mécanique de puissance.
Si un problème persiste, confiez votre aspirateur au Centre Service Agréé Rowenta le plus proche.
Consultez la liste des Centres Service Agréés Rowenta ou contactez le service consommateurs Ro-
wenta (voir les coordonnées en dernière page).
GARANTIE
• Cet appareil est uniquement réservé à un usage ménager et domestique ; en cas d’utilisation non ap-
propriée ou non conforme au mode d’emploi, aucune responsabilité ne peut engager la marque et la
garantie est annulée.
• Lisez attentivement le mode d’emploi avant la première utilisation de votre appareil : une utilisation
non conforme au mode d’emploi dégagerait Rowenta de toute responsabilité.
ENVIRONNEMENT
Conformément à la réglementation en vigueur, tout appareil hors d’usage doit être rendu définitive-
ment inutilisable : débranchez et coupez le cordon avant de jeter l’appareil.
Participons à la protection de l’environnement !
Votre appareil contient de nombreux matériaux valorisables ou recyclables.
Confiez celui-ci dans un point de collecte pour que son traitement soit effectué.
FR

6
SAFETY ADVICE
For your safety, this appliance complies with the applicable standards and regulations (Low Voltage,
Electromagnetic compatibility, Environment Directives, …).
1 • OPERATING CONDITIONS
• Your vacuum cleaner is an electrical appliance: it must be used under normal operating conditions.
• This appliance is not intended for use by persons (including children) with reduced physical, sensory
or mental capacities or by persons lacking experience or knowledge unless they are supervised or given
prior instructions concerning the use of the appliance by a person responsible for their safety.
Children must be supervised to ensure they do not play with the appliance.
• Never leave the appliance running without surveillance.
• Do not hold the nozzle or the end of the tube near the eyes or the ears.
• Do not suck up warm substances (embers), large sharp fragments (glass), harmful products (solvents,
scouring agents), inflammable and explosive (based on petrol, alcohol) substances.
• Never immerse the appliance into water, throw water on the device or store it outdoors.
• Do not use the appliance: if it fell and it presents visible damage marks or operation faults. In this case,
do not unscrew the appliance but send it to the nearest Approved Service Centre or contact the Rowenta
customer service department (see the contact information on the last page).
• In case you encounter problems in obtaining the attachments and the filters for this vacuum cleaner,
contact the Rowenta customer service department (see the contact information on the last page).
2 • POWER SUPPLY
•
Check if the operating voltage (tension) of your vacuum cleaner corresponds to that of your electrical installation.
• Unplug the appliance by removing the socket, without pulling the cord: immediately after use, before
each attachment change, before each cleaning, maintenance or filter changing operation.
• Do not use the device if the cord is faulty.
• The cord of your vacuum cleaner must be replaced only by an Approved Service Centre because spe-
cial tools are necessary to carry out any repairing operation in order to avoid any danger.
3 • REPAIRING WORKS
The repairing works must only be performed by specialists using original spare parts. Repairing the ap-
pliance by yourself can be dangerous for the user and cancels the warranty.
DESCRIPTION
1. Motor unit
2. On-off switch
3. Tub
4. Suction opening
5. Rollers support cradle
6. Retractable carrying handle.
7. Vent
8. Power cord
9. Cord hook for the power cord
10. Holding tabs
11. Rollers
ATTACHEMENTS
a. Stick with mechanical variable air flow rate controller*
b. Double function universal brush*
c. Corners nozzle*
d. Home furnishings nozzle*
e. Tube positioning tool*
f. Furniture brush*
g. Brush with heating/for radiators*
h. Adaptor for the suction opening*
i. Extension tubes*
* Depending on the model: equipment specific to certain models or attachments available as option.
EN

7
BEFORE THE FIRST USE
1 • UNPACKING
Unpack your device, keep your guarantee slip and carefully read the operating instructions before the
first use of your appliance.
IMPORTANT Never vaccum water.
USING THE VACCUM CLEANER
1 • MOUNTING THE APPLIANCE
Unpack your device and get rid of all the labels. Keep your warranty card and read the instructions for
use carefully before using your appliance for the first time.
• Open the securing clips (fig.1) , detach the motor housing (fig.2) and place it upside down.
• Remove the cone above the drum (fig.3)
• Fill the drum with maximum 2.0 liters of fresh water by the help of the cone (fig.4).
• Check the filter of the cone (B) whether it is on the correct place or not (fig.5).
• Put the cone into the drum again (fig.6).
• Attach the motor housing and close the securing clips.
• Attach the wide end of the flexible hose to the suction inlet (fig 7).
• Attach the desired accessory to the extension tubes and attach unused accessories to the wheel base
(fig 8).
• Plug out the cord (fig 9), plug the appliance to the mains.
IMPORTANT The power cord hook should not be fastened to the vacuum cleaner while the unit is in
operation.
• Switch the appliance on (fig 10).
During cleaning, dust and dirts are stored in the drum. Other materials, such as fine powders, filtered
with special filters. After every cleaning, empty the barrel and clean it.
2 • ACCESSORIES AND CLEANING
• Dual function universal brush (b)
Universal brush has a 360° swiveling joint and can be used to clean both carpets and hard floors (fig
11). For hard surfaces press the brush button on the universal floor nozzle with brush.
• Crevice nozzle (c)
This nozzle is particulary useful for cleaning awkward corners and crevices (fig 12).
• Upholstery nozzle (d)
This nozzle is suitable for furniture, clothing, car seats etc (fig 12).
• Furniture brush (e)
The furniture brush can be used for cleaning tables, furniture, curtains bookshelves etc (fig 12).
• Heater-radiator brush (f)
Use this accessory for cleaning heaters, heater covering etc (fig 12).By the attachment of “brush for
heating radiators”.
• Park position tool (g)
This accessory is used on the accessory holder section. The universal floor nozzle is hooked with exten-
sion tubes and flexible hose on it, when the appliance stored.
• Extension tubes (h)
Attach the extensions tubes.All suction nozzles can be fitted directly on to the flexible hose or the exten-
sions tubes. Either one or two tubes may be used.t is possible to use the flexible hose and tubes wi-
thout using a nozzle.
EN

8
• Accessory holder section
The accessory holder section is designed to place the unused accessories.(fig 8).
• Mechanical suction regulator
- The handle of the flexible hose has a mechanical suction regulator. By moving the suction regulator
slide, the suction power can be altered (fig 13).
3 • AFTER USE
• Switch off the appliance and unplug the cord.
• Collect the cable and hang to the hook. Make sure the cable is dry (fig 14).
• After demounting the inner barrel pieces, empty the dirty water.
• Clean and remount all the pieces and barrel (Look: Clean and Remounting The Inner Barrel Pieces.)
• Attach the motor housing and close the securing clips.
CLEANING AND MAINTENANCE
IMPORTANT Always stop and unplug your vacuum after cleaning.
.
• The drum, motor housing, wheel base and accessories should be cleaned from time to time and the
appliance should be checked regularly to prevent possible blockages.
• The drum and inner drum pieces can be washed with warm water when very dirty and should be dried
with a clean cloth before being used again.
ATTENTION Never use abrasive cleaning materials.
1 • REPLACING THE MOTOR SUCTION FOAM FILTER
• Motor suction foam filter should be cleaned periodicly. In this why, motor will be longer life and it is
power will be stronger.
• Motor suction grid should be removed from it is place by screwdriver or othet device as pulling to up
side (fig 15).
• Tap the filter out if it is only slightly clogged (after cleaning any dirty)(fig 16).
• Replace damaged or torn filters immediately. The spare filters are available from your dealer.
• Motor suction grid attach to the motor housing’s place properly.
2 • CLEANING AND REMOUNTING THE INNER DRUM PIECE
• Open the securing clips and detach the motor housing.
• Eject the cone (fig 3).
• Pull the elbow with pulverizer disc from the slipway that is placed inner side of the suction inlet (fig 17).
• Detach the pulverizer disc from the elbow by turning counter clockwise (fig 16).
• You can wash all those pieces by applying the steps reverse.
IMPORTANT Check that, the rubber sealing, which is mounted inlet of the pulverizer disk, is correctly
placed or not (fig 19).
WARNING
• Check all the piece and filters regularly.
• Replace damaged or torn filters immediately.
• When there is a notable drop in the suction power, check if there is a blockage in the air flowing path.
• When the clening water got dirty, although the cleaning has not finished yet, change the dirty water
with maximum 2.0 liters fresh water.
3 • REPLACING THE CONE FOAM FILTER
• Tap the cone foam filter out if it is only slightly clogged (after cleaning any dirty) (fig 20).
• Replace damaged or torn filters immediately. The spare filters are available from your dealer.
EN

9
* Depending on the model: equipment specific to certain models or attachments available as option.
4 • MAIN AIR OUTLET FILTER
There are two foam filter (fig 22- I and II) placed inside the main air outlet frame.
• For cleaning or replacing this filter (fig 22- I ) take out the main air outlet frame by pressing the
latch on it and pull (fig 21).
WARNING Never remove the foam filter(II) shown on figure 22
• Wash out the filter with a mild detergent under running water.
• Replace damaged or torn filters immediately. The spare filters are available from your dealer.
• After placing the foam filter (I) as in figure 22, attach the air outlet frame.
• For attaching it, first place the bottom side then push the upper side through the motor housing until
you hear the ‘’click’’ sound.
5 • BLOWING FUNCTION
This function is used for blowing, instead of vacuuming by the help of the outlet air pressure, by the
same accessories used in vacuuming operation (flexible hose). For preparing the appliance for blowing
function:
Detach the main air outlet frame by pressing the latch on it (fig 21).
Remove the foam filter ( I ) as seen on figure 22.
WARNING Never remove the foam filter ( II ) (fig 22).
• Attach the wide end of the flexible hose to the hole in the middle of the outlet openning (fig 23).
• The appliance is now ready for blowing function.
• Switch the appliance on (fig 10).
WARNING
• Check all the pieces and filters regularly.
• Replace damaged or torn filters immediately.
• The spare filters are available from your dealer.
• When there is a notable drop in the suction power, check if there is a blockage in the air flowing path.
• For storing the appliance, check if all the pieces, drum and accessory is clean and dry.
REPAIRS
The power mechanical speed variator* to the stick is opened:
• Close the power mechanical speed variator.
If a problem persists, take your vacuum cleaner to the nearest Rowenta Approved Service Centre.
Consult the list of Rowenta Approved Service Centres or contact the Rowenta customer service
WARRANTY
• This appliance is only intended for domestic use; in case of inadequate or non compliant use with the
operating instructions, no responsibility can be binding upon the brand and the warranty is cancelled.
• Carefully read the operating instructions before the first use of your appliance: a use that is not com-
pliant with the operating instructions shall hold Rowenta harmless of any responsibility.
ENVIRONMENT
According to the regulations in force, any appliance that is worn out must be rendered entirely unusa-
ble: unplug and cut the power cord before throwing the appliance.
Taking part in environmental protection!
Your appliance contains many materials which can be recovered or recycled.
Leave it at a waste collection point so that it can be processed.
EN

10
ZASADY BEZPIECZEŃSTWA
Aby zapewnić bezpieczeństwo użytkowania, urządzenie jest zgodne z normami i obowiązującymi przepisami (dy-
rektywami dotyczącymi niskiego napięcia, kompatybilności elektromagnetycznej, środowiskowymi,...).
1 • SPOSÓB UŻYCIA
• Odkurzacz jest sprzętem elektrycznym: powinien być używany w normalnych warunkach użytkowania.
• Urządzenie nie powinno być użytkowane przez osoby (w tym dzieci), które są upośledzone fizycznie lub umysłowo, jak
również przez osoby nieposiadające doświadczenia i wiedzy, z wyjątkiem przypadków, kiedy znajdują się one pod opieką
osoby odpowiedzialnej za ich bezpieczeństwo lub zostały przez nią poinstruowane w zakresie użytkowania urządzenia.
Należy dopilnować, aby dzieci nie używały urządzenia do zabawy.
• Nie należy pozostawiać działającego urządzenia bez nadzoru.
• Nie należy trzymać ssawki lub zakończenia rury w zasięgu oczu lub uszu.
• Nie należy odkurzać gorących substancji (gorący popiół), dużych ostrych kawałków (szkło), produktów szkodli-
wych (rozpuszczalniki, środki trawiące...), agresywnych (kwasy, środki czyszczące...), palnych i wybuchowych (na
bazie benzyny lub alkoholu).
• Nigdy nie zanurzać urządzenia w wodzie, nie polewać urządzenia wodą oraz nie przechowywać go na zewnątrz.
• Nie stosować urządzenia: jeśli zostało upuszczone i posiada widoczne uszkodzenia lub nie działa prawidłowo. W takim
przypadku nie należy otwierać urządzenia, lecz dostarczyć go do najbliższego autoryzowanego punktu serwisowego lub
skontaktować się z działem obsługi klienta firmy Rowenta (patrz dane teleadresowe na ostatniej stronie).
• W przypadku trudności z zakupem akcesoriów i filtrów do tego odkurzacza należy skontaktować się z działem klienta
firmy Rowenta (patrz dane teleadresowe na ostatniej stronie).
2 • ZASILANIE ELEKTRYCZNE
• Sprawdzić, czy napięcie pracy odkurzacza jest zgodne z napięciem domowej instalacji elektrycznej.
• Odłączyć urządzenie, wyciągając wtyczkę z gniazda sieciowego: natychmiast po użyciu, przed każdą zmianą akcesoriów,
przed każdym czyszczeniem, konserwacją lub wymianą filtra.
• Nie używać urządzenia, jeżeli przewód jest uszkodzony.•
• Aby uniknąć wszelkiego zagrożenia, zwijarka przewodu oraz przewód odkurzacza mogą być wymieniane jedynie przez
autoryzowany serwis, ponieważ każda naprawa wymaga użycia specjalnych narzędzi. Przed każdym użyciem przewód
powinien być całkowicie rozwinięty.
3 • NAPRAWY
Naprawy powinny być wykonywane jedynie przez wyspecjalizowany personel za pomocą oryginalnych części zamien-
nych. Samodzielna naprawa może być niebezpieczna dla użytkownika i powoduje utratę gwarancji.
OPIS
1. Blok silnika
2. Przycisk włączyć/wyłączyć
3. Naczynie
4. Otwór ssący
5. Zawieszenie kółek
6. Chowany uchwyt do przenoszenia.
7. Wylot powietrza
8. Przewód zasilania
9. Hak do zwijania kabla zasilającego
10. Uchwyty mocujące
11. Kółka
AKCESORIA
a. Uchwyt z mechaniczną regulacją siły ssania i rura elastyczna *
b. Szczotka uniwersalna z podwójną funkcją*
c. Ssawka szczelinowa*
d. Ssawka do mebli*
e. Przyrząd do ustawiania rury*
f. Szczotka do mebli*
g. Szczotka do grzejnika/kaloryfera*
*W zależności od modelu: chodzi o akcesoria specjalne dostępne tylko w wybranych modelach lub jako opcja dodatkowa.
PL

11
h. Łącznik do otworu ssącego*
i. Rury teleskopowe*
PRZED PIERWSZYM UŻYCIEM
1 • ODPAKOWANIE
Odpakować odkurzacz, zachować kartę gwarancyjną i przed pierwszym użyciem uważnie przeczytać instrukcję obsługi urządzenia.
WAŻNE Nigdy nie zasysać wody do odkurzacza.
UŻYTKOWANIE ODKURZACZA
1 • MONTAŻ URZĄDZENIA
Należy odpakować urządzenie i usunąć wszystkie zabezpieczenia. Należy zachować kartę gwarancyjną i uważnie przec-
zytać instrukcję użytkowania przed skorzystaniem z urządzenia po raz pierwszy.
• Odpiąć zaciski zabezpieczające (fig. 1), zdjąć osłonę silnika (fig. 2) i umieścić ją wewnętrzną stroną w górę.
• Wyjąć stożek znajdujący się nad bębnem (fig. 3)
•Za pomocą stożka napełnić bęben maksymalnie 2 litrami świeżej wody (fig. 4).
• Sprawdzić, czy filtr stożka (B) znajduje się na właściwym miejscu (fig. 5).
• Ponownie umieścić stożek na właściwym miejscu w bębnie (fig. 6).
• Zamontować obudowę i zapiąć zaciski zabezpieczające.
• Włożyć szeroki koniec węża elastycznego we wlot ssący odkurzacza (fig. 7).
• Połączyć odpowiedni element wyposażenia dodatkowego z rurami przedłużającymi, a nieużywane elementy umieścić
na podstawie na kółkach (fig. 8).
• Wyciągnąć przewód (fig. 9), podłączyć urządzenie do sieci.
WAŻNE Hak do przewodu zasilającego nie powinien być zamocowany na odkurzaczu, kiedy urządzenie pracuje.
• Włączyć urządzenie (fig. 10).
Podczas sprzątania w bębnie gromadzi się kurz i zanieczyszczenia. Inne materiały, np. drobny pył są filtrowane przez
specjalne filtry. Po zakończeniu sprzątania należy opróżnić i oczyścić bęben (zbiornik).
2 • ELEMENTY DODATKOWE SPRZĄTANIE
• Dwufunkcyjna szczotka uniwersalna (b)
Szczotka uniwersalna posiada główkę umożliwiającą obrót o 360°; szczotka ta może być używana zarówno do czyszcze-
nia dywanów, jak i twardych powierzchni podłogowych (fig. 11). Przy czyszczeniu twardych powierzchni należy wcisnąć
przycisk sterowania szczotką znajdujący się na uniwersalnej dyszy podłogowej ze szczotką.
• Ssawka do szczelin (c)
Ta ssawka jest szczególnie użyteczna w przypadku sprzątania trudno dostępnych kątów lub szczelin (fig. 12).
• Ssawka do odkurzania tapicerki (d)
Ta ssawka jest odpowiednia do czyszczenia mebli, obić, siedzeń samochodowych itd. (fig. 12).
• Szczotka do mebli (e)
Szczotka przeznaczona do odkurzania mebli może być używana do sprzątania stołów, mebli, zasłon, półek itd. (fig. 12).
• Szczotka do czyszczenia grzejników (f)
Przyłączając dodatkowy element – szczotkę do czyszczenia grzejników, można odkurzać grzejniki lub ich obudowy (fig. 12).
• Funkcja postojowa (g)
Ten element jest mocowany w części podtrzymywania elementów dodatkowych. Podczas składowania urządzenia uni-
wersalna szczotka podłogowa jest zawieszona na tym elemencie wraz z rurami przedłużającymi i wężem elastycznym.
• Rury przedłużające (h)
Zamocować rury przedłużające. Wszystkie ssawki mogą być mocowane bezpośrednio do węża lub do rur
*W zależności od modelu: chodzi o akcesoria specjalne dostępne tylko w wybranych modelach lub jako opcja dodatkowa.
PL

12
przedłużających. Można wykorzystywać jedną lub dwie rury przedłużające. Można także wykorzystywać do
sprzątania tylko wąż i rury przedłużające bez konieczności montowania ssawki lub szczotki.
• Uchwyt dla wyposażenia dodatkowego
Uchwyt dla wyposażenia dodatkowego służy do umieszczania na nim elementów, które w danym momencie nie są
używane (fig. 8)
• Mechaniczna regulacja mocy ssania
Uchwyt węża elastycznego wyposażony jest w mechaniczny regulator mocy ssania. Przesuwając suwak regulatora ssania,
można zmieniać moc ssania (fig. 13).
3 • PO ZAKOŃCZENIU ODKURZANIA
• Wyłączyć urządzenie i odłączyć zasilanie.
• Zwinąć przewód i zawiesić na haku. Upewnić się, że przewód jest suchy (fig. 14).
• Po zdemontowaniu wewnętrznego zbiornika należy wylać brudną wodę.
• Wyczyścić i ponownie zamontować wszystkie części i zbiornik (patrz: Czyszczenie i ponowny montaż elementów
wewnętrznego zbiornika).
• Zamontować obudowę i zapiąć zaciski zabezpieczające.
CZYSZCZENIE I KONSERWACJA
WAŻNE Przed przystąpieniem do czyszczenia należy wyłączyć odkurzacz i odłączyć go od zasilania.
• Bęben, obudowa, podstawa na kółkach i dodatkowe elementy wyposażenia powinny być okresowo czyszczone;
urządzenie musi być także sprawdzane, aby zapobiec jego zapchaniu.
• W przypadku zabrudzenia części bębna i zbiornika wewnętrznego należy umyć ciepłą wodą i wytrzeć do sucha szmatką
przed ich ponownym użyciem.
UWAGA Nigdy nie używać środków czyszczących, które mogą rysować powierzchnię.
1 • WYMIANA PIANKOWEGO FILTRA SSANIA
• Piankowy filtr ssania powinien być okresowo czyszczony. Zapewni to dłuższą żywotność silnika oraz jego większą moc.
Siatka ssania w silniku musi zostać wyciągnięta przy pomocy śrubokrętu lub innego urządzenia (fig. 15)
• Jeśli filtr jest tylko lekko zanieczyszczony, można usunąć brud poprzez pukanie filtrem (po wcześniejszym lekkim oc-
zyszczeniu) (fig. 16).
• Natychmiast należy wymienić wszelkie popsute lub uszkodzone filtry.
• Zapasowe filtry dostępne są u sprzedawcy urządzenia.
• Zamontować odpowiednio kratkę ssania do obudowy silnika.
2 • CZYSZCZENIE I PONOWNY MONTAŻ WEWNĘTRZNEGO BĘBNA
• Odpiąć zaciski zabezpieczające i zdjąć obudowę silnika.
• Wyjąć stożek (fig. 3).
• Wyciągnąć kątnik z filtrem pyłkowym z łącznicy umieszczonej wewnątrz wlotu ssania (fig. 17).
• Wyjąć filtr pyłkowy z kątnika poprzez przekręcenie go w kierunku przeciwnym do ruchu wskazówek zegara (fig. 16).
• Można umyć wszystkie te części i zamontować je ponownie, wykonując powyższe czynności w odwrotnej kolejności.
WAŻNE Należy upewnić się, że uszczelka zamontowana we wlocie filtra pyłkowego znajduje się na właściwym miejscu (fig. 19).
OSTRZEŻENIE
• Należy sprawdzać regularnie wszystkie części urządzenia oraz filtry.
• Natychmiast należy wymienić wszelkie popsute lub uszkodzone filtry.
• W przypadku zauważalnego zmniejszenia siły ssania należy sprawdzić, czy wlot powietrza nie jest zablokowany.
• W przypadku jeśli woda w odkurzaczu jest brudna, a odkurzanie nie zostało zakończone, należy wymienić wodę,
zastępując ją maksymalnie 2 litrami czystej.
3 • WYMIANA PIANKOWEGO FILTRA STOŻKA
• Jeśli filtr jest tylko lekko zanieczyszczony, można usunąć brud poprzez pukanie filtrem (po lekkim oczyszczeniu) (fig. 20).
• Natychmiast należy wymienić wszelkie popsute lub uszkodzone filtry.
• Zapasowe filtry dostępne są u sprzedawcy urządzenia.
PL

13
*W zależności od modelu: chodzi o akcesoria specjalne dostępne tylko w wybranych modelach lub jako opcja dodatkowa.
4 • GŁÓWNY FILTR WYLOTOWY POWIETRZA
Wewnątrz głównego wylotu powietrza znajdują się dwa filtry piankowe (fig. 22- I i II).
• W przypadku czyszczenia lub wymiany filtra (fig. 22- I) należy wyjąć element wylotu powietrza poprzez naciśnięcie
zatrzasku i wyciągnięcie tej części (fig. 21).
OSTRZEŻENIE Nigdy nie należy usuwać filtra piankowego (II) pokazanego na rysunku 22
• Umyć filtr łagodnym detergentem, płucząc pod bieżącą wodą.
• Natychmiast należy wymienić wszelkie popsute lub uszkodzone filtry.
• Zapasowe filtry dostępne są u sprzedawcy urządzenia.
• Po umieszczeniu filtra piankowego (I), tak jak to pokazano na rysunku 22, należy zamontować element wylotu powietrza.
• Aby zamontować tę część, należy najpierw umieścić odpowiednio jej część boczną, a następnie wepchnąć jego górną
część przez obudowę silnika – kliknięcie oznacza, że element ten znalazł się na właściwym miejscu.
5 • FUNKCJA DMUCHANIA
Funkcja dmuchania jest używana zamiast odkurzania (użycie ciśnienia wylotowego powietrza); stosowane są te same elementy
dodatkowe wyposażenia jak w przypadku odkurzania (wąż elastyczny). Przygotowanie urządzenia do funkcji dmuchania:
Odłączyć główny element wylotu powietrza poprzez przyciśnięcie zatrzasku (fig. 21).
Wyjąć filtr piankowy (I) w sposób przedstawiony na rysunku 22.
OSTRZEŻENIE Nigdy nie należy usuwać filtra piankowego (II) (fig. 22)
• Szeroki koniec elastycznego węża należy włożyć w otwór w środku wylotu. (fig. 23).
• Urządzenie jest gotowe do funkcji dmuchania.
• Włączyć urządzenie (fig. 10).
OSTRZEŻENIE
• Należy sprawdzać regularnie wszystkie części urządzenia oraz filtry.
• Natychmiast należy wymienić wszelkie popsute lub uszkodzone filtry.
• Zapasowe filtry dostępne są u sprzedawcy urządzenia.
• W przypadku zauważalnego zmniejszenia siły ssania należy sprawdzić, czy wlot powietrza nie jest zablokowany.
• W przypadku przechowywania urządzenia należy sprawdzić, czy wszystkie jego części, bęben oraz wyposażenie do-
datkowe są czyste i suche.
USTERKI
Regulator mechaniczny* jest otwarty:
• Zamknąć mechaniczny regulator siły ssania.
Jeśli problem będzie się powtarzał, należy zwrócić się do najbliższego autoryzowanego punktu serwisowego
Rowenta. Sprawdzić listę autoryzowanych punktów serwisowych Rowenta lub skontaktować się z działem
obsługi klienta Rowenta (zob. dane teleadresowe na ostatniej stronie instrukcji).
GWARANCJA
• Urządzenie jest przeznaczone wyłącznie do użytku domowego; jeśli urządzenie jest użytkowane w niewłaściwy lub
niezgodny z instrukcją obsługi sposób, producent nie ponosi żadnej odpowiedzialności z tytułu gwarancji i gwarancja
zostaje anulowana.
• Przed pierwszym użyciem prosimy uważnie przeczytać instrukcję obsługi urządzenia: nieprawidłowa obsługa wyłącza
wszelką odpowiedzialność firmy Rowenta.
ŚRODOWISKO
Zgodnie z obowiązującym prawem każde urządzenie wyłączone z użycia nie powinno nadawać się do użytku: przed wyr-
zuceniem urządzenia odłączyć je od zasilania i przeciąć przewód.
Bierzmy czynny udział w ochronie środowiska!
Urządzenie jest wykonane z materiałów, które mogą być poddawane ponownemu przetwarzaniu lub
recyklingowi.
Oddaj swoje urządzenie do punktu zbiórki, aby zostało prawidłowo zutylizowane.
PL

14
SAUGOS PATARIMAI
Siekiant užtikrinti Jūsų saugumą, šis aparatas pagamintas laikantis taikomų standartų ir teisės aktų (žemos įtampos,
elektromagnetinio suderinamumo, aplinkos ir kt. direktyvų).
1 • NAUDOJIMO SĄLYGOS
• Siurblys yra elektrinis aparatas: jis turi būti naudojamas įprastomis naudojimo sąlygomis.
• Šis aparatas nėra skirtas naudoti asmenims (taip pat vaikams), kurių fizinės, jutiminės arba protinės galimybės yra apri-
botos, taip pat asmenims, neturintiems atitinkamos patirties arba žinių, išskyrus tuos atvejus, kai už jų saugumą atsakingi
asmenys užtikrina tinkamą priežiūrą arba jie iš anksto gauna instrukcijas dėl šio aparato naudojimo.
Vaikai turi būti prižiūrimi užtikrinant, kad jie nežaistų su aparatu.
• Niekada neleiskite aparatui veikti be priežiūros.
• Antgalio arba vamzdžio galo nelaikykite prie akių ir ausų.
• Nesiurbkite karštų medžiagų (žarijų), didelių aštrių atliekų (stiklo), kenksmingų medžiagų (tirpiklių, dažų nuėmiklių ir
pan.), degių ir sprogių medžiagų (degalų, alkoholio).
• Aparato niekada nenardinkite į vandenį, nepilkite ant jo vandens ir nelaikykite lauke.
• Nenaudokite aparato, jeigu jis nukrito ir aiškiai matomi sugadinimai arba sutriko veikimas. Tokiu atveju aparato neatida-
rykite, bet nuneškite į artimiausią įgaliotą priežiūros centrą arba kreipkitės į Rowenta vartotojų aptarnavimo skyrių (koor-
dinaciniai duomenys pateikiami paskutiniame lape).
• Jeigu sunku gauti priedų ir filtrų šiam siurbliui, kreipkitės į Rowenta vartotojų aptarnavimo skyrių (koordinaciniai duo-
menys pateikiami paskutiniame lape).
2 • MAITINIMAS ELEKTROS TINKLE
• Patikrinkite, ar Jūsų elektros tinklo įtampa sutampa su nurodytąja ant siurblio.
• Aparatą iš elektros tinklo išjunkite laikydami už kištuko, o ne traukdami už laido: tuojau pat baigę naudoti, kaskart prieš
keisdami priedus, kaskart prieš valydami, atlikdami priežiūros veiksmus ar keisdami filtrą.
• Aparato nenaudokite, jeigu laidas pažeistas.
• Siekiant išvengti pavojaus, siurblio laidas privalo būti pakeistas Rowenta įgaliotame priežiūros centre, nes bet kokiam re-
montui reikalingi specialūs įrankiai.
3 • REMONTAS
Siurblį turi remontuoti tik specialistai, naudojantys originalias detales.
Remontuoti aparatą pačiam vartotojui gali būti pavojinga, tai panaikina garantiją.
APRAŠYMAS
1. Variklio blokas
2. Įjungimo / išjungimo mygtukas
3. Bakas
4. Siurbimo anga
5. Ratukų laikiklių anga
6. Įtraukiama nešimo rankena
7. Oro išpūtimo anga
8. Maitinimo laidas
9. Maitinimo laido vyniojimo kabliukas
10. Fiksavimo kabliukai
11. Ratukai
PRIEDAI
a. Lanksti žarna su lenktu galu ir mechaniniu oro srauto reguliatoriumi*
b. Dviejų funkcijų universalus šepetys*
c. Antgalis plyšiams siurbti*
d. Antgalis baldams siurbti*
e. Vamzdžio įdėjimo prietaisas*
f. Šepetys baldams siurbti*
g. Šepetys šildytuvams / radiatoriams siurbti*
h. Siurbimo angos adapteris*
i. Ilginamieji vamzdžiai*
* Priklauso nuo modelių: tai speciali tam tikrų modelių įranga arba pasirenkami priedai.
LT

15
PRIEŠ PIRMĄ KARTĄ NAUDOJANT
1 • IŠPAKAVIMAS
Aparatą išpakuokite, išsaugokite garantinį čekį ir prieš pirmą kartą naudodami atidžiai perskaitykite naudojimo instrukcijas.
SVARBU Niekada nesiurbkite vandens.
KAIP NAUDOTIS DULKIŲ SIURBLIU
1 • PRIETAISO SURINKIMAS
Išimkite prietaisą iš pakuotės, nuimkite visas etiketes. Išsaugokite prietaiso garantiją ir prieš pirmą kartą naudodamiesi
prietaisu atidžiai perskaitykite instrukciją.
• Atidarykite apsauginius spaustukus (fig. 1), nuimkite variklio korpusą (fig. 2) ir pastatykite jį viršumi žemyn.
• Nuimkite virš būgno esantį kūgį (fig. 3).
• Naudodamiesi kūgiu, pripilkite į būgną ne daugiau kaip 2 litrus švaraus vandens (fig. 4)
• Patikrinkite, ar kūgio filtras (B) reikiamoje vietoje (fig. 5).
• Vėl įstatykite kūgį į būgną (fig. 6).
• Pritvirtinkite variklio korpusą ir uždarykite apsauginius spaustukus.
• Pritvirtinkite platųjį lanksčios žarnos galą prie siurbimo angos (fig. 7).
• Pritvirtinkite norimą priedą prie prailginimo vamzdelių, o nenaudojamus priedus sudėkite į pagrindą ant ratukų (fig. 8).
• Ištraukite laidą (fig. 9), įjunkite prietaisą į maitinimo tinklą.
SVARBU Maitinimo laido kabliuko negalima tvirtinti prie dulkių siurblio, kai prietaisas veikia.
• Įjunkite prietaisą (fig. 10).
Valymo metu dulkės ir nešvarumai patenka į būgną. Kitos medžiagos, tokios kaip smulkūs milteliai, išfiltruojami specia-
liais filtrais. Kiekvieną kartą baigę valyti ištuštinkite būgną ir jį iššluostykite.
2 • PRIEDAI IR VALYMAS
• Dviejų funkcijų universalusis šepetys (b)
Universalusis šepetys turi 360° sukinėjamą jungtį ir gali būti naudojamas valyti tiek kilimams, tiek kietoms grindims (fig.
11). Valydami kietus paviršius, paspauskite šepečio mygtuką ant universalaus grindų antgalio su šepečiu.
• Antgalis siauriems plyšiams (c)
Šis antgalis ypač naudingas valant sunkiai pasiekiamus kampus ir siaurus plyšius (fig. 12).
• Antgalis apmušalams (d)
Šis antgalis tinka baldams, drabužiams, automobilių sėdynėms ir t.t. valyti (fig. 12).
• Baldų šepetys (e)
Baldų šepetys gali būti naudojamas stalams, baldams, užuolaidoms, knygų lentynoms ir t.t. valyti (fig. 12).
• Šildytuvų-radiatorių šepetys (f)
Naudokite šį priedą šildytuvams, šildytuvų dangčiams ir t.t. valyti (fig. 12), pritvirtindami „šepetį radiatoriams“.
• Prietaiso laikymo įrankis (g)
Šis priedas dedamas ant priedų laikymo skyriaus. Universalus grindų antgalis su prailginimo vamzdeliais ir ant jo esančia
lanksčia žarna yra užkabinamas dedant prietaisą į jo laikymo vietą.
• Prailginimo vamzdeliai (h)
Pritvirtinkite prailginimo vamzdelius. Visus siurbimo antgalius galima pritvirtinti tiesiai prie lanksčios žarnos arba ant prailgi-
nimo vamzdelių. Galima naudoti vieną arba du vamzdelius. Lanksčią žarną ir vamzdelius galima naudoti ir be antgalio.
• Priedų laikymo skyrius
Priedų laikymo skyrius yra skirtas nenaudojamiems priedams laikyti (fig. B).
LT

16
• Mechaninis siurbimo reguliatorius
Lanksčios žarnos rankena turi mechaninį siurbimo reguliatorių. Judinant slankiojančią reguliatoriaus dalį, galima
keisti siurbimo stiprumą (fig. 13).
3 • PASINAUDOJUS PRIETAISU
• Išjunkite prietaisą ir ištraukite laidą iš maitinimo lizdo.
• Suvyniokite laidą ir pakabinkite jį ant kabliuko. Žiūrėkite, kad laidas būtų sausas (fig. 14).
• Išrinkę vidines būgno detales, išpilkite nešvarų vandenį.
• Išvalykite ir vėl surinkite visas detales ir būgną (žr. Vidinių būgno detalių valymas ir surinkimas).
• Pritvirtinkite variklio korpusą ir uždarykite apsauginius spaustukus.
VALYMAS IR PRIEŽIŪRA
SVARBU Baigę valyti, siurblį visada išjunkite ir ištraukite iš lizdo kištuką.
• Būgną, variklio korpusą, pagrindą ant ratukų ir priedus reikia kartas nuo karto išvalyti ir reguliariai tikrinti, ar prietaisas
neužsikimšo.
• Labai nešvarų būgną ir vidines būgno detales galima plauti šiltu vandeniu ir, prieš naudojant pakartotinai, būtinai nu-
sausinti švaria šluoste.
DĖMESIO Niekada nenaudokite valiklių su abrazyvinėmis dalelėmis.
1 • VARIKLIO POROLONINIO FILTRO KEITIMAS
• Variklio poroloninį filtrą reikia periodiškai valyti. Taip variklis ilgiau tarnaus ir bus galingesnis.
• Naudodamiesi atsuktuvu ar kitu įrankiu, išimkite variklio siurbimo groteles (fig. 15).
• Jeigu filtras nors truputį užsiteršęs, jį ištraukite (prieš tai pašalinę nešvarumus) (fig. 16).
• Nedelsdami pakeiskite sugadintus ar suplyšusius filtrus. Atsarginių filtrų galite įsigyti iš savo prekybos atstovo.
• Prie variklio korpuso gerai pritvirtinkite variklio siurbimo groteles.
2 • VIDINIŲ BŪGNO DETALIŲ VALYMAS IR PAKARTOTINIS SURINKIMAS
• Atidarykite apsauginius spaustukus ir nuimkite variklio korpusą.
• Nukelkite kūgį (fig. 3).
• Patraukite alkūnę su purkštuvo disku nuo slankiklio, įmontuoto siurbiamosios angos vidinėje dalyje (fig. 17).
• Sukdami prieš laikrodžio rodyklę, nuimkite purškiklio diską nuo alkūnės (fig. 16).
• Visas šias detales galite išplauti, atlikdami aukščiau aprašytus žingsnius atvirkštine tvarka.
SVARBU Patikrinkite, ar teisingai įstatytas purkštuvo diske esantis guminis tarpiklis (fig. 19).
ĮSPĖJIMAS
• Reguliariai tikrinkite visas detales ir filtrus.
• Nedelsdami pakeiskite sugadintus ar susidėvėjusius filtrus.
• Jeigu pastebėjote, kad gerokai sumažėjo siurbimo galingumas, patikrinkite, ar neužblokuotas oro srovės kelias.
• Jeigu dar nebaigus darbo valymui skirtas vanduo susiteršė, pakeiskite nešvarų vandenį ne daugiau kaip 2 litrais šva-
raus vandens.
3 • KŪGIO POROLONINIO FILTRO KEITIMAS
• Išimkite kūgio poroloninį filtrą, jeigu jis nors truputį užsiteršęs (prieš tai pašalinę visus nešvarumus) (fig. 20).
• Nedelsdami pakeiskite sugadintus ar suplyšusius filtrus. Atsarginių filtrų galite įsigyti iš savo prekybos atstovo.
4 • PAGRINDINĖS ORO IŠLEIDIMO ANGOS FILTRAS
Pagrindiniame oro išleidimo rėme yra įstatyti du poroloniniai filtrai (fig. 22 – I ir II).
• Norėdami išvalyti ar pakeisti šį filtrą (fig. 22 – I), nuimkite pagrindinės oro išleidimo angos rėmą, paspausdami ant jo
esančią skląstį ir trukteldami (fig. 21).
ĮSPĖJIMAS
Niekada neišimkite poroloninio filtro (II), parodyto 22 paveikslėlyje.
LT

17
* Priklauso nuo modelių: tai speciali tam tikrų modelių įranga arba pasirenkami priedai.
• Išplaukite filtrą švelniu plovikliu po tekančiu vandeniu.
• Nedelsdami pakeiskite sugadintus ar suplyšusius filtrus. Atsarginių filtrų galite įsigyti iš savo prekybos atstovo.
• Įdėję poroloninį filtrą (I) kaip parodyta 22 paveikslėlyje, pritvirtinkite oro išleidimo angos rėmą.
• Norėdami jį pritvirtinti, pirmiausia įstatykite apatinį kraštą, o tada spauskite viršutinį kraštą prie variklio korpuso, kol
išgirsite spragtelėjimą.
5 • PŪTIMO FUNKCIJA
Ši funkcija naudojama orui pūsti, pasitelkiant išleidžiamo oro slėgį ir naudojant tokius pačius priedus, kokie naudojami
siurbimo rėžime (lanksčią žarną). Norėdami paruošti prietaisą pūtimo funkcijai:
• Nuimkite pagrindinės oro išleidimo angos rėmą, paspausdami ant jo esančią skląstį (fig. 21).
• Nuimkite poroloninį filtrą (I), kaip parodyta 22 paveikslėlyje.
ĮSPĖJIMAS Niekada neišimkite poroloninio filtro (II) (fig. 22).
• Pritvirtinkite platųjį lanksčios žarnos galą prie skylės išleidimo angos viduryje (fig. 23).
• Dabar prietaisas jau paruoštas pūtimo funkcijai.
• Įjunkite prietaisą (fig. 10).
ĮSPĖJIMAS
• Reguliariai tikrinkite visas detales ir filtrus.
• Nedelsdami pakeiskite sugadintus ar suplyšusius filtrus.
• Atsarginių filtrų galite įsigyti iš savo prekybos atstovo.
• Jeigu gerokai sumažėjo siurbimo galingumas, patikrinkite, ar neužblokuotas oro srovės kelias.
• Dėdami prietaisą į jo laikymo vietą patikrinkite, ar visos jo detalės, būgnas ir priedai yra švarūs ir sausi.
REMONTAS
Atsidarė mechaninis galingumo keitiklis*, esantis žarnos gale:
• Uždarykite mechaninį galingumo keitiklį.
Jeigu problema tebėra neišspręsta, siurblį nuneškite į artimiausią Rowenta įgaliotą priežiūros centrą (Rowenta
įgaliotų priežiūros centrų sąrašas pateiktas) arba kreipkitės į Rowenta vartotojų aptarnavimo skyrių (koordina-
ciniai duomenys pateikiami paskutiniame lape).
GARANTIJA
• Šis aparatas skirtas tik naudoti buities reikmėms namuose; jeigu jis naudojamas netinkamai ar nesilaikant naudojimo
instrukcijų, gamintojas neprisiima jokios atsakomybės ir garantija netaikoma.
• Prieš pirmą kartą naudodami aparatą atidžiai perskaitykite naudojimo instrukcijas: jeigu aparatas naudojamas nesilai-
kant naudojimo instrukcijų, Rowenta neprisiima jokio atsakomybės.
APLINKA
Pagal galiojančius teisės aktus visi nebenaudojami aparatai turi būti sutvarkyti taip, kad jų nebūtų galima naudoti: prieš
išmesdami aparatą ištraukite laidą ir jį nupjaukite.
Prisidėkime prie aplinkos saugojimo!
Jūsų aparate yra daug medžiagų, kurias galima pakeisti į pirmines žaliavas arba perdirbti.
Nuneškite jį į surinkimo punktą, kad aparatas būtų perdirbtas.
LT
Pagina se încarcă ...
Pagina se încarcă ...
Pagina se încarcă ...
Pagina se încarcă ...
Pagina se încarcă ...
Pagina se încarcă ...
Pagina se încarcă ...
Pagina se încarcă ...
Pagina se încarcă ...
Pagina se încarcă ...
Pagina se încarcă ...
Pagina se încarcă ...
Pagina se încarcă ...
Pagina se încarcă ...
Pagina se încarcă ...
Pagina se încarcă ...
Pagina se încarcă ...
Pagina se încarcă ...
Pagina se încarcă ...
Pagina se încarcă ...
Pagina se încarcă ...
Pagina se încarcă ...
Pagina se încarcă ...
Pagina se încarcă ...
Pagina se încarcă ...
Pagina se încarcă ...
Pagina se încarcă ...
Pagina se încarcă ...
Pagina se încarcă ...
Pagina se încarcă ...
Pagina se încarcă ...
Pagina se încarcă ...
Pagina se încarcă ...
Pagina se încarcă ...
Pagina se încarcă ...
Pagina se încarcă ...
Pagina se încarcă ...
Pagina se încarcă ...
Pagina se încarcă ...
Pagina se încarcă ...
Pagina se încarcă ...
Pagina se încarcă ...
Pagina se încarcă ...
Pagina se încarcă ...
Pagina se încarcă ...
Pagina se încarcă ...
Pagina se încarcă ...
Pagina se încarcă ...
Pagina se încarcă ...
Pagina se încarcă ...
Pagina se încarcă ...
Pagina se încarcă ...
Pagina se încarcă ...
Pagina se încarcă ...
Pagina se încarcă ...
Pagina se încarcă ...
Pagina se încarcă ...
Pagina se încarcă ...
Pagina se încarcă ...
Pagina se încarcă ...
Pagina se încarcă ...
Pagina se încarcă ...
Pagina se încarcă ...
Pagina se încarcă ...
Pagina se încarcă ...
Pagina se încarcă ...
Pagina se încarcă ...
Pagina se încarcă ...
Pagina se încarcă ...
Pagina se încarcă ...
Pagina se încarcă ...
Pagina se încarcă ...
Pagina se încarcă ...
Pagina se încarcă ...
Pagina se încarcă ...
Pagina se încarcă ...
-
 1
1
-
 2
2
-
 3
3
-
 4
4
-
 5
5
-
 6
6
-
 7
7
-
 8
8
-
 9
9
-
 10
10
-
 11
11
-
 12
12
-
 13
13
-
 14
14
-
 15
15
-
 16
16
-
 17
17
-
 18
18
-
 19
19
-
 20
20
-
 21
21
-
 22
22
-
 23
23
-
 24
24
-
 25
25
-
 26
26
-
 27
27
-
 28
28
-
 29
29
-
 30
30
-
 31
31
-
 32
32
-
 33
33
-
 34
34
-
 35
35
-
 36
36
-
 37
37
-
 38
38
-
 39
39
-
 40
40
-
 41
41
-
 42
42
-
 43
43
-
 44
44
-
 45
45
-
 46
46
-
 47
47
-
 48
48
-
 49
49
-
 50
50
-
 51
51
-
 52
52
-
 53
53
-
 54
54
-
 55
55
-
 56
56
-
 57
57
-
 58
58
-
 59
59
-
 60
60
-
 61
61
-
 62
62
-
 63
63
-
 64
64
-
 65
65
-
 66
66
-
 67
67
-
 68
68
-
 69
69
-
 70
70
-
 71
71
-
 72
72
-
 73
73
-
 74
74
-
 75
75
-
 76
76
-
 77
77
-
 78
78
-
 79
79
-
 80
80
-
 81
81
-
 82
82
-
 83
83
-
 84
84
-
 85
85
-
 86
86
-
 87
87
-
 88
88
-
 89
89
-
 90
90
-
 91
91
-
 92
92
-
 93
93
-
 94
94
-
 95
95
-
 96
96


Rowenta AQUA EXCEL WATER FILTRATION Manualul proprietarului
- Categorie
- Accesorii mixer / robot de bucătărie
- Tip
- Manualul proprietarului
în alte limbi
Lucrări conexe
-
Rowenta AQUA EXCEL WET& DRY Manualul proprietarului
-
-
-
-
-
-
-