
Original instructions
Originalbetriebsanleitung
Notice originale
Istruzioni originali
Manual original
Manual original
Oorspronkelijke
gebruiksaanwijzing
Original brugsanvisning
Original bruksanvisning
Bruksanvisning i original
Alkuperäiset ohjeet
Orijinal iş
Pů
Eredeti használati utasítás
Izvirna navodila
Originalne pogonske upute
Instrukcijâm oriěinâlvalodâ
Originali instrukcija
Algupärane kasutusjuhend
Instrucţiuni de folosire originale
DD 3-152

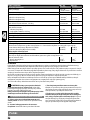
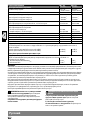
Technical Data,Safety Instructions, Specied Conditions of Use,
Declaration of Conformity, Mains connection, Maintenance, Symbols Please read and save
these instructions!
English
1212
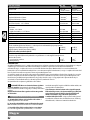
Technische Daten, Sicherheitshinweise, Bestimmungsgemäße Verwendung,
CE-Konformitätserklärung, Netzanschluss, Wartung, Symbole Bitte lesen und
aufbewahren!
Deutsch
1616
Caractéristiques techniques, Instructions de sécurité, Utilisation conforme aux
prescriptions, Déclaration CE de Conformité, Branchement secteur, Entretien, Symboles A lire et à conserver
soigneusement
Français
2020
Dati tecnici,Norme di sicurezza,Utilizzo conforme, Dicharazione di Conformità CE,
Collegamento alla rete, Manutenzione, Simboli Si prega di leggere e
conservare le istruzioni!
Italiano
2424
Datos técnicos, Instrucciones de seguridad, Aplicación de acuerdo a la nalidad,
Declaracion de Conformidad CE, Conexión eléctrica, Mantenimiento, Símbolos Lea y conserve estas
instrucciones por favor!
Español
2828
Características técnicas, Instruções de segurança, Utilização autorizada,
Declaração de Conformidade CE, Ligação à rede, Manutenção, Symbole Por favor leia e conserve
em seu poder!
Português
3232
Technische gegevens, Veiligheidsadviezen, Voorgeschreven gebruik van het
systeem, EC-Konformiteitsverklaring, Netaansluiting,Onderhoud, Symbolen Lees en let goed
op deze adviezen!
Nederlands
3636
Tekniske data, Sikkerhedshenvisninger, Tiltænkt formål,
CE-Konformitetserklæring, Nettilslutning, Vedligeholdelse, Symboler Vær venlig at læse
og opbevare!
Dansk
4040
Tekniske data, Spesielle sikkerhetshenvisninger, Formålsmessig bruk,
CE-Samsvarserklæring, Nettilkopling, Vedlikehold, Symboler Vennligst les og oppbevar!
Norsk
4444
Tekniska data, Säkerhetsutrustning, Använd maskinen Enligt anvisningarna,
CE-Försäkran, Nätanslutning, Skötsel, Symboler Läs igenom och spara!
Svenska
4848
Tekniset arvot, Turvallisuusohjeet, Tarkoituksenmukainen käyttö,
Todistus CE-standardinmukaisuudesta, Verkkoliitäntä, Huolto, Symbolit Lue ja säilytä!
Suomi
5252
Τεχνικά στοιχεία, Ειδικές υποδείξεις ασφάλειας, Χρήση σύμφωνα με το σκοπό
προορισμού, Δήλωση πιστότητας ΕΚ, Σύνδεση στο Ηλεκτρικό Δίκτυο, Συντήρηση, Σύμβολα. Παρακαλούμε να τις διαβάσετε και
να τις φυλάξετε!
Ελληνικά
5656
Teknik veriler, Güvenliğiniz için talimatlar, Kullanim, CE uygunluk beyanice,
Şebeke bağlantisi, Bakim, Semboller Lütfen okuyun ve saklayın
Türkçe
6060
Technická data, Speciální bezpečnostní upozornění, Oblast využití,
CE-prohlášení o shodě, Připojení na sít, Údržba, Symboly Po přečtení uschovejte
Česky
6464
Technické údaje, Špeciálne bezpčènostné pokyny, Použitie podl’a predpisov,
CE-Vyhlásenie konformity, Siet’ová prípojka, Údrzba, Symboly Prosím prečítať a uschovať!
Slovensky
6868
Dane techniczne, Specjalne zalecenia dotyczące bezpieczeństwa, Użytkowanie zgodne z
przeznaczeniem, Świadectwo zgodności ce, Podłączenie do sieci, Utrzymanie, Symbole Należy uważnie przeczytać i
zachować do wglądu!
Polski
7272
Műszaki adatok, Különleges biztonsági tudnivalók, Rendeltetésszerű használat,
Ce-azonossági nyilatkozat, Hálózati csatlakoztatás, Karbantartás, Szimbólumok Olvassa el és őrizze meg
Magyar
7676
Tehnični podatki, Specialni varnostni napotki, Uporaba v skladu z namembnostjo,
CE-izjava o konformnosti, Omrežni priključek, Vzdrževanje, Simboli Prosimo preberite
in shranite!
Slovenščina
8080
Tehnički podaci, Specijalne sigurnosne upute, Propisna upotreba,
CE-Izjava konformnosti, Priključak na mrežu, Održavanje, Simboli Molimo pročitati i sačuvati
Hrvatski
8484
Tehniskie dati, Speciālie drošības noteikumi, Noteikumiem atbilstošs izmantojums,
Atbilstība CE normām, Tīkla pieslēgums, Apkope, Simboli Lūdzu, izlasīt un uzglabāt!
Latviski
8888
Techniniai duomenys, Ypatingos saugumo nuorodos, Naudojimas pagal paskirti,
CE Atitikties pareiškimas, Elektros tinklo jungtis, Techninis aptarnavimas, Simboliai Prašome perskaityti
ir neišmesti!
Lietuviškai
9292
Tehnilised andmed, Spetsiaalsed turvajuhised, Kasutamine vastavalt otstarbele,
EÜ Vastavusavaldus, Võrku ühendamine, Hooldus, Sümbolid Palun lugege läbi ja hoidke alal!
Eesti
9696
Технические данные, Указания по безопасности, Использование, Декларация о
соответствии стандартам EC,
Ïîäêëþ÷åíèå ê ýëåêòðîñåòè
, Обслуживание, Символы Пожалуйста прочтите и
сохраните эту инструкцию.
Pусский
100100
Технически данни, Специални указания за безопасност, Използване по предназначение,
СЕ - Декларация за съответствие, Връзка c Електричество, Поддръжка, Символи Моля прочетете и запазете!
Български
104104
Date tehnice, Instrucţiuni de securitate, Condiţii de utilizare specifcate,
Declaraţie de conformitate, Alimentare de la reţea, Intreţinere, Simboluri Va rugăm citiţi şi păstraţi
aceste instrucţiuni
Română
108108
Технички податоци, Упатства за употреба, Специфицирани услови на употреба,
ЕУ- декларација за Сообразност, Напојување од мрежата, Одржување, Симболи Ве мoлиме прочитаjте го и
чувајте го ова упатство!
Македонски
112112
Технічні характеристики, Вказівки З Техніки Безпеки, Використання за призначенням,
Сертифікат Відповідності Вимогам Єс, Підключення до мережі, Обслуговування, Символи Прочитайте та збережіть
цю інструкцію.
Українська
116116
123123

22
44
33
33
1010
4932 3526 79
4932 3526 80
4932 3520 53
5588
Zubehör
Accessoires
Accessorio
Accessorio Acessório
Toebehoren Tilbehør
Tilbehør Tillbehör
Lisälaite
Aksesuar Příslušenství
Príslušenstv
Azokat a tartozékokat
Oprema Piederumi
Priedas Tarvikud
Äîïîëíèòåëü
Accesoriu
Original instructions
Originalbetriebsanleitung
Notice originale
Istruzioni originali
Manual original
Manual original
Oorspronkelijke
gebruiksaanwijzing
Original brugsanvisning
Original bruksanvisning
Bruksanvisning i original
Alkuperäiset ohjeet
Πρωτότυπο οδηγιών χρήσης
Orijinal işletme talimatı
Původním návodem k používání
Pôvodný návod na použitie
Instrukcją oryginalną
Eredeti használati utasítás
Izvirna navodila
Originalne pogonske upute
Instrukcijâm oriěinâlvalodâ
Originali instrukcija
Algupärane kasutusjuhend
Оригинальное руководство
по эксплуатации
Оригинално ръковод ство за
експлоатация
Instrucţiuni de folosire originale
Оригинален прирачник за
работа
Оригінал інструкц ії з
експлуатації
DD 3-152

11
I II III
VIII
VIVIV
VII

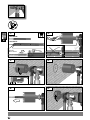
22
2.1.
1. 2.
I
2
1

33
II
1.
2.
3.
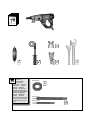
4932 3520 53
11/4“ UNC
1/2“ G
I

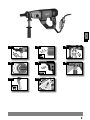
44
III
1. 2.
3. 4.
ø 36 mm
AS .. .AC

55
III III
1. 2.
3.
WT 10
max. 6 bar

66
3 8 – 32 mm 8 – 32 mm 38 - 62 mm
2 35 – 62 mm 35 – 62 mm 68 - 112 mm
1
X
62 - 152 mm 122 - 200 mm
IV
DR 152 T

77
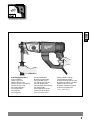
Insulated gripping surface
Isolierte Griäche
Surface de prise isolée
Supercie di presa isolata
Supercie de agarre con aislamiento
Superfície de pega isolada
Geïsoleerde handgrepen
Isolerede gribeader
Isolert gripeate
Isolerad greppyta
Eristetty tarttumapinta
Μονωμένη επιφάνεια λαβής
İzolasyonlu tutma yüzeyi
Izolovaná uchopovací plocha
Izolovaná úchopná plocha
Izolowana powierzchnia uchwytu
Szigetelt fogófelület
Izolirana prijemalna površina
Izolirana površina za držanje
Izolēta satveršanas virsma
Izoliuotas rankenos paviršius
Isoleeritud pideme piirkond
Изолированная поверхность ручки
Изолирана повърхност за хващане
Suprafaţă de prindere izolată
Изолирана површина на дршката
Ізольована поверхня ручки
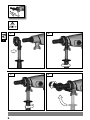
VIV

88
V
1.
4.
2. 3.
Stop
Reset
Start
Test On

99
115 °C
15 A
115 °C
15 A
Auto-Stop
Auto-Stop
°c
Restart
2 min.
VV

1010
VI
2.
5.
1.
3. 4.
6.
4932 3526 79
4932 3526 80
SDS-plus
Ø 8 x 110 mm
5 mm

1111
VII
Not included in standard equipment.
Im Lieferumfang nicht enthalten.
Ces pièces ne font pas partie de la livraison.
on incluso nella dotazione standard.
No incluido en el equipo estándar.
Não incluído no eqipamento normal.
Wordt niet meegeleverd.
Ikke inkluderet i leveringsomfanget.
Inngår ikke i leveransen.
Ingår ej i leveransomfånget.
Ei sisälly vakiovarustukseen.
Δεν συμπεριλαμβάνεται
Teslimat kapsamında değildir.
V dodávce neobsaženo.
Neobsahuje štandardná výbava.
Nie stanowi wyposażenia standardowego
Nem tartozéka a készüléknek.
Ni v obsegu dobave.
U opsegu isporuke nije sadržano.
Komplektācijā nav ietverts.
Neįeina į komplektaciją.
Ei kuulu tarne komplekti.
Не входит в объем поставки
Не е включено в обема на доставката.
Nu este inclus în echipamentul standard
Не е вклучено во стандардна опрема
Не входить в обсяг постачання.
DR 152 T
Original instructions
Originalbetriebsanleitung
Notice originale
Istruzioni originali
Manual original
Manual original
Oorspronkelijke
gebruiksaanwijzing
Original brugsanvisning
Original bruksanvisning
Bruksanvisning i original
Alkuperäiset ohjeet
Πρωτότυπο οδηγιών χρήσης
Orijinal işletme talimatı
Původním návodem k používání
Pôvodný návod na použitie
Instrukcją oryginalną
Eredeti használati utasítás
Izvirna navodila
Originalne pogonske upute
Instrukcijâm oriěinâlvalodâ
Originali instrukcija
Algupärane kasutusjuhend
Оригинальное руководство
по эксплуатации
Оригинално ръковод ство за
експлоатация
Instrucţiuni de folosire originale
Оригинален прирачник за
работа
Оригінал інструкц ії з
експлуатації
DR 152 T
Accessory
Zubehör
Accessoires
Accessorio
Accessorio
Acessório
Toebehoren
Tilbehør
Tilbehør
Tillbehör
Lisälaite
Εξαρτήματα
Aksesuar
Příslušenství
Príslušenstvo
Wyposażenie
Tartozékokat
Oprema
Oprema
Piederumi
Priedas
Tarvikud
Принадлежности
Аксесоари
Accesoriu
Дополнителна опрема
Комплектуючі
VI

1212
GB
English
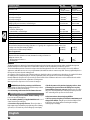
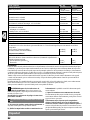
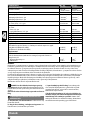
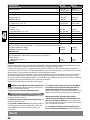
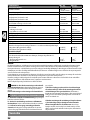
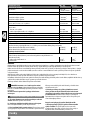
TECHNICAL DATA
Diamond Drill DD 3-152
(110-120 V) DD 3-152
(220-240 V)
Production code 4315 31 04...
... 000001-999999 4280 01 04...
... 000001-999999
Rated input 1700 W 1900 W
No-load speed 1st gear 0 -1000 min -1 0 -1050 min -1
No-load speed 2nd gear 0 -2100 min -1 0 -2400 min -1
No-load speed 3rd gear 0 -3900 min -1 0 -4700 min -1
Drilling using the drill stand:
Drilling capacity max. in concrete, 1st/2nd/3rd gear 152/62/32 mm 152/62/32 mm
Hand-held drilling:
Drilling capacity max.
in concrete, 2nd/3rd gear
in brick and tile, 1st/2nd/3rd gear 62/32 mm
200/112/62 mm 62/32 mm
200/112/62 mm
Tool reception 1/2“ / 11/4“ UNC 1/2“ / 11/4“ UNC
Weight according EPTA-Procedure 01/2014 6,5 kg 6,5 kg
Weight + DR 152 T 16,5 kg 16,5 kg
Safety class II II
Degree of protection IP 20 IP 20
Noise information
Measured values determined according to EN62841-2-1. Typically, the A-weighted noise levels of the tool are:
Sound pressure level (Uncertainty K=3dB(A))
Sound power level (Uncertainty K=3dB(A))
Wear ear protectors!
83,0 dB (A)
94,0 dB (A) 83,0 dB (A)
94,0 dB (A)
Vibration information
Vibration total values (triaxial vector sum) determined according to EN62841-2-1
Drilling into concrete, wet
Vibration emission value ah,DD
Uncertainty K= 7,3 m/s2
4,79 m/s27,3 m/s2
4,79 m/s2
WARNING!
The vibration and noise emission level given in this information sheet has been measured in accordance with a standardized test given in
EN62841 and may be used to compare one tool with another. It may be used for a preliminary assessment of exposure.
The declared vibration and noise emission level represents the main applications of the tool. However if the tool is used for dierent
applications, with dierent accessories or poorly maintained, the vibration and noise emission may dier. This may signicantly increase
the exposure level over the total working period.
An estimation of the level of exposure to vibration and noise should also take into account the times when the tool is switched o or when
it is running but not actually doing the job. This may signicantly reduce the exposure level over the total working period.
Identify additional safety measures to protect the operator from the eects of vibration and/or noise such as: maintain the tool and the
accessories, keep the hands warm, organization of work patterns.
Wear ear protectors. Exposure to noise can cause hearing loss.
WARNING Read all safety warnings and all instruc-
tions. Failure to follow all instructions listed below may result in
electric shock, re and/or serious injury.
Save all warnings and instructions for future reference.
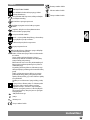
DRILL SAFETY WARNINGS
a) Wear hearing protection when diamond drilling. Exposu-
re to noise can cause hearing loss.
b) Use auxiliary handle(s), if supplied with the tool. Loss of
control can cause personal injury.
c) Brace the tool properly before use. This tool produces a
high output torque and without properly bracing the tool during
operation, loss of control may occur resulting in personal injury.
d) Hold the power tool by insulated gripping surfaces, when
performing an operation where the cutting accessory may
contact hidden wiring or its own cord.
Cutting accessory contac-
ting a “live” wire may make exposed metal parts of the power tool
“live” and could give the operator an electric shock.
Safety instructions when using long drill bits
a) Never operate at higher speed than the maximum speed
rating of the drill bit. At higher speeds, the bit is likely to bend
if allowed to rotate freely without contacting the workpiece,
resulting in personal injury.

1313
English
b) Always start drilling at low speed and with the bit tip in
contact with the workpiece. At higher speeds, the bit is likely to
bend if allowed to rotate freely without contacting the workpiece,
resulting in personal injury.
c) Apply pressure only in direct line with the bit and do not
apply excessive pressure. Bits can bend causing breakage or loss
of control, resulting in personal injury.
Additional Safety and Working Instructions
Use protective equipment. Always wear safety glasses when
working with the machine. The use of protective clothing is re-
commended, such as dust mask, protective gloves, sturdy non-slip
footwear, helmet and ear defenders.
Wear protective gloves when replacing the core bit. The core bit can
become hot after prolonged operation of the power tool.
The dust produced when using this tool may be harmful to health.
Do not inhale the dust. Use a dust absorption system and wear a
suitable dust protection mask. Remove deposited dust thoroughly,
e.g. with a vacuum cleaner.
Do not machine any materials that present a danger to health (e.g.
asbestos).
Keep mains lead clear from working range of the machine. Always
lead the cable away behind you.
When working in walls ceiling, or oor, take care to avoid electric
cables and gas or waterpipes.
The built-in friction clutch only reacts to jerky locking, which is why
you should always use the additional handle.
Before use check machine, cable, and plug for any damages or
material fatigue. Repairs should only be carried out by authorised
Service Agents.
Pay attention that neither persons in the working area nor the
power tool itself come into contact with the water that comes out.
After interruption of your work, restart the tool only after having
made sure that the drill bit is moving freely.
Never lay the power tool down until the accessory has come to a
complete stop. The spinning accessory may grab the surface and pull
the power tool out of your control.
Examine the core bit before inserting it. Use only core bits that are
in perfect condition. Damaged or deformed core bits can lead to
dangerous situations.
Check the proper seating of the core bit. Incorrectly or insecurely
fastened core bits can become loose during operation and may pose
a danger.
The tool may be used only in two-hand operation or with the drill rig.
Always keep a safe footing and hold machine with both hands. Keep
children or animals away from working area.
When drilling through walls or ceilings, ensure to protect persons
and the work area on the other side. The bit may extend through
the hole or the core may fall out on the other side.
When drilling overhead, always use the liquid collection device
specied in the instructions. Do not allow water to ow into the
tool. Water entering the power tool will increase the risk of electric
shock.
Switch the device o immediately if the insertion tool stalls! Do
not switch the device on again while the insertion tool is stalled,
as doing so could trigger a sudden recoil with a high reactive force.
Determine why the insertion tool stalled and rectify this, paying
heed to the safety instructions.
Possible causes may be:
• it is tilted in the workpiece to be machined
• it has pierced through the material to be machined
• the power tool is overloaded
Do not reach into the machine while it is running.
The insertion tool may become hot during use.
WARNING! Danger of burns
• when changing tools
• when setting the device down
Chips and splinters must not be removed while the machine is
running.
Always disconnect the plug from the socket before carrying out any
work on the machine.
When working with large drill diameters, the auxiliary handle must
be fastened in a right angle with the main handle (see illustrations,
section „Twisting the handle“).
SPECIFIED CONDITIONS OF USE
The machine is intended for dry drilling in brick and tile and wet
drilling in concrete.
Do not use this product in any other way as stated for normal use.
MAINS CONNECTION
Appliances used at many dierent locations including wet room
and open air must be connected via a residual current device (FI,
RCD, PRCD) of 30mA or less.
Connect only to single-phase AC system voltage as indicated on
the rating plate. It is also possible to connect to sockets without an
earthing contact as the design conforms to safety class II.
Only plug-in when machine is switched o.
Keep mains lead clear from working range of the machine. Always
lead the cable away behind you.
Before use check machine, cable and plug for any damages or
material fatigue. Repairs should only be carried out by authorised
Service Agents.
WORKING INSTRUCTIONS
To gain a better drill progress take out the centre bit after having
reached a depth of about 10-15 mm. Insert core cutter into the
existing groove and let machine run up smoothly.
Bore-holes which don‘t have to be applied exactly can be drilled
without a centre bit. For that purpose apply the core cutter
slantingly and put the machine slowly straight when a depth of
about 5 mm has been reached. (This is only possible when using
short core cutters!)
If drill cores should come loose, take core cutter from the material
and remove drill cores.
For best performance the diamond segments should be „roughed-
up“ to expose the fragments of diamond: To expose the diamond
fragments rub surface of segments with stone
WATER CONNECTION
A water connection is available on the tool to cool the wheel and
reduce the formation of dust. The water connection should be used
on all concrete cutting applications.
For best results, allow the water to coat the entire cutting wheel
before operation.
GB

1414
English
TROUBLESHOOTING
Vibration
1. Stop drilling.
2. Turn core drill o .
3. Always disconnect the plug from the socket before carrying out
any work on the machine.
4. Check for loose nuts and bolts. Tighten if required.
5. Check for excessive core drill bit runout. Replace if required. If
vibration continues to occur, remove the core and loose material.
If vibration continues to occur after attempting these measures,
return the rig to the nearest MILWAUKEE service facility.
Core drill bit Binding
Core drill bit binding is caused by one of two things: a dull (glazed)
core drill bit or a poorly stabilized stand. Causes of core drill bit
glazing:
• Wrong RPM for core drill bit diameter
• High feed pressure
• Low feed pressure
• High steel content in work surface
• Large, hard aggregate
• Too much water
• Low motor power
A sharp core drill bit typically has good diamond exposure and will
cut/grind almost anything in its path, including embedded steel.
MAINTENANCE
Always disconnect the plug from the socket before carrying out any
work on the machine.
If the replacement of the supply cord is necessary, this has to be
done by the manufacturer or his agent in order to avoid a safety
hazard.
The ventilation slots of the machine must be kept clear at all times.
Use only Milwaukee accessories and Milwaukee spare parts. Should
components need to be replaced which have not been described,
please contact one of our Milwaukee service agents (see our list of
guarantee/service addresses).
If needed, an exploded view of the tool can be ordered. Please
state the Article No. as well as the machine type printed on
the label and order the drawing at your local service agents or
directly at: TechtronicIndustriesGmbH, Max-Eyth-Straße10,
71364Winnenden, Germany.
ECDECLARATION OF CONFORMITY
We declare under our sole responsibility that the product described
under “Technical Data” fullls all the relevant provisions of the
directives
2011/65/EU (RoHS)
2006/42/EC
2014/30/EU
and the following harmonized standards have been used
EN62841-1:2015
EN62841-2-1:2018+A11:2019
EN55014-1:2017+A11:2020
EN55014-2:2015
EN61000-3-2:2014
EN61000-3-3:2013
ENIEC 63000:2018
Winnenden, 2020-11-17
Alexander Krug / Managing Director
Authorized to compile the technical le
Techtronic Industries GmbH
Max-Eyth-Straße 10, 71364Winnenden, Germany
GBDECLARATION OF CONFORMITY
We declare as the manufacturer under our sole responsibility that
the product described under „Technical Data“ fullls all the relevant
provisions of the following Regulations
S.I. 2012/3032 (as amended), S.I. 2008/1597 (as amended),
S.I. 2016/1091 (as amended) and that the following designated
standards have been used:
BS EN62841-1:2015
BS EN62841-2-1:2018+A11:2019
BS EN55014-1:2017+A11:2020
BS EN55014-2:2015
BS EN61000-3-2:2014
BS EN61000-3-3:2013
BS ENIEC 63000:2018
Winnenden, 2020-11-17
Alexander Krug / Managing Director
Authorized to compile the technical le
Techtronic Industries GmbH
Max-Eyth-Straße 10, 71364 Winnenden, Germany
GB

1515
English
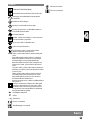
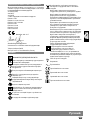
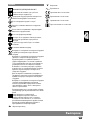
SYMBOLS
CAUTION! WARNING! DANGER!
Remove the battery pack before starting any work on the
appliance.
Please read the instructions carefully before starting the
machine.
Wear ear protectors!
Always wear goggles when using the machine.
Protect your head from injury from falling brickwork.
Always wear a protective helmet.
Wear gloves!
Accessory - Not included in standard equipment, available
as an accessory.
Do not work on a ladder. Be sure to stand rmly.
Never expose tool to rain.
Do not dispose of waste electrical and electronic equip-
ment as unsorted municipal waste.
Waste electrical and electronic equipment must be
collected separately.
Waste light sources have to be removed from equipment.
Check with your local authority or retailer for recycling
advice and collection point.
According to local regulations retailers may have an
obligation to take back waste electrical and electronic
equipment free of charge.
Your contribution to re-use and recycling of waste electri-
cal and electronic equipment helps to reduce the demand
of raw materials.
Waste electrical and electronic equipment contain
valuable, recyclable materials, which can adversely impact
the environment and the human health, if not disposed of
in an environmentally compatible manner.
Delete personal data from waste equipment, if any.
Class II tool. Tool in which protection against electric
shock does not rely on basic insulation only, but in which
additional safety precautions, such as double insulation or
reinforced insulation, are provided. There being no provi-
sion for protective earthing or reliance upon installation
conditions.
n0No-load speed
VVoltage
AC Current
European Conformity Mark
British Conformity Mark
GB
Ukraine Conformity Mark
EurAsian Conformity Mark

1616
D
Deutsch
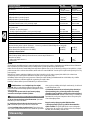
TECHNISCHE DATEN
Diamantbohrmaschine DD 3-152
(110-120 V) DD 3-152
(220-240 V)
Produktionsnummer 4315 31 04...
... 000001-999999 4280 01 04...
... 000001-999999
Nennaufnahmeleistung 1700 W 1900 W
Leerlaufdrehzahl 1. Gang 0 -1000 min -1 0 -1050 min -1
Leerlaufdrehzahl 2. Gang 0 -2100 min -1 0 -2400 min -1
Leerlaufdrehzahl 3. Gang 0 -3900 min -1 0 -4700 min -1
Ständergeführtes Bohren:
Bohr-Durchmesser max. in Beton, 1/2/3. Gang 152/62/32 mm 152/62/32 mm
Handgeführtes Bohren:
Bohr-Durchmesser max.
in Beton, 2/3. Gang
in Ziegel und Kalksandstein, 1/2/3. Gang 62/32 mm
200/112/62 mm 62/32 mm
200/112/62 mm
Werkzeugaufnahme 1/2“ / 11/4“ UNC 1/2“ / 11/4“ UNC
Gewicht nach EPTA-Prozedur 01/2014 6,5 kg 6,5 kg
Gewicht + DR 152 T 16,5 kg 16,5 kg
Schutzklasse II II
Schutzgrad IP 20 IP 20
Geräuschinformation
Messwerte ermittelt entsprechend EN62841-2-1. Der A-bewertete Geräuschpegel des Gerätes beträgt typischerweise:
Schalldruckpegel (Unsicherheit K=3dB(A))
Schallleistungspegel (Unsicherheit K=3dB(A))
Gehörschutz tragen!
83,0 dB (A)
94,0 dB (A) 83,0 dB (A)
94,0 dB (A)
Vibrationsinformationen
Schwingungsgesamtwerte (Vektorsumme dreier Richtungen) ermittelt entsprechend EN62841-2-1.
Bohren in Beton, nass
Schwingungsemissionswert ah,DD
Unsicherheit K= 7,3 m/s2
4,79 m/s27,3 m/s2
4,79 m/s2
WARNUNG!
Die angegebenen Schwingungsgesamtwerte und Geräuschemissionswerte wurden nach einem genormten Messverfahren gemäß EN62841
gemessen und können für den Vergleich von Elektrowerkzeugen miteinander verwendet werden. Sie können für eine vorläuge Einschätzung
der Belastung verwendet werden.
Der angegebene Schwingungs- und Geräuschemissionspegel repräsentiert die hauptsächlichen Anwendungen des Elektrowerkzeugs.
Wenn allerdings das Elektrowerkzeug für andere Anwendungen, mit abweichenden Einsatzwerkzeugen oder ungenügender Wartung
eingesetzt wird, können sich die Schwingungs- und Geräuschemissionen unterscheiden. Dies kann deren Wirkung über den gesamten
Arbeitszeitraum deutlich erhöhen.
Bei der Abschätzung der Belastung durch Schwingungen und Lärm sollten auch die Zeiten berücksichtigt werden, in denen das
Elektrowerkzeug ausgeschaltet ist oder zwar läuft, aber keine tatsächliche Arbeit verrichtet wird. Dies kann deren Wirkung über den
gesamten Arbeitszeitraum deutlich reduzieren.
Legen Sie zusätzliche Sicherheitsmaßnahmen zum Schutz des Bedieners vor den Auswirkungen von Schwingungen- und / oder Lärm fest,
wie z. B.: Wartung des Werkzeugs und des Zubehörs, Warmhalten der Hände, Organisation der Arbeitsabläufe.
Tragen Sie Gehörschutz. Die Einwirkung von Lärm kann Gehörverlust bewirken.
WARNUNG Lesen Sie alle Sicherheitshinweise und An-
weisungen. Versäumnisse bei der Einhaltung der nachfolgenden
Anweisungen können elektrischen Schlag, Brand und/oder schwere
Verletzungen verursachen.
Bewahren Sie alle Sicherheitshinweise und Anweisungen
für die Zukunft auf.
SICHERHEITSHINWEISE FÜR BOHRMASCHINEN
a) Tragen Sie beim Diamantbohren einen Gehörschutz Die
Einwirkung von Lärm kann Gehörverlust bewirken.
b) Benutzen Sie mit dem Gerät gelieferte Zusatzhand-
grie. Der Verlust der Kontrolle kann zu Verletzungen führen.
c) Halten Sie das Gerät vor Arbeitsbeginn am dafür
vorgesehenen Gri gut fest. Dieses Gerät erzeugt ein hohes
Abtriebsdrehmoment und wenn Sie es während des Betriebs nicht
gut festhalten, könnten Sie die Kontrolle darüber verlieren und sich
verletzen.
d) Halten Sie das Gerät an den isolierten Griächen, wenn
Sie Arbeiten ausführen, bei denen das Einsatzwerkzeug
verborgene Stromleitungen oder das eigene Netzkabel
treen kann.

1717
Deutsch
Der Kontakt mit einer spannungsführenden Leitung kann auch
metallene Geräteteile unter Spannung setzen und zu einem
elektrischen Schlag führen.
Sicherheitshinweise bei Verwendung von langen Bohrern
a) Verwenden Sie niemals eine höhere Drehzahl als die
maximale Drehzahl, die für den Bohreinsatz angegeben
ist. Bei höheren Drehzahlen kann sich der Bohreinsatz verbiegen,
wenn er ohne Kontakt zum Werkstück dreht, was zu Verletzungen
führen kann.
b) Starten Sie immer mit einer niedrigen Drehzahl und
während sich der Bohreinsatz in Kontakt mit dem Werk-
stück bendet. Bei höheren Drehzahlen kann sich der Bohreinsa-
tz verbiegen, wenn er ohne Kontakt zum Werkstück dreht, was zu
Verletzungen führen kann.
c) Üben Sie keinen übermäßigen Druck und nur in
Längsrichtung zum Bohrer aus. Bohrer können sich verbiegen
und dadurch brechen oder zu einem Verlust der Kontrolle und zu
Verletzungen führen.
Weitere Sicherheits- und Arbeitshinweise
Schutzausrüstung verwenden. Beim Arbeiten mit der Maschine
stets Schutzbrille tragen. Schutzkleidung wie Staubschutzmaske,
Schutzhandschuhe, festes und rutschsicheres Schuhwerk, Helm
und Gehörschutz werden empfohlen.
Tragen Sie beim Wechseln der Bohrkrone Schutzhandschuhe. Die
Bohrkrone kann bei längerem Betrieb des Elektrowerkzeugs heiß
werden.
Beim Arbeiten entstehender Staub ist oft gesundheitsschädlich und
sollte nicht in den Körper gelangen. Staubabsaugung verwenden
und zusätzlich geeignete Staubschutzmaske tragen. Abgelagerten
Staub gründlich entfernen, z.B. Aufsaugen.
Es dürfen keine Materialien bearbeitet werden, von denen eine
Gesundheitsgefährdung ausgeht (z.B. Asbest).
Anschlusskabel stets vom Wirkungsbereich der Maschine fernhal-
ten. Kabel immer nach hinten von der Maschine wegführen.
Beim Arbeiten in Wand, Decke oder Fußboden auf elektrische
Kabel, Gas- und Wasserleitungen achten.
Die eingebaute Rutschkupplung spricht nur bei ruckartigem
Blockieren an, deshalb Zusatzhandgri immer benutzen.
Vor jedem Gebrauch Gerät , Anschlusskabel, Akkupack Verlänge-
rungskabel und Stecker auf Beschädigung und Alterung kontrollie-
ren. Beschädigte Teile nur von einem Fachmann reparieren lassen.
Achten Sie darauf, dass weder Personen im Arbeitsbereich noch
das Elektrowerkzeug mit dem Austretenden Wasser in Kontakt
kommen.
Schalten Sie nach einer Unterbrechung Ihrer Arbeit die Diamant-
bohrmaschine nur dann ein, nachdem Sie sich davon überzeugt
haben, dass sich die Bohrkrone frei drehen lässt.
Legen Sie das Elektrowerkzeug niemals ab, bevor das Einsatzwerk-
zeug völlig zum Stillstand gekommen ist. Das sich drehende Einsatz-
werkzeug kann in Kontakt mit der Ablageäche geraten, wodurch Sie
die Kontrolle über das Elektrowerkzeug verlieren können.
Prüfen Sie die Bohrkronen vor dem Einsetzen. Setzen Sie nur ein-
wandfreie Bohrkronen ein. Beschädigte oder deformierte Bohrkronen
können zu gefährlichen Situationen führen.
Prüfen Sie die Bohrkrone auf festen Sitz. Falsch oder nicht sicher
befestigte Bohrkronen können sich während des Betriebs lösen und
Sie gefährden.
Das Gerät darf nur zweihandgeführt oder am Bohrständer eingesetzt
werden.
Beim Arbeiten sicheren Stand einnehmen und Gerät immer mit
beiden Händen an den zwei Grien halten. Im Arbeitsbereich dürfen
sich keine anderen Personen - vor allem keine Kinder - oder Tiere
aufhalten.
Sorgen Sie beim Bohren durch Wände oder Decken dafür, dass Per-
sonen und Arbeitsbereich auf der anderen Seite geschützt sind. Die
Bohrkrone kann über das Bohrloch hinausgehen und der Bohrkern
kann auf der anderen Seite herausfallen.
Verwenden Sie beim Bohren über Kopf immer das in den Anwei-
sungen angegebene Flüssigkeitssammelgerät. Lassen Sie kein Was-
ser in das Werkzeug ießen. In das Elektrowerkzeug eindringendes
Wasser erhöht das Risiko eines Stromschlags.
Beim Blockieren des Einsatzwerkzeuges bitte das Gerät sofort
ausschalten! Schalten Sie das Gerät nicht wieder ein, solange das
Einsatzwerkzeug blockiert ist; hierbei könnte ein Rückschlag mit
hohem Reaktionsmoment entstehen. Ermitteln und beheben
Sie die Ursache für die Blockierung des Einsatzwerkzeuges unter
Berücksichtigung der Sicherheitshinweise.
Mögliche Ursachen dafür können sein:
• Verkanten im zu bearbeitenden Werkstück
• Durchbrechen des zu bearbeitenden Materials
• Überlasten das Elektrowerkzeuges
Greifen Sie nicht in die laufende Maschine.
Das Einsatzwerkzeug kann während der Anwendung heiß werden.
WARNUNG! Verbrennungsgefahr
• bei Werkzeugwechsel
• bei Ablegen des Gerätes
Späne oder Splitter dürfen bei laufender Maschine nicht entfernt
werden.
Vor allen Arbeiten an der Maschine den Stecker aus der Steckdose
ziehen.
Bei großen Bohrdurchmessern muss der Zusatzhandgri
rechtwinklig zum Haupthandgri befestigt werden (siehe auch im
Bildteil, Abschnitt „Handgri verdrehen“).
BESTIMMUNGSGEMÄSSE VERWENDUNG
Die Diamantbohrmaschine ist einsetzbar zum Trockenbohren in
Ziegel und Kalksandstein und zum Nassbohren in Beton.
Dieses Gerät darf nur wie angegeben bestimmungsgemäß verwen-
det werden.
NETZANSCHLUSS
Steckdosen in Feuchträumen und Außenbereichen müssen mit
Fehlerstrom-Schutzschaltern (FI, RCD, PRCD) ausgerüstet sein. Das
verlangt die Installationsvorschrift für Ihre Elektroanlage. Bitte
beachten Sie das bei der Verwendung unseres Gerätes.
Nur an Einphasen-Wechselstrom und nur an die auf dem Leistungs-
schild angegebene Netzspannung anschließen. Anschluss ist auch
an Steckdosen ohne Schutzkontakt möglich, da ein Aufbau der
Schutzklasse II vorliegt.
Maschine nur ausgeschaltet an die Steckdose anschließen.
Anschlusskabel stets vom Wirkungsbereich der Maschine fernhal-
ten. Kabel immer nach hinten von der Maschine wegführen.
D
Pagina se încarcă...
Pagina se încarcă...
Pagina se încarcă...
Pagina se încarcă...
Pagina se încarcă...
Pagina se încarcă...
Pagina se încarcă...
Pagina se încarcă...
Pagina se încarcă...
Pagina se încarcă...
Pagina se încarcă...
Pagina se încarcă...
Pagina se încarcă...
Pagina se încarcă...
Pagina se încarcă...
Pagina se încarcă...
Pagina se încarcă...
Pagina se încarcă...
Pagina se încarcă...
Pagina se încarcă...
Pagina se încarcă...
Pagina se încarcă...
Pagina se încarcă...
Pagina se încarcă...
Pagina se încarcă...
Pagina se încarcă...
Pagina se încarcă...
Pagina se încarcă...
Pagina se încarcă...
Pagina se încarcă...
Pagina se încarcă...
Pagina se încarcă...
Pagina se încarcă...
Pagina se încarcă...
Pagina se încarcă...
Pagina se încarcă...
Pagina se încarcă...
Pagina se încarcă...
Pagina se încarcă...
Pagina se încarcă...
Pagina se încarcă...
Pagina se încarcă...
Pagina se încarcă...
Pagina se încarcă...
Pagina se încarcă...
Pagina se încarcă...
Pagina se încarcă...
Pagina se încarcă...
Pagina se încarcă...
Pagina se încarcă...
Pagina se încarcă...
Pagina se încarcă...
Pagina se încarcă...
Pagina se încarcă...
Pagina se încarcă...
Pagina se încarcă...
Pagina se încarcă...
Pagina se încarcă...
Pagina se încarcă...
Pagina se încarcă...
Pagina se încarcă...
Pagina se încarcă...
Pagina se încarcă...
Pagina se încarcă...
Pagina se încarcă...
Pagina se încarcă...
Pagina se încarcă...
Pagina se încarcă...
Pagina se încarcă...
Pagina se încarcă...
Pagina se încarcă...
Pagina se încarcă...
Pagina se încarcă...
Pagina se încarcă...
Pagina se încarcă...
Pagina se încarcă...
Pagina se încarcă...
Pagina se încarcă...
Pagina se încarcă...
Pagina se încarcă...
Pagina se încarcă...
Pagina se încarcă...
Pagina se încarcă...
Pagina se încarcă...
Pagina se încarcă...
Pagina se încarcă...
Pagina se încarcă...
Pagina se încarcă...
Pagina se încarcă...
Pagina se încarcă...
Pagina se încarcă...
Pagina se încarcă...
Pagina se încarcă...
Pagina se încarcă...
Pagina se încarcă...
Pagina se încarcă...
Pagina se încarcă...
Pagina se încarcă...
Pagina se încarcă...
Pagina se încarcă...
Pagina se încarcă...
Pagina se încarcă...
Pagina se încarcă...
Pagina se încarcă...
Pagina se încarcă...
Pagina se încarcă...
Pagina se încarcă...
-
 1
1
-
 2
2
-
 3
3
-
 4
4
-
 5
5
-
 6
6
-
 7
7
-
 8
8
-
 9
9
-
 10
10
-
 11
11
-
 12
12
-
 13
13
-
 14
14
-
 15
15
-
 16
16
-
 17
17
-
 18
18
-
 19
19
-
 20
20
-
 21
21
-
 22
22
-
 23
23
-
 24
24
-
 25
25
-
 26
26
-
 27
27
-
 28
28
-
 29
29
-
 30
30
-
 31
31
-
 32
32
-
 33
33
-
 34
34
-
 35
35
-
 36
36
-
 37
37
-
 38
38
-
 39
39
-
 40
40
-
 41
41
-
 42
42
-
 43
43
-
 44
44
-
 45
45
-
 46
46
-
 47
47
-
 48
48
-
 49
49
-
 50
50
-
 51
51
-
 52
52
-
 53
53
-
 54
54
-
 55
55
-
 56
56
-
 57
57
-
 58
58
-
 59
59
-
 60
60
-
 61
61
-
 62
62
-
 63
63
-
 64
64
-
 65
65
-
 66
66
-
 67
67
-
 68
68
-
 69
69
-
 70
70
-
 71
71
-
 72
72
-
 73
73
-
 74
74
-
 75
75
-
 76
76
-
 77
77
-
 78
78
-
 79
79
-
 80
80
-
 81
81
-
 82
82
-
 83
83
-
 84
84
-
 85
85
-
 86
86
-
 87
87
-
 88
88
-
 89
89
-
 90
90
-
 91
91
-
 92
92
-
 93
93
-
 94
94
-
 95
95
-
 96
96
-
 97
97
-
 98
98
-
 99
99
-
 100
100
-
 101
101
-
 102
102
-
 103
103
-
 104
104
-
 105
105
-
 106
106
-
 107
107
-
 108
108
-
 109
109
-
 110
110
-
 111
111
-
 112
112
-
 113
113
-
 114
114
-
 115
115
-
 116
116
-
 117
117
-
 118
118
-
 119
119
-
 120
120
-
 121
121
-
 122
122
-
 123
123
-
 124
124
-
 125
125
-
 126
126
-
 127
127


în alte limbi
- slovenčina: Milwaukee DD 3-152 Používateľská príručka
- eesti: Milwaukee DD 3-152 Kasutusjuhend
Lucrări înrudite
-
Milwaukee DR 152 T Instrucțiuni de utilizare
-
-
Milwaukee MDE 41 Original Instructions Manual
-
-
-
Milwaukee M18 FDD3 Manual de utilizare
-
-