First Austria FA-5618-6 Steam Iron Manual de utilizare
- Categorie
- Fiare de călcat
- Tip
- Manual de utilizare

ENGLISH ............................ PAGE 2
DEUTSCH ........................... SEITE 7
POLSKI ....................... STRONA 12
................. . 17
ROMANESTE .............. PAGINA 21
SCG/CRO/B.i.H. .......... STRANA 26
Λ ...................... . 31
........................... . 36
FRANÇAIS ........................ PAGE 41
ΕΛΛΗΝΙΚΑ .................. ΣΕΛΙΑ 46
ҚАЗАҚ
................................. 51
FA-5618-6
INSTRUCTION MANUAL
STEAM IRON
GEBRAUCHSANWEISUNG
DAMPFBÜGELEISEN
INSTRUKCJA OBSŁUGI
ŻELAZKO PAROWE
ПОСІБНИК КОРИСТУВАЧА
ПАРОВА ПРАСКА
MANUAL DE UTILIZARE
FIER DE CĂLCAT CU ABURI
UPUTSTVO ZA UPOTREBU
PEGLA NA PARU
УПЪТВАНЕ ЗА УПОТРЕБА
ПАРНА ЮТИЯ
ПРАВИЛА ЭКСПЛУАТАЦИИ
ПАРОВОЙ УТЮГ
MODE D’EMPLOI
FER A REPASSER A VAPEUR
ΟΔΗΓΙΕΣ ΧΡΗΣΕΩΣ
ΣΙΔΕΡΟ ΑΤΜΟΥ
ПАЙДАЛАНУ НҰСҚАУЛЫҒЫ
СЫМСЫЗ ҮТІК

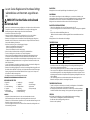
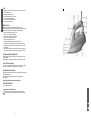
DESCRIPTION OF PARTS (see fig. 1)
Notes:
• Some parts of the iron have been slightly greased and as result the iron may smoke slightly when
switched on for the first time. It will not happen again after a few uses.
• Before using for the first time, remove any protective films or stickers from the sole plate and the
cabinet. Then clean the sole plate with a soft cloth.
• When using the iron for the first time, test it on an old piece of fabric to ensure that the sole plate
and water tank are completely clean.
3
ENGLISH
2
ENGLISH
INSTRUCTION MANUAL
IMPORTANT SAFEGUARDS
• Disconnect the iron from the wall outlet for
filling in water or when you remove the water
after use.
• The iron must be used and resetted on a stable
surface.
• When placing the iron on its stand, ensure that
the surface on which the stand is placed is
stable.
• The iron can not be used if it has been dropped,
causing visible signs of damage and leaking.
• This appliance is not intended for use by
persons (including children) with reduced
physical, sensory or mental capabilities, or lack
of experience and knowledge, unless they
have been given supervision or instruction
concerning use of the appliance by a person
responsible for their safety.
• This appliance can be used by children aged
from 8 years and persons with reduced physical,
sensory or mental capabilities, or lack of
experience and knowledge, if they have been
given supervision or instruction concerning use
of the appliance in a safe way and understand
the hazards involved. Children should not
play with the appliance. Cleaning and user
maintenance shall not be made by children
without supervision.
• Keep the iron and its cord out of the reach of
children less than 8 years of age when it is
energized or cooling down.
• The iron must not be left unattended while it is
connected to the supply mains.
CAUTION: the surface is liable to get hot
during use!
• Please read all instructions carefully before using the appliance for the first time.
• Before connecting the appliance, check if the voltage indicated on the rating plate corresponds
with the mains voltage in your home.
• Do not use appliance for other than intended use.
• The iron should always be switched off before connecting or disconnecting from the power
supply. Do not pull on the cord to disconnect the plug from the wall socket.
• Do not use the iron when it is damaged in any way. Do not operate the iron with a damaged
cord or plug. Do not replace the power cord or any other parts by yourself. Bring the iron to
the nearest authorized service facility or to the shop where you bought it, as special tools are
required for repair.
• When you have finished ironing or when you only leave it for a short while:
- turn the steam control knob to position “Ø”,
- stand the iron upright,
- disconnect the iron from the wall outlet.
• Do not allow children to touch the iron or the power cord when ironing.
• Do not immerse the iron or the cord into water or any other liquid.
• Do not touch hot metal parts, hot water or steam. These parts become hot and may cause burns.
Take care if you turn the iron upside down: there may be hot water in the tank.
• The plug and cord should not be allowed to touch the hot sole plate. Let the iron cool down
completely before taking it away. Roll the power cord around the iron for storage
• To avoid an overloaded circuit, do not operate another high voltage appliance in the same electric
circuit.
• Never use an extension power cord set that is not approved by a competent authority. The cord
should be rated for 10 A (Europe) or 15 A (America), cords rated for less amperage may overheat.
The cord should be arranged in a way that it cannot be pulled or tripped over.
• The iron is for household use only.
SAVE THE INSTRUCTION MANUAL FOR FUTURE REFERENCE.
1. Soleplate
2. Skirt
3. Up cover
4. Spray nozzle
5. Water inlet cover
6. Steam regulator
7. Spray button
8. Burst of steam button
9. Decorative part
10.Substantial set
11. Rear cover
12. Handle
13. Pilot light
14. Water tank
15. Temperature dial

4 5
ENGLISH
ENGLISH
IRONING
Important: Have you read the section “Important Safeguards”?
CHOICE OF WATER
If the water in your area is particularly hard, it is advisable to use distilled or demineralized water. Do
not use chemically descaled water or any other liquids for refilling.
Do not use chemical additives, scented substances or decalcifiers. Failure to comply with the above-
mentioned regulations leads to the loss of guarantee.
HOW TO FILL IN WATER
• Set the steam control knob to “0” and the temperature control dial to “OFF”.
• Unplug the iron from the wall outlet, and wait for the iron to cool down.
• Pour water into the water inlet:
- Fill up to the maximum level “MAX” of the water tank.
Important: Empty the watertank after use.
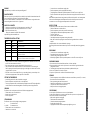
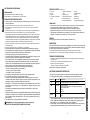
TEMPERATURE CONTROL SETTING
SETTING FABRIC RECOMMENDATION
•Acetete/Nylon Dry iron on reverse side
•• Silk/Nylon Dry iron on reverse side
min Rayon Check garment label and follow manufacturer’s instructions
•• Wool/Polyester Steam iron on wrong side or use pressing cloth
••• Cottons Steam iron or dry iron while fabric is damp until dry. Iron dark fabrics on
wrong side to avoid shine
••• Linen Steam iron or dry iron while fabric is damp until dry. Iron dark fabrics on
wrong side to avoid shine. Iron table linens on right side
• Always check first to see whether a label with ironing instructions is attached to the article to be
ironed. Follow these instruction in all cases.
• If the ironing instruction are missing, then the table below may help you.
• First you should sort the laundry: Wool with wool, Cotton with cotton etc. Start ironing the
fabrics requiring the lowest temperature and progress to the higher ones because the iron heats
up quicker than it cools down.
• If the fabric consist of various kinds of fibres (e.g. cotton with polyester) you must always select
the lowest ironing temperature of the composition of those fibres.
SETTING THE TEMPERATURE
• Insert the plug in the wall socket and stand the iron upright.
• Turn the temperature control knob to the correct temperature.
• The correct temperature will be reached when the pilot light has turned off. The pilot light will be
on and off from time to time indicating that the selected temperature is being maintained.
SPRAYING
This function can be used any time and it does not affect the ironing temperature.
• Fill water into the iron as described above.
• Aim the nozzle to the garment.
• Press the spray knob.
STEAM IRONING
This function can be used only at higher ironing temperature.
•• for moderate steam
••• or MAX for maximum steam
• Fill water into the iron as described above.
• Stand the iron on its rear side.
• Connect the iron to a suitable mains supply outlet.
• Turn the temperature control to appropriate fabric setting.
• The pilot light turns off when the required temperature is reached. The iron is ready for use.
• Turn the steam knob to the required position, steam starts coming out from the holes in the sole
plate.
Notice: With conventional steam ironing, water may leak from the sole plate if a too low temperature
has been select. If this happens, turn the temperature control to the advise position. Steam will
recommence as soon as the appropriate temperature has been reached.
BURST OF STEAM
This function provides an extra amount of steam to remove stubborn wrinkles.
• Fill the iron with water as described above.
• Turn the temperature control to the position for steam ironing.
• The pilot light turns off when the required temperature is reached.
• The iron is ready for use.
• Press the steam control knob once.
• Steam will penetrate into the garment removing the wrinkles.
• Wait a few seconds before pressing the steam control knob again when there are stubborn
wrinkles.
Usually all wrinkles can be removed within three pressings.
By pressing the shot-steam button at intervals you can also iron vertically (curtains, hung garments,
etc.)
DRY IRONING
• Connect the iron to a suitable mains supply outlet.
• Ensure that the steam control knob is in position “Ø”.
• Select the setting on the temperature control.
• When the pilot light turns off, the required temperature is reached. The iron is ready for use.
CARE AND CLEANING
1. Disconnect the iron from the wall outlet and let it cool down completely.
2. Deposits and other residues on the sole plate can be removed with a rough cloth soaked in a
vinegar/water solution.
3. The casting may be wiped with a damp cloth and then polished with a dry one.
4. Never use any abrasives to clean the sole plate.
5. Keep the sole plate smooth: avoid hard contact with metal objects.
STORAGE
• Turn the temperature control to “MIN” and set the steam control knob to position “Ø” (= no steam)
• Disconnect the iron from the wall outlet.
• Pour any remaining water out of the water tank.
• Stand the iron upright and let it cool down completely.
• The power cord can be wound around the iron.
• Always store the iron in an upright position.
SELF CLEANING
You can use the self-clean function to remove scale and impurities.
Use the self-clean function once every two weeks. If the water in your area is very hard, the self-
clean function should be used more frequently.
• Make sure the appliance is unplugged.
• Fill the water tank to maximum level.
• Select the maximum ironing temperature.
• Put the plug in the wall socket.
• Unplug the iron when the amber temperature pilot light has gone out.
5
ENGLISH
4
ENGLISH

6 7
ENGLISH
DEUTSCH
• Hold the iron over the sink, press and hold the self-clean button and gently shake the iron and
fro. (Steam and boiling water will come out of the soleplate. Impurities and flakes (if any) will be
flushed out.)
• Release the self-clean button as soon as all water in the tank has been used up.
Repeat the self-clean process if the iron still contains a lot of impurities.
SAFETY PROTECTIVE CUT-OUT
In the unlikely event of the thermostat failing, the protection cut-out will operate to prevent the iron
overheating.
Then the iron should be taken to the nearest authorized service facility.
ANTI-DRIP:
This iron is equipped with a drip stop function: the iron automatically stops steaming when the
temperature is too low to prevent water from dripping out of the soleplate.
ANTI-CALC:
The Anti-calc function filtrate the minerals from the water to prevent mineral residue build up at the
steam chamber.
The anti-calc cartridge is an integral part of the water tank and does not to be replace.
Children should be supervised to ensure that they do not play with the appliance.
SPECIFICATIONS
Power: 220-240 V ~ 50-60 Hz • 2200 W
Environment friendly disposal
You can help protect the environment! Please remember to respect the local regulations: hand
in the non-working electrical equipments to an appropriate waste disposal center.
GEBRAUCHSANWEISUNG
WICHTIGE SICHERHEITSHINWEISE
• Trennen Sie das Bügeleisen von der Strom-
versorgung, bevor Sie den Wassertank befüllen
oder entleeren.
• Stellen Sie das Bügeleisen bitte nur auf einer
stabilen Arbeitsfläche ab.
• Bei Aufstellen des Bügeleisens auf der Ablage
achten Sie bitte darauf, dass die Abstellfläche
stabil ist.
• Benutzen Sie das Bügeleisen nicht weiter,
falls es einmal heruntergefallen ist und
sichtbare Zeichen von Beschädigungen oder
Undichtigkeiten aufweist.
• Dieses Gerät ist geeignet für den Gebrauch
durch Kinder ab 8 Jahren und Personen mit
eingeschränkten körperlichen, sensorischen
oder geistigen Fähigkeiten, oder ohne
Erfahrung und Wissen, sofern sie beaufsichtigt
oder über den sicheren Gebrauch des
Geräts angeleitet werden und die damit
einhergehenden Gefahren verstehen. Kinder
dürfen nicht mit dem Gerät spielen. Reinigungs-
und Wartungsarbeiten dürfen von Kindern nur
unter Aufsicht durchgeführt werden.
• Halten Sie das Bügeleisen und dessen Netzkabel
von Kindern unter 8 Jahren fern, wenn das
Gerät am Netzstrom angeschlossen ist oder
abkühlt.

8 9
DEUTSCH
DEUTSCH
• Lassen Sie das Bügeleisen nicht unbeaufsichtigt,
während dieses am Netzstrom angeschlossen
ist.
VORSICHT: Die Oberfläche wird während
des Betriebs heiß!
• Bitte lesen Sie die Gebrauchsanweisung sorgfältig, bevor Sie das Gerät das erste Mal verwenden.
• Überprüfen Sie bitte vor der ersten Inbetriebnahme, ob die am Typenschild angegebene
Betriebsspannung mit der Netzspannung in Ihrem Haushalt über einstimmt.
• Verwenden Sie das Gerät nur um zu bügeln.
• Achten Sie darauf, dass das Bügeleisen ausgeschaltet ist, bevor Sie es an die Steckdose
anschließen. Ziehen Sie beim Ausstecken immer am Stecker, niemals am Kabel.
• Benützen Sie das Bügeleisen nur in einwandfreiem Zustand. Beschädigungen an Bügeleisen,
Netzkabel oder Stecker können nur von Kundendienst oder Fachpersonal behoben werden, da
dazu spezielles Werkzeug erforderlich ist.
• Bei kurzer Unterbrechung oder nach Beendigung des Bügelns:
- Schalten Sie den Dampfregler auf die Position “Ø”
- Stellen Sie das Bügeleisen auf die Standfläche
- Trennen Sie das Netzkabel von der Stromversorgung
• Halten Sie während des Betriebs Kinder von Bügeleisen und Netzkabel fern.
• Tauchen Sie das Bügeleisen nicht in Wasser oder andere Flüssigkeiten.
• Achten Sie darauf, nicht mit Bügelsohle, Dampf oder heißem Wasser in Berührung zu kommen.
Vorsicht beim Umdrehen des Bügeleisens: im Wasser tank könnte noch heißes Wasser sein!
• Netzkabel und Stecker dürfen nicht mit der heißen Bügelsohle in Berührung kommen. Lassen Sie
das Bügeleisen vollständig auskühlen bevor Sie es wegräumen. Zum Verstauen wickeln Sie das
Kabel um das Gehäuse.
• Um eine Überlastung des Stromkreises zu verhindern, vermeiden Sie während des Bügelns den
Betrieb weiterer Hochleistungs-Elektrogeräte im selben Stromkreis.
• Benützen Sie kein Verlängerungskabel, das nicht von den zuständigen Behörden geprüft wurde.
Das Kabel sollte die Aufschrift 10 A (Europa) oder 15 A (Amerika) aufweisen, Kabel die für weniger
Ampere geeignet sind, könnten überhitzen. Das Kabel sollte so liegen, dass ein Stolpern oder
Heraus reißen des Kabels nicht möglich ist.
• Das Bügeleisen ist nur für den Haushaltsgebrauch bestimmt.
BEWAHREN SIE DIESE BEDIENUNGSANLEITUNG GUT AUF!
BESCHREIBUNG DER TEILE
HINWEISE:
• Aufgrund von Fettrückständen kann es bei der ersten Inbetriebnahme zu leichter
Rauchentwicklung kommen. Diese tritt nach mehrmaligem Gebrauch nicht mehr auf.
• Entfernen Sie eventuell vorhandene Schutzfolien vor der ersten Inbetrieb nahme. Reinigen Sie die
Bügelsohle sodann mit einem weichen Tuch.
• Testen Sie das Bügeleisen zuerst an einem Stück Stoff um sicherzustellen, dass Bügelsohle und
Wassertank völlig sauber sind.
1. Bügelsohle
2. Schürze
3. Vordere Abdeckung
4. Spraydüse
5. Abdeckung der
Wassereinfüllöffnung
6. Dampfregler
7. Sprühtaste
8. Dampfstoßtaste
9. Verzierung
10. Netzkabelk nickschutz
11. Hintere Abdeckung
12. Handgriff
13. Kontrollanzeige
14. Wassertank
15. Temperaturregler
DAS BÜGELN
Wichtig: Haben Sie bereits das Kapitel “Wichtige Sicherheitshinweise” gelesen?
WASSERWAHL
Sollte das Wasser in Ihrer Region besonders kalkhaltig sein, so verwenden Sie destilliertes oder
entmineralisiertes Wasser. Verwenden Sie kein chemisch entkalktes Wasser oder andere Flüssigkeiten
zum Befüllen.Verwenden Sie keine chemischen Zusätze, Duftstoffe oder Entkalker. Bei Nicht-
Befolgen der oben erwähnten Vorschriften verlieren Sie Ihren Garantieanspruch.
DAS BEFÜLLEN DES WASSERTANKS
• Stellen Sie den Dampfregler auf „0“ und den Temperaturregler auf „OFF“.
• Trennen Sie das Bügeleisen vom Stromnetz und warten Sie solange, bis das Bügeleisen abgekühlt
ist.
• Füllen Sie über die Wassereinfüllöffnung Wasser ein:
- Befüllen Sie den Wassertank bis zur Markierung „MAX“ für den maximalen Wasserstand mit
Wasser.
Wichtig: Entleeren Sie den Wasser tank nach dem Bügeln!
TEMPERATURWAHL
EINSTELLUNG MATERIAL EMPFEHLUNG
•Acetat/Nylon Trockenbügeln a. verk. Seite
•• Seide/Nylon Trockenbügeln a. verk. Seite
min Rayon Prüfen Sie das Pegeetikett und folgen Sie diesen Anweisungen
•• Wolle/Polyester Dampfbügeln auf verkehrter Seite
••• Baumwolle Dampfbügeln dunkle Wäschestücke auf verkehrter Seite bügeln, um
Spiegel zu vermeiden
••• Leinen Dampfbügeln dunkle Wäschestücke auf verkehrter Seite bügeln, um
Spiegel zu vermeiden
Kontrollieren Sie bitte immer die Pflegeanleitung auf den zu bügelnden Kleidungsstücken.
Folgen Sie diesen Anweisungen auf alle Fälle.
• Sollte keine Pflegeanleitung vorhanden sein, richten Sie sich bitte nach der folgenden Tabelle.
• Zuerst sortieren Sie die Bügelwäsche: Wolle zu Wolle, Baumwolle zu Baumwolle etc. Bügeln Sie
zuerst die Kleidungsstücke, die eine niedrigere Bügeltemperatur erfordern und gehen Sie dann
zu Kleidungsstücken mit höheren Temperaturen über. Begründung: das Bügeleisen heizt rascher
auf als es abkühlt.
• Sollte das Kleidungsstück aus verschiedenen Materialien bestehen (Mischgewebe), z.B.:
Baumwolle mit Polyester, wählen Sie die niedrigere Temperatur.
TEMPERATUREINSTELLUNG
• Stecken Sie den Stecker in die Steckdose, und stellen Sie das Bügeleisen auf die Standfläche.
• Stellen Sie den Temperaturregler auf die gewünschte Temperatur.
• Die richtige Temperatur ist dann erreicht, wenn das Licht verloschen ist. Die Kontrolllampe
leuchtet in Intervallen auf um anzuzeigen, dass die gewünschte Temperatur gehalten wird.
SPRÜHEN
Diese Funktion steht unabhängig von der gewählten Bügeltemperatur zur Verfügung.
• Füllen Sie Wasser in das Bügeleisen. (Siehe Gebrauchs anweisung)
• Die Düse muss auf das Kleidungsstück gerichtet sein.
• Drücken Sie den Sprühknopf.

11
DEUTSCH
10
DEUTSCH
BÜGELN MIT DAMPF
Diese Funktion steht nur bei höheren Temperaturen zur Verfügung.
•• für gemäßigten Dampf
••• oder MAX für maximalen Dampf
• Füllen Sie Wasser in das Bügeleisen. (Siehe Gebrauchs anweisung)
• Stellen Sie das Bügeleisen auf die Standfläche.
• Stecken Sie den Stecker in die Steckdose.
• Drehen Sie den Temperaturregler auf Dampfbügeln
• Die Kontrolleuchte erlischt, wenn die richtige Temp eratur erreicht ist. Das Bügeleisen ist
betriebsbereit.
• Drehen Sie den Dampfknopf in die gewünschte Posit ion. Dampf tritt durch die Öffnungen der
Bügelsohle aus.
Achtung: Bei normalem Dampfbügeln kann bei zu niedrig gewählter Temperatur Wasser an der
Bügelsohle austreten. Sollte dies der Fall sein, so drehen Sie den Temperaturregler zur richtigen
Temperatur. Sobald diese erreicht ist, tritt Dampf aus.
DAMPFSTOSS
Bei dieser Funktion wird Dampf stoßweise abgegeben, sehr hilfreich bei stark geknitterter Kleidung.
• Füllen Sie das Bügeleisen mit Wasser. (Siehe Gebrauchs anweisung)
• Drehen Sie den Temperaturregler auf Dampfbügeln
• Das Licht schaltet sich ab, sobald die richtige Temperatur erreicht wurde. Nun können Sie mit
dem Bügeln be ginnen.
• Drücken Sie den Dampfknopf einmal. Der abgegebene Dampfstoß dringt in das Gewebe ein.
• Warten Sie ein wenig bevor Sie den Dampfknopf noch mals drücken.
Im Normalfall genügt dreimaliges Betätigen des Dampfknopfes.
Durch mehrfaches Drücken der Dampftaste können Sie ebenfalls vertikal bügeln (Gardinen,
Kleidung auf Bügeln usw.)
TROCKENBÜGELN
• Stecken Sie den Stecker in die Steckdose und stellen Sie das Bügeleisen auf die Standfläche.
• Vergewissern Sie sich, dass der Dampfregler auf “Ø” steht.
• Wählen Sie die gewünschte Temperatur mittels Temperaturregler.
• Wenn die Kontrolleuchte erlischt, ist das Bügeleisen gebrauchsfertig.
PFLEGE UND REINIGUNG
• Trennen Sie das Bügeleisen von der Stromversorgung und lassen Sie es vollständig auskühlen.
• Ablagerungen und andere Rückstände können mit einem in Essiglösung getränkten Tuch
entfernt werden.
• Reinigen Sie das Gehäuse mit einem feuchten Tuch und wischen es an schließend trocken.
• Verwenden Sie keine Scheuermittel zum Reinigen der Bügelsohle.
• Vermeiden Sie ein Zerkratzen der Bügelsohle.
AUFBEWAHRUNG
• Drehen Sie den Temperaturregler auf “MIN” und den Dampfregler auf “Ø” (= kein Dampf)
• Ziehen Sie den Stecker aus der Steckdose.
• Entleeren Sie den Wassertank.
• Stellen Sie das Bügeleisen zum vollständigen Aus kühlen auf die Standfläche.
• Wickeln Sie anschließend das Kabel um das Gehäuse.
• Stellen Sie das Bügeleisen zur Aufbewahrung immer auf die Standfläche.
SELBSTREINIGUNGFUNKTION
Mit der Selbstreinigungsfunktion können Sie Kalkablagerungen und Verunreinigungen entfernen.
Benutzen Sie die Selbstreinigungsfunktion alle zwei Wochen. Ist das Wasser in Ihrem Gebiet
besonders hart, so sollten Sie die Selbstreinigungsfunktion häufiger benutzen.
• Der Netzstecker muss gezogen sein.
• Füllen Sie den Wassertank bis zum Höchstfüllstand.
• Wählen Sie die höchste Bügeltemperatur.
• Stecken Sie den Netzstecker in die Steckdose.
• Ziehen Sie wieder den Netzstecker, nachdem die bernsteinfarbene Temperaturanzeige erloschen
ist.
• Halten Sie das Bügeleisen über einer Spüle und halten Sie die Selbstreinigungstaste gedrückt;
schütteln Sie das Bügeleisen etwas hin und her (Dampf und kochendes Wasser werden über die
Bügelsohle ausgegeben. Verunreinigungen und Ablagerungen werden herausgespült).
• Lassen Sie die Selbstreinigungstaste los, sobald des Wasser im Tank aufgebraucht ist.
Wiederholen Sie die Sebstreinigung, falls weitere Verunreinigungen im Bügeleisen vorhanden
sind.
SCHUTZSCHALTER
Im Ausnahmefall einer Funktionsstörung des Thermostats schaltet der auto matische Schutzschalter
das Bügeleisen aus, damit es zu keiner Überhitzung kommt.
Lassen Sie den Fehler beim Kundendienst oder autorisierten Fachhandel beheben.
ANTI-TROPF-SYSTEM:
Das Bügelleisen ist mit einer Anti-Tropf-Funktion ausgestattet: wenn die Temperatur zu niedrig ist,
wird die Dampfausgabe automatisch unterbrochen, damit kein Wasser aus der Bügeleisensohle
tropft.
ANTI-KALK-SYSTEM:
Die Anti-Kalk-Funktion filtert die Mineralien vom Wasser, damit sich in der Dampfkammer keine
Minerale ablagern können.
Die Antikalkpatrone ist ein integrierter Bestandteil des Wassertanks und kann nicht separat
gewechselt werden.
Wenn sich Kinder in der Umgebung des Produkts befinden, dann sollten diese immer
beaufsichtigt werden, um sicherzustellen, dass sie nicht mit dem Produkt spielen.
TECHNISCHE DATEN:
Leistung: 220-240 V ~ 50-60 Hz • 2200 W
Entsorgung
Helfen Sie mit beim Umweltschutz! Entsorgen Sie Elektroaltgeräte nicht mit dem Hausmüll.
Geben Sie dieses Gerät an einer Sammelstelle für Elektroaltgeräte ab.

13
POLSKI
12
OPIS ELEMENTÓW: PATRZ RYS. 1
WSKAZÓWKI:
• Przy pierwszym użyciu może wydzielać się dym wskutek pozostałości tłuszczu. Po parokrotnym
użyciu dym znika.
• Przed pierwszym użyciem usunąć folie ochronne. Potem wyczyścić stopę żelazka miękką
ściereczką.
• Zaleca się wstępne przetestowanie żelazka na kawałku materiału, aby stwierdzić, czy stopa
żelazka i zbiornik na wodę są czyste.
PRASOWANIE
Uwaga! Czy przeczytany został już rozdział „Zasady bezpieczeństwa”?
RODZAJ WODY
Jeśli lokalna woda z kranu posiada wysoką zawartość wapnia, zaleca się używanie wody destylowanej
lub zdemineralizowanej. Nie wolno używać wody chemicznie odwapnionej ani innych cieczy. Do
wody nie należy dodawać preparatów chemicznych, substancji zapachowych i odkamieniacza.
Niestosowanie się do niniejszych zaleceń powoduje utratę praw gwarancyjnych.
INSTRUKCJA OBSŁUGI
ZASADY BEZPIECZEŃSTWA:
• Przed napełnianiem lub opróżnianiem zbiornika
na wodę wyłączyć żelazko z sieci elektrycznej.
• Żelazko musi być używane i ustawiane na
stabilnej powierzchni.
• Stawiając żelazko na podstawce upewnij się,
że powierzchnia, na której podstawka stoi, jest
stabilna.
• Żelazka nie wolno używać, jeśli spadło, co
przyczyniło się do powstania widocznych
śladów uszkodzenia, lub wycieku.
• Urządzenie może być używane przez dzieci
w wieku ośmiu lat i powyżej oraz osoby
niepełnosprawne fizycznie, zmysłowo lub
umysłowo, albo nieposiadające oświadczenia
i wiedzy, o ile mają nadzór lub przeszkolenie
dotyczące bezpiecznego użytkowania oraz
rozumieją związane zagrożenia. Dzieci
nie powinny bawić się tym urządzeniem.
Czyszczenie i konserwacja nie powinny być
wykonywane przez dzieci bez nadzoru.
• Nagrzewające lub schładzające się żelazko i jego
sznur trzymać poza zasięgiem dzieci, młodszych
niż 8 lat.
• Podłączonego do zasilania żelazka nie wolno
zostawiać bez nadzoru.
OSTRZEŻENIE: powierzchnia w trakcie
używania może być bardzo gorąca!
1. Stopa
2. Osłona
3. Pokrywa
4. Dysza spryskiwacza
5. Pokrywa wlotu wody
6. Regulator pary wodnej
7. Przycisk spryskiwania
8. Przycisk wyrzutu pary
9. Element dekoracyjny
10. Prowadnica przewodu
11. Tylna osłona
12. Uchwyt
13. Lampka nagrzewania
14. Zbiornik na wodę
15. Pokrętło temperatury
POLSKI
• Przed pierwszym użyciem żelazka dokładnie przeczytać instrukcję obsługi.
• Przed pierwszym użyciem żelazka upewnić się, czy napięcie znamionowe żelazka jest zgodne z
napięciem domowej sieci elektrycznej.
• Używać żelazka tylko do prasowania.
• Przed podłączeniem do sieci elektrycznej upewnić się, że żelazko jest wyłączone. Podczas
wyłączania ciągnąć wtyczkę, a nie kabel.
• Używać tylko żelazka w nienagannym stanie. Naprawy ewentualnych uszkodzeń żelazka,
przewodu zasilającego lub wtyczki można dokonać tylko w specjalistycznym zakładzie, ponieważ
potrzebne są do tego specjalistyczne narzędzia.
• Podczas krótkiej przerwy w prasowaniu lub po zakończeniu prasowania należy:
- Nastawić regulator pary na pozycję “Ø”,
- Postawić żelazko na sztorc,
- Wyłączyć żelazko z sieci elektrycznej.
• Dzieci należy trzymać z daleka od żelazka i przewodu zasilającego.
• Nigdy nie wolno zanurzać żelazka w wodzie lub innych cieczach.
• Unikać kontaktu ze stopą żelazka, parą i gorącą wodą. Podczas obracania żelazka należy
zachować szczególną ostrożność, ponieważ w zbiorniku może być jeszcze gorąca woda.
• Kabel i wtyczka nie mogą dotykać gorącego spodu żelazka. Przed schowaniem odczekać do
ostygnięcia żelazka. Okręcić sznur dookoła obudowy żelazka.
• Aby uniknąć przeciążenia sieci elektrycznej nie należy podczas pracy żelazka włączać innych
urządzeń elektrycznych.
• Nie używać przedłużaczy bez odpowiedniego atestu. Na kablu powinno znajdować się
oznaczenie 10 A (Europa) lub 15 A (Ameryka). Kable przewidziane dla mniejszej liczby
amperów mogą się przegrzać. Kabel powinien być ułożony w sposób uniemożliwiający
potknięcie się o niego lub wyrwanie z gniazdka.
• Żelazko przeznaczone jest tylko do użytku w gospodarstwach domowych.
ZALECA SIĘ ZACHOWANIE NINIEJSZEJ INSTRUKCJI OBSŁUGI NA PRZYSZŁOŚĆ!

15
POLSKI
14
POLSKI
WYRZUT PARY
W tej funkcji para jest wyrzucana jednokrotnie. Jest to bardzo pomocne w wypadku mocno
pogniecionej odzieży.
• Napełnić zbiornik wodą. (patrz odpowiedni rozdział w niniejszej instrukcji)
• Nastawić pokrętło termostatu na prasowanie przy użyciu pary.
• Lampka kontrolna gaśnie, gdy prawidłowa temperatura została osiągnięta. Żelazko jest gotowe
do prasowania.
• Nacisnąć raz przycisk wyrzutu pary. Wydzielona w ten sposób para wnika głęboko w materiał.
• Odczekać chwilę przed powtórnym naciśnięciem przycisku wyrzutu pary.
W zwykłych przypadkach trzykrotne naciśnięcie przycisku wyrzutu pary jest wystarczające.
Naciskając, z przerwami, przycisk wyzwalania pary możesz używać żelazka do prasowania w pionie
(zasłony, wisząca odzież, itp.)
PRASOWANIE NA SUCHO
• Włączyć żelazko do sieci elektrycznej i postawić na sztorc.
• Upewnić się, że pokrętło termostatu nastawione jest na pozycję “Ø”.
• Nastawić odpowiednią temperaturę za pomocą pokrętła termostatu.
• Gdy zgaśnie lampka kontrolna, żelazko jest gotowe do pracy.
KONSERWACJA
• Wyłączyć żelazko z sieci elektrycznej i pozostawić do ostygnięcia.
• Usunąć zanieczyszczenia szmatką zwilżoną roztworem octu.
• Obudowę czyścić wilgotną szmatką. Potem starannie wytrzeć do sucha.
• Nie używać do czyszczenia stopy żelazka żadnych środków do szorowania.
• Unikać porysowania stopy żelazka.
PRZECHOWYWANIE
• Nastawić pokrętło termostatu na pozycję „MIN”, a regulator pary na pozycję “Ø”.
• Wyłączyć żelazko z sieci elektrycznej.
• Opróżnić zbiornik na wodę.
• Postawić żelazko na sztorc do całkowitego ostygnięcia.
• Owinąć kabel wokół obudowy.
• Żelazko należy zawsze przechowywać ustawione w pozycji na sztorc.
AUTOMATYCZNE CZYSZCZENIE:
Można do usunięcia kamienia i zanieczyszczeń skorzystać z funkcji samooczyszczania.
Zaleca się korzystanie z tej funkcji raz na dwa tygodnie. Jeśli stosowana woda jest szczególnie
twarda, to funkcja samooczyszczania powinna być stosowana częściej.
• Sprawdzić czy urządzenie ma odłączoną wtyczkę.
• Ustawić pokrętło regulacji pary w położeniu “Ø”.
• Napełnić zbiornik wody do maksimum.
• Ustawić maksymalną temperaturę prasowania.
• Wetknąć wtyczkę do gniazdka sieciowego.
• Odłączyć wtyczkę gdy żółta lampka wskaźnika grzania zgaśnie.
• Trzymając żelazko nad zlewem, nacisnąć oraz przytrzymać przycisk samooczyszczania i delikatnie
potrząsać żelazkiem do przodu i tyłu. (Para i wrząca woda będą się wydostawać poprzez stopkę.
Zanieczyszczenia oraz płatki (jeśli są) zostaną wypłukane na zewnątrz).
• Zwolnić przycisk samooczyszczania gdy woda ze zbiornika wycieknie.
Powtórzyć samooczyszczanie jeśli w żelazku nadal jest dużo zanieczyszczeń.
WYŁĄCZNIK BEZPIECZEŃSTWA
W przypadku usterki termostatu wyłącznik bezpieczeństwa automatycznie wyłącza żelazko, aby nie
doszło do przegrzania.
Żelazko należy wtedy oddać do naprawy w wyspecjalizowanym warsztacie.
NAPEŁNIANIE ZBIORNIKA
• Pokrętło regulacji pary ustawić na "0", a pokrętło regulacji temperatury na "OFF".
• Odłączyć żelazko od zasilania i odczekać, aż ostygnie.
• Wlać wodę do wlotu wody:
Napełnić zbiornik na wodę do maksymalnego poziomu oznaczonego jako "MAX".
Uwaga: Po zakończeniu prasowania należy opróżnić zbiornik!
WYBÓR TEMPERATURY
POZYCJA MATERIAL ZALECENIE
•Acetat/Nylon Prasować na sucho na lewej stronie
•• Jedwab/Nylon Prasować na sucho na lewej stronie
min Rayon Stosować się do zaleceń na etykietce
•• Wełna/Poliester Prasować przy użyciu pary na lewej stronie
••• Bawełna Prasować przy użyciu pary. Ciemne rzeczy prasować na lewej stronie,
aby uniknąć tzw. „efektu lustra”.
••• Len Prasować przy użyciu pary. Ciemne rzeczy prasować na lewej stronie,
aby uniknąć tzw. „efektu lustra”.
• Przed prasowaniem należy zawsze obejrzeć etykietkę na ubraniu i zastosować się do jej zaleceń.
• Jeżeli nie ma etykietki, można kierować się wskazaniami powyższej tabeli.
• Zaleca się posortowanie bielizny na wełnę, bawełnę itd. Prasować najpierw odzież wymagającą
niższej temperatury prasowania, potem przejść do wyższych temperatur. Powód: żelazko szybciej
nagrzewa się niż stygnie.
• Jeżeli odzież składa się z różnych włókien mieszanych np. wełny i poliestru, należy wybrać niższą
temperaturę.
NASTAWIANIE TEMPERATURY
• Włączyć żelazko do sieci elektrycznej i postawić na sztorc.
• Nastawić pokrętło termostatu na pożądaną temperaturę.
• Lampka kontrolna gaśnie, gdy prawidłowa temperatura została osiągnięta. Lampka zapala się w
regularnych ostępach, aby zasygnalizować, że odpowiednia temperatura jest utrzymywana.
SPRYSKIWANIE
Ta funkcja jest niezależna od nastawionej temperatury prasowania.
• Napełnić zbiornik wodą. (patrz odpowiedni rozdział w niniejszej instrukcji)
• Spryskiwacz musi być skierowany na prasowaną odzież.
• Nacisnąć przycisk spryskiwacza.
PRASOWANIE PRZY UŻYCIU PARY
Używanie tej funkcji jest możliwe tylko przy wyższych temperaturach.
•• dla umiarkowanej ilości pary
••• lub MAX dla maksymalnej ilości pary
• Napełnić zbiornik wodą. (patrz odpowiedni rozdział w niniejszej instrukcji)
• Postawić żelazko na sztorc.
• Włączyć wtyczkę do sieci elektrycznej.
• Nastawić pokrętło termostatu na prasowanie przy użyciu pary.
• Lampka kontrolna gaśnie, gdy prawidłowa temperatura została osiągnięta. Żelazko jest gotowe
do prasowania.
• Nastawić regulator pary na pożądaną pozycję. Para wydziela się przez otwory w spodzie żelazka.
Uwaga: Podczas normalnego prasowania przy użyciu pary przy niższych temperaturach na spodzie
żelazka może pojawić się woda. Wtedy należy nastawić pokrętło termostatu na odpowiednią
temperaturę. Gdy zostanie ona osiągnięta, wydziela się para.

16 17
SYSTEM ZAPOBIEGAJĄCY KAPANIU:
Żelazko jest wyposażone w system zapobiegający kapaniu: w przypadku zbyt niskiej temperatury,
wydzielanie pary zostaje wstrzymane, aby zapobiec skapywaniu wody z żelazka.
SYSTEM ZAPOBIEGAJĄCY OSADZANIU SIĘ KAMIENIA:
System zapobiegający osadzaniu się kamienia filtruje substancje mineralne zawarte w wodzie
zapobiegając w ten sposób osadzaniu się kamienia w komorze parowej.
Wkład antywapienny jest integralną częścią zbiornika na wodę i nie podlega wymianie.
Jeśli w pobliżu urządzenia znajdują się dzieci, należy je zawsze nadzorować, aby upewnić się,
że nigdy wykorzystują urządzenia do zabawy.
PARAMETRY TECHNICZNE
Moc: 220-240 V ~ 50-60 Hz • 2200 W
Utylizacja przyjazna środowisku
Możesz wspomóc ochronę środowiska! Proszę pamiętać o przestrzeganiu lokalnych przepisów:
przekaż uszkodzony sprzęt elektryczny do odpowiedniego ośrodka utylizacji.
УКРАЇНСЬКА
POLSKI
ПОСІБНИК КОРИСТУВАЧА
ЗАХОДИ БЕЗПЕКИ
• '
.
• .
• , , ,
, .
• , .
• 8
, ,
, ,
, ' . .
.
• ,
8 .
• , .
• .
• , , ,
.
• .
• .
.
• , .
.
- .
, ,
.
• :
- “Ø”,
- ,
- .
• .
• - .
• ,
. .
: .
• .
.
,
• ,
.
• ,
.
10 A () 15 A (), , ,
. ,
.
• .
ЗАСТЕРЕЖЕННЯ: поверхня нагрівається під час використання!
ЗБЕРЕЖІТЬ ДАНИЙ ПОСІБНИК КОРИСТУВАЧА ДЛЯ МАЙБУТНЬОЇ ДОВІДКИ.

18 19
УКРАЇНСЬКА
УКРАЇНСЬКА
ДЕТАЛІ ПРАСКИ (. . 1)
Примітки:
• ,
. .
•
. ' .
• ,
, .
ПРАСУВАННЯ
: “ ”?
ВИБІР ВОДИ
,
.
- .
, .
.
ЯК ЗАЛИВАТИ ВОДУ
• "0",
"OFF.".
• .
• :
- "MAX".
: .
НАСТРОЙКИ ТЕМПЕРАТУРИ
• /
•• /
min .
•• /
••• ,
. ,
.
••• ,
. ,
.
• , ,
. .
• , .
• : ,
. , ,
, ,
, .
1.
2.
3.
4.
5.
6.
7.
8.
9.
10.
11.
12.
13.
14.
15.
• (, ),
,
.
НАСТРОЙКА ТЕМПЕРАТУРИ
•
.
• .
• , .
, ,
.
РОЗПИЛЕННЯ
- ,
.
• , .
• .
• .
ПАРОВЕ ПРАСУВАННЯ
.
••
••• .
• , .
• .
• .
• .
• .
.
• ;
.
: ,
.
.
.
ПАРОВИЙ УДАР
.
• , .
• .
• .
• .
• .
• , .
• ,
.
.
, , (
, ).
СУХЕ ПРАСУВАННЯ
• .
• , “Ø”.
• .
• .
.

21
ROMANESTE
20
УКРАЇНСЬКА
ДОГЛЯД ТА ЧИЩЕННЯ
1. .
2. ,
, .
3. , .
4. .
5. : .
ЗБЕРІГАННЯ
• “MIN”
“Ø” (= )
• .
• .
• .
• .
• .
САМООЧИЩЕННЯ
, .
.
, .
• , .
• .
• .
• .
• , .
• ,
. ( .
.
• , .
, .
ЗАПОБІЖНЕ ВИМКНЕННЯ ПРАСКИ
, ,
, .
.
АНТИПРОСОЧУВАННЯ:
:
, .
ANTI-CALC:
Anti-calc ,
.
.
Якщо поряд із пристроєм знаходяться діти, завжди наглядайте за ними і не давайте їм
гратися з пристроєм.
ТЕХНІЧНІ ХАРАКТЕРИСТИКИ: : 220-240 ~ 50-60 • 2200
ТЕРМІН ПРИДАТНОСТІ: НЕ ОБМЕЖЕНИЙ
Безпечна утилізація
! :
.
MANUAL DE UTILIZARE
PRECAUTII IMPORTANTE
• Deconectati aparatul de la priza pentru
umplerea rezervorului cu apa sau pentru a goli
apa ramasa in rezervor dupa folosirea aparatului.
• Este necesar ca fierul să fie utilizat şi reaşezat în
poziia de repaus pe o suprafaă stabilă.
• La aşezarea fierului pe suportul său, asigurai-vă
că suprafaa pe care se află suportul este stabilă.
• Fierul nu poate fi folosit dacă a fost scăpat
şi prezintă semne vizibile de deteriorare şi
scurgeri.
• Acest aparat poate fi utilizat de către copii
cu vârsta minimă de opt ani şi persoanele cu
capacităi fizice, senzoriale sau mentale reduse
sau fără experienă şi cunoştine în cazul în care
acestora li s-a dat dreptul sau au fost instruii cu
privire la utilizarea aparatului într-un mod sigur
şi îneleg pericolele implicate. Nu le permitei
copiilor să se joace cu aparatul. Curăarea şi
întreinerea nu trebuie efectuate de copii fără
supraveghere.
• Nu lăsai fierul şi cablul acestuia la îndemâna
copiilor cu vârsta sub 8 ani când este sub
tensiune sau se răceşte.
• Nu lăsai fierul de călcat nesupravegheat cât este
conectat la alimentarea de la reea.
ATENŢIE: suprafaţa se poate încinge în
timpul utilizării!

23
ROMANESTE
22
ROMANESTE
• Cititi cu atentie toate instructiunile inainte de prima folosire a aparatului.
• Inainte de conectarea la priza, verificati ca tensiunea de la priza este aceeasi cu cea insrisa pe
eticheta de identificare a produsului.
• Folosti aparatul doar in scopul caruia ii este destinat.
• Fierul de calcat trebuie intotdeauna oprit inaite de conectare sau deconectare de la priza. Nu
trageti de cablu pentru deconectare, prindeti de stecher.
• Nu folosti aparatul daca este defect in orice fel. Nu folosti aparatul daca nu are cablul si stecherul
intacte. Nu inlocuiti singuri cablul sau alte parti. Duceti fierul de calcat la cel mai apropiat service
autorizat, sunt necesare ustensile speciale pentru reparatii.
• Cand ati terminat de calcat sau faceti o pauza:
- puneti butonul de control abur pe pozitia “Ø”,
- asezati fierul in pozitie verticala,
- deconectati aparatul de la priza.
• Nu lasati copii sa atinga aparatul sau cablul in timpul folosirii fierului de calcat.
• Nu introduceti aparatul sau cablul in apa sau alt lichid.
• Nu atingeti partile metalice, apa fierbinte sau aburul. Acestea pot produce arsuri in timpul
fuibctionara sau inediat dupa. Aveti grija daca intoarceti aparatul cu capul in jos: in rezervor poate
exista apa fierbinte.
• Nu permiteti contactul cablului si al stecherului cu talpa. Lasati aparatul sa se raceasca complet
inainte de al aseza in locul de depozitare. Rulati cablul de alimentare in jurul aparatului pentru
pastrare.
• Pentru a evita suprasolicitarea retelei, nu folositi aceasi priza pentru acest fier de calcat si un alt
aparat electric care necesita tensiune ridicata.
• Nu folositi prelungitoare care nu au aprobarea autoritatilor competente. Cabul trebuie sa
corespunda normei de 10 A (Europa) sau 15 A (America), cablurile pentru amperaj mai mic se pot
supraincalzii. Cablul trebuie aranjat in asa fel incat sa nu poata fi intins sau agatat.
• Fierul de calcat este destinat numai folosirii casnice.
PASTRATII ACEST MANUAL DE UTILUZARE PENTRU A-L PUTEA CONSULTA MAI TARZIU.
DESCRIEREA PARTILOR COMPONENTE (vezi fig.1)
NOTA:
• Unele parti ale apartului a fost gresate si ca rezultat poate apare putin fum la prima utilizare a
aparatulu. Acest lucru nu se va mai repeta dupa cateva folosiri.
• Inainte de prima folosire, indepartati toate ambalajele, inclusiv cele de protectie de pa talpa sau
de pe corpula aparatului. Curatati apoi talpa cu o carpa moale.
• Cand folositi aparatul pentru prima data, testati-l intai pe o bucata de tesatura pentru a va asigura
ca talpa si rezervorul sunt curate.
FOLOSIREA APARATULUI
Important: Ati citit sectiunea “Precautii importante”?
ALEGEREA APEI
Daca apa din zona dvs. are duritate mare, va sfatuim sa utilizati apa distilata sau demineralizata.
Nu folositi apa dedurizata chimic sau orice alt lichid.
Nu folosii aditivi chimici, substane odorizate sau decalcifiatori. Nerespectarea celor menionate mai
sus duce la pierderea garaniei.
1. Talpă
2. Fustă
3. Capac
4. Duză de pulverizare
5. Capac pentru locul de
umplere cu apă
6. Regulator de abur
7. Buton pulverizare
8. Buton jet de abur
9. Partea decorativă
10. Ghid de cordon
11. Capac posterior
12. Mâner
13. Lumina pilot
14. Rezervor de apă
15. Cadran de temperatură
UMPLEREA CU APA
• Setai butonul de control al aburului la „0” și selectorul de control al temperaturii pe „OFF”.
• Deconectai fierul de la sursa de alimentare și așteptai ca fierul să se răcească.
• Turnai apa în orificiul de apă:
- Umplei rezervorul de apă până la nivelul maxim „MAX”.
Important: Goliti rezervorul de apa dupa utilizare.
CONTROLUL TEMPERATURII
POZITIE TESTURA RECOMANDARI
•Acetat/Nylon calcare uscata pe dosul tesaturii
•• Matase/Nylon calcare uscata pe dosul tesaturii
min Vascoza urmati instructiunile producatorului de pe eticheta
•• Lana/Poliester calcare cu abur pe dosul tesaturii sau cu carpa.
••• Bumbac calcare cu abur sau uscata cat timp tesatura este umeda pana la uscare.
Calcati tesaturile inchise la culoare pe dos pentru a evita luciul.
••• Olanda calcare cu abur sau uscata cat timp tesatura este umeda pana la uscare.
Calcati tesaturile inchise la culoare pe dos pentru a evita luciul.
• Intotdeauna verificati intai daca tesatura are atasata o eticheta cu instructiunile pentru calcare
Urmati aceste instructiuni in toate cazurile.
• Daca instructiunile pentru calcare lipsesc, tabelul de deasupra va va fi de ajutor.
• Intai trebuie sa sortati articolele pe care doriti sa le calcati pe tipuri de tesaturi. Incepeti sa calcati
tesaturile care necesita temperatura cea mai scazuta si apoi cele cu temperatura din ce in ce mai
mare, pentru ca fierul se incalzeste mai rapede decat se raceste.
• Daca tesatura contine mai multe feluri de fibre (ex. bumbac si poliester) trebu ie sa alegeti
intodeauna temperatura de calcate corespunzatoare tipul de fibra care necesita temperatura mai
scazuta.
SETAREA TEMPERATURII
• Conectati aparatul la priza si asezati-l in pozitie verticala.
• Alegeti temperatura corecta cu ajutorul butonului de reglare a temperaturii.
• Se va ajunge la temperatura aleasa cand lampa termostatului se va stinge. Acesta lampa se va
aprinde si stinge periodic indicand faptul ca temperatura este mentinuta constanta.
STROPIREA
Aceasta functiune poate fi folosita fara sa afecteze temperatura de calcare.
• Introduceti apa in rezervor, cum este descris mai sus.
• Indreptati orificiul de stropire catre haina.
• Apasati butonul de stropire.
CALCAREA CU ABUR
Aceasta functiune poate fi folosita numai la cea mai inalta temperatura de calcare.
•• pentru abur moderat
••• sau MAX pentru abur maxim
• Introduceti apa in rezervor, cum este descris mai sus.
• Asezati aparatul in pozitie verticala.
• Conectati aparatul la o priza potrivita.
• Rasuciti butonul de control a temperaturii pe pozitia core spunzatoare temperaturii necesara
calcarii tesaturii.
• Lampa termostatului se va stinge cand aparatul ajunge la temperatura aleasa. Aparatul este gata
de folosire.
• Rasuciti butonul de controil abur pe pozitia dorita si aburul incepe sa iasa din aparat prin orificiile
din talpa.

24 25
ROMANESTE
ROMANESTE
Notati: La fiarele de calcat convetionale, poate sa curga apa din rezervor daca ati ales o temperatura
prea scazuta de calcare. Daca acest lucru se intampla, puneti butonul de control al temparaturii pe
cea mai inalta temperatura. Va reincepe producerea de abur imediat ce temperatura necesara va fi
atinsa.
JET DE ABUR
Aceasta functiune are ca efect producerea unui jet suplimentar de abur pentru indepartarea cutelor
persistente.
• Introduceti apa in rezervor, cum este descris mai sus.
• Puneti butonul de control al temperaturii pe pozitia pentru calcare cu abur.
• Lampa termostatului se va stinge cand aparatul ajunge la temperatura aleasa.
• Aparatuul este acum gata pentru folosire.
• Apasati o data pe butonul de control abur.
• Aburul va penetra in tesatura si va indrepta cutele.
• Asteptati cateva secunde inainte de a apasa din nou acest buton, in cazul in care cutele persista.
In general cutele se pot indeparta cu maxim trei apasari.
Prin apăsarea butonului de pulverizare de abur la anumite intervale, putei călca şi pe verticală
(perdele, haine agăate, etc.)
CALCATUL USCAT
• Conectati aparatul la o priza potrivita.
• Asigurati-va ca butonul de control al aburului este pe pozitia “Ø”.
• Selectati temperatura potrivita.
• Lampa termostatului se va stinge cand aparatul ajunge la temperatura aleasa. Aparatul este acum
gata pentru folosire.
INGRIJIREA SI CURATAREA
• Deconectati aparatul de la priza si lasati-l sa se raceasca complet.
• Depunerile sau alte reziduuri de pe talpa pot fi indepartate cu o carpa aspra inmuiata in solutie
apa/otet.
• Partea din plastic poate fi stearsa cu o carpa umeda si lustruita cu una uscata.
• Nu folositi materiale sau substante abrazive pentru curatate.
• Evitati contactul plitei cu obiecte metalice.
PASTRAREA
• Puneti butonul de control al aburului pe pozitia “MIN” iar pe cel ce control al temperaturii pe
pozitia “Ø”.
• Deconectati aparatul de la priza.
• Goliti toata apa ramasa in rezervor.
• Asezati aparatul in pozitie verticala si lasati-l sa se raceasca complet.
• Cablul poate fi infasurat in jurul aparatului.
• Intotdeauna pastrati aparatul in pozitie verticala.
AUTOCURĂŢARE
Putei utiliza funcia de auto-curăare pentru a îndepărta depunerile de calcar şi impurităile.
Utilizai funcia de auto-curăare odată la fiecare două săptămâni. Dacă apa din zona dvs. este foarte
calcaroasă, funcia de auto-curăare trebuie utilizată mai frecvent.
• Asigurai-vă că fierul de călcat este deconectat de la sursa de electricitate.
• Setai rotia de reglare abur la poziia “Ø”
• Umplei rezervorul de apă până la nivelul maxim.
• Selectai temperatura maximă de călcare.
• Introducei ştecherul în priza de perete.
• Deconectai fierul de călcat atonic când lumina beculeului galben pentru indicarea temperaturii
s-a stins.
• inei fierul deasupra chiuvetei, apăsai şi inei apăsat butonul de auto-curăare şi scuturai încet
fierul. (Aburul şi apa fierbinte se vor îndepărta prin talpa aparatului. Impurităile şi bucăelele de
calcar (dacă acestea există) vor fi eliminate în chiuvetă.)
• Nu mai apăsai butonul de auto-curăare imediat ce întregul rezervor s-a golit.
Repetai procedura de auto-curăare dacă fierul încă mai are impurităi la interior.
AUTO-PROTECTIA
In cazuri exceptionale in care termostatul cedeaza, aparatul se opreste singuri din functionare
pentru a preveni supraincalzirea. In urma acestui eveniment, aparatul trebuie dus la service-ul cel
mai apropiat.
ANTI-PICURARE:
Fierul de călcat este echipat cu o funcie de oprire a picurării: Fierul de călcat opreşte automat aburii
când temperatura este prea joasă pentru a preveni picurarea prin talpă.
ANTI-CALCAR:
Funcia anti-calcar filtrează mineralele din apă pentru minerale în compartimentul de aburi.
Cartușul anti-calc este o parte integrantă a rezervorului de apă și nu trebuie înlocuit.
Dacă copiii sunt aproape de aparat, trebuie să fie întotdeauna supravegheați, pentru a se
asigura că nu se joacă niciodată cu aparatul.
CARACTERISTICI:
220-240 V ~ 50-60 Hz • 2200 W
Eliminare ecologică
Putei ajuta la protejarea mediului! Respectai reglementările locale: predai echipamentele
electronice scoase din uz la un centru specializat de eliminare a deşeurilor.

26 27
SCG/CRO/B.i.H.
SCG/CRO/B.i.H.
UPUTSTVO ZA UPOTREBU
VAŽNA SIGURNOSNA UPUTSTVA
• Isključite peglu od izvora napajanja, pre nego
što počnete da punite ili praznite. Rezervoar za
vodu.
• Pegla se mora koristiti i podešavati na stabilnoj
površini
• Kada stavljate peglu na postolje, obezbedite da
se ono nalazi na stabilnoj površini
• Pegla se ne može koristiti ako padne, ako su
oštećenja na njoj vidljiva i ako postoji curenje.
• Uz nadzor, davanje uputstava za bezbednu
upotrebu aparata i upozorenja o potencijalnim
opasnostima, ovaj aparat mogu da koriste
deca starija od 8 godina, osobe sa umanjenim
fizičkim, senzornim i mentalnim sposobnostima
i osobe koje nemaju iskustvo sa aparatom i
znanje o njemu. Deca se ne smeju igrati sa ovim
aparatom. Deca ne smeju bez nadzora čistiti i
popravljati ovaj aparat.
• Držite peglu i njen kabl van domašaja dece
mlađe od 8 godina dok se pegla greje ili hladi.
• Peglu ne smete ostavljati bez nadzora dok je
uključena
OPREZ: Površina može postati vrela tokom
upotrebe!
• Molimo Vas da pažljivo pročitate uputstvo za upotrebu, pre nego što po prvi put upotrebite
peglu.
• Molimo Vas da pre prve upotrebe proverite, da li radni napon naveden na tipskoj pločici
odgovara naponu mreže u Vašem domaćinstvu.
• Uređaj koristite samo za peglanje.
• Vodite računa o tome da pegla bude isključena, pre nego što je priključite na utikač. Prilikom
isključivanja vucite uvek za utikač a nikada za kabl.
• Peglu koristite samo ako je ona u besprekornom stanju. Oštećenja na pegli, kablu za struju ili
utikaču može da otkloni samo servisna služba ili specijalizovani personal jer je za to potreban
specijalan alat.
• Prilikom kratkih prekida ili posle završenog peglanja:
- Isključite regulator pare na poziciju “Ø”
- Postavite peglu na postolje
- Odvojte kabl za struju od izvora snabdevanja strujom
• U toku rada, držite decu podalje od pegle i kabla za struju.
• Nemojte nikada da potapate peglu u vodu ili druge tečnosti.
• Vodite računa da ne dođete u dodir sa pločom pegle, parom ili vrelom vodom iz pegle.
Pažnja prilikom okretanja pegle: U rezervoaru za vodu može biti preostale vrele vode!
• Kabl za struju i utikač ne smeju da dolaze u dodir sa vrelom pločom pegle. Pustite da se pegla
sasvim ohladi pre nego što je sklonite. Za čuvanje obmotajte kabl oko kućišta.
• Kako bi sprečili da dođe do preopterećenja strujnog kola, u toku peglanja izbegavajte rad sa
drugim električnim uređajima visoke snage u istom strujnom kolu.
• Nemojte da koristite produžni kabl koji nije proveren od strane nadležne institucije. Na kablu
treba da se nalazi natpis 10 A (Evropa) ili 15 A (Amerika), a kablovi koji su namenjeni za manje
ampera bi mogli da se pregrevaju. Kabl treba da leži tako, da je nemoguće saplitati se ili iskidati
kabl.
• Pegla je namenjena isključivo za kucnu upotrebu.
DOBRO ČUVAJTE OVO UPUTSTVO ZA UPOTREBU!
OPIS DELOVA VIDI SLIKU 1
UPUTSTVA:
• Zbog zaostale masnoće može prilikom prvog puštanja u rad da dođe do stvaranja slabog dima.
Do toga posle nekoliko upotreba više neće dolaziti.
• Pre prve upotrebe uklonite eventualno postojeće zaštitne folije. Ploču pegle očistite sa mekom
krpom.
• Prvo proverite peglu na nekom komadu materijala da bi ste se uverili, da su ploča pegle i
rezervoar za vodu čisti.
PEGLANJE
Važno: Da li ste već pročitali poglavlje “Važna sigurnosna uputstva”?
ODABIR VODE
Ako voda u Vašem regionu sadrži posebno puno krečnjaka, koristite destilovanu ili vodu bez
minerala. Nemojte za punjenje da koristite vodu iz koje je hemijski odstranjen krečnjak ili druge
tečnosti. Nemojte da koristite hemijske dodatke, mirise ili sredstvo za uklanjanje kamenca. Ukoliko
ne postupite po gore navedenim uputstvima gubite Vaše pravo na garanciju.
PUNJENJE REZERVOARA ZA VODU
• Podesite dugme za kontrolu pare na „0“, a dugme za kontrolu temperature na „OFF“.
• Isključite peglu iz napajanja i sačekajte da se ohladi
• Sipajte vodu u ulaz za vodu:
- Napunite rezervoar za vodu do maksimalnog nivoa označenog sa „MAX“.
Važno: Posle peglanja ispraznite rezervoar za vodu!
1. Radna površina
2. Suknja
3. Poklopac
4. Mlaznica za fajtanje
5. Poklopac ulaza za vodu
6. Regulator pare
7. Dugme za fajtanje
8. Dugme za raspršivanje pare
9. Ukrasni deo
10. Vodič kabla
11. Zadnji poklopac
12. Ručka
13. Signalna lampica
14. Rezervoar za vodu
15. Podešavanje temperature

29
SCG/CRO/B.i.H.
28
SCG/CRO/B.i.H.
ODABIR TEMPERATURE
PODEŠENJE MATERIJAL PREPORUKA
•Acetat/Najlon Suvo peglanje sa strane naličja
•• Svila/Najlon Suvo peglanje sa strane naličja
min Rejon Proverite etiketu o nezi tkanine i pratite uputstva sa etikete
•• Vuna/Poliester Peglanje parom sa strane naličja
••• Pamuk Peglanje parom Tamne komade odeće peglati sa naličja da bi izbegli
presijavanje
••• Platno Peglanje parom Tamne komade odeće peglati sa naličja da bi izbegli
presijavanje
• Molimo Vas da uvek proverite uputstvo za održavanje na odeći koju peglate. U svakom slučaju
sledite ta uputstva.
• Ako nema uputstva za održavanje, molimo Vas da postupate prema sledećoj tabeli.
• Prvo sortirajte veš za peglanje: Vuna sa vunom, pamuk sa pamukom itd. Prvo ispeglajte odeću
koja zahteva nižu temperaturu peglanja, a zatim pređite na odeću sa većim temperaturama.
Obrazloženje: pegla se brže zagreva nego što se hladi.
• Ako se komad odeće sastoji iz različitih materijala (mešovita tkanina), npr.: pamuk sa poliesterom,
onda odaberite nižu temperaturu.
PODEŠAVANJE TEMPERATURE
• Utaknite utikač u utičnicu i postavite peglu na postolje.
• Podesite regulator temperature na željenu temperaturu.
• Pravilna temperatura je dostignuta kada se ugasi svetlo. Kontrolna lampica svetli u intervalima
kako bi pokazala da se održava željena temperatura.
PRSKANJE
Ova funkcija Vam stoji na raspolaganju nezavisno od odabrane temperature peglanja.
• Napunite vodu u peglu. (vidi uputstvo za upotrebu)
• Mlaznica mora da bude uperena na odevni predmet.
• Pritisnite dugme prskalice.
PEGLANJE SA PAROM
Ova funkcija Vam stoji na raspolaganju samo kod viših temperatura peglanja.
•• za umerenu paru
••• ili MAX za maksimalnu paru
• Napunite vodu u peglu. (vidi uputstvo za upotrebu)
• Postavite peglu na postolje. Priključite utikač na utičnicu za struju.
• Okrenite regulator temperature. Kontrolna lampica se gasi kada jedostignuta pravilna
temperatura. Pegla je spremna za rad. Okrenite regulator za paru na željenu poziciju. Para izlazi
kroz otvore na ploči pegle.
Pažnja: Kod normalnog peglanja parom kod niskih odabranih temperatura može da ističe vode iz
ploče pegle. Ako je to slučaj, okrenite regulator temperature na pravilnu temperaturu. Čim ona bude
dostignuta, izlaziće para.
UDAR PARE
Kod ove funkcije para se ispušta u udarima, što je veoma od pomoći kod jako gužvane odeće.
• Napunite peglu vodom. (vidi uputstvo za upotrebu)
• Regulator temperature okrenite na peglanje sa parom
• Lampica se isključuje čim bude dostignuta pravilna temperatura. Sada možete da počnete da
peglate.
• Pritisnite jedanput dugme za paru. Ispušteni udar pare prodire u tkaninu.
• Malo sačekajte pre nego što ponovo pritisnete dugme za paru.
Obično će biti dovoljno tri puta pritisnuti dugme za paru.
Pritiskanjem dugmeta za udar pare možete da peglate i vertikalno (zavese, odeća na vešalici, itd.)
SUVO PEGLANJE
• Utaknite utikač u utičnicu i postavite peglu na postolje.
• Uverite se da regulator za paru stoji na “Ø”.
• Odaberite željenu temperaturu uz pomoć regulatora temperature.
• Pegla je spremna za upotrebu kada se ugasi kontrolna lampica.
• Odaberite Ïeljenu temperaturu uz pomoç regulatora temperature.
• Pegla je spremna za upotrebu kada se ugasi kontrolna lampica.
NEGA I ČIŠĆENJE
• Odvojte peglu od izvora napajanja i pustite je da se sasvim ohladi.
• Taloženja i ostali ostaci mogu se ukloniti sa krpom namočenom u rastvor sirćeta.
• Očistite kućište vlažnom krpom i na kraju ga izbrišite dok ne bude suvo.
• Za čišćenje ploče pegle ne koristite abrazivna sredstva.
• Izbegavajte da ploča pegle bude ogrebana.
ČUVANJE
• Regulator temperature okrenite na “MIN” a regulator za paru na “Ø” (= nema pare)
• Izvucite utikač iz utičnice.
• Ispraznite rezervoar za vodu.
• Postavite peglu na postolje da se potpuno ohladi.
• Na kraju, obmotajte kabl oko kućišta.
• Postavljajte peglu uvek na postolje radi čuvanja.
FUNKCIJA SAMOČIŠĆENJA
Možete koristiti funkciju automatskog čišćenja da uklonite kamenac i nečistoće.
Koristite ovu funkciju na svake dve nedelje. Ako je voda koju koristite previše tvrda, onda treba češće
koristiti ovu funkciju.
• Proverite da li je strujni kabl izvučen iz naponske mreže.
• Napunite rezervoar do maksimuma.
• Odaberite maksimalnu temperaturu peglanja.
• Uključite utikač u utičnicu.
• Izvucite utikač kada se ugasi kontrolna lampica.
• Držite peglu iznad lavaboa, pritisnite i zadržite taster za automatsko čišćenje i blago pomerajte
peglu napred-nazad. (Para i kipuća voda će izlaziti iz grejne ploče Nečistoće i ljuspe, ako ih ima, će
biti isprane.)
• Otpustite taster za automatsko čišćenje čim nestane vode iz rezervoara.
Ponovite ovaj proces ako u pegli još ima nečistoća.
ZAŠTITNI PREKIDAČ
U vanrednom slučaju nastanka smetnji funkcije termostata, automatski zaštitni prekidač isključuje
peglu kako ne bi došlo do pregrevanja.
Neka grešku otklone u servisnoj služba ili autorizovanoj specijalizovanoj prodavnici.
ANTI-KAPANJE:
Ova pegla poseduje funkciju zaustavljanja kapanja: pegla automatski prekida puštanje pare ako je
temperatura premala kao bi sprečila da voda kaplje iz ploče pegle.
ANTI-KAMENAC:
Funkcija anti kamenac filtrira minerale iz vode da bi sprečila komori za paru.
Uložak za sprečavanje stvaranja kamenca je sastavni deo rezervoara za vodu i ne može da
se zameni.

31
БЪΛГАРСКИ
30
SCG/CRO/B.i.H.
Ako se deca nalaze u blizinu uređaja, uvek treba da budu pod nadzorom, kako bi se osiguralo
da se nikada ne igraju sa uređajem.
TEHNIČKI PODACI:
Snaga: 220-240 V ~ 50-60 Hz • 2200 W
Ekološko odlaganje otpada
Možete pomoći zaštiti okoline! Molimo ne zaboravite da poštujete lokalnu regulativu. Odnesite
pokvarenu električnu opremu u odgovarajući centar za odlaganje otpada.
УПЪТВАНЕ ЗА ИЗПОЛЗВАНЕ
ВАЖНИ УКАЗАНИЯ ЗА БЕЗОПАСНОСТ
• ,
.
•
.
• ,
, ,
, .
•
.
•
8 ,
,
,
.
.
.
•
, - 8 ,
.
• ,
.
ВНИМАНИЕ: повърхността се нагрява по
време на употреба!

32 33
• , .
• , ,
, .
• .
• , .
, .
• . ,
,
.
• :
- “Ø”.
- .
- .
• .
• .
• , .
: !
• .
, . ,
.
• , .
• ,
.
• , .
10 () 15 (). ,
- , . ,
.
• .
ПАЗЕТЕ ГРИЖЛИВО НАСТОЯЩЕО УПЪТВАНЕ ЗА ИЗПОЛЗВАНЕ НА ЮТИЯТА!
ОПИСАНИЕ НА ЧАСТИТЕ ( . 1)
ЗАБЕЛЕЖКИ:
• .
.
•
. .
• , ,
.
ГЛАДЕНЕ
: “ ”?
ИЗБОР НА ВОДА
,
.
.
, .
.
БЪΛГАРСКИ
БЪΛГАРСКИ
1.
2.
3.
4.
5.
6.
7.
8.
9.
10.
11.
12.
13.
14.
15.
ПЪЛНЕНЕ НА РЕЗЕРВОАРА С ВОДА
• “0”,
“OFF”.
• .
• :
- “MAX”.
: .
ИЗБОР НА ТЕМПЕРАТУРА
•/ .
•• / .
min
•• / .
••• . ,
••• . ,
• , .
.
• , .
• : , .
, - ,
- . : -, .
• ( ), .: ,
- .
НАСТРОЙКА НА ТЕМПЕРАТУРАТА
• .
• .
• , .
, , .
ПРЪСКАНЕ
.
• ( ).
• .
• .
ГЛАДЕНЕ С ПАРА
- .
••
••• MAX
• ( ).
• .
• .
• .
• , .
.
• . .

:
. ,
. , .
ПАРЕН УДАР
, .
• . ( ).
•
• , .
.
• . .
• , .
.
(, ..)
ГЛАДЕНЕ НА СУХО
•
• , “Ø”.
• .
• , .
ГРИЖИ И ПОДДРЪЖКА
• .
• , .
• .
• , .
• .
СЪХРАНЯВАНЕ
• “MIN”, “Ø” (= ).
• .
• .
• , .
• .
• .
ФУНКЦИЯ ЗА САМОПОЧИСТВАНЕ
,
.
.
, -.
• , .
• .
• .
• .
• , .
• ,
-. ( .
( ) .)
• .
, .
35
БЪΛГАРСКИ
34
БЪΛГАРСКИ
ЗАЩИТЕН ПРЕКЪСВАЧ
, .
.
СИСТЕМА ПРОТИВ КАПЕНЕ:
: ,
,
.
СИСТЕМА ПРОТИВ КОТЛЕН КАМЪК:
,
.
.
Винаги наблюдавайте децата, когато са в близост от уреда, за да се уверите, че не си
играят с него.
ТЕХНИЧЕСКИ ДАННИ:
: 220-240 V ~ 50-60 Hz • 2200 W
Съобразено с околната среда изхвърляне
!
, :
.

36 37
ИНСТРУКЦИЯ ПО ЭКСПЛУАТАЦИИ
ПРЕДНАЗНАЧЕНИЕ
.
.
VAØNYE PRAVILA BEZOPASNOSTI
• Otklühite utüg ot stennoj rozetki dlå zapolneniå vodoj ili, htoby vylitæ vodu
posle upotrebleniå.
• .
• , ,
.
• , , .
• 8 ,
, , ,
,
. .
.
• ,
8 .
• , .
• Prohtite vnimatelæno vse instrukcii pered pervihnym upotrebleniem qtogo pribora.
• Dopodsoedineniåqtogopribora,prosledite,htobynapråΩenie,ukazannoenazavodskoj
markesootvetstvovalonapråΩeniüqlektrosetivVa‚emdome.
• Upotreblåjte pribor sugubo dlå prednaznahennoj celi.
• UtügvsegdadolΩenbytævyklühendosoedineniåiliotsoedineniåotqlektroseti.Ne
dergajteza‚nurdlåotklüheniå‚tekkeraizstennojrozetki.
• Nepolæzujtesæutügom,eslionpovreΩden.Nepolæzujtesæutügom,esliego‚nurili
‚tekkerpovreΩdeny.Nezamenåjtesilovoj‚nurilidrugiehastisamostoåtelæno.
PrinesiteutügvkvallificirovannyjpunktpoobsluΩivaniüilivmagazin,gdeVyego
kupili, tak kak dlå ego pohinki trebuütså specialænye instrumenty.
• KogdaVyzakonhiliglaΩkuilikogdaVydelaetekorotkijpereryv:
-PostavæteknopkuregulåciiparavpoloΩenie“Ø”,
-postavæteutügvstoåhempoloΩenii,
- otsoedinite utüg iz stennoj rozetki.
• Nepozvolåjtedetåmdotragivatæsådoutügaili‚nuravovremåglaΩki.
• NepogruΩajteutügili‚nurvvoduilidruguüΩidkostæ.
• Netrogajtegoråhiemetalliheskiepoverxnosti,goråhuüvoduilipar.Qtihasti
nagrevaütsåiVymoΩeteobΩehæså.BudæteostoroΩny,esliVyperevorahivaeteutüg
vverxdnom:vvodånomtankemoΩetnaxoditæsågoråhaåvoda.
• Nedopuskajte,htoby‚tekkeri‚nurkasalisægoråhejfundamentalænojplaty.Dajte
utügupolnostæüoxladitæsådotogo,htoVyubiraeteego.Zakrutite‚nurvokrugutüga
dlåxraneniå.
• Nepolæzujtesæodnovremennodrugimvysokovolætovympriborom,htobynebylo
peregruzki v seti.
• Polæzujtesætolækoudlinitelem,utverΩdennymkompetentnymiorganami.∏nurdolΩen
vyderΩatæ10A(Evropa)ili15A(Amerika),‚nury,vyderΩivaüwiemenæ‚ijamperaΩ,
mogutperegrevatæså.∏nurneobxodimoklastætak,htobyegonevozmoΩnobylostånutæ
ili oprokinutæ.
• Utügprednaznahensugubodlådoma‚negopolæzovaniå.
ВНИМАНИЕ! Во время эксплуатации поверхность сильно нагревается!
SOXRANITE QTI UKAZANIÄ DLÄ BUDUWEJ KONSULÆTACII.
РУССКИЙ
РУССКИЙ
OPISANIE HASTEJ ( . 1)
PRIMEHANIÄ:
• NekotoryehastiutügalegkosmazanyΩirom,ikakrezulætatutügmoΩetdymitæså,
kogdaegovklühaütpervyjraz.Posleneskolækixrazqtoprekratitså.
• Pered pervonahalænym ispolæzovaniem, uberite vse naklejki i qtiketki s
fundamentalænoj platy i stenok. Posle qtogo protrite platu mågkoj tkanæü.
• Pri pervihnom ispolæzovanii utüga, proveræte ego na starom kusohke materiala dlå
proverki,htoniΩnååplataivodånojtank-absolütnohistye.
GLAØKA
VaΩno:Vyprohlisekciüo“VaΩnyxUkazaniåxoBezopasnosti”?
VYBOR VODY
Eslivodavva‚emrajoneohenæΩestkaå,rekomenduetsåpolæzovatæsådistillirovannoj
ilidiminerallizovannojvodoj.Neupotreblåjtevodu,ximiheskimobrazomohiwennuü
otnakipi,ilidrugieΩidkosti,dlåzapolneniå.
,
. .
PRAVILA ZAPOLNENIÄ VODY
• “0”
“OFF”.
• .
• :
- , “X”.
VaΩno:Vylejtevoduposleupotrebleniå.
NASTROJKA PRAVILÆNOJ TEMPERATURY
• VsegdasnahalaproveræteårlyksinstrukciåmipoglaΩkenapredmeteodeΩdy.
• Esliukazanijtakixneimeetså,togdasleduüwaåtablicamoΩetVampomohæ.
• Snahalarazberitestirku:‚erstæidets‚erstæü,xlopok-sxlopkom,it.d.Nahnite
glaΩkuspredmetov,nuΩdaüwixsåvsamyxnizkixtemperaturaxiprogressirujtena
boleevysokie,t.k.utügnagrevaetsåbystree,hemonoxlaΩdaetså.
• Eslimaterialsostoitizrazlihnyxvidovvolokna(naprimer,xlopokspoliesterom),
vsegdavyberiteniΩnüütemperaturudlåglaΩkiizsohetaniåqtixvolokon.
1.
2.
3.
4.
5.
6.
7.
8.
9.
10.
11.
12.
13.
14.
15.
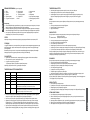
QTIKETKA MATERIAL VOLOKNA
Sintetika Akrilik; Modakril; Polipropilen; Poliuretan
Sintetika Acetat; Triacetat
Kupro;Poliamid(nejlon);Poliester; Modalæl; Viskoza
(iskustvennyj‚ölk)
∏ölk ∏ölk
∏erstæ ∏erstæ
Xlopok Xlopok
Lön Lön
l
ll
lll

38 39
NASTROJKA TEMPERATURY
• Vstavæte‚tekkervstennuürozetkuipostavæteutügvstoåheepoloΩenie.
• Povernite knopku regulirovki temperatury na pravilænuü temperaturu.
• Kogdasignalænyjsvetisheznet,togdabudetdostignutanuΩnaåtemperatura.Signalænaå
lampohkazagoritsåipotuxnetvremåotvremeni,ukazyvaå,htovybrannaåtemperatura
podderΩivaetså.
RAZBRYZGIVANIE
QtojfunkciejmoΩnopolæzovatæsåvlüboevremåiqtonevliåetnatemperaturuglaΩki.
• Zapolniteutügvodoj,kakukazanovy‚e.
• NapravætenosiknaodeΩdu.
• NaΩmitenaknopkuregulirovkirazbryzgivaniå.
PAROVAÄ GLAØKA
QtojfunkciejmoΩnopolæzovatæsåtolækonavysokojgladilænojtemperature.
••
•••
• Zapolnitevoduvutüg,kakukazanovy‚e.
• Postavæte utüg na zadnüü spinku.
• Podklühitekpodxodåwejtohkivseti.
• Poverniteknopkutemperaturynapoziciü“
•••
”.
• Signalænaålampohkaotklühitså,kogdadostignutaneobxodimaåtemperatura.Utüg
gotov k upotrebleniü.
• PostavæteknopkuparavnuΩnuüpoziciü,parnahnetvyxoditæherezdyrohkiv
fundamentalænoj plate.
Primehanie:PrikonvecionalænomsposobeparovojglaΩki,vodamoΩetprotekatæiz
fundamentalænojplaty,eslivybranasli‚komnizkaåtemperatura.Esliqtosluhitså,
postavæte regulåtor temperatury v rekomenduemuü poziciü. Par vozobnovitså, kak tolæko
budet budet dostignuta pravilænaå temperatura.
VZRYV PARA
Qtafunkciådaötdopolnitelænoekolihestvoparadlåtogo,htobyizbavitæsåotosobo
upråmyxskladok.
• Zapolniteutügvodoj,kakukazanovy‚e.
• Poverniteknopkutemperaturynapoziciü“
•••
”.
• Signalænaålampavklühaetså,ukazyvaå,htoutügvklühön.
• Signalænaålampaotklühitså,kogdabudetdostignutaΩelaemaåtemperatura.
• Utüg gotov k upotrebleniü.
• NaΩmiteodinraznaknopkuregulåtoravzryvapara.
• ParproniknetvodeΩdu,ubiraåskladki.
• PodoΩditeneskolækosekundpreΩde,hemVyvnovænaΩimaeteknopkuvzryvapara,
kogda estæ upråmye skladki.
ObyhnomoΩnoubratævseupråmyeskladkivtehenietröxglaΩek.
(, ..)
SUXAÄ GLAØKA
• Podsoediniteutügkpodxodåwejrozetkeotqlektroseti.
• Prosledite,htoknopkakontrolåparanaxoditsåvpoloΩenii“Ø”.
• Vyberitepoziciünaregulåtoretemperatury.
• Kogda signalænyj svet vyklühaetså, qto znak, hto dostignuta trebuemaå temperatura.
Utüg gotov k polæzovaniü.
РУССКИЙ
РУССКИЙ
UXOD I HISTKA
• Otklühiteutügizstennojrozetkiidajteemuokonhatelænooxladitæså.
• OstatkigråziiotloΩeniånaniΩnejplatemoΩnoudalitæspomowæüΩöstkojtkani,
namohennoj v rastvore iz vody s uksusom.
• MoΩnovyteretæotloΩeniåvlaΩnojtråpkojiotpolirovatæsuxoj.
• Nikogdanepolæzujtesæabrazivamidlåhistkifundamentalænojplaty.
• SoderΩiteplatuvgladkomsostoånii;izbegajtekontaktasmetalliheskimipredmetami.
XRANENIE
• Postavæteregulåtortemperaturyna“MIN”inastrojteknopkuparanapoziciü“Ø”.
(=netpara).
• Otklühite utüg ot stennoj rozetki.
• Vylejteostav‚uüsåvoduizvodånogotanka.
• PostavæteutügvstoåheepoloΩeniedajteemupolnostæüoxladitæså.
• MoΩetezavernutæ‚nurvokrugutüga.
• VsegdaxraniteutügvstoåhempoloΩenii.
ФУНКЦИЯ САМООЧИСТКИ:
.
. ,
.
• , .
• .
• .
• .
• , .
• , .
. ( ) .
• .
, .
ZAWITNOE OTKLŒHENIE
Vneveroåtnomsluhaeneispravnostitermostata,zawitnoeotklühenieottokasrabotaet,
takimobrazompredoxranååutügotperegreva.TogdaneobxodimovzåtæutügvbliΩaüwij
obsluΩivaüwijpunkt.
ФУНКЦИЯ ПРЕДОТВРАЩЕНИЯ ВЫТЕКАНИЯ ВОДЫ:
:
,
.
ФУНКЦИЯ ПРЕДОТВРАЩЕНИЯ ОТЛОЖЕНИЯ ИЗВЕСТИ:
.
.
Если в непосредственной близости от устройства находятся дети, следите, чтобы они не
играли с устройством.
ТЕХНИЧЕСКИЕ ХАРАКТЕРИСТИКИ
: 2200
: 220-240 ~ 50-60
Pagina se încarcă...
Pagina se încarcă...
Pagina se încarcă...
Pagina se încarcă...
Pagina se încarcă...
Pagina se încarcă...
Pagina se încarcă...
Pagina se încarcă...
-
 1
1
-
 2
2
-
 3
3
-
 4
4
-
 5
5
-
 6
6
-
 7
7
-
 8
8
-
 9
9
-
 10
10
-
 11
11
-
 12
12
-
 13
13
-
 14
14
-
 15
15
-
 16
16
-
 17
17
-
 18
18
-
 19
19
-
 20
20
-
 21
21
-
 22
22
-
 23
23
-
 24
24
-
 25
25
-
 26
26
-
 27
27
-
 28
28


First Austria FA-5618-6 Steam Iron Manual de utilizare
- Categorie
- Fiare de călcat
- Tip
- Manual de utilizare
Alte documente
-
Zelmer ZIR3000 Steam Iron Manual de utilizare
-
Rowenta DW9240 Manualul utilizatorului
-
Acme Made IA200 Manual de utilizare
-
Solac PV2020 Instrucțiuni de utilizare
-
Elta 709 Manual de utilizare
-
Beko SIM 3122 T Manual de utilizare
-
Bosch TDA5024210/01 Manual de utilizare
-
Bosch TDA3028210/01 Manual de utilizare
-
Bosch TDA5024210/01 Manualul proprietarului
-
Bosch TDA2321/01 Manual de utilizare