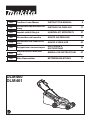
Makita DLM461 Manual de utilizare
- Categorie
- Cositoare
- Tip
- Manual de utilizare

DLM460
DLM461
EN Cordless Lawn Mower INSTRUCTION MANUAL 8
PL Akumulatorowa kosiarka do
trawy INSTRUKCJA OBSŁUGI 17
HU Vezeték nélküli fűnyíró HASZNÁLATI KÉZIKÖNYV 27
SK Akumulátorová kosačka NÁVOD NA OBSLUHU 37
CS Akumulátorová sekačka na
trávu NÁVOD K OBSLUZE 47
UK Бездротова газонокосарка ІНСТРУКЦІЯ З
ЕКСПЛУАТАЦІЇ 56
RO Maşină de tuns iarba fără
cablu MANUAL DE INSTRUCŢIUNI 67
DE Akku Rasenmäher BETRIEBSANLEITUNG 77

1
2
3
6
5
4
Fig.1
1
2
3
6
45
Fig.2
12
3
Fig.3
1
Fig.4
1
2
Fig.5
1
Fig.6
2

1
2
Fig.7
1
Fig.8
13
2
Fig.9
1
2
Fig.10
1
2
Fig.11
1
2
Fig.12
1
2
Fig.13
1
2
Fig.14
3

1
Fig.15
1
Fig.16
1
2
Fig.17
2 31
4
5 6
Fig.18
1
3
2
Fig.19
1
Fig.20
4

1
2
Fig.21
1
2
3
21
Fig.22
Fig.23
Fig.24
12
33
Fig.25
Fig.26
Fig.27
5

1 2
3
Fig.28
1
2
Fig.29
13
2
Fig.30
1
2
2
Fig.31
1
2
3
Fig.32
1
2
3
Fig.33
6

1
2
Fig.34
1
2
3
Fig.35
1
2
3
Fig.36
1
2
Fig.37
7

8ENGLISH
ENGLISH (Original instructions)
SPECIFICATIONS
Model: DLM460 DLM461
Mowing width (blade diameter) 460 mm
No load speed 2,500 min-1
Maximum speed 3,300 min-1
Part number of replacement mower blade 199367-2 199368-0
Dimensions
(L x W x H)
during operation L: 1,319 mm to 1,518 mm
W: 532 mm
H: 879 mm to 1,138 mm
when stored
(without grass basket)
L: 1,004 mm to 1,125 mm
W: 532 mm
H: 533 mm to 713 mm
Rated voltage D.C. 36 V
Net weight 25.3 - 27.6 kg 26.6 - 28.4 kg
•
Due to our continuing program of research and development, the specications herein are subject to change without notice.
• Specications and battery cartridge may differ from country to country.
• The weight may differ depending on the attachment(s), including the battery cartridge. The lightest and heavi-
est combination, according to EPTA-Procedure 01/2014, are shown in the table.
Applicable battery cartridge
BL1815N / BL1820 / BL1820B / BL1830 / BL1830B / BL1840 / BL1840B / BL1850 / BL1850B / BL1860B
• Some of the battery cartridges listed above may not be available depending on your region of residence.
WARNING: Only use the battery cartridges listed above. Use of any other battery cartridges may cause
injury and/or re.
Symbols
The following show the symbols used for the equipment.
Be sure that you understand their meaning before use.
Take particular care and attention.
Read instruction manual.
Danger; be aware of thrown objects.
The distance between the tool and
bystanders must be at least 15 m.
Never put your hands and feet near the
blade under the mower. Blades continue to
rotate after the motor is switched off.
Remove the lock key before inspecting,
adjusting, cleaning, servicing, leaving and
storing the mower.
Ni-MH
Li-ion
Only for EU countries
Do not dispose of electric equipment or battery
pack together with household waste material!
In observance of the European Directives,
on Waste Electric and Electronic Equipment
and Batteries and Accumulators and Waste
Batteries and Accumulators and their imple-
mentation in accordance with national laws,
electric equipment and batteries and battery
pack(s) that have reached the end of their life
must be collected separately and returned to an
environmentally compatible recycling facility.
Intended use
The tool is intended for lawn mowing.
Noise
The typical A-weighted noise level determined accord-
ing to EN60335-2-77:
Model DLM460
Sound pressure level (LpA) : 79 dB(A)
Sound power level (LWA) : 91 dB (A)
Uncertainty (K) : 3.4 dB(A)
The noise level under working may exceed 80 dB (A).
WARNING: Wear ear protection.
Vibration
The vibration total value (tri-axial vector sum) deter-
mined according to EN60335-2-77:
Model DLM460
Vibration emission (ah) : 2.5 m/s2 or less
Uncertainty (K) : 1.5 m/s2
NOTE: The declared vibration emission value has
been measured in accordance with the standard test
method and may be used for comparing one tool with
another.
NOTE: The declared vibration emission value
may also be used in a preliminary assessment of
exposure.

9ENGLISH
WARNING: The vibration emission during actual
use of the power tool can differ from the declared
emission value depending on the ways in which the
tool is used.
WARNING: Be sure to identify safety measures
to protect the operator that are based on an estima-
tion of exposure in the actual conditions of use (taking
account of all parts of the operating cycle such as
the times when the tool is switched off and when it is
running idle in addition to the trigger time).
EC Declaration of Conformity
For European countries only
The EC declaration of conformity is included as Annex A
to this instruction manual.
SAFETY WARNINGS
Lawn Mower Safety Instructions
WARNING: Read all safety warnings and
all instructions. Failure to follow the warnings and
instructions may result in electric shock, re and/or
serious injury.
Save all warnings and instruc-
tions for future reference.
1. Do not insert the lock key into mower until it is
ready to be used.
2. Children should be supervised to ensure that
they do not play with the mower.
3. Never allow children or people unfamiliar with
these instructions to use the mower. Local
regulations can restrict the age of the operator.
4. Never operate the mower while people, espe-
cially children, or pets are nearby.
5. Keep in mind that the operator or user is
responsible for accidents or hazards occurring
to other people or their property.
6. While operating the mower, always wear sub-
stantial footwear and long trousers. Do not
operate the mower when barefoot or wearing
open sandals. Avoid wearing clothing or jew-
elry that is loose tting or that has hanging
cords or ties. They can be caught in moving
parts.
7. Always wear protective goggles to protect
your eyes from injury when using power tools.
The goggles must comply with ANSI Z87.1 in
the USA, EN 166 in Europe, or AS/NZS 1336
in Australia/New Zealand. In Australia/New
Zealand, it is legally required to wear a face
shield to protect your face, too.
It is an employer's responsibility to enforce
the use of appropriate safety protective equip-
ments by the tool operators and by other per-
sons in the immediate working area.
8. Operate the mower only in daylight or in good
articial light.
9. Avoid operating the mower in wet grass.
10. Battery tool use and care
- Recharge only with the charger specied by
the manufacturer. A charger that is suitable for
one type of battery cartridge may create a risk of
re when used with another battery cartridge.
- Use power tools only with specically desig-
nated battery cartridges. Use of any other bat-
tery cartridges may create a risk of injury and re.
- When battery cartridge is not in use, keep
it away from other metal objects, like paper
clips, coins, keys, nails, screws or other small
metal objects, that can make a connection
from one terminal to another. Shorting the bat-
tery terminals together may cause burns or a re.
- Under abusive conditions, liquid may be ejected
from the battery; avoid contact. If contact acci-
dentally occurs, ush with water. If liquid contacts
eyes, additionally seek medical help. Liquid ejected
from the battery may cause irritation or burns.
- Do not dispose of the battery(ies) in a re.
The cell may explode. Check with local codes for
possible special disposal instructions.
- Do not open or mutilate the battery(ies). Released
electrolyte is corrosive and may cause damage to the
eyes or skin. It may be toxic if swallowed.
- Do not charge battery in rain, or in wet locations.
11. Always keep a rm hold on the handle.
12. Always be sure of your footing on slopes.
13. Walk, never run.
14.
Don't grasp the exposed cutting blades or cutting
edges when picking up or holding the mower.
15. Physical condition - Do not operate mower
while under the inuence of drugs, alcohol, or
any medication.
16. Keep hands and feet away from rotating
blades. Caution - Blades coast after the mower
is switched off.
17. Use only the manufacturer genuine blades
specied in this manual.
18.
Check the blades or blade bolts carefully for cracks
or damage before operation. Replace cracked or
damaged blades or blade bolts immediately.
19. Be sure the area is clear of other people before
mowing. Stop mower if anyone enters the area.

10 ENGLISH
20. Remove foreign matters such as rocks, wire,
bottles, bones and large sticks from the work
area before mowing to prevent personal injury
or damage to the mower.
21. Stop operation immediately if you notice
anything unusual. Switch off the mower and
remove the key. Then inspect the mower.
22. Never attempt to make cutting height adjust-
ments while mower is running if the mower
has cutting height adjustment feature.
23. Release switch lever and wait for blade rota-
tion to stop before crossing driveways, walks,
roads, and any gravel-covered areas. Also
remove the lock key if you leave the mower,
reach to pick up or remove something out of
your way, or for any other reason that may
distract you from what you are doing.
24. Objects struck by the mower blade can cause
severe injuries to persons. The lawn should
always be carefully examined and cleared of
all objects prior to each mowing.
25. If the mower strikes a foreign object, follow
these steps:
- Stop the mower, release the switch lever and
wait until the blade comes to a complete stop.
- Remove the lock key and the battery cartridge.
- Thoroughly inspect the mower for any damage.
- Replace the blade if it is damaged in any way.
Repair any damage before restarting and con-
tinuing to operate the mower.
26.
Check the grass basket frequently for wear or
deterioration. For storage, always make sure
the grass basket is empty. Replace a worn grass
basket with a new factory replacement for safety.
27. Use extreme caution when reversing or pulling
the mower towards you.
28. Stop the blade(s) if the mower has to be tilted
for transportation when crossing surfaces
other than grass, and when transporting the
mower to and from the area to be used.
29.
Never operate the mower with defective guards
or shields, or without safety devices, for exam-
ple deectors and/or grass basket, in place.
30.
Switch on the mower carefully according to instruc-
tions and with feet well away from the blade(s).
31. Do not tilt the mower when switching on the
motor, except if the mower has to be tilted for
starting. In this case, do not tilt it more than
absolutely necessary and lift only the part,
which is away from the operator.
32. Do not start the mower when standing in front
of the discharge opening.
33.
Do not put hands or feet near or under rotating parts.
Keep clear of the discharge opening at all times.
34. Do not transport the mower while the mower is
turned on.
35. Stop the mower, and remove the disabling
device. Make sure that all moving parts have
come to a complete stop
- whenever you leave the mower,
- before clearing blockages or unclogging chute,
- before checking, cleaning or working on the mower,
- after striking a foreign object. Inspect the
mower for damage and make repairs before
restarting and operating the mower.
36. If the mower starts to vibrate abnormally
(check immediately)
- inspect for damage,
- replace or repair any damaged parts,
- check for and tighten any loose parts.
37. Be careful during adjustment of the mower
to prevent entrapment of the ngers between
moving blades and xed parts of the mower.
38. Mow across the face of slopes, never up and
down. Exercise extreme caution when chang-
ing direction on slopes. Do not mow exces-
sively steep slopes.
39. Check the blade mounting bolt at frequent
intervals for proper tightness.
40.
Keep all nuts, bolts, and screws tight to be sure
the equipment is in safe working condition.
41. Always allow the mower to cool down before
storing.
42. When servicing the blades be aware that, even
though the power source is switched off, the
blades can still be moved.
43. Replace worn or damaged parts for safety.
Use only genuine replacement parts and
accessories.
44. Do not use the machine when there is a risk of
lightning.
45. When you use the machine on muddy ground,
wet slope, or slippery place, pay attention to
your footing.
46. Avoid working in poor environment where
increased user fatigue is expected.
47. Do not use the machine in bad weather where
visibility is limited. Failure to do so may cause
fall or incorrect operation due to low visibility.
48. Do not replace the battery in the rain.
49. Do not submerge the machine into a puddle.
50. Do not leave the machine unattended outdoors
in the rain.
51.
Do not insert or remove the lock key in the rain.
52. When wet leaves or dirt adhere to the suc-
tion mouth (ventilation window) due to rain,
remove them.
53.
Do not wash the machine with high pressure water.
54. When washing the machine, be sure to remove
the battery and lock key and close the battery
cover, and pour water toward the bottom of the
machine to which the blade is attached.
55. When storing the machine, avoid direct sun-
light and rain, and store it in a place where it
does not get hot or humid.
56. Perform inspection or maintenance in a place
where rain can be avoided.
57. After using the machine, remove the adhered
dirt and dry the machine completely before
storing. Depending on the season or the area,
there is a risk of malfunction due to freezing.
58. Do not wet the terminal of battery with liquid
such as water, or submerge the battery. Do not
leave the battery in the rain, nor charge, use,
or store the battery in a damp or wet place. If
the terminal gets wet or liquid enters inside of bat-
tery, the battery may be short circuited and there is
a risk of overheat, re, or explosion.

11 ENGLISH
59. After removing the battery from the machine or
charger, be sure to attach the battery cover to
the battery and store it in a dry place.
60. Do not replace the battery with wet hands.
61. Do not use the machine in the snow.
62. If the cut-off grass is wet, it is likely to be
clogged inside of the machine. Check the con-
dition of the machine regularly, and remove the
adhered grass as necessary.
SAVE THESE INSTRUCTIONS.
WARNING:
DO NOT let comfort or familiarity
with product (gained from repeated use) replace strict
adherence to safety rules for the subject product.
MISUSE or failure to follow the safety rules stated in this
instruction manual may cause serious personal injury.
Important safety instructions for
battery cartridge
1.
Before using battery cartridge, read all instruc-
tions and cautionary markings on (1) battery
charger, (2) battery, and (3) product using battery.
2. Do not disassemble battery cartridge.
3. If operating time has become excessively
shorter, stop operating immediately. It may
result in a risk of overheating, possible burns
and even an explosion.
4. If electrolyte gets into your eyes, rinse them
out with clear water and seek medical atten-
tion right away. It may result in loss of your
eyesight.
5. Do not short the battery cartridge:
(1) Do not touch the terminals with any con-
ductive material.
(2) Avoid storing battery cartridge in a con-
tainer with other metal objects such as
nails, coins, etc.
(3) Do not expose battery cartridge to water
or rain.
A battery short can cause a large current
ow, overheating, possible burns and even a
breakdown.
6. Do not store the tool and battery cartridge in
locations where the temperature may reach or
exceed 50 °C (122 °F).
7. Do not incinerate the battery cartridge even if
it is severely damaged or is completely worn
out. The battery cartridge can explode in a re.
8. Be careful not to drop or strike battery.
9. Do not use a damaged battery.
10.
The contained lithium-ion batteries are subject to
the Dangerous Goods Legislation requirements.
For commercial transports e.g. by third parties,
forwarding agents, special requirement on pack-
aging and labeling must be observed.
For preparation of the item being shipped, consult-
ing an expert for hazardous material is required.
Please also observe possibly more detailed
national regulations.
Tape or mask off open contacts and pack up the
battery in such a manner that it cannot move
around in the packaging.
11. Follow your local regulations relating to dis-
posal of battery.
12. Use the batteries only with the products
specied by Makita. Installing the batteries to
non-compliant products may result in a re, exces-
sive heat, explosion, or leak of electrolyte.
SAVE THESE INSTRUCTIONS.
CAUTION: Only use genuine Makita batteries.
Use of non-genuine Makita batteries, or batteries that
have been altered, may result in the battery bursting
causing res, personal injury and damage. It will
also void the Makita warranty for the Makita tool and
charger.
Tips for maintaining maximum
battery life
1. Charge the battery cartridge before completely
discharged. Always stop tool operation and
charge the battery cartridge when you notice
less tool power.
2. Never recharge a fully charged battery car-
tridge. Overcharging shortens the battery
service life.
3.
Charge the battery cartridge with room tempera-
ture at 10 °C - 40 °C (50 °F - 104 °F). Let a hot
battery cartridge cool down before charging it.
4. Charge the battery cartridge if you do not use
it for a long period (more than six months).
ASSEMBLY
WARNING: Always be sure that the lock key
and battery cartridge are removed before carrying
out any work on the mower. Failure to remove the
lock key and the battery cartridge may result in seri-
ous personal injury from accidental start-up.
WARNING: Never start the mower unless it is
completely assembled. Operation of the tools in a
partially assembled state may result in serious per-
sonal injury from accidental start-up.
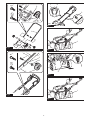
Installing the handle
NOTICE: When installing handles, position the
cords so that they are not caught by anything
between the handles. If the cord is damaged, the
mower switch may not work.
1. Attach the lower handle so that the holes in the
handle t in the protrusions on the mower body. Insert
the bolts from inside, then attach washer A from outside,
and then tighten the thumb nuts.
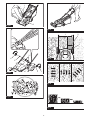
► Fig.1: 1. Lower handle 2. Washer A 3. Thumb nut
4. Protrusion 5. Hole 6. Bolt
2. Align the hole in the lower handle with the hole
in the upper handle, then insert the bolts from inside,
then attach washer B from outside, and then tighten the
thumb nuts.
► Fig.2: 1. Upper handle 2. Hole 3. Washer B
4. Thumb nut 5. Lower handle 6. Bolt

12 ENGLISH
CAUTION: Hold the upper handle rmly so
that it does not drop off your hand. Otherwise, the
handle may fall and cause an injury.
3. Attach holder A and holder B to the handle.
Position the cords as shown in the gure.
► Fig.3: 1. Cord 2. Holder A 3. Holder B
NOTE: When attaching holder A, be sure to x the
cord with the holder as shown in the gure.
Removing the mulching attachment
For DLM460
1. Open the rear cover.
► Fig.4: 1. Rear cover
2. Remove the mulching attachment while holding
down the lever.
► Fig.5: 1. Lever 2. Mulching attachment
For DLM461
1. Open the rear cover.
► Fig.6: 1. Rear cover
2. Remove the mulching attachment while pulling the
lever.
► Fig.7: 1. Mulching attachment 2. Lever
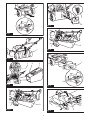
Installing the grass basket
1. Open the rear cover.
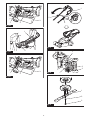
► Fig.8: 1. Rear cover
2. Hook the grass basket on the rod of the mower
body as shown in the gure.
► Fig.9: 1. Rod 2. Guard 3. Grass basket
NOTICE: Make sure that the guard on the grass
basket is facing downward. Otherwise, the grass
basket may not catch all of cut-off grass.
Attaching the mulching attachment
For DLM460
1. Open the rear cover, and then remove the grass
basket.
► Fig.10: 1. Rear cover 2. Grass basket
2. Attach the mulching attachment while holding
down the lever, and then release the lever to lock the
mulching attachment.
► Fig.11: 1. Lever 2. Mulching attachment
For DLM461
1. Open the rear cover, and then remove the grass
basket.
► Fig.12: 1. Rear cover 2. Grass basket
2. Attach the mulching attachment while pulling the
lever, and then release the lever to lock the mulching
attachment.
► Fig.13: 1. Mulching attachment 2. Lever
FUNCTIONAL DESCRIPTION
Installing or removing battery cartridge
CAUTION: Always switch off the tool before
installing or removing of the battery cartridge.
CAUTION:
Hold the tool and the battery cartridge
rmly when installing or removing battery cartridge.
Failure to hold the tool and the battery cartridge rmly may
cause them to slip off your hands and result in damage to
the tool and battery cartridge and a personal injury.
CAUTION: Make sure that you lock the battery
cover before use. Otherwise, mud, dirt, or water may
cause damage to the product or the battery cartridge.
CAUTION: Always install the battery cartridge
fully until the red indicator cannot be seen. If not,
it may accidentally fall out of the tool, causing injury to
you or someone around you.
CAUTION: Do not install the battery cartridge
forcibly. If the cartridge does not slide in easily, it is
not being inserted correctly.
NOTE: The tool does not work with only one battery
cartridge.
To install the battery cartridge;
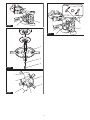
1.
Pull up the locking lever, and then open the battery cover.
► Fig.14: 1. Battery cover 2. Locking lever
2. Align the tongue on the battery cartridge with the
slot on the mower then slide the cartridge until it locks in
place with a little click.
► Fig.15: 1. Battery cartridge
3. Insert the lock key in the place shown in the gure
as far as it will go.
► Fig.16: 1. Lock key
4. Close the battery cover and push it until it is
latched with the locking lever.
To remove the battery cartridge from the mower;
1. Pull up the battery cover locking lever and open
the battery cover.
2. Pull out the battery cartridge from the mower while
sliding the button on the front of the cartridge.
3. Pull out the lock key.
4. Close the battery cover.
Tool / battery protection system
The tool is equipped with a tool/battery protection sys-
tem. This system automatically cuts off power to the
motor to extend tool and battery life. The tool will auto-
matically stop during operation if the tool or battery is
placed under one of the following conditions:
Overload protection
When the battery is operated in a manner that causes it to
draw an abnormally high current, the tool automatically stops
and the main power lamp blinks in green. In this situation,
turn the tool off and stop the application that caused the tool
to become overloaded. Then turn the tool on to restart.

13 ENGLISH
Overheat protection
When the tool or battery is overheated, the tool stops
automatically and the main power lamp lights up in red.
In this case, let the tool and battery cool before turning
the tool on again.
Overdischarge protection
When the battery capacity is not enough, the tool stops auto-
matically and the main power lamp blinks in red. In this case,
remove the battery from the tool and charge the battery car-
tridges or change the battery cartridges to fully charged ones.
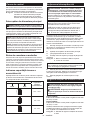
Indicating the remaining battery
capacity
Only for battery cartridges with the indicator
► Fig.17: 1. Indicator lamps 2. Check button
Press the check button on the battery cartridge to indi-
cate the remaining battery capacity. The indicator lamps
light up for a few seconds.
Indicator lamps Remaining
capacity
Lighted Off Blinking
75% to 100%
50% to 75%
25% to 50%
0% to 25%
Charge the
battery.
The battery
may have
malfunctioned.
NOTE: Depending on the conditions of use and the
ambient temperature, the indication may differ slightly
from the actual capacity.
Control panel
The control panel has the main power switch, the mode
switching button, and the indicator of remaining battery
capacity.
► Fig.18: 1. Battery indicator 2. Mode switching
lamp 3. Main power lamp 4. Check button
5. Mode switching button 6. Main power
switch
Main power switch
WARNING: Always turn off the main power
switch when not in use.
To turn on the machine, press the main power switch.
The main power lamp lights up in green. To turn off the
machine, press the main power switch again.
NOTE: If the main power lamp lights up in red or
blinks in red or green, refer to the instructions for tool/
battery protection system.
NOTE: This machine employs the auto power-off
function. To avoid unintentional start up, the main
power switch will automatically shut down when the
switch lever is not pulled for a certain period after the
main power switch is turned on.
Mode switching button
You can switch the operating mode by pressing the
mode switching button. When the machine is turned on,
the machine starts up in the normal mode. When you
press the mode switching button, the machine shifts to
the energy-saving mode and the mode switching lamp
lights up in green. In the energy-saving mode, you can
decrease the noise at mowing. When you press the
mode switching button again, the machine returns to
the normal mode.
Indicating the remaining battery
capacity
Press the check button to indicate the remaining battery
capacities. The battery indicators correspond to each
battery.
Battery indicator status
Remaining battery
capacity
On Off
50% - 100%
20% - 50%
0% - 20%
Switch action
WARNING: Before installing the battery car-
tridge, always check to see that the switch lever
actuates properly and returns to the original posi-
tion when released. Operating a tool with a switch
that does not actuate properly can lead to loss of
control and serious personal injury.
NOTE: The mower does not start without pressing the
switch button even the switch lever is pulled.
NOTE: Mower may not start due to the overload
when you try to mow long or dense grass at a time.
Increase the mowing height in this case.

14 ENGLISH
This mower is equipped with the interlock switch and han-
dle switch. If you notice anything unusual with either of
these switches, stop operation immediately and have them
checked by your nearest Makita Authorized Service Center.
1.
Install the battery cartridges. Insert the lock key into
the interlock switch and then close the battery cover.
2. Press the main power switch.
3. Press the switch button and hold it.
4. Grab the upper handle and pull the switch lever.
► Fig.19:
1. Switch button 2. Upper handle 3. Switch lever
NOTE: If the lock key is not inserted, the power lamp
blinks in green when you pull the switch lever.
5. Release the switch button as soon as the motor
starts running. The mower will continue to run until you
release the switch lever.
6. Release the switch lever to stop the motor.
Adjusting the mowing height
WARNING: Never put your hand or leg under
the mower body when adjusting the mowing
height.
WARNING: Always make sure that the lever
ts in the groove properly before operation.
For DLM460
The mowing height can be adjusted in the range of
between 20 mm and 75 mm.
For DLM461
The mowing height can be adjusted in the range of
between 16 mm and 71 mm.
Remove the lock key, and then pull the mowing height
adjusting lever outward of the mower body and move it
to your desired mowing height.
► Fig.20: 1. Mowing height adjusting lever
Hold the front grip with one hand, and then move the
mowing height adjusting lever with the other hand.
► Fig.21: 1. Mowing height adjusting lever 2. Front
grip
NOTE: The mowing height gures should be used
just as a guideline. Depending on the conditions of
the lawn or the ground, the actual lawn height may
become slightly different from the set height.
NOTE: Try a test mowing of grass in a less conspicu-
ous place to get your desired height.
Adjusting the handle height
CAUTION: Before removing the bolts, hold
the upper handle rmly. Otherwise, the handle may
fall and cause an injury.
The handle height can be adjusted in three levels.
1. Loosen the thumb nuts of the lower handle, and
then remove the bolts, washer, and thumb nuts.
► Fig.22: 1. Thumb nut 2. Washer 3. Bolt
2. Adjust the handle height.
3. Insert the bolts from inside, then attach washers
from outside, and then tighten the thumb nuts.
Using mulching attachment
The mulching attachment allows you to return the cut
grass to the ground without gathering the cut grass in the
grass basket. When you operate the machine with the
mulching attachment, be sure to remove the grass basket.
Electronic function
The machine is equipped with the electronic functions
for easy operation.
• Constant speed control
Electronic speed control for obtaining constant
speed. Possible to get ne nish, because the rotat-
ing speed is kept constant even under load condition.
• Soft start
The soft-start function minimizes start-up shock,
and makes the machine start smoothly.
OPERATION
Mowing
WARNING: Before mowing, clear away sticks
and stones from mowing area. Furthermore, clear
away any weeds from mowing area in advance.
WARNING: Always wear the safety goggles or
safety glasses with side shields when operating
the mower.
CAUTION:
If the cut grass or foreign object
blocks up inside of the mower body, be sure to
remove the lock key and battery cartridge and wear
gloves before removing the grass or foreign object.
NOTICE: Use this machine for mowing lawn only.
Do not mow weeds with this machine.
► Fig.23
Firmly hold the handle with both hands when mowing.
The mowing speed guideline is approximately 1 meter
per 4 seconds.
► Fig.24
The center lines of the front wheels are guidelines to
mowing width. Using the center lines as guidelines,
mow in strips. Overlap by one half to one third the previ-
ous strip to mow the lawn evenly.
► Fig.25: 1. Mowing width 2. Overlapping area
3. Center line
Change the mowing direction each time to prevent the
grass grain pattern from forming in just one direction.
► Fig.26
Periodically check the grass basket for mowed grass.
Empty the grass before it becomes full. Before every
periodical check, be sure to stop the mower then
remove the lock key and the battery cartridge.
NOTE: Using the mower with the grass basket full
prevents smooth blade rotation and places an extra
load on the motor, which may cause breakdown.

15 ENGLISH
Mowing a long-grass lawn
Do not try to cut long grass all at once. Instead, mow
the lawn in steps. Leave a day or two between mowings
until the lawn becomes evenly short.
► Fig.27
NOTE: Mowing long grass to a short length all at
once may cause the grass to die. The cut grass may
also block up inside of the mower body.
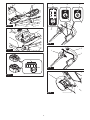
Emptying the grass basket
WARNING: To reduce a risk of accident, reg-
ularly check the grass basket for any damage or
weakened strength. Replace the grass basket if
necessary.
1. Release the switch lever.
2. Remove the lock key.
3. Open the rear cover and take out the grass basket
by holding the handle.
► Fig.28: 1. Rear cover 2. Handle 3. Grass basket
4. Empty the grass basket.
MAINTENANCE
WARNING: Always be sure that the lock
key and battery cartridge are removed from the
mower before storing or carrying the mower or
attempting to perform inspection or maintenance.
WARNING: Always remove the lock key when
the mower is not in use. Store the lock key in a
safe place out of reach of children.
WARNING: Wear gloves when performing
inspection or maintenance.
WARNING: Always wear the safety goggles or
safety glasses with side shields when performing
inspection or maintenance.
NOTICE: Never use gasoline, benzine, thinner,
alcohol or the like. Discoloration, deformation or
cracks may result.
To maintain product SAFETY and RELIABILITY,
repairs, any other maintenance or adjustment should
be performed by Makita Authorized or Factory Service
Centers, always using Makita replacement parts.
Maintenance
1. Remove the lock key and battery cartridges, and
then close the battery cover.
2. Put the mower on its side and clean grass clip-
pings accumulated on the underside of mower deck.
3. Pour water toward the bottom of the machine to
which the blade is attached.
NOTICE: Do not wash the machine with high
pressure water.
4. Check all nuts, bolts, knobs, screws, fasteners etc.
for tightness.
5.
Inspect moving parts for damage, breakage, and wear.
Damaged or missing parts should be repaired or replaced.
6. Store the mower in a safe place out of the reach of
children.
Carrying the mower
When carrying the mower, hold the front grip and lower
handle with two people as shown in the gure.
► Fig.29: 1. Lower handle 2. Front grip
Storing
Store mower indoors in a cool, dry and locked place.
Don't store the mower and charger in locations where
the temperature may reach or exceed 40 °C (104 °F).
1. Open the rear cover and take out the grass basket
by holding the handle.
► Fig.30: 1. Rear cover 2. Handle 3. Grass basket
2. Loosen the thumb nuts and fold the upper handle.
► Fig.31: 1. Upper handle 2. Thumb nut
Removing or installing the mower blade
WARNING: Always remove the lock key and
battery cartridge when removing or installing the
blade. Failure to remove the lock key and battery
cartridge may cause a serious injury.
WARNING:
The blade coasts for a few seconds
after releasing the switch. Do not start any opera-
tion until the blade comes to a complete stop.
WARNING: Always wear gloves when han-
dling the blade.
Removing the mower blade
For DLM460
1. Put the mower on its side so that the mowing
height adjusting lever comes to the upper side.
2. To lock the blade, insert a lumber or similar into
the mower.
3. Turn the bolt counterclockwise with the wrench.
► Fig.32: 1. Mower blade 2. Wrench 3. Lumber
4. Remove the bolt, washer, mower blade in order.
► Fig.33: 1. Mower blade 2. Washer 3. Bolt
For DLM461
1. Put the mower on its side so that the mowing
height adjusting lever comes to the upper side.
2. Turn the bolt counterclockwise with the wrench
while holding the base plate.
► Fig.34: 1. Wrench 2. Base plate
3. Remove the bolt, washer, base plate in order.
► Fig.35: 1. Base plate 2. Washer 3. Bolt
4.
To remove the individual blade, turn the bolt coun-
terclockwise with the wrench while holding the base plate.
► Fig.36: 1. Base plate 2. Mower blade 3. Wrench

16 ENGLISH
Installing the mower blade
To install the mower blade, take the removal procedure
in reverse.
WARNING: Install the blade carefully. It has
a top/bottom facing. Place the blade so that the
rotational direction arrow faces outward.
WARNING: Tighten the bolt clockwise rmly
to secure the blade.
WARNING: Make sure that the blade and all
the xing parts are installed correctly and tight-
ened securely.
WARNING: When you replace the blades,
always follow the instructions provided in this
manual.
For DLM461
NOTICE: When installing the mower blade, slide
the mower blade as shown in the gure so that
the protrusions touch the mower blade.
► Fig.37: 1. Protrusion 2. Mower blade
TROUBLESHOOTING
Before asking for repairs, conduct your own inspection rst. If you nd a problem that is not explained in the manual,
do not attempt to dismantle the tool. Instead, ask Makita Authorized Service Centers, always using Makita replace-
ment parts for repairs.
State of abnormality Probable cause (malfunction) Remedy
Mower does not start. Two battery cartridges are not installed. Install the charged battery cartridges.
Battery problem (under voltage) Recharge the battery cartridge. If recharging is not
effective, replace battery cartridge.
The lock key is not inserted. Insert the lock key.
Motor stops running after a little use. Battery's charge level is low. Recharge the battery cartridge. If recharging is not
effective, replace battery cartridge.
Cutting height is too low. Raise the cutting height.
Motor does not reach maximum
RPM. Battery cartridge is installed improperly. Install the battery cartridge as described in this
manual.
Battery power is dropping. Recharge the battery cartridge. If recharging is not
effective, replace battery cartridge.
The drive system does not work
correctly. Ask your local authorized service center for repair.
Cutting tool does not rotate:
stop the mower immediately!
Foreign object such as a branch is
jammed near the blade. Remove the foreign object.
The drive system does not work
correctly. Ask your local authorized service center for repair.
Abnormal vibration:
stop the mower immediately!
Blade is imbalanced, excessively or
unevenly worn.
Replace the blade.
OPTIONAL ACCESSORIES
CAUTION: These accessories or attachments
are recommended for use with your Makita tool
specied in this manual. The use of any other
accessories or attachments might present a risk of
injury to persons. Only use accessory or attachment
for its stated purpose.
If you need any assistance for more details regard-
ing these accessories, ask your local Makita Service
Center.
• Mower blade
• Makita genuine battery and charger
NOTE: Some items in the list may be included in the
tool package as standard accessories. They may
differ from country to country.

17 POLSKI
POLSKI (Instrukcja oryginalna)
DANE TECHNICZNE
Model: DLM460 DLM461
Szerokość koszenia (średnica noża) 460 mm
Prędkość bez obciążenia 2 500 min-1
Prędkość maksymalna 3 300 min-1
Numer części zamiennego noża kosiarki 199367-2 199368-0
Wymiary
(dług. x szer. x wys.) podczas pracy D: 1 319 mm do 1 518 mm
Sz: 532 mm
W: 879 mm do 1 138 mm
podczas przechowywania
(bez kosza na trawę)
D: 1 004 mm do 1 125 mm
Sz: 532 mm
W: 533 mm do 713 mm
Napięcie znamionowe Prąd stały 36 V
Masa netto 25,3–27,6 kg 26,6–28,4 kg
• W związku ze stale prowadzonym przez naszą rmę programem badawczo-rozwojowym niniejsze dane mogą
ulec zmianom bez wcześniejszego powiadomienia.
• W innych krajach urządzenie może mieć odmienne parametry techniczne i może być wyposażone w inny
akumulator.
• Masa może być różna w zależności od osprzętu, w tym akumulatora. W tabeli przedstawiona jest najlżejsza i
najcięższa konguracja, zgodnie z procedurą EPTA 01/2014.
Kompatybilne akumulatory
BL1815N / BL1820 / BL1820B / BL1830 / BL1830B / BL1840 / BL1840B / BL1850 / BL1850B / BL1860B
• Pewne z wymienionych powyżej akumulatorów mogą być niedostępne w regionie zamieszkania użytkownika.
OSTRZEŻENIE: Należy używać wyłącznie akumulatorów wymienionych powyżej. Używanie innych aku-
mulatorów może stwarzać ryzyko wystąpienia obrażeń ciała lub pożaru.
Symbole
Poniżej pokazano symbole zastosowane na urządze-
niu. Przed rozpoczęciem użytkowania należy zapoznać
się z ich znaczeniem.
Zachować szczególną ostrożność.
Przeczytać instrukcję obsługi.
Niebezpieczeństwo; uważać na wyrzucane
przedmioty.
Minimalna odległość między narzędziem
a osobami postronnymi musi wynosić co
najmniej 15 m.
Nigdy nie wkładać rąk ani stóp pod
kosiarkę, w pobliże noża. Noże obracają
się nawet po wyłączeniu silnika.
Przed przystąpieniem do kontroli, regula-
cji, czyszczenia, naprawy, a także przed
oddaleniem się od urządzenia lub jego
schowaniem należy wyjąć kluczyk.
Ni-MH
Li-ion
Dotyczy tylko państw UE
Nie wyrzucać urządzeń elektrycznych ani
akumulatorów wraz z odpadami z gospo-
darstwa domowego!
Zgodnie z dyrektywami europejskimi w
sprawie zużytego sprzętu elektrycznego i
elektronicznego oraz baterii i akumulato-
rów oraz zużytych baterii i akumulatorów,
a także dostosowaniem ich do prawa
krajowego, zużyte urządzenia elektryczne,
baterie i akumulatory, należy składować
osobno i przekazywać do zakładu recy-
klingu działającego zgodnie z przepisami
dotyczącymi ochrony środowiska.
Przeznaczenie
Narzędzie to jest przeznaczone do koszenia trawników.
Hałas
Typowy równoważny poziom dźwięku A określony w
oparciu o normę EN60335-2-77:
Model DLM460
Poziom ciśnienia akustycznego (LpA): 79 dB(A)
Poziom mocy akustycznej (LWA): 91 dB (A)
Niepewność (K): 3,4 dB(A)
Poziom hałasu podczas pracy może przekraczać 80 dB (A).
OSTRZEŻENIE: Nosić ochronniki słuchu.

18 POLSKI
Drgania
Całkowita wartość poziomu drgań (suma wektorów w 3
osiach) określona zgodnie z normą EN60335-2-77:
Model DLM460
Emisja drgań (ah): 2,5 m/s2 lub mniej
Niepewność (K): 1,5 m/s2
WSKAZÓWKA:
Deklarowana wartość wytwarzanych
drgań została zmierzona zgodnie ze standardową metodą
testową i można ją wykorzystać do porównywania narzędzi.
WSKAZÓWKA:
Deklarowaną wartość wytwarzanych drgań
można także wykorzystać we wstępnej ocenie narażenia.
OSTRZEŻENIE:
Drgania wytwarzane podczas rzeczy-
wistego użytkowania elektronarzędzia mogą się różnić od warto-
ści deklarowanej, w zależności od sposobu jego użytkowania.
OSTRZEŻENIE
: W oparciu o szacowane nara-
żenie w rzeczywistych warunkach użytkowania należy
określić środki bezpieczeństwa w celu ochrony opera-
tora (uwzględniając wszystkie elementy cyklu działania,
tj. czas, kiedy narzędzie jest wyłączone i kiedy pracuje
na biegu jałowym, a także czas, kiedy jest włączone).
Deklaracja zgodności WE
Dotyczy tylko krajów europejskich
Deklaracja zgodności WE jest dołączona jako załącznik
A do niniejszej instrukcji obsługi.
OSTRZEŻENIA DOTYCZĄCE
BEZPIECZEŃSTWA
Instrukcja bezpiecznego użytkowania
elektrycznej kosiarki do trawy
OSTRZEŻENIE: Przeczytać wszystkie ostrze-
żenia bezpieczeństwa i wszystkie instrukcje.
Niezastosowanie się do wspomnianych ostrzeżeń i
instrukcji może doprowadzić do porażenia prądem
elektrycznym, pożaru i/lub poważnych obrażeń ciała.
Wszystkie ostrzeżenia i instruk-
cje należy zachować do wykorzy-
stania w przyszłości.
1. Nie wkładać kluczyka do kosiarki, dopóki nie
jest ona gotowa do pracy.
2. Należy zwracać uwagę, aby dzieci nie bawiły
się kosiarką.
3. Nie dopuszczać, aby kosiarka była używana
przez dzieci lub osoby, które nie zapoznały się
z niniejszą instrukcją. Lokalne przepisy mogą
ograniczać wiek użytkownika.
4.
Nie wolno użytkować kosiarki, gdy w pobliżu znajdują
się inne osoby, zwłaszcza dzieci, oraz zwierzęta.
5. Należy pamiętać, że operator lub użytkownik
odpowiada za wypadki lub niebezpieczeństwa
zagrażające innym osobom lub ich mieniu.
6. Podczas użytkowania kosiarki zawsze należy
nosić odpowiednio mocne obuwie i długie
spodnie. Nie wolno używać kosiarki, nie mając
na stopach obuwia lub nosząc otwarte san-
dały. Unikać noszenia luźnej odzieży lub biżu-
terii, a także wiszących ozdób lub krawatów.
Mogą się one zahaczyć o ruchome części.
7.
Należy zawsze nosić okulary ochronne, aby
zabezpieczyć oczy przed urazami podczas użytko-
wania elektronarzędzi. Okulary ochronne muszą
spełniać wymagania normy ANSI Z87.1 w USA,
EN 166 w Europie oraz AS/NZS 1336 w Australii/
Nowej Zelandii. Przepisy prawne obowiązujące w
Australii/Nowej Zelandii wymagają również obo-
wiązkowego stosowania osłony twarzy.
Odpowiedzialność za egzekwowanie używania
odpowiednich środków ochrony osobistej
przez operatorów narzędzi oraz inne osoby
przebywające w bezpośrednim sąsiedztwie
obszaru roboczego ponosi pracodawca.
8.
Użytkować kosiarkę tylko przy świetle dziennym
lub odpowiednio silnym sztucznym oświetleniu.
9. Unikać koszenia mokrej trawy.
10. Użytkowanie narzędzi akumulatorowych i
dbałość o nie
- Akumulator należy ładować wyłącznie przy
użyciu określonej przez producenta ładowarki.
Ładowarka przeznaczona do jednego typu aku-
mulatora może stwarzać zagrożenie pożarem, gdy
będzie używana do ładowania innego akumulatora.
- Elektronarzędzia należy używać tylko ze spe-
cjalnie do tego celu przeznaczonymi akumulato-
rami. Używanie innych akumulatorów może stwa-
rzać ryzyko wystąpienia obrażeń ciała lub pożaru.
- Gdy akumulator nie jest używany, należy
chronić go przed kontaktem z metalowymi
przedmiotami, typu spinacze, monety, klucze,
gwoździe, wkręty czy innymi metalowymi
drobiazgami, które mogą spowodować zwarcie
styków akumulatora. Zwarcie styków akumula-
tora grozi poparzeniami lub pożarem.
- W niewłaściwych warunkach eksploatacji może
dojść do wycieku elektrolitu z akumulatora. Nie
należy go dotykać. W razie przypadkowego kontaktu
należy przemyć skażoną skórę wodą. W przypadku
dostania się elektrolitu do oczu należy dodatkowo
skorzystać z porady lekarza. Elektrolit z akumulatora
może powodować podrażnienia lub poparzenia.
- Nie wolno wyrzucać akumulatorów do ognia.
Ogniwo może eksplodować. Należy zapoznać się z
obowiązującymi lokalnie przepisami, które określają spe-
cjalne wytyczne dotyczące pozbywania się odpadów.

19 POLSKI
- Nie wolno otwierać ani niszczyć akumulato-
rów. Uwolniony elektrolit jest substancją żrącą,
która może spowodować uszkodzenie oczu lub
skóry. Może być on trujący w razie połknięcia.
- Akumulatora nie należy ładować w deszczu
ani w wilgotnym otoczeniu.
11. Zawsze trzymać urządzenie mocno za uchwyt.
12. Podczas pracy na pochyłym terenie należy
zadbać o dobre oparcie dla nóg.
13. Podczas użytkowania urządzenia należy cho-
dzić, a nie biegać.
14.
Podczas podnoszenia lub przenoszenia kosiarki
nigdy nie chwytać za noże lub krawędzie tnące.
15. Kondycja zyczna – nie używać kosiarki pod
wpływem narkotyków, alkoholu lub leków.
16. Trzymać ręce oraz stopy z dala od obracają-
cych się noży. Przestroga – po wyłączeniu
kosiarki noże obracają się dalej siłą rozpędu.
17. Używać wyłącznie oryginalnych noży wymie-
nionych w niniejszej instrukcji.
18. Przed przystąpieniem do pracy sprawdzić
dokładnie noże lub śruby noży pod kątem
ewentualnych pęknięć lub uszkodzeń.
Popękane lub uszkodzone noże lub śruby noży
należy niezwłocznie wymienić.
19. Upewnić się, że w miejscu koszenia nie są
obecne inne osoby. Wyłączyć kosiarkę w przy-
padku pojawienia się jakichkolwiek osób na
terenie przeznaczonym do koszenia.
20.
W celu niedopuszczenia do powstania obrażeń
ciała lub uszkodzenia kosiarki przed przystąpie-
niem do koszenia należy usunąć z terenu kosze-
nia wszystkie przedmioty, takie jak kamienie,
druty, butelki, kości oraz większe gałęzie.
21. W przypadku zauważenia jakichkolwiek nie-
prawidłowości należy natychmiast przerwać
pracę. Wyłączyć kosiarkę i wyjąć kluczyk.
Następnie przeprowadzić kontrolę kosiarki.
22.
Nigdy nie podejmować prób regulacji wysokości cię-
cia podczas pracy kosiarki, jeśli kosiarka jest wypo-
sażona w mechanizm regulacji wysokości cięcia.
23.
Zwolnić dźwignię przełącznika i poczekać na
zatrzymanie się noża przed przejściem przez
podjazd, ścieżkę, drogę lub inny obszar o
nawierzchni żwirowej. W przypadku oddalenia
się od kosiarki w celu podniesienia lub usunię-
cia czegoś z drogi lub z jakiegokolwiek innego
powodu przyczyniającego się bezpośrednio do
przerwania pracy należy również wyjąć kluczyk.
24.
Przedmioty odrzucone przez nóż kosiarki mogą
spowodować poważne obrażenia u osób znajdu-
jących się w pobliżu. Przed każdym przystąpie-
niem do koszenia należy sprawdzić i oczyścić
trawnik ze wszystkich niepożądanych rzeczy.
25.
W przypadku natraenia przez kosiarkę na obcy przedmiot
należy postępować zgodnie z następującą procedurą:
- Wyłączyć kosiarkę, zwolnić dźwignię przełącznika i
poczekać do momentu całkowitego zatrzymania się noża.
- Wyjąć kluczyk i akumulator.
- Sprawdzić dokładnie kosiarkę pod kątem
występowania jakichkolwiek uszkodzeń.
- W przypadku jakiegokolwiek uszkodzenia noża
należy wymienić go na nowy. Przed ponownym
uruchomieniem i kontynuowaniem koszenia
należy naprawić wszelkie powstałe uszkodzenia.
26.
Regularnie sprawdzać kosz na trawę pod kątem zuży-
cia lub występowania uszkodzeń. Kosiarkę należy
przechowywać wyłącznie z opróżnionym koszem na
trawę. W celu zachowania bezpieczeństwa zużyty kosz
na trawę należy wymienić na nowy, oryginalny kosz.
27.
Zachować szczególną ostrożność w przypadku
cofania lub ciągnięcia kosiarki w swoim kierunku.
28. Należy poczekać na zatrzymanie noża w przy-
padku konieczności przechylenia kosiarki,
przejechania nią przez nawierzchnię inną niż
trawa lub w przypadku konieczności przetrans-
portowania jej do lub z obszaru użytkowania.
29.
Nie używać kosiarki z uszkodzonymi osłonami lub
pokrywami bądź ze zdjętymi zabezpieczeniami,
takimi jak płyta odchylająca i/lub kosz na trawę.
30. Kosiarkę należy uruchamiać zgodnie z instruk-
cją, trzymając stopy z dala od noży.
31. Nie przechylać kosiarki podczas uruchamia-
nia silnika, poza przypadkiem gdy kosiarka
musi zostać przechylona w celu rozpoczęcia
pracy. W takim przypadku nie wolno prze-
chylać kosiarki bardziej, niż jest to absolut-
nie konieczne; należy unosić tylko tę część
kosiarki, która jest oddalona od użytkownika.
32.
Nie uruchamiać kosiarki, stojąc przed wylotem wyrzutnika.
33.
Nie zbliżać i nie wkładać dłoni ani stóp pod wiru-
jące części. Nie zasłaniać nigdy wylotu wyrzutnika.
34. Nie transportować włączonej kosiarki.
35. Wyłączyć kosiarkę i wyjąć mechanizm dez-
aktywujący. Upewnić się, że wszystkie części
ruchome całkowicie się zatrzymały:
- gdy operator oddala się od kosiarki;
- przed usunięciem niedrożności i odblokowa-
niem kanału wyrzutnika;
- przed sprawdzaniem, czyszczeniem lub kon-
serwacją kosiarki;
- po natraeniu na obcy przedmiot. Przed ponow-
nym uruchomieniem i użytkowaniem kosiarki
należy sprawdzić ją pod kątem występowania
uszkodzeń i wykonać ewentualne naprawy.
36. Jeśli kosiarka zaczyna drgać w nietypowy
sposób (natychmiast sprawdzić):
- sprawdzić pod kątem występowania uszkodzenia,
- wymienić lub naprawić uszkodzone części,
- sprawdzić pod kątem poluzowanych części i,
jeśli takie występują, dokręcić je.
37.
Zachować ostrożność podczas regulacji kosiarki
w celu niedopuszczenia do utknięcia palców
pomiędzy poruszającymi się nożami oraz zamo-
cowanymi na stałe częściami kosiarki.
38.
Kosić trawę w poprzek pochyłości; nigdy pod górę
ani w dół. Należy zachować szczególną ostrożność
przy zmianie kierunku na pochyłościach. Nie wolno
kosić trawy na stromych pochyłościach.
39. Regularnie sprawdzać śrubę mocującą noża
pod kątem prawidłowego dokręcenia.
40. Wszystkie nakrętki, wkręty i śruby powinny
być dokręcone, co pozwoli utrzymać urządze-
nie w bezpiecznym stanie technicznym.
41. Przed schowaniem kosiarki należy zawsze
odczekać, aż ostygnie.
42. Podczas obsługi noży należy pamiętać, że
nawet w przypadku wyłączenia zasilania, noże
mogą nadal się poruszać.

20 POLSKI
43.
Ze względów bezpieczeństwa należy wymieniać
zużyte lub uszkodzone części. Używać tylko ory-
ginalnych części zamiennych oraz akcesoriów.
44. Nie używać maszyny, gdy istnieje ryzyko wyła-
dowań atmosferycznych.
45. Używając maszyny na błotnistym gruncie,
mokrym zboczu lub śliskiej nawierzchni, utrzy-
mywać stabilną postawę ciała i uważać, by się
nie przewrócić.
46. Unikać pracy w niekorzystnych warunkach,
które mogą powodować szybsze zmęczenie
użytkownika.
47. Nie używać maszyny przy złej pogodzie ogra-
niczającej widoczność.Groziłoby to upadkiem
lub błędem w obsłudze maszyny spowodowanym
złą widocznością.
48. Nie wymieniać akumulatora w deszczu.
49. Nie zanurzać maszyny w kałużach.
50. Nie pozostawiać maszyny bez nadzoru na
otwartym powietrzu, w deszczu.
51.
Nie wkładać ani nie wyjmować kluczyka w deszczu.
52.
Gdy z powodu deszczu mokre liście lub zanie-
czyszczenia przylepią się do końcówki rury ssaw-
nej (otworu wentylacyjnego), należy je usunąć.
53. Nie myć maszyny wodą pod wysokim
ciśnieniem.
54. Na czas mycia maszyny koniecznie wyjąć aku-
mulator i kluczyk oraz zamknąć pokrywę aku-
mulatora, a wodę kierować na spód maszyny,
tam gdzie przymocowany jest nóż.
55. Maszyna powinna być przechowywana w miej-
scu nienarażonym na bezpośrednie nasłonecz-
nienie, deszcz, nadmierny wzrost temperatury
i zawilgocenie.
56.
Kontrole techniczne i czynności konserwacyjne
wykonywać w miejscu nienarażonym na deszcz.
57. Po użyciu maszyny usunąć przylepione zanie-
czyszczenia i całkowicie osuszyć maszynę
zanim zostanie odstawiona do przechowy-
wania.W niektórych porach roku i regionach
istnieje ryzyko nieprawidłowości spowodowanych
zamarznięciem.
58. Nie zwilżać zacisków akumulatora cieczami,
np. wodą, ani nie zanurzać akumulatora. Nie
pozostawiać akumulatora w deszczu ani nie
ładować, używać bądź przechowywać akumu-
latora w wilgotnym lub mokrym miejscu. Jeśli
zacisk zamoczy się lub do wnętrza akumulatora
dostanie się ciecz, może dojść do zwarcia akumu-
latora i przegrzania, zapłonu lub wybuchu.
59. Po wyjęciu akumulatora z maszyny lub łado-
warki należy koniecznie przymocować do aku-
mulatora jego pokrywę i umieścić akumulator
w suchym miejscu.
60. Nie wymieniać akumulatora mokrymi rękami.
61. Nie używać maszyny w śniegu.
62. Jeśli odcięta trawa będzie mokra, istnieje
prawdopodobieństwo, że będzie zatykać
maszynę. Należy regularnie sprawdzać stan
maszyny i w razie potrzeby usuwać przyle-
pioną trawę.
ZACHOWAĆ NINIEJSZE
INSTRUKCJE.
OSTRZEŻENIE: NIE WOLNO pozwolić, aby
wygoda lub rutyna (nabyta w wyniku wielokrot-
nego używania urządzenia) zastąpiły ścisłe prze-
strzeganie zasad bezpieczeństwa obsługi.
NIEWŁAŚCIWE UŻYTKOWANIE narzędzia lub niestosowanie
się do zasad bezpieczeństwa podanych w niniejszej instruk-
cji obsługi może prowadzić do poważnych obrażeń ciała.
Ważne zasady bezpieczeństwa
dotyczące akumulatora
1.
Przed użyciem akumulatora zapoznać się ze
wszystkimi instrukcjami i znakami ostrzegaw-
czymi na (1) ładowarce, (2) akumulatorze i (3)
produkcie, w którym będzie używany akumulator.
2. Akumulatora nie wolno rozbierać.
3.
Jeśli czas działania uległ znacznemu skróceniu, należy
natychmiast przerwać pracę. Może bowiem dojść do
przegrzania, ewentualnych poparzeń, a nawet eksplozji.
4.
W przypadku przedostania się elektrolitu do oczu,
przemyć je czystą wodą i niezwłocznie uzyskać pomoc
lekarską. Może on bowiem spowodować utratę wzroku.
5. Nie doprowadzać do zwarcia akumulatora:
(1) Nie dotykać styków materiałami przewo-
dzącymi prąd.
(2) Unikać przechowywania akumulatora w
pojemniku z metalowymi przedmiotami,
takimi jak gwoździe, monety itp.
(3)
Chronić akumulator przed deszczem lub wodą.
Zwarcie prowadzi do przepływu prądu elek-
trycznego o dużym natężeniu i przegrzania
akumulatora, co w konsekwencji może grozić
poparzeniami a nawet awarią urządzenia.
6. Narzędzia i akumulatora nie wolno przecho-
wywać w miejscach, w których temperatura
osiąga bądź przekracza 50°C (122°F).
7. Akumulatorów nie wolno spalać, również tych
poważnie uszkodzonych lub całkowicie zuży-
tych. Akumulator może eksplodować w ogniu.
8.
Chronić akumulator przed upadkiem i uderzeniami.
9. Nie wolno używać uszkodzonego akumulatora.
10. Stanowiące wyposażenie akumulatory lito-
wo-jonowe podlegają przepisom dotyczącym
produktów niebezpiecznych.
Na potrzeby transportu komercyjnego, np. świad-
czonego przez rmy trzecie czy spedycyjne,
należy przestrzegać specjalnych wymagań w
zakresie pakowania i oznaczania etykietami.
Przygotowanie produktu do wysyłki wymaga skon-
sultowania się ze specjalistą ds. materiałów niebez-
piecznych. Należy także przestrzegać przepisów
krajowych, które mogą być bardziej szczegółowe.
Zakleić taśmą lub zaślepić otwarte styki akumulatora oraz
zabezpieczyć go, aby nie mógł się przesuwać w opakowaniu.
11. Postępować zgodnie z przepisami lokalnymi
dotyczącymi usuwania akumulatorów.
12.
Używać akumulatorów tylko z produktami okre-
ślonymi przez rmę Makita. Zastosowanie akumula-
torów w niezgodnych produktach może spowodować
pożar, przegrzanie, wybuch lub wyciek elektrolitu.
ZACHOWAĆ NINIEJSZE
INSTRUKCJE.
Pagina se încarcă...
Pagina se încarcă...
Pagina se încarcă...
Pagina se încarcă...
Pagina se încarcă...
Pagina se încarcă...
Pagina se încarcă...
Pagina se încarcă...
Pagina se încarcă...
Pagina se încarcă...
Pagina se încarcă...
Pagina se încarcă...
Pagina se încarcă...
Pagina se încarcă...
Pagina se încarcă...
Pagina se încarcă...
Pagina se încarcă...
Pagina se încarcă...
Pagina se încarcă...
Pagina se încarcă...
Pagina se încarcă...
Pagina se încarcă...
Pagina se încarcă...
Pagina se încarcă...
Pagina se încarcă...
Pagina se încarcă...
Pagina se încarcă...
Pagina se încarcă...
Pagina se încarcă...
Pagina se încarcă...
Pagina se încarcă...
Pagina se încarcă...
Pagina se încarcă...
Pagina se încarcă...
Pagina se încarcă...
Pagina se încarcă...
Pagina se încarcă...
Pagina se încarcă...
Pagina se încarcă...
Pagina se încarcă...
Pagina se încarcă...
Pagina se încarcă...
Pagina se încarcă...
Pagina se încarcă...
Pagina se încarcă...
Pagina se încarcă...
Pagina se încarcă...
Pagina se încarcă...
Pagina se încarcă...
Pagina se încarcă...
Pagina se încarcă...
Pagina se încarcă...
Pagina se încarcă...
Pagina se încarcă...
Pagina se încarcă...
Pagina se încarcă...
Pagina se încarcă...
Pagina se încarcă...
Pagina se încarcă...
Pagina se încarcă...
Pagina se încarcă...
Pagina se încarcă...
Pagina se încarcă...
Pagina se încarcă...
Pagina se încarcă...
Pagina se încarcă...
Pagina se încarcă...
Pagina se încarcă...
-
 1
1
-
 2
2
-
 3
3
-
 4
4
-
 5
5
-
 6
6
-
 7
7
-
 8
8
-
 9
9
-
 10
10
-
 11
11
-
 12
12
-
 13
13
-
 14
14
-
 15
15
-
 16
16
-
 17
17
-
 18
18
-
 19
19
-
 20
20
-
 21
21
-
 22
22
-
 23
23
-
 24
24
-
 25
25
-
 26
26
-
 27
27
-
 28
28
-
 29
29
-
 30
30
-
 31
31
-
 32
32
-
 33
33
-
 34
34
-
 35
35
-
 36
36
-
 37
37
-
 38
38
-
 39
39
-
 40
40
-
 41
41
-
 42
42
-
 43
43
-
 44
44
-
 45
45
-
 46
46
-
 47
47
-
 48
48
-
 49
49
-
 50
50
-
 51
51
-
 52
52
-
 53
53
-
 54
54
-
 55
55
-
 56
56
-
 57
57
-
 58
58
-
 59
59
-
 60
60
-
 61
61
-
 62
62
-
 63
63
-
 64
64
-
 65
65
-
 66
66
-
 67
67
-
 68
68
-
 69
69
-
 70
70
-
 71
71
-
 72
72
-
 73
73
-
 74
74
-
 75
75
-
 76
76
-
 77
77
-
 78
78
-
 79
79
-
 80
80
-
 81
81
-
 82
82
-
 83
83
-
 84
84
-
 85
85
-
 86
86
-
 87
87
-
 88
88


Makita DLM461 Manual de utilizare
- Categorie
- Cositoare
- Tip
- Manual de utilizare
în alte limbi
- slovenčina: Makita DLM461 Používateľská príručka
- polski: Makita DLM461 Instrukcja obsługi
Lucrări înrudite
Alte documente
-
Dolmar AM3738 Manualul proprietarului
-
Ransomes USAG004 / USAD004 / 62706 Manualul proprietarului
-
Gardena 5023-20 Manual de utilizare
-
Ransomes HF600 Manualul proprietarului
-
-
Stiga Collector 132e Kit Manual de utilizare
-
-
Raider Garden Tools RD-GLM11 Manual de utilizare
-
-
 Einhell Expert Plus GE-CM 36/47 HW Li Manual de utilizare
