Parkside PKGA 20-Li C2 Manual de utilizare
- Tip
- Manual de utilizare

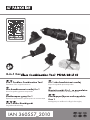
4-in-1 Cordless Combination Tool PKGA 20-Li C2
4 u 1 aku kombinirani uređaj
Prijevod originalnih uputa za uporabu
Mașină combi 4 în 1, cu acumulator
Traducerea instrucţiunilor de utilizare originale
4-in-1-Akku-Kombigerät
Originalbetriebsanleitung
Комбиниран уред 4 в 1
Превод на оригиналното ръководство за експлоатация
Aku kombinovani uređaj 4 u 1
Prevod originalnog uputstva za upotrebu
4-in-1 Cordless Combination Tool
Translation of the original instructions
Επαναφορτιζόενο πολυεργαλείο
4 σε 1
Μετάφραση των αυθεντικών οδηγιών λειτουργία
IAN 360557_ 2010
4-in-1 Cordless Combination Tool PKGA 20-Li C2

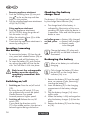
Before reading, unfold the page containing the illustrations and familiarise yourself with all functions of
the device.
Prije nego što pročitate tekst, otvorite stranicu sa slikama i upoznajte se na osnovu toga sa svim
funkcijama uređaja.
Pre čitanja rasklopite stranu sa uređajima i u sledećem koraku upoznajte se sa svim funkcijama uređaja.
Înainte de a citi instrucţiunile, priviţi imaginile şi familiarizaţi-vă cu toate funcţiile aparatului.
Преди да прочетете отворете страницата с фигурите и след това се запознайте с всички функции
на уреда.
Πριν ξεκινήσετε την ανάγνωση, ανοίξτε τη σελίδα ε τι εικόνε και εξοικειωθείτε ε όλε τι λειτουργίε
τη συσκευή.
Klappen Sie vor dem Lesen die Seite mit den Abbildungen aus und machen Sie sich anschließend mit
allen Funktionen des Gerätes vertraut.
GB / CY Translation of the original instructions Page 4
HR Prijevod originalnih uputa za uporabu Stranica 24
RS Prevod originalnog uputstva za upotrebu Strana 44
RO Traducerea instrucţiunilor de utilizare originale Pagina 65
BG Превод на оригиналното ръководство за експлоатация
Страница 87
GR / CY Μετάφραση των αυθεντικών οδηγιών λειτουργία Σελίδα 111
DE / AT / CH Originalbetriebsanleitung Seite 134

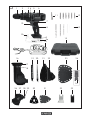
1 2 356
7
8
9
10
11 12
13
14
16 19
17
18
20 23 24
25
26 27 30 31 32 33
28 29
2221
15
4
9a
9b

4
GB CY
Content
Introduction .................................5
Intended Use ................................5
General Description ......................5
Scope of delivery .............................. 5
Overview ......................................... 6
Technical Data ..............................6
Notes on Safety ...........................7
Symbols ........................................... 7
General Safety Directions for
Power Tools ...................................... 8
Additional safety instructions ............ 11
Practical tips ..............................13
Operation ..................................13
Replacing the appliance attachment .. 13
.......... 14
Switching on/off ............................. 14
..... 14
Recharging the battery ..................... 14
Motor unit with drill attachment
PKGA1 .......................................15
Changing the tool ........................... 15
Choice of gear ............................... 15
Set the direction of rotation .............. 15
Torque adjustment ........................... 15
Motor unit with multisander
attachment PKGA2 .....................16
Attaching/removing sanding sheet .... 16
Connecting dust extraction ............... 16
Sanding ......................................... 16
Selection of sanding sheet ................ 16
Translation of the original EC
declaration of conformity ......... 156
Exploded Drawings ...........163-165
Motor unit with sabre saw
attachment PKGA3 .....................17
Installing/changing the blade ........... 17
Operating the sabre saw ................. 17
Sawing .......................................... 17
Plunge cuts ..................................... 17
Selection of sawblade ..................... 18
Motor unit with multifunction
tool PKGA4 ................................ 18
Changing the tool ........................... 18
Attaching/removing sanding sheet .... 18
Sanding ......................................... 18
Selection of sanding sheet ................ 19
Scraping ........................................ 19
Cleaning/Maintenance ...............19
Cleaning ........................................ 19
Maintenance .................................. 19
Storage ......................................19
Waste Disposal/Environmental
Protection ..................................19
Guarantee .................................20
Repair Service ............................21
Service-Center ............................21
Importer .................................... 21
Spare Parts/Accessories ............. 22
Trouble Shooting ........................ 23

5
CYGB
Introduction
Congratulations on the purchase of your
new device. With it, you have chosen a
high quality product. During production,
this equipment has been checked for
The functionality of your equipment is
therefore guaranteed.
The operating instructions constitute
part of this product. They contain
important information on safety, use
and disposal.
Before using the product, familiarise
yourself with all of the operating and
safety instructions. Use the product only
as described and for the applications
the event that the product is passed on,
hand over all documents to the third party.
Intended Use
The device is intended for tightening and
releasing screws and for drilling holes in
wood, metal or plastic.
The device is not suitable for commercial
use. Any other use that is not explicitly
approved in these instructions may result in
damage to the equipment and represent a
serious danger to the user.
The equipment is designed for use by
adults. Adolescents over the age of 16
may use the device only under supervision.
The manufacturer is not liable for damages
operation. Commercial use will invalidate
the guarantee.
The device is part of the Parkside
batteries.
The batteries may only be charged using
series.
General Description
The illustration of the principal
functioning parts can be found
on the front and back foldout
pages.
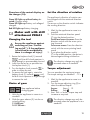
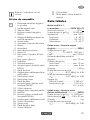
Scope of delivery
Carefully unpack the trimmer and check
that it is complete. Dispose of the packag-
ing material correctly.
• Motor unit with drill attachment
• Sabre saw attachment
• Multi-sander attachment
• Multifunction tool
• Accessories for drill attachment
- 6 drill bits (1,5/2/3/4/5/6 mm)
- 6 screwdriver bits, 50 mm
- Bit holder
• Accessories for sabre saw attachment
- Wood sawblade (HCS150/6TPI)
- Metal sawblade (HSS150/18TPI)
• Accessories for multi-sander attachment
- 5 sanding sheets
(2 x P* 60, 2 x P 120, 1 x P 240)
• Accessories for multifunction tool
- Plunge sawblade
- Scraper blade
- Delta sanding plate with 3 sanding
sheets (1 x P* 60, 1 x P 80, 1 x P 120)
• Dust extraction adaptor
• Reducer
• Storage case
• Instruction Manual
*P = Grain size

6
GB CY
Battery and charger are not
included.
Overview
2 Torque adjustment ring
3 Gear selection switch
5 Unlocking lever for appliance at-
tachment
6 Motor unit
7 Direction switch
8 Handle
9 Rechargeable battery
10 On/off switch
11 Bit holder
12 Screwdriver bits, 50 mm, 6 no.
13 Drill bits 6 no.
14 Charger
15 Storage case
17 Footplate
18 Lever for unlocking sawblade
19 Metal sawblade
20 Wood sawblade
21 Sanding plate
23 5 sanding sheets
24 Dust extraction adaptor
25 Reducer
27 Lever for unlocking tool
28 Arbor
29 Tool holder
30 Delta sanding plate
31 3 sanding sheets
32 Scraper blade
33 Plunge sawblade
Technical Data
4-in-1 Cordless
Combination Tool ................PKGA 20-Li C2
Motor voltage .............................
Idling speed (n0) ....................21000 min-1
Temperature...........................
Charging process ...................
Operation ..........................
Storage .................................
Motor unit with drill attachment ..... PKGA1
Idling speed (n0) ........ 0-400/0-1350 min-1
Torque ................................max. 35 Nm
Spread drill chuck ................ max. 13 mm
Drill diameter
for wood .......................... max. 13 mm
for steel ............................. max. 8 mm
Weight ......................................1.23 kg
Sound pressure level
(LpA) ................... 83.7pA= 5 dB
Sound power level
(LWA) ................. WA= 5 dB
h)
drilling in metal .. 1.322 m/s22
idling ..............1.531 m/s22
Motor unit with multisander
attachment .................................... PKGA2
Oscillation rate (n0) ..............0-9000 min-1
Sanding sheet size .......138 x 97 mm
Weight ...........................................1 kg
Sound pressure level
(LpA) ................... 88.6pA= 3 dB
Sound power level
(LWA) ................. WA= 3 dB
h) ......4.572 m/s22
Motor unit with sabre saw
attachment .................................... PKGA3
Stroke rate (n0) .....................0-3200 min-1
Stroke length ...................... 22 mm

7
CYGB
Cutting capacity
Wood .................................... 100 mm
Metal ...................................... 50 mm
Weight ......................................1.44 kg
Sound pressure level
(LpA) ................... 89.3pA= 5 dB
Sound power level
(LWA) ............... WA= 5 dB
h), Sawing
boards ..........12.395 m/s2; 2
wood beams ..12.392 m/s22
Motor unit with multifunction tool ... PKGA4
Oscillation rate (n0) ............0-20000 min-1
Oscillation angle ..............................
Weight ...........................................1 kg
Sound pressure level
(LpA) ................... 84.8pA= 3 dB
Sound power level
(LWA) ................. WA= 3 dB
h) ......4.229m/s22
Attention! An up-to-date list
of battery compatibility can
be found at:
www.lidl.de/akku
The stated vibration emission value was
measured in accordance with a standard
testing procedure and may be used to com-
pare one power tool to another.
The stated vibration emission value may
also be used for a preliminary exposure
assessment.
Warning: The vibration emission
value may differ during actual use
of the power tool from the stated
value depending on the manner in
which the power tool is used.
Try to keep the exposure to vibra-
of measures to reduce vibration
exposure are the wearing of gloves
when using the tool (except: operat-
ing mode drilling) and limiting the
working hours. For this purpose all
parts of the operating cycle have to
be considered (for example, times
when the electric tool is switched
off and times when it is switched on
but running without any load).
Notes on Safety
This section details the basic safety instruc-
tions for working with the appliance.
Symbols
Symbols in the manual
Warning symbols with in-
formation on damage and
injury prevention.
Hazard symbol with infor-
mation on the prevention of
personal injury caused by
electric shock.
Instruction symbols with information
on preventing damage.
Wear safety gloves.
Wear ear protection.
Wear a protective mask.
Help symbols with information on
improving tool handling.
Symbols on the Equipment
Read through the instruction manual
carefully.

8
GB CY
disposed of with the domestic
waste.
Stop appliance before
changing gear.
Injury hazard caused by rotating
This device is part of the Park-
Graphic symbols on the saw
blades:
Wear eye protection.
Suitable for sawing wood
Suitable for sawing metal
General Safety Directions for
Power Tools
WARNING! Read all safety
notices, instructions, illustra-
tions and technical data that
have been provided with this
power tool. Omissions in the
compliance with safety directions
and instructions can cause electrical
Retain all safety directions and in-
structions for future use.
The term „power tool“ in the warnings
refers to your mains-operated (corded)
power tool or battery-operated (cordless)
power tool).
1) WORK AREA SAFETY
a) Keep work area clean and well lit.
Cluttered or dark areas invite accidents.
b) Do not operate power tools in
explosive atmospheres, such as
Iiquids, gases or dust. Power tools
create sparks which may ignite the
dust or fumes.
c) Keep children and bystanders
away while operating a power
tool. Distractions can cause you to
lose control.
2) ELECTRICAL SAFETY
a) Power tool plugs must match
the outlet. Never modify the
plug in any way. Do not use
any adapter plugs with earthed
(grounded) power tools. Unmodi-
reduce risk of electric shock.
b) Avoid body contact with
earthed or grounded surfaces,
such as pipes, radiators, ranges
and refrigerators. There is an in-
creased risk of electric shock if your
body is earthed or grounded.
c) Do not expose power tools to
rain or wet conditions. Water
entering a power tool will increase the
risk of electric shock.
d) Do not abuse the cord. Never
use the cord for carrying, pulling
or unplugging the power tool.
Keep cord away from heat, oil,
sharp edges or moving parts.
Damaged or entangled cords increase
the risk of electric shock.
e) When operating a power tool
outdoors, use an extension cord
suitable for outdoor use. Use of a

9
CYGB
cord suitable for outdoor use reduces
the risk of electric shock.
f) If operating a power tool in a
damp location is unavoidable,
use a residual current device
(RCD) protected supply. Use of an
RCD reduces the risk of electric shock.
3) PERSONAL SAFETY
a) Stay alert, watch what you are
doing and use common sense
when operating a power tool.
Do not use a power tool while
-
ence of drugs, alcohol or medi-
cation. A moment of inattention white
operating power tools may result in
serious personal injury.
b) Use personal protective equip-
ment. Always wear eye protec-
tion. Protective equipment such as
dust mask, non-skid safety shoes, hard
hat, or hearing protection used for
appropriate conditions will reduce per-
sonal injuries.
c) Prevent unintentional starting.
Ensure the switch is in the off-
position before connecting to
power source and/or battery
pack, picking up or carrying
the tool. Carrying power tools with
power tools that have the switch on
invites accidents.
d) Remove any adjusting key or
wrench before turning the pow-
er tool on. A wrench or a key left at-
tached to a rotating part of the power
tool may result in personal injury.
e) Do not overreach. Keep proper
footing and balance at all times.
This enables better control of the pow-
er tool in unexpected situations.
f) Dress properly. Do not wear
loose clothing or jewellery.
Keep your hair, clothing and
gloves away from moving
parts. Loose clothes, jewellery or long
hair can be caught in moving parts.
g) If dust extraction and collection
devices can be installed, make
sure that these are connected
and used correctly. Use of dust col-
lection can reduce dust-related hazards.
h) Do not allow yourself to be lulled
into a false sense of security and
do not disregard the safety rules
for power tools, even if you are
familiar with the power tool after
using it many times. Careless action
can lead to serious injuries within a frac-
tion of a second.
4) POWER TOOL USE AND CARE
a) Do not force the power tool. Use
the correct power tool for your
application. The correct power tool
will do the job better and safer at the
rate for which it was designed.
b) Do not use the power tool if the
switch does not turn it on and
off. Any power tool that cannot be
controlled with the switch is dangerous
and must be repaired.
c) Remove the plug from the wall
socket and/or remove the re-
chargeable battery before you
change the device’s settings,
change accessory parts or put
away the power tool. Such pre-
ventive safety measures reduce the risk
of starting the power tool accidentaIly.
d) Store idle power tools out of the
reach of children and do not al-
low persons unfamiliar with the
power tool or these instructions

10
GB CY
to operate the power tool. Power
tools are dangerous in the hands of
untrained users.
e) Look after the power tool and
application tool carefully. Check
for misalignment or binding
of moving parts, breakage of
parts and any other condition
that may affect the power tool’s
operation. If damaged, have
the power tool repaired before
use. Many accidents are caused by
poorly maintained power tools.
f) Keep cutting tools sharp and
clean. Properly maintained cutting
tools with sharp cutting edges are less
Iikely to bind and are easier to control.
g) Use the power tool, accessories
and tool bits etc. in accordance
with these instructions, taking
into account the working condi-
tions and the work to be per-
formed. Use of the power tool for op-
erations different from those intended
could result in a hazardous situation.
h) Keep handles and grip surfaces
dry, clean and free from oil and
grease. Slippery handles and grip
surfaces do not permit safe operation
and control over the power tool in un-
expected situations.
5) CAREFUL HANDLING AND USE
OF BATTERY DEVICES
a) Charge the batteries only in
chargers that are recommended
by the manufacturer.
of battery is used with other batteries.
b) In the power tools, use only the
batteries designed for the pur-
pose. The use of other batteries may
c) Keep the unused battery away
from paper clips, coins, keys,
nails, screws and other small
metal objects, which could
cause bridging of the contacts.
A short circuit between the battery con-
d) If used incorrectly, liquid may
leak from the battery. Avoid
contact with this. In the event of
accidental contact, rinse off with
water. If the liquid gets into eyes, seek
medical assistance. Leaking battery
e) Do not use damaged or altered
batteries. Damaged or altered bat-
teries can be unpredictable and lead
or elevated temperatures. Fire or
an explosion.
g) Follow all instructions for charg-
ing and never charge the bat-
tery or the battery-powered
tool outside the temperature
range stated in the operating
instructions. Incorrect charging or
charging outside the permitted tem-
perature range may destroy the battery
6) SERVICE
a) Have your power tool serviced
-
ing only identical replacement
parts. This will ensure that the safety
of the power tool is maintained.
b) Never repair damaged batter-
ies. All battery repairs should be car-
ried out by the manufacturer or author-
ised customer service centres only.

11
CYGB
Additional safety instructions
Warning! The processing
of hazardous materials
material containing asbestos)
is hazardous to the user and
bystanders and is therefore
prohibited.
Warning! Sawing and san-
ding can result in dust. Al-
ways wear safety goggles,
safety gloves and respiratory
protection. If possible, attach
a dust extraction system.
1) SPECIAL SAFETY INFORMATION
FOR THE CORDLESS COMBINA-
TION TOOL
• Hold the electric tool by the in-
sulated handle surfaces when
performing work where the
screw may come into contact
with hidden wiring. Contact of the
screw with a live wire can also cause
a charge in metal parts of the appli-
ance and result in an electric shock.
• Use suitable detectors in order
ask the local utility company.
Contact with electrical cables can lead
a gas pipe can result in an explosion.
Damage to a water pipe can lead to
property damaged and electric shock.
• Secure the workpiece. A work-
piece that is retained with clamping
appliances or a vice is held more se-
curely than with your hand.
• Be very careful when handling
tools such as saws, scraper
blades and drills. These are sharp
and present an injury hazard.
• Wear safety gloves when
changing attachments. This ena-
bles you to avoid injuries if the appli-
ance attachment has heated up after
use.
2) SAFETY INFORMATION FOR
SAWING BACK AND FORTH
• Hold the electric tool by the in-
sulated gripping surfaces when
performing work in which the
cutting tool may come into con-
tact with hidden wiring. Contact
with a live wire can also cause a
charge in metal parts of the device and
result in an electric shock.
• Fasten and secure the workpie-
ce by means of clamps or with
another method on a stable un-
derground. If you hold the workpiece
only with your hand or against your
own body, it will stay instable and this
can lead to a loss of control.
• Keep hands away from the
sawing area. Do not reach
underneath the workpiece. Al-
ways stand to the side of the
saw when working. Upon contact
with the blade there is a risk of injury.
• Only when the electric tool is
turned on should the sawing
blade be moved against the
workpiece. There is a risk of kickback
if the tool insert jams in the workpiece.
• Make sure that the footplate
is securely placed against the
workpiece during sawing. The
sawblade can tilt and lead to loss of
control over the power tool.
•
the power tool off and do not

12
GB CY
pull the sawblade out of the cut
until it has come to a standstill.
In this way you will avoid any kickback
and can safely put down the power tool.
• Use only undamaged saw-
blades in perfect condition. Bent
or blunt blades can break, adversely
affect the cut or cause kickback.
• Do not brake the sawblade af-
ter switching the appliance off
by applying side pressure. The
sawblade may be damaged, break or
cause a kickback.
•
not support the workpiece by
hand or foot. Do not touch any
objects or the ground with the saw run-
ning. There is a risk of kickback.
• Hold the power tool tightly with
both hands while working and
ensure a secure footing. The
power tool is guided more securely
with both hands.
• Wait until the power tool has
stopped before placing it down.
The tool insert can tilt and lead to loss
of control over the power tool.
• Switch the appliance off im-
mediately if the sawing blade
jams. Spread the saw cut out and pull
the blade out carefully. This can lead
to loss of control over the power tool.
3) SPECIAL SAFETY INFORMATION
DURING SANDING AND
SCRAPING
• Only use the power tool for dry
sanding. Do not scrape moist
materials. Penetration of water into
the power tool increases the risk of
electric shock.
• Avoid overheating the sanded
object and the sander itself. Pos-
• The workpiece gets hot dur-
ing grinding. Do not touch the
machined area, allow it to cool
down. There is a risk of burning. Do
not use coolants or the like.
• Always empty the dust con-
tainer before work breaks.
Sanding dust in the dust sack, micro
under unfavourable conditions such
metals. Particular hazards are caused
if the sanding dust is mixed with paint,
polyurethane residues or other chemi-
cal substances, or if the sanded object
is hot after long working periods.
4) SAFETY INFORMATION FOR
USING LONG DRILLS
a) Do not work at a speed higher
than the maximum permissible
speed for the drill. Higher speeds
can cause the drill to bend slightly
when rotating freely without contact
with the workpiece and can also cause
injury.
b) Always begin drilling at a low
speed and when the drill is in
contact with the workpiece. Hig-
her speeds can cause the drill to bend
slightly when rotating freely without
contact with the workpiece and can
also cause injury.
c) Do not apply excessive pressu-
re to the drill. Drills can bend and
break or cause a loss in control, thus
resulting in injuries.

13
CYGB
5) RESIDUAL RISKS
electric tool, some residual risks will remain.
Due to its construction and build, this elec-
tric tool may present the following hazards:
a) Lung damage, if suitable respiratory
protection is not worn;
b) Cuts
protection.
is not worn.
e) Damage to your health caused by
swinging your hands and arms when
operating the appliance for longer pe-
riods of time or if the unit is not held or
maintained properly.
Warning! During operation, this
electric tool generates an electro-
circumstances, may impair the func-
tionality of active or passive medical
implants. To reduce the risk of seri-
ous or lethal injuries, we recommend
that persons with medical implants
consult their doctor and the manu-
facturer of their medical implant
before operating the machine.
Observe the safety informati-
on and notes on charging and
proper use as shown in the
instruction manual for your
battery and charger from the
A detailed description of the
charging process and further
information can be found in
the separate operating inst-
ructions.
Do not use any accessories that are not
recommended by PARKSIDE. This can result
Practical tips
When working with the ap-
pliance, always wear suita-
ble clothing and appropriate
protective equipment.
Prior to each use it must be
ensured that the appliance is
working correctly.
Personal protective equip-
ment and a fully functional
appliance reduce the risk of
injuries and accidents.
Ensure that the ambient tem-
perature does not exceed
during work.
Wear ear protection.
Operation
Replacing the appliance at-
tachment
Secure the appliance against
switching on (see “Switch-
ing on/off”) or remove the
rechargeable battery from
the appliance. There is an
injury hazard if the device is
switched on accidentally.
Wear safety gloves. The appliance
attachment might have heated up
after use.

14
GB CY
Removing appliance attachment
1. Push the unlocking lever (5) into posi-
tion as far as the stop and then
hold it in this position.
2. Pull the unlocked appliance attachment
off (4/16/22/26).
Fitting appliance attachment
3. Push the appliance attachment
(4/16/22/26) along the guide rail
into the motor unit (6).
4. Allow the unlocking lever (5) to slide
back into position .
5. Check that the appliance attachment is
secure by pulling on it.
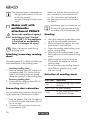
Inserting/removing
thebattery
1. To remove the battery (9) from the de-
vice, press both release buttons (9b) on
the battery and pull the battery out.
2. To insert the battery (9), push the bat-
tery along the guide rail into the de-
vice. You will hear it click into place.
Only insert the rechargeable
battery once the device is
completely assembled. Risk
of injury!
Switching on/off
1. Switching on: Press the on/off switch
(10).
By using the on/off switch (10) you
can progressively control the speed.
Gentle pressure: low speed
Increase pressure: higher speed.
2. Switching off: Release the on/off
switch (10).
If you place the direction switch
(7) in the middle position, the device is
secured against being switched on.
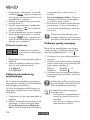
Checking the battery
chargelevel
The battery’s (9) charge level is indicated
by the charge state indicator (9a).
• The charge level of the battery is
indicated by illumination of the corre-
in operation. Press and hold the power
button to view.
red-yellow-green => Battery fully charged
red and yellow => Battery half charged
red => Battery needs
to be charged
Charge the battery (9) when only
illuminated.
Recharging the battery
Allow a hot battery to cool before
charging.
Only charge the battery (9) when
indicator (9a) is on.
1. Remove the battery (9) from the appli-
ance, as necessary (see „Removing/
inserting the battery“).
2. Insert the battery (9) in the charging
compartment of the battery charger
(14).
3. Plug the battery charger (14) into a
mains outlet.
4. When the battery is fully recharged un-
plug the battery charger (14) from the
mains.
5. Remove the battery (9) from the charg-
er (14).

15
CYGB
Overview of the control display on
the charger (14):
Green LED lights up without battery in-
serted: Charger ready.
Green LED lights up: Battery such alleged
charged.
Red LED lights up: Battery charging.
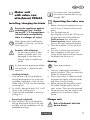
Motor unit with drill
attachment PKGA1
Changing the tool
Secure the appliance against
switching on (see “Switch-
ing on/off”). If the appliance
is switched on accidentally,
there is a danger of injury.
1. Rotate the keyless chuck (1) towards
RELEASE
until the drill chuck aperture is
large enough to accommodate the tool.
2. Insert the tool as far as possible into
the keyless chuck (1).
3. Turn the keyless chuck towards
GRIP
in
order to clamp the tool.
4. To remove the tool again, rotate the
keyless chuck (1) towards
RELEASE
until
the drill chuck aperture is large enough
to remove the tool.
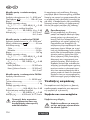
Choice of gear
Stop appliance before
changing gear.
1. Wait for the appliance to come to a
standstill.
2 Slide the gear selector (3) into the re-
quired position:
1: 0-400 min-1
2: 0-1350 min-1
Set the direction of rotation
The appliance’s direction of rotation can
be changed with the rotational direction
switch.
The arrow on the direction switch indicates
the working direction.
1. Wait for the appliance to come to a
standstill.
2. Push the rotational direction speed
(7) into the desired position:
To drill and screw in screws: Press the
direction switch with the arrow poin-
ting forwards
To unscrew screws: Press the direction
switch with the arrow pointing back-
wards
3. If you place the direction switch
(7) in the middle position, the device is
secured against being switched on.
The direction change may only be
actuated when at a standstill!
Torque adjustment
You can preselect the maximum torque.
The torque settings are labelled 1 - 19 +
1. Wait for the appliance to come to a
standstill.
2. Turn the torque adjusting ring (2) to
select the desired torque:
Screws: Steps 1 - 19
Drilling: Step
3. Start with a lower torque step and
increase as required.
The direction change may only be
actuated when the appliance is at a
standstill!

16
GB CY
The necessary torque is dependent on:
- the type and hardness of the ma-
terial to be treated;
- the type and length of the screws
used.
Motor unit with
multisander
attachment PKGA2
Secure the appliance against
switching on (see “Switch-
ing on/off”). If the appliance
is switched on accidentally,
there is a danger of injury.
Wear a protective mask during
grinding work.
Attaching/removing sanding
sheet
for
rapid attachment of the sanding sheet.
Attaching sanding sheet
1. Press the sanding sheet (23) evenly onto
holes in the sanding sheet are placed
above the openings in the sanding plate.
Removing sanding sheet
2. Simply pull the sanding sheet (23) off
the sanding plate (21).
Connecting dust extraction
You can reduce dust production during sand-
ing by attaching a dust extraction system.
1. Push the adaptor (24) into the opening
on the multi-sander attachment (22) as
far as the stop.
2. Connect a dust extractor suction hose
to the adaptor (24).
Make sure that the dust extraction sys-
tem is suitable for the material to be
cut. This information can be found in
the operating instructions of the exter-
nal device.
If necessary, you can connect the suc-
tion hose of a vacuum cleaner with-
out reducer (25) to the adapter (24).
Sanding
• Use a dust extraction system when sand-
ing with the multi-sander attachment.
• Move the appliance against the work-
piece once it is switched on.
• Clean the sanding plate before you at-
tach a sanding sheet.
• Only work with sanding sheets in per-
fect condition to achieve good sanding
results.
• Work using low and even pressure.
This protects the appliance and the
sanding sheet.
• Do not use the same sanding sheet to
sand different materials (e.g. metal
and then wood).
Selection of sanding sheet
Grain size P Application
P 60 for pre-sanding rough wood
surfaces
P 80 / 120 for plain sanding
P 240
and painted surfaces

17
CYGB
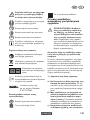
Motor unit
with sabre saw
attachment PKGA3
Installing/changing the blade
Secure the appliance against
switching on (see “Switch-
ing on/off”). If the appliance
is switched on accidentally,
there is a danger of injury.
Wear gloves when handling the
sawblade. In this way, you avoid
injury from cuts.
Caution, risk of Injury!
- Do not use any blunt or bent
blades or blades which are
damaged in any other way.
- Always insert a suitable saw-
blade.
An overview of appropriate blades
can be found in “Spare Parts/Ac-
cessories”.
Installing the blade:
1. Push the lever (18) for sawblade un-
locking downwards as far as the stop
and keep it held down. Push the saw-
blade shaft (19/20) into the sawblade
mounting slot.
2. To unlock, release the lever (18), it will
return to the initial position.
3. Check that the sawblade is secure by
pulling on it.
Removing the sawblade:
4. Press the lever (18) for sawblade un-
locking downwards as far as the stop
and then pull the sawblade out of the
sawblade mounting.
For certain work, the sawblade
can also be inserted after turning
Operating the sabre saw
1. Before switching the appliance on, en-
sure it is not in contact with the work-
piece.
2. Turn the appliance on.
By using the on/off switch (10) you can
progressively control the stroke rate.
Gentle pressure: low stroke rate.
Greater pressure: higher stroke rate.
The on/off switch cannot be locked.
3. Place the footplate (17) on the work-
piece.
4. Cut with a uniform forward motion.
switch off the device and then remove
the blade from the saw cut.
Sawing
Wear eye protection.
• Use only undamaged sawblades in
perfect condition. Only use metal saw-
blades for metalworking.
the appliance tightly with both hands
and away from your body.
• Before sawing the workpiece, check
for hidden foreign objects such as
nails, screws. These must be removed.
• Plunge cuts may only be made in soft
material such as wood or plaster-
board.
Plunge cuts
Risk of kickback! Hold the

18
GB CY
1. Place the device with the bottom edge
of the footplate (17) on the workpiece.
2. Turn on the device.
3. Insert the saw blade (20) in the workpi-
ece by tipping the device forward until
the device is vertical.
4. Continue sawing along the desired cut-
ting line.
Selection of sawblade
Wood sawblade for wood, plastic, plaster-
board
Metal sawblade
and tubes
Plunge sawblade for soft materials like
wood or plasterboard
Motor unit with
multifunction tool
PKGA4
Wear a protective mask during
grinding work.
Changing the tool
Secure the appliance against
switching on (see “Switch-
ing on/off”). If the appliance
is switched on accidentally,
there is a danger of injury.
tightly screwed in to ensure you can
safely mount and use all the sup-
plied tools (30/32/33).
1. Push the lever (27) for tool unlocking
upwards as far as the stop.
2. Place the desired tool (30/32/33) be-
low the tool holder (29) on the arbors
(28). You may need to rotate the un-
locked tool holder (29) as far as need-
ed to allow you to place the desired
tool (30/32/33) onto the arbors (28).
12 different positions are possible.
3. Rotate the tool holder as required until
4. Push the lever (27) for tool unlocking
forwards again. The tool holder is
Attaching/removing sanding
sheet
sheet.
Attaching sanding sheet
1. Press the sanding sheet (31) evenly
-
sure that the holes in the sanding sheet
are placed above the openings in the
sanding plate.
Removing sanding sheet
2. Simply pull the sanding sheet (31) off
the delta sanding plate (30).
Sanding
• Move the appliance against the work-
piece once it is switched on.
• Clean the sanding plate before you at-
tach a sanding sheet.
• Only work with sanding sheets in per-
fect condition to achieve good sanding
results.
• Work using low and even pressure.
This protects the appliance and the
sanding sheet.
• Do not use the same sanding sheet to
sand different materials (e.g. metal
and then wood).

19
CYGB
Selection of sanding sheet
Grain size P Application
P 60 for pre-sanding rough wood
surfaces
P 80 / 120 for plain sanding
P 240
and painted surfaces
Scraping
• Use a high oscillation rate when scrap-
ing.
• Work using low pressure and at a low
angle in order not to damage the sub-
strate material.
Cleaning/Maintenance
Repair and servicing work not
described in this manual should
always be carried by our Service
Centre. Use only original parts.
Switch off the device and remove
the battery from the device before
working with or transporting it.
The following cleaning and servicing
should be done regularly. This will ensure
a long and reliable service life.
Cleaning
Do not spray the appliance
with water and do not im-
merse it in water. Electric
shock hazard!
housing and handles of the appliance.
Use a damp cloth or a brush.
Do not use cleaning agents or solvents.
You may otherwise irreparably dam-
age the appliance.
Maintenance
• The equipment is maintenance free.
Storage
• Store the device in a dry place well out
of reach of children.
cold or heat so the battery does not
lose power.
• Remove the battery before storing the
unit for longer periods of time.
• Store the battery only in a partially
charged state. The state of charge
should be 40 – 60 % over a longer
charge status display ( 9a) illumi-
nate).
• During a longer storage period, check
the state of charge of the battery and
recharge if necessary roughly every
Waste Disposal/Envi-
ronmental Protection
Remove the battery from the device and
take the device, battery, accessories and
packaging for environmentally friendly
recycling. Instructions on how to dispose
of the rechargeable battery can be found
in the separate instruction manual for your
battery and charger.
domestic waste.

20
GB CY
• Remove the rechargeable battery be-
fore disposing of the appliance.
• Return the unit and the recharger to a
recycling centre. The plastic and metal
parts employed can be separated out
and thus recycled use can be imple-
mented. Ask our Service-Center for
details.
• Defective units returned to us will be
disposed of for free.
Guarantee
Dear Customer,
This equipment is provided with a 3-year
guarantee from the date of purchase.
In case of defects, you have statutory rights
against the seller of the product. These
statutory rights are not restricted by our
guarantee presented below.
Terms of Guarantee
The term of the guarantee begins on the
date of purchase. Please retain the original
receipt. This document is required as proof
of purchase.
If a material or manufacturing defect
occurs within three years of the date of
purchase of this product, we will repair or
replace – at our choice – the product for
you free of charge. This guarantee requires
the defective equipment and proof of pur-
chase to be presented within the three-year
period with a brief written description of
what constitutes the defect and when it oc-
curred.
If the defect is covered by our guarantee,
you will receive either the repaired product
or a new product. No new guarantee pe-
riod begins on repair or replacement of the
product.
Guarantee Period and Statutory
Claims for Defects
The guarantee period is not extended by
the guarantee service. This also applies for
replaced or repaired parts. Any damages
and defects already present at the time of
purchase must be reported immediately af-
ter unpacking. Repairs arising after expiry
of the guarantee period are chargeable.
Guarantee Cover
The equipment has been carefully pro-
duced in accordance with strict quality
guidelines and conscientiously checked
prior to delivery.
The guarantee applies for all material and
manufacturing defects. This guarantee
does not extend to cover product parts that
are subject to normal wear and may there-
fore be considered as wearing parts (e.g.
tools) or to cover damage to breakable
parts (e.g. switches).
This guarantee shall be invalid if the prod-
uct has been damaged, used incorrectly or
not maintained. Precise adherence to all of
manual is required for proper use of the
product. Intended uses and actions against
which the operating manual advises or
warns must be categorically avoided.
The product is designed only for private
and not commercial use. The guarantee
will be invalidated in case of misuse or
improper handling, use of force, or inter-
ventions not undertaken by our authorised
service branch.
Pagina se încarcă...
Pagina se încarcă...
Pagina se încarcă...
Pagina se încarcă...
Pagina se încarcă...
Pagina se încarcă...
Pagina se încarcă...
Pagina se încarcă...
Pagina se încarcă...
Pagina se încarcă...
Pagina se încarcă...
Pagina se încarcă...
Pagina se încarcă...
Pagina se încarcă...
Pagina se încarcă...
Pagina se încarcă...
Pagina se încarcă...
Pagina se încarcă...
Pagina se încarcă...
Pagina se încarcă...
Pagina se încarcă...
Pagina se încarcă...
Pagina se încarcă...
Pagina se încarcă...
Pagina se încarcă...
Pagina se încarcă...
Pagina se încarcă...
Pagina se încarcă...
Pagina se încarcă...
Pagina se încarcă...
Pagina se încarcă...
Pagina se încarcă...
Pagina se încarcă...
Pagina se încarcă...
Pagina se încarcă...
Pagina se încarcă...
Pagina se încarcă...
Pagina se încarcă...
Pagina se încarcă...
Pagina se încarcă...
Pagina se încarcă...
Pagina se încarcă...
Pagina se încarcă...
Pagina se încarcă...
Pagina se încarcă...
Pagina se încarcă...
Pagina se încarcă...
Pagina se încarcă...
Pagina se încarcă...
Pagina se încarcă...
Pagina se încarcă...
Pagina se încarcă...
Pagina se încarcă...
Pagina se încarcă...
Pagina se încarcă...
Pagina se încarcă...
Pagina se încarcă...
Pagina se încarcă...
Pagina se încarcă...
Pagina se încarcă...
Pagina se încarcă...
Pagina se încarcă...
Pagina se încarcă...
Pagina se încarcă...
Pagina se încarcă...
Pagina se încarcă...
Pagina se încarcă...
Pagina se încarcă...
Pagina se încarcă...
Pagina se încarcă...
Pagina se încarcă...
Pagina se încarcă...
Pagina se încarcă...
Pagina se încarcă...
Pagina se încarcă...
Pagina se încarcă...
Pagina se încarcă...
Pagina se încarcă...
Pagina se încarcă...
Pagina se încarcă...
Pagina se încarcă...
Pagina se încarcă...
Pagina se încarcă...
Pagina se încarcă...
Pagina se încarcă...
Pagina se încarcă...
Pagina se încarcă...
Pagina se încarcă...
Pagina se încarcă...
Pagina se încarcă...
Pagina se încarcă...
Pagina se încarcă...
Pagina se încarcă...
Pagina se încarcă...
Pagina se încarcă...
Pagina se încarcă...
Pagina se încarcă...
Pagina se încarcă...
Pagina se încarcă...
Pagina se încarcă...
Pagina se încarcă...
Pagina se încarcă...
Pagina se încarcă...
Pagina se încarcă...
Pagina se încarcă...
Pagina se încarcă...
Pagina se încarcă...
Pagina se încarcă...
Pagina se încarcă...
Pagina se încarcă...
Pagina se încarcă...
Pagina se încarcă...
Pagina se încarcă...
Pagina se încarcă...
Pagina se încarcă...
Pagina se încarcă...
Pagina se încarcă...
Pagina se încarcă...
Pagina se încarcă...
Pagina se încarcă...
Pagina se încarcă...
Pagina se încarcă...
Pagina se încarcă...
Pagina se încarcă...
Pagina se încarcă...
Pagina se încarcă...
Pagina se încarcă...
Pagina se încarcă...
Pagina se încarcă...
Pagina se încarcă...
Pagina se încarcă...
Pagina se încarcă...
Pagina se încarcă...
Pagina se încarcă...
Pagina se încarcă...
Pagina se încarcă...
Pagina se încarcă...
Pagina se încarcă...
Pagina se încarcă...
Pagina se încarcă...
Pagina se încarcă...
Pagina se încarcă...
Pagina se încarcă...
Pagina se încarcă...
Pagina se încarcă...
Pagina se încarcă...
Pagina se încarcă...
Pagina se încarcă...
-
 1
1
-
 2
2
-
 3
3
-
 4
4
-
 5
5
-
 6
6
-
 7
7
-
 8
8
-
 9
9
-
 10
10
-
 11
11
-
 12
12
-
 13
13
-
 14
14
-
 15
15
-
 16
16
-
 17
17
-
 18
18
-
 19
19
-
 20
20
-
 21
21
-
 22
22
-
 23
23
-
 24
24
-
 25
25
-
 26
26
-
 27
27
-
 28
28
-
 29
29
-
 30
30
-
 31
31
-
 32
32
-
 33
33
-
 34
34
-
 35
35
-
 36
36
-
 37
37
-
 38
38
-
 39
39
-
 40
40
-
 41
41
-
 42
42
-
 43
43
-
 44
44
-
 45
45
-
 46
46
-
 47
47
-
 48
48
-
 49
49
-
 50
50
-
 51
51
-
 52
52
-
 53
53
-
 54
54
-
 55
55
-
 56
56
-
 57
57
-
 58
58
-
 59
59
-
 60
60
-
 61
61
-
 62
62
-
 63
63
-
 64
64
-
 65
65
-
 66
66
-
 67
67
-
 68
68
-
 69
69
-
 70
70
-
 71
71
-
 72
72
-
 73
73
-
 74
74
-
 75
75
-
 76
76
-
 77
77
-
 78
78
-
 79
79
-
 80
80
-
 81
81
-
 82
82
-
 83
83
-
 84
84
-
 85
85
-
 86
86
-
 87
87
-
 88
88
-
 89
89
-
 90
90
-
 91
91
-
 92
92
-
 93
93
-
 94
94
-
 95
95
-
 96
96
-
 97
97
-
 98
98
-
 99
99
-
 100
100
-
 101
101
-
 102
102
-
 103
103
-
 104
104
-
 105
105
-
 106
106
-
 107
107
-
 108
108
-
 109
109
-
 110
110
-
 111
111
-
 112
112
-
 113
113
-
 114
114
-
 115
115
-
 116
116
-
 117
117
-
 118
118
-
 119
119
-
 120
120
-
 121
121
-
 122
122
-
 123
123
-
 124
124
-
 125
125
-
 126
126
-
 127
127
-
 128
128
-
 129
129
-
 130
130
-
 131
131
-
 132
132
-
 133
133
-
 134
134
-
 135
135
-
 136
136
-
 137
137
-
 138
138
-
 139
139
-
 140
140
-
 141
141
-
 142
142
-
 143
143
-
 144
144
-
 145
145
-
 146
146
-
 147
147
-
 148
148
-
 149
149
-
 150
150
-
 151
151
-
 152
152
-
 153
153
-
 154
154
-
 155
155
-
 156
156
-
 157
157
-
 158
158
-
 159
159
-
 160
160
-
 161
161
-
 162
162
-
 163
163
-
 164
164
-
 165
165
-
 166
166
-
 167
167
-
 168
168


Parkside PKGA 20-Li C2 Manual de utilizare
- Tip
- Manual de utilizare
Lucrări înrudite
-
Parkside PKGA 14.4 A1 Original Instructions Manual
-
Parkside PABS 20-Li E6 Instrucțiuni de utilizare
-
-
-
Parkside PFBS 9.6 A1 Operation and Safety Notes
-
Parkside 331791 1907 Translation Of The Original Instructions
-
Parkside PAMFW 20-LI A1 Translation Of The Original Instructions
-
-
Parkside IAN 391289_2201 Manual de utilizare
Alte documente
-
Bose EasySander 12 Manual de utilizare
-
Bosch KEO Manual de utilizare
-
FEIN AMM500 Plus 18V StarlockPlus MultiMaster Multi-Tool Manual de utilizare
-
Skil SR1E3720FB Manual de utilizare
-
Bosch 600861902 Manual de utilizare
-
Bosch EasySander Manual de utilizare
-
-
BORMANN PRO BSS5300 Manual de utilizare
-
Scheppach 4901402901 Manual de utilizare
-
BorMann BCD20202 Manual de utilizare