
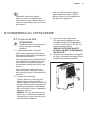
EXD16DN3W
EXD20DN3W
Dehumidier
Обезвлажнител
Αφυγραντήρας
Dezumidicator
Osuszacz powietrza
Odvlaživač
Razvlaževalnik
EN
BG
EL
RO
PL
HR
SL
USER MANUAL
РЪКОВОДСТВО
НА ПОТРЕБИТЕЛЯ
ΕΓΧΕΙΡΙ ΙΟ ΧΡΗΣΤΗ
MANUALUL UTILIZATORULUI
INSTRUKCJA OBSŁUGI
KORISNIČKI PRIRUČNIK
NAVODILA ZA UPORABO
2
13
27
40
53
66
77

2 www.electrolux.com
CONTENTS
1. SAFETY INFORMATION ....................................................................................3
2. SAFETY INSTRUCTION .....................................................................................4
3. BEFORE FIRST USE ..........................................................................................5
4. OPERATING INSTRUCTION ..............................................................................5
5. CARE AND CLEANING .......................................................................................9
6. WHAT TO DO IF... ...............................................................................................9
7. ENVIRONMENT CONCERNS ..........................................................................11
WE’RE THINKING OF YOU
Thank you for purchasing an Electrolux appliance. You’ve chosen a product that brings
with it decades of professional experience and innovation. Ingenious and stylish, it has
been designed with you in mind. So whenever you use it, you can be safe in the knowl-
edge that you’ll get great results every time.
Welcome to Electrolux.
Visit our website to:
Get usage advice, brochures, trouble shooter, service information:
www.electrolux.com
Register your product for better service:
www.registerelectrolux.com
Buy Accessories, Consumables and Original spare parts for your appliance:
www.electrolux.com/shop
CUSTOMER CARE AND SERVICE
Always use original spare parts.
When contacting our Authorised Service Centre, ensure that you have the following
data available: Model, PNC, Serial Number.
The information can be found on the rating plate.
Warning / Caution-Safety information.
General information and tips.
Environmental information.
Subject to change without notice.

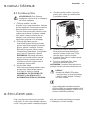
3 ENGLISH
This USER MANUAL provides specic operating instruc-
tions for your model. Use the dehumidier only as instruc
ted in this USER MANUAL. These instructions are not
meant to cover every possible condition and situation that
may occur. Common sense and caution must be practiced
when installing, operating, and maintaining any appliance.
WARNING!
Avoid re hazard or electric shock. Do not use an
extension cord or an adaptor plug. Do not remove any
prong from the power cord.
• Do not, under any circumstances, cut, remove or bypass
the grounding prong.
• Do not store or use gasoline or other ammable vapors
and liquids in the vicinity of this or any other appliance.
Read product labels for ammability and other warnings.
• Discard water from bucket. Water is not potable and can-
not be used for drinking.
1.1 Children and Vulnerable People Safety
WARNING!
Risk of suffocation, injury or permanent disability.
• This appliance can be used by children aged from
8 years and above and persons with reduced physi-
cal, sensory or mental capabilities or lack of experience
and knowledge if they have been given supervision or
instruction concerning use of the appliance in a safe
way and understand the hazards involved.
• Do not let children play with the appliance.
• Children of less than 3 years should be kept away unless
continuously supervised.
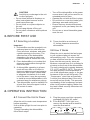
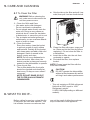
1. SAFETY INFORMATION

4 www.electrolux.com
2.1 Safety Precautions
CAUTION!
Avoid Serious Injury or Death
• This dehumidier contains no user
serviceable parts. Always call an
authorized Electrolux servicer for
repairs.
• Do not insert or place ngers or
objects into the air discharge area or
front grille of the unit.
• Do not start or stop the dehumidier
by unplugging the power cord or
turning off the power at the electrical
box.
• Do not cut or damage the power cord.
• If the power cord is damaged, it should
only be replaced by an authorized
Electrolux servicer.
• In the event of a malfunction (sparks,
burning smell, etc.), immediately stop
the operation, disconnect the power
cord, and call an authorized Electrolux
servicer.
• Do not operate the dehumidier with
wet hands.
• Do not pull on the power cord.
• Do not drink any water from the
dehumidier.
2. SAFETY INSTRUCTION
• Keep all packaging away from children.
• Keep all detergents away from children.
• Keep children and pets away from the appliance door
when it is open.
• If the appliance has a child safety device, we recom-
mend you activate it.
• Cleaning and user maintenance shall not be made by
children without supervision.
1.2 Electrical Information
WARNING!
Avoid re hazard or electric shock.
• If you are not sure the outlet is adequately grounded or
protected by a time delay fuse or circuit breaker, have a
qualied electrician install the proper outlet according to
the National Electrical Code and applicable local codes
and ordinances. Do not use an extension cord or an
adapter plug.
• Never unplug the dehumidier by pulling on the power
cord. Always grip the plug rmly and pull straight out
from the receptacle.
• Do not pinch, bend, or knot the power cord.

5 ENGLISH
3. BEFORE FIRST USE
3.1 Selecting a Location
Important
1. Dehumidier must be operated in an
enclosed area to be most effective.
Close all doors, windows, and other
outside openings to the room. The
effectiveness of the dehumidier
depends on the rate at which new
moisture-laden air enters the room.
2. Place dehumidier in a location that
does not restrict airow through the
front of the unit.
3. A dehumidier operating in a base-
ment will have little or no effect in
drying an adjacent enclosed storage
area, such as a closet, unless there
is adequate circulation of air in and
out of the area. lt may be necessary
to install a second dehumidier in the
enclosed area for satisfactory drying.
4. The dehumidier must be installed on
a level oor that will support it with a
full bucket of water.
5. There should be a minimum of
12 inches clearance around the
dehumidier.
3.2 How It Works
When the unit is started, the fan begins
to pull moisture-laden air across the
dehumidifying coils. The coils condense
or draw moisture from the air, and air
ows into the room as dry, warm air.
Moisture removed from air is collected in
a bucket on the front of the dehumidier.
The unit is designed to operate between
5°C (41°F) and 35°C (96°F). The unit will
not work properly if the temperature is
out of this temperature range, or the per-
formance of the unit will fall greatly. The
“Compressor” circuit has an automatic
3 minute time delayed start if the unit is
turned off and on quickly. This prevents
overheating of the compressor and pos-
sible circuit breaker tripping. Make sure
the tank is tted correctly otherwise unit
will not turn on.
CAUTION!
Avoid Injury or damage to the unit
or other property
• Do not direct airow at replaces or
other heat related sources as this
could cause are ups.
• Do not climb on or place objects on
the unit.
• Do not hang objects off the unit.
• Do not place containers with liquids on
the unit.
• Turn off the dehumidier at the power
source when it will not be used for an
extended period of time.
• Operate the unit with air lter in place.
• Do not block or cover the intake grille,
discharge area and outlet ports.
• Ensure that any electrical/electronic
equipment is one yard away from the
unit.
• Do not use or store ammable gases
near the unit.
4. OPERATING INSTRUCTION
4.1 Connect the Unit to Power
Allow the unit to reach room temperature
before operating.
Unit must be upright for one hour prior to
operating.
To begin operating the dehumidier,
follow these steps:
1. Plug the power cord into a properly
grounded 220-240V AC outlet.
2. If the BUCKET FULL light is on,
remove the bucket and re-install to
reset the oat switch.

6 www.electrolux.com
4.2 To Run in Continuous Mode
1. Press the ON/OFF button.
2. Pressing the Option button until the
Cont. indicator light.
4.3 To Set Desired Humidity
After a few days when the Relative
Humidity has declined, press the HUMID-
ITY
or buttons to choose a value
between 35% to 85%, so the room is
kept at a comfortable humidity. Press-
ing the
or buttons will change the
humidity selection in 5% increments.
After you have set the desired humidity,
the readout will display the actual room
humidity.
4.4 Change the Fan Speed
You can use the Turbo button to
change the fan speed to HIGH or LOW.
In the high fan speed, the indicator which
above the turbo button will light. A higher
fan speed will result in quicker moisture
removal.
4.5 ION Function
Press the Ion button to activate the
ionizer. Anions air automatically gener-
ated by ionization. The anions deac-
tive the airborne chemical vapors and
dust particles. When the Ion function is
activated the indicator which above the
Ion button will light. Press the Ion button
again to stop the function.
4.6 SMD mode
At smart dehumidifying mode, the unit
will automatically control room humidity
in a comfortable range 45%~55% accor-
ding to the room temperature. The humi-
dity setting function will be invalid. To
activate the SMD mode, press the Option
button
until the SMD indicator light.
During the SMD mode the humidity is con-
trolled by the unit automatically, no need
to change the setting humidity manually.
4.7 Dryer Mode
The unit can reach the MAX dehumidi-
cation performance when it is under
the Dryer mode. The fan speed is xed
at high fan speed. The humidity level is
automatically controlled according to the
actual room humidity. The unit will quit
dryer mode after a maximum 10 hours’
operation.
To activate the Dryer mode, press the Op-
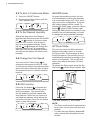
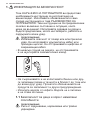
tion button until the Dryer indicator light.
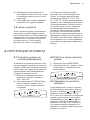
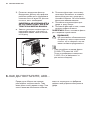
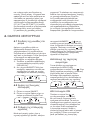
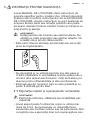
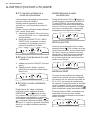
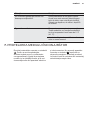
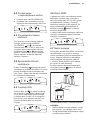
30~50cm
1)
2)
30~50cm
1) Air ow direction; 2) Wet clothes.
NOTE:
• The Dryer mode must be operated in a
close room, do not open the door and
window.
• To make the best effective dehumidi-
cation, please rst dehydrate the wet
clothes.

7 ENGLISH
• Make sure to direct airow at the wet
clothes shown as picture below.
• For thick and heavy wet clothes may
not get the best effective dehumidica-
tion.
CAUTION!
• Do not cover the air outlet of the
unit with clothes. It may cause
excessive heat, re or failure
of unit.
• Do not place the wet clothes on
the top of the unit and do not
make the water drop into the
unit. It may cause electric shock,
creepage or failure of unit.
4.8 How to Use Timer Function
The TIMER function enables you to ei-
ther Delay Start or Delay Stop the unit in
the choice from 0.5 hour to 24 hours.
When the unit is on, rst press the Timer
button, the Timer Off indicator light il-
luminates. It indicates the Auto Stop pro-
gram is initiated. Press it again the Time
On indicator light illuminates. It indicates
the Auto Start is initiated.
Press or hold the
or pad to change
the Auto time by 0.5 hour increments, up
to 10 hours, then at 1 hour increments up
to 24 hours. The control will count down
the time remaining until start.
The selected time will register in
5 seconds and the system will automati-
cally revert back to display the previous
humidity setting.
When the Auto start & Auto stop times
are set, within the same program se-
quence, TIMER ON OFF indicator lights
illuminate identifying both ON and OFF
times are now programmed.
Turning the unit ON or OFF at any time
or adjusting the timer setting to 0.0 will
cancel the Auto Start/Stop function.
When LED display window displays the
code of P2, the Auto Start/Stop function
will also be cancelled.
NOTE:
• Before entering TIMER setting, make
sure power is being supplied to the unit.
• Before entering TIMER setting, make
sure pressing HUMIDITY or button
sets one desired room humidity rst.
4.9 Fault Codes
AS- Humidity sensor error--Unplug the
unit and plug it back in. If error repeats,
call for service.
ES- Temperature sensor error-- Unplug
the unit and plug it back in. If error re-
peats, call for service.
P1- Unit is defrosting-- Allow the unit time
to automatically defrost. The protection
will clear after the unit self defrosts.
P2- Bucket is full or bucket is not in right
position-- Empty the bucket and replace
it in the right position.
E3- Unit malfunction-- Unplug the unit
and plug it back in. If error repeats, call
for service.
EC- Refrigerant leakage detection-- With
this new technology, the display area will
appear EC when the unit detects refriger-
ant leakage,call for service.
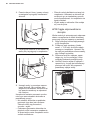
4.10 Removing collected water
There are two ways to remove collected
water.
4.11 Use the bucket
When the unit is off, if the bucket is full,
the unit will beep 8 times and the Full
indicator light will ash, the digital display
shows P2.
When the unit is on, if the bucket is full,
the compressor turns off and the fan
turns off after 30 seconds for drying the
water of the condenser, then the unit will
beep 8 times and the Full indicator light
will ash, the digital display shows P2.
Follow the step below to remove the col-
lected water from the bucket:

8 www.electrolux.com
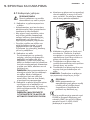
1. Grip the left and right handles secu-
rely, then pull out the bucket a little.
2. Hold both sides of the bucket with
even strength, and pull it out from the
unit.
3. Throw away the water and replace
the bucket. The bucket must be in
place and securely seated for the
dehumidier to operate.
The unit will re-start when the bucket is
restored in its correct position.
• Do not put the tank on the oor
because the bottom of the bucket is
uneven. Otherwise the bucket will fall
and cause the water to spill.
• When you remove the bucket, do not
touch any parts inside of the unit.
Doing so may damage the product.
• Be sure to push the bucket gently
all the way into the unit. Banging the
bucket against anything or failing to
push it in securely may cause the unit
not to operate.
• Discard water from bucket. Water is
not potable and cannot be used for
drinking.
4.12 Continuous Drainage
Water can be automatically emptied into
a oor drain by attaching the unit with a
water hose (not included).
1. Cut the cover down from the back
drain hose outlet.
2. Insert a drain hose(ID=13.5mm) onto
the drain connector of the unit. Make
sure the hose is secure so there are
no leaks.
3. Direct the hose toward the drain,
making sure that there are no kinks
that will stop the water owing.
4. Place the end of the hose into the
drain and make sure the end of the
hose is level or down to let the water
ow smoothly.
• Check the seal between the hose and
the drain connector. If there is a small
leak then replace the hose gasket and
re-tighten the hose.
• If the mode of continuous drainage
is not chosen, the drain cap must be
screwed securely to prevent leakage.

9 ENGLISH
5. CARE AND CLEANING
5.1 To Clean the Filter
WARNING! Before cleaning the
unit, make sure to disconnect the
unit from power source.
1. Clean the Grille and Case
• Use water and a mild detergent.
Do not use bleach or abrasives.
• Do not splash water directly onto the
main unit. Doing so may cause an
electrical shock, cause the insulation
to deteriorate, or cause the unit to rust
• The air intake and outlet grilles get
soiled easily, so use a vacuum attach-
ment or brush to clean.
2. Clean the bucket
Every few weeks, clean the bucket
to prevent growth of mold, mildew
and bacteria. Partially ll the bucket
with clean water and add a little mild
detergent. Swish it around in the
bucket, empty and rinse.
NOTE: Do not use a dishwasher to
clean the bucket. After clean, the
bucket must be in place and securely
seated for the dehumidier to operate.
3. Clean the air lter
The air lter behind the front grille
should be checked and cleaned at
least every 30 days or more often if
necessary.
NOTE: DO NOT RINSE OR PUT
THE FILTER IN AN AUTOMATIC
DISHWASHER.
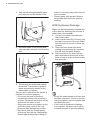
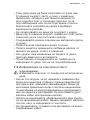
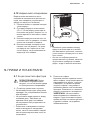
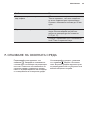
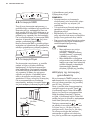
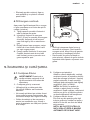
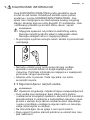
a. Grip the tab on the lter and pull it up-
ward, then pull it out as shown below.
1
2
b. Clean the lter with warm, soapy wa-
ter. Rinse and let the lter dry before
replacing it. Do not clean the lter in
a dishwasher.
c. Insert the air lter into the unit from
underside to upside.
4. Reinstall the lter, then replace
bucket.
NOTE: Please insert the lter with the
front side outwards.
CAUTION!
DO NOT operate the dehumidier
without a lter because dirt and lint
will clog it and reduce performance.
• This unit contains a R134A refrigerant
uid with a GWP equal to 1430.
Refrigerant weight:
0.105/0.12KG(depending on different
models).
6. WHAT TO DO IF...
Before calling for service, review this list.
It may save you time and expense. This
list includes common occurrences that
are not the result of defective workman-
ship or materials in this appliance.

10 www.electrolux.com
Occurrence Solution
Dehumidier does not operate Wall plug disconnected. Push plug rmly
into wall outlet.
House fuse blown or circuit breaker
tripped. Replace fuse with time delay type
or reset circuit breaker.
The dryness level you selected has been
reached. Dehumidier automatically shuts
off when selected amount of moisture has
been removed from the air. If you want
to remove more moisture, select CON-
TINUOUS by using the humidity button or
knob. After the dehumidier starts, reset
the control to the desired setting.
Bucket not installed properly. See
“Removing Collected Water”.
Water in the bucket has reached its preset
level. Dehumidier automatically turns
off when this occurs. Empty bucket and
return bucket to position.
Dehumidier is not turned on. Turn unit on.
BUCKET FULL light is on. Remove buck-
et, empty water and re-install correctly.
Dehumidier runs too much Windows or doors near dehumidier are
open to outdoors. Close all windows or
doors to outside.
Area to be dehumidied is too large.
Check with your dealer to see if capacity
is adequate.
Air movement through dehumidier is
blocked. Grill may be dirty. Use brush at-
tachment of vacuum cleaner to clean grill.
See “Care and Cleaning“. Dehumidier
must be placed in a space that does not
restrict air owing into the rear coil or out
of the front grill.
Dehumidier has been installed or re-
started recently. The higher the moisture
in the room, the longer the dehumidier
will operate.
Dehumidier is in the CONTINUOUS
mode and will remain on in this mode, use
the humidity button or knob to set a RH%
higher level.

11 ENGLISH
Occurrence Solution
Dehumidier is operating, but room is
not dry enough.
Humidity setting is too high. Press the
HUMIDITY button or rotate knob to a
lower setting or choose CONTINUOUS
for maximum dryness.
Dehumidier has been installed or re-
started recently. The higher the moisture
in the room air, the longer it takes for the
room air to become dry.
Dehumidier does not have sufcient
clearance to operate. Air ow to front grill
is blocked. See “Selecting a Location“.
Room temperature is too low. Unit will
not operate satisfactorily if the room
temperature is below 5°C (41°F).
See “Operating Conditions“.
Refer to causes under DEHUMlDIFIER
RUNS TOO MUCH.
frost appears on coils above bucket. Dehumidier has been turned on recently.
This is normal due to refrigerant rushing
through the coil. Frost will usually disap-
pear within 60 minutes.
Fan noise. Room Temperature is too low. All models
will operate satisfactorily at temperatures
greater than 5°C (41°F).
Air is moving through the dehumidier.
This is a normal sound.
7. ENVIRONMENT CONCERNS
Recycle the materials with the symbol
. Put the packaging in applicable
containers to recycle it. Help protect the
environment and human health and to
recycle waste of electrical and electronic
appliances. Do not dispose appliances
marked with the symbol
with the
household waste. Return the product
to your local recycling facility or contact
your municipal ofce.

12 www.electrolux.com
Refrigerant leakage contributes to climate change. Refrigerant with lower global warming
potential (GWP) would contribute less to global warming than a refrigerant with higher
GWP, if leaked to the atmosphere. This appliance contains a refrigerant uid with a GWP
equal to 1430. This means that if 1 kg of this refrigerant uid would be leaked to the
atmosphere, the impact on global warming would be 1430 times higher than 1 kg of CO2,
over a period of 100 years. Never try to interfere with the refrigerant circuit yourself or
disassemble the product yourself and always ask a professional.
The product or equipment contains uorinated greenhouse gases, and the uorinated
greenhouse gases are contained in hermetically sealed equipment.
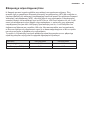
F-Gas
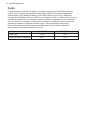
Model EXD16DN3W EXD20DN3W
0.105 0.12
0.15 0.17
Charge (kg)
CO2 Equivalent (tonnes)

13 БЪЛГАРСКИ
СЪДЪРЖАНИЕ
1. ИНФОРМАЦИЯ ЗА БЕЗОПАСНОСТ ..............................................................14
2. ИНСТРУКЦИИ ЗА БЕЗОПАСНОСТ ................................................................16
3. ПРЕДИ ПЪРВА УПОТРЕБА ............................................................................16
4. ИНСТРУКЦИИ ЗА РАБОТА .............................................................................17
5. ГРИЖИ И ПОЧИСТВАНЕ ................................................................................21
6. КАК ДА ПОСТЪПИТЕ, АКО... ..........................................................................22
7. ОПАЗВАНЕ НА ОКОЛНАТА СРЕДА ...............................................................25
НИЕ МИСЛИМ ЗА ВАС
Благодарим ви, че закупихте уред от Electrolux. Избрахте продукт, който носи със
себе си десетилетия професионален опит и нововъведения. Оригинален и стилен,
той е създаден с мисъл за вас. Така че, когато и да го използвате, можете да сте
сигурни, че ще получите невероятни резултати по всяко време.
Добре дошли в Electrolux.
Посетете нашата уебстраница, за да:
Получите полезни съвети, брошури, отстраняване на неизправности,
сервизна информация:
www.electrolux.com
Регистрирате своя продукт за подобро обслужване:
www.registerelectrolux.com
Купите аксесоари, консумативи и оригинални резервни части за вашия уред:
www.electrolux.com/shop
ГРИЖИ ЗА КЛИЕНТА И ОБСЛУЖВАНЕ
Винаги използвайте оригинални резервни части.
Когато се свързвате с нашия Оторизиран център за обслужване, трябва да имате
под ръка следната информация: модел, номер на продукта (PNC), сериен номер.
Информацията можете да намерите на табелката с данни.
Предупреждение / Внимание – информация за безопасност.
Обща информация и съвети.
Информация за опазване на околната среда.
Запазваме си правото на изменения без предизвестие.

14 www.electrolux.com
Този НАРЪЧНИК НА ПОТРЕБИТЕЛЯ ви предоставя
необходимите инструкции за експлоатация на
вашия модел. Използвайте обезвлажнителя само
според инструкциите в това РЪКОВОДСТВО НА
ПОТРЕБИТЕЛЯ. Тези инструкции не са предназначени
за всяко възможно състояние и ситуация, които
може да възникнат. Използвайте здравия си разум и
бъдете предпазливи, когато инсталирате, работите и
поддържате всеки уред.
ПРЕДУПРЕЖДЕНИЕ!
Избягвайте опасност от пожар или електрически
удар. Не използвайте удължителен кабел или
преходен щепсел. Не отстранявайте щифтове от
захранващия кабел.
• В никакъв случай не режете, не отстранявайте
и не шунтирайте заземителния извод.
• Не съхранявайте и не използвайте бензин или дру
ги запалими газове и течности в близост до този или
до всеки друг уред. Прочетете обозначенията на
продукта за запалимост и други предупреждения.
• Изсипете водата от кофата. Водата не е питейна
и не става за пиене.
1.1 Безопасност за деца и хора с намалени
способности
ПРЕДУПРЕЖДЕНИЕ!
Риск от задушаване, нараняване или трайно
увреждане.
1. ИНФОРМАЦИЯ ЗА БЕЗОПАСНОСТ

15 БЪЛГАРСКИ
• Този уред може да бъде използван от деца над
8 годишна възраст, както и лица с намалени
физически, сетивни и умствени възможности
или лица без опит и познания само ако те са
под наблюдение или са инструктирани относно
безопасната употреба на уреда и разбират
възможните рискове.
• Не позволявайте на деца да си играят с уреда.
• Деца под 3годишна възраст трябва да стоят далеч,
освен ако не са под постоянен надзор.
• Съхранявайте всички опаковъчни материали далеч
от деца.
• Пазете всички препарати далеч от деца.
• Пазете децата и домашните любимци далече от
вратата на уреда, когато е отворена.
• Ако уредът има механизъм за защита от деца,
препоръчваме да го активирате.
• Почистването и поддръжката не трябва да се
извършват от деца, ако не са под наблюдение.
1.2 Информация за електричеството
ПРЕДУПРЕЖДЕНИЕ!
Избягвайте опасност от пожар или електрически
удар.
• Ако не сте сигурни, че ел. мрежата е заземена пра
вилно или защитена от бавно стопяем предпазител
или прекъсвач, извикайте квалифициран техник да
инсталира правилния контакт съгласно национални
те изисквания за електрозахранване и приложимите
местни кодекси и разпоредби. Не използвайте удъл
жителен кабел или преходен щепсел.
• Никога не изключвайте обезвлажнителя чрез дърпа
не на захранващия кабел. Винаги хващайте щепсела
плътно, като го издърпвате от контакта.
• Не прещипвайте, огъвайте или връзвайте на възел
захранващия кабел.

16 www.electrolux.com
3. ПРЕДИ ПЪРВА УПОТРЕБА
3.1 Избиране на място
Внимание
1. Обезвлажнителят трябва да
работи в затворено помещение,
за да е найефективен. Затворете
всички врати, прозорци и други
изходи в стаята. Ефективността
на обезвлажнителя зависи от
степента, с която новият, напоен с
влага въздух навлиза в стаята.
2. Поставете обезвлажнителя
на място, което не пречи на
въздушния поток да преминава
пред уреда.
3. Ако обезвлажнителят работи
в мазе, няма да има никакво
или ще има слабо влияние в
подсушаването на въздуха в
съседно затворено складово
помещение, например
като гардероб, освен ако в
помещението няма достатъчна
циркулация на въздух. Може да
се наложи да инсталирате втори
обезвлажнител в затвореното
помещение за постигане на
задоволително обезвлажняване.
2.1 Мерки за безопасност
ВНИМАНИЕ!
Избягвайте рискове от сериозни
наранявания или смърт
• Този обезвлажнител не съдържа
части, които могат да се поправят от
потребителя. Винаги се обаждайте
на оторизиран сервизен техник на
Electrolux за ремонт.
• Не поставяйте пръсти или предмети
в зоната за освобождаване
на въздух или върху предната
решетката на уреда.
• Не включвайте и не изключвайте
обезвлажнителя чрез дърпане на
захранващия кабел или направо от
електрическата кутия.
• Не режете и не увреждайте
захранващия кабел.
• Ако захранващият кабел е увреден,
той трябва да се замени само от
оторизиран сервизен техник на
Electrolux.
• В случай на неизправност (искри,
миризма на изгоряло, т.н.), неза
бавно спрете употребата на уреда,
издърпайте захранващия кабел от
контакта и се обадете на оторизи
ран техник на Electrolux.
• Не работете с обезвлажнителя с
мокри ръце.
• Не издърпвайте захранващия кабел
направо от контакта.
• Не пийте вода от обезвлажнителя.
ВНИМАНИЕ!
Избягвайте нараняване или
повреда на уреда или друга
собственост
• Не насочвайте потока на въздух
към камина или други отоплителни
уреди, тъй като това може да
причини възпламеняване.
• Не се качвайте и не поставяйте
предмети върху уреда.
• Не закачвайте предмети на уреда.
• Не поставяйте съдове с течности
върху уреда.
• Изключете обезвлажнителя от
електрозахранването, когато не се
използва за дълъг период от време.
• Използвайте уреда с въздушния
филтър, поставен на място.
• Не блокирайте и не покривайте
решетката за поемане на въздух,
зоната за освобождаване на въздух
и изходните отвори.
• Уверете се, че всяко електрическо/
електронно оборудване е на един
метър разстояние от уреда.
• Не използвайте и не съхранявайте
възпламеними газове в близост до
уреда.
2. ИНСТРУКЦИИ ЗА БЕЗОПАСНОСТ

17 БЪЛГАРСКИ
4. Обезвлажнителят трябва да се
инсталира на нивото на пода, за да
се поддържа тежестта му с пълна
кофа вода.
5. Той трябва да е на разстояние ми-
нимум 30 см от други предмети.
3.2 Начин на работа
Когато включите уреда, вентилаторът
започва да изсмуква влажен въздух
през серпентините на обезвлажнителя.
Серпентините поглъщат или извличат
влажността от въздуха и той протича
в стаята като сух, топъл въздух.
Влажността, която е отстранена
от въздуха се събира в кофа в
предната част на обезвлажнителя.
Уредът е създаден да работи при
температури между 5 °C (41 °F) и
35 °C (96 °F). Уредът няма да работи
правилно, ако температурата е извън
посочения диапазон, или качеството
му на работа ще е ниско. Веригата
на компресора има автоматично
3минутно закъснение при пускане,
ако уредът се изключва и включва
бързо. Това предпазва компресора от
прегряване и вероятно прекъсване на
електрическия прекъсвач. Уверете се,
че резервоарът е поставен правилно,
в противен случай уредът няма да се
включи.
4. ИНСТРУКЦИИ ЗА РАБОТА
4.1 Свържете уреда към
електрозахранването
Позволете на уреда да достигне стай
на температура, преди да го включите.
Уредът трябва да в изправено положе
ние за един час, преди да го включите.
При включване на обезвлажнителя,
следвайте следните стъпки:
1. Включете захранващия кабел
в правилно заземен контакт от
220 – 240 V AC.
2. Ако лампичката на ПЪЛНА КОФА
свети, извадете кофата и я по
ставете отново, за да се включи
поплавъка.
4.2 Работа в продължителен
режим
1. Натиснете бутона ВКЛ./ИЗКЛ.
2. Натискайте бутона „Опция“, докато
индикаторът за продължителен
режим светне.
4.3 Задаване на желаната
влажност
След няколко дни, когато относител
ната влажност е спаднала, натиснете
бутоните за ВЛАГА
или , за да
изберете стойност между 35% до
85%, така че в стаята да се поддържа
удобна за вас влажност на въздуха.
Натискайки бутоните
или , ще
промените избора на зададената
влажност в стъпки от 5%. След като
сте задали желаната влажност, на
екрана ще се изпише действителната
влажност в стаята.

18 www.electrolux.com
4.4 Смяна на скоростта на
вентилатора
Използвайте бутона ″Турбо″ , за да
смените скоростта на вентилатора на
ВИСОКА или НИСКА. Във високите
скорости на вентилатора индикаторът,
който се намира над бутона ″Турбо″,
ще светне. Повисока скорост на
вентилатора ще доведе до побързо
премахване на влажност.
4.5 ЙОНИЗИРАЩА функция
Натиснете бутона ″Йон″ , за да
активирате йонизатора. Автоматично
се генерират аниони от йонизацията.
Анионите неутрализират химичните
изпарения и частици прах. Когато
функцията ″Йон″ е активирана, инди
каторът, намиращ се над бутона ″Йон″,
ще светне. Натиснете бутона ″Йон″
отново, за да спрете функцията.
4.6 Режим SMD (интелигентен
режим на обезвлажняване)
В интелигентен режим на обезвлаж
няване устройството автоматично ще
контролира влажността в помеще
нието в удобен обхват от 45%~55%, в
зависимост от стайната температура.
Функцията за настройка на влажността
няма да работи. За да активирате ре
жима SMD, натиснете бутона ″Опция″
, докато индикаторът за функцията
SMD светне.
По време на режима SMD влажност
та се контролира автоматично от
устройството, без да е необходимо да
се сменя настройката на влажността
ръчно.
4.7 Режим на изсушаване
Устройството може да достигне
максимална (MAX) ефективност на
обезвлажняване, когато е в режим на
изсушаване. Скоростта на вентилато
ра е нагласена на висока. Нивото на
влажност се контролира автоматично,
в зависимост от реалната влажност в
помещението. Апаратът ще излезе от
режим на изсушаване след максимум
10 часа на работа.
За да активирате режима на изсуша
ване, натиснете бутона ″Опция″
,
докато индикаторът на режим ″Изсуша
ване″ светне.
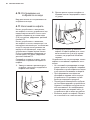
30~50cm
1)
2)
30~50cm
1) Посока на въздушния поток;
2) Мокри дрехи.
ЗАБЕЛЕЖКА:
• Режимът на изсушаване трябва
да се използва в затворено по
мещение, не отваряйте вратата и
прозореца.
• За да постигнете найефективното
обезвлажняване, първо подсушете
мокрите дрехи.
• Уверете се, че сте насочили въздуш
ния поток към мокрите дрехи, както
е показано на фигурата подолу.
• За дебели и тежки мокри дрехи не
може да се постигне найефектив
ното обезвлажняване.

19 БЪЛГАРСКИ
ВНИМАНИЕ!
• Не покривайте изхода за
въздух от устройството с
дрехи. Това може да предиз
вика прегряване, пожар или
повреда на уреда.
• Не поставяйте мокри дрехи
върху горната част на устрой
ството и не оставяйте водата
да капе в уреда. Това може да
причини токов удар, нараня
ване или повреда на уреда.
4.8 Как да използвате
функцията „Таймер“
Функцията ТАЙМЕР ви позволява да
използвате отложено пускане или
отложено спиране на уреда в диапазон
от 0,5 час до 24 часа.
Когато уредът е включен, първо
натиснете бутона ″Таймер″
, след
което светва светлинният индикатора
за изключен таймер (Timer Off). Това
показва, че програмата за автоматич
но спиране (Auto Stop) е започнала.
Натиснете го отново и светлинният
индикатор за включен таймер (Timer
On) светва. Той показва, че функцията
за автоматично включване (Auto Start)
е въведена.
Натиснете и задръжте бутоните
или
, за да промените зададеното време
(Auto time) със стъпки от 0,5 часа до
10 часа, а след това в стъпки от 1 час
до 24 часа. Контролът ще отброява
времето, оставащо до стартиране.
Избраното време ще се програмира
за 5 секунди и системата автоматично
ще се върне обратно, за да покаже
предишните настройки за влажност.
Когато времената за Auto Start и Auto
stop са зададени, в рамките на същата
последователност на програмата свет
линните индикатори за TIMER ON OFF
светват, за да идентифицират време
ната за начало (ON) и край (OFF) като
програмирани.
Включването (ON) или изключването
(OFF) на устройството по всяко време
или нагласяването на настройката на
таймера на 0,0 ще отмени функциите
Auto Start/Stop. Когато LED екранът по
казва кода на P2, функцията Auto Start/
Stop също ще бъде анулирана.
ЗАБЕЛЕЖКА:
• Преди въвеждане на настройка за
ТАЙМЕР се уверете, че уредът е
включен към електрозахранването.
• Преди въвеждане на настройка за
ТАЙМЕР се уверете, че първо сте
натиснали бутона ВЛАЖНОСТ или
бутоните ″+″ и ″–″ за желаната влаж
ност в стаята.
4.9 Кодове за неизправност
AS- Грешка в сензора за влажност –
изключете устройството и го включете
отново. Обадете се на сервиза, в слу
чай че грешката възникне отново.
ES- Грешка в сензора за температура
– изключете устройството и го вклю
чете отново. Обадете се на сервиза,
в случай че грешката възникне отново.
P1 Устройството се размразява –
дайте време на устройството да се
размрази автоматично. Защитата ще
се премахне, след като устройството
се саморазмрази.
P2- Кофата е пълна или кофата не
е поставена на правилното място –
изпразнете кофата и я поставете на
правилното място.
E3- Повреда в устройството – изклю
чете устройството и го включете отно
во. Обадете се на сервиза, в случай че
грешката възникне отново.
EC- Установяване на теч в хладилния
агент – с новата технология на дис
плея ще се появи EC, когато устрой
ството установи теч в хладилния агент,
тогава се обадете в сервиза.

20 www.electrolux.com
4.10 Отстраняване на
събралата се вода
Има два начина за отстраняване на
събралата се вода.
4.11 Използвайте кофата
Когато устройството е изключено,
ако кофата е пълна, устройството ще
издаде звуков сигнал 8 пъти и свет
линният индикатор за пълна кофа
(Full) ще светне, цифровият дисплей
показва P2.
Когато устройството е включено,
ако кофата е пълна, компресорът се
изключва и вентилаторът се изключва
след 30 секунди за изсушаване на
водата от кондензатора, след това
устройството издава звуков сигнал
8 пъти и светлинният индикатор за
пълна кофа (Full) мига, цифровият
дисплей показва P2.
Следвайте стъпките подолу, за да
отстраните събралата се водата от
кофата:
1. Хванете лявата и дясната дръж
ка добре, след което издърпайте
кофата леко навън.
2. Дръжте двете страни на кофата с
еднаква сила и я издърпайте навън
от уреда.
3. Изхвърлете водата и заменете
кофата. Кофата трябва да е поста
вена на мястото си и да е здраво
стъпила, за да работи обезвлаж
нителят.
Устройството ще се рестартира, когато
кофата е поставена в правилно поло
жение.
• Не поставяйте резервоара на пода,
защото дъното на кофата е неравно.
В противен случай кофата ще падне
и ще причини изсипване на водата.
• При премахване на кофата не
докосвайте никакви части вътре в
устройството. В противен случай
може да повредите продукта.
• Подсигурете внимателното избутва
не на кофата докрай в устройството.
Удрянето на кофата на други места
или поставянето й в неподходяща
позиция може да направи така, че
устройството да не може да работи.
• Изсипете водата от кофата. Водата
не е питейна и не става за пиене.
Pagina se încarcă ...
Pagina se încarcă ...
Pagina se încarcă ...
Pagina se încarcă ...
Pagina se încarcă ...
Pagina se încarcă ...
Pagina se încarcă ...
Pagina se încarcă ...
Pagina se încarcă ...
Pagina se încarcă ...
Pagina se încarcă ...
Pagina se încarcă ...
Pagina se încarcă ...
Pagina se încarcă ...
Pagina se încarcă ...
Pagina se încarcă ...
Pagina se încarcă ...
Pagina se încarcă ...
Pagina se încarcă ...
Pagina se încarcă ...
Pagina se încarcă ...
Pagina se încarcă ...
Pagina se încarcă ...
Pagina se încarcă ...
Pagina se încarcă ...
Pagina se încarcă ...
Pagina se încarcă ...
Pagina se încarcă ...
Pagina se încarcă ...
Pagina se încarcă ...
Pagina se încarcă ...
Pagina se încarcă ...
Pagina se încarcă ...
Pagina se încarcă ...
Pagina se încarcă ...
Pagina se încarcă ...
Pagina se încarcă ...
Pagina se încarcă ...
Pagina se încarcă ...
Pagina se încarcă ...
Pagina se încarcă ...
Pagina se încarcă ...
Pagina se încarcă ...
Pagina se încarcă ...
Pagina se încarcă ...
Pagina se încarcă ...
Pagina se încarcă ...
Pagina se încarcă ...
Pagina se încarcă ...
Pagina se încarcă ...
Pagina se încarcă ...
Pagina se încarcă ...
Pagina se încarcă ...
Pagina se încarcă ...
Pagina se încarcă ...
Pagina se încarcă ...
Pagina se încarcă ...
Pagina se încarcă ...
Pagina se încarcă ...
Pagina se încarcă ...
Pagina se încarcă ...
Pagina se încarcă ...
Pagina se încarcă ...
Pagina se încarcă ...
Pagina se încarcă ...
Pagina se încarcă ...
Pagina se încarcă ...
Pagina se încarcă ...
-
 1
1
-
 2
2
-
 3
3
-
 4
4
-
 5
5
-
 6
6
-
 7
7
-
 8
8
-
 9
9
-
 10
10
-
 11
11
-
 12
12
-
 13
13
-
 14
14
-
 15
15
-
 16
16
-
 17
17
-
 18
18
-
 19
19
-
 20
20
-
 21
21
-
 22
22
-
 23
23
-
 24
24
-
 25
25
-
 26
26
-
 27
27
-
 28
28
-
 29
29
-
 30
30
-
 31
31
-
 32
32
-
 33
33
-
 34
34
-
 35
35
-
 36
36
-
 37
37
-
 38
38
-
 39
39
-
 40
40
-
 41
41
-
 42
42
-
 43
43
-
 44
44
-
 45
45
-
 46
46
-
 47
47
-
 48
48
-
 49
49
-
 50
50
-
 51
51
-
 52
52
-
 53
53
-
 54
54
-
 55
55
-
 56
56
-
 57
57
-
 58
58
-
 59
59
-
 60
60
-
 61
61
-
 62
62
-
 63
63
-
 64
64
-
 65
65
-
 66
66
-
 67
67
-
 68
68
-
 69
69
-
 70
70
-
 71
71
-
 72
72
-
 73
73
-
 74
74
-
 75
75
-
 76
76
-
 77
77
-
 78
78
-
 79
79
-
 80
80
-
 81
81
-
 82
82
-
 83
83
-
 84
84
-
 85
85
-
 86
86
-
 87
87
-
 88
88


Electrolux EXD20DN3W Manual de utilizare
- Tip
- Manual de utilizare
- Acest manual este potrivit și pentru
în alte limbi
Alte documente
-
Gorenje D16M Manualul proprietarului
-
Tesy DHF20CEL Manual de utilizare
-
 Inventor CF - WUHI - 16L Manualul proprietarului
-
Tesy DHF 10 CEL Manual de utilizare
-
 NEO TOOLS 90-160 Manualul proprietarului
-
 Duracraft DD-TEC10NE Operating Instructions Manual
-
 NEO TOOLS 90-161 Manualul proprietarului
-
 Inventor R2-ION8L Manual de utilizare
-
-


