Inventor CF - WUHI - 16L Manualul proprietarului
- Categorie
- Dezumidificatoare
- Tip
- Manualul proprietarului
Acest manual este potrivit și pentru

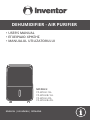
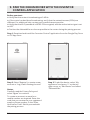
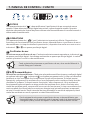
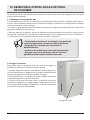
DEHUMIDIFIER - AIR PURIFIER
MODELS:
CF-WUHI-16L
CF-WUHIB-16L
CF-WUHI-20L
CF-WUHIB-20L
• USER’S MANUAL
• ΕΓΧΕΙΡΙΔΙΟ ΧΡΗΣΗΣ
• MANUALUL UTILIZATORULUI
ENGLISH | ΕΛΛΗΝΙΚΑ | ROMANA

LANGUAGES
ENGLISH ......................................................................................................... 3
..................................................................................................... 33
ROMANA ...................................................................................................... 65

3
EN
TABLE OF CONTENTS
1. SAFETY & WARNING INSTRUCTIONS ............................................................................ 4
2. ELECTRICAL INFORMATION .......................................................................................... 6
3. SOCIABLE REMARKS ENVIRONMENTAL PROTECTION ................................................ 6
4. ADDITIONAL WARNINGS FOR APPLIANCES WITH R290 REFRIGERANT .................... 7
5. STEPS BEFORE USE ......................................................................................................... 8
6. GETTING TO KNOW YOUR DEHUMIDIFIER ................................................................. 10
7. CONTROL PANEL • FUNCTIONS .................................................................................. 11
.................................................................................................... 17
9. PAIR THE DEHUMIDIFIER WITH THE INVENTOR CONTROL APPLICATION .............. 18
10. WATER TANK & DRAIN HOSE ..................................................................................... 20
11. MAINTENANCE & CLEANING..................................................................................... 22
12. STORAGE ..................................................................................................................... 23
13. FREQUENTLY ASKED QUESTIONS & TROUBLESHOOTING ..................................... 23
14. INSTRUCTION FOR REPAIRING APPLIANCES
CONTAINING REFRIGERANT R290 ........................................................................... 26
Dear Consumer,
Congratulations on your choice!
ensures both dehumidifying and purifying capabilities
with a premium performance. It's dual usage and the
With Comfort series you can enjoy a healthy & comfortable
Please read all the safety instructions carefully before use
and keep this instruction manual for future reference.

4EN
!
1. SAFETY & WARNING INSTRUCTIONS
For your continued safety and to reduce the risk of injury or Electric shock, please follow all the safety
warnings list below.
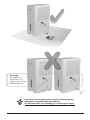
l Please be certain the power supply is 220-240V/50Hz.
l
bathroom.
l
must be unplugged immediately. If the unit has been placed on its side for a longer period of
its operation.
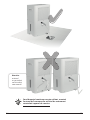
l Please ensure a required clearance of 30cm on all sides
l
l Do not spray or spill any water on this unit, as this may result in malfunction and/or
l Do not pull the power cable with force as this may result in its damage.
l
l
l
l
l
l
commercial, industrial or marine use, and in areas with wet surfaces such as restrooms
window or in a bathroom.
l Operate the
l
l
l
safely be transferred from one area to another.
l
used for a prolonged time.
l
l
completely dry before resuming operation.
l

5
EN
l
l Do not attempt to repair, dismantle or modify this appliance. Contact your authorized
l
l
l
l
arranged away from areas where accidental tripping may occur.
l
l
l Do not place the unit in direct sunlight or near other heating sources.
l
l
l
performance.
l
l Do not use the unit with wet hands.
allow unit to operate continuously for 24 hours.
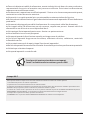
UV-C lamp
This appliance contains a UV-C lamp. Read the maintenance instructions before opening the appliance.
1. Do not operate UV-C lamps outside of the appliance.
3. Unintended use of the appliance or damage to the housing may result in the escape of dangerous UV-C radiation.
4. Before opening doors and access panels bearing the ULTRAVIOLET RADIATION hazard symbol for the conducting
USER MAINTENANCE, it is recommended to disconnect the power.
5. The UV-C lamp cannot be cleaned, repaired and replaced.

6EN
2. ELECTRICAL INFORMATION
The nameplate with all the electrical and technical data of this appliance, is located on the
l The appliance should be installed in accordance with national wiring regulations.
l
l
intend to use is not adequately grounded or protected by a time delay fuse or circuit
l
l
l
maintenance.
3. SOCIABLE REMARKS
ENVIRONMENTAL PROTECTION
Disposal of equipment no longer used:
countries.
l This appliance requires special treatment for disposal. In the European Union,
electronic equipment must not be treated as domestic waste, but must be disposed
and Council of 27th January 2003 concerning old electrical and electronic equipment.
The disposal of this unit should follow all legal requirements and should not be
disposed as unsorted municipal waste.
l
electronic waste.
dealers.

7
EN
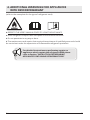
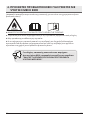
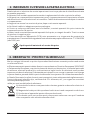
4. ADDITIONAL WARNINGS FOR APPLIANCES
WITH R290 REFRIGERANT
l REFER TO THE USER'S MANUAL PRIOR TO USING THIS APPLIANCE.
l
l Do not penetrate in any way or burn.
l
refer to Section "INSTRUCTION FOR REPAIRING
APPLIANCES CONTAINING REFRIGERANT R290"

8EN
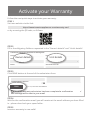
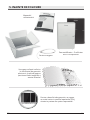
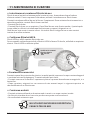
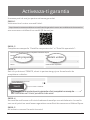
Drain hose
For warranty purposes, please note the SN
Please refer to the electronic
warranty instructions,
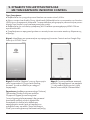
5. STEPS BEFORE USE
User's manual
with Compressor
SN: D2002255780115715200209
SN: D2002255780115715200209

EN
use.
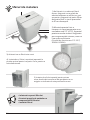
Installation tips
obstructed. Allow 30cm of clearance
possibility the coils will collect frost
at temperatures that are under
performance.

10 EN
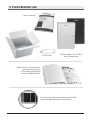
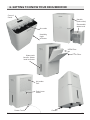
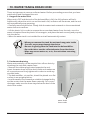
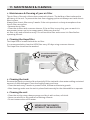
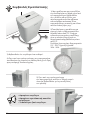
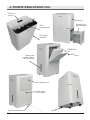
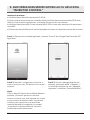
6. GETTING TO KNOW YOUR DEHUMIDIFIER
Air Filter
HEPA Filter
Power Cord
Air outlet
Handle
Grill
Drain hose
outlet
handle - Water
Control
Panel
Casters
Humidity
Light
Indicator

11
EN
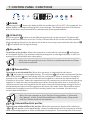
7. CONTROL PANEL • FUNCTIONS
POWER
By pressing the "
OPERATION
By pressing the ‘’
+ will appear on the digital display.
Operation as air purier: When this operation is selected the indication will appear
on the digital display. The ambient humidity will appear on the digital display. Under this
mode can be selected.
&
Operation as an dehumidier: When this operation is selected the indications
+ will appear on the digital display. The indicator
while the indicator
humidity in the room. Under this operation both the compressor and the fan are operating
-
and Dry Clothes mode can be selected.
&
Operation as a dehumidier & Air purier: When this operation is selected the indications
+ will appear on the digital display. Under this operation both the compressor and the
Pantone 7693C Pantone 1797C
Control panel backround (white)

12 EN
will appear on the digital display. When the set humidity is reached the compressor will turn
Clothes mode can be selected.
on the humidity conditions.
55%.
45% to 55%
MODE
By pressing the ‘’
modes are: Manual mode , Sleep mode and
Dry Clothes mode .
Manual mode
Under manual mode, the desired operating conditions can be adjusted.
• the fan speed may be adjusted.
• + both
be adjusted.
Sleep mode
be selected under all three operations of Comfort series.

13
EN
Dry Clothes mode
complete drying of the clothes.
•
reduced depending on the room size and the dampness of the clothes.
•
•
from the beginning.
•
•
• Allow 30-50cm distance from the moist clothes.
HUMIDITY SET BUTTON
is pressed.
and Sleep mode .
time.
FAN SPEED
By pressing the “ the fan air speed could
By pressing the “
+
• Low: When Low Speed is selected, indicated by number ‘’01’’ on the digital display, the
operation is silent, and standard functioning conditions are applied.

14 EN
• Medium: When Medium Speed is selected, indicated by number ‘’02’’ on the digital display,
the fan is set at medium speed.
• High: When High Speed is selected, indicated by number ‘’03’’ on the digital display, the fan
quality issue.
• Auto: When Auto is selected, indicated by the letter A on the digital display, the fan speed
can change between low, medium, and high.
TIMER
Press the “
•
•
•
power resumes.
SWING LOUVER
Press the ‘’
•
directional air stream.
•
By pressing the buttons '' '', '' '', '' '' and '' ''

15
EN
INDICATOR LIGHT
Press the ‘’
indicator.
+
The sound of the control panel buttons can be muted and unmuted by pressing
and the Indicator Light buttons for 3 seconds.
IONIZER
Long press for 3 seconds the button
ULTRAVIOLET TYPE C (UVC)
Long press for 3 seconds the button
CHILD LOCK
By long pressing the timer button
automatically. The indicator
if the unit is unplugged or if there is a power failure.
ANTIBACTERIAL FUNCTION
By long pressing the button for 3 seconds the antibacterial function will be selected.
is selected a countdown of the 90 minutes will appear on the

16 EN
ON-DISPLAY INDICATORS
P1 - AUTO DEFROST
on the digital display panel.
•
the unit enters defrost mode for 12 minutes. After 12 minutes of defrosting, the sensor
•
P2- FULL WATER TANK
placed correctly, the indication P2 will appear on
the digital control panel followed by a beeping sound.
P3 - PRE-FILTER CLEAR NOTICE
"
P4 - HEPA FILTER REPLACEMENT REMINDER
•
• " button must be pressed continuously for

17
EN
AUTO-RESTART
the unit will operate in default settings prior to disconnection.
After Auto-Restart the setting of “Timer” cannot
be retained.
Lo - Very Low Humidity
•
settings.
•
•
•

18 EN
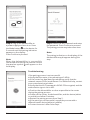
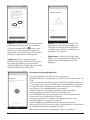
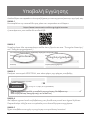
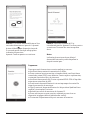
9. PAIR THE DEHUMIDIFIER WITH THE INVENTOR
CONTROL APPLICATION
Before you start:
l Verify that the router is broadcasting at 2.4GHz.
l
l Verify that the Wi-Fi password is WPA2-PSK encrypted, and the authorization type is set
to AES.
l
Step 1:
or IOS App Store.
Step 2: Select “Register” to create a new
Notes:
select “Agree” to continue.
To create an account, an email or a
mobile number are required. Enter the
email or phone number, in the “Enter
the pairing process.
Step 3:
appliances” and press “+” on the top

EN
Step 4:
a power supply and turn it on. Press
the Mode button
3 seconds until the pairing indication
appears on the display.
Note:
When the dehumidifier is successfully
connected and during the remote control
the wireless symbol will appear on the
led display.
Step 5:
Note:
The pairing indication on the display of the
step.
If the pairing process is not successful:
l Verify that the router is broadcasting at 2.4GHz.
l
l Verify that the Wi-Fi password is WPA2-PSK encrypted, and the
authorization type is set to AES.
l
during the pairing process.
l
l Restart the pairing process from Step 2.
l If the pairing is not successful, repeat the process with a
l

20 EN
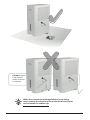
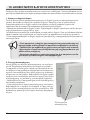
10. WATER TANK & DRAIN HOSE
indicator will illuminate, and the unit
will automatically stop operating.
the tank.
attaching the unit with a water hose.
surface in an upright position.
• Lead the water hose towards a suitable drainage facility
drain hose outlet.
water drain
hose outlet
Pagina se încarcă ...
Pagina se încarcă ...
Pagina se încarcă ...
Pagina se încarcă ...
Pagina se încarcă ...
Pagina se încarcă ...
Pagina se încarcă ...
Pagina se încarcă ...
Pagina se încarcă ...
Pagina se încarcă ...
Pagina se încarcă ...
Pagina se încarcă ...
Pagina se încarcă ...
Pagina se încarcă ...
Pagina se încarcă ...
Pagina se încarcă ...
Pagina se încarcă ...
Pagina se încarcă ...
Pagina se încarcă ...
Pagina se încarcă ...
Pagina se încarcă ...
Pagina se încarcă ...
Pagina se încarcă ...
Pagina se încarcă ...
Pagina se încarcă ...
Pagina se încarcă ...
Pagina se încarcă ...
Pagina se încarcă ...
Pagina se încarcă ...
Pagina se încarcă ...
Pagina se încarcă ...
Pagina se încarcă ...
Pagina se încarcă ...
Pagina se încarcă ...
Pagina se încarcă ...
Pagina se încarcă ...
Pagina se încarcă ...
Pagina se încarcă ...
Pagina se încarcă ...
Pagina se încarcă ...
Pagina se încarcă ...
Pagina se încarcă ...
Pagina se încarcă ...
Pagina se încarcă ...
Pagina se încarcă ...
Pagina se încarcă ...
Pagina se încarcă ...
Pagina se încarcă ...
Pagina se încarcă ...
Pagina se încarcă ...
Pagina se încarcă ...
Pagina se încarcă ...
Pagina se încarcă ...
Pagina se încarcă ...
Pagina se încarcă ...
Pagina se încarcă ...
Pagina se încarcă ...
Pagina se încarcă ...
Pagina se încarcă ...
Pagina se încarcă ...
Pagina se încarcă ...
Pagina se încarcă ...
Pagina se încarcă ...
Pagina se încarcă ...
Pagina se încarcă ...
Pagina se încarcă ...
Pagina se încarcă ...
Pagina se încarcă ...
Pagina se încarcă ...
Pagina se încarcă ...
Pagina se încarcă ...
Pagina se încarcă ...
Pagina se încarcă ...
Pagina se încarcă ...
Pagina se încarcă ...
Pagina se încarcă ...
-
 1
1
-
 2
2
-
 3
3
-
 4
4
-
 5
5
-
 6
6
-
 7
7
-
 8
8
-
 9
9
-
 10
10
-
 11
11
-
 12
12
-
 13
13
-
 14
14
-
 15
15
-
 16
16
-
 17
17
-
 18
18
-
 19
19
-
 20
20
-
 21
21
-
 22
22
-
 23
23
-
 24
24
-
 25
25
-
 26
26
-
 27
27
-
 28
28
-
 29
29
-
 30
30
-
 31
31
-
 32
32
-
 33
33
-
 34
34
-
 35
35
-
 36
36
-
 37
37
-
 38
38
-
 39
39
-
 40
40
-
 41
41
-
 42
42
-
 43
43
-
 44
44
-
 45
45
-
 46
46
-
 47
47
-
 48
48
-
 49
49
-
 50
50
-
 51
51
-
 52
52
-
 53
53
-
 54
54
-
 55
55
-
 56
56
-
 57
57
-
 58
58
-
 59
59
-
 60
60
-
 61
61
-
 62
62
-
 63
63
-
 64
64
-
 65
65
-
 66
66
-
 67
67
-
 68
68
-
 69
69
-
 70
70
-
 71
71
-
 72
72
-
 73
73
-
 74
74
-
 75
75
-
 76
76
-
 77
77
-
 78
78
-
 79
79
-
 80
80
-
 81
81
-
 82
82
-
 83
83
-
 84
84
-
 85
85
-
 86
86
-
 87
87
-
 88
88
-
 89
89
-
 90
90
-
 91
91
-
 92
92
-
 93
93
-
 94
94
-
 95
95
-
 96
96


Inventor CF - WUHI - 16L Manualul proprietarului
- Categorie
- Dezumidificatoare
- Tip
- Manualul proprietarului
- Acest manual este potrivit și pentru