Makita DUH502 Manual de utilizare
- Categorie
- Aparate de tuns gard viu
- Tip
- Manual de utilizare

DUH501
DUH601
DUH751
DUH502
DUH602
DUH752
EN Cordless Hedge Trimmer INSTRUCTION MANUAL 8
PL Akumulatorowe nożyce do
żywopłotu INSTRUKCJA OBSŁUGI 17
HU Akkumulátoros sövénynyíró HASZNÁLATI KÉZIKÖNYV 27
SK Akumulátorové nožnice na
živé ploty NÁVOD NA OBSLUHU 36
CS Akumulátorový zastřihovač NÁVOD K OBSLUZE 45
UK Акумуляторна пила для
підрізання живоплоту ІНСТРУКЦІЯ З
ЕКСПЛУАТАЦІЇ 54
RO Maşină de tuns gardul viu
fără cablu MANUAL DE INSTRUCŢIUNI 64
DE Akku-Heckenschere BETRIEBSANLEITUNG 73

1
2
3
Fig.1
1
2
Fig.2
1
Fig.3
2
1
Fig.4
12
3
Fig.5
2
1
Fig.6
1
Fig.7
1
Fig.8
2

1
2
Fig.9
1
Fig.10
1
4
2
3
Fig.11
1
2
Fig.12
1
1
Fig.13
1
Fig.14
3

1
2
3
4
Fig.15
1
2
Fig.16
1
2
Fig.17
1
2
Fig.18
2
1
Fig.19
1
1
2
Fig.20
1
Fig.21
4

1
Fig.22
1
Fig.23
(1)
(2)
Fig.24
Fig.25
Fig.26
Fig.27
Fig.28
Fig.29
5

Fig.30
Fig.31
Fig.32
1
Fig.33
Fig.34
1
2
Fig.35
1
2
Fig.36
1
Fig.37
6

1
2
Fig.38
2
1
Fig.39
7

8ENGLISH
ENGLISH (Original instructions)
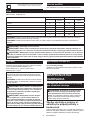
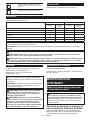
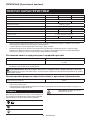
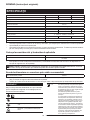
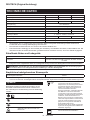
SPECIFICATIONS
Model: DUH501 DUH601 DUH751
Blade length 500 mm 600 mm 750 mm
Strokes per minute 0 - 2,000 / 0 - 3,600 / 0 - 4,400 min-1
Overall length 1,016 mm 1,121 mm 1,261 mm
Rated voltage D.C. 18 V
Net weight 3.8 - 4.5 kg
Model: DUH502 DUH602 DUH752
Blade length 500 mm 600 mm 750 mm
Strokes per minute 0 - 2,000 / 0 - 3,600 / 0 - 4,400 min-1
Overall length 1,016 mm 1,121 mm 1,261 mm
Rated voltage D.C. 18 V
Net weight 3.8 - 4.5 kg
•
Due to our continuing program of research and development, the specications herein are subject to change without notice.
• Specications may dier from country to country.
• The weight may dier depending on the attachment(s), including the battery cartridge. The lightest and heavi-
est combination, according to EPTA-Procedure 01/2014, are shown in the table.
Applicable battery cartridge and charger
Battery cartridge BL1815N / BL1820B / BL1830B / BL1840B / BL1850B / BL1860B
Charger DC18RC / DC18RD / DC18RE / DC18SD / DC18SE / DC18SF /
DC18SH
•
Some of the battery cartridges and chargers listed above may not be available depending on your region of residence.
WARNING: Only use the battery cartridges and chargers listed above. Use of any other battery cartridges
and chargers may cause injury and/or re.
Recommended cord connected power source
Portable power pack PDC01
• The cord connected power source(s) listed above may not be available depending on your region of residence.
• Before using the cord connected power source, read instruction and cautionary markings on them.
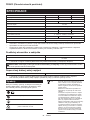
Symbols
The followings show the symbols which may be used
for the equipment. Be sure that you understand their
meaning before use.
Read instruction manual.
Do not expose to moisture.
Wear eye protection.
DANGER - Keep hands away from blade.
Ni-MH
Li-ion
Only for EU countries
Due to the presence of hazardous com-
ponents in the equipment, waste electrical
and electronic equipment, accumulators
and batteries may have a negative impact
on the environment and human health.
Do not dispose of electrical and electronic
appliances or batteries with household
waste!
In accordance with the European Directive
on waste electrical and electronic equip-
ment and on accumulators and batteries
and waste accumulators and batteries,
as well as their adaptation to national law,
waste electrical equipment, batteries and
accumulators should be stored separately
and delivered to a separate collection point
for municipal waste, operating in accor-
dance with the regulations on environmen-
tal protection.
This is indicated by the symbol of the
crossed-out wheeled bin placed on the
equipment.

9ENGLISH
Guaranteed sound power level according
to EU Outdoor Noise Directive.
Sound power level according to Australia
NSW Noise Control Regulation
Intended use
The tool is intended for trimming hedges.
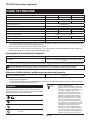
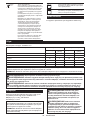
Noise
Applicable standard : EN62841-4-2
Model Sound pressure level Sound power level
LpA(dB(A)) Uncertainty K
(dB(A))
LWA(dB(A)) Uncertainty K
(dB(A))
DUH501 81 392 3
DUH601 80 391 3
DUH751 81 392 3
DUH502 76 387 3
DUH602 76 387 3
DUH752 77 388 3
NOTE: The declared noise emission value(s) has been measured in accordance with a standard test method and
may be used for comparing one tool with another.
NOTE: The declared noise emission value(s) may also be used in a preliminary assessment of exposure.
WARNING: Wear ear protection.
WARNING: The noise emission during actual use of the power tool can dier from the declared val-
ue(s) depending on the ways in which the tool is used especially what kind of workpiece is processed.
WARNING: Be sure to identify safety measures to protect the operator that are based on an estimation
of exposure in the actual conditions of use (taking account of all parts of the operating cycle such as the
times when the tool is switched o and when it is running idle in addition to the trigger time).
Vibration
The vibration total value (tri-axial vector sum) deter-
mined according to EN62841-4-2:
Vibration emission (ah) : 2.5 m/s2 or less
Uncertainty (K) : 1.5 m/s2
NOTE: The declared vibration total value(s) has been
measured in accordance with a standard test method
and may be used for comparing one tool with another.
NOTE: The declared vibration total value(s) may also
be used in a preliminary assessment of exposure.
WARNING: The vibration emission during
actual use of the power tool can dier from the
declared value(s) depending on the ways in which
the tool is used especially what kind of workpiece
is processed.
WARNING: Be sure to identify safety mea-
sures to protect the operator that are based on an
estimation of exposure in the actual conditions of
use (taking account of all parts of the operating
cycle such as the times when the tool is switched
o and when it is running idle in addition to the
trigger time).
EC Declaration of Conformity
For European countries only
The EC declaration of conformity is included as Annex A
to this instruction manual.
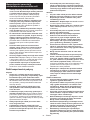
SAFETY WARNINGS
General power tool safety warnings
WARNING: Read all safety warnings, instruc-
tions, illustrations and specications provided
with this power tool. Failure to follow all instructions
listed below may result in electric shock, re and/or
serious injury.
Save all warnings and instruc-
tions for future reference.
The term "power tool" in the warnings refers to your
mains-operated (corded) power tool or battery-operated
(cordless) power tool.

10 ENGLISH
Cordless Hedge Trimmer Safety
Warnings
1. Keep all parts of the body away from the blade.
Do not remove cut material or hold material
to be cut when blades are moving. Blades
continue to move after the switch is turned o. A
moment of inattention while operating the hedge
trimmer may result in serious personal injury.
2. Carry the hedge trimmer by the handle with the
blade stopped and taking care not to operate
any power switch. Proper carrying of the hedge
trimmer will decrease the risk of inadvertent start-
ing and resultant personal injury from the blades.
3. When transporting or storing the hedge trim-
mer, always t the blade cover. Proper handling
of the hedge trimmer will decrease the risk of
personal injury from the blades.
4. When clearing jammed material or servicing
the unit, make sure all power switches are o
and the battery pack is removed or discon-
nected. Unexpected actuation of the hedge trim-
mer while clearing jammed material or servicing
may result in serious personal injury.
5.
Hold the hedge trimmer by insulated gripping
surfaces only, because the blade may contact
hidden wiring. Blades contacting a "live" wire may
make exposed metal parts of the hedge trimmer
"live" and could give the operator an electric shock.
6.
Keep all power cords and cables away from cutting
area. Power cords or cables may be hidden in hedges
or bushes and can be accidentally cut by the blade.
7. Do not use the hedge trimmer in bad weather
conditions, especially when there is a risk of
lightning. This decreases the risk of being struck
by lightning.
Additional Safety Instructions
Preparation
1. Check the hedges and bushes for foreign
objects, such as wire fences or hidden wiring
before operating the tool.
2. The tool must not be used by children or
young persons under 18 years of age. Young
persons over 16 years of age may be exempted
from this restriction if they are undergoing training
under the supervision of an expert.
3. First-time users should have an experienced
user show them how to use the tool.
4.
Use the tool only if you are in good physical
condition. If you are tired, your attention will be
reduced. Be especially careful at the end of a work-
ing day. Perform all work calmly and carefully. The
user is responsible for all damages to third parties.
5. Never use the tool when under the inuence of
alcohol, drugs or medication.
6. Work gloves of stout leather are part of the
basic equipment of the tool and must always
be worn when working with it. Also wear
sturdy shoes with anti-skid soles.
7. Before starting work check to make sure that
the tool is in good and safe working order.
Ensure guards are tted properly. The tool
must not be used unless fully assembled.
Operation
1. Hold the tool rmly with both hands when
using the tool.
2. The tool is intended to be used by the operator
at ground level. Do not use the tool on ladders
or any other unstable support.
3.
DANGER - Keep hands away from blade. Contact
with blade will result in serious personal injury.
4. Do not use the tool in the rain or in wet or
very damp conditions. The electric motor is not
waterproof.
5. Make sure you have a secure footing before
starting operation.
6.
Do not operate the tool at no-load unnecessarily.
7. Immediately switch o the tool and remove the
battery cartridge if the shear blades should
come into contact with a fence or other hard
object. Check the blades for damage, and if
damaged, replace the blades immediately.
8. Before checking the shear blades, taking care
of faults, or removing material caught in the
shear blades, always switch o the tool and
remove the battery cartridge.
9. Never point the shear blades to yourself or
others.
10. If the blades stop moving due to the stuck of
foreign objects between the blades during
operation, switch o the tool and remove the
battery cartridge, and then remove the foreign
objects using tools such as pliers. Removing
the foreign objects by hand may cause an injury
for the reason that the blades may move in reac-
tion to removing the foreign objects.
11. Avoid dangerous environment. Don't use the
tool in damp or wet locations or expose it to
rain. Water entering the tool will increase the
risk of electric shock.
Maintenance and storage
1. Switch o the tool and remove the battery
cartridge before doing any maintenance work.
2. When moving the tool to another location,
including during work, always remove the
battery cartridge and put the blade cover on
the shear blades. Never carry or transport the
tool with the blades running. Never grasp the
blades with your hands.
3. Clean the tool and especially the shear blades
after use, and before putting the tool into stor-
age for extended periods. Lightly oil the blades
and put on the blade cover.
4. Store the tool with the blade cover on, in a dry
room. Keep it out of reach of children. Never
store the tool outdoors.
5. Do not dispose of the battery(ies) in a re. The
cell may explode. Check with local codes for
possible special disposal instructions.
6. Do not open or mutilate the battery(ies).
Released electrolyte is corrosive and may
cause damage to the eyes or skin. It may be
toxic if swallowed.
7. Do not charge battery in rain, or in wet
locations.
SAVE THESE INSTRUCTIONS.

11 ENGLISH
WARNING: DO NOT let comfort or familiarity
with product (gained from repeated use) replace
strict adherence to safety rules for the subject
product. MISUSE or failure to follow the safety
rules stated in this instruction manual may cause
serious personal injury.
Important safety instructions for
battery cartridge
1. Before using battery cartridge, read all instruc-
tions and cautionary markings on (1) battery
charger, (2) battery, and (3) product using
battery.
2. Do not disassemble or tamper with the battery
cartridge. It may result in a re, excessive heat,
or explosion.
3. If operating time has become excessively
shorter, stop operating immediately. It may
result in a risk of overheating, possible burns
and even an explosion.
4. If electrolyte gets into your eyes, rinse them
out with clear water and seek medical atten-
tion right away. It may result in loss of your
eyesight.
5. Do not short the battery cartridge:
(1) Do not touch the terminals with any con-
ductive material.
(2) Avoid storing battery cartridge in a con-
tainer with other metal objects such as
nails, coins, etc.
(3) Do not expose battery cartridge to water
or rain.
A battery short can cause a large current
ow, overheating, possible burns and even a
breakdown.
6. Do not store and use the tool and battery car-
tridge in locations where the temperature may
reach or exceed 50 °C (122 °F).
7. Do not incinerate the battery cartridge even if
it is severely damaged or is completely worn
out. The battery cartridge can explode in a re.
8. Do not nail, cut, crush, throw, drop the battery
cartridge, or hit against a hard object to the
battery cartridge. Such conduct may result in a
re, excessive heat, or explosion.
9. Do not use a damaged battery.
10. The contained lithium-ion batteries are subject
to the Dangerous Goods Legislation require-
ments.
For commercial transports e.g. by third parties,
forwarding agents, special requirement on pack-
aging and labeling must be observed.
For preparation of the item being shipped, consult-
ing an expert for hazardous material is required.
Please also observe possibly more detailed
national regulations.
Tape or mask o open contacts and pack up the
battery in such a manner that it cannot move
around in the packaging.
11. When disposing the battery cartridge, remove
it from the tool and dispose of it in a safe
place. Follow your local regulations relating to
disposal of battery.
12. Use the batteries only with the products
specied by Makita. Installing the batteries to
non-compliant products may result in a re, exces-
sive heat, explosion, or leak of electrolyte.
13. If the tool is not used for a long period of time,
the battery must be removed from the tool.
14. During and after use, the battery cartridge may
take on heat which can cause burns or low
temperature burns. Pay attention to the han-
dling of hot battery cartridges.
15. Do not touch the terminal of the tool imme-
diately after use as it may get hot enough to
cause burns.
16. Do not allow chips, dust, or soil stuck into the
terminals, holes, and grooves of the battery
cartridge. It may result in poor performance or
breakdown of the tool or battery cartridge.
17. Unless the tool supports the use near
high-voltage electrical power lines, do not use
the battery cartridge near high-voltage electri-
cal power lines. It may result in a malfunction or
breakdown of the tool or battery cartridge.
18. Keep the battery away from children.
SAVE THESE INSTRUCTIONS.
CAUTION: Only use genuine Makita batteries.
Use of non-genuine Makita batteries, or batteries that
have been altered, may result in the battery bursting
causing res, personal injury and damage. It will
also void the Makita warranty for the Makita tool and
charger.
Tips for maintaining maximum
battery life
1. Charge the battery cartridge before completely
discharged. Always stop tool operation and
charge the battery cartridge when you notice
less tool power.
2. Never recharge a fully charged battery car-
tridge. Overcharging shortens the battery
service life.
3. Charge the battery cartridge with room tem-
perature at 10 °C - 40 °C (50 °F - 104 °F). Let
a hot battery cartridge cool down before
charging it.
4. When not using the battery cartridge, remove
it from the tool or the charger.
5. Charge the battery cartridge if you do not use
it for a long period (more than six months).

12 ENGLISH
FUNCTIONAL DESCRIPTION
CAUTION: Always be sure that the tool is
switched o and the battery cartridge is removed
before adjusting or checking function on the tool.
Installing or removing battery cartridge
CAUTION: Always switch o the tool before
installing or removing of the battery cartridge.
CAUTION: Hold the tool and the battery car-
tridge rmly when installing or removing battery
cartridge. Failure to hold the tool and the battery
cartridge rmly may cause them to slip o your hands
and result in damage to the tool and battery cartridge
and a personal injury.
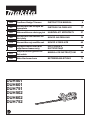
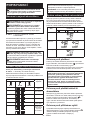
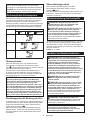
► Fig.1: 1. Red indicator 2. Button 3. Battery cartridge
To remove the battery cartridge, slide it from the tool
while sliding the button on the front of the cartridge.
To install the battery cartridge, align the tongue on the
battery cartridge with the groove in the housing and slip
it into place. Insert it all the way until it locks in place
with a little click. If you can see the red indicator as
shown in the gure, it is not locked completely.
CAUTION: Always install the battery cartridge
fully until the red indicator cannot be seen. If not,
it may accidentally fall out of the tool, causing injury to
you or someone around you.
CAUTION: Do not install the battery cartridge
forcibly. If the cartridge does not slide in easily, it is
not being inserted correctly.
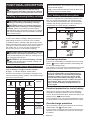
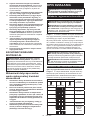
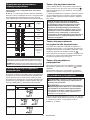
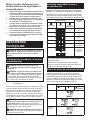
Indicating the remaining battery capacity
Only for battery cartridges with the indicator
► Fig.2: 1. Indicator lamps 2. Check button
Press the check button on the battery cartridge to indi-
cate the remaining battery capacity. The indicator lamps
light up for a few seconds.
Indicator lamps Remaining
capacity
Lighted O Blinking
75% to 100%
50% to 75%
25% to 50%
0% to 25%
Charge the
battery.
The battery
may have
malfunctioned.
NOTE: Depending on the conditions of use and the
ambient temperature, the indication may dier slightly
from the actual capacity.
NOTE: The rst (far left) indicator lamp will blink when
the battery protection system works.
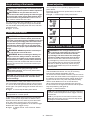
Tool / battery protection system
The tool is equipped with a tool/battery protection sys-
tem. This system automatically cuts o power to the
motor to extend tool and battery life. The tool will auto-
matically stop during operation if the tool or battery is
placed under one of the following conditions:
Status Indicator lamps
On O Blinking
Overload
Overheat
Over
discharge
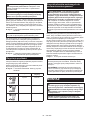
Overload protection
If the tool is overloaded by entangled branches or other
debris, and the middle indicators start blinking and
the tool automatically stops.
In this situation, turn the tool o and stop the application that caused
the tool to become overloaded. Then turn the tool on to restart.
NOTICE: Depending on the usage conditions,
the tool is automatically turned o without any
indication if the tool is overloaded by entangled
branches or debris. In this case, switch o the
tool and remove the battery cartridge, and then
remove entangled branches or debris using tools
such as pliers. After removing the branches or
debris, install the battery cartridge and turn on
the tool again.
Overheat protection for tool or battery
There are two types of overheating; tool overheating
and battery overheating. When the tool over heating
occurs, all speed indicators blink. When the battery over
heating occurs, indicator blinks.
If the overheating occurs, the tool stops automatically. Let the
tool and/or battery cool down before turning the tool on again.
Overdischarge protection
When the battery capacity becomes low, the tool stops
automatically and indicator blinks.
If the tool does not operate even when the switches are
operated, remove the battery from the tool and charge
the battery.

13 ENGLISH
Angle setting of the handle
CAUTION: Always make sure that the handle
is locked in the desired position before operation.
CAUTION: Do not pull down the lever to
unlock the handle while pulling the switch trigger.
Do not pull the switch trigger while pulling down
the lever and turning the handle. Failure to do so
may cause a malfunction of the tool.
You can set the angle of the handle to 0°, 45°, or 90°
to the left or right. To change the angle of the handle,
turn the handle while pulling down the lever, and then
release the lever.
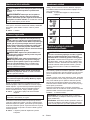
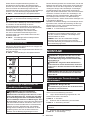
► Fig.3: 1. Lever
Power switch action
WARNING: For your safety, this tool is
equipped with lock-o lever which prevents the
tool from unintended starting. NEVER use the tool
if it runs when you simply press the switch lever
and pull the switch trigger without pressing the
lock-o lever. Return the tool to our authorized
service center for proper repairs BEFORE further
usage.
WARNING: NEVER tape down or defeat pur-
pose and function of lock-o lever.
WARNING: Before installing the battery car-
tridge on the tool, always check to see that the
switch trigger and switch lever actuate properly
and return to the "OFF" position when released.
Operating a tool with a switch that does not actuate
properly can lead to loss of control and serious per-
sonal injury.
CAUTION: Never put your nger on the
switch when carrying. The tool may start uninten-
tionally and cause injury.
NOTICE: Do not pull the switch trigger hard with-
out pressing the lock-o lever. This can cause
switch breakage.
Press and hold the main power button to turn on the
tool. The power lamp lights up when the tool is turned
on. To turn o the tool, press and hold the main power
button again. The power lamp goes o when the tool is
turned o.
► Fig.4: 1. Power lamp 2. Main power button
NOTE: The tool is automatically turned o if the tool is
not operated for a certain period.
To prevent the switch trigger from being accidentally
pulled, a lock-o lever is provided. To start the tool,
depress the lock-o lever, and then press the switch
lever and pull the switch trigger. The tool speed
increases by increasing pressure on the switch trigger.
Release the switch trigger to stop.
► Fig.5: 1. Switch lever 2. Lock-o lever 3. Switch
trigger
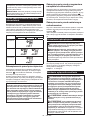
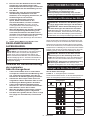
Speed adjusting
You can adjust the tool speed by tapping the main
power button.
Each time you tap the main power button, the level of
speed will change.
► Fig.6: 1. Power lamp 2. Main power button
Indicator Mode Stroke speed
High 4,400 min-1
Medium 3,600 min-1
Low 2,000 min-1
Reverse button for debris removal
WARNING: If the entangled branches or
debris cannot be removed by the reverse func-
tion, switch o the tool and remove the bat-
tery cartridge, and then remove the entangled
branches or debris using tools such as pliers.
Failure to switch o the tool and remove the bat-
tery cartridge may result in serious personal injury
from accidental start-up. Removing the entangled
branches or debris by hand may cause an injury,
since the shear blades may move in reaction to
removing them.
This tool has a reverse button to change the direction
of shear blades movement. It is only for removing
branches and debris entangled in the tool.
To reverse the shear blades movement, tap the reverse
button when the shear blades have stopped, then press
the switch lever and pull the switch trigger while press-
ing the lock-o lever. The power lamp starts blinking,
and the shear blades move in reverse direction.
When entangled branches and debris are removed,
the tool returns to the regular movement and the power
lamp stops blinking and lights up.
► Fig.7: 1. Reverse button
NOTE: If the entangled branches or debris cannot be
removed, release and pull the switch trigger until they
are removed.
NOTE: If you tap the reverse button while the shear
blades are still moving, the tool comes to stop and to
be ready for reverse movement.

14 ENGLISH
ASSEMBLY
CAUTION: Always be sure that the tool is
switched o and the battery cartridge is removed
before carrying out any work on the tool.
CAUTION: When replacing the shear blades,
always wear gloves so that your hands do not
directly contact the blades.
NOTICE: When replacing the shear blades, do
not wipe o grease from the gear and crank.
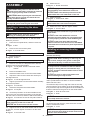
Installing or removing the shear
blades
CAUTION: Attach the blade cover before
removing or installing the shear blades.
You can install 500 mm, 600 mm, or 750 mm shear
blades to your tool.
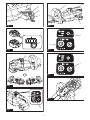
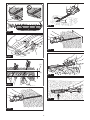
1. Place the tool upside down, and then remove 6
bolts.
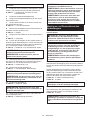
► Fig.8: 1. Bolt
2. Remove the cover and the plate.
► Fig.9: 1. Cover 2. Plate
NOTE: The plate may remain on the cover.
3. Remove the rod.
► Fig.10: 1. Rod
NOTE: The rod may remain on the cover.
4. Remove 2 screws, the felt pad and the sleeves,
and then remove the shear blades.
► Fig.11: 1. Felt pad 2. Screw 3. Sleeve 4. Shear
blades
5. Remove the blade cover.
6. Attach the blade cover to the new shear blades.
7. Adjust the crank so that 2 holes are lined up on
the alignment line.
► Fig.12: 1. Hole 2. Alignment line
8. Align the protrusions on the shear blades vertically
at the same position.
► Fig.13: 1. Protrusion
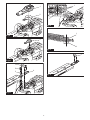
9. Attach the felt pad to the shear blades.
► Fig.14: 1. Felt pad
10. Insert the protrusion on the shear blades to the
hole on the rod, then align the position of the felt pad
with the holes on the tool, and then attach new sleeves.
► Fig.15: 1. Protrusion 2. Hole 3. Felt pad 4. Sleeve
NOTICE: Apply a small amount of grease to the
inner periphery of the hole of the rod.
NOTICE: Be careful not to lose the sleeves.
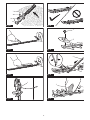
11. Align the holes on the shear blades with the holes
on the tool, and then tighten 2 screws to x the shear
blades.
► Fig.16: 1. Screw 2. Hole
12. Attach the rod.
► Fig.17: 1. Rod 2. Small hole
NOTICE: Apply a small amount of grease to the
inner periphery of the small hole of the rod.
NOTICE: Make sure that the protrusion on the
shear blades ts in the small hole on the rod.
13. Attach the plate.
► Fig.18: 1. Protrusion 2. Plate
NOTICE: Make sure that the protrusion on the
shear blades ts in the hole on the plate.
14. Attach the cover, and then tighten 6 bolts.
► Fig.19: 1. Cover 2. Bolt
NOTICE: Be sure to attach 2 long screws to the
center holes.
NOTICE: If the shear blades do not move
smoothly, the shear blades are not engaged with
the rods properly. Install the shear blades again.
NOTICE: If the parts other than the shear
blades such as the rods are worn out, ask Makita
Authorized Service Centers for parts replacement
or repairs.
Installing or removing the chip
receiver
Optional accessory
CAUTION: When installing or removing the
chip receiver, always wear gloves so that your
hands do not directly contact the shear blades.
NOTICE: The blade cover cannot be installed if
the chip receiver is installed on the tool. Before
carrying or storing the tool, uninstall the chip
receiver, and then install the blade cover to avoid
blade exposure.
NOTICE: Be sure to remove the blade cover
before installing the chip receiver.
The chip receiver gathers discarded leaves and makes
clean-up afterward much easier. It can be installed on
either side of the tool.
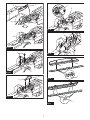
To install the chip receiver, align the hooks of the chip
receiver with the arrow marks on the shear blades, and
then press the chip receiver against the shear blades so
that the hooks t into the grooves on the shear blades.
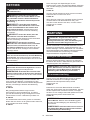
► Fig.20: 1. Hook 2. Arrow mark
► Fig.21: 1. Hook
NOTICE: Make sure that the chip receiver does
not overlap the branch catcher.
► Fig.22: 1. Branch catcher
To remove the chip receiver, press the levers on both
sides to release the hooks.
► Fig.23: 1. Lever
NOTICE: Never try to remove the chip receiver
by an excessive force with its hooks locked in the
grooves of the shear blades.

15 ENGLISH
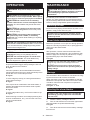
OPERATION
WARNING: Keep hands away from shear
blades.
CAUTION: Avoid operating the tool in very
hot weather as much as practicable. When operat-
ing the tool, be careful of your physical condition.
CAUTION: Be careful not to accidentally
contact a metal fence or other hard objects while
trimming. The shear blades may break and cause
an injury.
CAUTION: Be careful not to allow the shear
blades to contact the ground. The tool may recoil
and cause an injury.
CAUTION: Overreaching with a hedge trim-
mer, particularly from a ladder, is extremely
dangerous. Do not work while standing on anything
wobbly or inrm.
NOTICE: Do not attempt to cut branches thicker
than 10 mm in diameter with the tool. Cut branches
to 10 cm lower than the cutting height using branch
cutters before using the tool.
► Fig.24: (1) Cutting height (2) 10 cm
NOTICE: Do not cut down dead trees or similar
hard objects. Doing so may damage the tool.
NOTICE: Do not trim the grass or weeds while
using the shear blades. The shear blades may
become tangled in the grass or weeds.
Hold the tool with both hands, press the switch lever
and pull the switch trigger while pressing the lock-o
lever, and then move it forward.
► Fig.25
For basic operation, tilt the shear blades toward the
trimming direction and move it calmly and slowly at the
speed rate of 3 to 4 seconds per meter.
► Fig.26
To cut a hedge top evenly, tie a string at the desired
height and trim along it.
► Fig.27
If the chip receiver is attached to the shear blades, it
gathers discarded leaves and makes clean-up after-
ward much easier.
► Fig.28
To cut a hedge side evenly, cut from the bottom to top.
► Fig.29
When trimming to make a round shape (trimming box-
wood or rhododendron, etc.), trim from the root to the
top for a beautiful nish.
► Fig.30
MAINTENANCE
CAUTION: Always be sure that the tool is
switched o and the battery cartridge is removed
before attempting to perform inspection or
maintenance.
To maintain product SAFETY and RELIABILITY,
repairs, any other maintenance or adjustment should
be performed by Makita Authorized or Factory Service
Centers, always using Makita replacement parts.
Cleaning the tool
Clean the tool by wiping o dust with a dry cloth or one
dipped in soapy water and wrung out.
NOTICE: Never use gasoline, benzine, thinner,
alcohol or the like. Discoloration, deformation or
cracks may result.
Shear blade maintenance
Before the operation or once per hour during operation,
apply low-viscosity oil (machine oil, or spray-type lubri-
cating oil) to the shear blades.
► Fig.31
After operation, remove dust from both sides of the
shear blades with a wired brush, wipe it o with a cloth
and then apply low-viscosity oil (machine oil, or spray-
type lubricating oil) to the shear blades.
► Fig.32
NOTICE: Do not wash the shear blades in water.
Doing so may cause rust or damage to the tool.
NOTICE: Dirt and corrosion cause excessive
blade friction and shorten the operating time per
battery charge.
Storage
The hook hole in the tool bottom is convenient for hang-
ing the tool from a nail or screw on the wall.
Attach the blade cover to the shear blades so that the
blades are not exposed. Store the tool out of the reach
of children. Store the tool in a place not exposed to
moisture or rain.
► Fig.33: 1. Hole
Grinding the shear blades
NOTICE: If the shear blades have considerably
deformed by grinding, replace the shear blades
with new ones.
1. Install the battery cartridge to the tool.
2. Turn on and start the tool so that the upper blade
and lower blade are positioned alternately.
► Fig.34
3. Turn o the tool and remove the battery cartridge
from the tool.

16 ENGLISH
4. Remove the screw, and then remove the branch
catcher.
► Fig.35: 1. Screw 2. Branch catcher
5. Set the angle of a le to 45°, and grind the upper
blade from 3 directions with the le.
► Fig.36: (1) File (2) 45°
CAUTION: Before grinding the shear blades,
make sure that the tool is switched o and the
battery cartridge is removed from the tool.
6. Place the tool upside down, and then remove the
burrs from the shear blades with the dressing stone.
► Fig.37: 1. Dressing stone
7. Set the angle of the le to 45°, and grind the lower
blade from 3 directions with the le.
8. Return the tool to normal position, and then
remove the burrs from the shear blades with the dress-
ing stone.
9. Attach the branch catcher by tightening the screw.
Grease lubrication
Interval of lubrication: Every 100 operating hours
1. Remove 3 bolts, and then remove the bottom
cover.
► Fig.38: 1. Bolt 2. Bottom cover
2. Remove the cap from the grease vessel, and then
attach the grease vessel to the hole on the cover by
turning the grease vessel.
► Fig.39: 1. Cover 2. Grease vessel
3. Apply the grease to the tool (Approximately 5 g as
a guide).
4. Remove the grease vessel.
5. Attach the bottom cover, and then tighten 3
screws.
OPTIONAL
ACCESSORIES
CAUTION: These accessories or attachments
are recommended for use with your Makita tool
specied in this manual. The use of any other
accessories or attachments might present a risk of
injury to persons. Only use accessory or attachment
for its stated purpose.
If you need any assistance for more details regard-
ing these accessories, ask your local Makita Service
Center.
• Shear blade assembly
• Shear blade cover
• Chip receiver
• Grease vessel
• Makita genuine battery and charger
NOTE: Some items in the list may be included in the
tool package as standard accessories. They may
dier from country to country.

17 POLSKI
POLSKI (Instrukcja oryginalna)
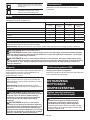
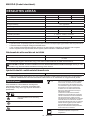
DANE TECHNICZNE
Model: DUH501 DUH601 DUH751
Długość ostrza 500 mm 600 mm 750 mm
Liczba oscylacji na minutę 0–2 000 / 0–3 600 / 0–4 400 min-1
Długość całkowita 1 016 mm 1 121 mm 1 261 mm
Napięcie znamionowe Prąd stały 18 V
Masa netto 3,8–4,5 kg
Model: DUH502 DUH602 DUH752
Długość ostrza 500 mm 600 mm 750 mm
Liczba oscylacji na minutę 0–2 000 / 0–3 600 / 0–4 400 min-1
Długość całkowita 1 016 mm 1 121 mm 1 261 mm
Napięcie znamionowe Prąd stały 18 V
Masa netto 3,8–4,5 kg
• W związku ze stale prowadzonym przez naszą rmę programem badawczo-rozwojowym niniejsze dane mogą
ulec zmianom bez wcześniejszego powiadomienia.
• Dane techniczne mogą różnić się w zależności od kraju.
• Masa może być różna w zależności od osprzętu, w tym akumulatora. W tabeli przedstawiona jest najlżejsza i
najcięższa konguracja, zgodnie z procedurą EPTA 01/2014.
Kompatybilne akumulatory i ładowarki
Akumulator BL1815N / BL1820B / BL1830B / BL1840B / BL1850B / BL1860B
Ładowarka DC18RC / DC18RD / DC18RE / DC18SD / DC18SE / DC18SF /
DC18SH
•
Pewne z wymienionych powyżej akumulatorów i ładowarek mogą być niedostępne w regionie zamieszkania użytkownika.
OSTRZEŻENIE: Należy używać wyłącznie akumulatorów i ładowarek wymienionych powyżej.
Używanie innych akumulatorów i ładowarek może stwarzać ryzyko wystąpienia obrażeń ciała lub pożaru.
Zalecane źródło zasilania podłączane za pomocą przewodu
Przenośna jednostka zasilająca PDC01
• Wymienione powyżej źródło zasilania podłączane za pomocą przewodu może być niedostępne w regionie
zamieszkania użytkownika.
• Przed użyciem źródła zasilania podłączanego za pomocą przewodu należy zapoznać się z instrukcją i umiesz-
czonymi na nim znakami ostrzegawczymi.
Symbole
Poniżej pokazano symbole, jakie mogą być zastoso-
wane na urządzeniu. Przed rozpoczęciem użytkowania
należy zapoznać się z ich znaczeniem.
Przeczytać instrukcję obsługi.
Chronić przed wilgocią.
Należy stosować środki ochrony wzroku.
NIEBEZPIECZEŃSTWO — Nie zbliżać rąk
do ostrza.
Ni-MH
Li-ion
Dotyczy tylko państw UE
Z uwagi na obecność w sprzęcie niebezpiecznych
składników, zużyty sprzęt elektryczny, elektroniczny,
akumulatory oraz baterie mogą powodować nega-
tywny wpływ na środowisko i zdrowie ludzi.
Nie wyrzucaj urządzeń elektrycznych,
elektronicznych lub akumulatorów wraz z
odpadami z gospodarstwa domowego!
Zgodnie z Europejską Dyrektywą w sprawie
zużytego sprzętu elektrycznego i elektronicz-
nego oraz dotyczącą akumulatorów i baterii
oraz zużytych akumulatorów i baterii, a także
dostosowaniem ich do prawa krajowego, zużyte
urządzenia elektryczne, elektroniczne, baterie
i akumulatory, należy składować osobno i
przekazywać do punktu selektywnej zbiórki
odpadów komunalnych, działającego zgodnie z
przepisami dotyczącymi ochrony środowiska.
Informuje o tym symbol przekreślonego kołowego
kontenera na odpady umieszczony na sprzęcie.

18 POLSKI
Gwarantowany poziom mocy akustycznej
zgodnie z dyrektywą UE w sprawie hałasu
na zewnątrz.
Poziom mocy akustycznej zgodnie z
australijskimi przepisami dot. redukcji
hałasu dla Nowej Południowej Walii
Przeznaczenie
Narzędzie to jest przeznaczone do przycinania
żywopłotów.
Hałas
Obowiązująca norma : EN62841-4-2
Model Poziom ciśnienia akustycznego Poziom natężenia dźwięku
LpA(dB(A)) Niepewność K
(dB(A))
LWA(dB(A)) Niepewność K
(dB(A))
DUH501 81 392 3
DUH601 80 391 3
DUH751 81 392 3
DUH502 76 387 3
DUH602 76 387 3
DUH752 77 388 3
WSKAZÓWKA: Deklarowana wartość emisji hałasu została zmierzona zgodnie ze standardową metodą testową i
można ją wykorzystać do porównywania narzędzi.
WSKAZÓWKA: Deklarowaną wartość emisji hałasu można także wykorzystać we wstępnej ocenie narażenia.
OSTRZEŻENIE: Nosić ochronniki słuchu.
OSTRZEŻENIE: Poziom hałasu wytwarzanego podczas rzeczywistego użytkowania elektronarzędzia
może się różnić od wartości deklarowanej w zależności od sposobu użytkowania narzędzia, a w szczegól-
ności od rodzaju obrabianego elementu.
OSTRZEŻENIE: W oparciu o szacowane narażenie w rzeczywistych warunkach użytkowania należy
określić środki bezpieczeństwa w celu zapewnienia ochrony operatora (uwzględniając wszystkie elementy
cyklu działania, tj. czas, kiedy narzędzie jest wyłączone i kiedy pracuje na biegu jałowym, a także czas,
kiedy jest włączone).
Drgania
Całkowita wartość poziomu drgań (suma wektorów w 3
osiach) określona zgodnie z normą EN62841-4-2:
Emisja drgań (ah): 2,5 m/s2 lub mniej
Niepewność (K): 1,5 m/s2
WSKAZÓWKA: Deklarowana wartość poziomu
drgań została zmierzona zgodnie ze standardową
metodą testową i można ją wykorzystać do porówny-
wania narzędzi.
WSKAZÓWKA: Deklarowaną wartość poziomu
drgań można także wykorzystać we wstępnej ocenie
narażenia.
OSTRZEŻENIE: Drgania wytwarzane pod-
czas rzeczywistego użytkowania elektronarzędzia
mogą się różnić od wartości deklarowanej w
zależności od sposobu użytkowania narzędzia,
a w szczególności od rodzaju obrabianego
elementu.
OSTRZEŻENIE: W oparciu o szacowane
narażenie w rzeczywistych warunkach użytkowa-
nia należy określić środki bezpieczeństwa w celu
zapewnienia ochrony operatora (uwzględniając
wszystkie elementy cyklu działania, tj. czas, kiedy
narzędzie jest wyłączone i kiedy pracuje na biegu
jałowym, a także czas, kiedy jest włączone).
Deklaracja zgodności WE
Dotyczy tylko krajów europejskich
Deklaracja zgodności WE jest dołączona jako załącznik
A do niniejszej instrukcji obsługi.
OSTRZEŻENIA
DOTYCZĄCE
BEZPIECZEŃSTWA
Ogólne zasady bezpiecznej
eksploatacji elektronarzędzi
OSTRZEŻENIE: Należy zapoznać się z
ostrzeżeniami dotyczącymi bezpieczeństwa,
instrukcjami, ilustracjami i danymi technicz-
nymi dołączonymi do tego elektronarzędzia.
Niezastosowanie się do podanych poniżej instrukcji
może prowadzić do porażenia prądem, pożaru i/lub
poważnych obrażeń ciała.

19 POLSKI
Wszystkie ostrzeżenia i instruk-
cje należy zachować do wykorzy-
stania w przyszłości.
Pojęcie „elektronarzędzie", występujące w wymienio-
nych tu ostrzeżeniach, odnosi się do elektronarzędzia
zasilanego z sieci elektrycznej (z przewodem zasilają-
cym) lub do elektronarzędzia akumulatorowego (bez
przewodu zasilającego).
Ostrzeżenia dotyczące
bezpieczeństwa dla
akumulatorowych nożyc do
żywopłotu
1. Nie wolno zbliżać żadnych części ciała do
ostrza. Ciętego materiału nie wolno usuwać
ani przytrzymywać, kiedy ostrza są w ruchu.
Ostrza poruszają się nawet po ustawieniu prze-
łącznika w pozycji wyłączenia. Moment nieuwagi
podczas pracy z nożycami do żywopłotu może
spowodować poważne obrażenia ciała.
2. Nożyce do żywopłotu należy przenosić przy
zatrzymanych ostrzach, trzymając narzędzie
za uchwyt i uważając, by nie nacisnąć żadnego
przełącznika zasilania. Prawidłowe przenoszenie
nożyc do żywopłotu zmniejsza ryzyko ich nieza-
mierzonego włączenia i doznania urazów spowo-
dowanych przez ostrza.
3. Podczas transportu lub przechowywania
nożyc do żywopłotu na ostrza zawsze powinna
być założona osłona. Prawidłowe obchodzenie
się z nożycami do żywopłotu zmniejsza ryzyko
doznania urazów spowodowanych przez ostrza.
4. Przed usunięciem zablokowanego mate-
riału lub przystąpieniem do serwisowania
narzędzia należy koniecznie sprawdzić, czy
wszystkie przełączniki zasilania są wyłączone,
a akumulator został wyjęty lub odłączony.
Niespodziewane uruchomienie nożyc do żywo-
płotu podczas usuwania zablokowanego materiału
lub serwisowania może doprowadzić do poważ-
nych obrażeń ciała.
5. Ponieważ ostrze może zetknąć się z ukry-
tymi przewodami elektrycznymi, nożyce do
żywopłotu należy trzymać tylko za izolowane
uchwyty. Zetknięcie ostrzy z przewodem elek-
trycznym znajdującym się pod napięciem spo-
woduje, że odsłonięte elementy metalowe nożyc
do żywopłotu również znajdą się pod napięciem,
stwarzając ryzyko porażenia operatora prądem
elektrycznym.
6. Wszystkie przewody elektryczne należy
trzymać z dala od obszaru cięcia. Przewody
elektryczne mogą być ukryte w zaroślach i zostać
przypadkowo przecięte przez ostrze.
7. Nie używać nożyc do żywopłotu przy złej
pogodzie, w szczególności podczas burzy.
Zmniejszy to ryzyko uderzenia piorunem.
Dodatkowe zalecenia dotyczące
bezpieczeństwa
Przygotowanie
1. Przed uruchomieniem narzędzia należy spraw-
dzić, czy w żywopłocie lub krzewach nie ma
elementów takich jak ogrodzenia z drutu lub
niewidoczne przewody elektryczne.
2. Narzędzia nie wolno obsługiwać dzieciom i
młodzieży poniżej 18 roku życia. Młode osoby
powyżej 16 roku życia można wyłączyć z tego
zastrzeżenia, jeżeli odbywają szkolenie pod nad-
zorem fachowca.
3. Osoba mająca praktyczne doświadczenie
powinna poinstruować użytkownika, który
jeszcze nie pracował z takim narzędziem.
4. Narzędzie powinno być używane tylko wtedy,
gdy osoba je obsługująca jest w odpowied-
niej formie zycznej. W przypadku zmęczenia
koncentracja operatora jest obniżona. Zachować
szczególną ostrożność pod koniec dnia robo-
czego. Wszelkie czynności powinny być wyko-
nywane spokojnie i ostrożnie. Użytkownik odpo-
wiada za wszelkie szkody wyrządzone osobom
trzecim.
5. Zabrania się używania narzędzia po spożyciu
alkoholu, narkotyków lub leków.
6. Rękawice robocze z grubej skóry należą do
podstawowego wyposażenia podczas pracy
z narzędziem i zawsze należy je nosić. Należy
też nosić mocne buty z antypoślizgowymi
podeszwami.
7. Przed rozpoczęciem pracy należy się upewnić,
że narzędzie jest w dobrym i zapewniającym
bezpieczeństwo stanie. Należy sprawdzić, czy
osłony są zamocowane prawidłowo. Narzędzia
nie wolno używać, jeśli nie zostało całkowicie
zmontowane.
Obsługa
1. Narzędzie podczas pracy należy trzymać pew-
nie i oburącz.
2. Operator używający narzędzia powinien znaj-
dować się na poziomie podłoża. Nie można
używać narzędzia na drabinie lub innej niesta-
bilnej podporze.
3. NIEBEZPIECZEŃSTWO - Nie wolno zbliżać rąk
do ostrza. Kontakt z ostrzem może spowodować
poważne obrażenia ciała.
4. Narzędzia nie wolno używać podczas deszczu,
kiedy występuje rosa ani w bardzo wilgot-
nych warunkach. Silnik elektryczny nie jest
wodoszczelny.
5. Przed rozpoczęciem pracy należy sprawdzić,
czy grunt pod nogami jest pewny.
6. Nie należy bez potrzeby uruchamiać narzędzia
bez obciążenia.
7. Kiedy ostrza nożyc zetkną się z elementami
ogrodzenia lub innym twardym przedmiotem,
należy natychmiast wyłączyć urządzenie i
wyjąć akumulator. Sprawdzić, czy ostrza nie
zostały uszkodzone, i w razie potrzeby natych-
miast je wymienić.

20 POLSKI
8. Przed sprawdzeniem ostrzy nożyc, usunięciem
uszkodzeń lub materiału zablokowanego w
ostrzach nożyc narzędzie należy zawsze wyłą-
czyć i wyjąć akumulator.
9. Nigdy nie kierować ostrzy nożyc w swoją
stronę ani w stronę innych osób.
10. Jeśli podczas pracy ostrza przestaną się poru-
szać z powodu utknięcia między nimi przed-
miotów obcych, należy wyłączyć narzędzie,
wyjąć akumulator, a następnie usunąć przed-
mioty obce za pomocą odpowiednich narzędzi,
takich jak szczypce. Wyjmowanie przedmiotów
obcych dłonią grozi odniesieniem obrażeń, ponie-
waż ostrza mogą poruszyć się w reakcji na usu-
nięcie przedmiotu obcego.
11. Unikać niebezpiecznych warunków pracy.
Nie wolno używać narzędzia w otoczeniu wil-
gotnym, mokrym ani narażać go na działanie
deszczu. Woda, która dostanie się do wnętrza
narzędzia, zwiększa ryzyko porażenia prądem
elektrycznym.
Konserwacja i przechowywanie
1. Przed przystąpieniem do jakichkolwiek prac
konserwacyjnych należy wyłączyć narzędzie i
wyjąć akumulator.
2. Przed przeniesieniem narzędzia na inne miej-
sce, także podczas pracy, należy wyjąć aku-
mulator i założyć osłonę na ostrza nożyc. Nie
wolno przenosić ani przewozić narzędzia, gdy
ostrza są w ruchu. Nigdy nie chwytać ostrzy
rękami.
3. Narzędzie, a zwłaszcza ostrza nożyc, należy
wyczyścić po pracy, a także przed odłożeniem
do przechowywania na dłuższy okres. Ostrza
należy lekko naoliwić i nałożyć na nie osłonę.
4. Narzędzie należy przechowywać w suchym
pomieszczeniu, z założoną na ostrza osłoną.
Narzędzie należy przechowywać w niedostęp-
nym dla dzieci miejscu. Narzędzia nie wolno
przechowywać na zewnątrz pomieszczeń.
5. Nie wolno wyrzucać akumulatorów do ognia.
Ogniwo może eksplodować. Należy zapoznać
się z obowiązującymi lokalnie przepisami,
które określają specjalne wytyczne dotyczące
pozbywania się odpadów.
6. Nie wolno otwierać ani niszczyć akumula-
torów. Uwolniony elektrolit jest substancją
żrącą, która może spowodować uszkodzenie
oczu lub skóry. Może być on trujący w razie
połknięcia.
7. Akumulatora nie należy ładować w deszczu ani
w wilgotnym otoczeniu.
ZACHOWAĆ NINIEJSZE
INSTRUKCJE.
OSTRZEŻENIE: NIE WOLNO pozwolić,
aby wygoda lub rutyna (nabyta w wyniku wielo-
krotnego używania urządzenia) zastąpiły ścisłe
przestrzeganie zasad bezpieczeństwa obsługi.
NIEWŁAŚCIWE UŻYTKOWANIE narzędzia lub
niestosowanie się do zasad bezpieczeństwa
podanych w niniejszej instrukcji obsługi może
prowadzić do poważnych obrażeń ciała.
Ważne zasady bezpieczeństwa
dotyczące akumulatora
1. Przed użyciem akumulatora zapoznać się ze
wszystkimi instrukcjami i znakami ostrze-
gawczymi na (1) ładowarce, (2) akumulatorze
i (3) produkcie, w którym będzie używany
akumulator.
2. Nie rozmontowywać ani modykować akumu-
latora. Może to spowodować pożar, przegrzanie
lub wybuch.
3. Jeśli czas działania uległ znacznemu skróce-
niu, należy natychmiast przerwać pracę. Może
bowiem dojść do przegrzania, ewentualnych
poparzeń, a nawet eksplozji.
4. W przypadku przedostania się elektrolitu do
oczu, przemyć je czystą wodą i niezwłocznie
uzyskać pomoc lekarską. Może on bowiem
spowodować utratę wzroku.
5. Nie doprowadzać do zwarcia akumulatora:
(1) Nie dotykać styków materiałami przewo-
dzącymi prąd.
(2) Unikać przechowywania akumulatora w
pojemniku z metalowymi przedmiotami,
takimi jak gwoździe, monety itp.
(3) Chronić akumulator przed deszczem lub
wodą.
Zwarcie prowadzi do przepływu prądu elek-
trycznego o dużym natężeniu i przegrzania
akumulatora, co w konsekwencji może grozić
poparzeniami a nawet awarią urządzenia.
6. Narzędzia i akumulatora nie wolno przechowy-
wać ani używać w miejscach, w których tempe-
ratura osiąga bądź przekracza 50°C (122°F).
7. Akumulatorów nie wolno spalać, również tych
poważnie uszkodzonych lub całkowicie zuży-
tych. Akumulator może eksplodować w ogniu.
8. Nie należy przecinać ani zgniatać akumulatora,
wbijać w niego gwoździ, rzucać nim, upusz-
czać, ani uderzać akumulatorem o twarde
obiekty. Takie działanie może spowodować pożar,
przegrzanie lub wybuch.
9. Nie wolno używać uszkodzonego akumulatora.
10. Stanowiące wyposażenie akumulatory lito-
wo-jonowe podlegają przepisom dotyczącym
produktów niebezpiecznych.
Na potrzeby transportu komercyjnego, np. świad-
czonego przez rmy trzecie czy spedycyjne,
należy przestrzegać specjalnych wymagań w
zakresie pakowania i oznaczania etykietami.
Przygotowanie produktu do wysyłki wymaga
skonsultowania się ze specjalistą ds. materiałów
niebezpiecznych. Należy także przestrzegać
przepisów krajowych, które mogą być bardziej
szczegółowe.
Zakleić taśmą lub zaślepić otwarte styki akumula-
tora oraz zabezpieczyć go, aby nie mógł się prze-
suwać w opakowaniu.
11. Jeśli zajdzie konieczność utylizacji akumula-
tora, należy wyjąć go z narzędzia i przekazać
w bezpieczne miejsce. Postępować zgodnie z
przepisami lokalnymi dotyczącymi utylizacji
akumulatorów.
Pagina se încarcă...
Pagina se încarcă...
Pagina se încarcă...
Pagina se încarcă...
Pagina se încarcă...
Pagina se încarcă...
Pagina se încarcă...
Pagina se încarcă...
Pagina se încarcă...
Pagina se încarcă...
Pagina se încarcă...
Pagina se încarcă...
Pagina se încarcă...
Pagina se încarcă...
Pagina se încarcă...
Pagina se încarcă...
Pagina se încarcă...
Pagina se încarcă...
Pagina se încarcă...
Pagina se încarcă...
Pagina se încarcă...
Pagina se încarcă...
Pagina se încarcă...
Pagina se încarcă...
Pagina se încarcă...
Pagina se încarcă...
Pagina se încarcă...
Pagina se încarcă...
Pagina se încarcă...
Pagina se încarcă...
Pagina se încarcă...
Pagina se încarcă...
Pagina se încarcă...
Pagina se încarcă...
Pagina se încarcă...
Pagina se încarcă...
Pagina se încarcă...
Pagina se încarcă...
Pagina se încarcă...
Pagina se încarcă...
Pagina se încarcă...
Pagina se încarcă...
Pagina se încarcă...
Pagina se încarcă...
Pagina se încarcă...
Pagina se încarcă...
Pagina se încarcă...
Pagina se încarcă...
Pagina se încarcă...
Pagina se încarcă...
Pagina se încarcă...
Pagina se încarcă...
Pagina se încarcă...
Pagina se încarcă...
Pagina se încarcă...
Pagina se încarcă...
Pagina se încarcă...
Pagina se încarcă...
Pagina se încarcă...
Pagina se încarcă...
Pagina se încarcă...
Pagina se încarcă...
Pagina se încarcă...
Pagina se încarcă...
-
 1
1
-
 2
2
-
 3
3
-
 4
4
-
 5
5
-
 6
6
-
 7
7
-
 8
8
-
 9
9
-
 10
10
-
 11
11
-
 12
12
-
 13
13
-
 14
14
-
 15
15
-
 16
16
-
 17
17
-
 18
18
-
 19
19
-
 20
20
-
 21
21
-
 22
22
-
 23
23
-
 24
24
-
 25
25
-
 26
26
-
 27
27
-
 28
28
-
 29
29
-
 30
30
-
 31
31
-
 32
32
-
 33
33
-
 34
34
-
 35
35
-
 36
36
-
 37
37
-
 38
38
-
 39
39
-
 40
40
-
 41
41
-
 42
42
-
 43
43
-
 44
44
-
 45
45
-
 46
46
-
 47
47
-
 48
48
-
 49
49
-
 50
50
-
 51
51
-
 52
52
-
 53
53
-
 54
54
-
 55
55
-
 56
56
-
 57
57
-
 58
58
-
 59
59
-
 60
60
-
 61
61
-
 62
62
-
 63
63
-
 64
64
-
 65
65
-
 66
66
-
 67
67
-
 68
68
-
 69
69
-
 70
70
-
 71
71
-
 72
72
-
 73
73
-
 74
74
-
 75
75
-
 76
76
-
 77
77
-
 78
78
-
 79
79
-
 80
80
-
 81
81
-
 82
82
-
 83
83
-
 84
84


Makita DUH502 Manual de utilizare
- Categorie
- Aparate de tuns gard viu
- Tip
- Manual de utilizare
în alte limbi
- slovenčina: Makita DUH502 Používateľská príručka
- polski: Makita DUH502 Instrukcja obsługi
Lucrări înrudite
-
Makita DUN600L Manual de utilizare
-
Makita DUH506 Manual de utilizare
-
Makita EN402MP Manual de utilizare
-
Makita DUH604S Manual de utilizare
-
Makita UH014 Manual de utilizare
-
Makita UH004G Manual de utilizare
-
Makita UH013G Manual de utilizare
-
Makita DUM166 Manual de utilizare
-
Makita DUN461W Manual de utilizare
-