Q17044
First Edition
August 2020
Copyright © ASUSTeK Computer Inc.
All Rights Reserved
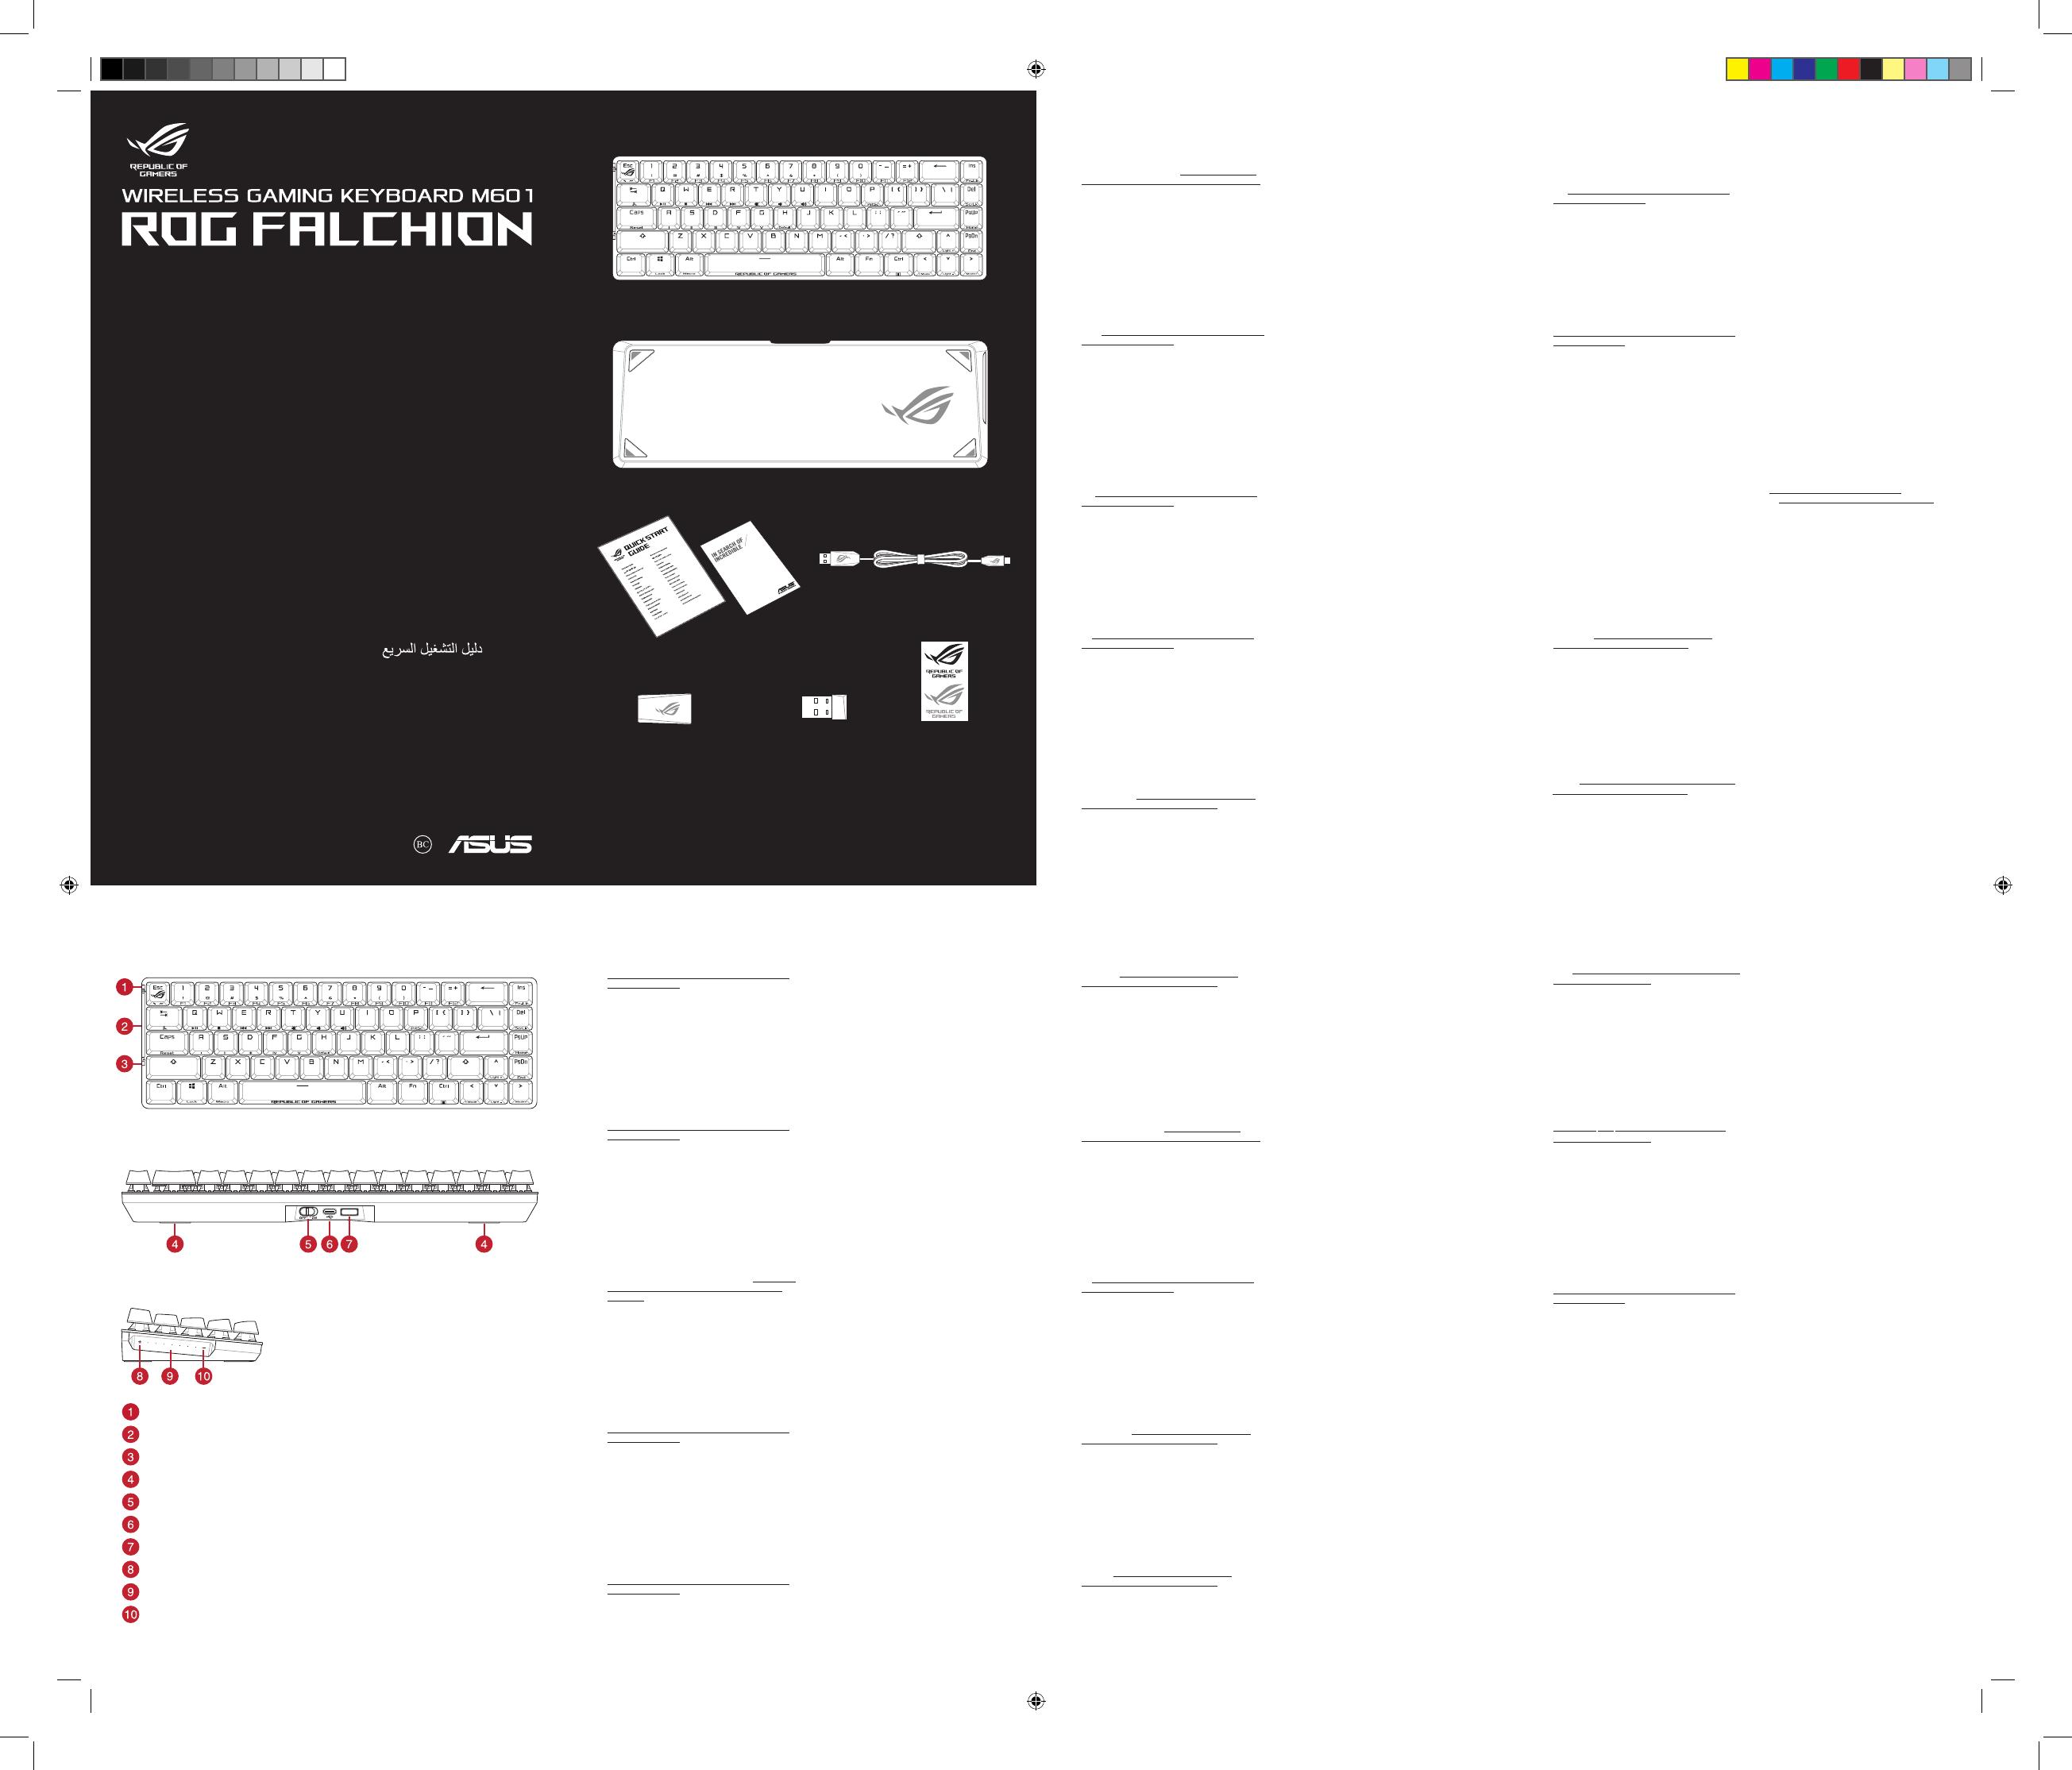
Package Contents
Quick Start Guide
快速使用指南(繁體中文)
快速使用指南(簡體中文)
クイックスタートガイド
빠른 시작 설명서
Guide de démarrage rapide
Schnellstartanleitung
Guida rapida
Краткое руководство
Guía de inicio rápido
Beknopte handleiding
Hızlı Başlangıç Kılavuzu
Beüzemelési útmutató
Стисле керівництво для
початку експлуатації
Instrukcja szybkiej instalacji
Rychlý průvodce
Ghid de pornire rapidă
Snabbstartsguide
Stručný návod na spustenie
Quick Start-vejledning
Pikaopas
Hurtigstartveiledning
Guia de consulta rápida
Keyboard features
Win lock indicator / Win lock
指示燈
/ Win lock
指示燈
RGB indicator / RGB
指示燈
/ RGB
指示燈
Caps Lock indicator /
大寫字母鎖定指示燈
/
大寫字母鎖定指示燈
Kickstand /
支架
/
支架
Power switch /
電源開關
/
電源開關
USB Type-C® port / USB Type-C®
連接埠
/ USB Type-C®
接口
Magnetic dongle storage /
無線接收器磁吸收納
/
無線接收器磁吸收納
Up button /
向上按鍵
/
向上按鍵
Slider bar /
滑動條
/
滑動條
Down button /
向下按鍵
/
向下按鍵
Top view (US layout for reference)
Rear view
Left view
ROG Falchion wireless gaming keyboard (US layout)* /
ROG Falchion
無線電競鍵盤(美式佈局)
* /
ROG Falchion
無線電競鍵盤(美式佈局)
*
USB Type-C® cable /
USB Type-C®
傳輸線
/
USB Type-C®
數據線
Keyboard cover /
鍵盤蓋
/
鍵盤蓋
Wireless dongle extender* /
無線接收器延長器
* /
無線接收器延長器
*
USB Wireless Dongle /
USB
無線接收器
/
USB
無線接收器
Technical documents /
技術文件
/
技術文件
Sticker /
貼
紙
/
貼紙
* The illustration is for reference only. Actual product specifications may vary with models, such as keyboard layout. /
圖示僅供參考。實際產品規格如鍵盤佈局可能因型號而異。
/
圖示僅供參考。實際產品規格如鍵盤佈局可能因型號而異。
** Only use the wireless dongle extender for the wireless dongle. /
無線接收器延長器僅可用於連接無線接收器。
/
無線接收器延長器僅可用於連接無線接收器。
Warranty Card
EN
FR
DE
IT
ES
Getting started
1. Connect the bundled Type-C
®
cable to your keyboard.
2. Connect your keyboard to the PC.
3. Download and install the Armoury Crate software from
https://www.asus.com/supportonly/Armoury%20Crate/
HelpDesk_Download/
4. Follow the software instructions to update your keyboard’s
firmware.
5. Customize your keyboard using Armoury Crate.
Procedimientos iniciales
1. Conecte el cable Type-C® incluido al teclado.
2. Conecte el teléfono a su PC.
3. Descargue e instale el software ROG Armoury Crate desde
https://www.asus.com/supportonly/Armoury%20Crate/
HelpDesk_Download/.
4. Siga las instrucciones de software para actualizar el
firmware del teclado.
5. Personalice el teclado mediante Armoury Crate.
Setting up as a wireless keyboard
1. Remove the wireless dongle from the keyboard.
2. Insert the wireless dongle to a USB port on the PC.
3. Set the power switch to ON.
Configurar como un teclado inalámbrico
1. Quite la llave inalámbrica del teclado USB.
2. Inserte la llave inalámbrica a un puerto USB de su PC.
3. Coloque el interruptor de alimentación en la posición ENCENDIDO.
Battery Status
The RGB indicator on your gaming keyboard will turn red
(breathing) and the LEDs for all the other keys will switch o
when the battery power is below 20% in wireless mode. You
may charge your gaming keyboard by using the bundled USB
cable.
Estado de la batería
El color del indicador RGB del teclado para juegos cambiará
a rojo (respirando) y los LED de todas las demás teclas se
apagarán cuando la energía de la batería sea inferior al 20 % en
modo inalámbrico. Puede cargar el teclado para juegos utilizando
el cable USB incluido.
Prise en main
1. Connectez le câble Type-C® fourni à votre clavier.
2. Connectez votre clavier à l'ordinateur.
3. Téléchargez et installez le logiciel Armoury sur :
https://www.asus.com/supportonly/Armoury%20Crate/
HelpDesk_Download/
4. Suivez les instructions du logiciel pour mettre à jour le
firmware de votre clavier.
5. Personnalisez votre clavier avec Armoury.
Configurer en tant que clavier sans fil
1. Retirez le dongle sans fil du clavier.
2. Insérez le dongle sans fil à un port USB sur votre ordinateur.
3. Placez l'interrupteur d'alimentation sur ON.
État de la batterie
L'indicateur RGB de votre clavier gaming deviendra rouge
(pulsation) et les LED de toutes les autres touches seront
éteintes lorsque le niveau de batterie est inférieur à 20% en
mode sans l. Vous pouvez recharger votre clavier gaming en
utilisant le câble USB fourni.
Erste Schritte
1. Verbinden Sie das mitgelieferte Typ-C-Kabel mit Ihrer
Tastatur.
2. Schließen Sie Ihre Tastatur an den PC an.
3. Laden Sie die Armoury Crate Software unter https://www.
asus.com/supportonly/Armoury%20Crate/HelpDesk_
Download/ herunter und installieren Sie sie.
4. Befolgen Sie die Anweisungen in der Software, um die
Firmware Ihrer Tastatur zu aktualisieren.
5. Passen Sie Ihre Tastatur über Armoury Crate an.
Einrichten als kabellose Tastatur
1. Entfernen Sie den Wireless-Dongle von der Tastatur.
2.
Stecken Sie den Wireless-Dongle in einen USB-Anschluss am PC.
3. Stellen Sie den Ein-/Ausschalter auf EIN.
Akkustatus
Die RGB-Anzeige an Ihrer Gaming Tastatur leuchtet rot
(pulsierend) und die LEDs aller anderen Tasten werden
ausgeschaltet, wenn die Akkuleistung im Drahtlos-Modus
unter 20% liegt. Sie können Ihre Gaming Tastatur mithilfe des
mitgelieferten USB-Kabels auaden.
Per iniziare
1. Collegate il cavo USB di tipo C® in dotazione alla tastiera.
2. Collegate la tastiera al PC.
3. Scaricate e installate il software Armoury Crate dal sito
https://www.asus.com/supportonly/Armoury%20Crate/
HelpDesk_Download/
4. Seguite le istruzioni del software per aggiornare il
firmware della vostra tastiera.
5. Usate Armory Crate per personalizzare la vostra tastiera.
Installazione della tastiera senza fili
1. Estraete il dongle senza fili dalla tastiera.
2. Inserite il dongle senza fili in una porta USB del PC.
3. Impostate l'interruttore di alimentazione su ON.
Stato della batteria
L'indicatore RGB della tastiera gaming si accende di rosso
(respiro) e i LED degli altri tasti si spengono quando la carica
residua della batteria è inferiore al 20% nella modalità senza li.
Potete caricare la batteria della tastiera gaming usando il cavo
USB in dotazione.
TR
FI
CZ
HU
NL
NO
PT:BR
PL
RU
SK
Начало работы
1. Подключите поставляемый кабель USB Type-C к
клавиатуре.
2. Подключите клавиатуру к компьютеру.
3. Скачайте и установите программное обеспечение
Armoury Crate с https://www.asus.com/supportonly/
Armoury%20Crate/HelpDesk_Download/
4. Следуйте инструкциям для обновления прошивки
клавиатуры.
5. Настройте клавиатуру с помощью Armoury Crate.
Настройка в качестве беспроводной
клавиатуры
1. Снимите с клавиатуры беспроводной приемник.
2. Подключите USB приемник к USB порту компьютера.
3. Установите переключатель питания в положение ON.
Состояние аккумулятора
Когда аккумулятор разрядится ниже 20% в беспроводном
режиме, индикатор RGB на клавиатуре загорится красным
цветом, а индикаторы всех остальных клавиш погаснут.
Игровую клавиатуру можно зарядить с помощью
поставляемого в комплекте USB-кабеля.
Başlarken
1. Birlikte verilen Type-C ® kablosunu klavyenize bağlayın.
2. Klavyenizi bilgisayara bağlayın.
3. ROG Armoury Crate yazılımını https://www.asus.com/
supportonly/Armoury%20Crate/HelpDesk_Download/
adresinden indirip yükleyin.
4. Klavyenizin aygıt yazılımını güncellemek için yazılım
yönergelerini izleyin.
5. Armoury Crate yazılımını kullanarak klavyenizi özelleştirin.
Näin pääset alkuun
1. Liitä mukana toimitettu Type-C ® -kaapeli näppäimistölle.
2. Liitä näppäimistö PC-tietokoneeseen.
3. Lataa ja asenna ROG Armoury Crate -ohjelmisto
osoitteesta https://www.asus.com/supportonly/
Armoury%20Crate/HelpDesk_Download/.
4. Päivitä näppäimistösi laiteohjelmisto ohjelmiston
ohjeiden mukaisesti.
5. Mukauta näppäimistösi Armoury Crate-ohjelmistolla.
Začínáme
1. Připojte dodaný kabel Type-C® ke klávesnici.
2. Připojte klávesnici k počítači.
3. Stáhněte a nainstalujte software ROG Armoury Crate z
webu https://www.asus.com/supportonly/Armoury%20
Crate/HelpDesk_Download/.
4. Podle pokynů softwaru zaktualizujte firmware klávesnice.
5. Přizpůsobte vaši klávesnici pomocí Armoury Crate.
Első lépések
1. Csatlakoztassa a tartozék Type-C® kábelt a billentyűzethez.
2. Csatlakoztassa a billentyűzetet a PC-hez.
3. Töltse le és telepítse az ROG Armoury Crate szoftvert
a következő weboldalról: https://www.asus.com/
supportonly/Armoury%20Crate/HelpDesk_Download/.
4. Frissítse a billentyűzet firmware-ét a szoftver útmutatása
szerint.
5. Testreszabhatja a billentyűzetet az Armoury Crate
segítségével.
Aan de slag
1. Sluit de meegeleverde Type-C®-kabel aan op uw
toetsenbord
2. Sluit uw toetsenbord aan op de pc.
3. Download en installeer de ROG Armoury Crate-software
van https://www.asus.com/supportonly/Armoury%20
Crate/HelpDesk_Download/.
4. Volg de softwareinstructies voor het bijwerken van de
firmware van uw toetsenbord.
5. Pas uw toetsenbord aan met Armoury Crate.
Komme i gang
1. Koble den medfølgende Type-C®-kabelen til tastaturet.
2. Koble tastaturet til PC-en.
3. Last ned og installer ROG Armoury Crate-programvaren
fra https://www.asus.com/supportonly/Armoury%20
Crate/HelpDesk_Download/.
4. Følg bruksanvisningen i programvaren for å oppdatere
fastvaren til tastaturet.
5. Tilpass tastaturet ved hjelp av Armoury Crate.
Iniciando
1. Ligue o cabo Type-C® fornecido ao seu teclado.
2. Ligue o teclado ao PC.
3. Transfira e instale o software ROG Armoury Crate a partir
de https://www.asus.com/supportonly/Armoury%20
Crate/HelpDesk_Download/.
4. Siga as instruções do software para atualizar o firmware
do teclado.
5. Personalize o teclado utilizando o software Armoury Crate.
Rozpoczęcie
1. Podłącz do klawiatury dołączony kabel Type-C®.
2. Podłącz klawiaturę do komputera.
3. Pobierz i zainstaluj oprogramowanie ROG Armoury
Crate ze strony https://www.asus.com/supportonly/
Armoury%20Crate/HelpDesk_Download/.
4. Wykonaj instrukcje w oprogramowaniu, aby zaktualizować
oprogramowanie sprzętowe klawiatury.
5. Dostosuj klawiaturę za pomocą oprogramowania
Armoury Crate.
Začíname
1. Pripojte dodávaný kábel Type-C® ku klávesnici.
2. Klávesnicu pripojte k počítaču.
3. Z lokality https://www.asus.com/supportonly/
Armoury%20Crate/HelpDesk_Download/ si prevezmite
súbor ROG Armoury Crate a nainštalujte si ho.
4. Pri aktualizovaní firmvéru klávesnice postupujte podľa
návodu na softvér.
5. Klávesnicu si prispôsobte podľa aplikácie Armoury Crate.
Kablosuz klavye olarak kurma
1. Kablosuz donanım kilidini klavyeden çıkarın.
2. Kablosuz donanım kilidini PC’deki bir USB bağlantı noktasına takın.
3. Güç düğmesini ON (AÇIK) konumuna getirin.
Langattoman näppäimistön asettaminen
1. Irrota langaton käyttöavain näppäimistöstä.
2. Liitä langaton käyttöavain PC-tietokoneen USB-porttiin.
3. Aseta virtakytkin ON (Päällä) -asentoon.
Nastavení bezdrátové klávesnice
1. Vyjměte bezdrátový modul z klávesnice.
2. Připojte bezdrátový modul k portu USB na počítači.
3. Přepněte vypínač do polohy ON (Zapnuto).
Beálítás vezeték nélküli billentyűzetként
1. Távolítsa el a vezeték nélküli kulcsot a billentyűzetből.
2. Helyezze be a vezeték nélküli kulcsot a PC egyik USB portjába.
3. Állítsa a tápkapcsolót BE helyzetbe.
Instellen als een draadloos toetsenbord
1. Verwijder de draadloze dongle uit het toetsenbord.
2. Sluit de draadloze dongle aan op een USB-poort op de pc.
3. Zet de voedingsschakelaar op AAN.
Sette opp som et trådløst tastatur
1. Ta ut trådløsdonglen fra tastaturet.
2. Sett trådløsdonglen inn i en USB-port på PC-en.
3. Slå PÅ strømbryteren.
Configurando como um teclado sem fio
1. Remova o dongle sem fio do teclado.
2. Insira o dongle sem fio na porta USB do PC.
3. Defina o interruptor de energia na posição ON.
Konfiguracja klawiatury bezprzewodowej
1. Wyjmij z klawiatury moduł połączenia bezprzewodowego.
2. Włóż moduł połączenia bezprzewodowego do portu USB w
komputerze.
3. Przesuń przełącznik zasilania do pozycji ON (WŁ.).
Nastavenie ako bezdrôtová klávesnica
1. Bezdrôtový kľúč vyberte z klávesnice.
2. Bezdrôtový kľúč vložte do portu USB v počítači.
3. Hlavný vypínač prepnite do polohy ON (Zap.).
Pil Durumu
Oyun klavyenizdeki RGB göstergesi kırmızıya döner (nefes alır)
ve kablosuz modda pil gücü %20’nin altına düştüğünde diğer
tüm tuşların ışıkları söner. Oyun klavyenizi birlikte verilen USB
kablosunu kullanarak şarj edebilirsiniz.
Akun tila
Pelinäppäimistön RGB-merkkivalo muuttuu punaiseksi
(hengitys) ja kaikkien muiden näppäinten LED-valot kytkeytyvät
pois päältä, kun akun varaus on alle 20 % langattomassa tilassa.
Voit ladata pelinäppäimistöä toimitukseen kuuluvalla USB-
kaapelilla.
Stav baterie
Když je napětí baterie v bezdrátovém režimu nižší než 20 %,
indikátor RGB na herní klávesnici se rozsvítí červeně (pulzuje)
a LED pro všechny ostatní klávesy zhasnou. Herní klávesnici lze
nabít pomocí dodaného kabelu USB.
Akkumulátor állapota
A játékbillentyűzet RGB jelzőfénye vörös (lélegző) lesz és a
minden más gomb LEDje kikapcsol amikor az akkumulátor
feszültsége 20% alatti vezeték nélküli módban. A
játékbillentyűzetet feltöltheti a tartozék USB kábel használatával..
Batterijstatus
De RGB-indicator op uw gamingtoetsenbord wordt rood
(ademend) en de LED’s voor alle andere toetsen worden
uitgeschakeld wanneer het batterijvermogen lager is dan 20%
in de draadloze modus. U kunt uw gamingtoetsenbord opladen
met de meegeleverde USB-kabel.
Batteristatus
RGB-indikatoren på spilltastaturet ditt blir rødt (puster) og LED-
lampene for alle de andre tastene slukkes når batteristrømmen er
under 20 % i trådløs modus. Du kan lade spilltastaturet med den
medfølgende USB-kabelen.
Status da bateria
O indicador RGB no teclado para jogos cará vermelho
(respirando) e os LEDs de todas as outras teclas se apagarão
quando a bateria estiver abaixo de 20% no modo sem o. Você
pode carregar o teclado para jogos usando o cabo USB fornecido
em conjunto.
Stan baterii
Jeśli w trybie bezprzewodowym poziom naładowania baterii
spadnie poniżej 20%, wskaźnik RGB na klawiaturze do gier
będzie świecił (oddychającym) czerwonym światłem, a diody
LED pozostałych klawiszy zostaną wyłączone. Klawiaturę do gier
można naładować przy użyciu dołączonego kabla USB.
Stav batérie
Na hernej klávesnici bude svietiť červená LED kontrolka RGB
(rozjasňujúca) a keď je batéria nabitá na menej ako 20 %, zhasnú
LED kontrolky pre všetky ostatné klávesy. Hernú myš môžete
nabiť pomocou dodaného kábla USB.
SE
UA
KR
AR
JP
RO
Komma igång
1. Anslut den medföljande Type-C ® -kabeln till
tangentbordet.
2. Anslut ditt tangentbord till datorn.
3. Hämta och installera ROG Armoury Crate-programvaran
från https://www.asus.com/supportonly/Armoury%20
Crate/HelpDesk_Download/.
4. Följ programvaruinstruktionerna för att uppdatera
tangentbordets inbyggda programvara.
5. Anpassa tangentbordet med Armoury Crate.
Початок роботи
1. Підключіть до клавіатури кабель Типу C® з комплекту
2. Підключіть клавіатуру до ПК.
3. Завантажте і встановіть ПЗ ROG Armoury Crate з
https://www.asus.com/supportonly/Armoury%20Crate/
HelpDesk_Download/.
4. Виконуйте інструкцію до ПЗ, щоб оновити
мікропрограму клавіатури.
5. Пристосуйте клавіатуру за допомогою Armoury Crate.
시작하기
1. 제품과함께제공된Type-C
®
케이블을키보드에
연결하십시오.
2. 키보드를PC에연결합니다.
3. https://www.asus.com/supportonly/Armoury%20
Crate/HelpDesk_Download/에서ROGArmoury
Crate소프트웨어를다운로드하여설치합니다.
4. 소프트웨어지침에따라키보드의펌웨어를
업데이트합니다.
5. ArmouryCrate를사용하여키보드를사용자
지정합니다.
Type-C
.
..
.
.
Noţiuni introductive
1. Conectați cablul Type-C® inclus în pachet la tastatură.
2. Conectaţi tastatura la PC.
3. Descărcaţi şi instalaţi software-ul ROG Armoury Crate
de la adresa https://www.asus.com/supportonly/
Armoury%20Crate/HelpDesk_Download/.
4. Urmaţi instrucţiunile software-ului pentru a actualiza
firmware-ul tastaturii.
5. Particularizaţi tastatura cu ajutorul software-ului
Armoury Crate.
Installera som ett trådlöst tangentbord
1. Ta bort donglen för trådlös anslutning från tangentbordet.
2. Sätt i donglen för trådlös anslutning i en USB-port på
datorn.
3. Ställ strömbrytaren på PÅ.
Налаштування бездротової клавіатури
1. Вийміть з клавіатури бездротовий ключ.
2. Вставте бездротовий ключ до порту USB на ПК.
3. Встановіть перемикач живлення на ON (Увімкнено).
무선 키보드로서 설정하기
1. 키보드에서무선동글을제거합니다.
2. 무선동글을PC의USB포트에끼웁니다.
3. 전원스위치를ON(켜기)으로설정합니다.
1
USB
ON 3
Configurarea ca tastatură wireless
1. Scoateți dongle-ul wireless de la tastatură.
2. Introduceți dongle-ul wireless într-un port USB de pe
computer.
3. Setați întrerupătorul de alimentare la ON (pornit).
Batteristatus
RGB-indikatorn på speltangentbordet blir röd
(pulserande) och indikatorerna för alla andra tangenter
släcks när batterieekten är lägre än 20 % i trådlöst läge.
Du kan ladda speltangentbordet med den medföljande
USB-kabeln.
Стан акумулятора
Індикатор RGB на ігровій клавіатурі почервоніє
(з пульсацією), а світлодіоди всіх інших клавіш
вимкнуться, коли заряд батареї буде нижче 20 % у
бездротовому режимі. Заряджувати ігрову клавіатуру
можна кабелем USB з комплекту.
배터리 상태
무선모드에서배터리전원이20%미만으로
떨어지면게이밍키보드의RGB표시등이
빨간색 ( 브리딩 ) 으로바뀌면서기타모든키의
LED 가꺼집니다 .제품과함께제공된USB케이블을
사용하여게이밍키보드를충전할수있습니다 .
USB
Stare baterie
Indicatorul RGB de pe tastatura dvs. pentru jocuri se va
aprinde roșu (intermitent) și LED-urile pentru toate celelalte
taste se vor opri atunci când bateria are o capacitate de sub
20% în modul wireless. Puteți încărca tastatura dvs. pentru
jocuri folosind cablul USB inclus.
はじめに
1. 付属のUSBType-C®ケーブルを本製品に接続します。
2. もう一端をパソコンのUSBポートに接続します。
3. ArmouryCrateソフトウェアをダウンロードしてインス
トールします。
https://www.asus.com/supportonly/Armoury%20Crate/
HelpDesk_Download/
4. 画面の指示に従い、キーボードのファームウェアを更新
します。
5. ArmouryCrateでキーボードの設定をカスタマイズし
ます。
ワイヤレスキー ボードとして使 用 する
1. キーボードからUSBレシーバーを取り外します。
2. USBレシーバーをパソコンのUSBポートに接続します。
3. 製品の電源スイッチをONにします。
バッテリー の 状 態
ワイヤレスモード使用時、バッテリー残量が 20% 未
満になると RGB インジケーターは赤色にゆっくり点
滅し、他の LED は消灯します。バッテリーは付属の
USB ケーブルを使用してパソコンの USB ポートから
充電することができます。
CN
TW
開始使用
1. 將隨附的 Type-C® 線連接至鍵盤。
2. 將鍵盤連接至電腦。
3. 請至
https://www.asus.com.cn/supportonly/Armoury%20
Crate/HelpDesk_Download/
下載並安裝 Armoury
Crate 軟件。
4. 按照軟件指示更新鍵盤固件。
5. 使用 Armoury Crate 個性化您的鍵盤。
開始使用
1. 將隨附的 Type-C® 線連接至鍵盤。
2. 將鍵盤連接至電腦。
3. 請至
https://www.asus.com/tw/supportonly/
Armoury%20Crate/HelpDesk_Download/
下載並安裝
Armoury Crate 軟體。
4. 依照軟體指示更新鍵盤韌體。
5. 透過 Armoury Crate 客製化您的鍵盤。
設置為無線鍵盤
1. 取下鍵盤上的無線接收器。
2. 將無線接收器連接到電腦的 USB 接口。
3. 將電源開關撥至開啟 (ON) 位置。
設定為無線鍵盤
1. 取下鍵盤上的無線接收器。
2. 將無線接收器連接到電腦的 USB 連接埠。
3. 將電源開關撥至開啟 (ON) 位置。
電池狀態
在無線模式下,當電池電量低於 20% 時,電競鍵盤
上的 RGB 指示燈會亮紅色(呼吸),且其他所有
按鍵的燈效都熄滅。您可以使用隨附的 USB 線為電
競鍵盤充電。
電池狀態
在無線模式下,當電池電量低於 20% 時,電競鍵盤上的
RGB 指示燈會亮紅色(呼吸),且其他所有按鍵的燈效
都熄滅。您可以使用隨附的 USB 線為電競鍵盤充電。


