Asus ROG Strix Scope II 96 Ghid de inițiere rapidă
- Tip
- Ghid de inițiere rapidă

EN
FI
SK
DE
Q21811
First Edition
March 2023
Copyright © ASUSTeK Computer Inc.
All Rights Reserved
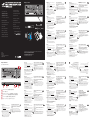
Package Contents
Keyboard features
Top view (US layout for reference)
Rear view
* The illustration is for reference only. Actual product specifications may vary with models, such as keyboard layout. /
圖示僅供參考。實際產品規格如鍵盤佈局可能因型號而異。
/
圖示僅供參考。實際產品規格如鍵盤佈局可能因型號而異。
** Only use the Wireless dongle extender for the Omni receiver. /
無線接收器延長器僅可用於連接Omni接收器。
/
無線接收器延長器僅可用於連接Omni接收器。
Warranty Card
Switch function button /
功能切換開關
/
功能切換開關
Multiwheel /
滾輪
/
滾輪
Adjustable feet with 3 tilt positions /
三檔可調節腳墊
/
三檔可調節腳墊
Magnetic receiver storage /
無線接收器磁吸收納
/
無線接收器磁吸收納
Connection switch /
連線模式切換開關
/
連接模式切換開關
USB Type-C® port / USB Type-C®
連接埠
/ USB Type-C®
接口
Стисле керівництво для
початку експлуатації (UA)
Instrukcja szybkiej instalacji (PL)
Rychlý průvodce (CZ)
Ghid de pornire rapidă (RO)
Snabbstartsguide (SV)
Stručný návod na spustenie (SK)
Pikaopas (FI)
Hurtigstartveiledning (NO)
Guia de consulta rápida (PT:BR)
)HB
()
Quick Start Guide (US)
快速使用指南(繁體中文)
快速使用指南(簡體中文)
クイックスタートガイド (JA)
빠른 시작 설명서 (KO)
Guide de démarrage rapide (FR)
Schnellstartanleitung (DE)
Guida rapida (IT)
Краткое руководство (RU)
Guía de inicio rápido (ES)
Beknopte handleiding (NL)
Hızlı Başlangıç Kılavuzu (TR)
Beüzemelési útmutató (HU)
)AR(
Getting started
1. Connect your keyboard to a PC with the bundled
Type-C® cable.
2. Download and install the Armoury Crate software
from https://rog.asus.com.
3. Follow the software instructions to update your
keyboard’s firmware.
4. Customize your keyboard using Armoury Crate.
Setting up Bluetooth for the first time
Set the connection switch to Bluetooth mode.
Pairing Bluetooth mode to additional host
devices
1. Set the connection switch to Bluetooth mode.
2. Press and hold the Fn + 7 for 3 seconds until the RGB
indicator on your gaming keyboard starts to blink blue.
Once your gaming keyboard has been successfully paired,
the RGB indicator on your gaming keyboard will light up
blue for 3 seconds.
Setting up as a wireless keyboard
1. Remove the Omni receiver from the keyboard and
insert the Omni receiver to a USB port on the PC.
2. Set the connection switch on the keyboard to RF
2.4GHz.
* The Omni receiver can be connected to multiple
devices through the Armoury Crate software.
Začíname
1. Klávesnicu pripojte k počítaču pomocou pribaleného
kábla Type-C®.
2. Z lokality https://rog.asus.com si prevezmite súbor
Armoury Crate a nainštalujte si ho.
3. Pri aktualizovaní firmvéru klávesnice postupujte podľa
návodu na softvér.
4. Klávesnicu si prispôsobte podľa aplikácie Armoury Crate.
Nastavenie Bluetooth po prvýkrát
Spínač pripojenia prepnite do režimu Bluetooth.
Režim párovania cez Bluetooth s ďalšími
hostiteľskými zariadeniami
1. Spínač pripojenia prepnite do režimu Bluetooth.
2. Stlačte tlačidlo FN + 7 a podržte ho stlačené na 3 sekundy,
kým nebude na hernej klávesnici blikať modrá kontrolka
RGB. Po úspešnom spárovaní hernej klávesnici sa na nej
rozsvieti modrá RGB kontrolka na dobu 3 sekúnd.
Zostavenie ako bezdrôtová klávesnica
1. Z klávesnice vyberte Prijímač Omni a Prijímač Omni
zapojte do portu USB v počítači.
2. Spínač pripojenia na klávesnici nastavte na RF 2.4GHz.
* Prijímač Omni sa môže pripojiť k viacerým zariadeniam
prostredníctvom softvéru Armoury Cratee.
Näin pääset alkuun
1. Liitä näppäimistö PC:hen toimitukseen kuuluvalla
Type-C®-kaapelilla.
2. Lataa ja asenna Armoury Crate -ohjelmisto
osoitteesta https://rog.asus.com.
3. Päivitä näppäimistösi laiteohjelmisto ohjelmiston
ohjeiden mukaisesti.
4. Mukauta näppäimistösi Armoury Crate-ohjelmistolla.
Bluetoothin asettaminen ensimmäistä kertaa
Aseta liitäntäkytkin Bluetooth -tilaan.
Bluetooth-tilan pariuttaminen
lisäisäntälaitteisiin
1. Aseta liitäntäkytkin Bluetooth -tilaan.
2. Pidä FN + 7 painettuna 3 sekuntia, kunnes
pelinäppäimistösi RGB-merkkivalo alkavat vilkkua
sinisenä. Kun pelinäppäimistö pariuttaminen on
onnistunut, pelihiiren RGB-merkkivalo palaa sinisenä 3
sekuntia.
Aseta langattoman näppäimistönä
1. Irrota Omni-vastaanotin näppäimistöstä ja Liitä
Omni-vastaanotin tietokoneen USB-porttiin.
2. Aseta näppäimistön yhteyskytkin RF 2,4 GHz
-taajuudelle.
* Omni-vastaanottimen voi liittää useisiin laitteisiin
Armoury Crate-ohjelmiston kautta.
Erste Schritte
1. Schließen Sie Ihre Tastatur mithilfe des mitgelieferten
Typ-C-Kabels an einen PC an.
2. Laden Sie die Armoury Crate Software unter
https://rog.asus.com herunter und installieren Sie sie.
3. Befolgen Sie die Anweisungen in der Software, um die
Firmware Ihrer Tastatur zu aktualisieren.
4. Passen Sie Ihre Tastatur über Armoury Crate an.
Erstmalige Einrichtung von Bluetooth
Legen Sie den Schalter für die Verbindung auf den Bluetooth-
Modus fest.
Im Bluetooth-Modus mit zusätzlichen Host-
Geräten koppeln
1. Legen Sie den Schalter für die Verbindung auf den
Bluetooth-Modus fest.
2. Halten Sie Fn + 7 für drei Sekunden gedrückt, bis die RGB-
Anzeige an Ihrer Gaming Tastatur blau zu blinken beginnt.
Sobald Ihre Gaming Tastatur erfolgreich gekoppelt wurde,
leuchtet die RGB-Anzeige drei Sekunden lang blau.
Einrichten als kabellose Tastatur
1. Entfernen Sie den Omni-Empfänger von der Tastatur
und stecken Sie ihn in einen USB-Anschluss Ihres PCs.
2. Legen Sie den Schalter für die Verbindung an der
Tastatur auf RF 2,4 GHz fest.
* Der Omni-Empfänger kann über die Armoury Crate
Software mit mehreren Geräten verbunden werden.
PL
AR
PT:BR
Rozpoczęcie
1. Podłącz klawiaturę do komputera za pomocą
dołączonego kabla Type-C®.
2. Pobierz i zainstaluj oprogramowanie Armoury Crate ze
strony https://rog.asus.com.
3. Wykonaj instrukcje w oprogramowaniu, aby
zaktualizować oprogramowanie sprzętowe klawiatury.
4. Dostosuj klawiaturę za pomocą oprogramowania
Armoury Crate.
Pierwsza konfiguracja połączenia
Bluetooth
Ustaw przełącznik połączenia w pozycji trybu połączenia
Bluetooth.
Parowanie z dodatkowymi urządzeniami
hosta w trybie Bluetooth
1. Ustaw przełącznik połączenia w pozycji trybu połączenia
Bluetooth.
2. Naciśnij FN + 7 i przytrzymaj go przez 3 sekundy, aż
wskaźnik RGB na klawiaturze gamingowej zaczną migać
na niebiesko. Po pomyślnym sparowaniu wskaźnik RGB
klawiaturze gamingowej będzie świecić na niebiesko
przez 3 sekundy.
Konfiguracja klawiatury bezprzewodowej
1. Wyjmij z klawiatury odbiornik Omni i włóż odbiornik
Omni do portu USB w komputerze.
2. Ustaw przełącznik połączenia klawiatury w pozycji
RF 2,4 GHz.
* Odbiornik Omni można połączyć z wieloma urządzeniami
przy użyciu programu Armoury Crate.
Bluetooth
.Bluetooth
Bluetooth
.Bluetooth 1
RGB3FN+7 2
RGB
3
Iniciando
1. Conecte seu teclado a um PC com o cabo Type-C®
fornecido.
2. Transfira e instale o software Armoury Crate a partir
de https://rog.asus.com.
3. Siga as instruções do software para atualizar o
firmware do teclado.
4. Personalize o teclado utilizando o software Armoury
Crate.
Configurando o Bluetooth pela primeira vez
Defina o comutador do modo de ligação para o modo
Bluetooth.
Emparelhar o modo Bluetooth com
dispositivos host adicionais
1. Defina o comutador do modo de ligação para o modo
Bluetooth.
2. Prima e mantenha premido o botão de FN +7 durante 3
segundos aaté que o indicador RGB em seu teclado gamer
comecem a piscar em azul. Assim que o rato gaming
tiver sido emparelhado com sucesso, o indicador RGB do
seu teclado gamer irá ficar iluminado em azul durante 3
segundos.
Configurando como um teclado sem fio
1. Remova receptor omni fio do teclado um Insira receptor
omni fio em uma porta USB do PC.
2. Defina a chave de conexão no teclado para RF 2,4 GHz.
* O receptor Omni pode ser conectado a vários dispositivos
através do software Armory Crate.
C
®
1
Armoury Crate 2
.https://rog.asus.com
3
.Armoury Crate 4
1
USB
RF 2
*
.ArmoCrate
CZ
RO
NL
Začínáme
1. Připojte vaši klávesnici k počítači přiloženým
kabelem Type-C®.
2. Stáhněte a nainstalujte software Armoury Crate z
webu https://rog.asus.com.
3. Podle pokynů softwaru zaktualizujte firmware
klávesnice.
4. Přizpůsobte vaši klávesnici pomocí Armoury Crate.
První nastavení Bluetooth
Nastavte přepínač připojení na režim Bluetooth.
Spárování s dalšími hostitelskými zařízeními
v režimu Bluetooth
1. Nastavte přepínač připojení na režim Bluetooth.
2. Stiskněte a podržte Fn + 7 3 sekundy, dokud indikátor
RGB na vaší herní klávesnici blikat modře. Po úspěšném
spárování herní myši bude indikátor RGB na herní
klávesnice svítit 3 sekundy modře.
Nastavení bezdrátové klávesnice
1. Vyjměte vícesměrový přijímač z klávesnice a připojte
vícesměrový přijímač k portu USB na počítači.
2. Nastavte přepínač připojení na klávesnici na
RF 2,4 GHz.
* Vícesměrový přijímač lze připojit k více zařízením
prostřednictvím softwaru Armoury Crate.
Noţiuni introductive
1. Conectați tastatura la un PC cu ajutorul cablului
Tip-C® inclus în pachet.
2. Descărcaţi şi instalaţi software-ul Armoury Crate de
la adresa https://rog.asus.com.
3. Urmaţi instrucţiunile software-ului pentru a actualiza
firmware-ul tastaturii.
4. Particularizaţi tastatura cu ajutorul software-ului
Armoury Crate.
Configurarea funcției Bluetooth pentru
prima dată
Setați butonul de conectare la modul Bluetooth.
Asocierea modului Bluetooth la dispozitive
gazdă suplimentare
1. Setați butonul de conectare la modul Bluetooth.
2. Apăsaţi şi Fn + 7 timp de 3 secunde până când indicatorul
RGB de pe tastatura dvs. pentru jocuri încep să lumineze
albastru intermitent. După ce tastatură pentru jocuri a
fost asociat cu succes, indicatorul RGB al mouse-ului va
ilumina în culoarea albastru timp de 3 secunde.
Configurarea ca tastatură wireless
1. Scoateți receptor omni de la tastatură şi conectați
receptor omni la un port USB de pe computer.
2. Setați comutatorul de conectare de pe tastatură la RF
2.4GHz.
* Puteți conecta receptorul Omni la mai multe dispozitive
prin intermediul software-ului Armory Crate.
Aan de slag
1. Sluit uw toetsenbord aan op een pc met de
meegeleverde Type-C®-kabel.
2. Download en installeer de Armoury Crate-software
van https://rog.asus.com.
3. Volg de softwareinstructies voor het bijwerken van
de firmware van uw toetsenbord.
4. Pas uw toetsenbord aan met Armoury Crate.
Bluetooth instellen voor de eerste keer
Stel de verbindingsschakelaar in op de Bluetooth modus.
De Bluetooth-modus koppelen met extra
hostapparaten
1. Stel de verbindingsschakelaar in op de Bluetooth modus.
2. Houdt u de Fn + 7 3 seconden ingedrukt tot de RGB-
indicator op uw gamingtoetsenbord blauw beginnen
te knipperen. Zodra uw gamemuis is gekoppeld, licht
de RGB-indicator op uw gamingtoetsenbord blauw op
gedurende 3 seconden.
Instellen als een draadloos toetsenbord
1. Verwijder de omni-ontvanger uit het toetsenbord en
sluit de omni-ontvanger aan op een USB-poort op de pc.
2. Stel de verbindingsschakelaar op het toetsenbord op RF
2.4GHz.
* De Omni-ontvanger kan worden verbonden met
meerdere apparaten via de Armoury Crate-software.
HU
ES
Első lépések
1. Csatlakoztassa billentyűzetét a PC-hez a mellékelt
Type-C®-kábellel.
2. Töltse le és telepítse az Armoury Crate szoftvert a
következő weboldalról https://rog.asus.com.
3. Frissítse a billentyűzet firmware-ét a szoftver
útmutatása szerint.
4. Testreszabhatja a billentyűzetet az Armoury Crate
segítségével.
A Bluetooth funkció első beállítása
Állítsa át a csatlakozási kapcsolót az Bluetooth-es üzemmódra.
Bluetooth-módban történő párosítás további
gazdaeszközökkel
1. Állítsa át a csatlakozási kapcsolót az Bluetooth-es
üzemmódra.
2. Tartsa megnyomva a FN + 7 3 másodpercig, amíg az RGB
jelzőfény a játékbillentyűzeten kék színnel fognak villogni.
Miután a játszóegér párosítása sikeresen megtörtént, a
játékbillentyűzet lévő RGB-jelzőfény 3 másodpercig kék
színnel fog világítani.
Beállítás vezeték nélküli billentyűzetként
1. Távolítsa el a Omni vevőegység a billentyűzetből
és helyezze be a Omni vevőegység a PC egyik USB
portjába.
2. Állítsa a billentyűzet kapcsolóját RF 2,4 GHz-re.
* Az Omni vevőegység több eszközhöz is csatlakoztatható
az Armoury Crate szoftveren keresztül.
Procedimientos iniciales
1. Conecte el teclado a un equipo mediante el cable
Type-C® incluido.
2. Descargue e instale el software Armoury Crate desde
https://rog.asus.com.
3. Siga las instrucciones de software para actualizar el
firmware del teclado.
4. Personalice el teclado mediante Armoury Crate.
Configuración de Bluetooth por primera vez
Establezca el conmutador de conexión en el modo de
Bluetooth.
Asociar el modo Bluetooth a dispositivos host
adicionales
1. Establezca el conmutador de conexión en el modo de
Bluetooth.
2. Presione sin FN + 7 de asociación durante 3 segundos
hasta el indicador RGB del teclado para juegos comiencen
a parpadear en azul. Una vez que el teclado para juegos se
haya asociado correctamente, el indicador RGB de dicho
ratón se iluminará en verde durante 3 segundos.
Configurar como un teclado inalámbrico
1. Quite la Omnirreceptor del teclado y inserte la
Omnirreceptor a un puerto USB de su PC.
2. Establezca el interruptor de conexión en el teclado
en RF 2,4 GHz.
* El omnirreceptor se puede conectar a varios
dispositivos mediante el software Armory Crate.
TR
SV
UA
Başlarken
1. Klavyenizi birlikte verilen Type-C® kablosuyla bir
bilgisayara bağlayın.
2. Aşağıdaki link üzerinden Armoury Crate yazılımını
indirin ve yükleyin: AC Link.com.
3. Klavyenizin aygıt yazılımını güncellemek için yazılım
yönergelerini izleyin.
4. Armoury Crate yazılımını kullanarak klavyenizi
özelleştirin.
Bluetooth'u ilk kez kurma
Bağlantı anahtarını Bluetooth moduna ayarlayın.
Bluetooth modunu ek ana aygıtlarla
eşleştirme
1. Bağlantı anahtarını Bluetooth moduna ayarlayın.
2. FN + 7, oyun klavyenizdeki RGB’ler mavi renkte yanıp
sönene dek 3 saniye basılı tutun. Oyuncu fareniz başarıyla
eşleştirildikten sonra, oyun klavyenizin üzerindeki RGB
göstergesi, 3 saniye kadar mavi renkte yanacaktır.
Kablosuz klavye olarak kurma
1. Omni alıcı klavyeden çıkarın ve Omni alıcı
bilgisayardaki bir USB bağlantı noktasına takın.
2. Klavyedeki bağlantı anahtarını RF 2,4 GHz olarak
ayarlayın.
* Omni alıcı, Armory Crate yazılımı aracılığıyla birden
fazla aygıta bağlanabilir.
Komma igång
1. Anslut tangentbordet till en dator med den
medföljande Type-C®-kabeln.
2. Hämta och installera Armoury Crate-programvaran från
https://rog.asus.com.
3. Följ programvaruinstruktionerna för att uppdatera
tangentbordets inbyggda programvara.
4. Anpassa tangentbordet med Armoury Crate.
Konfigurera Bluetooth för första gången
Ställ in kopplingsbrytaren på Bluetooth.
Länka Bluetooth-läge för fler värdenheter
1. Ställ in kopplingsbrytaren på Bluetooth.
2. Tryck och håll FN+7 i 3 sekunder tills RGB-indikatorn på
speltangentbordet börja blinka blå. När spelmusen har
länkats kommer RGB- indikatorn på speltangentbordet att
lysa blå i 3 sekunder.
Installera som ett trådlöst
tangentbord
1. Ta bort Omni-mottagare från tangentbordet och sätt i
Omni-mottagare i en USB-port på datorn.
2. Ställ in tangentbordets kopplingsbrytare på RF 2,4 GHz.
* Omni-mottagaren anslutas till flera enheter genom
Armoury Crate-programvaran kan.
Початок роботи
1. Підключіть клавіатуру до ПК поєднаним у пару
кабелем Type-C®.
2. Завантажте і встановіть ПЗ Armoury Crate з
https://rog.asus.com.
3. Виконуйте інструкцію до ПЗ, щоб оновити
мікропрограму клавіатури.
4. Налаштуйте клавіатуру за допомогою Armoury Crate.
Налаштування Bluetooth вперше
Встановіть перемикач підключення на бездротовий режим
Bluetooth.
Поєднання в пару в режимі Bluetooth з
додатковими пристроями-хостами
1. Встановіть перемикач підключення на бездротовий
режим Bluetooth.
2. Натисніть і утримуйте FN+7 в пари 3 секунди, доки
індикатор RGB на ігровій клавіатурі почнуть мерехтіти
блакитним. Щойно ігрову клавіатурі буде успішно
поєднано в пару, індикатор RGB на ігровій клавіатурі
засвітиться блакитним на 3 секунди.
Налаштування бездротової
клавіатури
1. Вийміть з клавіатури Приймач Omni Вставте і
Приймач Omni до порту USB на ПК.
2. Перемикач підключення на клавіатурі встановіть на
частоту 2,4 ГГц.
* Приймач Omni можна підключити до багатьох
пристроїв через ПЗ Armoury Crate.
NO
Komme i gang
1. Koble tastaturet til en PC med den medfølgende
Type-C®-kabelen.
2. Last ned og installer Armoury Crate-programvaren
fra https://rog.asus.com.
3. Følg bruksanvisningen i programvaren for å
oppdatere fastvaren til tastaturet.
4. Tilpass tastaturet ved hjelp av Armoury Crate.
Sette opp Bluetooth for første gang
Sett tilkoblingsbryteren til Bluetooth modus.
Pare Bluetooth-modus til flere vertsenheter
1. Sett tilkoblingsbryteren til Bluetooth modus.
2. Holder du inne FN + 7 i 3 sekunder til RGB-indikatoren på
spilltastaturet begynner å blinke blått. Når spillmusen har
blitt paret, lyser RGB-indikatoren på spilltastatur blått i 3
sekunder.
Sette opp som et trådløst tastatur
1. Ta ut Omni-mottaker fra tastaturet og sett Omni-
mottaker inn i en USB-port på PC-en.
2. Sett tilkoblingsbryteren på tastaturet til RF 2,4 GHz.
* Omni-mottakeren kan kobles til flere enheter
gjennom Armoury Crate-programvaren.
FR
IT
Prise en main
1. Connectez votre clavier à un ordinateur avec le câble
Type-C® fourni.
2. Téléchargez et installez le logiciel Armoury Crate en
vous rendant sur https://rog.asus.com.
3. Suivez les instructions du logiciel pour mettre à jour
le firmware de votre clavier.
4. Personnalisez votre clavier avec Armoury.
Configurer le Bluetooth pour la première fois
Basculez le sélecteur de connexion en mode Bluetooth.
Appairage d'appareils supplémentaires en
mode Bluetooth
1. Basculez le sélecteur de connexion en mode Bluetooth.
2. Appuyez sur Fn + 7 pendant 3 secondes, jusqu'à ce que
le voyant lumineux de votre clavier gaming commence à
clignoter en bleu. Une fois votre clavier appairé, le voyant
lumineux de votre clavier gaming s'allume en bleu pendant 3
secondes.
Configurer en tant que clavier sans fil
1. Retirez le récepteur Omni du clavier et insérez-le
dans un port USB de l'ordinateur.
2. Réglez le sélecteur de connexion du clavier sur RF
2,4GHz.
* Le récepteur Omni peut être connecté à plusieurs
appareils via le logiciel Armoury Crate.
Per iniziare
1. Collega la tastiera a un PC con il cavo Type-C® in
dotazione.
2. Scaricate e installate il software Armoury Crate dal sito
https://rog.asus.com.
3. Seguire le istruzioni del software per aggiornare il
firmware della tastiera.
4. Usate Armory Crate per personalizzare la vostra tastiera.
Configurazione del Bluetooth per la
prima volta
Impostate il selettore modalità di connessione sulla modalità
Bluetooth.
Associazione della modalità Bluetooth a
dispositivi host aggiuntivi
1. Impostate il selettore modalità di connessione sulla
modalità Bluetooth.
2. Premete e tenete premuto il FN + 7 per 3 secondi, finché
l’indicatore RGB sulla tastiera da gioco lampeggeranno di
colore blu. Ad associazione avvenuta il RGB del tastiera da
gioco si accende di una luce blu fissa per 3 secondi.
Configurazione come tastiera wireless
1. Rimuovere il Ricevitore Omni dalla tastiera e inserire
il Ricevitore Omni in una porta USB del PC.
2. Impostare l'interruttore di connessione sulla tastiera
su RF 2,4 GHz.
* Il ricevitore Omni può essere connesso a più
dispositivi tramite il software Armoury Crate.
RU
ZH
ZH:SC
開始使用
1. 使用隨附的 Type-C® 線將鍵盤連接至電腦。
2. 請至 https://rog.asus.com 下載並安裝 Armoury
Crate 軟體。
3. 依照軟體說明更新鍵盤韌體。
4. 透過 Armoury Crate 自訂您的鍵盤。
首次設定藍牙模式
將連線模式切換至藍牙模式。
藍牙模式下與其他主機裝置配對
1. 將連線模式切換至藍牙模式。
2. 長按 FN + 7 按鍵 3 秒直至電競鍵盤上的 RGB 指
示燈變為藍色閃爍。電競鍵盤配對成功後,RGB
指示燈將會亮藍色 3 秒。
設定為無線鍵盤
1. 取下鍵盤上的 Omni 接收器並將接收器插入電
腦的 USB 連接埠。
2. 將鍵盤上的連線模式切換為 RF 2.4Ghz 模式。
* 可以透過 Armoury Crate 將 Omni 接收器連線至多
個裝置。
開始使用
1. 使用隨附的 Type-C® 線將鍵盤連接至電腦。
2. 請至 https://rog.asus.com.cn/ 下載並安裝
Armoury Crate 軟件。
3. 按照軟件說明更新鍵盤固件。
4. 使用 Armoury Crate 個性化您的鍵盤。
首次設定藍牙模式
將連接模式切換至藍牙模式。
藍牙模式下與其他主機設備配對
1. 將連接模式切換至藍牙模式。
2. 長按【FN + 7】按鍵 3 秒直至電競鍵盤上的
RGB 指示燈變為藍色閃爍。電競鍵盤配對成功
後,RGB 指示燈將會亮藍色 3 秒。
設置為無線鍵盤
1. 取下鍵盤上的 Omni 接收器並將接收器插入電
腦的 USB 接口。
2. 將鍵盤上的連接模式切換為 RF 2.4Ghz 模式。
* 可以通過 Armoury Crate 將 Omni 接收器連接至多
個設備。
Начало работы
1. Подключите клавиатуру к компьютеру с помощью
прилагаемого кабеля Type-C.
2. Скачайте и установите программное обеспечение
Armoury Crate с https://rog.asus.com.
3. Следуйте инструкциям для обновления прошивки
клавиатуры.
4. Настройте клавиатуру с помощью Armoury Crate.
Настройка Bluetooth в первый раз
Установите переключатель подключения в режим
Bluetooth.
Сопряжение в режиме Bluetooth с
дополнительными хостами
1. Установите переключатель подключения в режим
Bluetooth.
2. Нажмите и удерживайте FN + 7 в течение 3 секунд,
пока индикатор RGB на игровой клавиатуре не начнет
мигать синим цветом. После успешного сопряжения
индикатор RGB на клавиатуре загорится синим цветом на
3 секунды.
Настройка в качестве
беспроводной клавиатуры
1. Извлеките приемник Omni из клавиатуры и
подключите его к разъему USB компьютера.
2. Установите переключатель подключения в режим
RF 2,4 ГГц.
* Приемник Omni может быть подключен к
нескольким устройствам с помощью программного
обеспечения Armoury Crate.

HB
KR
單元 限用物質及其化學符號
鉛 (Pb) 汞 (Hg) 鎘 (Cd) 六價鉻
(Cr+6)
多溴聯苯
(PBB)
多溴二苯醚
(PBDE)
印刷電路板及電子組件 -○ ○ ○ ○ ○
外殼 ○ ○ ○ ○ ○ ○
按鍵 ○ ○ ○ ○ ○ ○
其他及其配件 ○ ○ ○ ○ ○ ○
備考1. “O”係指該項限用物質之百分比含量未超出百分比含量基準值。
備考2. “-”係指該項限用物質為排除項目。
「產品之限用物質含有情況」之相關資訊,請參考下表:
Официальное представительство в России
Горячая линия Службы технической поддержки в России:
Бесплатный федеральный номер для звонков по России: 8-800-100-2787
Номер для пользователей в Москве: +7(495)231-1999
Время работы: Пн-Пт, 09:00 - 21:00 (по московскому времени)
Официальные сайты ASUS в России:
www.asus.ru
www.asus.com/ru/support
Данное устройство соответствует требованиям Технического регламента Таможенного Союза
ТР ТС 020/2011 Электромагнитная совместимость технических средств утв. решением КТС от
09.12.2011г. №879
KC: Korea Warning Statement
Ukraine Certification Logo EAC Certification Logo
Safety Guidelines
Keep the device away from liquid, humidity, or moisture. Operate the device only within the specific temperature range of
0°C (32°F) to 40°C (104°F). When the device exceeds the maximum temperature, unplug or switch off the device to let it cool
down.
安全說明
- 此滑鼠只應在溫度不高於 40°C(104°F)的環境下使用。
- 安裝錯誤型號的電池可能會導致爆炸。
Notices
Limitation of Liability
Circumstances may arise where because of a default on ASUS’ part or other liability, you are entitled to recover damages from
ASUS. In each such instance, regardless of the basis on which you are entitled to claim damages from ASUS, ASUS is liable for
no more than damages for bodily injury (including death) and damage to real property and tangible personal property; or any
other actual and direct damages resulted from omission or failure of performing legal duties under this Warranty Statement,
up to the listed contract price of each product.
ASUS will only be responsible for or indemnify you for loss, damages or claims based in contract, tort or infringement under
this Warranty Statement.
This limit also applies to ASUS’ suppliers and its reseller. It is the maximum for which ASUS, its suppliers, and your reseller are
collectively responsible.
UNDER NO CIRCUMSTANCES IS ASUS LIABLE FOR ANY OF THE FOLLOWING: (1) THIRD-PARTY CLAIMS AGAINST YOU FOR
DAMAGES; (2) LOSS OF, OR DAMAGE TO, YOUR RECORDS OR DATA; OR (3) SPECIAL, INCIDENTAL, OR INDIRECT DAMAGES OR
FOR ANY ECONOMIC CONSEQUENTIAL DAMAGES (INCLUDING LOST PROFITS OR SAVINGS), EVEN IF ASUS, ITS SUPPLIERS OR
YOUR RESELLER IS INFORMED OF THEIR POSSIBILITY.
Federal Communications Commission Statement
This device complies with Part 15 of the FCC Rules. Operation is subject to the following two conditions:
• This device may not cause harmful interference.
• This device must accept any interference received including interference that may cause undesired operation.
This equipment has been tested and found to comply with the limits for a Class B digital device, pursuant to Part 15 of the FCC
Rules. These limits are designed to provide reasonable protection against harmful interference in a residential installation.
This equipment generates, uses and can radiate radio frequency energy and, if not installed and used in accordance with
manufacturer’s instructions, may cause harmful interference to radio communications. However, there is no guarantee that
interference will not occur in a particular installation. If this equipment does cause harmful interference to radio or television
reception, which can be determined by turning the equipment off and on, the user is encouraged to try to correct the
interference by one or more of the following measures:
• Reorient or relocate the receiving antenna.
• Increase the separation between the equipment and receiver.
• Connect the equipment to an outlet on a circuit different from that to which the receiver is connected.
• Consult the dealer or an experienced radio/TV technician for help.
CAUTION! The use of shielded cables for connection of the monitor to the graphics card is required to assure
compliance with FCC regulations. Changes or modifications to this unit not expressly approved by the party
responsible for compliance could void the user’s authority to operate this equipment.
REACH
Complying with the REACH (Registration, Evaluation, Authorisation, and Restriction of Chemicals) regulatory framework, we
published the chemical substances in our products at ASUS REACH website at http://csr.asus.com/english/REACH.htm.
ASUS Recycling/Takeback Services
ASUS recycling and takeback programs come from our commitment to the highest standards for protecting our environment.
We believe in providing solutions for you to be able to responsibly recycle our products, batteries, other components as
well as the packaging materials. Please go to http://csr.asus.com/english/Takeback.htm for detailed recycling information in
different regions.
Compliance Statement of Innovation, Science and Economic Development Canada (ISED)
This device complies with Innovation, Science and Economic Development Canada licence exempt RSS standard(s). Operation
is subject to the following two conditions: (1) this device may not cause interference, and (2) this device must accept any
interference, including interference that may cause undesired operation of the device.
CAN ICES-003(B)/NMB-003(B)
Déclaration de conformité de Innovation, Sciences et Développement économique Canada (ISED)
Le présent appareil est conforme aux CNR d’Innovation, Sciences et Développement économique Canada applicables aux
appareils radio exempts de licence. L’exploitation est autorisée aux deux conditions suivantes : (1) l’appareil ne doit pas produire
de brouillage, et (2) l’utilisateur de l’appareil doit accepter tout brouillage radioélectrique subi, même si le brouillage est
susceptible d’en compromettre le fonctionnement.
CAN ICES-003(B)/NMB-003(B)
Proper disposal
DO NOT throw the device in municipal waste. This product has been designed to enable proper reuse of parts
and recycling. The symbol of the crossed out wheeled bin indicates that the product (electrical, electronic
equipment and mercury-containing button cell battery) should not be placed in municipal waste. Check local
regulations for disposal of electronic products.
DO NOT throw the device in fire. DO NOT short circuit the contacts.
DO NOT disassemble the device.
Lithium-Ion Battery Warning
CAUTION: Danger of explosion if battery is incorrectly replaced. Replace only with the same or equivalent type
recommended by the manufacturer. Dispose of used batteries according to the manufacturer’s instructions.
NCC: Wireless Statement
取得審驗證明之低功率射頻器材,非經核准,公司、商號或使用者均不得擅自變更頻率、加大功率或變更原設計之特性
及功能。低功率射頻器材之使用不得影響飛航安全及干擾合法通信;經發現有干擾現象時,應立即停用,並改善至無干
擾時方得繼續使用。前述合法通信,指依電信管理法規定作業之無線電通信。低功率射頻器材須忍受合法通信或工業、
科學及醫療用電波輻射性電機設備之干擾。
警告 VCCI準拠クラスB機器(日本)
この装置は、情報処理装置等電波障害自主規制協議会(VCCI)の基準に基づくクラスB情報技術装置です。この装置は、家
庭環境で使用することを目的としていますが、この装置がラジオやテレビジョン受信機に近接しaて使用されると、受信障
害を引き起こすことがあります。
取扱説明書に従って正しい取り扱いをして下さい。
VCCI: Japan Compliance Statement
VCCI Class B Statement
CE Mark Warning
English ASUSTeK Computer Inc. hereby declares that this device is in compliance with the essential requirements and other
relevant provisions of related Directives. Full text of EU declaration of conformity is available at: www.asus.com/support
Français AsusTek Computer Inc. déclare par la présente que cet appareil est conforme aux critères essentiels et autres clauses
pertinentes des directives concernées. La déclaration de conformité de l’UE peut être téléchargée à partir du site Internet
suivant : www.asus.com/support.
Radio Frequency (RF) Exposure Information
The radiated output power of the Wireless Device is below the Innovation, Science and Economic Development Canada (ISED)
radio frequency exposure limits. The Wireless Device should be used in such a manner such that the potential for human
contact during normal operation is minimized.
This device has also been evaluated and shown compliant with the ISED RF Exposure limits under portable exposure
conditions. (antennas are less than 20 cm of a person's body).
RF exposure warning
The equipment complies with FCC RF exposure limits set forth for an uncontrolled environment.
The equipment must not be co-located or operating in conjunction with any other antenna or transmitter.
Informations concernant l'exposition aux fréquences radio (RF)
La puissance de sortie rayonnée du dispositif sans fil est inférieure aux limites d'exposition aux radiofréquences d'Innovation,
Sciences et Développement économique Canada (ISED). Le dispositif sans fil doit être utilisé de manière à minimiser le
potentiel de contact humain pendant le fonctionnement normal.
Cet appareil a également été évalué et montré conforme aux limites d'exposition RF ISED dans des conditions d'exposition
portable. (les antennes mesurent moins de 20 cm du corps d'une personne).
Précautions d’emploi de l’appareil :
a. Soyez particulièrement vigilant quant à votre sécurité lors de l’utilisation de cet appareil dans certains lieux (les
aéroports, les hôpitaux, les stations-service et les garages professionnels).
b. Évitez d’utiliser cet appareil à proximité de dispositifs médicaux implantés lors d’un appel téléphonique. Si
vous portez un implant électronique (stimulateurs cardiaques, pompes à insuline, neurostimulateurs…),
veuillez impérativement respecter une distance minimale de 15 centimètres entre cet appareil et l’implant
pour réduire les risques d’interférence.
c. Utilisez cet appareil dans de bonnes conditions de réception pour minimiser le niveau de rayonnement.
Ce n’est pas toujours le cas dans certaines zones ou situations, notamment les parkings souterrains, les
ascenseurs, en train ou en voiture ou tout simplement dans un secteur mal couvert par le réseau.
d. Tenez cet appareil à distance du ventre des femmes enceintes et du bas-ventre des adolescents.
UKCA RF Output table (The Radio Equipment Regulations 2017)
Function Frequency Maximum Output Power (EIRP)
2.4GHz wireless (2403 - 2480MHz) - Keyboard 5dBm
(2403 - 2480MHz) - Dongle 4dBm
BLE (2403 - 2480MHz) - Keyboard 5dBm
KC RF Output table
Function Frequency Maximum Output Power (EIRP)
2.4GHz wireless
(2403 - 2480MHz) - Keyboard
특정소출력 무선기기 (무선데이터통신시스템용 무선기기) 4mW
(2403 - 2480MHz) - Dongle
특정소출력 무선기기 (무선데이터통신시스템용 무선기기) 5mW
BLE (2403 - 2480MHz) - Keyboard
특정소출력 무선기기(무선데이터통신시스템용 무선기기) 4mW
CE RED RF Output table (Directive 2014/53/EU)
Function Frequency Maximum Output Power (EIRP)
2.4GHz wireless (2403 - 2480MHz) - Keyboard 5dBm
(2403 - 2480 MHz) - Dongle 4dBm
BLE (2403 - 2480MHz) - Keyboard 5dBm
Simplified UKCA Declaration of Conformity
ASUSTek Computer Inc. hereby declares that this device is in compliance with the essential requirements and other relevant
provisions of The Radio Equipment Regulations 2017 (S.I. 2017/1206). Full text of UKCA declaration of conformity is available
at https://www.asus.com/support/.
Service and Support
Visit our multi-language website at https://www.asus.com/support/.
Manufacturer ASUSTek COMPUTER INC.
Address, City 1F., No. 15, Lide Rd., Beitou Dist., Taipei City 112
Authorized Representative in
Europe
ASUS COMPUTER GmbH
Address Harkortstrasse 21-23, 40880 Ratingen
Country Germany
Authorized Representative in
United Kingdom
ASUSTEK (UK) LIMITED
Address 1st Floor, Sackville House, 143-149 Fenchurch Street, London,
EC3M 6BL, England
Country United Kingdom
付属品は当該専用品です。他の機器には使用しないでください。機器の破損もしくは、火災や感電の原因となることがあります。
部件名稱 有害物質
鉛 (Pb) 汞 (Hg) 鎘(Cd) 六價鉻
(Cr (VI))
多溴聯苯
(PBB)
多溴二苯醚
(PBDE)
印刷電路板及其電子組件 ×○ ○ ○ ○ ○
外壳 ○ ○ ○ ○ ○ ○
外部信號連接頭及線材 ○ ○ ○ ○ ○ ○
其它 ×○ ○ ○ ○ ○
本表格依據 SJ/T 11364 的規定編制。
○: 表示該有害物質在該部件所有均質材料中的含量均在 GB/T 26572 規定的限量要求以下。
×: 表示該有害物質至少在該部件的某一均質材料中的含量超出 GB/T 26572 規定的限量要求,然該部件仍符合歐盟指令
2011/65/EU 的規范。
備註:此產品所標示之環保使用期限,係指在一般正常使用狀況下。
電子電氣產品有害物質限制使用標識:圖中之數字為產品之環保使用期限。僅指電子電氣
產品中含有的有害物質不致發生外洩或突變,從而對環境造成污染或對人身、財產造成嚴
重損害的期限。
Regional notice for Singapore
This ASUS product complies with IMDA Standards.
Complies with
IMDA Standards
DB103778
France sorting and recycling information
Points de collecte sur www.quefairedemesdechets.fr
Privilégiez la répara�on ou le don de votre appareil !
À DÉPOSER
EN MAGASIN À DÉPOSER
EN DÉCHÈTERIE
OU
Cet appareil
se recycle
FR
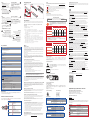
Modes
Media Control
: Volume up
: Volume down
: Mute/Unmute
Media Content
: Previous track
: Next track
: Play/Pause
Brightness adjustment
: Brightness up
: Brightness down
: Brightness 100% / Brightness 0%
Customization
(Reassignment in
Armoury Crate)
: Scroll up (default, can be reassigned)
: Scroll down (default, can be reassigned)
: Scroll click (default, can be reassigned)
Multiwheel and Switch function button
Press the switch function button ( ) to rotate between modes. You can then use the Multiwheel to
adjust the settings for each function ( ).
Key combinations
On-the-fly Macro Recording
Step 1: Fn + Left-ALT to start recording
Step 2: Enter the keys to be recorded as a macro
Step 3: Fn + Left-ALT to end recording
Step 4: Assign Macro Key
Profile Switch
Fn + 1 / 2 / 3 / 4 / 5 / 6*
* 6 is default
Light Effect Switch
Fn + Right or Fn + Left
Brightness Level
Fn + Up: Brightness up
Fn + Down: Brightness down
Factory Default
Fn + Esc: Hold these two buttons until the LEDs blink green.
BLE host switch
Host 1 (default): Fn + 8
Host 2: Fn + 9
Host 3: Fn + 0
Function Keys
Fn + Ins: Scroll Lock Fn + Del: Pause
Fn + PgUp: Home Fn + P: Print screen
Fn + PgDn: End Fn + R-Ctrl: Menu
F - Switch
Fn + =: Toggle between function keys or F1-F12 (default)
Function keys:
F1: (Win + G) Open the Game Bar
F2: (Win + Alt + PrintScreen) Take a screenshot of your game
F3: (Win + Alt + G) Record the last 30 seconds
F4: (Win + Alt + R) Start or stop recording
F5: (Win + Alt + M) Start or stop microphone recording
F6: Play/Pause F10: Volume down
F7: Previous track F11: Volume up
F8: Next track F12: Stealth key
F9: Mute
本产品为微功率设备,消费者使用时应遵守以下规范,以免造成危害或损伤。
(一) 本产品2.4G微功率模式使用频率为:2400-2483.5MHz,发射功率限值: 10mW(e.i.r.p) ,频率容限:75kGHz搭载
2.4GHz无线技术,透过USB Dongle配对连接PC,提供低延迟音讯传输,符合“微功率短距离无线电发射设
备目录和技术要求”;
(二) 不得擅自改变使用场景或使用条件、扩大发射频率范围、加大发射功率(包括额外加装射频功率放大器)
,不得擅自更改发射天线;
(三)不得对其他合法的无线电台(站)产生有害干扰,也不得提出免受有害干扰保护;
(四) 应当承受辐射射频能量的工业、科学及医疗(ISM)应用设备的干扰或其他合法的无线电台(站)干扰;
(五) 如对其他合法的无线电台(站)产生有害干扰时,应立即停止使用,并采取措施消除干扰后方可继续使
用;
(六) 在航空器内和依据法律法规、国家有关规定、标准划设的射电天文台、气象雷达站、卫星地球站(含测
控、测距、接收、导航站)等军民用无线电台(站)、机场等的电磁环境保护区域内使用微功率设备,应
当遵守电磁环境保护及相关行业主管部门的规定;
(七) 禁止在以机场跑道中心点为圆心、半径5000米的区域内使用各类模型遥控器;
(八)本产品使用时工作温度为0 ~ 45度,工作电压3.4-4.2V。
Battery status
The battery status can be checked at any time by pressing and holding FN + -. When the battery
status is below 20% the keys will light up red.
Deutsch ASUSTeK Computer Inc. erklärt hiermit, dass dieses Gerät mit den wesentlichen Anforderungen und anderen
relevanten Bestimmungen der zugehörigen Richtlinien übereinstimmt. Der gesamte Text der EU-Konformitätserklärung ist
verfügbar unter: www.asus.com/support
Italiano ASUSTeK Computer Inc. con la presente dichiara che questo dispositivo è conforme ai requisiti essenziali e alle
altre disposizioni pertinenti con le direttive correlate. Il testo completo della dichiarazione di conformità UE è disponibile
all’indirizzo: www.asus.com/support
Русский Компания ASUS заявляет, что это устройство соответствует основным требованиям и другим
соответствующим условиям соответствующих директив. Подробную информацию, пожалуйста, смотрите на
www.asus.com/support
Български С настоящото ASUSTeK Computer Inc. декларира, че това устройство е в съответствие със съществените
изисквания и другите приложими постановления на свързаните директиви. Пълният текст на декларацията за
съответствие на ЕС е достъпна на адрес: www.asus.com/support
Hrvatski ASUSTeK Computer Inc. ovim izjavljuje da je ovaj uređaj sukladan s bitnim zahtjevima i ostalim odgovarajućim
odredbama vezanih direktiva. Cijeli tekst EU izjave o sukladnosti dostupan je na: www.asus.com/support
Čeština Společnost ASUSTeK Computer Inc. tímto prohlašuje, že toto zařízení splňuje základní požadavky a další příslušná
ustanovení souvisejících směrnic. Plné znění prohlášení o shodě EU je k dispozici na adrese: www.asus.com/support
Dansk ASUSTeK Computer Inc. erklærer hermed, at denne enhed er i overensstemmelse med hovedkravene og andre
relevante bestemmelser i de relaterede direktiver. Hele EU-overensstemmelseserklæringen kan findes på:
www.asus.com/support
Nederlands ASUSTeK Computer Inc. verklaart hierbij dat dit apparaat voldoet aan de essentiële vereisten en andere
relevante bepalingen van de verwante richtlijnen. De volledige tekst van de EU-verklaring van conformiteit is beschikbaar op:
www.asus.com/support
Eesti Käesolevaga kinnitab ASUSTeK Computer Inc, et see seade vastab asjakohaste direktiivide oluliste nõuetele ja teistele
asjassepuutuvatele sätetele. EL vastavusdeklaratsiooni täielik tekst on saadaval järgmisel aadressil: www.asus.com/support
Suomi ASUSTeK Computer Inc. ilmoittaa täten, että tämä laite on asiaankuuluvien direktiivien olennaisten vaatimusten ja
muiden tätä koskevien säädösten mukainen. EU-yhdenmukaisuusilmoituksen koko teksti on luettavissa osoitteessa:
www.asus.com/support
Ελληνικά Με το παρόν, η AsusTek Computer Inc. δηλώνει ότι αυτή η συσκευή συμμορφώνεται με τις θεμελιώδεις απαιτήσεις
και άλλες σχετικές διατάξεις των Οδηγιών της ΕΕ. Το πλήρες κείμενο της δήλωσης συμβατότητας είναι διαθέσιμο στη
διεύθυνση: www.asus.com/support
Magyar Az ASUSTeK Computer Inc. ezennel kijelenti, hogy ez az eszköz megfelel a kapcsolódó Irányelvek lényeges
követelményeinek és egyéb vonatkozó rendelkezéseinek. Az EU megfelelőségi nyilatkozat teljes szövege innen letölthető:
www.asus.com/support
Latviski ASUSTeK Computer Inc. ar šo paziņo, ka šī ierīce atbilst saistīto Direktīvu būtiskajām prasībām un citiem citiem
saistošajiem nosacījumiem. Pilns ES atbilstības paziņojuma teksts pieejams šeit: www.asus.com/support
Lietuvių „ASUSTeK Computer Inc.“ šiuo tvirtina, kad šis įrenginys atitinka pagrindinius reikalavimus ir kitas svarbias susijusių
direktyvų nuostatas. Visą ES atitikties deklaracijos tekstą galima rasti: www.asus.com/support
Norsk ASUSTeK Computer Inc. erklærer herved at denne enheten er i samsvar med hovedsaklige krav og andre relevante
forskrifter i relaterte direktiver. Fullstendig tekst for EU-samsvarserklæringen finnes på: www.asus.com/support
Polski Firma ASUSTeK Computer Inc. niniejszym oświadcza, że urządzenie to jest zgodne z zasadniczymi wymogami i innymi
właściwymi postanowieniami powiązanych dyrektyw. Pełny tekst deklaracji zgodności UE jest dostępny pod adresem:
www.asus.com/support
Português A ASUSTeK Computer Inc. declara que este dispositivo está em conformidade com os requisitos essenciais e
outras disposições relevantes das Diretivas relacionadas. Texto integral da declaração da UE disponível em:
www.asus.com/support
Română ASUSTeK Computer Inc. declară că acest dispozitiv se conformează cerinţelor esenţiale şi altor prevederi relevante
ale directivelor conexe. Textul complet al declaraţiei de conformitate a Uniunii Europene se găseşte la: www.asus.com/
support
Srpski ASUSTeK Computer Inc. ovim izjavljuje da je ovaj uređaj u saglasnosti sa osnovnim zahtevima i drugim relevantnim
odredbama povezanih Direktiva. Pun tekst EU deklaracije o usaglašenosti je dostupan da adresi: www.asus.com/support
Slovensky Spoločnosť ASUSTeK Computer Inc. týmto vyhlasuje, že toto zariadenie vyhovuje základným požiadavkám a
ostatým príslušným ustanoveniam príslušných smerníc. Celý text vyhlásenia o zhode pre štáty EÚ je dostupný na adrese:
www.asus.com/support
Slovenščina ASUSTeK Computer Inc. izjavlja, da je ta naprava skladna z bistvenimi zahtevami in drugimi ustreznimi
določbami povezanih direktiv. Celotno besedilo EU-izjave o skladnosti je na voljo na spletnem mestu: www.asus.com/support
Español Por la presente, ASUSTeK Computer Inc. declara que este dispositivo cumple los requisitos básicos y otras
disposiciones pertinentes de las directivas relacionadas. El texto completo de la declaración de la UE de conformidad está
disponible en: www.asus.com/support
Svenska ASUSTeK Computer Inc. förklarar härmed att denna enhet överensstämmer med de grundläggande kraven och
andra relevanta föreskrifter i relaterade direktiv. Fulltext av EU-försäkran om överensstämmelse finns på:
www.asus.com/support
Українська ASUSTeK Computer Inc. заявляє, що цей пристрій відповідає основним вимогам та іншим відповідним
положенням відповідних Директив. Повний текст декларації відповідності стандартам ЄС доступний на:
www.asus.com/support
Türkçe AsusTek Computer Inc., bu aygıtın temel gereksinimlerle ve ilişkili Yönergelerin diğer ilgili koşullarıyla uyumlu
olduğunu beyan eder. AB uygunluk bildiriminin tam metni şu adreste bulunabilir: www.asus.com/support
Bosanski ASUSTeK Computer Inc. ovim izjavljuje da je ovaj uređaj usklađen sa bitnim zahtjevima i ostalim odgovarajućim
odredbama vezanih direktiva. Cijeli tekst EU izjave o usklađenosti dostupan je na: www.asus.com/support
ASUSTek Computer Inc.
www.asus.com/support
Type-C
®
1
Armoury Crate 2
.https://rog.asus.com
3
.Armoury Crate 4
Bluetooth
.Bluetooth
Bluetooth
.Bluetooth 1
3FN + 7 2
RGB
3RGB
Omni 1
USBOmni
.RF 2.4GHz 2
Omni
.Armory Crate
시작하기
1. 제품과 함께 제공된 Type-C
®
케이블을 사용하여
키보드와 PC를 연결합니다.
2. https://rog.asus.com 에서 Armoury Crate
소프트웨어를 다운로드하여 설치합니다.
3. 소프트웨어 지침에 따라 키보드의 펌웨어를
업데이트합니다.
4. Armoury Crate를 사용하여 키보드를 사용자
지정합니다.
블루투스를 처음 설정하기
연결 스위치를 블루투스 무선 모드로 설정합니다.
추가적인 호스트 장치에 대한 블루투스
페어링 모드
1. 연결 스위치를 블루투스 무선 모드로 설정합니다.
2. 게이밍 키보드의 RGB 표시등이 파란색으로 깜박이기
시작할 때까지 FN + 7을 3초 동안 누르고 게이밍
마우스가 성공적으로 페어링되면 게이밍 키보드 LED
표시등이 3초 동안 파란색으로 켜집니다.
무선 키보드로서 설정하기
1. 키보드에서 전방위 수신기를 제거합니다, 그리고
전방위 수신기를 PC의 USB 포트에 끼웁니다.
2. 키보드의 연결 스위치를 RF 2.4GHz로 설정합니다.
* 전방위 수신기는 Armoury Crate 소프트웨어를
사용하여 여러 대의 장치에 연결할 수 있습니다.
JP
Bluetooth® モードで使用する
接続モードスイッチを Bluetooth® モードに設定します。
2.4GHz ワイヤレス接続で使用する
1. キーボードからUSBレシーバーを取り外します。USBレシ
ーバーをパソコンのUSBポートに接続します。
2. 接続モードスイッチを 2.4GHz ワイヤレスモード に設定し
ま す 。
* OmniレシーバーではArmoury Crateアプリを介して複数のデ
バイスと接 続することができます。
はじめに
1. 付属のUSB Type-C® ケーブルを使用して本製品とパソ
コンを接続します。
2. ASUS ウェブサイトからから Armoury Crate アプリをダ
ウンロードしインストールします。https://rog.asus.com
3. Armoury Crate アプリを起動し、表示される画面の指示
に従いファームウェアを 更 新します。
4. ファームウェアの更新が正常に完了したら、Armoury
Crate アプリで設定をカスタマイズします。
Bluetooth® 接続デバイスを追加する
1. 接続モードスイッチを Bluetooth® モードに設定します。
2. キーボードの <Fn + 7>を同時に3秒間押し続けると
RGB インジケーターが青色に点滅しペアリングモードに
移行します。ペアリングが正常に完了すると、RGB インジ
ケーターが青色に3秒間点灯します。
Swapping the Spacebar
Remove Install
-
 1
1
-
 2
2


Asus ROG Strix Scope II 96 Ghid de inițiere rapidă
- Tip
- Ghid de inițiere rapidă
în alte limbi
Lucrări conexe
-
Asus ROG Strix Scope RX EVA-02 Edition Ghid de inițiere rapidă
-
Asus P707 ROG SPATHA X Wireless Gaming Mouse Manualul utilizatorului
-
Asus ROG Strix Scope II Ghid de inițiere rapidă
-
-
Asus ROG Gladius III Ghid de inițiere rapidă
-
Asus P709 Rog Keris Wireless Aimpoint Wireless Optical Gaming Mouse Manualul utilizatorului
-
-
-
-
Asus Rog Falchion M601 Manualul utilizatorului

