
DOUBLE BENCH GRINDER
Operation and Safety Notes
Translation of original operation manual
DOPPELSCHLEIFMASCHINE
Bedienungs- und Sicherheitshinweise
Originalbetriebsanleitung
DVOSTRUKA BRUSILICA
Upute za posluživanje i za Vašu sigurnost
Prijevod originalnih uputa za uporabu
ΣΥΣΚΕΥΗ ΔΙΠΛΗΣ ΤΡΙΒΗΣ
Υποδείξεις χειρισμού και ασφαλείας
Μετάφραση των αυθεντικών οδηγιών λειτουργίας
MAȘINĂ DUBLĂ DE ȘLEFUIT
Instrucţiuni de utilizare şi de siguranţă
Traducerea instrucţiunilor de utilizare originale
ДВОЙНА ШЛАЙФМАШИНА
Инструкции за обслужване и безопасност
Превод на оригиналното ръководство за експлоатация
7
DOUBLE BENCH GRINDER PDOS 200 A1

Before reading, unfold both pages containing illustrations and familiarise yourself with all functions of the
device.
Rasklopite prije čitanja obije stranice sa slikama i nakon toga se upoznajte sa svim funkcijama uređaja.
Înainte de a citi instrucţiunile, priviţi ambele pagini cu imagini şi familiarizaţi-vă cu toate funcţiile aparatului.
Преди да прочетете отворете двете страници с фигурите и след това се запознайте с всички
функции на уреда.
Πριν ξεκινήσετε την ανάγνωση, ανοίξτε τις δυο σελίδες με τις εικόνες και εξοικειωθείτε με όλες τις
λειτουργίες της συσκευής.
Klappen Sie vor dem Lesen die beiden Seiten mit den Abbildungen aus und machen Sie sich anschließend
mit allen Funktionen des Gerätes vertraut.
GB / CY Operation and Safety Notes Page 5
HR Upute za posluživanje i za Vašu sigurnost Stranica 13
RO Instrucţiuni de utilizare şi de siguranţă Pagina 21
BG Инструкции за обслужване и безопасност страница 29
GR / CY Υποδείξεις χειρισμού και ασφαλείας Σελίδα 39
DE / AT / CH Bedienungs- und Sicherheitshinweise Seite 49

A B
E F
C D
11 10
12
13
1
2
3
5
4
8
9
14
6
7

N
G H
I K
2
2
M
7
L
5
7
14
2 2
33
6 5 6
O
7

5 GB/CY
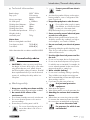
Table of contents
Introduction
Proper use ......................................................................................................................Page 6
Features and equipment ...............................................................................................Page 6
Included items ...............................................................................................................Page 6
Technical information ....................................................................................................Page 7
General safety advice
Working safely ..............................................................................................................Page 7
Safety advice relating specifically to bench grinders .................................................Page 8
Before use
Assembly........................................................................................................................Page 9
Positioning the workpiece / tool rests and eye guard mounts ....................................Page 10
Preparing for first use
Switching on and off .....................................................................................................Page 10
Grinding a workpiece ...................................................................................................Page 10
Replacing a grinding wheel .........................................................................................Page 10
Original accessories / Attachments ..............................................................................Page 11
Maintenance and cleaning .........................................................................Page 11
Service .........................................................................................................................Page 11
Warranty ................................................................................................................... Page 11
Disposal ......................................................................................................................Page 12
Declaration of Conformity / Manufacturer..................................Page 12

6 GB/CY
Introduction
Double bench grinder PDOS 200 A1
For grinding and sharpening metal tools
Introduction
Please make sure you familiarise your-
self fully with the way the device works
before you use it for the first time and
that you understand how to handle electrical power
tools correctly. To help you do this please read the
accompanying operating instructions. Keep these
instructions in a safe place. If you pass the device
on to anyone else, please ensure that you also pass
on all the documentation.
Proper use
The double grinding machine is intended for grind-
ing and sharpening metal tools such as drills, chisels
etc. and metal items. The device is not intended for
commercial use. Any other use or modification to
the device shall be considered as improper use
and could give rise to considerable dangers.
The manufacturer will not accept liability for loss or
damage arising from improper use.
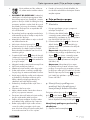
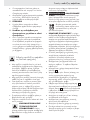
Features and equipment
1
Magnifying glass
2
Eye guard mount
3
Eye guard
4
Grinding wheel
5
Workpiece / tool rest
6
Adjuster screw for workpiece / tool rest
7
Wheel guard cover
8
Mounting holes
9
ON / OFF switch
10
Machine-side flange
11
Left-hand thread
12
Outside flange
13
Nut
14
Fastening screw
Included items
Check that all the items and accessories
are present immediately after unpacking
the device:
1 Double bench grinder PDOS 200 A1 with
- 2 x eye guard mounts / eye guards
- 2 x workpiece / tool rests / adjuster screws
1 Operating instructions
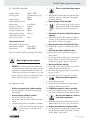
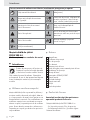
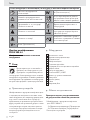
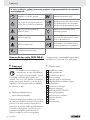
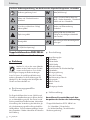
The following pictograms are used in these operating instructions / on the device:
Read instruction manual!
W
Watts (effective power)
Observe caution and safety notes!
Wear hearing protection, dust
protection mask, protective glasses
and protective gloves.
Caution – electric shock!
Danger to life!
Keep children away from electrical
power tools!
Risk of explosion!
Risk of loss of life by electric shock from
damaged mains lead or mains plug!
Risk of fire!
Dispose packaging and appliance in
an environmentally-friendly way!
V
~
Volt (AC)

7 GB/CY
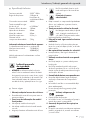
Technical information
Rated voltage: 230 V
~
50 Hz
Duty cycle: S2 short-term
operation 30 min
Nom. power input: 200 W
No load speed: n
0
2950 min
-1
Grinding wheel diameter: 150 mm
Grinding wheel width: 20 mm
Grinding wheel bore: 20 mm
Circumferential speed max.: 23.2 m / s
Weight including
removable parts: 7.5 kg
Noise data:
Refers to A-weighted sound level.
Sound pressure level: 75.30 dB (A)
Sound level: 85.00 dB (A)
Values determined in accordance with EN 61029.
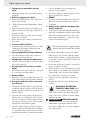
General safety advice
CAUTION! In order to protect yourself from
the danger of electric shock, injury or fire when
using electrical power tools, please observe
the following basic safety precautions. Read all
these requirements before you use the electrical
power tool, and keep the safety advice in a
safe place.
Working safely
1. K
eep your working area clean and tid
y.
A disorderly working area can lead to accidents.
2. Be aware of the effects of the
environment.
Do not leave electrical power tools out in the rain.
Do not use electrical power tools in moist or
wet surroundings.
Ensure that your working area is well lit.
Do not use electrical power tools in
areas where there is risk of fire or
explosion.
3.
Protect yourself from electric
shock.
Avoid touching earthed objects such as pipes,
heating radiators, ovens or refrigerators with
parts of your body.
4. Keep other people at a safe distance.
Do not allow other people, in partic-
ular children, to touch the electrical
power tool or the mains lead.
Keep them away from your working area.
5. Store currently unused electrical pow-
er tools in a safe place.
When not being used electrical power tools
should be stored in dry conditions in a high or
enclosed place, out of reach of children.
6. Do not overload your electrical power
tool.
By keeping within the specified working range
of the tool you will work more safely and
achieve a better result.
7. Use the right electrical power tool for
the task.
Do not use low-output devices for heavy tasks.
Do not use an electrical power tool for purposes
for which it was not intended. For example, do
not use a hand operated circular saw for trim-
ming tree branches or cutting logs.
8. Wear suitable clothing.
Do not wear loose-fitting clothing or jewellery.
They could become caught on moving parts.
We recommend that you wear anti-slip footwear
when working outdoors.
If you have long hair, wear a hair net.
9.
Use personal protective
equipment.
Wear protective glasses.
Wear a dust mask if your work generates dust.
10. Attaching the vacuum dust extraction
device.
Where there are connection points provided
for vacuum dust extraction please ensure that
the connections are made and used properly.
11.
Do not use the mains lead
for purposes for which it was
not intended.
Introduction / General safety advice

8 GB/CY
Do not use the mains lead to pull the plug out
of the mains socket. Protect the mains lead
from heat, oil and sharp edges.
12. Securely support the workpiece.
Use clamps or a vice to grip the workpiece
firmly. This is much safer than holding it with
your hand.
13. Avoid placing your body in an
unnatural position.
Keep proper footing and balance at all times.
14. Look after your tools carefully.
Keep cutting tools sharp and clean. This way
you will work more safely and achieve better
results.
Follow the advice on tool lubrication and con-
sumables replacement.
Check the condition of the mains lead on your
electrical power tool regularly and have any
damage repaired by a competent specialist.
Check the condition of extension leads regular-
ly and replace them if they are damaged.
Keep handles and hand grips clean, dry and
free of oil and grease.
15. Pull the mains plug out of the mains
socket.
Do this if the electrical power tool is not being
used, before carrying out maintenance tasks
on the electrical power tool and whenever you
are changing inserted tools, e.g. saw blades,
drills or router bits.
16. Make sure that no spanners, keys etc.
are left attached.
Check before switching on that all spanners,
keys and setting tools have been removed.
17. Avoid unintentionally starting up the
device.
Check that the switch is set to OFF on the de-
vice when the mains plug is inserted into the
mains socket.
18. Using an extension lead for working
outdoors.
When working outside, always use an approved
and appropriately labelled extension lead.
19. Remain alert.
Watch what you are doing. Proceed with cau-
tion. Do not use electrical power tools if you
cannot concentrate.
20. Check the electrical power tool for
damage.
Before the electrical power tool is used, carefully
check the safety equipment and any slightly
damaged parts to see that they are still work-
ing properly.
Check that all moving parts on the tool are
working properly, can move freely and are not
damaged. All parts must be correctly attached
and fulfil all the requirements necessary to allow
the electrical power tool to operate properly.
Damaged safety equipment and components
must be properly repaired or replaced at a
competent electrical equipment repair centre
unless otherwise indicated in the operating in-
structions.
Damaged switches must be replaced at a
Customer Service Centre.
Never use an electrical power tool that cannot
be switched on and off properly.
21. CAUTION!
The use of inserted tools and accessories other
than those recommended by the manufacturer
could lead to you being injured.
22. Have your electrical power tool
repaired at an electrical equipment
repair specialist.
This electrical power tool complies with the
relevant safety regulations. Repairs may only
be carried out by a specialist electrical repair
centre using original spare parts, otherwise
injury could occur to the user.
Safety advice relating spe-
cifically to bench grinders
Do not touch the mains lead if it becomes damaged
or cut through while you are using the device.
Pull the plug out of the mains socket immediately
and have the device repaired by a suitably
qualified person or at your service centre.
Do not operate the device if it is damp and do
not use it in a damp environment.
If you use the device outdoors, always connect
it through a residual current device (RCD) with
a maximum trip current of 30 mA.
General safety advice

9 GB/CY
If using an extension lead, always use one that
is approved for outdoor use.
If a dangerous situation arises, pull the mains
plug immediately out of the mains socket.
Always work with the mains lead leading
away from the rear of the device.
DANGER OF FIRE FROM FLY-
ING SPARKS! Grinding metal
creates flying sparks. For this reason,
always make sure that nobody is placed in any
danger and that there are no inflammable ma-
terials near the working area.
WARNING!
NOXIOUS FUMES! Working
with harmful / noxious dusts represents a risk to
the health of the person operating the device
and to anyone near the work area.
Wear protective glasses, hearing
protection, dust protection mask and
protective gloves.
DANGER OF BURNS! The workpiece gets
hot during grinding. Never touch the part you
are grinding. Allow the workpiece to cool suffi-
ciently first. When grinding for longer periods,
stop grinding from time to time and allow the
workpiece to cool before continuing. Do not
operate the device for continuous periods ex-
ceeding 30 minutes.
The double grinding machine is intended for
dry grinding of the surfaces of metal objects.
The device may only be used for dry grinding.
Do not grind materials containing asbestos.
Asbestos is a known carcinogen.
Do not use damaged grinding wheels
4
.
Only use grinding wheels with details that cor-
respond with those given on the device rating
plate. The circumferential speed should be
equal to or greater than the value given on the
device rating plate.
Adjust the eye guard mounts
2
(spark deflectors)
and the eye guards
3
periodically so that wear
on the grinding wheels can be evened out.
Keep the gap as small as possible.
Avoid contact with the moving grinding wheel.
Never leave the device working unattended.
Never use the device for a purpose for which it
was not intended.
Before you insert the mains plug into the sock-
et, always check that the device is switched off.
Always switch the device on before bringing
the workpiece into contact with the grinding
wheel. After grinding, lift off the workpiece
before switching the device off.
Hold the workpiece firmly with both hands at
all times when working.
Always keep proper footing and balance.
After you have finished grinding metal, allow
the grinding wheel(s) to come to a standstill.
When taking a break from your work, before
carrying out any tasks on the device itself and
when you are not using the device, always pull
the mains plug out of the mains socket.
Handle the device carefully and treat it with re-
spect. Always keep the device clean, dry and
free of oil or grease.
Remain alert at all times! Always watch what
you are doing and proceed with caution. Do
not use the device if you cannot concentrate or
you are feeling unwell.
Store grinding wheels in such a way that they
are not subject to mechanical loads or damag-
ing environmental influences.
Before use
Assembly
Before using the device for the first time make
sure that you have fitted all its parts.
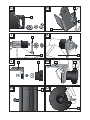
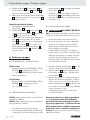
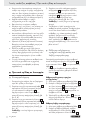
1) Attach the two eye guard mounts
2
to the in-
side of the wheel guard covers
7
, one each
on the left and right sides. Use the illustrated
fixings in the arrangement shown (see Figs. G, H).
2) Attach the eye guards
3
to the eye guard
mounts
2
, one each on the left and right
sides. Use the illustrated fixings in the arrange-
ment shown (see Figs. I, K).
Note: The illustrations show the left side.
3) Attach the two workpiece / tool rests
5
to the
inside of the wheel guard covers
7
, one each
on the left and right sides. Use the illustrated
fixings in the arrangement shown (see Figs. L, M).
Note: The illustrations show the left side.
Mount the double grinding machine on a firm,
level surface, if at all possible on a fixed sup-
port, e.g. working surface, workbench. Use the
General safety advice / Before use

10 GB/CY
four mounting holes
8
and suitable fixings
(not supplied). Refer to Figure C.
Positioning the workpiece / tool
rests and eye guard mounts
To ensure safe working, the workpiece / tool rests
5
,
the eye guards
3
and the eye guard mounts
2
must be correctly positioned.
Check and correct the settings at frequent intervals
to ensure even wear on the grinding wheels
4
.
Adjusting the workpiece / tool rests:
1) To adjust the setting, first loosen the adjuster
screw
6
.
2) Bring the workpiece / tool rest
5
close up to
the grinding wheel
4
, the distance between
the grinding wheel
4
and the workpiece /
tool rest
5
must be no more than 2 mm.
3) Retighten the adjuster screw
6
and check
using your hand that the grinding wheel
4
movement is true and free.
Adjusting the eye guard mounts:
1) To adjust the setting, first loosen the fastening
screw
14
.
2) Bring the eye guard mount
2
close up to the
grinding wheel
4
, the distance between the
grinding wheel
4
and the eye guard mount
2
must be no more than 2 mm.
3) Retighten the fastening screw
14
and check
using your hand that the grinding wheel
4
movement is true and free. A worn out grinding
wheel
4
needs to be replaced. This is necessary
when the specified gap cannot be achieved even
after readjusting the positions of the workpiece /
tool rest
5
and / or the eye guard mount
2
.
Preparing for first use
Switching on and off
Switching on:
Press the ON / OFF switch
9
into the “1“
position to switch the device on and run it
at a constant speed.
Switching off:
Press the ON / OFF switch
9
into the “0“
position to switch the device off.
Grinding a workpiece
NOTE: Use the fine grinding wheel for precise
grinding tasks (grade “A80M”).
NOTE: Use the coarse grinding wheel for rough
grinding tasks (grade “A36M”).
Switch on the machine as described above.
To grind metal tools or metal items, place the
workpiece on the workpiece / tool rest
5
and
slowly bring it up to the grinding wheel
4
.
Press the workpiece carefully against the grind-
ing wheel
4
. Pressing too hard can overload
the device. When grinding always use the
circumferential end face (not the sides) of the
grinding wheel only (See Figures D, E, F).
Replacing a grinding wheel
WARNING!
RISK OF INJURY!
Before
carrying out any tasks on the device itself and
when you are not using the device, always pull the
mains plug out of the mains socket.
Do not use damaged grinding wheels.
Only use grinding wheels with details that cor-
respond with those given on the device rating
plate. The circumferential speed should be
equal to or greater than the value given on the
device rating plate.
Only grinding wheels with markings indicating
the manufacturer, the type of adhesive, dimen-
sions and permitted circumferential speed are
to be used. If you install new grinding wheels
carry out a ringing test before use. Grinding
wheels in good condition give a clear ringing
noise when struck lightly with a plastic hammer.
1) Take off the outer part of the wheel guard cov-
er
7
by unscrewing the 3 threaded fixings
(see Figs. N, O).
Before use / Preparing for first use

11 GB/CY
2) Release the nut
13
by preventing the nut on the
opposite side from rotating and then remove the
outside flange
12
.
3) Now replace the grinding wheel and reassem-
ble all the components in the reverse order.
Take note that the left-hand side of the double
grinding machine has a left-hand thread
11
and
the right-hand side has a right-hand thread. This
ensures that the nuts
13
can only be screwed
off in the direction of rotation of the spindle.
Use only the supplied flanges to mount the
grinding wheels.
Note: The grinding wheels are fitted with
a ½“ adapter so that they can be used
with grinding wheels purchased later with
either a ½“, or a 20 mm bore. Grinding
wheels are available in various grit grades
and hardnesses. The central fixing holes in
grinding wheels must not be redrilled.
Original accessories /
Attachments
Use only the accessories and attach-
ments detailed in the operating instruc-
tions. The use of inserted tools or accessories
other than those recommended in the operating
instructions could lead to you suffering an injury.
Maintenance and cleaning
WARNING!
RISK OF INJURY! Before
carrying out any tasks on the device itself and when
you are not using the device, always pull the mains
plug out of the mains socket.
The device is largely maintenance-free.
Clean the device frequently. For best results,
clean the double grinding machine immediate-
ly after you have finished using it.
Do not allow any liquids to enter the device.
Use a dry cloth to clean the device.
Do not under any circumstances use petrol or
strong solvents.
Store the device in a dry room.
Service
WARNING!
Have your device
repaired at the service centre or by
qualified specialist personnel using
original manufacturer parts only. This
will ensure that your device remains safe to use.
WARNING!
If the plug or lead needs
to be replaced, always have the
replacement carried out by the manu-
facturer or its service centre. This will
ensure that your device remains safe to use.
Warranty
The warranty for this appliance is for 3
years from the date of purchase. The ap-
pliance has been manufactured with care
and meticulously examined before deliv-
ery. Please retain your receipt as proof
of purchase. In the event of a warranty
claim, please make contact by telephone
with our Service Department. Only in this
way can a post-free despatch for your
goods be assured.
The warranty covers only claims for material and
maufacturing defects, but not for transport damage,
for wearing parts or for damage to fragile compo-
nents, e.g. buttons or batteries. This product is for
private use only and is not intended for commercial
use.
The warranty is void in the case of abusive and im-
proper handling, use of force and internal tamper-
ing not carried out by our authorized service branch.
Your statutory rights are not restricted in any way
by this warranty.
The warranty period will not be extended by repairs
made unter warranty. This applies also to replaced
and repaired parts. Any damage and defects extant
on purchase must be reported immediately after
unpacking the appliance, at the latest, two days after
the purchase date. Repairs made after the expiration
of the warranty period are subject to payment.
Preparing for first use / Maintenance and cleaning / Service / Warranty

12 GB/CY
GB
DES UK LTD
Tel.: 0871 5000 700 (£ 0.10 / minute)
e-mail: [email protected]
CY
Kompernass Service Cyprus
Tel.: 800 94401
e-mail: [email protected]
Disposal
The packaging is wholly composed of
environmentally-friendly materials that
can be disposed of at a local recycling
centre.
Do not dispose of electrical
power tools with the household
rubbish!
In accordance with European Directive 2002 / 96 / E
C
(covering waste electrical and electronic equipment)
and its transposition into national legislation, worn
out electrical power tools must be collected separately
and taken for environmentally compatible recycling.
Contact your local refuse disposal authority for
more details of how to dispose of your worn out
electrical devices.
Declaration of Conformity /
Manufacturer
We, Kompernaß GmbH, the person responsible for
documents: Mr Felix Becker, Burgstr. 21, D-44867
Bochum, Germany, hereby declare that this product
complies with the following standards, normative
documents and EU directives:
Machinery Directive
(2006 / 42 / EC)
EU Low Voltage Directive
(2006 / 95 / EC)
Electromagnetic Compatibility
(2004 / 108 / EC)
Applicable harmonized standards
EN 55014-2:1997+A1
EN 55014-1:2000+A1+A2
EN 55014-1:2000/A1:2001, EN 55014-1:2006
EN 61000-3-2:2006, EN 61000-3-2:2000+A2
EN 61000-3-3:1995+A1+A2
EN 61000-3-3:1995/A1:2001
EN 61029-1:2000+A11+A12
EN 61029-2-4:2003+A1
IEC 61029-2-4:1993+A1:2001
IEC 61029-1:1990
Type / Device description:
Double bench grinder PDOS 200 A1
Date of manufacture (DOM): 09 - 2010
Serial number: IAN 56956
Bochum, 30.09.2010
Hans Kompernaß
- Managing Director -
We reserve the right to make technical modifica-
tions in the course of further development.
Warranty / Disposal / Declaration of Conformity / Manufacturer

Sicherheit / Bedienung
13 HR
Uvod
Propisano korištenje ....................................................................................................Stranica 14
Oprema .......................................................................................................................Stranica 14
Opseg dostave ............................................................................................................Stranica 14
Tehnički podaci ...........................................................................................................Stranica 15
Opće sigurnosne upute
Siguran rad ..................................................................................................................Stranica 15
Karakteristične sigurnosne upute za dvostruku brusilicu ..........................................Stranica 16
Prije puštanja u pogon
Montaža ......................................................................................................................Stranica 17
Namještanje podloge za predmet koji obrađujemo i namještanje držača štitnika .......Stranica 17
Puštanje u pogon
Uključivanje i isključivanje ..........................................................................................Stranica 18
Obrađivanje predmeta ...............................................................................................Stranica 18
Izmjena brusne ploče .................................................................................................Stranica 18
Originalni dodaci / dodatni uređaji ...........................................................................Stranica 19
Održavanje i čišćenje ....................................................................................Stranica 19
Servis ..........................................................................................................................Stranica 19
Jamstveni list........................................................................................................Stranica 19
Zbrinjavanje .........................................................................................................Stranica 19
Objašnjenje konformnosti / Proizvođač .......................................Stranica 20
Popis sadržaja

14 HR
Uvod
Dvostruka brusilica PDOS 200 A1
Za brušenje i oštrenje metalnog alata
Uvod
Prije prvog korištenja upoznajte se sa
svim funkcijama uređaja i informirajte se
o pravilnom rukovanju s električnim
uređajem. K tome pročitajte slijedeće upute za kori-
štenje. Dobro čuvajte ove upute. U slučaju prodaje
uređaja proslijedite sve dokumente na treću osobu.
Propisano korištenje
Dvostruka je brusilica namijenjena za brušenje i
oštrenje metalnog alata kao što su svrdla, dlijeta,
itd. i metalnih dijelova. Uređaj nije namijenjen za
korištenje u obrtne svrhe. Svako drugo korištenje ili
izmjena na stroju tretira se kao nepropisano i krije
znatne opasnosti od nesreća. Za oštećenja nastala
zbog nepropisane upotrebe proizvođač ne preuzi-
ma nikakvu odgovornost.
Oprema
1
povećalo
2
držač štitnika
3
zaštitna ploča
4
brusna ploča
5
podloga za predmete koji obrađujemo
6
šaraf za namještanje podloge za predmete
koji obrađujemo
7
zaštitna kapa
8
izbušene rupe za pričvršćivanje
9
prekidač za UKLJUČIVANJE / ISKLJUČIVANJE
10
unutarnja prirubnica
11
lijevi navoj
12
vanjska prirubnica
13
matica
14
šaraf za pričvršćivanje
Opseg dostave
Neposredno nakon otvaranja
provjerite opseg dostave:
1 dvostruka brusilica PDOS 200 A1 s
- 2 x držača štitnika / zaštitna ploča
- 2 x podloge za predmete koje obrađujemo /
šaraf za namještanje
1 upute za korištenje
U ovim uputama za uporabu / na uređaju rabi se slijedeće prikaze:
Čitati upute za rukovanje!
W
W (efektivna snaga)
Obratiti pažnju na upozoravajuće
i sigurnosne upute!
Nosite zaštitne naočale, zaštitu za
uši, zaštitnu masku i zaštitne rukavice.
Čuvajte se strujnog udara!
Opasnost po život!
Držite djecu podalje od
električnog alata!
Opasnost od eksplozije!
Opasnost po život zbog udara stru-
jom ako je oštećen mrežni kabel ili
mrežni utikač!
Opasnost od požara!
Materijal ambalaže i uređaj zbrinite
na način neškodljiv za okoliš!
V
~
Volt (Imjenični napon)

15 HR
Tehnički podaci
Nazivni napon: 230 V
~
50 Hz
Vrsta pogona: S2-kratkotrajni pogon
30 min
Nazivni prijem: 200 W
Nazivna praznohodna
brzina vrtnje: n
0
2950 min
-1
Promjer brusne ploče: 150 mm
Širina brusne ploče: 20 mm
Promjer unutarnje rupe: 20 mm
Ophodna brzina max.: 23,2 m / s
Težina uključivši dijelove
koje se može skinuti: 7,5 kg
Informacije o buci:
Razina buke ocijenjena sa A.
Razina zvučnog tlaka: 75,30 dB (A)
Razina buke: 85,00 dB (A)
Mjerne vrijednosti dobivene sukladno EN 61029.
Opće sigurnosne upute
OPREZ! Pri korištenju električnih alata treba
se radi zaštite protiv električnog udara, opasnosti
od požara i ozljeda pridržavati slijedećih na-
čelnih sigurnosnih mjera. pročitajte sve ove na-
pomene prije korištenja ovog električnog lata i
dobro sačuvajte sigurnosne napomene.
Siguran rad
1. Držite svoje područje rada urednim.
Nered u području rada može imati nezgode
za posljedicu.
2. Uzmite utjecaj okoline u obzir.
Ne izložite električne alate kiši.
Ne koristite električne alate u vlažnoj ili mokroj
okolini.
Osigurajte da je područje rada dobro osvijetljeno.
Ne koristite električni alat tamo gdje
postoji opasnost od požara ili ek-
splozije.
3.
Štitite se od električnog udara.
Izbjegavajte fizički kontakt s uzemljenim dijelo-
vima (npr. cijevima, radijatorima, električnim
pećima, frižiderima).
4. Držite druge osobe podalje.
Ne pustite da druge osobe, napose
djeca, dodiruju električni alat ili kabel.
Držite djecu podalje od područja
rada.
5. Spremite nekorišten električni alat na
sigurno.
Nekorišteni električni alati trebaju se spremiti
na suho, visoko postavljenom ili zaključanom
mjestu gdje je izvan dosega djece.
6. Ne preopteretite vaš električni alat.
Radite bolje i sigurnije u navedenom području
snage.
7. Koristite pravilan električni alat.
Ne koristite strojeve sa slabom snagom za
teške radove.
Ne koristite električni alat za one svrhe za koje
nije predviđen. na primjer ne koristite ručnu
kružnu pilu za piljenje grana ili cjepanica.
8. Nosite prikladnu odjeću.
Ne nosite široku odjeću ili nakit, jer mogu biti
zahvaćeni pokretnim dijelovima.
Kod rada vani je preporučljivo nošenje obuće
koja se ne kliže.
Ako imate dugu kosu nosite mrežu za kosu.
9.
Koristite zaštitnu opremu.
Nosite zaštitne naočale.
Koristite pri radovima koje uzrokuju prašinu
masku za disanje protiv prašine.
10. Priključite napravu za usis prašine.
Ako postoje priključci za usis prašine, uvjerite
se u to da su priključeni te da se ispravno rabe.
11.
Ne koristite kabel u svrhe za
koje nije namijenjen.
Ne koristite kabel da bi izvukli utikač iz utičnice.
Zaštitite kabel od vrućine, ulja i oštrih rubova.
12. Osigurajte komad na kojem radite.
Koristite naprave za napinjanje ili škripac da bi
komad na kojem radite čvrsto držali. Time je si-
gurnije držano nego rukom.
Uvod / Opće sigurnosne upute

16 HR
13. Izbjegavajte neprirodno držanje
tijela.
Osigurajte siguran stav i svakodobno održite
ravnotežu.
14. Brižljivo njegujte vaše alate.
Držite rezne alate čistima i oštrim, kako bi ste
bolje i sigurnije radili.
Slijedite napomene za podmazivanje i zamje-
nu alata.
Redovito provjerite priključni vod električnog
alata i u slučaju oštećenja dajte da ga obnovi
priznati stručnjak.
Redovito provjerite produžne vodove i zamije-
nite ih, ako su oštećeni.
Držite ručke suhima, čistima i slobodnima od
ulja i masti.
15. Izvucite utikač iz utičnice:
Kod nekorištenja električnog alata, prije radnji
održavanja i kod zamjene alata poput npr.
lista pile, bušilice, glodalice.
16. N
e ostavljajte ključeve alata utaknute.
Prije uključivanja provjerite da li su ključevi i
alati za podešavanje uklonjeni.
17. Izbjegavajte nenadzirano pokretanje.
Uvjerite se da je prekidač pri umetanjem utika-
ča u utičnicu isključen.
18. Za područje vani koristite produžni
kabel.
Vani koristite samo za to odobrene i odgovara-
juće označene produžne kabele.
19. Budite pažljivi.
Pazite na to što činite. pristupite radu razborito.
Ne koristite električni alat ako niste koncentrirani.
20. Provjerite električni alat na eventual-
na oštećenja.
Prije daljnje uporabe električnog alata moraju
se zaštitne naprave ili blago oštećene dijelove
brižljivo pretražiti na njihovu besprijekornu i na-
mjensku funkciju.
Provjerite da li pokretni dijelovi besprijekorno
funkcioniraju i nisu ukliješteni ili da li su dijelovi
oštećeni. svi dijelovi moraju biti ispravno monti-
rani i moraju ispuniti sve uvjete da bi osigurali
besprijekoran rad električnog alata.
Oštećene zaštitne naprave i dijelovi moraju u
skladu s namjenom biti popravljeni ili zamijenje-
ni od strane priznate stručne radionice, ukoliko
nije drugačije navedeno u uputama za uporabu.
Oštećeni prekidači moraju se zamijeniti u
radionici servisa za kupce.
Ne koristite električne alate kod kojih se preki-
dač ne može uključiti i isključiti.
21. OPREZ!
Korištenje drugih namjenskih alata i druge do-
datne opreme može značiti za vas opasnost
od ozljeda.
22. Dajte da vam električni alat popravlja
stručni električar.
Ovaj električni alat odgovara jednoznačnim si-
gurnosnim odredbama. popravke smije izvoditi
samo stručni električar koristeći pri tome origi-
nalne zamjenske dijelove; u suprotnom mogu
za korisnika nastati nezgode.
Karakteristične sigurnosne
upute za dvostruku brusili
cu
Ne dirajte mrežni kabel ukoliko je za vrijeme
rada oštećeno ili prerezano. Odmah izvadite
mrežni utikač iz utičnice, te uređaj dajte isključi-
vo popraviti od strane stručnjaka ili ovlaštenog
servisnog mjesta.
Ne koristite uređaj ako je vlažno, i nemojte ga
koristiti u vlažnom okruženju.
Ukoliko radite na otvorenome priključite uređaj
preko zaštitne strujne sklopke (FI)-s maksimalno
30 mA okidne struje. Koristite produžni kabel
koji je dozvoljen za rad na otvorenome.
U slučaju opasnosti odmah izvucite utikač iz
utičnice.
Mrežni kabel neka ide uvijek s zadnje strane
uređaja.
OPASNOST OD POŽARA
POSREDSTVOM ISKRE! Kada
brusite metale nastaju iskre. Stoga
uvijek vodite računa o tome da ne ugrožavate
druge osobe i da se u blizini ne nalaze nikakvi
zapaljivi materijali.
UPOZORENJE!
OTROVNI PLINOVI!
Obrađivanje štetnih / otrovnih prašina pred-
stavlja znatno ugrožavanje zdravlja osobe
koja rukuje uređajem ili osobe koja se nalazi u
neposrednoj blizini.
Opće sigurnosne upute

17 HR
Nosite zaštitne naočale, zaštitu za
uši, zaštitnu masku i zaštitne rukavice.
OPASNOST OD OPEKLINA! Predmet koji
obrađujemo se kod brušenja zagrijava. Nika-
da ne dirajte mjesto koje obrađujete, i ostavite
ga da se dovoljno ohladi. Kod dužeg brušenja
povremeno prekinite s radom, kako bi se pred-
met ohladio, prije nego što nastavite s daljnjim
brušenjem. Ne preporuča se neprekidan rad
više od 30 minuta.
Dvostruka je brusilica napravljena za brušenje
suhih metalnih površina. Uređaj se smije koristi-
ti samo za suho brušenje.
Materijal koji sadrži azbest ne smije se obrađi-
vati. Azbest izaziva rak.
Ne koristite oštećene brusne ploče
4
.
Koristite brusne ploče čiji podaci odgovaraju
podacima koji se nalaze na pločici uređaja.
Brzina okretaja bi trebala biti ista ili veća od
navedenog broja.
Postavite držač štitnika
2
(zaštita od iskrenja)
i zaštitnu ploču postepeno, tako da se izjedna-
či trošenje brusnih ploča
3
. Držite razmak što
je moguće manjim.
Izbjegnite kontakt s rotirajućom brusnom pločom.
Ne koristite uređaj bez nadzora.
Nikada ne koristite uređaj u neke druge svrhe.
Vodite uvijek računa o tome da je uređaj isklju-
čen prije nego što stavite mrežni utikač u utičnicu.
Uvijek najprije uključite uređaj a tek onda stavi-
te predmet koji obrađujete na brusnu ploču.
Nakon obrade podignite predmet koji ste
obrađivali i tek onda isključite uređaj.
Predmet koji obrađujete držite uvijek čvrsto s
obje ruke.
Pobrinite se da čvrsto stojite.
Nakon obrade metala ostavite da se brusna
ploča / e u potpunosti zaustavi.
Za vrijeme odmora ili kada ne koristite uređaj
izvucite uvijek mrežni utikač iz utičnice.
Pažljivo rukovajte uređajem. Uređaj se stalno
mora držati čistim, suhim bez ulja i masnoća.
Budite uvijek pažljivi! Uvijek vodite računa o
onome što radite i postupajte uvijek s razu-
mom. Ni u kom slučaju ne koristite uređaj ukoli-
ko ste nekoncentrirani ili se loše osjećate.
Potrebno je brusne ploče tako skladištiti, da
nisu izložene mehaničkim oštećenjima i štetnim
vanjskim uvjetima.
Prije puštanja u pogon
Montaža
Prije prvog puštanja u pogon u potpunosti
montirajte sve dijelove.
1) Pričvrstite oba držača štitnika
2
lijevo i desno
s unutrašnje strane zaštitne kape
7
. Koristite
materijal koji je prikazan na slici i to u prikaza-
nom redoslijedu (vidi sliku G, H).
2) Pričvrstite zaštitne ploče
3
lijevo i desno na
držače štitnika
2
. Koristite materijal koji je
prikazan na slici i to u prikazanom redoslijedu
(vidi sliku I, K).
Napomena: slike prikazuju lijevu stranu.
3) Pričvrstite obje podloge za predmete koji obra-
đujemo
5
lijevo i desno s unutrašnje strane
zaštitne kape
7
. Koristite materijal koji je pri-
kazan na slici i to u prikazanom redoslijedu
(vidi sliku L, M).
Napomena: slike prikazuju lijevu stranu.
Dvostruku brusilicu postavite na ravno čvrstu
podlogu. Po mogućnosti je montirajte na čvrstu
podlogu npr. radnu ploču ili radni stol. Koristite
izbušene rupe za pričvršćivanje
8
i odgovara-
juće šarafe (nije sadržano u opsegu dostave).
K tome vidi sliku C.
Namještanje podloge za
predmet koji obrađujemo i
namještanje držača štitnika
Za siguran rad moraju se podloge
5
, zaštitne
ploče
3
i držač štitnika
2
pravilno namjestiti.
Redovito provjeravajte i namještajte podešavanja
kako bi izjednačili trošenje brusnih ploča
4
.
Namještanje podloge za predmet koji
obrađujemo:
1) Otpustite šaraf za namještanje
6
.
Opće sigurnosne upute / Prije puštanja u pogon

18 HR
2) Približite podlogu
5
k brusnoj ploči
4
, raz-
mak između brusne ploče
4
i podloge
5
ne
smije iznositi više od 2 mm.
3) Nakon toga čvrsto stegnite šaraf za namještanje
6
i rukom provjerite da li se brusna ploča
4
besprijekorno okreće.
Namještanje držača štitnika:
1) Za namještanje otpustite šarafe za
pričvršćivanje
14
.
2) Približite držač štitnika
2
brusnoj ploči
4
,
razmak između brusne ploče
4
i držača štitni-
ka
2
ne smije iznositi više od 2 mm.
3) Nakon toga čvrsto stegnite šarafe za pričvršći-
vanje
14
i rukom provjerite da li se brusna
ploča
4
besprijekorno okreće. Zamijenite po-
trošene brusne ploče
4
. To se radi u onom
slučaju kada se namještanjem podloge
5
,
odnosno držača štitnika
2
navedeni razmak
ne može održati.
Puštanje u pogon
Uključivanje i isključivanje
Uključivanje:
Pritisnite prekidač za UKLJUČIVANJE / ISKLJU-
ČIVANJE
9
i postavite ga na poziciju
„I” = uređaj je sada uključen i radi s konstant-
nim brojem okretaja.
Isključivanje:
Pritisnite prekidač za UKLJUČIVANJE / ISKLJU-
ČIVANJE
9
i postavite ga na poziciju
„0” = uređaj se isključuje.
Obrađivanje predmeta
UPUTA: Rabite finu brusnu ploču za fino brušenje
(granulacija “A80M”).
UPUTA: Rabite grubu brusnu ploču za grubo bru-
šenje (granulacija “A36M”).
Stroj uključite na način kako je opisano.
Za obrađivanje metalnih alata ili metalnih dije-
lova potrebno ih je staviti na podlogu za obra-
đivanje predmeta
5
te ga lagano približavati
brusnoj ploči
4
.
Predmet koji obrađujete pažljivo pritisnite na
brusnu ploču
4
. Prejako tiskanje može preop-
teretiti stroj. Brusite samo na obodu brusne ploče
(vidi slike D, E, F).
Izmjena brusne ploče
UPOZORENJE!
OPASNOST OD OZLJE-
DA! Prije svih radova na uređuju i kod nekorištenja
potrebno je uvijek izvaditi mrežni utikač iz utičnice!
Ne koristite nikakve oštećene brusne ploče.
Koristite brusne ploče čiji podaci odgovaraju
onima koji su navedeni na pločici uređaja.
Brzina okretaja trebala bi biti ista ili veća od
broja navedenog na uređaju.
Koristite isključivo brusne ploče na kojima se
nalaze podaci o proizvođaču, načinu rukovanja,
dimenzije i dozvoljeni broj okretaja. Nove bru-
sne ploče najprije podvrgnite zvučnom testu.
Nove brusne ploče pri laganom udarcu plastič-
nim čekićem daju čist zvuk.
1) Rastavite vanjski dio zaštitne kape
7
tako da
otpustite 3 vijčana spoja (vidi slike N, O).
2) Otpustite maticu
13
- čvrsto pritiskajući nasup-
rotne matice jednu o druge - i otklonite nakon
toga prirubnicu
12
.
3) Izmijenite brusnu ploču i montirajte natrag sve
dijelove, ali u obrnutom redoslijedu. Vodite ra-
čuna o tome da se na lijevoj strani dvostruke
brusilice nalazi lijevi navoj
11
a na desnoj desni
navoj. Matice se, prema tome, mogu odšarafiti
u smjeru okretanja osovine.
Za napinjanje brusnih ploča koristite samo
isporučene prirubnice.
Napomena! Brusne su ploče opremljene
s ½“ adapterom, tako da kod kupnje
novih brusnih ploča možete koristi ploče
čiji promjer rupe iznosi ½ ili 20 mm. Brusne
ploče možete kupiti s različitim stupnjevima
granulacije kao i s različitim stupnjevima
tvrdoće. Promjer rupe na brusnoj ploči ne smije se
naknadno proširivati.
Prije puštanja u pogon / Puštanje u pogon

19 HR
Originalni dodaci /
dodatni uređaji
Koristite samo opremu i dodatne ure-
đaje koji su navedeni u uputama za
korištenje. Korištenje drugih alata ili dodata-
ka od onih koji su opisani u uputama mogu
prouzrokovati nezgode.
Održavanje i čišćenje
UPOZORENJE!
OPASNOST OD
OZLJEDA! Prije svih radova na uređuju i kod ne-
korištenja potrebno je uvijek izvaditi mrežni utikač
iz utičnice!
Stroj u većoj mjeri nije potrebno održavati.
Redovito očistite uređaj, najbolje odmah nakon
završetka rada.
U unutrašnjost uređaja ne smiju dospjeti nikakve
tekućine. Za čišćenje koristite samo suhu krpu.
Ni u kom slučaju ne koristite benzin ili neka
jaka otapajuća sredstva.
Uređaj uskladištite u nekoj suhoj prostoriji.
Servis
UPOZORENJE!
Električne naprave
smiju popravljati samo ovlašteni ser-
viseri ili električari. Time ćete zadržati
sigurnost vaših uređaja.
UPOZORENJE!
Zamjenu utikača ili
mrežnih vodova neka izvodi uvijek
proizvođač ili korisnička služba. Time
ćete zadržati sigurnost vaših uređaja.
Jamstveni list
Na ovaj uređaj vrijedi jamstvo u trajanju
od 3 godine od datuma kupovine. Uređaj
je pažljivo proizveden i prije isporuke
brižljivo kontroliran. Molimo sačuvajte
blagajnički račun kao dokaz o kupnji.
Molimo da se u slučaju ostvarivanja prava
na jamstvo telefonski povežete sa Vašom
servisnom ispostavom. Samo na taj način
vaša roba može biti besplatno uručena.
Jamstvo vrijedi samo za greške materijala i izrade, a
ne za transportne štete, potrošne dijelove ili oštećenja
lomljivih dijelova, na primjer prekidača ili baterija.
Proizvod je namijenjen isključivo za privatnu, a ne
za gospodarstvenu uporabu.
U slučaju nestručnog rukovanja, rukovanja protiv-
nog namjeni uređaja, primjene sile i zahvata, koji
nisu izvršeni od strane našeg ovlaštenog servisnog
predstavništva, važenje jamstva prestaje. Vaša za-
konska prava ovim jamstvom ostaju netaknuta.
Jamstveni rok se ne produžava uslijed ostvarivanja
prava na jamstvo. To vrijedi i za zamijenjene i po-
pravljene dijelove. Eventualno već prilikom kupovine
prisutna oštećenja i nedostaci moraju biti javljena
neposredno nakon raspakiranja, ali najkasnije dva
dana nakon datuma kupovine. Popravke vršene nakon
isteka jamstvenog roka podliježu obavezi plaćanja.
Proizvođač:
Kompernaß GmbH
Burgstraße 21
44867 Bochum (Germany)
Njemačka
HR
Ovlašteni servis: Microtec sistemi d.o.o.
Tel.: 01/3692-008
email: support.hr@kompernass.com
Zbrinjavanje
Ambalaža se sastoji od okolini primjere-
nih materijala koju možete zbrinuti u
mjesnim stanicama za reciklažu.
Električni alat ne bacajte
u kućni otpad!
Sukladno europskim smjernicama 2002 / 96 / EC
o starim električnim i elektroničkim uređajima i njihovo
provođenje u nacionalno pravo, stari se električni
Puštanje u pogon / Održavanje i čišćenje / Servis / Jamstveni list / Zbrinjavanje

20 HR
uređaji moraju odvojeno sakupljati kao bi se po-
novno upotrijebili.
O mogućnostima zbrinjavanja isluženih uređaja
saznat ćete u vašoj općini ili gradskoj upravi.
Objašnjenje konformnosti /
Proizvođač
Mi, Kompernaß GmbH, odgovorni za ovu doku-
mentaciju: gospodin Felix Becker, Burgstr. 21,
D-44867 Bochum, Njemačka, ovim izjavljujemo
da je ovaj proizvod u skladu sa slijedećim norma-
ma, normativnim dokumentima i EZ smjernicama:
Strojne smjernice
(2006 / 42 / EC)
EG- niskonaponske smjernice
(2006 / 95 / EC)
Elektromagnetska kompatibilnost
(2004 / 108/ EC)
Primijenjene harmonizirane norme
EN 55014-2:1997+A1
EN 55014-1:2000+A1+A2
EN 55014-1:2000/A1:2001, EN 55014-1:2006
EN 61000-3-2:2006, EN 61000-3-2:2000+A2
EN 61000-3-3:1995+A1+A2
EN 61000-3-3:1995/A1:2001
EN 61029-1:2000+A11+A12
EN 61029-2-4:2003+A1
IEC 61029-2-4:1993+A1:2001
IEC 61029-1:1990
Tip / Naziv uređaja:
Dvostruka brusilica PDOS 200 A1
Date of manufacture (DOM): 09 - 2010
Serijski broj: IAN 56956
Bochum, 30.09.2010
Hans Kompernaß
- Direktor -
Izjava o sukladnosti za ovaj proizvod dostupna je
na internet stranici www.lidl.hr.
Pridržavamo pravo tehničkih izmjena u smislu
daljnjeg razvoja.
Zbrinjavanje / Objašnjenje konformnosti / Proizvođač
Pagina se încarcă...
Pagina se încarcă...
Pagina se încarcă...
Pagina se încarcă...
Pagina se încarcă...
Pagina se încarcă...
Pagina se încarcă...
Pagina se încarcă...
Pagina se încarcă...
Pagina se încarcă...
Pagina se încarcă...
Pagina se încarcă...
Pagina se încarcă...
Pagina se încarcă...
Pagina se încarcă...
Pagina se încarcă...
Pagina se încarcă...
Pagina se încarcă...
Pagina se încarcă...
Pagina se încarcă...
Pagina se încarcă...
Pagina se încarcă...
Pagina se încarcă...
Pagina se încarcă...
Pagina se încarcă...
Pagina se încarcă...
Pagina se încarcă...
Pagina se încarcă...
Pagina se încarcă...
Pagina se încarcă...
Pagina se încarcă...
Pagina se încarcă...
Pagina se încarcă...
Pagina se încarcă...
Pagina se încarcă...
Pagina se încarcă...
Pagina se încarcă...
Pagina se încarcă...
-
 1
1
-
 2
2
-
 3
3
-
 4
4
-
 5
5
-
 6
6
-
 7
7
-
 8
8
-
 9
9
-
 10
10
-
 11
11
-
 12
12
-
 13
13
-
 14
14
-
 15
15
-
 16
16
-
 17
17
-
 18
18
-
 19
19
-
 20
20
-
 21
21
-
 22
22
-
 23
23
-
 24
24
-
 25
25
-
 26
26
-
 27
27
-
 28
28
-
 29
29
-
 30
30
-
 31
31
-
 32
32
-
 33
33
-
 34
34
-
 35
35
-
 36
36
-
 37
37
-
 38
38
-
 39
39
-
 40
40
-
 41
41
-
 42
42
-
 43
43
-
 44
44
-
 45
45
-
 46
46
-
 47
47
-
 48
48
-
 49
49
-
 50
50
-
 51
51
-
 52
52
-
 53
53
-
 54
54
-
 55
55
-
 56
56
-
 57
57
-
 58
58


Parkside PDOS 200 A1 Manualul proprietarului
- Tip
- Manualul proprietarului
- Acest manual este potrivit și pentru
Lucrări înrudite
-
Parkside PDOS 200 A1 - 3 Instrucțiuni de utilizare
-
Parkside PWS 125 A1 Instrucțiuni de utilizare
-
Parkside PDOS 200 B2 Translation Of The Original Instructions
-
Parkside PWS 230 A1 Instrucțiuni de utilizare
-
Parkside PMGS 12 C3 Operation and Safety Notes
-
Parkside PMGS 12 B2 Operation and Safety Notes
-
Parkside PFBS 9.6 A1 Operation and Safety Notes
-
-
-
Alte documente
-
Tryton TS121501 Manual de utilizare
-
Pattfield Doppelschleifer 150 W Manualul proprietarului
-
Ikra LS BV 2800 E 2800W R3000 Manualul proprietarului
-
BorMann BDT1515 Manual de utilizare
-
 Raider Power Tools RD-BG06 Manual de utilizare
-
EINHELL TC-BG 200 Manual de utilizare
-
Güde GDS 125 Manual de utilizare
-
ATIKA KSG 220 A - Manualul proprietarului
-
