
Important
Please read this “User’s Manual” carefully to familiarize yourself
with safe and eective usage.
Please retain this manual for future reference.
• For the latest product information including the “User’s Manual”,
refer to our web site :
www.eizoglobal.com
Color LCD Monitor
User’s Manual
English

SAFETY SYMBOLS
This manual and this product use the safety symbols below. They denote critical information. Please read
them carefully.
WARNING
Failure to abide by the information in a
WARNING may result in serious injury
and can be life threatening.
CAUTION
Failure to abide by the information in a
CAUTION may result in moderate injury and /
or property or product damage.
Indicates a warning or caution. For example, indicates an “electrical shock” hazard.
Indicates a prohibited action. For example, means “Do not disassemble”.
<For USA-California Only>
CR Coin Lithium Battery contains Perchlorate Material - special handling may apply.
See www.dtsc.ca.gov/hazardouswaste/perchlorate.
No part of this manual may be reproduced, stored in a retrieval system, or transmitted, in any form or by
any means, electronic, mechanical, or otherwise, without the prior written permission of EIZO Corporation.
EIZO Corporation is under no obligation to hold any submitted material or information condential unless
prior arrangements are made pursuant to EIZO Corporation’s receipt of said information. Although every
eort has been made to ensure that this manual provides up-to-date information, please note that EIZO
monitor specications are subject to change without notice.
2

PRECAUTIONS
IMPORTANT
• This product has been adjusted specically for use in the region to which it was originally shipped.
If the product is used outside the region, it may not operate as specied in the specications.
• To personal safety and proper maintenance, please read carefully this section and the caution
statements on the monitor.
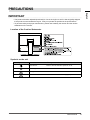
Location of the Caution Statements
Symbols on the unit
Symbol This symbol indicates
Power button: Press to turn the monitor’s power on or o.
Alternating current
Alerting electrical hazard
CAUTION: Refer to “SAFETY SYMBOLS” (page 2).
English
3
PRECAUTIONS

WARNING
If the unit begins to emit smoke, smells like something is burning, or makes strange noises,
disconnect all power connections immediately and contact your EIZO representative for advice.
Attempting to use a malfunctioning unit may result in re, electric shock, or equipment damage.
Do not disassemble or modify the unit.
Opening the cabinet or modifying the unit may result in re, electric shock, or burn.
Refer all servicing to qualied service personnel.
Do not attempt to service this product yourself as opening or removing covers may result in re, electric
shock, or equipment damage.
Keep small objects or liquids away from the unit.
Small objects accidentally falling through the ventilation slots into the cabinet or spillage
into the cabinet may result in re, electric shock, or equipment damage. If an object or
liquid falls/spills into the cabinet, unplug the unit immediately. Have the unit checked by
a qualied service engineer before using it again.
Place the unit at a sturdy and stable place.
A unit placed on an inadequate surface may fall and result in injury or equipment damage. If the unit falls,
disconnect the power immediately and ask your local EIZO representative for advice. Do not continue using
a damaged unit. Using a damaged unit may result in re or electric shock.
Use the unit in an appropriate location.
Otherwise, re, electric shock, or equipment damage may result.
• Do not place outdoors.
• Do not place in any form of transportation (ships, aircraft, trains, automobiles, etc.).
• Do not place in dusty or humid environments.
• Do not place in locations where water may be splashed on the screen (bathrooms, kitchens,
etc.)
• Do not place in locations where steam comes in direct contact with the screen.
• Do not place near heat generating devices or humidiers.
• Do not place in locations where the product is subject to direct sunlight.
• Do not place in environments with inammable gas.
• Do not place in environments with corrosive gases (such as sulfur dioxide, hydrogen sulde,
nitrogen dioxide, chlorine, ammonia, and ozone)
• Do not place in environments with dust, components that accelerate corrosion in the
atmosphere (such as sodium chloride and sulfur), conductive metals, and so on
To avoid danger of suocation, keep the plastic packing bags away from babies and children.
Use the enclosed power cord and connect to the standard power outlet in your country.
Be sure to use within the rated voltage of the power cord. Otherwise, re or electric shock may result.
Power supply: 100-240Vac 50/60Hz
To disconnect the power cord, grasp the plug rmly and pull.
Tugging on the cord may damage and result in re or electric shock.
The equipment must be connected to a grounded main outlet.
Failure to do so may result in re or electric shock.
Use the correct voltage.
• The unit is designed for use with a specic voltage only. Connection to another voltage than specied in this
“Instructions for Use” may cause re, electric shock, or equipment damage.
Power supply: 100-240Vac 50/60Hz
• Do not overload your power circuit, as this may result in re or electric shock.
4
PRECAUTIONS

WARNING
Handle the power cord with care.
• Do not place the cord underneath the unit or other heavy objects.
• Do not pull on or tie the cord.
If the power cord becomes damaged, stop using it. Using of a damaged cord may result
in re or electric shock.
Never touch the plug and power cord if it begins to thunder.
Touching them may result in electric shock.
When attaching an arm stand, please refer to the user’s manual of the arm stand and install the unit
securely.
Otherwise, the unit may become detached, resulting in injury and/or equipment damage. Before installation,
make sure that desks, walls, or any other installation surface has adequate mechanical strength. If the unit
falls, please ask your local EIZO representative for advice. Do not continue using a damaged unit. Using
a damaged unit may result in re or electric shock. When reattaching the tilt stand, please use the same
screws and tighten them securely.
Do not touch a damaged LCD panel directly with bare hands.
Liquid crystal is poisonous. If any part of your skin comes in direct contact with the
panel, wash thoroughly. If liquid crystal enters your eyes or mouth, immediately ush
with large amounts of water and seek medical attention.
English
5
PRECAUTIONS

CAUTION
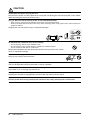
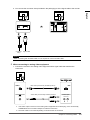
Handle with care when carrying the unit.
Disconnect the power cord and cables when moving the unit. Moving the unit with the power cord or cables
attached is dangerous and may result in injury.
Carry or place the unit according to the correct specied methods.
• When carrying, grasp and rmly hold the unit as shown in the illustration below.
• Monitors of size 30 inches and above are heavy. When unpacking and/or carrying the monitor, ensure at least two
people are utilized.
Dropping the unit may result in injury or equipment damage.
Do not block the ventilation slots on the cabinet.
• Do not place any objects on the ventilation slots.
• Do not install the unit in a place with poor ventilation or inadequate space.
• Do not use the unit laid down or upside down.
Blocking the ventilation slots prevents proper airow and may result in re, electric
shock, or equipment damage.
Do not touch the plug with wet hands.
Doing so may result in electrical shock.
Use an easily accessible power outlet.
This is to facilitate disconnecting the power in case of a problem.
Periodically clean the area around the power plug and the ventilation slot of the monitor.
Dust, water, or oil on the plug may result in re.
Unplug the unit before cleaning it.
Cleaning the unit while it is plugged into a power outlet may result in electric shock.
If you plan to leave the unit unused for an extended period of time, disconnect the power cord from
the wall socket after turning o the power switch for the safety and the power conservation.
6
PRECAUTIONS

Notice for this monitor
This product is suited for displaying surveillance camera images.
This product has been adjusted specically for use in the region to which it was originally shipped. If the
product is used outside the region, it may not operate as specied in the specications.
This product may not be covered by warranty for uses other than those described in this manual.
The specications noted in this manual are only applicable when the following are used:
• Power cords provided with the product
• Signal cables specied by us
Only use optional products manufactured or specied by us with this product.
If you place this product on a lacquer-coated desk, the color may adhere to the bottom of the stand due to
the composition of the rubber. Check the desk surface before use.
It takes about 30 minutes (under our measurement conditions) for the monitor display to stabilize. Please
wait 30 minutes or more after the monitor power has been turned on, and then adjust the monitor.
Monitors should be set to a lower brightness to prevent a loss in the screen quality caused by long-term use
and to maintain stable use.
When the screen image is changed after displaying the same image for extended periods of time, an
afterimage may appear. Use the screen saver or power save function to avoid displaying the same image for
extended periods of time. Depending on the image, an afterimage may appear even if it was displayed for
a short period of time. To remove such a phenomenon, change the image or keep the power turned o for
several hours.
If the monitor displays continuously over a long period of time, dark smudges or burn-in may appear. To
maximize the life of the monitor, we recommend the monitor be turned o periodically.
Periodic cleaning is recommended to keep the monitor looking new and to prolong its operation lifetime (refer
to “Cleaning” (page 8)).
The LCD panel is manufactured using high-precision technology. Although, missing pixels or lit pixels may
appear on the LCD panel, this is not a malfunction. Percentage of eective dots: 99.9994 % or higher.
The backlight of the LCD panel has a xed lifetime. Depending on the usage pattern, such as usage for
long continuous periods, the lifespan of the backlight may run out sooner, requiring replacement. When the
screen becomes dark or begins to icker, please contact your local EIZO representative.
Do not press on the LCD panel or edge of the frame strongly, as this may result in display malfunctions, such
as interference patterns, etc. If pressure is continuously applied to the LCD panel surface, the liquid crystal
may deteriorate or the LCD panel may be damaged. (If the pressure marks remain on the panel, leave the
monitor with a black or white screen. The symptom may disappear.)
Do not scratch or press on the LCD panel with any sharp objects, at this may result in damage to the LCD
panel. Do not attempt to brush with tissues as this may scratch the panel.
When the monitor is cold and brought into a room or the room temperature goes up quickly, dew
condensation may occur on the interior and exterior surfaces of the monitor. In that case, do not turn the
monitor on. Instead wait until the dew condensation disappears, otherwise it may cause some damage to the
monitor.
English
7
Notice for this monitor

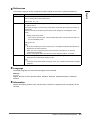
Cleaning
The stains on the cabinet and LCD panel surface can be removed by moistening part of a soft cloth with
water or by using ScreenCleaner (available as an option).
Attention
• Chemicals such as alcohol and antiseptic solution may cause gloss variation, tarnishing, and fading of the cabinet
or LCD panel, and also quality deterioration of the image.
• Never use thinner, benzine, wax, or abrasive cleaner as they may damage the cabinet or LCD panel surface.
To use the monitor comfortably
• An excessively dark or bright screen may aect your eyes. Adjust the brightness of the monitor
according to the environmental conditions.
• Staring at the monitor for a long time tires your eyes. Take a 10-minute rest every hour.
8
Notice for this monitor

CONTENTS
PRECAUTIONS ...................................................... 3
IMPORTANT .............................................................. 3
Notice for this monitor ......................................... 7
Cleaning .................................................................... 8
To use the monitor comfortably ............................. 8
CONTENTS ............................................................. 9
Chapter 1 Introduction ..................................... 10
1-1. Features ........................................................10
1-2. Package Contents ........................................10
1-3. Controls and Functions ..............................11
Chapter 2 Connecting Cables ......................... 12
2-1. Connecting ...................................................12
2-2. Turning On the Power ..................................14
2-3. Adjusting the Screen Height and Angle ....14
Chapter 3 Basic Adjustment/Setting .............. 15
3-1. How to Operate the Buttons .......................15
3-2. Switching Input Signals ..............................15
3-3. Adjusting the Brightness ............................16
3-4. Adjusting Volume.........................................16
Chapter 4 Advanced Adjustment/Setting ...... 17
4-1. Basic Operation of the Setting Menu ........17
4-2. Setting Menu Functions ..............................18
●
Color Adjustment ............................................18
●
Signal Settings .............................................. 20
●
Preferences ................................................... 23
●
Language ...................................................... 23
●
Information .................................................... 23
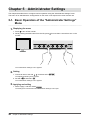
Chapter 5 Administrator Settings ................... 24
5-1. Basic Operation of the "Administrator
Settings" Menu ............................................ 24
5-2.
"Administrator Settings" Menu Functions ...
25
Chapter 6 Troubleshooting .............................. 26
6-1. No Picture .................................................... 26
6-2. Imaging Problems ....................................... 26
6-3. Other Problems ........................................... 26
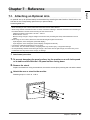
Chapter 7 Reference ........................................ 27
7-1. Attaching an Optional Arm ........................ 27
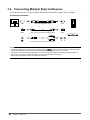
7-2. Connecting Multiple External Devices ..... 28
7-3. Specications ............................................. 29
Appendix .............................................................. 31
Trademark ................................................................31
License .....................................................................31
Copyright .................................................................31
Warning for Radio interference ............................ 32
LIMITED WARRANTY ............................................. 33
Recycling Information / Informations sur le
recyclage ................................................................. i
English
9
CONTENTS

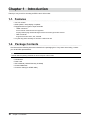
Chapter 1 Introduction
Thank you very much for choosing an EIZO color LCD monitor.
1-1. Features
• 17.0-inch screen
• SXGA (1280 × 1024) display compliant
• Equipped with two types of input terminals
- HDMI connector
PCs and audio-visual devices are supported
Displays HDCP (High-bandwidth Digital Content Protection) protected contents.
- BNC connector
Supported formats: NTSC, PAL, SECAM
• A 2-year long-term warranty for 24-hour continuous use
1-2. Package Contents
Check that all the following items are included in the packaging box. If any items are missing, contact
your local EIZO representative.
Note
• Please retain the packing materials for future transport of the monitor.
• LCD Monitor
• Power cord
• User's Manual (Limited Warranty included)
• Contact Addresses
• Connector clamp (for HDMI cable)
10
Chapter 1 Introduction

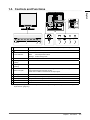
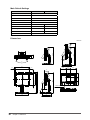
1-3. Controls and Functions
AUDIO INVIDEO
MAINTENANCE
AUDIO INVIDEO
MAINTENANCE
31 2 4 5 6 7 8
9
12
10
11
Not used
1 Operation button Displays menus. Operate the switches according to the operation guide.
2
button Turns the power on or o.
3 Power indicator
Indicates the monitor's operation status.
Blue: Normal operation status
Orange: Power saving mode
4 Power connector Connects the power cord.
5
Input signal connector
(HDMI)
HDMI connector
6
Input signal connector
(VIDEO)
BNC connector
7 Stereo mini jack
If you connect to an external device using a stereo mini jack cable, you can
output external audio from the monitor.
Used when "VIDEO" is selected for the input signal.
8 mini USB For maintenance use. Not for normal use.
9 Stand
*1
Used to adjust the height and angle (tilt, swivel, rotation) of the monitor screen.
10 Security lock slot Complies with Kensington's MicroSaver security system.
11 Speakers Outputs audio.
12 Cable holder Covers the monitor cables.
*1 An optional arm (or an optional stand) can be attached by removing the stand (see “7-1. Attaching an
Optional Arm” (page 27)).
English
11
Chapter 1 Introduction

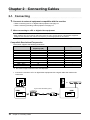
Chapter 2 Connecting Cables
2-1. Connecting
1.
Connects to external equipment compatible with the monitor.
• When connecting to a PC or digital video equipment: see page 12
• When connecting to analog video equipment: see page 13
●
When connecting to a PC or digital video equipment
Attention
• When replacing the current monitor with this monitor, be sure to change the PC or digital video equipment
settings for the resolution and vertical scan frequency to those appropriate for this monitor.
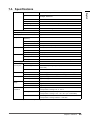
Compatible Resolutions/Frequencies
The monitor supports the following resolutions.
Resolution Vertical scan
frequency (Hz)
Interlace Progressive
640 × 480 59.94 / 60 - √
720 × 400 70 - √
720 × 480 59.94 / 60 √ √
720 × 576 50 √ √
800 × 600 60 - √
1024 × 768 60 - √
1280 × 720 50 / 59.94 / 60 - √
1280 × 960 60 - √
1280 × 1024
*1
60 - √
1920 × 1080
*2
50 / 59.94 / 60 - √
*1 Recommended resolution (Set this resolution.)
*2 The screen image is reduced in size when displayed.
1. Connect the monitor to a PC or digital video equipment with a signal cable that matches the
connectors.
HDMIHDMI
Signal cable HH200PR (option)
Or
12
Chapter 2 Connecting Cables

2. You can use the connector clamp included in the packaging to x the signal cable to the monitor.
AUDIO INVIDEO
MAINTENANCE
Connector
clamp
Signal cable
Attention
• When connecting with an HDMI cable, it is not required to connect an audio cable.
●
When connecting to analog video equipment
1. Connect the monitor to the analog video equipment with a signal cable that matches the
connectors.
VIDEO BNC
AUDIO IN
BNC cable (commercially available product)
*1
Audio output
connector
Audio cable (commercially available product)
*2
*1 If the video output connector for the analog video equipment has an RCA plug, use a commercially
available BNC-RCA conversion adapter to make the connection.
*2 The audio cable to use varies depending on the device that is connected.
English
13
Chapter 2 Connecting Cables

2.
Plug the power cord of the monitor into a power outlet.
Plug the power cord into a power outlet and the Power connector on the monitor.
Attention
• Turn o the power after you are nished. Unplugging the power cord completely shuts o power supply to the
monitor.
2-2. Turning On the Power
Press .
2-3. Adjusting the Screen Height and Angle
Hold left and right edge of the monitor with both hands, and adjust the screen height, tilt and swivel the
screen to the best condition for working.
Attention
• Be sure that the cables are correctly connected.
14
Chapter 2 Connecting Cables

Chapter 3 Basic Adjustment/Setting
This chapter describes the basic functions that can be adjusted and set using the operation buttons on the
front of the monitor.
For advanced adjustment and setting procedures using the Setting menu, see “Chapter 4 Advanced
Adjustment/Setting” (page 17).
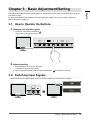
3-1. How to Operate the Buttons
1.
Displaying the operation guide
1. Press any of the buttons (excluding ).
The operation guide appears on the screen.
2.
Adjusting/setting
1. Press the button of an item to adjust/set.
The Adjustment/Setting menu appears.
2. Perform adjustment/setting with the buttons and select to accept the changes.
3-2. Switching Input Signals
When a monitor has multiple signal inputs, the signal to display on-screen can be changed.
English
15
Chapter 3 Basic Adjustment/Setting

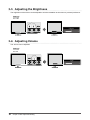
3-3. Adjusting the Brightness
The brightness of the screen can be adjusted to suit the installation environment or personal preference.
Settings
0 to 100
3-4. Adjusting Volume
The volume can be adjusted.
Settings
0 to 30
16
Chapter 3 Basic Adjustment/Setting

Chapter 4 Advanced Adjustment/Setting
This chapter describes the advanced monitor adjustment and setting procedures using the Setting menu.
For basic functions, see “Chapter 3 Basic Adjustment/Setting” (page 15).
4-1. Basic Operation of the Setting Menu
1.
Displaying the menu
1. Press any button (except ).
The operation guide appears.
2. Select .
The Setting menu appears.
2.
Adjusting/setting
1. Select a menu to adjust/set with and select .
The Sub menu appears.
2. Select an item to adjust/set with and select .
The Adjustment/Setting menu appears.
3. Perform adjustment/setting with or and select to accept the changes.
The Sub menu appears.
Selecting
during adjustment/setting will cancel the adjustment/setting and restore the state prior to
making changes.
3.
Exiting
1. Select or several times to terminate the Setting menu.
English
17
Chapter 4 Advanced Adjustment/Setting

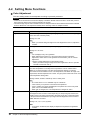
4-2. Setting Menu Functions
●
Color Adjustment
The color setting status can be adjusted according to personal preference.
Attention
• It takes about 30 minutes for the monitor display to stabilize. Please wait 30 minutes or more after power to
the monitor has been turned on before adjusting the monitor.
• The same image may be seen in dierent colors on multiple monitors due to dierences between individual
monitors. Make ne color adjustment visually when matching colors on multiple monitors.
Functions Description
Brightness The screen brightness is adjusted by changing the brightness of the backlight (light
source from the LCD back panel).
Settings: 0 to 100
Note
• When your feel the image is bright even if the brightness is set to 0, adjust the
contrast.
Contrast
The brightness of the screen is adjusted by varying the video signal level.
Settings: 0 % to 100 %
Note
• 100 % displays every color gradation.
• When adjusting the monitor, it is recommended to perform brightness
adjustment, which does not lose gradation characteristics, prior to contrast
adjustment.
• Perform contrast adjustment in the following cases.
- When you feel the image is bright even if the brightness is set to 0. (Set the
contrast to lower than 100 %).
Temperature
The color temperature can be adjusted.
The color temperature is normally used to express the color of "White" and/or
"Black" by a numerical value. The value is expressed in degrees "K" (Kelvin).
The screen becomes reddish at a low color temperature, and bluish at a high color
temperature, like the temperature of a ame. The gain preset values are set for each
color temperature setting value.
Settings: Native, 4000K to 10000K (in units of 100K), User
Note
• The value shown in "K" is available only as a reference.
• "Gain" allows you to perform more advanced adjustment.
• If set to "Native", the image is displayed in the preset color of the LCD panel
(Gain: 100 for each RGB channel).
• When gain is changed, the color temperature is changed to "User".
Gamma
Adjust the gamma.
The brightness of the monitor varies depending on the input signal, however, the
variation rate is not simply proportional to the input signal. The control performed
to keep the balance between the input signal and the brightness of the monitor is
called "Gamma correction".
Settings: 1.8, 2.0, 2.2, 2.4, Dynamic
Note
• If "Dynamic" is selected, the display is adjusted to emphasize low gradation
contrast.
18
Chapter 4 Advanced Adjustment/Setting

Functions Description
Advanced
Settings
Hue Adjust the hue.
Settings: -100 to 100
Note
• Using this function may make some color gradations unavailable for display.
Saturation
Adjust the color saturation.
Settings: -100 to 100
Note
• Using this function may make some color gradations unavailable for display.
• The minimum value (-100) changes the screen to monochrome.
Gain
The brightness of each color component red, green, and blue is called Gain. The
hue of "white" can be changed by adjusting the gain.
Settings: 0 % to 100 %
Note
• Using this function may make some color gradations unavailable for display.
• The gain value changes according to the color temperature.
• When gain is changed, the color temperature is changed to "User".
Reset Resets the currently selected color adjustments back to the default settings.
English
19
Chapter 4 Advanced Adjustment/Setting

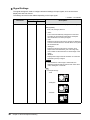
●
Signal Settings
The signal settings are used to congure advanced settings for input signals, such as the screen
display size and color format.
The settings of each function diers depending on the input signal.
√: Settable -: Not settable
Functions
Input Signal
Description
HDMI Video
Screen Size √ √ The screen size of the monitor display can be changed.
Settings(HDMI):
Auto, Full, Enlarged, Normal
• "Auto"
The monitor automatically changes the screen size
according to the resolution information and aspect
ratio information from the input signal.
• "Full"
Displays an image in full screen. Images are distorted
in some cases because the vertical rate is not equal to
the horizontal rate.
• "Enlarged"
Displays an image in full screen. However, since
aspect ratios are maintained, part of an image may
not be visible for the horizontal or vertical edge of the
image.
• "Normal"
Displays the image at the set resolution or at the size
specied by the input signal.
Attention
• If the resolution of the image is 1920×1080, the
displayed resolution will be reduced even when set to
"Full", "Enlarged" or "Normal".
Note
• Example settings
- "Full"
- "Enlarged"
- "Normal"
20
Chapter 4 Advanced Adjustment/Setting
Pagina se încarcă...
Pagina se încarcă...
Pagina se încarcă...
Pagina se încarcă...
Pagina se încarcă...
Pagina se încarcă...
Pagina se încarcă...
Pagina se încarcă...
Pagina se încarcă...
Pagina se încarcă...
Pagina se încarcă...
Pagina se încarcă...
Pagina se încarcă...
Pagina se încarcă...
Pagina se încarcă...
Pagina se încarcă...
Pagina se încarcă...
Pagina se încarcă...
-
 1
1
-
 2
2
-
 3
3
-
 4
4
-
 5
5
-
 6
6
-
 7
7
-
 8
8
-
 9
9
-
 10
10
-
 11
11
-
 12
12
-
 13
13
-
 14
14
-
 15
15
-
 16
16
-
 17
17
-
 18
18
-
 19
19
-
 20
20
-
 21
21
-
 22
22
-
 23
23
-
 24
24
-
 25
25
-
 26
26
-
 27
27
-
 28
28
-
 29
29
-
 30
30
-
 31
31
-
 32
32
-
 33
33
-
 34
34
-
 35
35
-
 36
36
-
 37
37
-
 38
38


în alte limbi
- English: Eizo FDS1703-A User manual
Lucrări înrudite
-
Eizo FDS1903-A Manual de utilizare
-
-
-
-
Eizo FDF2382WT Manual de utilizare
-
-
Eizo S1933 Manual de utilizare
-
-
-