
WP3861

2

3
A
B
D
E
1
2
3
F
G
4
C
H
I
J
K
L
1

4

WP3861
ENGLISH 8
18
29
39
48
58
68
79
89
99
109
119
130
140
149
159

6
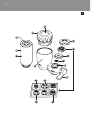
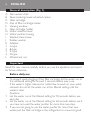
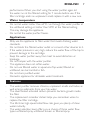
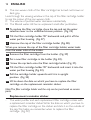
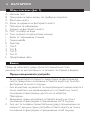
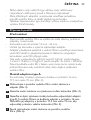
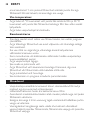
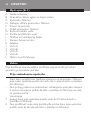
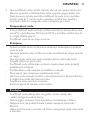
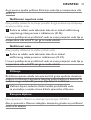
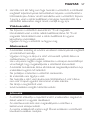
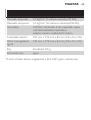
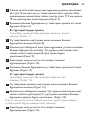
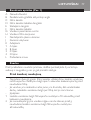
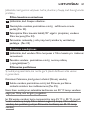
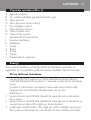
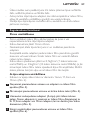
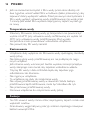
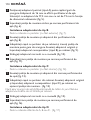
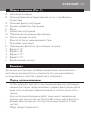
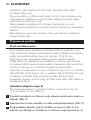
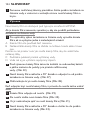
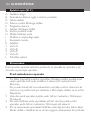
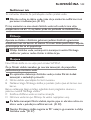
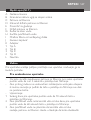
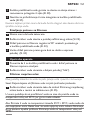
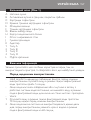
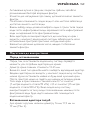
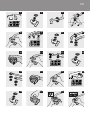
General description (Fig. 1)
A Non-woven cloth
B Silver-coated granular activated carbon
C Filter cartridge
D Capofltercartridgeholder
E Viewing window
F Filter cartridge holder
G Water selection lever
H Waterpurierhousing
I Stainless steel screen
J Rubber washer
K Adapter
1 A-type
2 B-type
3 C type
4 D-type
L Attachment nut
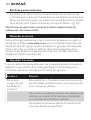
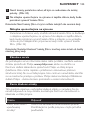
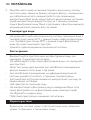
Important
Read this user manual carefully before you use the appliance and save it
for future reference.
Before daily use
Topreventquickcloggingoftheltercartridge,letthewaterrunat
theunlteredsettingforaround5secondsbeforeeveryuse.
If the water is highly coloured or turbid due to work on your water
network,donotletthewaterrunatthelteredsettinguntilthe
water is clear.
Cautions:
1 Letthewaterrunatthelteredsettingfor10secondsbeforeuse
each day.
2 Letthewaterrunatthelteredsettingfor60secondsbeforeuseif
youhavenotusedthewaterpurierformorethantwodays.
3 Ifyouarenotgoingtousethewaterpurierformorethantwo
weeks,puttheltercartridgeintherefrigeratortoensureitsgood
-
-
-
ENGLISH

performance.Whenyoustartusingthewaterpurieragain,let
thewaterrunatthelteredsettingfor1minutebeforeuse.Ifthe
ltercartridgeemitsanunpleasantsmell,replaceitwithanewone.
Water temperature
Donotletwaterhotterthan65°Crunthroughthewaterpurierat
theunlteredsettingorhotterthan50°Catthelteredsetting.
This may damage the appliance.
Donotletthewaterpurierfreeze.
Onlyusetheappliancetolterwaterthatmeetsdrinkingwater
standards.
Donotblockthelteredwateroutletorconnectotherdevicestoit.
Ifthewaterpressureisveryhigh,reducethewaterowofthetapto
prevent damage to the cartridge.
Keepthewaterpurierawayfromheattoavoiddistortionor
breakage.
Donottamperwiththewaterpurier.
This appliance does not soften water.
Donotuselteredwaterinaquariums.Tapwater,lteredor
unltered,canbeharmfultosh.
Donotstorepuriedwater.
Domestic appliance for drinkable water treatment.
Features
Thewaterpurierremoveschlorine,unpleasantsmellsandtastes,as
well as large sediments from your tap water.
The silver-coated activated carbon prevents bacteria growth inside
thelter.
The replacement reminder sticker helps you remember when to
replacetheltercartridge.
The2ltrs/minhigh-speedinitialowrategivesyouplentyofclean
water instantly.
Thewaterselectionleveroffersyouachoiceofthreewaterow
types:unlteredspray,unlteredstreamorlteredspray.
-
-
-
-
-
-
-
-
-
-
-
-
-
-
-
-
ENGLISH 7

Theeighttap-mountingadapterssuppliedwiththewaterpurier
allow easy installation on almost any type of tap.
Thebayonet-typemountensuresquick,easyandsecurelter
cartridge replacement.
Preparing for use
Before installation
Beforeyouinstallthewaterpurier,makesurealltap-mounting
adapters you require are present.
Thetapmusthaveadiameterof13mm-25mm.
Determine what type of tap you have and select the appropriate
adapter.
Theadapterssuppliedmakethewaterpuriersuitableforalmost
anykitchentap.However,thewaterpuriermaynottsome
uncommon types of taps.
Thetapwaterpressurehastobebetween0.7kgf/cm²(7metresof
watercolumn/70kPa)and3.5kgf/cm²(35metresofwatercolumn/
350kPa).Ifyouusethewaterpurieratawaterpressureoutsidethis
range,eitherthelteredwaterowwillbeextremelyloworthe
waterpurierwillgetdamaged.
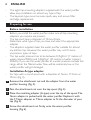
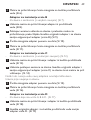
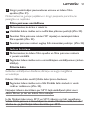
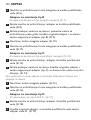
Fortapswitharoundspoutwithadiameterof16mm,17.5mmor
19mm(Fig.2).
1 Remove the attachment nut and the adapter from the water
purier housing (Fig. 3).
2 Pass the attachment nut over the tap spout (Fig. 4).
3 Place the matching adapter (A-type) over the tip of the spout. The
16mm adapter is packed with the water purier. Replace it with
the 17.5mm adapter or 19mm adapter to t the diameter of your
tap (Fig. 5).
4 Screw the attachment nut rmly onto the water purier
housing (Fig. 6).
-
-
-
-
-
-
-
-
ENGLISH8

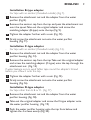
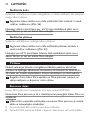
Fortapswithanaerator(threadedoutside)(Fig.7).
1 Remove the attachment nut and the adapter from the water
purier (Fig. 8).
2 Remove the aerator cap from the tap and pass the attachment nut
over the spout. Take out the original adapter and screw the
matching adapter (B-type) onto the tap (Fig. 9).
3 Tighten the adapter further with a coin (Fig. 10).
4 Firmly screw the attachment nut onto the water purier
housing (Fig. 11).
Fortapswithanaerator(threadedinside)(Fig.12).
1 Remove the attachment nut and the adapter from the water
purier housing (Fig. 13).
2 Remove the aerator cap from the tap. Take out the original adapter
and screw the matching adapter (C-type) onto the tap through the
attachment nut. (Fig. 14)
Ifwaterleakageoccurs,windTeontaperoundtheadapter’sthread
before you screw it onto the tap.
3 Tighten the adapter further with a coin (Fig. 15).
4 Firmly screw the attachment nut onto the water purier
housing (Fig. 16).
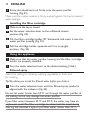
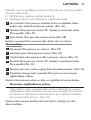
FortapsotherthanA,BorC.(Fig.17)
1 Remove the attachment nut and the adapter from the water
purier housing (Fig. 18).
2 Take out the original adapter and screw the D-type adapter onto
the water purier housing. (Fig. 19)
3 Push the water purier housing onto the tap from below and
tighten the 4 screws evenly (Fig. 20).
-
-
-
ENGLISH 9

4 Screw the attachment nut rmly onto the water purier
housing (Fig. 21).
Makesuretherubberwasherisrmlypushedagainstthetaptoprevent
water leakage.
1 Make sure the tap is closed.
2 Set the water selection lever to the unltered stream
position (Fig. 22).
3 Tilt the lter cartridge holder 90° backwards and insert it into the
water purier housing (Fig. 23).
4 Pull the cartridge holder upwards until it is in upright
position. (Fig. 24)
1
Make sure that the water purier housing and the lter cartridge
holder are properly installed.
2 Turn the water selection lever to the desired setting (‘click’).
Filtered spray
Selectthissettingfordrinking,washingvegetablesorfruitsand
for cooking.
Tip: We advise you to boil the ltered water before you drink it.
1 Turn the water selection lever until the ltered spray symbol is
aligned with the indicator (Fig. 25).
Do not let water hotter than 50°C run through the water purier at
this setting, as this may damage the water purier.
If you lter water between 35°C and 50°C, the water may have an
unpleasant smell. The lter cartridge has absorbed this smell during
ltering, but releases it again if you lter water hotter than 35°C.
ENGLISH10

Select this setting for washing dishes and other jobs that require a gentle
waterow.
1 Turn the water selection lever until the unltered spray symbol is
aligned with the indicator (Fig. 26).
Do not let water hotter than 65°C run through the water purier at
this setting, as this may damage the water purier.
Selectthissettingforastrongwaterow.
1 Turn the water selection lever until the unltered stream symbol is
aligned with the indicator (Fig. 22).
Do not let water hotter than 65°C run through the water purier at
this setting as this may damage the water purier.
Cleaning
Never use scouring pads, abrasive cleaning agents or aggressive liquids
such as petrol or acetone to clean the appliance. These substances may
cause cracking, discolouration or distortion.
1 Clean the water purier housing and the inside and outside of the
lter cartridge holder and cap regularly with a damp cloth.
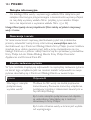
Replacement
NewltercartridgesareavailableundertypenumberWP3961.
Replace the lter cartridge if it is clogged to prevent damage to the
water purier.
1 For optimal performance of the water purier, replace the lter
cartridge if either of the following situations occurs:
A Youhaveusedtheltercartridgeforsixmonths.
ENGLISH 11

B Thenon-wovenclothoftheltercartridgehasturnedrustbrownor
dark grey.
Lookthroughtheviewingwindowinthecapoftheltercartridgeholder
to see the colour of the non-woven cloth.
C Thevolumeofpuriedwaterdecreasessubstantially.
D Thelteredwaterstillhasanunpleasantsmellafterpurication.
2 To replace the lter cartridge, close the tap and set the water
selection lever to the unltered stream position. (Fig. 22)
3 Tilt the lter cartridge holder 90° backwards and pull it off the
water purier housing. (Fig. 27)
4 Unscrew the cap of the lter cartridge holder (Fig. 28).
When you remove the cap of the lter cartridge holder, water leaks
from the water inlet of the holder.
5 Remove the lter cartridge from the holder. (Fig. 29)
6 Put a new lter cartridge in the holder (Fig. 30).
7 Screw the cap back onto the lter cartridge holder (Fig. 31).
8 Tilt the lter cartridge holder 90° backwards and insert it into the
water purier housing (Fig. 23).
9 Pull the cartridge holder upwards until it is in upright
position. (Fig. 24)
10 Write down the date on which you have to replace the lter
cartridge on the replacement reminder sticker.
Note: The lter cartridge holder and the cap can be purchased as service
parts.
Replacement reminder sticker
Thewaterpurierandeachreplacementltercartridgecomeswith
a replacement reminder sticker. Write the date on which you have to
replacetheltercartridgeonthestickerandstickitontheoutsideof
thecap.Thishelpsyourememberwhentoreplacethelter
cartridge.(Fig.32)
-
ENGLISH12

Note: The actual lifetime of the lter cartridge strongly depends on the
quality of the local tap water.
Guarantee & service
Ifyouneedserviceorinformationorifyouhaveaproblem,pleasevisit
the Philips website at
www.philips.com or contact the Philips Customer
CareCentreinyourcountry(younditsphonenumberinthe
worldwideguaranteeleaet).IfthereisnoCustomerCareCentrein
yourcountry,gotoyourlocalPhilipsdealerorcontacttheService
Department of Philips Domestic Appliances and Personal Care BV.
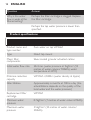
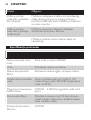
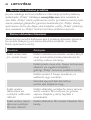
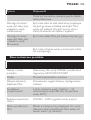
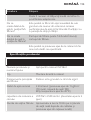
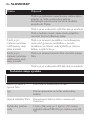
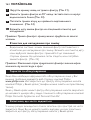
Frequently asked questions
This chapter lists the questions most frequently asked about the
appliance.Ifyoucannotndtheanswertoyourquestion,contactthe
Customer Care Centre in your country.
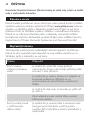
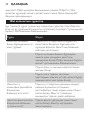
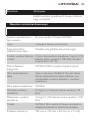
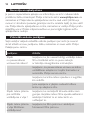
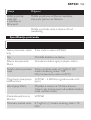
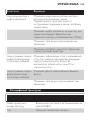
Question Answer
Why does water
leak from
the attachment nut?
Perhaps you have not installed the water
purierproperly.Reinstalltheappliance
according to the instructions in this user manual.
Perhaps the attachment nut or the tap-
mounting adapter is damaged. Contact an
authorised Philips service centre.
Perhaps the tap water pressure is higher than
specied.
YoumayneedtowindsomeTeontapearound
the thread of the adapter.
Why is the water
owweakat
theunltered
setting?
Perhaps the stainless steel screen under the
rubberwasherinsidethewaterpurierhousing
is clogged. Clean it with a toothbrush and rinse
it.
ENGLISH 13

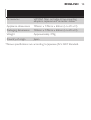
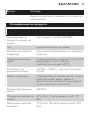
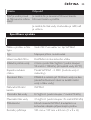
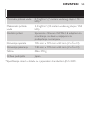
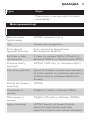
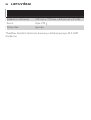
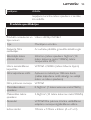
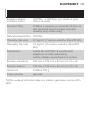
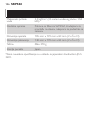
Question Answer
Why is the water
owisweakatthe
lteredsetting?
Perhapstheltercartridgeisclogged.Replace
theltercartridge.
Perhaps the tap water pressure is lower than
specied.
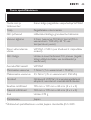
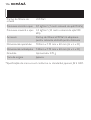
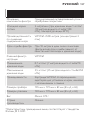
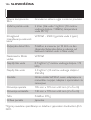
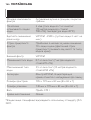
Product name and
type number
Pure water on tap WP3861
Type Direct tap mount
Majorlter
components
Silver-coated granular activated carbon
Initialwaterowrate 2ltrs/min.(waterpressureat1kgf/cm²(10
metresofwatercolumn/100kPa),water
temperatureat20°C)
Chlorine reduction
capacity
WP3961-2,500ltrs(waterdensityat2ppm)
Filter lifetime Approximately6monthsat10ltrsaday(the
actual lifetime depends on the quality of the
localwaterandthewaterpressure)
Replacementlter
cartridge
WP3961
Minimum water
pressure
0.7kgf/cm²(7metresofwatercolumn/70kPa)
Maximumwater
pressure
3.5kgf/cm²(35metresofwatercolumn/
350kPa)
ENGLISH14

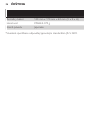
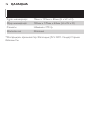
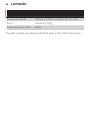
Accessories WP3961ltercartridge,8tap-mounting
adapters,replacementremindersticker
Appliance dimensions 105mmx139mmx83mm(HxWxD)
Packaging dimensions 140mmx170mmx84mm(HxWxD)
Weight Approximately370g
Country of origin
Japan
*AbovespecicationsareaccordingtoJapaneseJISS3201Standard.
ENGLISH 15

16
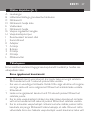
A Нетъканплат
B Гранулиранактивенвъгленсъссребърнопокритие
C Филтърнакасета
D Капакнадържачанафилтърнатакасета
E Прозорчезанаблюдение
F Държачнафилтърнатакасета
G Лостзаизборнавода
H Тялонаблоказапречистваненавода
I Екранотнеръждаемастомана
J Гуменашайба
K Адаптер
1 ТипA
2 ТипB
3 ТипC
4 ТипD
L Прикрепващагайка
Предидаизползватеуреда,прочететевнимателнотова
ръководствозаексплоатацияигозапазетезасправкавбъдеще.
Задапредотвратитебързотозадръстваненафилтриращата
касета,предивсякоизползванеоставяйтеводатадатечебез
филтриранезаоколо5секунди.
Аковследствиенаремонтиповодопроводнатамрежаводатае
силнооцветенаилинеравномерна,неяоставяйтедатечев
положениезафилтриране,докатонесеизбистри.
Препоръки:
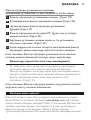
1 Ежедневнопредиизползванеоставяйтеводатадатечев
положениезафилтрираневпродължениена10секунди.
2 Аконестеползвалипречиствателнияуредвпродължениена
повечеотдвадни,предиупотребаоставетеводатадатечев
положениезафилтрираневпродължениена60секунди.
-
-
-

3 Аконевъзнамеряватедаползватепречиствателнияуреддве
седмицииповече,сложетефилтриращатакасетавхладилника,за
дазапазитеработоспособносттай.Когатоотновозапочнете
използванетонапречиствателнияуред,предиупотребаоставете
водатадатечевположениезафилтрираневпродължениена1
минута.Акоусещатенеприятнамиризмаотфилтриращата
касета,подменетеяснова.
Непозволявайтепрезпречиствателнияуреддапротичаводас
температуранад65°Cбезфилтриранеилинад50°Cв
положениезафилтриране.Товаможедаповредиуреда.
Неоставяйтеблоказапречистваненаводадазамръзне.
Използвайтеуредасамозафилтрираненавода,коятоотговаря
настандартитезапитейна.
Незапушвайтеотворазаизтичаненафилтриранатаводаине
свързвайтедругиприспособлениякъмнего.
Аконаляганетонаводатаемноговисоко,намалетедебитана
водатаотчешмата,задапредотвратитеповредипокасетата.
Дръжтепречиствателнияуреддалечеотизточницинатоплина,
задапредотвратитенеговотодеформиранеилисчупване.
Несииграйтесблоказапречистваненавода.
Тозиуреднеомекотяваводата.
Неизползвайтефилтриранатаводазааквариуми.Чешмяната
вода,филтриранаилине,можедаевредназарибите.
Несъхранявайтезадългопречистенатавода.
Домакинскиуредзаобработканапитейнавода.
Пречиствателниятуредпремахваотчешмянатаводахлор,
неприятнимиризмиивкусове,кактоипо-значителниутайки.
Гранулираниятактивенвъгленсъссребърнопокритие
предотвратяваразвъжданетонабактериивъвфилтъра.
-
-
-
-
-
-
-
-
-
-
-
-
-
17

Стикерътзаподмянавинапомнякогатрябвадаподмените
филтриращатакасета.
Високиятначалендебитот2л/мин.виосигуряваголямо
количествочиставоданамомента.
Лостътзаизборнаводавидаваизбормеждутривидавода:
нефилтрираноразпръскване,нефилтриранаструяифилтрирано
разпръскване.
Приложенитеспречиствателнияуредосемадаптеразачешма
вигарантиратлесенмонтажкъмпочтивсякаквачешма.
Закрепванетонабайонетосигурявабърза,леснаинадеждна
подмянанафилтриращатакасета.
Предидаинсталиратепречиствателнияуред,проверетедалиса
налицевсичкинеобходимивиадаптеризамонтажкъмчешма.
Чешмататрябвадаесдиаметърот13ммдо25мм.
Проверетекакъвтипвиечешматаиизберетеподходящия
адаптер.
Приложенитеадаптериправятпречиствателниятуредподходящ
започтивсякаквачешма.Всепак,възможноеуредътданестава
занякоинестандартнитиповечешми.
Наляганетонаводатавчешмататрябвадаемежду0,7кгс/см²
(7метраводенстълб/70kPa)и3,5кгс/см²(35метраводен
стълб/350kPa).Акоизползватепречиствателнияуредпри
наляганенаводатаизвънтезипределнистойности,дебитътна
филтриранатаводащеемногослабилиуредътщесеповреди.
Зачешмискръгълотворсдиаметри16мм,17,5ммили
19мм(фиг.2).
1 Свалете прикрепващата гайка и адаптера от тялото на блока за
пречистване на вода (фиг. 3).
2 Вмъкнете прикрепващата гайка през отвора на чешмата (фиг. 4).
-
-
-
-
-
-
-
-
-
-
-
18

3 Поставете съответния адаптер (тип A) на накрайника на
чешмата. 16-милиметровият е опакован заедно с блока за
пречистване на вода. Заменете го със 17,5-милиметровия или
19-милиметровия, съобразно диаметъра на чешмата ви (фиг. 5).
4 Завийте здраво прикрепващата гайка към тялото на блока за
пречистване на вода (фиг. 6).
Зачешмисаератор(свъншнарезба)(фиг.7).
1 Свалете прикрепващата гайка и адаптера от блока за
пречистване на вода (фиг. 8).
2 Свалете накрайника на аератора от чешмата и вмъкнете
прикрепващата гайка през отвора на чешмата. Извадете
оригиналния адаптер и завинтете съответния такъв (тип B) към
чешмата (фиг. 9).
3 Затегнете допълнително адаптера с монета (фиг. 10).
4 Завийте здраво прикрепващата гайка към тялото на блока за
пречистване на вода (фиг. 11).
Зачешмисаератор(свътрешнарезба)(фиг.12).
1 Свалете прикрепващата гайка и адаптера от тялото на блока за
пречистване на вода (фиг. 13).
2 Свалете накрайника на аератора от чешмата. Извадете
оригиналния адаптер и завинтете съответния такъв (тип C) към
чешмата през прикрепващата гайка. (фиг. 14)
Акосепоявятутечкинавода,навийтетефлоновалентаоколо
резбатанаадаптера,предидагозавинтитекъмчешмата.
3 Затегнете допълнително адаптера с монета (фиг. 15).
4 Завийте здраво прикрепващата гайка към тялото на блока за
пречистване на вода (фиг. 16).
-
-
19

Зачешми,различниотA,BиC.(фиг.17)
1 Свалете прикрепващата гайка и адаптера от тялото на блока за
пречистване на вода (фиг. 18).
2 Извадете оригиналния адаптер и завинтете адаптера тип D към
тялото на блока за пречистване на вода. (фиг. 19)
3 Притиснете тялото на блока за пречистване на вода отдолу
към чешмата и затегнете равномерно 4-те винта (фиг. 20).
4 Завийте здраво прикрепващата гайка към тялото на блока за
пречистване на вода (фиг. 21).
Осигуретегуменаташайбадаездравопритиснатакъмчешмата,за
дасепредотвратятутечки.
1 Проверете дали чешмата е затворена.
2 Поставете лоста за избор на вода в положение за
нефилтрирано разпръскване (фиг. 22).
3 Наклонете държача на филтриращата касета на 90° назад и го
вмъкнете в тялото на блока за пречистване на вода (фиг. 23).
4 Издърпайте държача на касетата нагоре, докато застане в
изправено положение. (фиг. 24)
1
Убедете се, че тялото на блока за пречистване на вода и
държача на филтриращата касета са правилно монтирани.
2 Завъртете лоста за избор на вода в желаното положение (с
щракване).
Изберететоваположениезапиене,измиваненаплодовеи
зеленчуциизаготвене.
-
20
Pagina se încarcă...
Pagina se încarcă...
Pagina se încarcă...
Pagina se încarcă...
Pagina se încarcă...
Pagina se încarcă...
Pagina se încarcă...
Pagina se încarcă...
Pagina se încarcă...
Pagina se încarcă...
Pagina se încarcă...
Pagina se încarcă...
Pagina se încarcă...
Pagina se încarcă...
Pagina se încarcă...
Pagina se încarcă...
Pagina se încarcă...
Pagina se încarcă...
Pagina se încarcă...
Pagina se încarcă...
Pagina se încarcă...
Pagina se încarcă...
Pagina se încarcă...
Pagina se încarcă...
Pagina se încarcă...
Pagina se încarcă...
Pagina se încarcă...
Pagina se încarcă...
Pagina se încarcă...
Pagina se încarcă...
Pagina se încarcă...
Pagina se încarcă...
Pagina se încarcă...
Pagina se încarcă...
Pagina se încarcă...
Pagina se încarcă...
Pagina se încarcă...
Pagina se încarcă...
Pagina se încarcă...
Pagina se încarcă...
Pagina se încarcă...
Pagina se încarcă...
Pagina se încarcă...
Pagina se încarcă...
Pagina se încarcă...
Pagina se încarcă...
Pagina se încarcă...
Pagina se încarcă...
Pagina se încarcă...
Pagina se încarcă...
Pagina se încarcă...
Pagina se încarcă...
Pagina se încarcă...
Pagina se încarcă...
Pagina se încarcă...
Pagina se încarcă...
Pagina se încarcă...
Pagina se încarcă...
Pagina se încarcă...
Pagina se încarcă...
Pagina se încarcă...
Pagina se încarcă...
Pagina se încarcă...
Pagina se încarcă...
Pagina se încarcă...
Pagina se încarcă...
Pagina se încarcă...
Pagina se încarcă...
Pagina se încarcă...
Pagina se încarcă...
Pagina se încarcă...
Pagina se încarcă...
Pagina se încarcă...
Pagina se încarcă...
Pagina se încarcă...
Pagina se încarcă...
Pagina se încarcă...
Pagina se încarcă...
Pagina se încarcă...
Pagina se încarcă...
Pagina se încarcă...
Pagina se încarcă...
Pagina se încarcă...
Pagina se încarcă...
Pagina se încarcă...
Pagina se încarcă...
Pagina se încarcă...
Pagina se încarcă...
Pagina se încarcă...
Pagina se încarcă...
Pagina se încarcă...
Pagina se încarcă...
Pagina se încarcă...
Pagina se încarcă...
Pagina se încarcă...
Pagina se încarcă...
Pagina se încarcă...
Pagina se încarcă...
Pagina se încarcă...
Pagina se încarcă...
Pagina se încarcă...
Pagina se încarcă...
Pagina se încarcă...
Pagina se încarcă...
Pagina se încarcă...
Pagina se încarcă...
Pagina se încarcă...
Pagina se încarcă...
Pagina se încarcă...
Pagina se încarcă...
Pagina se încarcă...
Pagina se încarcă...
Pagina se încarcă...
Pagina se încarcă...
Pagina se încarcă...
Pagina se încarcă...
Pagina se încarcă...
Pagina se încarcă...
Pagina se încarcă...
Pagina se încarcă...
Pagina se încarcă...
Pagina se încarcă...
Pagina se încarcă...
Pagina se încarcă...
Pagina se încarcă...
Pagina se încarcă...
Pagina se încarcă...
Pagina se încarcă...
Pagina se încarcă...
Pagina se încarcă...
Pagina se încarcă...
Pagina se încarcă...
Pagina se încarcă...
Pagina se încarcă...
Pagina se încarcă...
Pagina se încarcă...
Pagina se încarcă...
Pagina se încarcă...
Pagina se încarcă...
Pagina se încarcă...
Pagina se încarcă...
Pagina se încarcă...
Pagina se încarcă...
Pagina se încarcă...
Pagina se încarcă...
Pagina se încarcă...
Pagina se încarcă...
Pagina se încarcă...
Pagina se încarcă...
Pagina se încarcă...
Pagina se încarcă...
Pagina se încarcă...
-
 1
1
-
 2
2
-
 3
3
-
 4
4
-
 5
5
-
 6
6
-
 7
7
-
 8
8
-
 9
9
-
 10
10
-
 11
11
-
 12
12
-
 13
13
-
 14
14
-
 15
15
-
 16
16
-
 17
17
-
 18
18
-
 19
19
-
 20
20
-
 21
21
-
 22
22
-
 23
23
-
 24
24
-
 25
25
-
 26
26
-
 27
27
-
 28
28
-
 29
29
-
 30
30
-
 31
31
-
 32
32
-
 33
33
-
 34
34
-
 35
35
-
 36
36
-
 37
37
-
 38
38
-
 39
39
-
 40
40
-
 41
41
-
 42
42
-
 43
43
-
 44
44
-
 45
45
-
 46
46
-
 47
47
-
 48
48
-
 49
49
-
 50
50
-
 51
51
-
 52
52
-
 53
53
-
 54
54
-
 55
55
-
 56
56
-
 57
57
-
 58
58
-
 59
59
-
 60
60
-
 61
61
-
 62
62
-
 63
63
-
 64
64
-
 65
65
-
 66
66
-
 67
67
-
 68
68
-
 69
69
-
 70
70
-
 71
71
-
 72
72
-
 73
73
-
 74
74
-
 75
75
-
 76
76
-
 77
77
-
 78
78
-
 79
79
-
 80
80
-
 81
81
-
 82
82
-
 83
83
-
 84
84
-
 85
85
-
 86
86
-
 87
87
-
 88
88
-
 89
89
-
 90
90
-
 91
91
-
 92
92
-
 93
93
-
 94
94
-
 95
95
-
 96
96
-
 97
97
-
 98
98
-
 99
99
-
 100
100
-
 101
101
-
 102
102
-
 103
103
-
 104
104
-
 105
105
-
 106
106
-
 107
107
-
 108
108
-
 109
109
-
 110
110
-
 111
111
-
 112
112
-
 113
113
-
 114
114
-
 115
115
-
 116
116
-
 117
117
-
 118
118
-
 119
119
-
 120
120
-
 121
121
-
 122
122
-
 123
123
-
 124
124
-
 125
125
-
 126
126
-
 127
127
-
 128
128
-
 129
129
-
 130
130
-
 131
131
-
 132
132
-
 133
133
-
 134
134
-
 135
135
-
 136
136
-
 137
137
-
 138
138
-
 139
139
-
 140
140
-
 141
141
-
 142
142
-
 143
143
-
 144
144
-
 145
145
-
 146
146
-
 147
147
-
 148
148
-
 149
149
-
 150
150
-
 151
151
-
 152
152
-
 153
153
-
 154
154
-
 155
155
-
 156
156
-
 157
157
-
 158
158
-
 159
159
-
 160
160
-
 161
161
-
 162
162
-
 163
163
-
 164
164
-
 165
165
-
 166
166
-
 167
167
-
 168
168
-
 169
169
-
 170
170
-
 171
171
-
 172
172


