Parkside PGI 1200 A1 Operating And Safety Instructions Manual
- Categorie
- Generatoare de curent
- Tip
- Operating And Safety Instructions Manual

INVERTER GENERATOR PGI 1200 A1
BG
ROHR
IAN 270526
INVERTER GENERATOR PGI 1200 A1
Operating and Safety Instructions
Translation of Original Operating Manual
GB
GENERATOR INVERTER KONTROLIRANO
PGI 1200 A1
Uputa i Sigurnosne upute
Prijevod originalnog priručnika za uporabu
HR
ИНВЕРТОР ГЕНЕРАТОР PGI 1200 A1
Указания за обслужване и безопасност
Превод на оригиналното ръководство
BG
INVERTOR GENERATORUL PGI 1200 A1
Indicaţii de operare şi de securitate
Traducere din manual de exploatare original
RO
INVERTER STROMERZEUGER PGI 1200 A1
Bedienungs- und Sicherheitshinweise
Originalbetriebsanleitung
DE AT CH

GB Inverter generator 1
HR Generator inverter kontrolirano 10
RO Invertor generatorul 19
BG Инвертор Генератор 28
DE | AT | CH Inverter Stromerzeuger 37
INVERTER GENERATOR PGI 1200 A1
GENERATOR INVERTER KONTROLIRANO
PGI 1200 A1
ИНВЕРТОР ГЕНЕРАТОР PGI 1200 A1

A B C
D
E F
9
10
11
12
13
14
15
16
17
1
2
3
45678
1
2 3
4 5
6
18
7
max 4.2 L

8
9

10
11

1
GB
Table of contents:
Page:
1. Introduction 3
2. Device description 3
3. Intended use 3
4. Technical data 3
5. Safety instructions 4
6. Before operation 4
7. Operation 5
8. Cleaning 5
9. Storage 6
10. Transport 6
11. Ordering spare parts 6
12. Recycling 6
13. Troubleshooting guide 7
14 Maintenance schedule 8
15 Warranty certicate 9
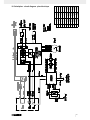
16 Circuit diagram 47
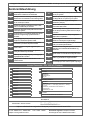
17 Declaration of conformity 48

2
GB
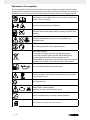
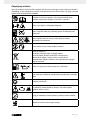
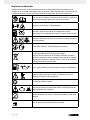
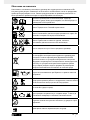
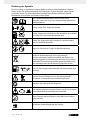
Explanation of the symbols
The use of symbols in this manual is intended to draw your attention to possible risks. The safety
symbols and the explanations that accompany them must be perfectly understood. The warnings in
themselves do not remove the risks and cannot replace correct actions for preventing accidents.
Read operator manual. Before any use, refer to the corresponding
section in this user manual.
Important. Hot parts. Keep your distance.
Important. Switch off the engine before refueling. Not refuel when
operating.
Important. Exhaust gas is poisonous, do not operate in an
unventilated area.
Wear hearing protection. Wear protective gloves.
Only for EU countries.
Do not dispose of power tools with your domestic waste!
In accordance with European Directive 20012/19/EU about
electrical appliances and old electrical appliances and
implementation in national law, old power tools have to be collected
separately and recycled in an environmentally friendly manner.
Take care when handling fuel and lubricants!
Remove the ignition cable before all maintenance work, and read
the instructions for use.
Don’t expose to rain.
Starting engine creates sparking.
Sparking can ignite nearby ammable gases.
Strictly no naked ames or smoking near the appliance!
Guaranteed sound power level of the device.

3
GB
Please ensure that this device was not intended for
commercial use. We do not accept any warranty
liability if the device is used for commercial, manual,
or industrial operations, or activities similar to these.
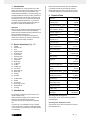
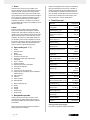
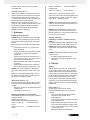
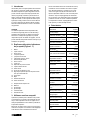
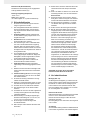
4. Technical Data
Generator Inverter
Protection type IP23M
Continuous output P
rated
(S1) 1000 W
Max. output P
max
(S2/5 s) 1200 W
Nominal voltage U
rated
230 V~
Rated current I
rated
4,3 A
Frequency F
rated
50 Hz
Type drive motor 4 stroke air-cooled
Engine displacement 53,5 cm³
Max. power (motor) 2,1 kW/2,85 PS
Fuel: unleaded fuel
Tank capacity 4,2 l
Engine oil 0,25 l
(15W-40)
Use at 2/3 engine load approx.0,88 l/h
Weight 12,8 kg
Sound pressure level L
pA
(1 m) 81,5 dB(A)
Sound power level L
WA
95 dB(A)
Uncertainty K 1,07 dB (A)
Power factor cos ϕ 1
Performance class G1
Quality class B
Spark plug MS A7RTC
Operating mode S1 (long use)
The machine can be used continuously with the
indicated power.
Operating mode S2 (Short term use)
The machine can be used in the short term with the
indicated power (5 s)
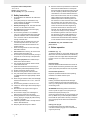
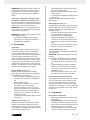
1. Introduction
We congratulate you on the purchase of your new
device. You have chosen a high quality product. The
instructions for use are part of the product. They
contain important information concerning safety, use
and disposal. Before using the product, please famil-
iarise yourself with all of the safety information and
instructions for use. Only use the unit as described
and for the specied applications. If you pass the
product on to anyone else, please ensure that you
also pass on all the documentation with it.
Important!
When using the equipment, a few safety precautions
must be observed to avoid injuries and damage.
Please read the complete operating instructions and
safety information with due care.
We cannot accept any liability for damage or ac-
cidents which arise due to a failure to follow these
instructions and the safety information.
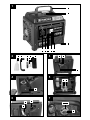
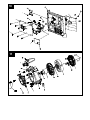
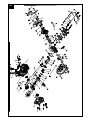
2. Device description (Fig. 1/7)
1. Handle
2. Fuel tank cap
3. Foot
4. Operating bulb
5. Oil check bulb
6. On/off switch
7. Earthing screw
8. 230 V~ socket
9. Choke lever
10. Starter grip
11. Air lter lid
12. Air lter
13. Oil ller plug
14. Low oil trip
15. Spark plug cap
16. Spark plug
17. Fuel tap
18. Fuel lter
A. Oil ller bottle
B. Handle
C. Screwdriver
D. Spark plug spanner
E. Socket wrench
F. Tool bag
3. Intended use
The generator is suitable for devices which use a
230 AC voltage source.
Please check the suitability for use of house hold
devices on the manufacturer information.
The machine may only be utilised for its intended
use.
Any other use is not intended. The user / operator,
not the manufacturer, is liable for resulting damages
or any type of injury resulting from any other use that
is not intended.

4
GB
24. Emission levels are represented in the technical
data under the stated values for sound power
level (LWA) and sound pressure level (LpA) and
are not compulsory denite working levels.Be-
cause there is a connection between emission
levels and immission levels, this can not reliably
used to determine the potentially necessary
additional precautions. Inuencing factors on
the workforce‘s current immission level includes
the properties of the work area, other noise
sources, air borne sound, etc. such as e.g. the
number of machines and other neighbouring
processes and intervals, to which the user is
exposed. Also the admissible immission levels
can vary from country to country. However,
this information gives the user of the machine
the opportunity to have a better estimation of
the risks and dangers. Occasionally acoustic
measurements should be take after installation
in order to determine the sound pressure level.
ATTENTION: Only use unleaded normal
petrol as fuel.
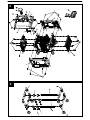
6. Before operation
Installation (Fig. 1/2)
To attach the handle (1), remove both Phillips screws
M6x35 mm which are inserted. Place the handle (1)
in position and screw it tight. Attach all parts before
pouring in fuel or oil in order to prevent leaking of
liquids.
Electrical safety
Electrical cables and attached devices must be de-
fect free. Never connect the generator to the mains
(power point). Keep the cables as short as possible.
Environmental protection
Dispense of polluted maintenance and operating
materials in a suitable collection point.
Earthing (Fig. 1)
Earthing is needed to disperse static discharge.
Connect a cable from one side of the earthing con-
nector (7) of the generator and from the other side to
an external ground.
ATTENTION! When being used for the rst time,
motor oil (15 W-40, approx. 0.25 l) and petrol (un-
leaded normal petrol) must be put in.
Check the fuel level and the oil, and if necessary top
them up. Make sure you have adequate ventilation.
Ensure that the spark cable is securely in the spark
plug. Unplug any electric device connected to the
generator.
Putting in oil (Fig. 5)
Put the generator with its front side down and
unscrew the oil ller plug (13). Pour in 0.25 litres of
engine oil (15 W-40).
Acceptable ambient temperature:
-10 to +40 °C
Height: 1000 m above NN
rel. air humidity: 90 % (not condensed)
5. Safety instructions
1. No modications are allowed to be made to the
generator
2. The speed preset by the manufacturer may
not be changed. The generator or connected
devices could be damaged.
3. Risk of poisoning! Fumes, fuels and lubricants
are toxic. Do not breath in the fumes.
4. Fire risk! Petrol and petrol fumes are highly
ammable and explosive.
5. Do not use the generator in non ventilated
rooms or in highly ammable areas. When the
generator should be used in a well ventilated
room, the fumes must be channeled outside
through a exhaust hose.
6. Even when using an exhaust hose, toxic gas
can still escape. Due to the risk of re, the
exhaust hose should never be aimed at com-
bustible material.
7. Never use the generator in rooms with highly
ammable materials.
8. Hot surface! Risk of burning, do not touch the
exhaust system and engine unit.
9. Do not touch any of the mechanically moving or
hot parts. Do not remove any of the protective
caps.
10. Protective equipment! Use suitable ear pro-
tection when near the device.
11. Only original parts should be used for mainte-
nance and accessories.
12. Repair and maintenance work must only be
performed by authorised qualied personnel.
13. Protect yourself from electric shocks.
14. Never touch the generator with wet hands
15. Only use outside with a extension cable which
is suitable for that and is appropriately marked
(H07RN).
16. When using an extension cable, the total length
should not exceed 50 m for 1.5 mm², 100 m for
2.5 mm².
17. Do not use the generator in the rain or snow.
18. Always turn off the engine when transporting or
refuelling.
19. Ensure that no fuel is spilt on the engine or
exhaust when refuelling.
20. Do not refuel or empty near naked lights or
ames or ying sparks. Do not smoke!
21. Put the generator on a secure and level place.
Turning, tipping or changing its position during
operation is forbidden.
22. Install the generator at least 1 m away from the
walls or attached devices.
23. Keep the generator away from children.

5
GB
ATTENTION! If this happens reduce the amount of
electrical output which you are extracting from the
generator or remove defective devices which are
attached.
ATTENTION! Faulty overload switches should only
be replaced with identically constructed overload
switches with the same performance data. Please
use our customer service department.
Cleaning, maintenance, storage,
transport and ordering
replacement parts
Before cleaning and maintenance work, turn off the
engine and pull the spark plug connector (15) out of
the spark plug (16) .
WARNING! Risk of burning! Wait until the machine
has cooled down before cleaning or servicing it.
ATTENTION! Turn the device off immediately and
contact your Service Station:
• With unusual vibrations or noises.
• If the engine seems overloaded or has back-
red.
8. Cleaning
Keep the safeguards, air vents and the engine
housing as dust and dirt free as possible. Wipe the
device with a clean cloth or blow it with compressed
air with low pressure. We recommend that you clean
the device after every use. Regularly clean the de-
vice with a damp cloth and a little soft soap. Do not
use any cleaning products or solvents which could
attack the plastic part of the device. Ensure that no
water can penetrate the housing.
Air lter (Fig. 4)
Also refer to the service information.
Clean the air lter regularly, and if necessary
exchange it.
• Open the air lter cover (11) by removing the 2
Phillips head screws M6x16 mm.
• Remove the lter element
• When cleaning the element do not use any
strong cleaners or petrol.
• Clean the element by tapping it on a at sur-
face.
• If it is very dirty wash with soapy water, rinse
with clean water and leave to dry.
• Put it back together in the opposite order.
Spark plug (Fig. 6)
Check the spark plug (16) after the rst 20 hours of
use for dirt and if necessary clean it with a copper
wire brush. Then service the spark plug after every
50 hours of use.
• Remove the spark plug connector (15) with a
turning movement.
• Remove the spark plug (16) with the spark plug
socket 25 included.
Close the oil ller cap (13) and stand the generator
upright
Putting in fuel (Fig. 1/7)
Keep away from ignition sources! Always refuel in
well-ventilated rooms or outside. Open the fuel tank
cap (2) and, using a ller pipe (not included in de-
livery), pour in a maximum of 4.2 litres of unleaded
fuel into the fuel container. Ensure the tank level
is not exceeded and no fuel is spilled. Use the fuel
lter. Clean up spilled fuel immediately and wait until
the fuel fumes have evaporated (re hazard). Close
the fuel tank cap (2).
7. Operating
Start the engine (Fig. 1/3/6 )
ATTENTION! When starting with the express start
you can injure your hand with the sudden kick back.
Wear protective gloves when starting.
1. Open the petrol tap by turning the tap down-
wards.
2. Put the on / off switch (6) to the on position.
3. Turn the choke lever (9) to I I (in the left posi-
tion).
4. Start the engine with the express start (10) by
sharply pulling the handle. If the engine has not
started pull the handle again.
5. Push the choke lever (9) back once the engine
has started (in the right position).
6. Connect the device to the 230 V~ socket (8).
ATTENTION! This socket can be loaded continu-
ously (S1) with 1000 W and short term (S2) for a
maximum of 5 seconds with 1200 W.
Note: Some electric devices (sabre saws, drills etc.)
can use more electricity when doing heavy duty
tasks.
Storing the engine (Fig. 1/6)
Before putting away, let the generator run without
load so that the device can „cool down“.
• Turn the on / off switch to the „OFF“ position.
• Close the petrol tap.
Overload protection 230 V~ socket
WARNING! This generator is tted with an overload
protector.
This cuts off the sockets
Green operating bulb
Flashes 1 x per interval Speed too low
Flashes 2 x per interval Temperature too high
Flashes 3 x per interval Overload protection
switches on
Flashes 4 x per interval Short circuit
The socket (8) can be used again after the overload
protection has been triggered once the engine has
been switched off and restarted (See “Turning off
engine” and “Starting engine”).

6
GB
10. Transport
Preparation for transporting
• Empty the petrol tank with a petrol suction
pump.
• Once it it ready for use, leave the engine run-
ning until the rest of the petrol has been used
up.
• Empty the engine oil from the engine (as de-
scribed).
• Remove the spark plug connector from the
spark plug.
• Secure the device with a tension belt to prevent
it slipping out of place.
11. Ordering spare parts
When ordering replacement parts you should give
the following information:
• Type of device
• Device article number
12. Recycling
The packaging is
made of environmentally friendly materials. It can
be disposed of at your local recycling centre. Do
not dispose of electric equipment in the household
waste! According to European Directive 2012 / 19 /
EU, used electrical devices must be collected and
recycled in an environmentally friendly manner.
Contact your local refuse disposal authority for more
details of how to dispose of your worn-out devices.
Environmental protection
Dispose of soiled maintenance material and oper-
ating materials at the appropriate collection point.
Dispose of the waste oil properly.
• Put it back together in the opposite order.
Note: alternative spark plugs to
Bosch UR3AC
Petrol lter (Fig. 7)
Note: The petrol lter (18) is a lter bowl located
directly under the petrol cap (2) , ltering any petrol
added.
• Turn the on /o ff switch (6) to the “OFF“ position.
• Open the petrol cap (2)
• Remove the petrol lter 5 and clean in a non-
ammable solvent or solvent with a high tlash
• point.
• Reinsert petrol lter
• Close the petrol cap (2)
Changing the oil, (Fig. 5)
Changing the oil should take place when the engine
is warm.
WARNING! Drain fuel before replacing the oil.
Only use engine oil (15 W-40).
• Place the generator on its front side on a suit-
able surface.
• Open the oil ller cap (13) and drain the warm
engine oil into a container by tilting the genera-
tor.
• Pour in engine oil (approx. 0.25 litres).
• Stand the generator upright again.
Low oil switch off
The low oil switch-off responds, if there is not
enough engine oil. The oil check bulb (5) starts to
ash when there is insufcient oil in the motor. The
check bulb begins to ash when the oil amount has
gone below the safe level. The engine will turn off
independently after a short time. Restart is possible
only after pouring in more engine oil (see Chapter
“Replacing the oil”).
9. Storage
Preparation for storage
• Empty the petrol tank with a petrol suction
pump.
Warning notice: Do not remove fuel in closed
rooms, close to re or whilst smoking. Vapours
can cause explosions or res.
• Start the engine and leave it running until the
rest of the petrol has been used up.
• Change the oil after each season. To do this,
remove the old oil from the warm engine and
rell with new oil
• Remove the spark plug. Fill about 20 ml of oil
into the cylinder using an oil can.
• Slowly pull the express start so that the oil pro-
tects the cylinder from the inside.
• Screw the spark plug back in
• Store the device in a well ventilated place or
area.

7
GB
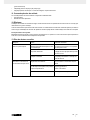
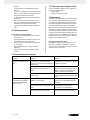
13.Troubleshooting guide
Fault Cause Remedy
Engine does not start Automatic oil cut-out has not responded Check oil level, top up engine oil
Spark plug fouled Clean or replace spark plug (electrode
spacing 0.6 mm)
No fuel Refuel / habe the petrol cock checked
Generator has too little or no
voltage
electronic defective Contact your dealer
Overcurrent circuit-breaker has triggered Actuate the circuitbreaker and reduce
the consumers
Air lter dirty Clean or replace the lter

8
GB
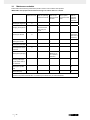
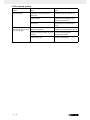
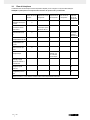
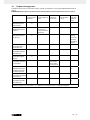
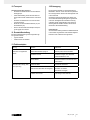
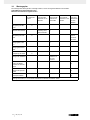
14. Maintenance schedule
Please adhere to the following maintenance periods in order to ensure a failure-free operation.
IMPORTANT! The equipment must be lled with engine oil and fuel before it is started.
Before each use After an operating
period of 20 hours
After an ope-
rating period of
50 hours
After an opera-
ting period of 100
hours
After an
operating
period of
300 hours
Checking the engine oil X
Changing the engine oil For the rst time,
then every 50
hours
X
Checking the air lter X Change the
lter insert if
necessary
Cleaning the air lter X
Cleaning the petrol lter X
Visual inspection of the
equipment
X
Cleaning the spark plug Distance: 0.6
mm, replace if
necessary
Checking andreadjus-
ting the throttle vale on
the carburetor
X*
Cleaning the cylinder
head
X*
Set the valve play X*
Important: The positions marked with “x*“ should only be carried out by an authorized dealer.

9
GB
15. Warranty certicate
All of our products undergo strict quality checks to ensure that they reach you in perfect condition. In the unlikely event
that your device develops a fault, please contact our service department at the address shown on this guarantee card.
Of course, if you would prefer to call us then we are also happy to offer our assistance under the service number printed
below. Please note the following terms under which guarantee claims can be made:
• These guarantee terms cover additional guarantee rights and do not affect your statutory warranty rights. We do not
charge you for this guarantee.
• Our guarantee only covers problems caused by material or manufacturing defects, and it is restricted to the rectication
of these defects or replacement of the device. Please note that our devices have not been designed for use in commer-
cial, trade or industrial applications. Consequently, the guarantee is invalidated if the equipment is used in commercial,
trade or industrial applications or for other equivalent activities. The following are also excluded from our guarantee:
compensation for transport damage, damage caused by failure to comply with the installation/assembly instructions or
damage caused by unprofessional installation, failure to comply with the operating instructions (e.g. connection to the
wrong mains voltage or current type), misuse or inappropriate use (such as overloading of the device or use of non-
approved tools or accessories), failure to comply with the maintenance and safety regulations, ingress of foreign bodies
into the device (e.g. sand, stones or dust), effects of force or external inuences (e.g. damage caused by the device
being dropped) and normal wear resulting from proper operation of the device.
The guarantee is rendered null and void if any attempt is made to tamper with the device.
• The guarantee is valid for a period of 3 years starting from the purchase date of the device. Guarantee claims should
be submitted before the end of the guarantee period within two weeks of the defect being noticed. No guarantee claims
will be accepted after the end of the guarantee period. The original guarantee period remains applicable to the device
even if repairs are carried out or parts are replaced. In such cases, the work performed or parts tted will not result in an
extension of the guarantee period, and no new guarantee will become active for the work performed or parts tted. This
also applies when an on-site service is used.
• In order to assert your guarantee claim, please send your defective device postage-free to the address shown below.
Please enclose either the original or a copy of your sales receipt or another dated proof of purchase. Please keep your
sales receipt in a safe place, as it is your proof of purchase. It would help us if you could describe the nature of the
problem in as much detail as possible. If the defect is covered by our guarantee then your device will either be repaired
immediately and returned to you, or we will send you a new device.
Of course, we are also happy offer a chargeable repair service for any defects which are not covered by the scope of this
guarantee or for units which are no longer covered. To take advantage of this service, please send the device to our ser-
vice address.

10
HR
Popis sadržaja: Stranica:
1. Uvod 12
2. Opis uređa ja 12
3. Namjenska uporaba 12
4. Tehnički podaci 12
5. Sigurnosne napomene 13
6. Prije puštanja u rad 13
7. Rukovanje 14
8. Čišćenje 14
9. Skladište 15
10. Transport 15
11. Naručivanje rezervnih dijelova 15
12.
Zbrinjavanje
15
13. Plan traženja grešaka 16
14 Plan održavanja 17
15 Jamstvena potvrda 18
16 Spojna shema 47
17 Izjava o sukladnosti 48

11
HR
Objašnjenje simbola
Svrha je simbola u ovom priručniku skrenuti vašu pozornost na moguće rizike. Sigurnosni simboli i
objašnjenja uz njih valja pozorno proučiti. Sama upozorenja neće ukloniti rizike i ne mogu zamijeniti
isprave mjere za sprječavanje nezgoda.
Pročitajte priručnik za uporabu. Prije uporabe uređaja uvijek
pročitajte odgovarajući odjeljak u priručniku za uporabu.
Važno. Vrući dijelovi. Održavajte udaljenost.
Važno. Isključite motor prije ulijevanja goriva. Ne dolijevajte kad
uređaj radi.
Važno. Ispušni plinovi su otrovni, motor stoga ne rabite u
neprozračenim prostorima.
Nosite zaštitu za sluh. Nosite zaštitne rukavice.
Samo za države EU
Ne bacajte električne alate u kućanski otpad!
Prema europskoj Direktivi 2012/19/EU o električnom i
elektroničkom otpadu i njezinoj inačici u nacionalnom
zakonodavstvu rabljene električne alati valja odvojeno prikupiti i
ekološki reciklirati.
Budite vrlo oprezni pri rukovanju gorivom i mazivima!
Prije obavljanja održavanja odvojite kabel za pokretanje i pročitajte
upute.
Uređaj ne izlažite kiši.
Pri pokretanju motora stvara se iskrenje. Ono može zapaliti
zapaljive plinove u blizini.
Strogo su zabranjeni otvoreni plamen i pušenje u blizini uređaja!
Zajamčena razina zvučne snage uređaja.

12
HR
1. Uvod
Čestitamo Vam na kupnji novog uređaja. Ovom
kupnjom odlučili ste se za visokokvalitetan proizvod.
Uputa za uporabu je sastavni dio ovog proizvoda.
Ona sadrži važne upute o sigurnosti, uporabi i ukla-
njanju otpada. Prije upotrebe proizvoda upoznajte se
sa svim njegovim uputama za korištenje i sigurno-
snim uputama. Koristite ovaj proizvod u skladu s
navedenim uputama te u navedene svrhe. Ukoliko
proizvod dajete nekoj drugoj osobi, predajte toj osobi
također i sve upute.
POZOR!
Prilikom uporabe uređaja morate se pridržavati
sigurnosnih propisa kako biste spriječili nastanak
ozljeda i šteta. Zato pažljivo pročitajte ove upute za
uporabu / sigurnosne napomene. Dobro ih sačuvajte
tako da vam informacije u svako doba budu na ras-
polaganju. Ako biste ovaj uređaj trebali predati dru-
gim osobama, molimo da im proslijedite i ove upute
za uporabu / sigurnosne napomene. Ne preuzimamo
jamstvo za štete nastale zbog nepridržavanja ovih
uputa za uporabu i sigurnosnih napomena.
2. Opis uređa ja (sl. 1 -7)
1. Ručka
2. Poklopac tanka
3. Nogar
4. Žaruljica rada
5. Žaruljica za kontrolu ulja
6. Sklopka za uključivanje / isključivanje
7. Uzemljenje
8. 230 V ~ utičnice
9. Ručica prigušnice
10. Naprava za reverzivno pokretanje
11. Poklopac zračnog ltra
12. Zračni ltar
13. Vijak na otvoru za punjenje ulja
14. Osiguranje od pomanjkanja ulja za automatsko
isključivanje ulja
15. Utikač svjećice
16. Svjećica
17. Pipac za benzin
18. Benzinski ltar
A. Boca za ulijevanje ulja
B. Ručka
C. Odvijač
D. Odvijač
E. Nasadni ključ
F. Kutija za alat
3. Namjenska uporaba
Uređaj je konstruiran za napon od 230 V izvora
izmjenične struje. Kod kućanskih aparata molimo
da provjerite prikladnost prema dotičnim podacima
proizvođača.
Stroj se smije koristiti samo namjenski. Svaka dru-
gačija uporaba nije namjenska.
Za štete ili ozljeđivanja svih vrsta koji bi nastali zbog
takve uporabe odgovoran je korisnik / rukovatelj, a
nikako proizvođač. Molimo da obratite pažnju na to
da naši uređaji nisu prikladni za uporabu u komerci-
jalne, obrtničke ili industrijske svrhe. Ne preuzimamo
jamstvo ako se uređaj koristi u komercijalne i indu-
strijske svrhe kao i u sličnim djelatnostima.
4. Tehnički podaci
Generator Izmjenjivač
Vrsta zaštite IP23M
Trajna snaga P
naz
(S1) 1000 W
Maksimalna snaga P
maks
(S2/5s)
1200 W
Nazivni napon U
naz
230 V~
Nazivna struja I
naz
4,3 A
Frekvencija F
naz
50 Hz
Izvedba pogonskog motora 4-taktni hlađen
zrakom
Zapremnina 53,5 cm³
Maks. snaga (motor) 2,1 kW/2,85 PS
Gorivo Bezolovni benzin
Sadržaj tanka 4,2 l
Motorno ulje 0,25 l
(15W-40)
Potrošnja kod ⅔ opterećenja: oko 0,88 l/h
Težina 12,8 kg
Razina zvučnog tlaka L
pA
(1 m) 81,5 dB(A)
Intenzitet buke L
WA
95 dB(A)
Nesigurnost K 1,07 dB (A)
Faktor snage cos φ 1
Klasa snage G1
Razred kvalitete B
Svjećica MS A7RTC
Vrsta pogona S1 (trajni pogon)
Stroj može s navedenom snagom raditi stalno.

13
HR
Vrsta pogona S2 (kratkotrajni pogon)
Stroj smije s navedenom snagom raditi kratkotrajno
(5 s).
Dopuštena temperatura okoline:
-10 do +40 °C
visina: 1000 m iznad nadmorske visine
rel. vlaga zraka: 90 % (nema kondenziranja)
5. Sigurnosne napomene
1. Na generatoru el. struje ne smiju se provoditi
nikakve izmjene.
2. Broj okretaja koji je podesio proizvođač ne smije
se mijenjati. Mogli bi se oštetiti generator el.
struje ili priključeni uređaji.
3. Opasnost od trovanja! Ispušni plinovi, goriva i
maziva su otrovni. Ne udišite ispušne plinove.
4. Opasnost od požara! Benzin i benzinske pare
lako su zapaljivi tj. eksplozivni.
5. Ne pogonite generator el. struje u neprozrače-
nim prostorijama ili lako zapaljivoj okolini. Ako
se generator koristiti u dobro prozračenim pro-
storijama, ispušni plinove treba izravno odvoditi
putem crijeva za ispušne plinove na otvoreno.
6. Čak i kod korištenja crijeva mogu se oslobađati
otrovni plinovi. Zbog opasnosti od nastanka
požara crijevo za ispušne plinove nikad se ne
smije usmjeriti na zapaljive materijale.
7. Generator el. struje nikad nemojte koristiti u
prostorijama s lako zapaljivim tvarima.
8. Vruće površine! Opasnost od opeklina. Ne
dodirujte ispušni sustav i pogonski agregat.
9. Ne dodirujte mehanički pokretne ili vruće dijelo-
ve. Nemojte ukloniti zaštitne poklopce.
10. Zaštitna oprema! Ako se nalazite u blizini ure-
đaja, nosite prikladnu zaštitu za sluh.
11. Za održavanje i pribor smiju se koristiti samo
originalni dijelovi.
12. Popravke i podešavanja smije vršiti samo auto-
rizirano stručno osoblje.
13. Zaštitite se od udara električne struje.
14. Nikad ne dodirujte generator mokrim rukama.
15. Na otvorenom koristite samo za to dopuštene
i na odgovarajući način označene produžne
kabele (H07RN).
16. Ukupna dužina korištenih produžnih kabela ne
smije biti veća od 50 m za 1,5 mm
2
i 100 m za
2,5 mm
2
.
17. Generator el. struje ne rabite kad kiši ili sniježi.
18. Kod transporta ili punjenja goriva uvijek isključi-
te motor.
19. Pripazite na to da kod punjenja ne prolijete gori-
vo na motor ili ispušnu cijev.
20. Tank nemojte puniti odnosno prazniti u blizini
otvorenog svjetla, vatre ili iskrenja. Nemojte
pušiti!
21. Postavite ga na sigurno i ravno mjesto. Za-
branjeno je okretanje, prevrtanje ili promjena
lokacije tijekom rada uređaja.
22. Generator el. struje postavite najmanje 1m od
zidova ili priključenih uređaja.
23. Djecu držite podalje od generatora el. struje.
24. Tehnički podaci o intenzitetu buke (LWA) i zvuč-
nog tlaka (LpA) predstavljaju vrijednost emisije
i nisu obavezno sigurne radne vrijednosti.
Budući da postoji ovisnost između vrijednosti
emisije i imisije, ne mogu se pouzdano poduzeti
eventualno potrebne mjere opreza na temelju
navedenih vrijednosti. Faktori koji utječu na
aktualnu razinu imisije radne snage obuhvaćaju
svojstva radnog mjesta, ostalih izvora buke, itd,
kao npr. broj strojeva i ostalih susjednih procesa
i vremenskih intervala kojima je izložen korisnik
uređaja. Isto tako dopuštena razina imisije ovisi
o zemlji korištenja. Ova informacija ipak nudi
korisniku stroja mogućnost bolje procjene rizika
i opasnosti. U slučaju potrebe nakon montaže
valja obaviti akustična mjerenja radi utvrđivanja
razine zvučnog tlaka.
POZOR: Kao gorivo koristite isključivo normalni,
bezolovni benzin.
6. Prije puštanja u rad
Montaža (sl. 1/2)
Radi montaže ručke (1) odvrnite dva uvrnuta križna
vijka M6×35 mm. Stavite ručku (1) i zategnite je
vijcima. Montirajte sve dijelove prije ulijevanja goriva
i ulja kako bi se izbjeglo istjecanje tekućina.
Električna sigurnost
Električni dovodni kabeli i priključeni uređaji moraju
biti u besprijekornom stanju.
Generator struje nikad nemojte spajati na strujnu
mrežu (utičnicu).
J Dužine kabela prema potrošaču trebaju biti što
kraće.
m Pozor!
Zaprljani materijal za održavanje i pogonske materi-
jale otpremite na za to predviđeno sabiralište.
Uzemljenje (sl. 1)
Za odvođenje statičkih naboja potrebno je uzemlje-
nje uređaja. U tu svrhu na jednoj strani spojite kabel
na priključak za uzemljenje (7) generatora, a na
drugoj strani ga spojite s vanjskom masom.
POZOR! Kod prvog puštanja u rad morate napuniti
motorno ulje (15 W-40, oko 0,25 l) i gorivo (Normalni
bezolovni benzin). Provjerite razinu goriva i motor-
nog ulja, i ako je potrebno nadopunite. Osigurajte
dostatno prozračivanje uređaja. Provjerite je li kabel
za paljenje pričvršćen na svjećici.
Odspojite eventualno priključen električni uređaj s
generatora.
Ulijevanje ulja (slika 5)
Položite generator s prednjom stranom prema dolje
i odvrnite vijak za ulijevanje ulja (13). Ulijte 0,25 l
motornog ulja (15W-40).

14
HR
Zatvorite vijak za ulijevanje ulja (13) i uspravite
natrag generator.
Ulijevanje goriva (slika 1/7)
Udaljite izvore zapaljenja! Ulijevajte gorivo samo u
dobro provjetravanim prostorijama ili na otvorenom.
Odvrnite poklopac spremnika (2) i s pomoću grla
za ulijevanje (nije isporučen) ulijte maksimalno 4,2 l
bezolovnog benzina u spremnik goriva.
Pazite na to da se spremnik ne prepuni i da se
benzin ne prolije. Uporabite benzinski ltar. Proliveni
benzin odmah prikupite i pričekajte da benzinske
pare potpuno ishlape (opasnost od zapaljenja).
Zatvorite poklopac spremnika (2).
7. Rukovanje
Pokretanje motora (sl. 1/3/6 )
POZOR! BKod pokretanja reverzivnim pokretačem
(10) može doći do ozljeđivanja ruke zbog iznenad-
nog povratnog udarca kojeg uzrokuje motor koji se
pokreće.
Zbog toga prilikom pokretanja nosite zaštitne ruka-
vice.
• Otvorite pipac za benzin (17) ; za to okrenite
pipac prema dolje.
• Sklopku za uključivanje / isključivanje (6) stavite
u položaj “ON”. Polugu čoka (9) postavite u
položaj I Ø I.
• Pokrenite motor reverzivnim pokretačem (10) ;
za to snažno povucite za ručku. Ako motor ne bi
upalio, povucite ručku još jednom.
• Nakon pokretanja motora ponovno vratite polu-
gu čoka (9) .
• Opterećivanje generatora struje: Uređaje koje
treba pogoniti priključite na utičnice 230 V~ (8) .
POZOR! Ove utičnice smijete trajno opteretiti (S1)
s 1000 W i kratkotrajno (S2) na maks. 5 sek. s 1200
W.
Napomena: Neki elektrouređaji (motorne ubodne
pile, bušilice itd.) mogu imati veću potrošnju struje,
ako se koriste u otežanim uvjetima.
Isključivanje motora (sl. 1/6)
Prije nego ćete isključiti generator pustite da nakrat-
ko radi bez opterećenja, tako da se agregat može
“ohladiti”.
• Sklopku za uključivanje / isključivanje (6) stavite
u položaj “OFF”.
• Zatvorite pipac za benzin (17) .
Zaštita od preopterećenja, utičnice 230 V~
NAPOMENA! Generator struje opremljen je zaštitom
od preopterećenja.
Ona isključuje utičnice (8).
Zelena žaruljica rada prikazuje sljedeća stanja:
Treperi 1 x u intervalu Preniska brzina vrtnje
motora
Treperi 2 x u intervalu Previsoka brzina vrtnje
motora
Treperi 3 x u intervalu Aktivirala se zaštita od
preopterećenja
Treperi 4 x u intervalu Postoji kratki spoj
Isključivanjem i ponovnim pokretanjem motora
utičnica (8) može se nakon aktiviranja zaštite od pre-
opterećenja ponovno staviti u pogon. (Vidi „Isključi-
vanje motora” i „Pokretanje motora”)
POZOR! Ako bi došlo do toga, smanjite električnu
snagu koju ćete uzeti od generatora ili uklonite neis-
pravne priključene uređaje.
POZOR! Neispravna sklopka za zaštitu od preop-
terećenja smije se zamijeniti samo istovrsnom s
jednakim parametrima. U tom slučaju obratite se za
pomoć našoj servisnoj službi.
Čišćenje, održavanje,
skladištenje, transport i narudžba rezervnih
dijelova
Prije svih postupaka čišćenja i održavanja isključite
motor i skinite utikač svjećice (15) sa svjećice (16).
POZOR! Opasnost od opeklina! Pričekajte da se
uređaj ohladi, a tek zatim obavite čišćenje ili održa-
vanje.
POZOR! Isključite odmah uređaj i obratite se vašoj
servisnoj službi:
• U slučaju neobičnih vibracija ili buke.
• Kad izgleda da je motor preopterećen ili radi
nepravilno.
8. Čišćenje
Čišćenje
Zaštitne naprave, prolazi za zrak i kućište motora
moraju uvijek biti očišćeni od prašine i prljavštine.
Istrljajte uređaj čistom krpom ili ga ispušite kompri-
miranim zrakom pod niskim pritiskom. Preporučuje-
mo da očistite uređaj odmah nakon svake uporabe.
Redovito čistite uređaj vlažnom krpom i s malo
kalijevog sapuna. Ne koristite otapala ni sredstva
za čišćenje; ona bi mogla oštetiti plastične dijelove
uređaja. Pripazite na to da u unutrašnjost uređaja ne
dospije voda.
Filtar za zrak (sl. 4)
Obratite pažnju na servisne informacije.
Redovito čistite ltar za zrak (12), po potrebi ga
zamijenite.
• Otvorite poklopac zračnog ltra (11) tako da
odvrnete 2 križna vijka M6×16 mm.
• Izvadite ltar (12).
• Za čišćenje elemenata ne smijete koristiti agre-
sivna otapala ni benzin.
• Elemente čistite lupkanjem iznad ravne površi-
ne. U slučaju jače zaprljanosti operite ga sapu-
nicom, na kraju isperite čistom vodom i ostavite
na zraku da se osuši.
• Montaža slijedi obrnutim redoslijedom.

15
HR
Svjećica (sl. 6)
Prvi put provjerite zaprljanost svjećice (16) nakon
20 sati rada i po potrebi je očistite pomoću četke od
bakrene žice. Nakon toga održavajte svjećicu svakih
50 radnih sati.
• Okretom izvucite utikač svjećice (15).
• Priloženim ključem (D) odvrnite svjećicu (16).
• Montaža slijedi obrnutim redoslijedom.
Napomena: Alternativna svjećica
Bosch UR3AC
Benzinski ltar (slika 7)
Napomena: Benzinski ltar (18) ltarska je čašica
koja se nalazi direktno ispod poklopca spremnika (2)
i ltrira sve uliveno gorivo.
• Pomaknite sklopku za uključivanje i isključivanje
(6) u položaj „OFF”.
• Otvorite poklopac spremnika (2).
• Izvadite benzinski ltar (18) i očistite ga u neza-
paljivom otapalu ili otapalu s visokom točkom
zapaljenja.
• Stavite natrag benzinski ltar (18).
• Zatvorite poklopac spremnika (2).
Zamjena ulja (sl. 5)
Zamjenu ulja obavite dok je motor topao.
POZOR! Prije zamjene ulja ispustite benzin.
Koristite samo motorno ulje (15 W-40).
• Položite generator prednjom stranom na priklad-
nu podlogu.
• Otvorite vijak za ulijevanje ulja (13) i naginja-
njem generatora ispustite toplo motorno ulje u
prihvatnu posudu.
• Ulijte motorno ulje (oko 0,25 l)
• Ponovno uspravite generator.
Automatsko isključivanje ulja
Automatsko isključenje aktivirat će se ako ima
premalo motornog ulja. Žaruljica za kontrolu ulja
(5) počet će treperiti ako je u motor premalo ulja.
Kontrolna žaruljica počet će svijetliti ako količina ulja
padne ispod minimalne sigurnosne količine. Motor
će se nakon kratkog vremena automatski isključiti.
Pokretanje je tek moguće nakon što se motorno ulje
napuni (vidi odlomak „Zamjena ulja“).
9. Skladište
Priprema za skladištenje
• Ispraznite tank za benzin pomoću usisne pum-
pe.
Upozorenje: Ne ispumpavajte benzin u za-
tvorenoj prostoriji, u blizini vatre ili ako pušite.
Isparavanja mogu izazvati eksploziju ili vatru.
• Pokrenite motor i pustite ga da radi tako dugo
dok se ne potroši preostali benzin.
• Zamijenite ulje nakon svake sezone.
• U tu svrhu odstranite staro motorno ulje od
toplog motora i napunite novim.
• Uklonite svjećicu za paljenje
• Napunite s kantom za ulje cca. 20 ml ulja u
cilindar.
• Vucite polako kabel startera, tako da ulje iznutra
štiti cilindar.
• Uvrnite opet svjećicu.
• Pohranite uređaj na jednom dobro ozračenom
mjestu.
10. Transport
Priprema za transport
• Ispraznite tank za benzin pomoću usisne pum-
pe.
• Pustite da motor radi tako dugo dok se ne potro-
ši sav preostali benzin.
• Ispraznite motorno ulje iz toplog motora (prema
opisu).
• Uklonite utikač (15) sa svjećice (16).
• Osigurajte uređaj od klizanja npr. pomoću ste-
znih remena.
11. Naručivanje rezervnih dijelova
Kod naručivanja rezervnih dijelova trebali biste nave-
sti sljedeće podatke:
• Tip uređaja
• Kataloški broj uređaja
12. Zbrinjavanje
Ambalaža se sastoji od ekološkog materijala. Može
se baciti u komunalne spremnike za recikliranje. Ne
bacajte električne uređaje u kućanski otpad!
Prema europskoj Direktivi 2012/19/EU rabljene
električne uređaje valja odvojeno prikupiti i ekološ-
ki reciklirati. O mogućnostima zbrinjavanja starog
uređaja raspitajte se kod mjerodavne općinske ili
gradske službe.
Zaštita okoliša
Zaprljani materijal za održavanje i pogonske materi-
jale otpremite na za to predviđeno sabiralište. Staro
ulje morate zbrinuti u skladu s važećim propisima.
Pagina se încarcă...
Pagina se încarcă...
Pagina se încarcă...
Pagina se încarcă...
Pagina se încarcă...
Pagina se încarcă...
Pagina se încarcă...
Pagina se încarcă...
Pagina se încarcă...
Pagina se încarcă...
Pagina se încarcă...
Pagina se încarcă...
Pagina se încarcă...
Pagina se încarcă...
Pagina se încarcă...
Pagina se încarcă...
Pagina se încarcă...
Pagina se încarcă...
Pagina se încarcă...
Pagina se încarcă...
Pagina se încarcă...
Pagina se încarcă...
Pagina se încarcă...
Pagina se încarcă...
Pagina se încarcă...
Pagina se încarcă...
Pagina se încarcă...
Pagina se încarcă...
Pagina se încarcă...
Pagina se încarcă...
Pagina se încarcă...
Pagina se încarcă...
Pagina se încarcă...
Pagina se încarcă...
Pagina se încarcă...
Pagina se încarcă...
-
 1
1
-
 2
2
-
 3
3
-
 4
4
-
 5
5
-
 6
6
-
 7
7
-
 8
8
-
 9
9
-
 10
10
-
 11
11
-
 12
12
-
 13
13
-
 14
14
-
 15
15
-
 16
16
-
 17
17
-
 18
18
-
 19
19
-
 20
20
-
 21
21
-
 22
22
-
 23
23
-
 24
24
-
 25
25
-
 26
26
-
 27
27
-
 28
28
-
 29
29
-
 30
30
-
 31
31
-
 32
32
-
 33
33
-
 34
34
-
 35
35
-
 36
36
-
 37
37
-
 38
38
-
 39
39
-
 40
40
-
 41
41
-
 42
42
-
 43
43
-
 44
44
-
 45
45
-
 46
46
-
 47
47
-
 48
48
-
 49
49
-
 50
50
-
 51
51
-
 52
52
-
 53
53
-
 54
54
-
 55
55
-
 56
56


Parkside PGI 1200 A1 Operating And Safety Instructions Manual
- Categorie
- Generatoare de curent
- Tip
- Operating And Safety Instructions Manual
în alte limbi
- Deutsch: Parkside PGI 1200 A1
Lucrări înrudite
Alte documente
-
EINHELL 41.525.35 Operating Instructions Manual
-
-
Güde GSE 950 Translation Of The Original Instructions
-
-
-
EINHELL TC-PG 65 Instrucțiuni de utilizare
-
 Raider Power Tools RD-GG10 Manual de utilizare
-
 Raider Power Tools RD-GG11 Manual de utilizare
-
-
Stanley SGT-51-820H Manual de utilizare

