Electrolux END44501W Manual de utilizare
- Categorie
- Frigidere
- Tip
- Manual de utilizare

PDF created with pdfFactory Pro trial version www.pdffactory.com
END44501W
NO-FROST REFRIGERATOR
Freezer-Fridge
Instruction booklet
NO FROST FRIGORÍFICO
Congelador - Frigoríco
Manual de Instrucciones
COMBINĂ FRIGORIFICĂ NO-FROST
Manual de utilizare si intretinere
ХЛАДИЛНИК NO-FROST
ЛАДИЛНИК - ДЛАБОКО ЗАМРЗНУВАЊЕ
NO-FROST
ПРИРАЧНИК ЗА УПОТРЕБА
FRIŽIDER - DUBOKO ZAMRZAVANJE
NO-FROST
Uputstva za upotrebu
ХОЛОДИЛЬНИК БЕЗ РОЗМОРОЖУВАННЯ
Брошура по використанню
FRIGORIFERI MEKANIK ME
SISTEMIN NO-FROST
Manual perdorimi

PDF created with pdfFactory Pro trial version www.pdffactory.com

UK - 1 -
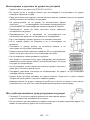
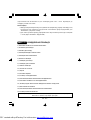
Index
BEFORE USING THE APPLIANCE.....................................................................2
Safety Instructions...........................................................................................................2
Recommendations.........................................................................................................3
Installation and Switching On The Appliance...............................................................4
Before Switching On........................................................................................................4
THE VARIOUS FUNCTION AND POSSIBILITIES...............................................5
Thermostat Setting..........................................................................................................5
Accessories.....................................................................................................................6
Magic Shelf...............................................................................................................................6
Making Ice Cubes.....................................................................................................................6
Fast Freezing Shelf..................................................................................................................6
Chiller Shelves..........................................................................................................................7
Crisper and Crisper Shelf........................................................................................................7
REMOVING THE CRISPER COVER..........................................................................................8
ARRANGING FOOD IN THE APPLIANCE..........................................................9
Refrigerator Compartment.............................................................................................9
Freezer Compartment...................................................................................................10
CLEANING AND MAINTENANCE......................................................................14
Defrosting ......................................................................................................................14
Replacing The Refrigerator and Freezer Light Bulb..................................................15
TRANSPORTATION AND CHANGING OF INSTALLATION POSITION..............15
Changing of Door Opening Direction..........................................................................15
BEFORE CALLING YOUR AFTER SALES SERVICE.........................................16
THE PARTS OF THE APPLIANCE AND THE COMPARTMENTS.......................18
Tips For Saving Energy.................................................................................................19
PDF created with pdfFactory Pro trial version www.pdffactory.com

UK - 2 -
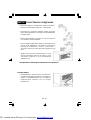
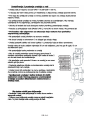
Safety Instructions
• If the model contains R600a-see name plate under refrigerant (the coolant isobutane),
naturals gas that, is very environmentally friendly but also combustible. When
transporting and installing the unit care must be taken to ensure that none of the
refrigeration circuit components become damaged. In the event of damage avoid
naked flames or ignition sources and ventilate the room in which the unit is placed
for a few minutes.
Warning: Keep ventilation openings in appliance enclosure or in structure for building
in, clear of obstruction.
• Do not use mechanical devices or other artificial means to accelerate the defrosting
process.
• Do not use electrical appliances in the refrigerator or freezer compartment of the
appliance.
• If this appliance is to replace an old refrigerator with a lock; break or remove the lock
as a safety measure before storing it, to protect children while playing might lock
themselves inside.
• Old refrigerators and freezers contain insulation gases and refrigerant, which must
be disposed of properly. Entrust the disposal of a scrap unit categorically to
competence of your local waste disposal service and contact your local authority or
your dealer if you have any questions. Please ensure that the pipe of work of your
refrigerating unit does not get damaged prior to being picked-up by the relevant waste
disposal service.
Important note:
Please read this booklet before installing and switching on this appliance. The
manufacturer assumes no responsibility for incorrect installation and usage as described
in this booklet.
PART- 1.
BEFORE USING THE APPLIANCE
PDF created with pdfFactory Pro trial version www.pdffactory.com

UK - 3 -
Recommendations
Warning: Do not use mechanical devices or other means to accelerate the defrosting
process, other than those recommended by the manufacturer. Do not use electrical
appliances inside the food storage compartments of the appliance, unless they are of
the type recommended by the manufacturer. Keep ventilation openings, in the appliance
enclosure or in the built-in structure, clear of obstruction. Do not damage the refrigerant
circuit.
• Do not use adopters or shunts which could cause overheating
or burning.
• Do not plug old, warped power supply cables.
• Do not twist and bend the cables.
• Do not allow children to play with the appliance. Children must
NEVER sit on drawers/shelves or hang from the door.
• Do not plug the power supply with wet hands.
• Do not place containers (glass bottles or tin containers) of liquids
into the freezer especially gassy liquids as they could cause
the container to burst during freezing.
• Bottles, which contain a high percentage of alcohol must be
sealed well and placed vertically in the refrigerator.
• Do not touch the cooling surfaces, especially with wet hands as
you could be burnt or hurt.
• Do not eat ice, which have just been removed from the freezer.
• If the supply cord is damaged it must be replaced by the
manufacturer or service agent or appointed qualified person.
• The appliance is not intended for use by people (including children) with reduced
physical, sensory or mental capabilities, or lack of experience and knowledge, unless
they have been given supervision or instruction concerning use of the appliance by
a person responsible for their safety. Children should be supervised to ensure that
they don’t play with the appliance.
• If the supply cord is damaged it must be replaced by the manufacturer or service
agent or similary qualified people in order to avoid a hazard.
PDF created with pdfFactory Pro trial version www.pdffactory.com

UK - 4 -
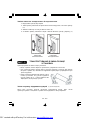
Installation and Switching On The Appliance
• This appliance is connecting to 220-240V and 50 Hz.
• Before making the connection to the power supply, ensure that the voltage on the
nameplate corresponds to the voltage of electrical system in your home.
• If the socket does not match the refrigerator plug, replace the plug with a suitable
one (at least 16 A)
• Insert the plug into a socket with an efficient ground connection. If the socket has no
ground contact, we suggest you call an electrician for assistance.
• Manufacturer is not responsible for failure to complete the ground connection as
described in this booklet.
• Do not place the appliance in direct sunlight.
• Do not use in open air and shall not be exposed to the rain.
• Place the refrigerator far from heat sources and in a
well-ventilated position. The refrigerator should be at least 50
cm from radiators, gas or coal stoves and 5 cm far from electrical
stoves.
• Keep the top free for at least 15 cm.
• Do not place heavy and lots of things on the appliance.
• If the appliance is installed next to another refrigerator or freezer,
observe a minimum distance of 2 cm to prevent condensation.
• Install the distance adjustment plastic (the part with black vanes
at the rear) by turning it 90° to prevent the condenser from
touching the wall.
• The appliance must be stand firmly and level on the floor Use
the two front levelling-feet to compensate for an even floor.
• In order to have air circulation under the appliance, the space
under the appliance must be open. Don’t close it with carpet,
etc.
• The outside of the appliance and the accessories inside should
be cleaned with a solution of water and liquid soap; the inside
of the appliance with sodium bicarbonate dissolved in lukewarm
water. After drying replace all the accessories.
Before Switching On
• Wait after 3 hours before plugging the appliance in to the main power
to ensure proper performance.
• There can be an odour when you first switch on the appliance. It will
disappear after the appliance starts to cool.
PDF created with pdfFactory Pro trial version www.pdffactory.com

UK - 5 -
PART- 2.
THE VARIOUS FUNCTION AND POSSIBILITIES
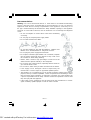
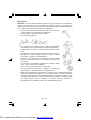
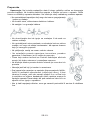
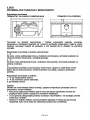
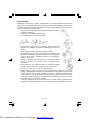
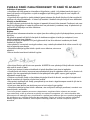
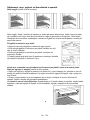
Thermostat Setting
FREEZER THERMOSTATREFRIGERATOR THERMOSTAT
Freezer and refrigerator thermostat automatically regulates the inside temperature of the
compartments. By rotating the knob from position 1 to 5, colder temperatures can be
obtained. In cold seasons, you can set lower positions in order to decrease the energy
consumption.
Freezer Thermostat Setting;
1 – 2 : For short-term storage of food in the freezer compartment, you can set the
knob between minimum and medium position.
3 – 4 : For long-term storage of food in the freezer compartment, you can set knob
medium position.
5 : For freezing the fresh food. Th appliance will work longer. After you get the
cold condition you must position to its original position.
Refrigerator Thermostat Setting;
1 – 2 : For less coldly conditions.
3 – 4 : For normal conditions.
5 : For colder conditions.
• Note that; the ambient temperature, temperature of the freshly stored food and how
often the door is opened, affects the temperature in the refrigerator and freezer
compartment. If required, change the temperature setting.
• When you first switch on the appliance, for starting a suitable cooling, the appliance
should work 24 hours continuously until it cools down to sufficient temperature.
• In this time do not open the door so often and place a lot of food inside the appliance.
• If the unit is switched off or unplugged, you must allow at least 5 minutes before
restarting or re-plugged the unit in order not to damage the compressor.
PDF created with pdfFactory Pro trial version www.pdffactory.com

UK - 6 -
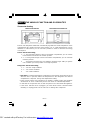
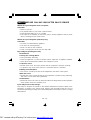
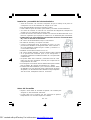
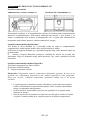
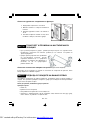
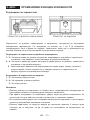
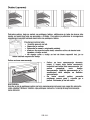
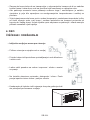
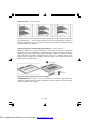
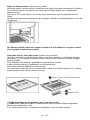
Accessories
Making Ice Cubes
• Take out the ice making tray
• Fill the water in level of line.
• Place the ice making tray in its original position
• When ice cubes are formed, twist the lever to drop off ice
cubes into the icebox.
Do not fill the icebox with water in order to make ice. It
can be broken.
Fast Freezing Shelf
• Use the fast freezing shelf to freeze
home cooking (and fresh foods
which is wanted to freeze) more
quickly because of the freezing
room’s greater freezing power.
• For opening the shelf pull the cover
up, and slide it in to the shelf. You
can close it in the same way
Note that; be sure that the cover of fast freezing shelf is closed before closing the
compartment door. If not, it can not show its fast freezing power.
Magic Shelf
Magic shelf, which is on the crisper cover, was designed to give you more place and
comfort placing the things in the appliance. This shelf is mobile so you can arrange long
or big containers on the crisper cover.
(In some models)
(In some models)
PDF created with pdfFactory Pro trial version www.pdffactory.com

UK - 7 -
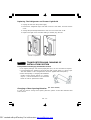
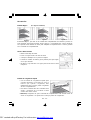
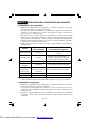
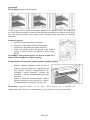
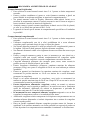
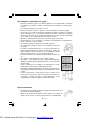
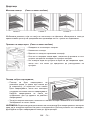
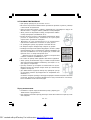
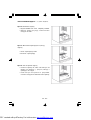
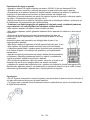
Crisper and Crisper Shelf
The crisper compartment absorbs and decomposes ethylene gas (*) emitted from fruits
and vegetables with a “FILTER” in the crisper shelf, keeping fruits and vegetables fresh.
The filter also eliminates unpleasant odours from inside the crisper, and control the excess
water released by the vegetables, maintaining a high humidity environment inside the
crisper. When the crisper shelf become dirty, remove the filter by taking out the filter cover
and wash the crisper cover with water.
! Do not wash the “Humidity-Control Filter” with water.
(*)NOTE; Ethylene gas is a gas, produced from fruits and vegetables, which accelerates
the ageing of fruits and vegetables. For example, spinach and broccoli turn to yellow
colour easily in places where ethylene gas is abundant.
Chiller Shelves
Keeping food in the Chiller compartment
instead of the freezer or refrigerator
compartment allows food retain freshness and
flavour longer, while preserving its fresh
appearance. When chiller tray becomes dirty,
remove it and wash it with water.
(Water freezes at 0°C, but foods containing salt
or sugar freeze at temperature lower than that)
Normally people use the chiller compartment
for raw fish, lightly pickled, rice, etc...
Do not put foods you want to freeze or ice trays in order to make ice.
(In some models)
Crisper Cover
Filter
Filter cover
PDF created with pdfFactory Pro trial version www.pdffactory.com

UK - 8 -
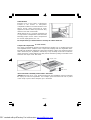
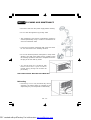
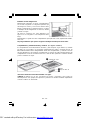
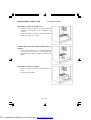
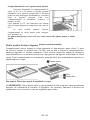
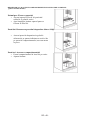
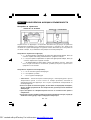
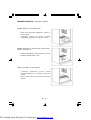
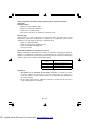
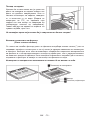
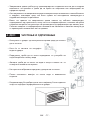
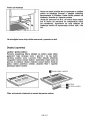
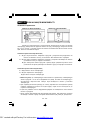
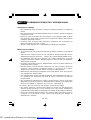
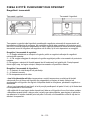
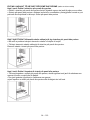
REMOVING THE CRISPER COVER
First Step : Removing the crispers
• It is easy to pull out the crisper because
of the crisper has rollers.
• Pull the crisper out as far as possible
and pull the front part up and out
Second Step: Taking out the partition
crisper center between the crispers.
• Bend the Partition toward left from the
bottom of the part
• Take out the Partition crisper
Third Step: Taking out the crisper cover
• Pull out the crisper cover until the nails
of the cover come on the cavities (right
and left side) of the cabinet.
• When the nails comes into the cavities
pull up and take out the crisper cover
NOTE: Make the inverse of the same operation for the resetting the crisper cover.
All written and visual descriptions in the accessories
may vary according to the appliance model.
(In some models)
PDF created with pdfFactory Pro trial version www.pdffactory.com

UK - 9 -
PART- 3.
ARRANGING FOOD IN THE APPLIANCE
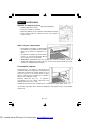
Refrigerator Compartment
• To set the refrigerator compartment to 2-3 graphic bar will be enough for normal
conditions.
• To reduce humidity and consequent increase of frost never place liquids in unsealed
containers in the refrigerator.
• Never place warm food in the refrigerator. Warm food should be allowed to cool at
room temperature and should be arranged to ensure adequate air circulation in the
refrigerator compartment.
• Arrange the meat and cleaned fish (wrapped in packages or sheets of plastic) which
you will use in 1-2 days.
• You can put the fruits and vegetables into crisper without packing.
NOTE: Potatoes, onions and garlic should not be stored in the refrigerator.
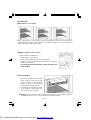
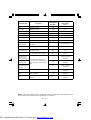
FoodStoring time
Where to place in the fridge
department
Vegetables and fruits1 week
In the Crisper (without being
wrapped)
Meat and fish2 to 3 days
Covered with plastic folio and bags
Or in a meat box
(on the glass shelf)
Fresh cheese3 to 4 daysIn the special door shelf
Butter and Margarine1 weekIn the special door shelf
Bottled product, Milk and
Yoghurt
Until the expiry date
recommended by the producer
In the special door shelf
Eggs1 monthIn the egg shelf
Cooked foodAll shelves
PDF created with pdfFactory Pro trial version www.pdffactory.com

UK - 10 -
Freezer Compartment
• To set the freezer compartment to 2-3 graphic bar will be enough for normal conditions.
• The use of freezer is, storing of deep-frozen or frozen foods for long periods of time
and making ice cubes.
• Do not put fresh and warm foods to the freezer door shelves to be frozen. Only use
for storage of frozen foods.
• Do not put fresh and warm food with frozen food side by side as it can thaw the frozen
food.
• Use the fast freezing shelf to freeze home cooking (and the foods which is wanted to
freeze) more quickly because of the freezing room’s greater freezing power.
• While freezing fresh foods (i.e. meat, fish and mincemeat) divide them in parts you
will use in one time.
• While freezing fresh foods ; Maximum amount of fresh food (in kg) that can be frozen
in 24 hours is indicated on the appliance label.
• For optimum appliance performance to reach maximum freezing capacity, turn the
freezer thermostat knob to position max 24 hours before placing fresh food inthe
freezer.
• After placing fresh food in the freezer, 24 hours on max position is generally
sufficient,After 24 hours, don not need to set the feezer thermostat knob to position
max.
• Attention; In order to save energy, When freezing small amounts of food, don not
need to set the freezer thermostat knob to position max.
• For storing the frozen foods; the instructions shown on frozen food packages should
always be followed carefully and if no information is provided food should not be
stored for more than 3 months from the purchased date.
• When buying frozen foods ensure that these have been frozen at suitable
temperatures and that the packing is intact.
• Frozen foods should be transported in appopriate containers to maintain the quality
of the food and should be returned to the freezing surfaces of the unit in the shortest
possible time.
• If a package of frozen food shows the sign of humidity and abnormal swelling it is
probable that it has been previously stored at an unsuitable temperature and that
the contents have deteriorated.
• The storage life of frozen foods depends on the room temperature, thermostat
setting, how often the door is opened, the type of food and the length of time required
to transport the product from the shop to your home. Always follow the instructions
printed on the package and never exceed the maximum storage life indicated.
Some recommendations have been specified on pages 11, 12 and 13 for the placement
and storage of your food in the deep freeze compartment.
PDF created with pdfFactory Pro trial version www.pdffactory.com

UK - 11 -
Note: Frozen foods, when thawed, should be cooked just like fresh foods. If they are not
cooked after being thawed they must NEVER be re-frozen.
Meat and fishPreparing
Storing time
(months)
In room temperature
Defrost time
-hour-
SteakWrapping in a foil6-101-2
Lamb meatWrapping in a foil6-81-2
Veal roastWrapping in a foil6-101-2
Veal cubesIn small pieces6-101-2
Lamb cubesIn pieces4-82-3
Minced meatIn packages without using spices1-32-3
Giblets (pieces)In pieces1-31-2
Bologna
sausage/salami
Should be packaged even if it has
membrane
Until it is defrosted
Chicken and turkeyWrapping in a foil7-810-12
Goose and DuckWrapping in a foil4-810
Deer, Rabbit, Wild
Boar
In 2.5 kg portions and as fillets9-1210-12
Freshwater fishes
(Salmon, Carp,
Crane, Siluroidea)
2
Until it is thawed
completely
Lean fish; bass,
turbot, flounder
4-8
Until it is thawed
completely
Fatty fishes (Tunny,
Mackarel, bluefish,
anchovy)
2-4
Until it is thawed
completely
ShellfishCleaned and in bags4-6
Until it is thawed
completely
Caviar
In its package, aluminum or
plastic container
2-3
Until it is thawed
completely
Snail
In salty water, aluminum or plastic
container
3
Until it is thawed
completely
After cleaning the bowels and
scales of the fish, wash and dry it;
and if necessary, cut the tail and
head.
PDF created with pdfFactory Pro trial version www.pdffactory.com

UK - 12 -
Vegetables and
Fruits
Preparing
Storing time
(months)
In room temperature
Defrost time
-hour-
Cauliflower
Take the leaves apart, cut
the heart into pieces, and
leave it in water with a little
lemon juice for a while
10 - 12It can be used as frozen
String beans and
beans
Wash and cut to small
pieces
10 - 13It can be used as frozen
BeansHull and wash12It can be used as frozen
Mushroom and
asparagus
Wash and cut to small
pieces
6 - 9It can be used as frozen
CabbageCleaned6 - 82
Eggplant
Cut to pieces of 2cm after
washing
10 - 12Separate them from one another
Corn
Clean and pack with its
stem or as sweetcorn
12It can be used as frozen
CarrotClean and cut to slices12It can be used as frozen
Pepper
Cut the stem, cut into two
pieces and remove the core
8 - 10It can be used as frozen
SpinachWashed6 - 92
Apple and pearPeel and slice8 - 10(In Fridge) 5
Apricot and Peach
Cut into two pieces and
remove the stone
4 - 6(In Fridge) 4
Strawberry and
Blackberry
Wash and hull8 - 122
Cooked fruits
Adding 10 % of sugar in the
container
124
Plum, cherry,
sourberry
Wash and hull the stems8 - 125 - 7
PDF created with pdfFactory Pro trial version www.pdffactory.com

UK - 13 -
* It should not be frozen with its shells. The white and yolk of the egg should be frozen
separately or as having been well mixed.
The taste of some spices found in cooked dishes (anise, basilica, watercress, vinegar,
assorted spices, ginger, garlic, onion, mustard, thyme, marjoram, black pepper, etc.)
changes and they assume a strong taste when they are stored for a long period.
Therefore, the frozen food should be added little amount of spices or the desired spice
should be added after the food has been thawed.
The storage period of food is dependent on the oil used. The suitable oils are margarine,
calf fat, olive oil and butter and the unsuitable oils are peanut oil and pig fat.
The food in liquid form should be frozen in plastic cups and the other food should be
frozen in plastic folios or bags.
Preparing
Storing time
(months)
In its own packet2 - 3
In slices6 - 8
In its package6
Albumen10 - 1230 gr of it is equal to a yolk.
Egg mixture
(Albumen – yolk)
Some salt or sugar is
added for preventing it
from becoming dense.
1050 gr of it is equal to a yolk.
Yolk
Some salt or sugar is
added for preventing it
from becoming dense.
8 - 1020 gr of it is equal to a yolk.
* Eggs
Storing Conditions
Pure Milk – In its own packet
It can be left in its original
package for storing for a short
time. For long term storage It
should be stored in a plastic
In closed container
Dairy Products
Pastry
Packet (Homogenize)
Milk
Cheese-excluding
white cheese
Butter, margarine
Storing time
(months)
Thawing time in room
temperature (hours)
Thawing time in owen (min.)
Bread4 - 62 - 34-5 (220-225 °C)
Biscuits3 - 61 - 1,55-8 (190-200 °C)
Pastry1 - 32 - 35-10 (200-225 °C)
Pie1 - 1,53 - 45-8 (190-200 °C)
Phyllo dough2 - 31 - 1,55-8 (190-200 °C)
Pizza2 - 32 - 415-20 (200 °C)
PDF created with pdfFactory Pro trial version www.pdffactory.com

UK - 14 -
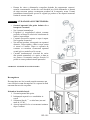
Defrosting
• Defrosting occurs fully automatically during
operation; the defrost water is collected by the
evaporating tray and evaporates automatically.
PART- 4. CLEANING AND MAINTENANCE
• Disconnect unit from the power supply before cleaning.
• Do not clean the appliance by pouring water.
• The refrigerator and freezer compartment should be
cleaned periodically using a solution of bicarbonate of
soda and lukewarm water
• Clean the accessories separately with soap and water.
Do not clean them in the washing machine.
• Do not use abrasive products, detergents or soaps. After
washing, rinse with clean water and dry carefully. When
the cleaning operations have been completed reconnect
the plug of the unit with dry hands.
• You should clean the condenser with
broom at least once a year in order to
provide energy saving and increase the
productivity.
THE POWER SUPPLY MUST BE DISCONNECTED.
evaporating tray
PDF created with pdfFactory Pro trial version www.pdffactory.com

UK - 15 -
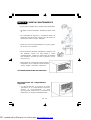
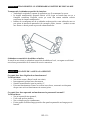
Replacing The Refrigerator and Freezer Light Bulb
1. Unplug the unit from the power supply,
2. Remove the refrigerator light cover with a minus screw driver, and take out the
cover.
3. Change the present light bulb with a new one of not more than 15 W.
4. Replace the light cover and after waiting 5 minutes plug the unit.
PART- 5.
TRANSPORTATION AND CHANGING OF
INSTALLATION POSITION
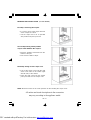
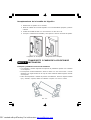
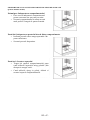
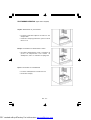
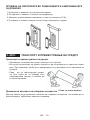
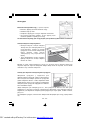
Transportation and Changing of Installation Position
• The original packages and foamed polystyrene (PS) can be concealed if required.
• In transportation the appliance should be tied with a wide stripe or a strong rope.
The rules written on the corrugated box must be applied while transporting.
• Before transporting or changing old installation
position, all the moving objects (i.e., shelves,
crisper…) should be taken out or fixed with
bands in order to prevent the shake.
Freezer compartment
Cooler compartment
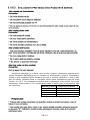
Changing of Door Opening Direction
In case you need to change door-opening direction, please consult the domestic after
sales service.
(For some models)
PDF created with pdfFactory Pro trial version www.pdffactory.com

UK - 16 -
PART- 6.
BEFORE CALLING YOUR AFTER SALES SERVICE
What to do if your refrigerator does not operate;
Check that;
• There is no power ,
• The general switch in your home is disconnected ,
• The thermostat setting is on «0» position ,
• The socket is not sufficient. To check this, plug in another appliance that you know
which is working into the same socket.
What to do if your refrigerator performs poorly;
Check that;
• You have not overloaded the appliance ,
• The doors are closed perfectly ,
• There is no dust on the condenser ,
• There is enough place at the rear and side walls.
IIf your fridge is operating too loudly;
Normal Noises
Cracking (Ice cracking) Noise:
• During automatic defrosting.
• When the appliance is cooled or warmed (due to expansion of appliance material).
• Heard when the thermostat switches the compressor on/off.
Compressor noise
• Normal motor noise. This noise means that the compressor operates normally
• Compressor may cause more noise for a short time when it is activated.
Bubbling noise and splash:
• This noise is caused by the flow of the refrigerant in the tubes of the system.
Water flow noise:
• Normal flow noise of water flowing to the evaporation container during defrosting.
This noise can be heard during defrosting.
Air Blow Noise:
• Normal fan noise. This noise can be heard in No-Frost fridge during normal operation
of the system due to the circulation of air.
If your fridge is not cooling enough;
Your fridge is designed to operate in the ambient temperature intervals stated in the
standards, according to the climate class stated in the information label. We do not
recommend operating your fridge out of stated temperatures value limits in terms of cooling
effectiveness.
PDF created with pdfFactory Pro trial version www.pdffactory.com

UK - 17 -
Climate ClassAmbient Temperature (°C)
T
Between 16 and 43 (°C)
ST Between 16 and 38 (°C)
N
Between 16 and 32 (°C)
SN Between 10 and 32 (°C)
• Tropical Climate Class is described as between 16°C and 43°C of ambient
temperatures according to EN ISO15502 standards.
• Appliance complies with EN15502, IEC60335-1 / IEC60335-2-24, 2004/108/EC
standards.
IMPORTANT NOTES:
• Compressor protection function will be activated after sudden power breakdowns or
after unplugging the appliance, because the gas in the cooling system is not
stabilized yet. Your fridge will start after 5 minutes, there is nothing to worry about.
• If you will not use your fridge for a long time (e.g. in summer holidays) unplug it.
Clean your fridge according to Part 4 and leave the door open to prevent humidity
and smell
• If the problem persists after you have followed all the instructions above, please
consult to the nearest service.
• The appliance you bought is designed for home type use and can be used only at
home and for the stated purposes. It is not suitable for commercial or common
use. If the consumer use the appliance in a way that does not comply with these
features, we emphasize that the producer and the dealer shall not be responsible
for any repair and failure within the guarantee period.
• The lifetime of your appliance stated and declared by the Department of the Industry
is 10 years (the period for retaining parts required for the proper functioning of the
appliance).
PDF created with pdfFactory Pro trial version www.pdffactory.com

UK - 18 -
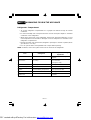
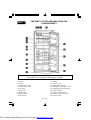
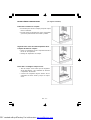
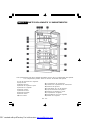
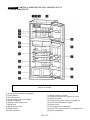
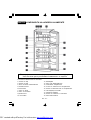
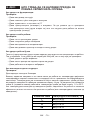
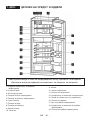
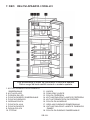
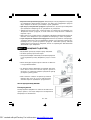
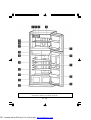
PART- 7.
THE PARTS OF THE APPLIANCE AND THE
COMPARTMENTS
This presentation is only for information about the parts of the appliance.
Parts may vary according to the appliance model.
1) Freezer thermostat box
2) Ice box
3) Ice tray
4) Fast freezing shelf
5) Freezer door shelf
6) Top shelf
7) Egg shelf
8) Bottle shelf
9) Bottom shelf
10) Kick plate
11) Crisper
12) Crisper cover
13) Refrigerator shelves
14) Refrigerator lamp box / cover
15) Refrigerator thermostat box
16) Chiller shelves
17) Freezer compartment
18) Freezer lamp box / cover
19) Freezer shelf
PDF created with pdfFactory Pro trial version www.pdffactory.com
Pagina se încarcă...
Pagina se încarcă...
Pagina se încarcă...
Pagina se încarcă...
Pagina se încarcă...
Pagina se încarcă...
Pagina se încarcă...
Pagina se încarcă...
Pagina se încarcă...
Pagina se încarcă...
Pagina se încarcă...
Pagina se încarcă...
Pagina se încarcă...
Pagina se încarcă...
Pagina se încarcă...
Pagina se încarcă...
Pagina se încarcă...
Pagina se încarcă...
Pagina se încarcă...
Pagina se încarcă...
Pagina se încarcă...
Pagina se încarcă...
Pagina se încarcă...
Pagina se încarcă...
Pagina se încarcă...
Pagina se încarcă...
Pagina se încarcă...
Pagina se încarcă...
Pagina se încarcă...
Pagina se încarcă...
Pagina se încarcă...
Pagina se încarcă...
Pagina se încarcă...
Pagina se încarcă...
Pagina se încarcă...
Pagina se încarcă...
Pagina se încarcă...
Pagina se încarcă...
Pagina se încarcă...
Pagina se încarcă...
Pagina se încarcă...
Pagina se încarcă...
Pagina se încarcă...
Pagina se încarcă...
Pagina se încarcă...
Pagina se încarcă...
Pagina se încarcă...
Pagina se încarcă...
Pagina se încarcă...
Pagina se încarcă...
Pagina se încarcă...
Pagina se încarcă...
Pagina se încarcă...
Pagina se încarcă...
Pagina se încarcă...
Pagina se încarcă...
Pagina se încarcă...
Pagina se încarcă...
Pagina se încarcă...
Pagina se încarcă...
Pagina se încarcă...
Pagina se încarcă...
Pagina se încarcă...
Pagina se încarcă...
Pagina se încarcă...
Pagina se încarcă...
Pagina se încarcă...
Pagina se încarcă...
Pagina se încarcă...
Pagina se încarcă...
Pagina se încarcă...
Pagina se încarcă...
Pagina se încarcă...
Pagina se încarcă...
Pagina se încarcă...
Pagina se încarcă...
Pagina se încarcă...
Pagina se încarcă...
Pagina se încarcă...
Pagina se încarcă...
Pagina se încarcă...
Pagina se încarcă...
Pagina se încarcă...
Pagina se încarcă...
Pagina se încarcă...
Pagina se încarcă...
Pagina se încarcă...
Pagina se încarcă...
Pagina se încarcă...
Pagina se încarcă...
Pagina se încarcă...
Pagina se încarcă...
Pagina se încarcă...
Pagina se încarcă...
Pagina se încarcă...
Pagina se încarcă...
Pagina se încarcă...
Pagina se încarcă...
Pagina se încarcă...
Pagina se încarcă...
Pagina se încarcă...
Pagina se încarcă...
Pagina se încarcă...
Pagina se încarcă...
Pagina se încarcă...
Pagina se încarcă...
Pagina se încarcă...
Pagina se încarcă...
-
 1
1
-
 2
2
-
 3
3
-
 4
4
-
 5
5
-
 6
6
-
 7
7
-
 8
8
-
 9
9
-
 10
10
-
 11
11
-
 12
12
-
 13
13
-
 14
14
-
 15
15
-
 16
16
-
 17
17
-
 18
18
-
 19
19
-
 20
20
-
 21
21
-
 22
22
-
 23
23
-
 24
24
-
 25
25
-
 26
26
-
 27
27
-
 28
28
-
 29
29
-
 30
30
-
 31
31
-
 32
32
-
 33
33
-
 34
34
-
 35
35
-
 36
36
-
 37
37
-
 38
38
-
 39
39
-
 40
40
-
 41
41
-
 42
42
-
 43
43
-
 44
44
-
 45
45
-
 46
46
-
 47
47
-
 48
48
-
 49
49
-
 50
50
-
 51
51
-
 52
52
-
 53
53
-
 54
54
-
 55
55
-
 56
56
-
 57
57
-
 58
58
-
 59
59
-
 60
60
-
 61
61
-
 62
62
-
 63
63
-
 64
64
-
 65
65
-
 66
66
-
 67
67
-
 68
68
-
 69
69
-
 70
70
-
 71
71
-
 72
72
-
 73
73
-
 74
74
-
 75
75
-
 76
76
-
 77
77
-
 78
78
-
 79
79
-
 80
80
-
 81
81
-
 82
82
-
 83
83
-
 84
84
-
 85
85
-
 86
86
-
 87
87
-
 88
88
-
 89
89
-
 90
90
-
 91
91
-
 92
92
-
 93
93
-
 94
94
-
 95
95
-
 96
96
-
 97
97
-
 98
98
-
 99
99
-
 100
100
-
 101
101
-
 102
102
-
 103
103
-
 104
104
-
 105
105
-
 106
106
-
 107
107
-
 108
108
-
 109
109
-
 110
110
-
 111
111
-
 112
112
-
 113
113
-
 114
114
-
 115
115
-
 116
116
-
 117
117
-
 118
118
-
 119
119
-
 120
120
-
 121
121
-
 122
122
-
 123
123
-
 124
124
-
 125
125
-
 126
126
-
 127
127
-
 128
128


Electrolux END44501W Manual de utilizare
- Categorie
- Frigidere
- Tip
- Manual de utilizare
în alte limbi
Lucrări înrudite
-
Electrolux EJF4442AOX Manual de utilizare
-
-
-
-
-
-
Electrolux LNT7MF46X2 Manual de utilizare
-
Alte documente
-
FRAM FDD-VRL212BGF Manual de utilizare
-
 Myria MY1007 Manual de utilizare
-
 FRAM FC-VRL268BGE Manual de utilizare
-
Gorenje DK63MCLB Manual de utilizare
-
Indesit B 34 FNF (SP) Manualul proprietarului
-
Tesla RC3400FHX1 Manual de utilizare
-
Whirlpool B 23 (SP) Manualul utilizatorului
-
Gorenje E015AII1K28A1BSB Manual de utilizare

