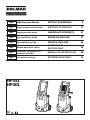
Dolmar HP351 Manualul proprietarului
- Categorie
- Unelte electrice
- Tip
- Manualul proprietarului
Acest manual este potrivit și pentru

HP351
HP401
EN
High Pressure Washer INSTRUCTION MANUAL 8
PL
Myjka wysokociśnieniowa INSTRUKCJA OBSŁUGI 17
HU
Nagynyomású mosó HASZNÁLATI KÉZIKÖNYV 27
SK
Vysokotlakový čistič NÁVOD NA OBSLUHU 37
CS
Vysokotlaká myčka NÁVOD K OBSLUZE 46
UK
Мийка високого тиску
ІНСТРУКЦІЯ З
ЕКСПЛУАТАЦІЇ
55
RO
Dispozitiv de spălare cu
presiune ridicată
MANUAL DE INSTRUCŢIUNI 65
DE
Hochdruckreiniger BETRIEBSANLEITUNG 75

1
2
Fig.1
13
2
Fig.2
Fig.3
Fig.4
Fig.5
2
1
Fig.6
1
2
3
Fig.7
1
2
Fig.8
2

4 5
6
1 2
3
Fig.9
1
Fig.10
1
Fig.11
2
1
3
Fig.12
Fig.13
1
2
Fig.14
1
2
Fig.15
3

1
2
3
Fig.16
1
2
3
Fig.17
1
2
3
Fig.18
2
1
3
Fig.19
2 3
1
Fig.20
1
2
Fig.21
1
Fig.22
Fig.23
4

1
Fig.24
1
Fig.25
Fig.26
Fig.27
1
Fig.28
1
2
Fig.29
1
Fig.30
1
2
Fig.31
5

1
Fig.32
1
23
Fig.33
1
2
Fig.34
Fig.35
Fig.36
Fig.37
Fig.38
Fig.39
6

Fig.40
Fig.41
Fig.42
Fig.43
Fig.44
Fig.45
Fig.46
Fig.47
7

8 ENGLISH
ENGLISH (Original instructions)
WARNING
• Machines shall not be used by children. Children should be
supervised to ensure that they do not play with the machine.
• This machine is not intended for use by persons (including chil-
dren) with reduced physical, sensory, or mental capabilities, or
lack of experience and knowledge.
•
This machine has been designed for use with the cleaning agent sup-
plied or recommended by the manufacturer. The use of other cleaning
agents or chemicals may adversely affect the safety of the machine.
• High pressure jets can be dangerous if subject to misuse. The jet
must not be directed at persons, live electrical equipment or the
machine itself.
• Do not use the machine within range of persons unless they
wear protective clothing.
• Do not direct the jet against yourself or others in order to clean
clothes or foot-wear.
• Riskofexplosion–Donotsprayammableliquids.
• High pressure cleaners shall not be used by children or
untrained personnel.
• Highpressurehoses,ttingsandcouplingsareimportantforthe
safetyofthemachine.Useonlyhoses,ttingsandcouplings
recommended by the manufacturer.
• To ensure machine safety, use only original spare parts from the
manufacturer or approved by the manufacturer.
• Always be sure that the tool is switched off and unplugged
before carrying out any work on the tool.
•
Do not use the machine if a supply cord or important parts of the machine
are damaged, e.g. safety devices, high pressure hoses, trigger gun.
• Inadequate extension cords can be dangerous. If an extension
cord is used, it shall be suitable for outdoor use, and the con-
nection has to be kept dry and off the ground. It is recommended
that this is accomplished by means of a cord reel which keeps
the socket at least 60 mm above the ground.
• Always switch off the mains disconnecting switch when leaving
the machine unattended.

9 ENGLISH
•
Comply with the requirements of the local water supply company.
• For European countries:
According to EN12729 (BA), the appliance can also be con-
nectedtothemainsdrinkingwatersupplyifabackowpreventer
valve with drain facility is installed in the supply hose.
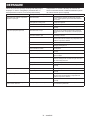
SPECIFICATIONS
Model: HP351 HP401
Max. feed volume 7.0 l/min 7.5 l/min
Waterowrate 5.5 l/min 6.0 l/min
Max. permissible pressure 12 MPa (120 bars) 13 MPa (130 bars)
Working pressure High mode 10 MPa (100 bars) 11 MPa (110 bars)
Low mode - 8 MPa (80 bars)
Max. feed pressure 1 MPa (10 bars)
Max. feed temperature 40 °C
Max. suction height 1.0 m
Dimensions
(L x W x H)
292 mm x 358 mm x 830 mm
Weight 11.0 kg 12.7 kg
Motor protection IPX5
• Duetoourcontinuingprogramofresearchanddevelopment,thespecicationshereinaresubjecttochange
without notice.
• Specicationsmaydifferfromcountrytocountry.
• WeightaccordingtoEPTA-Procedure01/2003
Symbols
The following show the symbols used for the equipment.
Be sure that you understand their meaning before use.
Read the instruction manual.
Take particular care and attention.
DOUBLEINSULATION
Only for EU countries
Do not dispose of electric equipment
together with household waste material! In
observance of the European Directive, on
Waste Electric and Electronic Equipment
and its implementation in accordance with
national law, electric equipment that have
reached the end of their life must be col-
lected separately and returned to an envi-
ronmentally compatible recycling facility.
Do not direct the jet at people including
yourself, animals, and live electrical
equipments.
Not suitable for connection to the potable
water mains.
Intended use
This tool is intended for cleaning stubborn dirt by using
water jet. This tool is intended for household use.
Power supply
The tool should be connected only to a power supply of
the same voltage as indicated on the nameplate, and
can only be operated on single-phase AC supply. They
are double-insulated and can, therefore, also be used
from sockets without earth wire.
For public low-voltage distribution
systems of between 220 V and 250 V
Switchingoperationsofelectricapparatuscausevolt-
ageuctuations.Theoperationofthisdeviceunder
unfavorable mains conditions can have adverse effects
to the operation of other equipment. With a mains
impedance equal or less than 0.25 Ohms it can be pre-
sumed that there will be no negative effects. The mains
socket used for this device must be protected with a
fuse or protective circuit breaker having slow tripping
characteristics.

10 ENGLISH
Noise
The typical A-weighted noise level determined accord-
ing to EN60335-2-79:
Model HP351
Soundpressurelevel(L
pA
) : 72 dB(A)
Uncertainty (K) : 3.8 dB(A)
Model HP401
Soundpressurelevel(L
pA
) : 76 dB(A)
Uncertainty (K) : 2.4 dB(A)
The noise level under working may exceed 80 dB (A).
WARNING: Wear ear protection.
Vibration
The vibration total value (tri-axial vector sum) deter-
mined according to EN60335-2-79:
Model HP351
Vibration emission (a
h
) : 4.11 m/s
2
Uncertainty (K) : 1.5 m/s
2
Model HP401
Vibration emission (a
h
) : 4.86 m/s
2
Uncertainty (K) : 1.5 m/s
2
NOTE: The declared vibration emission value has
been measured in accordance with the standard test
method and may be used for comparing one tool with
another.
NOTE: The declared vibration emission value
may also be used in a preliminary assessment of
exposure.
WARNING: The vibration emission during actual
use of the power tool can differ from the declared
emission value depending on the ways in which the
tool is used.
WARNING: Be sure to identify safety measures
to protect the operator that are based on an estima-
tion of exposure in the actual conditions of use (taking
account of all parts of the operating cycle such as
the times when the tool is switched off and when it is
running idle in addition to the trigger time).
EC Declaration of Conformity
For European countries only
The EC declaration of conformity is included as Annex A
to this instruction manual.
SAFETY WARNINGS
WARNING: Read all safety warnings and
all instructions. Failure to follow the warnings and
instructionsmayresultinelectricshock,reand/or
serious injury.
Save all warnings and instruc-
tions for future reference.
Work area safety
1. Keep operating area clear of all persons.
2. Do not overreach or stand on unstable sup-
ports. Keep good footing and balance at all
times.
3. Always place the high pressure washer body
on a level and stable surface. Avoid areas
where the ejected water will run or pool.
4. Before cleaning, check the surroundings and
objects to be cleaned. High pressure jets can
scrape away paint or other surface treatments
including toxic chemicals. Take the preventive
measures if necessary.
5. Be careful not to trip over by the cord or hose
of the high pressure washer. Always be aware
of the conguration of the cord and hose
during operation.
6. During use, a small amount of water will come
out from the bottom of the high pressure
washer. Avoid locating the high pressure
washer in the areas where you don't want to
wet.
Personal safety
1. To protect against the jet and objects by the
jet, operators should wear appropriate cloth-
ing such as safety boots, safety gloves, safety
helmets with visors, hearing protection, etc.
2. Do not use the high pressure washer within
range of persons unless they wear protective
clothing.
3. To reduce the risk of injury, close supervision
is necessary when the product is used near
children.
4. Water that has owed through backow pre-
venter is considered to be non-potable.
Electrical safety
1. Never use the high pressure washer outdoors
in the rain.
2. Never touch the mains plug and/or socket with
wet hands.
3. Do not use the machine if the supply cord or
important parts of the machine are damaged,
e.g. safety devices, high pressure hoses, or
the trigger gun.
4. Plug must match the outlet. Never modify
the plug in any way. Do not use any adapter
plug with grounded tools.Unmodiedplugand
matching outlet will reduce risk of the electric
shock.
5. Inadequate extension cords can be dangerous.
If an extension cord is used, it shall be suitable
for outdoor use, and the connection has to be
kept dry and off the ground. It is recommended
that this is accomplished by means of a cord reel
which keeps the socket at least 60 mm above the
ground.
6. Note the following when using extension
cords:
• Use only extension cords that are
intended for outdoor use.

11 ENGLISH
• Use only extension cords with an elec-
trical rating equal to or higher than the
rating of the product.
• Do not use damaged extension cords.
• Examine extension cords before use and
replace if damaged.
• Do not abuse extension cords and do not
yank on cords to disconnect them.
• Keep cords away from heat and sharp
edges.
• Always disconnect the extension cord
from the receptacle before disconnecting
the product from the extension cord.
7. The electric supply connection shall be made
by a qualied electrician and comply with IEC
60364-1. It is recommended that the electric
supply to this machine should include either
a residual current device that will interrupt the
supply if the leakage current to earth exceeds
30 mA for 30 ms or a device that will prove the
earth circuit.
Power tool use and care
1. Read all the instructions before using the
product.
2. Know how to stop the high pressure washer
and bleed pressures quickly. Be thoroughly
familiar with the controls.
3. High pressure jets can be dangerous if mis-
used. The jet must not be directed at people,
live electrical equipment, or the machine itself.
4. This machine is not intended for use by per-
sons (including children) with reduced physi-
cal, sensory, or mental capabilities, or lack of
experience and knowledge.
5. Children should be supervised to ensure that
they do not play with the appliance.
6. Do not spray ammable and/or toxic liquids.
This may cause an explosion, intoxication, or
damage to the machine.
7. Do not direct the jet against yourself or others
in order to clean clothes or foot-wear.
8. High-pressure hoses, ttings and couplings
are important for the safety of the machine.
Use only hoses, ttings and couplings recom-
mended by the manufacturer.
9. Follow the instructions when changing
accessories.
10. Keep handles dry, clean, and free of oil or
grease.
11. Stay alert – watch what you are doing.
12. Do not operate the product when fatigued or
under the inuence of alcohol or drugs.
13. Do not run the high pressure washer without
water for longer than one minute. It will dam-
age the motor, resulting in malfunction.
14. Always turn off the power and shut off the
water mains when leaving the high pressure
washer unattended.
15. Be wary of the kickback. The trigger gun
recoils when the high pressure jet is ejected
from the nozzle. Hold the trigger gun rmly to
prevent accidental injuries.
16. Check for damaged or worn parts before use.
Also make sure that the hose is properly con-
nected and there is no leakage during oper-
ation. Operating the machine with functional
defects may cause an accident.
17. This machine has been designed for use with
the cleaning agent supplied or recommended
by the manufacturer. The use of other cleaning
agents or chemicals may adversely affect the
safety of the machine.
18. Do not pull the cord and/or hose to move the
high pressure washer body. This will damage
the cord, hose, and connecting parts and
result in a short circuit or functional defects.
19. Do not put heavy objects on the hose or let
vehicles drive over it.
20. Always discharge the residual pressure in the
trigger gun before disconnecting the hose.
21. When connecting the hose to the water mains,
observe the instructions of your local water-
works department or company.
Service
1. Follow the maintenance instructions specied
in the manual.
2. To ensure machine safety, use only original
spare parts from the manufacturer or approved
by the manufacturer.
3. Have your high pressure washer serviced by
a qualied repair person using only identi-
cal replacement parts. This will ensure that
the safety of the high pressure washer is
maintained.
4. In case of breakdown or malfunction of the
high pressure washer, immediately switch it
off and remove the mains plug. Contact your
local dealer or service center.
SAVE THESE INSTRUCTIONS.
WARNING: DO NOT let comfort or familiarity
with product (gained from repeated use) replace
strict adherence to safety rules for the subject
product.
MISUSE or failure to follow the safety rules stated
in this instruction manual may cause serious
personal injury.

12 ENGLISH
FUNCTIONAL
DESCRIPTION
CAUTION: Always be sure that the tool is
switched off and unplugged before adjusting or
checking function on the tool.
Power switch
NOTICE: Do not turn the power switch forcibly.
This may cause the switch to malfunction.
For the HP351
►Fig.1: 1. OFF position 2. ON position
Turn the power switch clockwise to switch on the high
pressure washer.
For the HP401
Turn the power switch clockwise or counterclockwise
depending on the pressure level. Turn the power switch
clockwise for high pressure mode, counterclockwise for
low pressure mode.
►Fig.2: 1. Low pressure mode 2. OFF position
3. High pressure mode
Nozzle functions
Vario-Power spray lance
►Fig.3
Jet pressure can be adjusted by rotating the nozzle.
CAUTION: When adjusting the jet pressure,
do not rotate the nozzle while pulling it toward the
trigger gun. The nozzle may come off from the trig-
ger gun and cause a personal injury.
Dirt blaster
►Fig.4
Aspiraljetisejected.Suitableforremovingstubborn
dirt.
NOTICE: Do not use the dirt blaster to clean frag-
ile surfaces such as windows or car bodies.
Foam nozzle
►Fig.5
Detergent can be sprayed as foam.
Trigger operations
Pull the trigger to eject a water jet. The jet continues as
long as the trigger is squeezed.
The trigger can be locked for safe handling of the trigger
gun. To lock the trigger, pull out the stopper and hook it
to the groove on the grip.
►Fig.6: 1.Stopper2. Groove
NOTICE: To avoid mechanical error in the pres-
sure switch, always leave a two-second interval
between trigger operations.
Safety valve
This appliance is equipped with a safety valve that
prevents undue overpressure. When the trigger is
released, the valve opens and the water recirculates
through the pump inlet.
CAUTION: Do not tamper with or adjust the
safety valve setting.
Hose reel
For the HP401 only
To unreel the hose, take the end of the hose out of the
catchrst.Unfoldthehandleandturnitclockwise.
Always unreel the hose all the way to the end when
operating the high pressure washer.
►Fig.7: 1. Hose reel 2. Handle 3. End of the hose
When storing the hose, turn the handle counterclock-
wiseandxtheendofthehose.
►Fig.8: 1. Catch 2. Handle
Supplying water from a tank/
reservoir
Optional accessory
You can supply water from a tank or reservoir instead
of a faucet.
Replace the water hose connector with the suction hose
set (optional accessory). When connecting the suction
hoseset,disconnecttheltercasefromthehoseand
attach it to the inlet on the high pressure washer. Then,
connectthehosetotheltercase.
►Fig.9: 1. Tank/reservoir 2.Suctionhoseset3. Water
hose connector 4. Hose 5. Filter case 6. Inlet
on the high pressure washer
NOTICE: Always use Makita's suction hose set.
NOTICE: Always keep 1.0 m (3.28 ft) or less in
height between the inlet on the high pressure
washer and the water surface. Otherwise, the high
pressure washer will be unable to take the water up
into the pump.
To introduce water into the hose, remove the nozzle
from the trigger gun and switch on the high pressure
washer while the trigger is squeezed. Once water is
ejected stably from the trigger gun, release the trigger
and attach the nozzle for your purpose.
►Fig.10: 1. Trigger gun
NOTE: When water is not ejected, detach the suction
hose set and soak it in water. Then reconnect it to the
high-pressure washer.
►Fig.11: 1.Suctionhoseset

13 ENGLISH
ASSEMBLY
CAUTION: Always be sure that the tool is
switched off and unplugged before carrying out
any work on the tool.
Assembling the carrying handle
For the HP351 only
1.
Join the front and rear halves of the handle by align-
ing the screw holes on the high pressure washer body.
►Fig.12: 1. Front half of the handle 2. Rear half of the
handle 3. High pressure washer body
2. Securethecarryinghandlewithscrews(7pcs).
►Fig.13
Connecting the high-pressure hose
For the HP351 only
Connect the high-pressure hose to the outlet (with the
gun marking). Turn the nut on the high-pressure hose
clockwise while screwing it onto the screw thread of the
outlet.
►Fig.14: 1. Outlet 2. Nut
CAUTION: Make sure that the high-pressure
hose is securely connected. A loose connection
may blow the high-pressure hose off, resulting in a
personal injury.
Attaching the trigger gun
Connect the high-pressure hose to the inlet on the
trigger gun. Turn the nut on the high-pressure hose
clockwise while screwing it onto the screw thread on
the inlet.
►Fig.15: 1. Inlet 2. Nut
CAUTION: Make sure that the high-pressure
hose is securely connected. A loose connection
may blow the high-pressure hose off, resulting in a
personal injury.
Connecting to a faucet
CAUTION: Always use a pressure-resistant
water hose with ø13 mm or larger diameter and
connect to the faucet using a proper ttings.
Otherwise,thewaterhoseand/orthettingmay
break and cause personal injury.
NOTICE: Use a pressure-resistant water hose
as short as possible. The amount of intake water
should be higher than the max feed volume of the
pump.
NOTICE: If you connect to the mains for drink-
ing water, use a backow preventer valve which
meets the regulations in your region.
Prepare a pressure-resistant water hose. Attach the
coupling sleeve to one end and connect the other end
to the faucet as follows.
1. Remove the nut on the coupling sleeve and pass
the pressure-resistant water hose through the nut.
Insert the end of the hose into the coupling sleeve and
then tighten the nut.
►Fig.16: 1. Pressure-resistant water hose 2. Nut of
the coupling sleeve 3. Coupling sleeve
NOTE: If you connect the pressure-resistant water
hose to the faucet using a coupling sleeve, attach it to
the both ends of the hose.
2. Connect the pressure-resistant water hose to the
faucet.Applyasuitablettingsuchashosebandor
water tap joint to secure the hose end with the faucet.
►Fig.17: 1. Hose band 2. Water tap joint 3. Pressure-
resistant water hose
NOTE:Thettingdependsontheshapeofthefaucet
to which you connect. Prepare a suitable commercial-
ly-boughttting.
3. Attach the water hose connector to the inlet (with
the faucet marking) and then insert the coupling sleeve.
►Fig.18: 1. Coupling sleeve 2. Water hose connector
3. Inlet
Connecting/disconnecting the
nozzle
CAUTION: Always lock the trigger when con-
necting/disconnecting the nozzle.
Insert the end of the nozzle into the slot on the trigger
gun and turn it in the direction of the arrow as shown in
thegure.Todisconnect,turnthenozzleinthereverse
direction while pressing it toward the trigger gun.
►Fig.19: 1. Trigger gun 2.Slot3. End of the nozzle
Someoptionalnozzlesrequiretheconnectingjoint
(optional accessory) to attach to the trigger gun. Attach
the connecting joint to the trigger gun in the same way
as the nozzle.
►Fig.20: 1. Nozzle 2. Connecting joint 3. Trigger gun
NOTE: The connecting joint is needed when using
the nozzles included with another model, HP-350 or
HP-400.
Connecting the foam nozzle
CAUTION: Always lock the trigger when con-
necting/disconnecting the nozzle.
Prepare a detergent before using the foam nozzle.
1. Remove the nozzle from the tank by rotating the
nozzle counterclockwise. Attach the nozzle to the trig-
ger gun.
►Fig.21: 1. Nozzle 2. Trigger gun
2. Pour the detergent into the tank and install it to the
nozzle.
►Fig.22: 1. Tank
NOTICE: Always use neutral detergent. Acidic or
alkaline detergent may damage the tank or nozzle.

14 ENGLISH
OPERATION
WARNING: Do not touch the water jet or
direct the it toward yourself or others. The water
jet is dangerous and can hurt you or others.
WARNING: When shooting the water jet,
never hold the object that you are cleaning or
place your hands and feet near the water jet.
CAUTION: Stay alert to the rebound of the
water jet and blown objects. Do not bring the
nozzle closer than 30 cm .
CAUTION: Do not run the high pressure
washer without water for longer than 1 minute.
CAUTION: Do not operate the high pressure
washer for a extended period of time. This may
causeoverheatingorre.Also,long-termusemay
cause vibration disorder.
CAUTION: Be aware of the direction of the
wind. If the detergent gets into your eyes or mouth,
rinse with fresh water immediately and seek medical
attention if necessary.
NOTICE: Avoid using the high pressure washer
for longer than 1 hour. After using 1 hour, leave a
same length of intermission.
1. Connect the end of the high-pressure hose to the
trigger gun. For the HP351, connect the other end to the
high pressure washer. For the HP401, unreel the hose
all the way to the end.
2. Connect the high pressure washer to the faucet
and then open the faucet.
►Fig.23
NOTICE: To protect the mechanism of the high
pressure washer, do not use water hotter than
40°C.
3. Plug the high pressure washer into the mains and
switch it on.
►Fig.24: 1. Power switch
4. To eject a water jet, unlock the stopper and
squeeze the trigger. The jet continues as long as the
trigger is squeezed.
►Fig.25: 1.Stopper
CAUTION: Hold the trigger gun rmly. The
trigger gun recoils when you pull the trigger.
CAUTION: Always hold the trigger gun by the
grip and barrel when cleaning. While the motor is
running, do not touch any part of the high pres-
sure washer body other than the carrying handle
and power switch.
NOTICE: Be careful not to pull the trigger gun
forcibly during operation. It may cause the high
pressure washer to fall over.
After operating
CAUTION: After operating, always perform
the procedure described in this manual. Residual
pressure in the trigger gun or high pressure washer
can cause personal injury or damage to the pump
inside.
1. After operating, leave the power switch on.
2. Close the faucet and disconnect the water hose
from the high pressure washer.
►Fig.26
3. Squeezethetriggeruntiltheremainingwaterin
the high pressure washer is discharged.
Do not run the motor for longer than 1 minute.
►Fig.27
4. Switchoffthehighpressurewasherandunplugit
from the mains.
►Fig.28: 1. Power switch
5. Disconnect the high-pressure hose from the trig-
ger gun.
►Fig.29: 1. Trigger gun 2. High-pressure hose
For the HP351, also disconnect the high pressure hose
from the high pressure washer.
►Fig.30: 1. High pressure hose
FortheHP401,reelthehoseandxtheendofthe
hose.
►Fig.31: 1. Catch 2. Handle
NOTICE: To prevent the high-pressure hose from
being damaged, remove the remaining water in
the hose before storing.
MAINTENANCE &
STORAGE
CAUTION: Always be sure that the tool is
switched off and unplugged before attempting to
perform inspection or maintenance.
NOTICE: Never use gasoline, benzine, thinner,
alcohol or the like. Discoloration, deformation or
cracks may result.
Cleaning the nozzle
Use the cleaner pin to remove dirt from or unclog the
nozzle.
►Fig.32: 1. Cleaner pin
NOTICE: Do not remove dirt or debris forcibly.
This may result in personal injury or damage to the
ejection hole causing deviated jet angles or poor
performance.

15 ENGLISH
Cleaning the lter
Detach the water hose connector and remove dirt and
debrisfromtheinsideofthelter.
►Fig.33: 1. Water hose connector 2. Filter 3.Sealing
ring
When using the suction hose set (optional accessory),
takethelteroutoftheltercaseandremovedirtand
debris.
►Fig.34: 1. Filter 2. Filter case
NOTE: To maintain the optimal performance, clean
thelterperiodically.
Storage
Reel the hose and cord. Put the trigger gun and nozzles
in the pockets.
HP351
►Fig.35
HP401
►Fig.36
CAUTION: Always store in an indoor location
where the temperature does not go below freez-
ing. If the high pressure washer freezes and malfunc-
tions, contact your local service center for repairs.
CAUTION: Always use the carrying handle
when moving the high pressure washer. Do not
carry it by the hose or cord. The hose or cord may
be damaged.
CAUTION: Do not carry the high pressure
washer with the hose and/or cord unreeled. The
extended hose or cord may be damaged or entan-
gled with other objects, resulting in personal injury or
breakage.
TomaintainproductSAFETYandRELIABILITY,
repairs, any other maintenance or adjustment should
beperformedbyMakitaAuthorizedorFactoryService
Centers, always using Makita replacement parts.
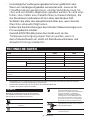
TROUBLESHOOTING
Before asking for repairs, conduct your own inspection
rst.Ifyoundaproblemthatisnotexplainedinthe
manual, do not attempt to dismantle the tool. Instead,
askDolmarAuthorizedServiceCenters,alwaysusing
Dolmar replacement parts for repairs.
State of abnormality Probable cause (malfunction) Remedy
The washer does not start. No electricity Connect the plug to the mains. Also check if electric-
ity is being supplied to the mains.
The switch is not turned on. Turn on the switch.
Residual pressure in the pump Pull the trigger.
Damaged cord or electric circuit Contact an authorized service center for repairs.
No water jet / weak water jet No water supply Make sure that the faucet is open. If using the suc-
tion hose set, introduce water into the hose.
Poor water supply Turn on the faucet.
Poor water hose connection Check the connection between the water hose and
the faucet and inlet on the high pressure washer.
Cloggedhose,lter,ornozzle Unclogthehose,lter,ornozzle.
Airisblockingtheowofwater. Turn off the switch and then turn it on again while
squeezing the trigger.
Damaged or worn nozzle Replace the nozzle.
Pump or valve malfunction Contact an authorized service center for repairs.
Unstable water jet. Clogged nozzle Unclog on the ejection hole of the nozzle using the
cleaner pin.
Poor water suction Check the water hose starting from the faucet for
any leakage or clogs. Turn on the faucet.
The water is too hot. Supplycoolerwater.
Valve malfunction Contact an authorized service center for repairs.
Abnormal sound. The water is too hot. Supplycoolerwater.
Air is stuck in the pump. Contact an authorized service center for repairs.
Water/oil leakage. Poor connection Check the connection between the high pressure
hose and the trigger gun and high pressure washer.
Worn out sealings Contact an authorized service center for repairs.
The pump does not run even though
the motor sound is heard.
Unsuitable extension cord. Use an extension cord suitable for the rating of the
product.

16 ENGLISH
OPTIONAL
ACCESSORIES
CAUTION: These accessories or attachments
are recommended for use with your Dolmar tool
specied in this manual. The use of any other
accessories or attachments might present a risk of
injury to persons. Only use accessory or attachment
for its stated purpose.
If you need any assistance for more details regarding
theseaccessories,askyourlocalDolmarService
Center.
NOTE:Someitemsinthelistmaybeincludedinthe
tool package as standard accessories. They may
differ from country to country.
Spray lance
►Fig.37
Jet width can be adjusted from 0° to 25° by rotating the
front end of the nozzle.
CAUTION: When adjusting the jet width, do
not rotate the nozzle while pulling it toward the
trigger gun. The nozzle may come off from the trig-
ger gun and cause a personal injury.
Washing brush (long)
►Fig.38
A nozzle equipped with a brush. Useful for washing out
dirt while scrubbing with brush.
Suction hose set
►Fig.39
Replace the water hose with this set to supply water
from a tank or reservoir.
Rotating wash brush
►Fig.40
Three brushes inside rotate slowly when ejecting the
jet.Suitableforcleaninglightdirtonaexteriorwall,car
body, bath tub, etc.
Lance extension
►Fig.41
Pipes to extend the length of the trigger gun. Three
different lengths are available by changing the number
of the pipes to be used.
Under body spray lance
►Fig.42
An extra long spray lance with angled nozzle. Best for
cleaning hard-to-reach areas such as car under body
and roof gutter.
CAUTION: Do not use the under body spray
lance with the lance extension.
Splash guard
►Fig.43
Reduces splash back when cleaning corners with the
dirt blaster.
Swivel joint
►Fig.44
Prevents the high-pressure hose from being twisted.
Connecting joint
►Fig.45
A joint to connect with a nozzle from other model.
NOTE: The connecting joint is needed when using
the nozzles included with another model, HP-350 or
HP-400.
Pipe-cleaning set (10 m/15 m)
►Fig.46
For cleaning and unclogging plumbing and downpipes.
CAUTION: Pay particular attention to the
water jet when using the pipe cleaning set. Highly
intense water jet is ejected backward.
Extension high-pressure hose (5 m/8
m/10 m)
►Fig.47
Extension hose to connect the high pressure washer
body with the trigger gun.

17 POLSKI
POLSKI (Instrukcja oryginalna)
OSTRZEŻENIE
• Urządzenianiepowinnybyćużytkowaneprzezdzieci.Należy
zwracaćuwagę,abydzieciniebawiłysięurządzeniem.
• Tourządzenieniejestprzeznaczonedoużytkowaniaprzez
osoby(wtymdzieci)oograniczonejsprawnościruchowej,sen-
sorycznejiumysłowejorazosobynieposiadająceodpowiedniej
wiedzyidoświadczenia.
• Urządzeniejestprzeznaczonedoużytkuześrodkiemmyjącym
dostarczonym lub zalecanym przez producenta. Zastosowanie
innychśrodkówmyjącychlubśrodkówchemicznychmożenie-
korzystniewpłynąćnabezpieczeństwourządzenia.
• Nieprawidłowekorzystaniezestrumieniapodwysokimciśnie-
niemmożebyćniebezpieczne.Strumienianienależykierować
wstronęludziczyurządzeńelektrycznychpodnapięciemanina
samourządzenie.
• Nienależyużywaćurządzeniawpobliżuludzi,chybażenoszą
odpowiedniąodzieżochronną.
• Nienależykierowaćstrumienianasiebieaninainneosobyw
celuoczyszczeniaodzieżylubobuwia.
• Niebezpieczeństwowybuchu–nierozpylaćłatwopalnych
płynów.
• Myjkiciśnienioweniepowinnybyćużytkowaneprzezdzieciani
osoby bez odpowiedniego przeszkolenia.
• Wężewysokociśnieniowe,elementypołączenioweizłączkisą
bardzoważnedlabezpieczeństwaurządzenia.Należystosować
wyłączniewęże,elementypołączenioweizłączkizalecaneprzez
producenta.
• Abyzapewnićbezpieczeństwourządzenia,należystosować
wyłącznieoryginalneczęścizamienneodproducentalub
zatwierdzone przez producenta.
• Przedwykonaniemjakichkolwiekpracprzynarzędziunależy
upewnićsię,żejestonowyłączoneiodłączoneodzasilania.
• Nienależyużywaćurządzeniawprzypadkuuszkodzeniajego
przewoduzasilanialubważnychelementów,takichjakzabezpie-
czenia,wężewysokociśnieniowelubpistoletspustowy.

18 POLSKI
•
Nieodpowiednieprzedłużaczemogąbyćniebezpieczne.W
przypadkukorzystaniazprzedłużaczapowinienonbyćprze-
znaczonydozastosowańzewnętrznych,aponadtonależydbać,
abypołączeniebyłosucheinieleżałonaziemi.Zalecanejest
użyciewtymceluszpuliprzewodu,którautrzymujegniazdona
wysokościconajmniej60mmnadziemią.
• Przedpozostawieniemurządzeniabeznadzorunależybez-
względnieużyćodłącznikasieciowego.
• Przestrzegaćwymagańlokalnejrmywodociągowej.
• Kraje europejskie:
ZgodnieznormąEN12729(BA)urządzeniemożnapodłączyć
równieżdosieciwodociągowejwodypitnej,jeślinawężuzasila-
jącymjestzainstalowanyzawórzwrotnyzespustemzapobiega-
jącyprzepływowiwstecznemu.
DANE TECHNICZNE
Model: HP351 HP401
Maks.objętośćpodawania 7,0 l/min 7,5 l/min
Prędkośćprzepływuwody 5,5 l/min 6,0 l/min
Maks.dopuszczalneciśnienie 12 MPa (120 bar) 13 MPa (130 bar)
Ciśnienierobocze Trybwysokiegociśnienia 10 MPa (100 bar) 11 MPa (110 bar)
Trybniskiegociśnienia - 8 MPa (80 bar)
Maks.ciśnieniepodawania 1 MPa (10 bar)
Maks. temperatura podawania 40°C
Maks.wysokośćzasysania 1,0 m
Wymiary
(dług.×szer.×wys.)
292mm×358mm×830mm
Waga 11,0 kg 12,7 kg
Zabezpieczenie silnika IPX5
• Wzwiązkuzestaleprowadzonymprzeznasząrmęprogramembadawczo-rozwojowymniniejszedanemogą
uleczmianombezwcześniejszegopowiadomienia.
• Danetechnicznemogąróżnićsięwzależnościodkraju.
• CiężarpodanyzgodniezprocedurąEPTA01/2003.
Symbole
Poniżejpokazanosymbolezastosowanenaurządze-
niu.Przedrozpoczęciemużytkowanianależyzapoznać
sięzichznaczeniem.
Przeczytaćinstrukcjęobsługi.
Zachowaćszczególnąostrożność.
PODWÓJNA IZOLACJA
DotyczytylkopaństwUE
Niewyrzucaćurządzeńelektrycznychwrazz
odpadami z gospodarstwa domowego! Zgodnie z
dyrektywąeuropejskąwsprawiezużytegosprzętu
elektrycznego i elektronicznego oraz dostosowa-
niemjejdoprawakrajowego,zużyteurządzenia
elektrycznenależyskładowaćosobnoiprzekazy-
waćdozakładurecyklingudziałającegozgodniez
przepisamidotyczącymiochronyśrodowiska.
Nienależykierowaćstrumienianasiebie
aniteżwstronęinnychludzi,zwierząti
urządzeńelektrycznychpodnapięciem.
Nieodpowiednidopodłączeniadosieci
wodociągowejwodypitnej.

19 POLSKI
Przeznaczenie
Narzędziejestprzeznaczonedousuwaniauporczywych
zabrudzeńprzyużyciustrumieniawody.Narzędziejest
przeznaczonedozastosowańdomowych.
Zasilanie
Narzędziewolnopodłączaćtylkodoźródełzasilaniao
napięciuzgodnymznapięciempodanymnatabliczce
znamionowej.Możnajezasilaćwyłączniejednofazo-
wymprądemprzemiennym.Narzędziemapodwójną
izolację,dlategoteżmożnajezasilaćzgniazdaelek-
trycznego bez uziemienia.
Dotyczy niskonapięciowych sieci
elektroenergetycznych o napięciu
pomiędzy 220 V a 250 V
Włączanieiwyłączanieurządzeńelektrycznychpowo-
dujewahanianapięcia.Posługiwaniesięnarzędziem
przyniesprzyjającychparametrachzasilaniamożemieć
niekorzystnywpływnadziałanieinnychurządzeń.Jeśli
impedancjasiecielektrycznejjestmniejszalubrówna
0,25Ωmożnazałożyć,żeniekorzystneefektynie
wystąpią.Gniazdosiecioweużywanedopodłączenia
tegourządzeniapowinnobyćzabezpieczonebezpiecz-
nikiemlubwyłącznikiemozwłocznejcharakterystyce
wyłączania.
Hałas
TypowyrównoważnypoziomdźwiękuAokreślonyw
oparciuonormęEN60335-2-79:
Model HP351
Poziomciśnieniaakustycznego(L
pA
): 72 dB(A)
Niepewność(K):3,8dB(A)
Model HP401
Poziomciśnieniaakustycznego(L
pA
): 76 dB(A)
Niepewność(K):2,4dB(A)
Poziomhałasupodczaspracymożeprzekraczać80
dB (A).
OSTRZEŻENIE: Nosić ochronniki słuchu.
Drgania
Całkowitawartośćpoziomudrgań(sumawektoróww3
osiach)określonazgodnieznormąEN60335-2-79:
Model HP351
Emisjadrgań(a
h
): 4,11 m/s
2
Niepewność(K):1,5m/s
2
Model HP401
Emisjadrgań(a
h
): 4,86 m/s
2
Niepewność(K):1,5m/s
2
WSKAZÓWKA:Deklarowanawartośćwytwarzanych
drgańzostałazmierzonazgodniezestandardową
metodątestowąimożnająwykorzystaćdoporówny-
wanianarzędzi.
WSKAZÓWKA:Deklarowanąwartośćwytwarzanych
drgańmożnatakżewykorzystaćwewstępnejocenie
narażenia.
OSTRZEŻENIE: Drgania wytwarzane podczas
rzeczywistegoużytkowaniaelektronarzędziamogą
sięróżnićodwartoścideklarowanej,wzależnościod
sposobujegoużytkowania.
OSTRZEŻENIE: W oparciu o szacowane
narażeniewrzeczywistychwarunkachużytkowania
należyokreślićśrodkibezpieczeństwawceluochrony
operatora(uwzględniającwszystkieelementycyklu
działania,tj.czas,kiedynarzędziejestwyłączonei
kiedypracujenabiegujałowym,atakżeczas,kiedy
jestwłączone).
Deklaracja zgodności WE
Dotyczy tylko krajów europejskich
DeklaracjazgodnościWEjestdołączonajakozałącznik
Adoniniejszejinstrukcjiobsługi.
OSTRZEŻENIA
DOTYCZĄCE
BEZPIECZEŃSTWA
OSTRZEŻENIE: Przeczytać wszystkie ostrze-
żenia bezpieczeństwa i wszystkie instrukcje.
Niezastosowaniesiędowspomnianychostrzeżeńi
instrukcjimożedoprowadzićdoporażeniaprądem
elektrycznym,pożarui/lubpoważnychobrażeńciała.
Wszystkie ostrzeżenia i instruk-
cje należy zachować do wykorzy-
stania w przyszłości.
Bezpieczeństwo w miejscu pracy
1. W miejscu pracy nie powinny przebywać
żadne osoby.
2. Nie należy sięgać zbyt daleko ani stawać na
niestabilnych podporach. Zawsze należy
zachowywać odpowiednią pozycję stóp i utrzy-
mywać równowagę.
3. Zawsze należy stawiać korpus myjki wysokoci-
śnieniowej na poziomej i stabilnej powierzchni.
Unikać obszarów, w których wyrzucana woda
będzie spływała lub tworzyła kałuże.
4. Przed rozpoczęciem mycia należy spraw-
dzić otoczenie oraz obiekty, które mają być
myte. Strumienie pod wysokim ciśnieniem
mogą spowodować złuszczenie farby lub
innych warstw na powierzchni zawierających
toksyczne substancje chemiczne. W razie
potrzeby należy podjąć odpowiednie działania
zaradcze.
5. Należy zachować ostrożność, aby nie nadep-
nąć na przewód lub wąż myjki wysokociśnie-
niowej. Podczas pracy należy zawsze zwracać
uwagę na poprowadzenie przewodu i węża.
6. Z dolnej części pracującej myjki wysokociśnie-
niowej wypływa niewielka ilość wody. Unikać
ustawiania myjki wysokociśnieniowej w miej-
scach, które nie powinny być zawilgocone.

20 POLSKI
Bezpieczeństwo osobiste
1. Aby chronić się przed strumieniem i obiektami
na drodze strumienia, operatorzy powinni
nosić odpowiednią odzież – obuwie ochronne,
rękawice ochronne, kask ochronny z dasz-
kiem, ochronniki słuchu itp.
2. Nie należy używać myjki wysokociśnieniowej
w pobliżu ludzi, chyba że noszą odpowiednią
odzież ochronną.
3. W przypadku użytkowania produktu przez
dzieci należy zapewnić ścisły nadzór, aby
zmniejszyć ryzyko obrażeń.
4.
Woda wypływająca przez zabezpieczenie przed
przepływem wstecznym nie nadaje się do picia.
Bezpieczeństwo elektryczne
1. Nigdy nie należy używać myjki wysokociśnie-
niowej na zewnątrz podczas deszczu.
2. Nigdy nie należy dotykać wtyku i/lub gniazda
sieciowego mokrymi rękami.
3.
Nie należy używać urządzenia w przypadku
uszkodzenia jego przewodu zasilania lub waż-
nych elementów, takich jak zabezpieczenia, węże
wysokociśnieniowe czy pistolet spustowy.
4. Wtyk musi pasować do gniazda. W żadnym
wypadku nie należy przerabiać wtyku. W
przypadku elektronarzędzi z uziemieniem
nie należy stosować wtyków rozgałęźnych.
Oryginalne wtyki i dopasowane do nich gniazda
zmniejszająryzykoporażeniaprądem.
5. Nieodpowiednie przedłużacze mogą być nie-
bezpieczne. W przypadku korzystania z prze-
dłużacza powinien on być przeznaczony do
zastosowań zewnętrznych, a ponadto należy
dbać, aby połączenie było suche i nie leżało
na ziemi.Zalecanejestużyciewtymceluszpuli
przewodu,którautrzymujegniazdonawysokości
conajmniej60mmnadziemią.
6. W przypadku korzystania z przedłużacza
należy uwzględnić następujące uwagi:
• Używać wyłącznie przedłużaczy przezna-
czonych do zastosowań zewnętrznych.
• Używać wyłącznie przedłużaczy o para-
metrach elektrycznych równych lub wyż-
szych od parametrów produktu.
• Nie używać uszkodzonych przedłużaczy.
• Sprawdzać przedłużacze przed użyciem i
wymieniać je w przypadku uszkodzenia.
• Nie działać na przedłużacze z nadmierną
siłą ani szarpać za przewody w celu ich
odłączenia.
• Przewody należy chronić przed ciepłem i
ostrymi krawędziami.
• Zawsze przed odłączeniem produktu od
przedłużacza należy odłączyć przedłu-
żacz od gniazda zasilania.
7. Podłączenie do zasilania powinno zostać
wykonane przez odpowiednio wykwaliko-
wanego elektryka i być zgodnie z normą IEC
60364-1. Zalecane jest, aby obwód zasilania
tego urządzenia był wyposażony w wyłącznik
różnicowoprądowy odłączający zasilanie, gdy
prąd upływu do ziemi przekracza 30 mA w
ciągu 30 ms, ewentualnie w urządzenie kontro-
lujące obwód uziemienia.
Użytkowanie i utrzymywanie elektronarzędzia w
dobrym stanie
1. Przed rozpoczęciem użytkowania produktu
należy zapoznać się z wszystkimi instrukcjami.
2. Należy wiedzieć, jak zatrzymać myjkę wyso-
kociśnieniową i szybko obniżyć ciśnienie.
Należy uważnie zapoznać się z elementami
sterowania.
3. Nieprawidłowe korzystanie ze strumienia pod
wysokim ciśnieniem może być niebezpieczne.
Strumienia nie należy kierować w stronę ludzi
czy urządzeń elektrycznych pod napięciem ani
na samo urządzenie.
4. To urządzenie nie jest przeznaczone do użyt-
kowania przez osoby (w tym dzieci) o ograni-
czonej sprawności ruchowej, sensorycznej i
umysłowej oraz osoby nieposiadające odpo-
wiedniej wiedzy i doświadczenia.
5. Należy pilnować, aby dzieci nie bawiły się
urządzeniem.
6. Nie należy rozpylać łatwopalnych i/lub tok-
sycznych płynów. Może to spowodować
wybuch, zatrucie lub uszkodzenie urządzenia.
7. Nie należy kierować strumienia na siebie ani
na inne osoby w celu oczyszczenia odzieży lub
obuwia.
8. Węże wysokociśnieniowe, elementy połącze-
niowe i złączki są bardzo ważne dla bezpie-
czeństwa urządzenia. Należy stosować wyłącz-
nie węże, elementy połączeniowe i złączki
zalecane przez producenta.
9. Podczas wymiany akcesoriów należy prze-
strzegać instrukcji.
10. Dbać, aby uchwyty były suche, czyste i nieza-
brudzone olejem ani smarem.
11. Zwracać uwagę na wykonywane czynności.
12. Nie obsługiwać produktu w stanie zmęczenia
ani pod wpływem alkoholu lub narkotyków.
13. Nie uruchamiać myjki wysokociśnieniowej
bez wody na dłużej niż minutę. Może to spo-
wodować uszkodzenie silnika prowadzące do
awarii.
14. Przed pozostawieniem myjki wysokociśnie-
niowej bez nadzoru bezwzględnie wyłączyć
zasilanie i zamknąć źródło dopływu wody.
15. Zwracać uwagę na zjawisko odrzutu. Wyrzut
strumienia wody pod wysokim ciśnieniem
powoduje odrzut pistoletu spustowego. Należy
silnie trzymać pistolet spustowy, aby zapobiec
przypadkowym obrażeniom.
16. Przed użyciem należy przeprowadzić kontrolę
pod kątem uszkodzonych lub zużytych części.
Należy także upewnić się, że wąż jest prawi-
dłowo podłączony, a podczas pracy nie docho-
dzi do wycieków. Korzystanie z uszkodzonego
urządzenia grozi wypadkiem.
17. Urządzenie jest przeznaczone do użytku ze
środkiem myjącym dostarczonym lub zaleca-
nym przez producenta. Zastosowanie innych
środków myjących lub środków chemicznych
może niekorzystnie wpłynąć na bezpieczeń-
stwo urządzenia.
Pagina se încarcă...
Pagina se încarcă...
Pagina se încarcă...
Pagina se încarcă...
Pagina se încarcă...
Pagina se încarcă...
Pagina se încarcă...
Pagina se încarcă...
Pagina se încarcă...
Pagina se încarcă...
Pagina se încarcă...
Pagina se încarcă...
Pagina se încarcă...
Pagina se încarcă...
Pagina se încarcă...
Pagina se încarcă...
Pagina se încarcă...
Pagina se încarcă...
Pagina se încarcă...
Pagina se încarcă...
Pagina se încarcă...
Pagina se încarcă...
Pagina se încarcă...
Pagina se încarcă...
Pagina se încarcă...
Pagina se încarcă...
Pagina se încarcă...
Pagina se încarcă...
Pagina se încarcă...
Pagina se încarcă...
Pagina se încarcă...
Pagina se încarcă...
Pagina se încarcă...
Pagina se încarcă...
Pagina se încarcă...
Pagina se încarcă...
Pagina se încarcă...
Pagina se încarcă...
Pagina se încarcă...
Pagina se încarcă...
Pagina se încarcă...
Pagina se încarcă...
Pagina se încarcă...
Pagina se încarcă...
Pagina se încarcă...
Pagina se încarcă...
Pagina se încarcă...
Pagina se încarcă...
Pagina se încarcă...
Pagina se încarcă...
Pagina se încarcă...
Pagina se încarcă...
Pagina se încarcă...
Pagina se încarcă...
Pagina se încarcă...
Pagina se încarcă...
Pagina se încarcă...
Pagina se încarcă...
Pagina se încarcă...
Pagina se încarcă...
Pagina se încarcă...
Pagina se încarcă...
Pagina se încarcă...
Pagina se încarcă...
Pagina se încarcă...
Pagina se încarcă...
Pagina se încarcă...
Pagina se încarcă...
-
 1
1
-
 2
2
-
 3
3
-
 4
4
-
 5
5
-
 6
6
-
 7
7
-
 8
8
-
 9
9
-
 10
10
-
 11
11
-
 12
12
-
 13
13
-
 14
14
-
 15
15
-
 16
16
-
 17
17
-
 18
18
-
 19
19
-
 20
20
-
 21
21
-
 22
22
-
 23
23
-
 24
24
-
 25
25
-
 26
26
-
 27
27
-
 28
28
-
 29
29
-
 30
30
-
 31
31
-
 32
32
-
 33
33
-
 34
34
-
 35
35
-
 36
36
-
 37
37
-
 38
38
-
 39
39
-
 40
40
-
 41
41
-
 42
42
-
 43
43
-
 44
44
-
 45
45
-
 46
46
-
 47
47
-
 48
48
-
 49
49
-
 50
50
-
 51
51
-
 52
52
-
 53
53
-
 54
54
-
 55
55
-
 56
56
-
 57
57
-
 58
58
-
 59
59
-
 60
60
-
 61
61
-
 62
62
-
 63
63
-
 64
64
-
 65
65
-
 66
66
-
 67
67
-
 68
68
-
 69
69
-
 70
70
-
 71
71
-
 72
72
-
 73
73
-
 74
74
-
 75
75
-
 76
76
-
 77
77
-
 78
78
-
 79
79
-
 80
80
-
 81
81
-
 82
82
-
 83
83
-
 84
84
-
 85
85
-
 86
86
-
 87
87
-
 88
88


Dolmar HP351 Manualul proprietarului
- Categorie
- Unelte electrice
- Tip
- Manualul proprietarului
- Acest manual este potrivit și pentru
în alte limbi
- slovenčina: Dolmar HP351 Návod na obsluhu
- polski: Dolmar HP351 Instrukcja obsługi
Alte documente
-
NEO 04-705 Instrucțiuni de utilizare
-
Graphite 59G620 Manualul proprietarului
-
-
 NEO TOOLS 04-705 Manualul proprietarului
-
Hitachi AW18DBL Manualul proprietarului
-
Greenworks G20 Manualul proprietarului
-
Ferm GRM1012 Manualul proprietarului
-
Parkside PHD 150 B2 Translation Of Original Operation Manual
-
Parkside PHD 100 C2 Translation Of Original Operation Manual
-
Ferm GRM1015 Manual de utilizare
