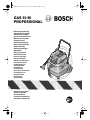
Bosch GAS 50 M Professional Operating Instructions Manual
- Categorie
- Aspiratoare
- Tip
- Operating Instructions Manual

Bedienungsanleitung
Operating instructions
Instructions d’emploi
Instrucciones de servicio
Manual de instruções
Istruzioni d’uso
Gebruiksaanwijzing
Betjeningsvejledning
Bruksanvisning
Brukerveiledningen
Käyttöohje
δηγία ειρισµύ
Kullan∂m k∂lavuzu
Instrukcja obs¬ugi
Návod k obsluze
Návod na pouÏívanie
Használati utasítás
Руководство по
эксплуатации
Iнструкцiя з
експлуатацiї
Instrucøiuni de folosire
Ръководство за
експлоатация
Uputstvo za
opsluÏivanje
Navodilo za uporabo
Upute za uporabu
Kasutusjuhend
Lietošanas pamācība
Naudojimo instrukcija
GAS 50 M
PROFESSIONAL
1 609 929 K11.book Seite 1 Freitag, 1. Dezember 2006 12:33 12

2
1 609 929 K11 • 1.12.06
Deutsch . . . . . . . . . . . . . . . . . . . . . . . . . . . . Seite 6
English . . . . . . . . . . . . . . . . . . . . . . . . . . . . . Page 12
Français . . . . . . . . . . . . . . . . . . . . . . . . . . . . Page 18
Español . . . . . . . . . . . . . . . . . . . . . . . . . . . Página 25
Português . . . . . . . . . . . . . . . . . . . . . . . . . Página 31
Italiano . . . . . . . . . . . . . . . . . . . . . . . . . . . . Pagina 37
Nederlands . . . . . . . . . . . . . . . . . . . . . . . . Pagina 43
Dansk . . . . . . . . . . . . . . . . . . . . . . . . . . . . . . . Side 49
Svenska . . . . . . . . . . . . . . . . . . . . . . . . . . . . . Sida 55
Norsk . . . . . . . . . . . . . . . . . . . . . . . . . . . . . . . Side 61
Suomi. . . . . . . . . . . . . . . . . . . . . . . . . . . . . . . Sivu 67
Eλληνικά. . . . . . . . . . . . . . . . . . . . . . . Σελίδα 73
Türkçe . . . . . . . . . . . . . . . . . . . . . . . . . . Sayfa 80
Polski. . . . . . . . . . . . . . . . . . . . . . . . . . Strona 86
âesky. . . . . . . . . . . . . . . . . . . . . . . . . .Strana 92
Slovensky . . . . . . . . . . . . . . . . . . . . . Strana 98
Magyar. . . . . . . . . . . . . . . . . . . . . . . . . . Oldal 104
Рyсский. . . . . . . . . . . . . . . . . . . . . .Страница 110
Українська . . . . . . . . . . . . . . . . . . . Сторiнка 116
Românã. . . . . . . . . . . . . . . . . . . . . . . . Pagina 122
Български. . . . . . . . . . . . . . . . . . . .Страница 128
Srpski. . . . . . . . . . . . . . . . . . . . . . . . . Strana 135
Slovensko . . . . . . . . . . . . . . . . . . . . . . Stran 141
Hrvatski . . . . . . . . . . . . . . . . . . . . . . Stranica 147
Eesti . . . . . . . . . . . . . . . . . . . . . . . . . Lehekülg 153
Latviešu . . . . . . . . . . . . . . . . . . . . . . Lappuse 159
Lietuviškai . . . . . . . . . . . . . . . . . . . . . Puslapis 165
1 609 929 K11.book Seite 2 Freitag, 1. Dezember 2006 12:33 12

1 609 929 K11 • 1.12.06
3
1 609 929 K11.book Seite 3 Freitag, 1. Dezember 2006 12:33 12

1 609 929 K11 • 1.12.06
4
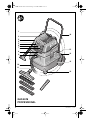
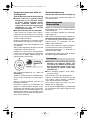
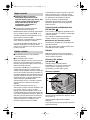
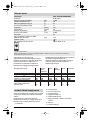
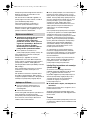
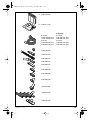
1
3
6
7
8
9
10
11
15
5
4
12
13
14
16
2
GAS 50 M
PROFESSIONAL
1 609 929 K11.book Seite 4 Freitag, 1. Dezember 2006 12:33 12

1 609 929 K11 • 1.12.06
5
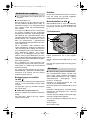
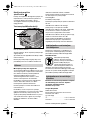
A
13
9
10
17
11
B
18
19
8
1 609 929 K11.book Seite 5 Freitag, 1. Dezember 2006 12:33 12

6
| Deutsch
1 609 929 K11 • 1.12.06
In den Sauger ist eine Schutzkontakt-Steck-
dose
7
integriert. Sie können dort ein externes
Elektrowerkzeug anschließen. Die maximal zu-
lässige Stromaufnahme des angeschlossenen
Elektrowerkzeuges darf den in der nachfolgen-
den Tabelle aufgeführten Wert in Summe nicht
überschreiten. Die Steckdosen können unter
Berücksichtigung länderspezifischer Normen
variieren.
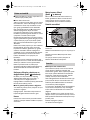
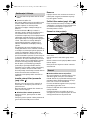
Die Nummerierung der abgebildeten Kompo-
nenten bezieht sich auf die Darstellung des
Saugers auf der Grafikseite.
Bitte klappen Sie die Aufklappseite mit der Dar-
stellung des Saugers auf, und lassen Sie diese
Seite aufgeklappt, während Sie die Bedie-
nungsanleitung lesen.
1
Kabelhalterung
2
Tragegriff
3
Saugeroberteil
4
Warnlampe
5
Airflow-Regler
6
Betriebsartenwahlschalter
7
Steckdose für Elektrowerkzeug
8
Riegel
9
Schlauchaufnahme
10
Saugschlauch
11
Behälter
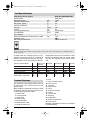
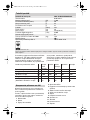
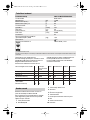
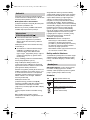
Technische Daten
Holzsauger GAS 50 M PROFESSIONAL
Sachnummer 0 601 988 1..
Nennaufnahmeleistung [W] 1 200
Behältervolumen (Brutto) [l] 50
Nettovolumen, ca. [l] 43
Staubbeutelvolumen [l] 21
Unterdruck* [mbar] 225
Luftstrom* [l/s] 39
Saugleistung [W] 316 (6 mbar)
Fläche Faltenfilter [cm
3
] 8 600
Staubklasse M
Gewicht entsprechend EPTA-Procedure 01/2003 [kg] 15,8
Schutzklasse
/ I
BIA-Prüfzeugnis-Nr. 200 22 0710/1110
*) gemessen am Schlauchende
Bitte beachten Sie die Sachnummer auf dem Typenschild Ihres Saugers. Die Handelsbezeichnungen einzelner Sauger
können variieren.
Länderausführung Europa,
außer
Dänemark
Dänemark Groß-
britannien
Japan Australien
Netzspannung [V] 230 230 110 100 240
Leistung P
max.
(GAS 50 M) [W] 1200 1200 1200 1100 1200
Leistung P
max.
(Elektrowerkzeug) [W] 2500 1100 550 400 1200
Aufnahmeleistung gesamt [W] 3700 2300 1750 1500 2400
max. Stromaufnahme
(GAS 50 M +
Elektrowerkzeug) [A] 16 10 16 15 10
Abgebildete Komponenten
1 609 929 K11.book Seite 6 Freitag, 1. Dezember 2006 12:33 12

Deutsch |
7
1 609 929 K11 • 1.12.06
12
Radbremse
13
Verschluss
14
Zubehördepot
15
Klammern
16
Führungsbügel
17
Staubbeutel
18
Faltenfilter
19
Motorschutzfilter
20
Füllstandssensor
Abgebildetes oder beschriebenes Zubehör gehört
nicht zum Standard-Lieferumfang.
Messwerte ermittelt entsprechend EN 60 704.
Der A-bewertete Schalldruckpegel des Gerätes
ist typischerweise kleiner als 70 dB (A).
Wir erklären in alleiniger Verantwortung, dass
dieses Produkt mit den folgenden Normen oder
normativen Dokumenten EN 60 335 und den
Richtlinien 98/37/EG, 89/336/EWG einschließ-
lich ihrer Änderungen übereinstimmt.
Dr. Egbert Schneider Dr. Eckerhard Strötgen
Senior Vice President Head of Product
Engineering Certification
13.06.2006, Robert Bosch GmbH, Power Tools Division
D-70745 Leinfelden-Echterdingen
Lesen Sie alle Sicherheitshin-
weise und Anweisungen.
Ver-
säumnisse bei der Einhaltung der
Sicherheitshinweise und Anweisun-
gen können elektrischen Schlag,
Brand und/oder schwere Verletzun-
gen verursachen.
BEWAHREN SIE DIESE ANWEISUNGEN GUT
AUF.
■
Wird bei der Arbeit das Netzkabel beschädigt
oder durchtrennt, Kabel nicht berühren, son-
dern sofort den Netzstecker ziehen. Gerät
niemals mit beschädigtem Kabel benutzen.
■
Gerät nur an eine Steckdose mit Schutzkon-
takt anschließen.
■
Kabel nicht überfahren, quetschen, zerren.
■
Vor jeder Benutzung Gerät, Kabel und Ste-
cker überprüfen. Werden Schäden festge-
stellt, das Gerät nicht weiter benutzen. Repa-
ratur nur von einem Fachmann durchführen
lassen. Gerät nie selbst öffnen.
■
In Arbeitspausen, bei Nichtgebrauch und vor
allen Arbeiten am Gerät (z. B. Wechseln der
Arbeitswerkzeuge, Wartung, Reinigung, Ein-
stellungen) Netzstecker ziehen.
■
Explosions- und Brandgefahr! Keine brenn-
baren oder explosiven Flüssigkeiten saugen;
zum Beispiel Benzin, Öl, Alkohol, Lösemittel.
Keine heißen und brennenden Stäube sau-
gen. Das Gerät nicht in explosionsgefährde-
ten Räumen betreiben.
■
Arbeitsplatz gut belüften, wenn die Abluft in
den Raum zurückgeführt wird.
■
Achtung!
Das Gerät enthält gesundheitsge-
fährdenden Staub. Die Leerungs- und War-
tungsvorgänge, einschließlich der Beseiti-
gung der Staubsammelbehälter, dürfen nur
von Fachleuten durchgeführt werden. Eine
entsprechende Schutzausrüstung ist erfor-
derlich. Das Gerät nicht ohne das vollstän-
dige Filtersystem betreiben.
■
Beim Austritt von Schaum oder Wasser den
Sauger sofort abschalten und Behälter ent-
leeren.
■
Der Sauger darf im Freien nicht unter nassen
Bedingungen verwendet oder aufbewahrt
werden.
■
Vor Inbetriebnahme Saugschlauch auf ein-
wandfreien Zustand prüfen. Saugschlauch
am Gerät montiert lassen, damit nicht unbe-
absichtigt Staub austritt.
■
Niemals Kindern die Benutzung des Gerätes
gestatten.
■
Bosch kann nur dann eine einwandfreie
Funktion des Gerätes zusichern, wenn das
für dieses Gerät vorgesehene Original-Zube-
hör verwendet wird.
Der Sauger ist bestimmt zum Erfassen, Aufsau-
gen, Fördern und Abscheiden nicht brennbarer
trockener Stäube sowie Holzstäube und nicht
brennbarer Flüssigkeiten und eines Wasser-
Luft-Gemisches. Der Sauger ist staubtechnisch
geprüft und entspricht der Staubklasse M. Er ist
geeignet für die erhöhten Beanspruchungen bei
gewerblicher Nutzung, z. B. in Handwerk, In-
dustrie und Werkstätten.
Geräuschinformation
Konformitätserklärung
Zu Ihrer Sicherheit
Bestimmungsgemäßer
Gebrauch
1 609 929 K11.book Seite 7 Freitag, 1. Dezember 2006 12:33 12

8
| Deutsch
1 609 929 K11 • 1.12.06
Das Fahrwerk ist so ausgelegt, dass der Sauger
mit Hilfe des Führungsbügels
16
leichter
gezo-
gen
werden kann. Das Gerät immer mit beiden
Händen ziehen.
Montage Führungsbügel
Den Führungsbügel
16
in die zwei Öffnungen
stecken. Mit den dazugehörigen Klammern
15
befestigen.
Die Räder sind mit Radbremsen
12
ausgestat-
tet. Zum Feststellen die Radbremse
12
nach un-
ten treten.
■
Vor allen Arbeiten am Gerät Netzstecker zie-
hen.
Die Verschlüsse
13
öffnen und das Sauger-
oberteil
3
abnehmen.
■
Sofern keine gesundheitsgefährdenden
Stoffe und Stoffe ohne oder mit einem Expo-
sitionswert größer/gleich 1 mg/m
3
entspre-
chend der Staubklasse L (bisher Verwen-
dungskategorie U) gesaugt werden, kann di-
rekt in den Behälter gesaugt werden.
Für das Trockensaugen sollte ein Staubbeu-
tel
17
(Zubehör) eingesetzt werden.
Bei Verwendung eines Staubbeutels bleibt der
Faltenfilter
18
länger frei, die Saugleistung
bleibt länger erhalten und die Entsorgung des
Staubes wird erleichtert.
Neuen Staubbeutel
17
am Flansch fassen und
zuerst unten über den Ansaugstutzen, dann
oben über die Rastnocke schieben. Sicherstel-
len, dass der Staubbeutel in seiner vollen Länge
an der Innenwand des Behälters
11
anliegt. Das
Saugeroberteil aufsetzen.
Die Verschlüsse
13
schließen.
Den Saugschlauch
10
in die Schlauchauf-
nahme
9
einführen bis dieser fest sitzt bzw. auf
die Schlauchaufnahme
9
aufsetzen und im Uhr-
zeigersinn bis zum Anschlag drehen.
Die Saugrohre fest ineinander stecken.
Es wird empfohlen statisch ableitende Schläu-
che mit einem Schlauch-Ø von 19 oder 35 mm
einzusetzen.
Wenn die Warnlampe
4
während des IS-Be-
triebs (Industriestaubsauger-Betrieb) blinkt und/
oder während des ENT-Betriebs (Entstauberbe-
trieb) das akustische Signal ertönt, müssen die
Faltenfilter
18
gereinigt werden. Stellen Sie
dazu den Betriebsartenwahlschalter
6
auf das
Symbol „Elektromagnetische Filterreinigung“.
Die Filter werden ca. 10 Sekunden gereinigt.
Sollte die Warnlampe
4
danach weiter blinken
und/oder das akustische Signal ertönen, muss
der Staubbeutel
17
ausgetauscht werden. Blinkt
die Warnlampe
4
weiter und/oder das akusti-
sche Signal ertönt ebenfalls immer noch, muss
der Sauger wie im Abschnitt „Störungen“ be-
schrieben überprüft werden.
■
Achtung!
Das Gerät enthält gesundheitsge-
fährdenden Staub. Die Leerungs- und War-
tungsvorgänge, einschließlich der Beseiti-
gung der Staubsammelbehälter, dürfen nur
von Fachleuten durchgeführt werden. Eine
entsprechende Schutzausrüstung ist erfor-
derlich. Das Gerät nicht ohne das vollstän-
dige Filtersystem betreiben.
Staubbeutel entfernen
Den Staubbeutel
17
von der Saugöffnung nach
hinten ziehen. Den Flansch des Staubbeutels
durch Umklappen des Deckels verschließen
und herausnehmen.
Netzspannung beachten:
Die Spannung der
Stromquelle muss mit den Angaben auf dem
Typschild des Gerätes übereinstimmen. Mit
230 V gekennzeichnete Geräte können auch an
220 V betrieben werden.
Symbole
Aufsaugen von abgelagerten Stäuben
(Betriebsart IS)
■
Staubschutzmaske tragen.
In dieser Betriebsart darf nur das im Zubehör
aufgeführte 35-mm-Schlauch- und Düsen-
programm verwendet werden.
Zur Inbetriebnahme des Saugers den Be-
triebsartenwahlschalter 6 auf on stellen.
Zum Ausschalten des Saugers den Betriebs-
artenwahlschalter 6 auf off stellen.
Fahrwerk
Montage (siehe Bild )
A
Inbetriebnahme
on Einschalten (Betriebsart IS)
off Ausschalten
Elektromagnetische
Filterreinigung
Betrieb mit Fernschaltautomatik
(Betriebsart ENT)
1 609 929 K11.book Seite 8 Freitag, 1. Dezember 2006 12:33 12

Deutsch | 9
1 609 929 K11 • 1.12.06
Das Gerät ist mit einer Volumenstromüberwa-
chung (Airflow) ausgestattet.
Der Volumenstrom im Saugschlauch ist auf ei-
nen Wert von 20 m/s fest eingestellt, unabhän-
gig von der Stellung des Airflow-Reglers 5.
Wird dieser Wert unterschritten, z. B. durch an-
gestauten Schmutz im Saugschlauch, einen
vollen Staubbeutel oder einen zugesetzten Fil-
ter blinkt die Warnlampe 4. In diesem Fall das
Gerät ausschalten und wie in Abschnitt „Störun-
gen“ beschrieben überprüfen.
Absaugen der anfallenden Stäube
von laufenden Elektrowerkzeugen
(Betriebsart ENT mit Fernschaltautomatik)
■ Es muss eine ausreichende Luftwechsel-
rate (L) in dem Raum vorhanden sein,
wenn die Abluft in den Raum zurückgeht.
Entsprechende Bestimmungen der
TRGS 560 beachten. Gemessen mit einem
Saugschlauch Ø 35 mm und 5 m Länge
beträgt der Luftstrom 39 l/s und der maxi-
male Unterdruck 225 mbar.
■ Staubschutzmaske tragen.
In dieser Betriebsart kann das Gerät nur in Ver-
bindung mit einem Elektrowerkzeug (z. B. Kreis-
säge) betrieben werden.
Das Gerät wird über das an der Steckdose 7 an-
geschlossene Elektrowerkzeug automatisch in
Betrieb genommen.
Die Steckdose 7 des Saugers darf nur für die in
der Bedienungsanleitung festgelegten Zwecke
verwendet werden.
Für die Elektrowerkzeuge stehen als Zubehör
unterschiedliche Schlauchsysteme zum An-
schluss zur Verfügung.
Den Airflow-Regler 5 auf den verwendeten
Schlauchdurchmesser 19 mm bzw. 35 mm stellen.
Damit ein ausreichender Staubtransport an der
Absaugstelle gewährleistet ist, darf der Mindest-
volumenstrom (Airflow) für das angeschlossene
Elektrowerkzeug nicht unterschritten werden.
Den Betriebsartenwahlschalter 6 auf das Sym-
bol Betrieb mit Fernschaltautomatik stellen.
Bei dem Symbol wird der Volumenstrom ent-
sprechend der Einstellung auf dem Airflow-Reg-
ler 5 elektronisch überwacht.
Bei richtig gewählter Einstellung ist ein ausrei-
chender Staubtransport gewährleistet.
Zur Inbetriebnahme des Saugers das an die
Steckdose 7 angeschlossene Elektrowerkzeug
einschalten. Der Sauger startet automatisch.
Wenn das akustische Signal ertönt und die
Warnlampe 4 blinkt, das Elektrowerkzeug aus-
schalten (der Sauger schaltet ca. 6 Sekunden
später automatisch ab) und wie in Abschnitt
„Störungen“ beschrieben überprüfen.
Anlaufstrombegrenzung
(Betriebsart ENT mit Fernschaltautomatik)
Durch den sanften Anlauf des Gerätes wird ein
Anlaufstrom von 16 A nicht überschritten.
Das Gerät ist mit einer elektromagnetischen Fil-
terreinigung ausgestattet, die die Faltenfilter 18
von anhaftendem Staub befreit.
Spätestens wenn die Saugleistung nicht mehr
ausreicht, muss die Filterreinigung betätigt wer-
den.
Den Betriebsartenwahlschalter 6 auf das Sym-
bol Elektromagnetische Filterreinigung stel-
len. Ein eventuell angeschlossenes Elektro-
werkzeug muss ausgeschaltet sein.
Das Gerät rüttelt ca. 10 Sekunden und schaltet
automatisch ab.
Vor der Wiederaufnahme des Saugbetriebes
kurz warten, damit der Staub sich im Behälter
setzen kann.
Die Häufigkeit der Filterreinigung ist abhängig
von Staubart und Staubmenge.
Bei regelmäßiger Anwendung bleibt die maxi-
male Förderleistung länger erhalten.
■ Explosions- und Brandgefahr! Keine
brennbaren oder explosiven Flüssigkei-
ten saugen; zum Beispiel Benzin, Öl, Alko-
hol, Lösemittel. Keine heißen und bren-
nenden Stäube saugen. Das Gerät nicht in
explosionsgefährdeten Räumen betrei-
ben.
■ Vor dem Nasssaugen muss der Staubbeu-
tel 17 entfernt werden.
Den Behälter vor dem Nasssaugen entleeren.
Einstellwert
Airflow m
3
/h
Ø 35 mm 70
Ø 19 mm 20
19
35
Ø
Elektromagnetische
Filterreinigung
Nasssaugen
1 609 929 K11.book Seite 9 Freitag, 1. Dezember 2006 12:33 12

10 | Deutsch
1 609 929 K11 • 1.12.06
Das Gerät ist mit Füllstandssensoren 20 ausge-
stattet. Ist die maximale Füllhöhe erreicht,
schaltet das Gerät ab. Schalter auf off stellen.
Vor dem Öffnen und Entleeren unbedingt den
Stecker aus der Steckdose ziehen.
Nach dem Saugen die Faltenfilter 18 zur Ver-
meidung von Schimmelbildung herausnehmen
und gut trocknen lassen bzw. das Saugerober-
teil 3 abnehmen und trocknen lassen.
■ Vor allen Arbeiten am Gerät Netzstecker zie-
hen.
■ Gerät stets sauber halten.
Es ist mindestens einmal jährlich vom Hersteller
oder einer unterwiesenen Person eine staub-
technische Überprüfung durchzuführen, z. B.
auf Beschädigungen des Filters, Dichtheit des
Gerätes und Funktion der Kontrolleinrichtung.
Bei Saugern der Klasse M, die sich in ver-
schmutzter Umgebung befanden, sollte das Äu-
ßere sowie alle Maschinenteile gereinigt oder
mit Abdichtmitteln behandelt werden. Bei der
Durchführung von Wartungs- und Reparaturar-
beiten müssen alle verunreinigten Teile, die
nicht zufriedenstellend gereinigt werden kön-
nen, entsorgt werden. Solche Teile müssen in
undurchlässigen Beuteln in Übereinstimmung
mit den gültigen Bestimmungen für die Beseiti-
gung solchen Abfalls entsorgt werden.
Zur Wartung durch den Benutzer muss das Ge-
rät demontiert, gereinigt und gewartet werden,
soweit es durchführbar ist, ohne dabei eine Ge-
fahr für das Wartungspersonal und andere Per-
sonen hervorzurufen. Vor der Demontage sollte
der Sauger gereinigt werden, um eventuellen
Gefahren vorzubeugen. Der Raum in dem der
Sauger demontiert wird, sollte gut gelüftet wer-
den. Tragen Sie während der Wartung eine per-
sönliche Schutzausrüstung. Nach der Wartung
sollte eine Reinigung des Wartungsbereichs er-
folgen.
Sollte das Gerät trotz sorgfältiger Herstellungs-
und Prüfverfahren einmal ausfallen, ist die Repa-
ratur von einer autorisierten Kundendienststelle
für Bosch-Elektrowerkzeuge ausführen zu las-
sen.
Bei allen Rückfragen und Ersatzteilbestellungen
bitte unbedingt die 10-stellige Sachnummer laut
Typenschild des Saugers angeben.
Faltenfilter herausnehmen/wechseln
(siehe Bild )
Mit einer Münze o. ä. den Verschluss am Rie-
gel 8 um eine
1
/
4
-Drehung in Pfeilrichtung dre-
hen und den Riegel eindrücken.
Die Haube aufklappen und den Faltenfilter an
den Stegen fassen und nach oben herausneh-
men.
■ Beschädigte Filter sofort austauschen.
Neuen Faltenfilter einsetzen, dabei auf sicheren
Sitz achten.
Die Haube wieder herunterklappen. Durch leich-
ten Druck von oben schnappt der Riegel 8 wie-
der zurück.
Behälter
Den Behälter 11 von Zeit zu Zeit mit handelsüb-
lichem nicht scheuerndem Reinigungsmittel
auswischen und trocknen lassen.
Motorschutzfilter (siehe Bild )
Der Motorschutzfilter 19 ist weitgehend war-
tungsfrei. Von Zeit zu Zeit den Motorschutzfilter
herausnehmen und ausspülen. Vor dem Einset-
zen gut trocknen lassen.
Füllstandssensoren
Die Füllstandssensoren 20 sind gelegentlich zu
säubern.
Die Verschlüsse 13 öffnen und das Saugero-
berteil 3 abnehmen.
Die Füllstandssensoren 20 mit einem weichen
Tuch reinigen.
Das Saugeroberteil 3 wieder aufsetzen und die
Verschlüsse 13 schließen.
Wartung und Reinigung
B
B
20
20
1 609 929 K11.book Seite 10 Freitag, 1. Dezember 2006 12:33 12

Deutsch | 11
1 609 929 K11 • 1.12.06
■ Staubschutzmaske tragen.
Wenn die Warnlampe 4 blinkt und/oder das
akustische Signal ertönt, müssen die Faltenfil-
ter 18 gereinigt werden. Stellen Sie dazu den
Betriebsartenwahlschalter 6 auf das Symbol
„Elektromagnetische Filterreinigung“. Die Filter
werden ca. 10 Sekunden gereinigt.
Vergewissern, dass der Airflow-Regler 5 in der
Position des verwendeten Schlauchdurchmes-
sers steht.
Den Staub von den Faltenfiltern 18 abrütteln,
ggf. austauschen.
Den Staubbeutel 17 überprüfen, ob die Öffnung
verstopft oder der Staubbeutel voll ist. In diesem
Fall den Staubbeutel 17 wechseln.
Ertönt nach der Inbetriebnahme erneut das
akustische Signal und/oder blinkt die Warn-
lampe 4:
Im ENT-Betrieb das Elektrowerkzeug ausschal-
ten und den Netzstecker ziehen.
Den Sauger einschalten.
35-mm-Schlauch anschließen.
Blinkt die Warnlampe 4 nicht, sind der Sauger
und der Saugschlauch in Ordnung.
Blinkt die Warnlampe 4, das Absaugsystem und
den Saugschlauch auf eventuell angestauten
Schmutz überprüfen.
Blinkt die Warnlampe 4 danach immer noch, die
Faltenfilter 18 reinigen bzw. austauschen.
Wird die Saugleistung danach nicht erreicht, ist
das Gerät dem Kundendienst zuzuführen.
Sauger, Zubehör und Verpackungen sollen ei-
ner umweltgerechten Wiederverwertung zuge-
führt werden.
Nur für EU-Länder:
Werfen Sie Sauger nicht in den
Hausmüll!
Gemäß der Europäischen Richtli-
nie 2002/96/EG über Elektro- und
Elektronik-Altgeräte und ihrer Um-
setzung in nationales Recht müs-
sen nicht mehr gebrauchsfähige Sauger ge-
trennt gesammelt und einer umweltgerechten
Wiederverwertung zugeführt werden.
Explosionszeichnungen und Informationen
zu Ersatzteilen finden Sie unter:
www.bosch-pt.com
www.powertool-portal.de, das Internetportal
für Handwerker und Heimwerker
www.ewbc.de, der Informations-Pool für Hand-
werk und Ausbildung
Deutschland
Robert Bosch GmbH
Servicezentrum Elektrowerkzeuge
Zur Luhne 2
37589 Kalefeld
✆ ....................................................... 0 18 05 / 70 74 10
Fax
...................................................... 0 18 05 / 70 74 11
Österreich
ABE Service GmbH
Jochen-Rindt-Straße 1
1232 Wien
✆ Service ................................... +43 (0)1 / 61 03 80
Fax :
............................................ +43 (0)1 / 61 03 84 91
✆ Kundenberater ....... +43 (0)1 / 7 97 22 30 66
E-Mail: [email protected]
Schweiz
✆ .......................................................... 0 44 / 8 47 15 11
Fax
......................................................... 0 44 / 8 47 15 51
Luxemburg
✆ .................................................. +32 (0)70 / 22 55 65
Fax
................................................. +32 (0)70 / 22 55 75
E-Mail: [email protected]
Änderungen vorbehalten
Störungen
Entsorgung
Service und Kundenberater
1 609 929 K11.book Seite 11 Freitag, 1. Dezember 2006 12:33 12

12 | English
1 609 929 K11 • 1.12.06
A socket outlet with earthing contact 7 is inte-
grated in the vacuum cleaner. It is possible to
connect an external power tool here. The maxi-
mal allowable current consumption of the con-
nected power tool must not exceed the values
listed in the following table. The socket outlets
can vary with regard to country-specific stand-
ards.
The numbering of the product features refers to
the illustration of the vacuum cleaner on the
graphics page.
While reading the operating instructions, unfold
the graphics page with the representation of the
vacuum cleaner and leave it open.
1 Cable holder
2 Carrying handle
3 Vacuum top
4 Warning lamp
5 Airflow regulator
6 Mode selector switch
7 Socket for power tool
8 Lock
9 Hose connection piece
10 Vacuum hose
11 Container
12 Caster brake
13 Latch
14 Accessory storage
15 Clamps
16 Push handle
17 Dust bag
18 Folded filter
19 Motor protection filter
20 Level sensor
Illustrated or described accessories are not included
as standard delivery.
Tool Specifications
All-purpose vacuum cleaner GAS 50 M PROFESSIONAL
Article number 0 601 988 1..
Rated power input [W] 1 200
Container volume (gross) [l] 50
Net volume, approx. [l] 43
Capacity of dust bag [l] 21
Vacuum* [mbar] 225
Air flow* [l/s] 39
Vacuuming performance [W] 316 (6 mbar)
Flat folded filter [cm
3
] 8 600
Dust category M
Weight according to EPTA-Procedure 01/2003 [kg] 15.8
Protection class / I
BIA Testing Certificate No. 200 22 0710/1110
*) measured at the hose end
Please observe the article number on the type plate of your vacuum cleaner. The trade names of individual vacuum
cleaners may vary.
Country-specific Model Europe, excl.
Denmark
Denmark Great Britain Japan Australia
Mains voltage [V] 230 230 110 100 240
Power P
max.
(GAS 50 M) [W] 1200 1200 1200 1100 1200
Power P
max.
(Power tool) [W] 2500 1100 550 400 1200
Power input, total [W] 3700 2300 1750 1500 2400
Current consumption, max.
(GAS 50 M + Power tool) [A] 16 10 16 15 10
Product Features
1 609 929 K11.book Seite 12 Freitag, 1. Dezember 2006 12:33 12

English | 13
1 609 929 K11 • 1.12.06
Measured values determined according to
EN 60 704.
Typically the A-weighted sound pressure level
of the product is less than 70 dB (A).
We declare under our sole responsibility, that this
product is in conformity with the following stand-
ards or standardized documents EN 60 335 and
the directives 98/37/EC, 89/336/EEC including
their amendments.
Dr. Egbert Schneider Dr. Eckerhard Strötgen
Senior Vice President Head of Product
Engineering Certification
13.06.2006, Robert Bosch GmbH, Power Tools Division
D-70745 Leinfelden-Echterdingen
Read all safety warnings and all
instructions. Failure to follow the
warnings and instructions may re-
sult in electric shock, fire and/or se-
rious injury.
SAVE THESE INSTRUCTIONS.
■ If the mains cable is damaged or cut through
while working, do not touch the cable but im-
mediately pull the mains plug. Never use the
machine with a damaged cable.
■ Connect the machine only to socket-outlets
with earthing contact.
■ Do not drive over, crush or stretch the cable.
■ Before each use of the machine, check the
cable and plug. If damage is detected, do not
use the machine. Have repairs performed
only by a qualified technician. Never open the
machine yourself.
■ During work breaks, when not in use or when
working on the machine (e. g. changing tool
inserts, repairs, cleaning, adjustments), pull
the mains plug.
■ Danger of explosion and fire! Do not vacuum
inflammable or explosive fluids; for example,
petrol, oil, alcohol, solvents. Do not vacuum
hot or burning dust. Do not operate the ma-
chine in rooms where the danger of an explo-
sion exists.
■ If the exhaust air is led indoors, ventilate the
working place well.
■ Caution! The machine contains dust which is
harmful to one’s health. Emptying and main-
tenance, including the disposal of dust collec-
tion containers, may be carried out only by
specialists. Suitable safety equipment is re-
quired. Do not operate the machine without
the complete filter system.
■ If foam or water emits, switch the vacuum
cleaner off immediately and empty the drum.
■ The vacuum cleaner may not be used or
stored outdoors under wet conditions.
■ Before starting operation, check if the vac-
uum hose is in is in proper condition. Leave
the vacuum hose mounted on the machine, in
order to avoid unintentional dust emission.
■ Never allow children to use the machine.
■ Bosch is only able to ensure perfect operation
of the machine if the original accessories in-
tended for it are used.
The vacuum cleaner is intended for pick-up,
vacuuming, conveying and separating of
non-flammable dry dusts and sawdust of wood,
as well as for non-flammable liquids and a wa-
ter-air mixture. The vacuum cleaner has under-
gone a dust-technical inspection and complies
with dust category M. It is suitable for the in-
creased demands of commercial use, such as in
crafts, industry and workshops.
The vacuum cleaner cart is designed in such a
manner, that the vacuum cleaner can be
pushed easier with the push handle 16. Always
push the unit using both hands.
Assembling the push handle
Insert the push handle 16 into the two openings
and fasten with the two clamps 15.
The front castors are equipped with brakes 12.
To actuate the castor brake 12 press the lever
downwards.
Noise Information
Declaration of Conformity
For Your Safety
Intended Use
Vacuum Cart
1 609 929 K11.book Seite 13 Freitag, 1. Dezember 2006 12:33 12

14
| English
1 609 929 K11 • 4.12.06
■
Before any work on the device itself, pull the
mains plug.
Unlock the latches
13
and remove the vacuum
top
3
.
■
Vacuuming directly into the container is pos-
sible for materials not harmful to one’s health
with or without an exposure limit value
greater than/equal to 1 mg/m
3
according to
dust category L (until now applicational cate-
gory U).
For dry vacuuming operation, a dust bag
17
(ac-
cessory) should be inserted.
When operating with a dust bag, the folded fil-
ter
18
clogs less fast, the vacuuming perform-
ance is kept up longer and the disposal of dust
becomes easier.
Grasp a new dust bag
17
at the flange. Push it
over the bottom of the connection piece first and
then over the cog on the top. Make sure that the
full length of the dust bag faces against the inner
wall of the container
11
. Attach the vacuum top.
Lock the latches
13
.
Insert the vacuum hose
10
into the hose con-
nection piece
9
until it is seated firmly or place it
onto the hose connection piece
9
respectively,
and turn it in clockwise direction to the stop.
Insert the extension tubes firmly into each other.
It is recommended to use static-discharging
hoses with a hose Ø of 19 or 35 mm.
If the warning lamp
4
flashes during IS opera-
tion (industrial vacuum cleaner operation) and/
or the alarm sounds during ENT (dedusting)
mode, the folded filters
18
must be cleaned. For
this, set the mode selector switch
6
to the “Elec-
tromagnetic filter cleaning” symbol. The filters
are cleaned for approx. 10 seconds. If the warn-
ing lamp
4
continues to flash and/or the alarm
sounds afterwards, the dust bag
17
must be re-
placed. If the warning lamp
4
still flashes and/or
the alarm still sounds, the vacuum cleaner must
be checked as described in the section “Mal-
functions”.
■
Caution!
The machine contains dust which is
harmful to one’s health. Emptying and main-
tenance, including the disposal of dust collec-
tion containers, may be carried out only by
specialists. Suitable safety equipment is re-
quired. Do not operate the machine without
the complete filter system.
Removing the Dust Bag
Pull the dust bag
17
from the connection piece
towards the rear. Close the flange of the dust
bag by folding down the lid and remove.
Observe correct mains voltage:
The voltage
of the power source must agree with the voltage
specified on the nameplate of the machine.
Equipment marked with 230 V can also be con-
nected to 220 V.
Symbols
Vacuuming of Settled Dust
(IS operating mode)
■
Wear a dust protection mask.
In this operating mode, only the accessories
listed in the 35 mm hose and nozzle program
may be used.
To
start the operation
of the vac, set the mode
selector switch
6
to
on
.
To
switch off
the vac, set the mode selector
switch
6
to
off
.
The machine is equipped with an airflow moni-
tor.
The airflow in the vacuuming hose is set to a
fixed value of 20 m/s independent of the setting
of the airflow regulator
5
.
The warning lamp
4
flashes if the airflow falls
below this value, due to accumulated debris in
the suction hose, a full dust bag or a clogged fil-
ter. In this case, switch off the machine and
check as described in section “Malfunctions”.
Mounting (see figure )
A
Starting Operation
on
Switching on (IS operating mode)
off
Switching off
Electromagnetic filter cleaning
Operation with remote automatic
switching (ENT operating mode)
1 609 929 K11 - GB Seite 14 Montag, 4. Dezember 2006 4:11 16

English | 15
1 609 929 K11 • 1.12.06
Vacuuming the Dust Resulting from
Running Power Tools
(ENT operation mode with remote automatic
switching)
■ When the outgoing air is circulated (re-
maining in the work area), a sufficient rate
of air-change (L) in the room must be
given. Observe the respective TRGS 560
regulations. Measured with a Ø 35 mm
vacuum hose at 5 m length, the air flow
amounts to 39 l/s and the maximum vac-
uum to 225 mbar.
■ Wear a dust protection mask.
In this operation mode the machine can only be
operated in conjunction with a power tool (e. g.
circular saw).
The vacuum cleaner is switched on automati-
cally by the power tool connected to the
socket 7.
The socket 7 of the vacuum cleaner must be
used only for the purposes specified in the oper-
ating instructions.
For connecting the power tools, various hose
systems are available as accessories.
Set the airflow regulator 5 to the suction hose di-
ameter (19 mm or 35 mm) being used.
To ensure adequate dust transport at the vacu-
uming location, the airflow should not fall below
the minimum required amount for the connected
power tool.
Set the mode selector switch 6 to the operation
with remote automatic switching symbol.
In this setting, the volume flow is electronically
controlled according to the adjustment of the air-
flow regulator 5.
With the correct chosen setting, sufficient dust
transport is guaranteed.
To start the operation of the vac, switch on the
power tool connected to the socket outlet 7. The
vacuum cleaner starts automatically. When the
alarm sounds and the warning lamp 4 flashes,
switch the power tool off (the vac automatically
switches off approx. 6 seconds later) and check
as described in the section “Malfunctions”.
Reduced Starting Current
(ENT operation mode with remote automatic
switching)
Due to the soft starting of the machine, a starting
current of 13 A is not exceeded.
The machine is equipped with an electromag-
netic filter cleaning system, which removes dust
adhering to the folded filter 18.
The filter cleaning system must be actuated lat-
est when the vacuuming performance is no
longer sufficient.
Set the mode selector switch 6 to the symbol
electromagnetic filter cleaning. A possibly
connected power tool must be switched off.
The machine vibrates for approx. 10 seconds
and switches off automatically.
Wait shortly before restarting the vacuuming op-
eration so that the dust can settle in the con-
tainer.
The filter cleaning frequency depends on the
type and amount of dust.
With regular usage, the maximum vacuuming
performance is maintained longer.
■ Danger of explosion and fire! Do not vac-
uum inflammable or explosive fluids; for
example, petrol, oil, alcohol, solvents. Do
not vacuum hot or burning dust. Do not
operate the machine in rooms where the
danger of an explosion exists.
■ The dust bag 17 must be removed before wet
vacuuming.
Empty the container before wet vacuuming.
The machine is equipped with level sensors 20.
The machine switches off when the maximum
filling height is reached. Set the switch to off.
Before opening and emptying, always pull the
plug from the socket outlet.
After vacuuming, remove the folded filter 18 and
allow it to dry thoroughly, in order to avoid mil-
dew. Also remove the vacuum top 3 and allow it
to dry, too.
Airflow
setting m
3
/h
Ø 35 mm 70
Ø 19 mm 20
19
35
Ø
Electromagnetic filter cleaning
Wet Vacuuming
1 609 929 K11.book Seite 15 Freitag, 1. Dezember 2006 12:33 12

16 | English
1 609 929 K11 • 1.12.06
■ Before any work on the machine itself, pull
the mains plug.
■ Always keep the machine clean.
At least once every year a dust-technical test is
to be carried out by the manufacturer or a
trained professional, e. g. to check for damage
to the filter, tightness of the machine and func-
tion of the control machine.
For class M vacuum cleaners which have been
used in contaminated areas, the exterior and all
unit parts should be cleaned or treated with
sealants. All contaminated parts that cannot be
cleaned satisfactorily during maintenance and
repair must be disposed of. Such parts must be
disposed of in impermeable bags, in accord-
ance with the relevant regulations for the dis-
posal of such waste materials.
For maintenance carried out by the user, the
unit must be dismounted, cleaned and main-
tained as far as possible without presenting any
danger to the maintenance personnel or other
persons. In order to prevent possible danger,
the vacuum cleaner should be cleaned prior to
dismounting. The area in which the vacuum
cleaner will be dismounted should be well venti-
lated. Wear personal protective equipment dur-
ing maintenance. After the maintenance, the
maintenance area should be cleaned.
If the machine should fail despite the care taken
in manufacturing and testing procedures, repair
should be carried out by an authorized after-
sales service agent for Bosch power tools.
In all correspondence and spare parts orders,
please always include the 10-digit article
number given on the nameplate of the vacuum
cleaner.
WARNING! This appliance must be earthed.
Important instructions for connecting a new
3-pin plug.
The wires in the cable are coloured according to
the following code:
Do not
connect the blue or brown wire to the
earth terminal of the plug.
Important: If for any reason the moulded plug is
removed from the cable of this machine, it must
be disposed of safely.
Removing/Replacing the
Folded Filter (see figure )
With a coin or similar, rotate the lock 8 by
1
/
4
turn in the direction of the arrow and push the
lock in.
Fold up the cover of the vacuum top, grasp the
folded filter by the fins, pull up and remove.
■ Replace a damaged filter immediately.
Insert new folded filters, and ensure that they
are seated tightly.
Fold the cover down again. With slight pressure
from above on the cover, the lock 8 will snap
back again.
Container
Wipe out the container 11 from time to time with
a commercially available, non-scouring cleaning
agent and allow to dry.
Motor Protection Filter (see figure )
The motor protection filter 19 is basically main-
tenance-free. Take out the motor protection filter
from time to time and flush it. Allow to dry thor-
oughly before reinserting.
Level sensors
Clean the level sensors 20 occasionally.
Unlock the latches 13 and remove the vacuum
top 3.
Clean the level sensors 20 with a soft cloth.
Reattach the vacuum top 3 again and lock the
latches 13.
Maintenance and Cleaning
strain relief
live = brown
To be fitted
by a qualified
professional only
neutral = blue
earth = green/yellow
B
B
20
20
1 609 929 K11.book Seite 16 Freitag, 1. Dezember 2006 12:33 12

English | 17
1 609 929 K11 • 1.12.06
■ Wear a dust protection mask.
When the warning lamp 4 flashes and/or the
alarm sounds, the folded filters 18 must be
cleaned. For this, set the mode selector switch 6
to the “Electromagnetic filter cleaning” symbol.
The filters are cleaned for approx. 10 seconds.
Ensure that the airflow regulator 5 is in the posi-
tion of the hose diameter used.
Dedust the flat filter 18 or replace it, if neces-
sary.
Check if the opening of the dust bag is clogged
or if the dust bag 17 is full. In this case replace
the dust bag 17.
When the alarm sounds and/or the warning
lamp 4 flashes again after starting operation:
Switch the power tool off in ENT mode and pull
the mains plug.
Switch the vacuum cleaner on.
Connect a 35 mm hose.
If the warning lamp 4 does not flash, the vacuum
cleaner and the vacuum hose are in order.
If the warning lamp 4 flashes, check the vacuum
system and the vacuum hose for possibly accu-
mulated debris.
If the warning lamp 4 still flashes, clean or re-
place the folded filter 18.
If the vacuuming performance is not achieved
thereafter, take the machine to customer serv-
ice.
The vacuum cleaner, accessories and packag-
ing should be sorted for environmental-friendly
recycling.
Only for EC countries:
Do not dispose of vacuum clean-
ers into household waste!
According to the European Direc-
tive 2002/96/EC on waste electri-
cal and electronic equipment and
its incorporation into national law,
vacuum cleaners that are no longer suitable for
use must be separately collected and sent for
recovery in an environmental-friendly manner.
Exploded views and information on spare
parts can be found under:
www.bosch-pt.com
Great Britain
Robert Bosch Ltd. (B.S.C.)
P.O. Box 98
Broadwater Park
North Orbital Road
Denham-Uxbridge
Middlesex UB 9 5HJ
✆ Service ......................... +44 (0) 18 95 / 83 87 82
✆ Advice line.................. +44 (0) 18 95 / 83 87 91
Fax
.......................................... +44 (0) 18 95 / 83 87 89
Ireland
Origo Ltd.
Unit 23 Magna Drive
Magna Business Park
City West
Dublin 24
✆ Service ............................. +353 (0)1 / 4 66 67 00
Fax
.............................................. +353 (0)1 / 4 66 68 88
Australia and New Zealand
Robert Bosch Australia Pty. Ltd.
RBAU/SPT
1555 Centre Road
P.O. Box 66
3168 Clayton/Victoria
✆ .......................................... +61 (0)1 / 3 00 30 70 44
Fax
.......................................... +61 (0)1 / 3 00 30 70 45
www.bosch.com.au
Subject to change without notice
Malfunctions
Disposal
Service and
Customer Assistance
1 609 929 K11.book Seite 17 Freitag, 1. Dezember 2006 12:33 12

18 | Français
1 609 929 K11 • 1.12.06
Une prise de courant avec contact de mise à la
terre 7 est intégrée dans l’aspirateur. Il est pos-
sible d’y connecter un outil électroportatif ex-
terne. La consommation en courant maximale
admissible de l’appareil électrique connecté ne
doit pas dépasser la valeur indiquée dans le ta-
bleau suivant. Les prises de courant peuvent
varier en fonction des normes spécifiques aux
différents pays.
La numérotation des éléments de l’appareil se
réfère à la représentation de l’aspirateur sur la
page graphique.
Déplier le volet sur lequel l’aspirateur est repré-
senté de manière graphique. Laisser le volet dé-
plié pendant la lecture de la présente notice
d’utilisation.
1 Logement de câble
2 Poignée
3 Partie supérieure de l’aspirateur
4 Lampe d’avertissement
5 Régulateur du débit d’air (Airflow)
6 Commutateur du mode de service
7 Prise de courant pour raccord de l’outil
électroportatif
8 Verrou
9 Raccord du tuyau flexible
10 Tuyau flexible
11 Cuve
Caractéristiques techniques
Aspirateur « spécial bois » GAS 50 M PROFESSIONAL
N° d’article 0 601 988 1..
Puissance absorbée nominale [W] 1 200
Contenance de la cuve (brut) [l] 50
Contenance nette de la cuve, env. [l] 43
Contenance du sac à poussières [l] 21
Dépression* [mbar] 225
Débit d’air* [l/s] 39
Capacité d’aspiration [W] 316 (6 mbar)
Surface filtre à plis [cm
3
] 8 600
Classe de poussières M
Poids suivant EPTA-Procedure 01/2003 [kg] 15,8
Classe de protection / I
N° d’homologation BIA 200 22 0710/1110
*) mesuré au niveau du bout du tuyau
Respectez impérativement le numéro d’article se trouvant sur la plaque signalétique de l’aspirateur. Les désignations
commerciales des différents aspirateurs peuvent varier.
Version spécifique du pays Europe,
sauf le
Danemark
Danemark Grande-
Bretagne
Japon Australie
Tension d’alimentation [V] 230 230 110 100 240
Puissance P
max.
(GAS 50 M) [W] 1200 1200 1200 1100 1200
Puissance P
max.
(Outil électroportatif) [W] 2500 1100 550 400 1200
Puissance absorbée, complète [W] 3700 2300 1750 1500 2400
Courant absorbé max.
(GAS 50 M + Outil
électroportatif) [A] 16 10 16 15 10
Eléments de l’appareil
1 609 929 K11.book Seite 18 Freitag, 1. Dezember 2006 12:33 12

Français | 19
1 609 929 K11 • 1.12.06
12 Frein sur roue
13 Fermeture
14 Porte-accessoires
15 Agrafes
16 Barre de conduite
17 Sac à poussières
18 Filtre à plis
19 Filtre de protection du moteur
20 Capteur de niveau
Les accessoires décrits ou montrés ne sont pas com-
pris dans l’emballage standard.
Valeurs de mesure déterminées conformément
à EN 60 704.
La mesure réelle (A) du niveau sonore de l’outil
est inférieur à de 70 dB (A).
Nous déclarons sous notre seule responsabilité
que ce produit correspond aux normes ou docu-
mentations normatives EN 60 335 et aux direc-
tives 98/37/CE, 89/336/CEE, ainsi qu’à leurs
modifications.
Dr. Egbert Schneider Dr. Eckerhard Strötgen
Senior Vice President Head of Product
Engineering Certification
13.06.2006, Robert Bosch GmbH, Power Tools Division
D-70745 Leinfelden-Echterdingen
Lire tous les avertissements et
indications. Le non-respect des
avertissements et instructions indi-
qués ci-après peut entraîner un
choc électrique, un incendie et/ou
de graves blessures sur les person-
nes.
GARDER PRECIEUSEMENT CES INSTRUC-
TIONS DE SECURITE.
■ Si le câble d’alimentation électrique est en-
dommagé ou se rompt pendant le travail, ne
pas y toucher. Retirer immédiatement la fiche
du câble d’alimentation de la prise de cou-
rant. Ne jamais utiliser un appareil dont le câ-
ble d’alimentation est endommagé.
■ Ne brancher l’appareil que sur une prise do-
tée d’un contact de protection.
■ Ne pas écraser, déformer, cisailler ni tirer vio-
lemment le câble.
■ Avant chaque utilisation, vérifier l’état de l’ap-
pareil, celui de son cordon et de sa fiche d’ali-
mentation. Ne jamais utiliser un appareil avec
un cordon d’alimentation endommagé. Les
réparations ne doivent être confiées qu’à un
spécialiste. Ne jamais ouvrir soi-même l’ap-
pareil.
■ Extraire la fiche du câble d’alimentation de
l’appareil hors de la prise de courant à cha-
que interruption du travail, dès que l’appareil
n’est plus utilisé ainsi qu’avant toute interven-
tion sur l’appareil lui-même (changement
d’outil, maintenance, nettoyage, réglage, par
exemple).
■ Risque d’explosion et d’incendie ! Ne pas as-
pirer de liquides combustibles ou explosifs
(essence, huile, alcool, solvants, par exem-
ple). Ne pas aspirer de poussières incandes-
centes ou dont la température serait trop éle-
vée. Ne pas utiliser l’appareil dans des locaux
où il y a risque d’explosion.
■ Bien aérer le poste de travail si l’air con-
sommé est libéré dans le même local.
■ Attention ! Cet appareil contient des pous-
sières potentiellement nocives. La vidange, la
maintenance, ainsi que l’élimination du con-
tenu du bac à poussières ne doivent être ef-
fectuées que par des professionnels. Une te-
nue de protection appropriée est nécessaire.
Ne pas mettre en œuvre cet appareil sans le
système de filtre complet.
■ En cas de rejet de mousse ou d’eau, éteindre
immédiatement l’aspirateur et vider la cuve.
■ Ne pas utiliser ou stocker l’aspirateur à l’exté-
rieur dans des conditions d’humidité.
■ Avant toute mise en oeuvre, vérifier que le
tuyau d’aspiration est en parfait état. Laisser
le tuyau d’aspiration monté sur l’appareil afin
qu’aucune poussière ne puisse en sortir de
manière intempestive.
■ Ne jamais permettre aux enfants d’utiliser cet
appareil.
■ Bosch ne peut garantir un fonctionnement im-
peccable que si les accessoires Bosch d’ori-
gine prévus pour cet appareil sont utilisés.
Informations concernant
les bruits
Déclaration de conformité
Pour votre sécurité
1 609 929 K11.book Seite 19 Freitag, 1. Dezember 2006 12:33 12

20 | Français
1 609 929 K11 • 1.12.06
L’aspirateur est conçu pour le ramassage, l’as-
piration, le transport et la séparation de poussiè-
res sèches ininflammables ainsi que de pous-
sières de bois, et de liquides ininflammables et
d’un mélange air/eau. L’aspirateur a été con-
trôlé conformément aux prescriptions relatives à
l’aspiration de poussières et correspond à la
classe de poussières M. Il est approprié pour
une utilisation intensive professionnelle, par
exemple dans l’artisanat, l’industrie ainsi que
dans les ateliers.
Le châssis a été conçu de façon à faciliter le
plus possible le déplacement de l’aspirateur
au moyen de la barre de conduite 16. Tirer l’ap-
pareil avec les deux mains.
Montage de la barre de conduite
Introduire la barre de conduite 16 dans les deux
ouvertures. Les fixer avec les deux agrafes 15
correspondantes.
Les roues sont pourvues de freins 12. Pour blo-
quer les roues, rabattre les freins 12 sur les
roues.
■ Avant toute intervention sur l’appareil, tou-
jours retirer la fiche du câble d’alimentation
de la prise de courant.
Ouvrir les fermetures 13 et enlever la partie su-
périeure de l’aspirateur 3.
■ Tant qu’il n’y a pas de matières nocives ou de
matières sans ou avec une valeur d’exposi-
tion supérieure/égale à 1 mg/m
3
conformé-
ment à la classe de poussière L (autrefois ca-
tégorie d’utilisation U), il est possible d’aspi-
rer les matières directement dans la cuve.
Pour l’aspiration à sec, il est recommandé d’in-
troduire un sac à poussières 17 (accessoire).
En utilisant un sac à poussières, le filtre à plis 18
ne s’obstrue pas aussi rapidement, il en résulte
une meilleure capacité d’aspiration à long terme
et l’élimination des poussières s’en trouve facili-
tée.
Saisir le nouveau sac à poussières 17 par la
bride, le pousser d’abord en bas par-dessus la
tubulure d’aspiration, puis en haut par-dessus la
came. Veiller à ce que le sac à poussières soit
correctement posé sur toute sa longueur contre
les parois intérieures de la cuve 11. Remettre
en place la partie supérieure de l’aspirateur.
Faire encliqueter les fermetures 13.
Introduire à fond le tuyau flexible 10 dans le rac-
cord du tuyau flexible 9 jusqu’à ce que celui-ci
soit bien fixé ou le monter sur raccord du tuyau
flexible 9 et tourner à fond dans le sens des
aiguilles d’une montre.
Bien introduire les tuyaux d’aspiration l’un dans
l’autre.
Il est recommandé d’utiliser des tuyaux flexibles
à déchargement électrostatique ayant un dia-
mètre de 19 ou 35 mm.
Lorsque la lampe d’avertissement 4 clignote
dans le mode de fonctionnement IS (service as-
pirateur industriel) et/ou qu’un signal acoustique
se fait entendre dans le mode de fonctionne-
ment ENT (aspiration des outils électroporta-
tifs), nettoyer alors les filtres à plis 18. Pour ce
faire, positionner le commutateur du mode de
service 6 sur le symbole « Nettoyage électro-
magnétique des filtres ». Les filtres sont net-
toyés pendant 10 secondes env. Au cas où la
lampe d’avertissement 4 continuerait à clignoter
et/ou que le signal acoustique se ferait enten-
dre, remplacer le sac à poussières 17. Si la
lampe d’avertissement 4 continue à clignoter et/
ou que le signal acoustique continue à se faire
entendre, contrôler l’aspirateur comme décrit
dans le chapitre « Pannes et perturbations ».
■ Attention ! Cet appareil contient des pous-
sières potentiellement nocives. La vidange, la
maintenance, ainsi que l’élimination du con-
tenu du bac à poussières ne doivent être ef-
fectuées que par des professionnels. Une te-
nue de protection appropriée est nécessaire.
Ne pas mettre en œuvre cet appareil sans le
système de filtre complet.
Démontage du sac à poussières
Retirer le sac à poussières 17 vers l’arrière en
l’écartant de l’ouverture d’aspiration. Fermer la
bride du sac à poussières en rabattant le cou-
vercle et enlever le sac à poussières.
Restrictions d’utilisation
Châssis
Montage (voir figure )
A
1 609 929 K11.book Seite 20 Freitag, 1. Dezember 2006 12:33 12
Pagina se încarcă...
Pagina se încarcă...
Pagina se încarcă...
Pagina se încarcă...
Pagina se încarcă...
Pagina se încarcă...
Pagina se încarcă...
Pagina se încarcă...
Pagina se încarcă...
Pagina se încarcă...
Pagina se încarcă...
Pagina se încarcă...
Pagina se încarcă...
Pagina se încarcă...
Pagina se încarcă...
Pagina se încarcă...
Pagina se încarcă...
Pagina se încarcă...
Pagina se încarcă...
Pagina se încarcă...
Pagina se încarcă...
Pagina se încarcă...
Pagina se încarcă...
Pagina se încarcă...
Pagina se încarcă...
Pagina se încarcă...
Pagina se încarcă...
Pagina se încarcă...
Pagina se încarcă...
Pagina se încarcă...
Pagina se încarcă...
Pagina se încarcă...
Pagina se încarcă...
Pagina se încarcă...
Pagina se încarcă...
Pagina se încarcă...
Pagina se încarcă...
Pagina se încarcă...
Pagina se încarcă...
Pagina se încarcă...
Pagina se încarcă...
Pagina se încarcă...
Pagina se încarcă...
Pagina se încarcă...
Pagina se încarcă...
Pagina se încarcă...
Pagina se încarcă...
Pagina se încarcă...
Pagina se încarcă...
Pagina se încarcă...
Pagina se încarcă...
Pagina se încarcă...
Pagina se încarcă...
Pagina se încarcă...
Pagina se încarcă...
Pagina se încarcă...
Pagina se încarcă...
Pagina se încarcă...
Pagina se încarcă...
Pagina se încarcă...
Pagina se încarcă...
Pagina se încarcă...
Pagina se încarcă...
Pagina se încarcă...
Pagina se încarcă...
Pagina se încarcă...
Pagina se încarcă...
Pagina se încarcă...
Pagina se încarcă...
Pagina se încarcă...
Pagina se încarcă...
Pagina se încarcă...
Pagina se încarcă...
Pagina se încarcă...
Pagina se încarcă...
Pagina se încarcă...
Pagina se încarcă...
Pagina se încarcă...
Pagina se încarcă...
Pagina se încarcă...
Pagina se încarcă...
Pagina se încarcă...
Pagina se încarcă...
Pagina se încarcă...
Pagina se încarcă...
Pagina se încarcă...
Pagina se încarcă...
Pagina se încarcă...
Pagina se încarcă...
Pagina se încarcă...
Pagina se încarcă...
Pagina se încarcă...
Pagina se încarcă...
Pagina se încarcă...
Pagina se încarcă...
Pagina se încarcă...
Pagina se încarcă...
Pagina se încarcă...
Pagina se încarcă...
Pagina se încarcă...
Pagina se încarcă...
Pagina se încarcă...
Pagina se încarcă...
Pagina se încarcă...
Pagina se încarcă...
Pagina se încarcă...
Pagina se încarcă...
Pagina se încarcă...
Pagina se încarcă...
Pagina se încarcă...
Pagina se încarcă...
Pagina se încarcă...
Pagina se încarcă...
Pagina se încarcă...
Pagina se încarcă...
Pagina se încarcă...
Pagina se încarcă...
Pagina se încarcă...
Pagina se încarcă...
Pagina se încarcă...
Pagina se încarcă...
Pagina se încarcă...
Pagina se încarcă...
Pagina se încarcă...
Pagina se încarcă...
Pagina se încarcă...
Pagina se încarcă...
Pagina se încarcă...
Pagina se încarcă...
Pagina se încarcă...
Pagina se încarcă...
Pagina se încarcă...
Pagina se încarcă...
Pagina se încarcă...
Pagina se încarcă...
Pagina se încarcă...
Pagina se încarcă...
Pagina se încarcă...
Pagina se încarcă...
Pagina se încarcă...
Pagina se încarcă...
Pagina se încarcă...
Pagina se încarcă...
Pagina se încarcă...
Pagina se încarcă...
Pagina se încarcă...
Pagina se încarcă...
Pagina se încarcă...
Pagina se încarcă...
Pagina se încarcă...
Pagina se încarcă...
Pagina se încarcă...
-
 1
1
-
 2
2
-
 3
3
-
 4
4
-
 5
5
-
 6
6
-
 7
7
-
 8
8
-
 9
9
-
 10
10
-
 11
11
-
 12
12
-
 13
13
-
 14
14
-
 15
15
-
 16
16
-
 17
17
-
 18
18
-
 19
19
-
 20
20
-
 21
21
-
 22
22
-
 23
23
-
 24
24
-
 25
25
-
 26
26
-
 27
27
-
 28
28
-
 29
29
-
 30
30
-
 31
31
-
 32
32
-
 33
33
-
 34
34
-
 35
35
-
 36
36
-
 37
37
-
 38
38
-
 39
39
-
 40
40
-
 41
41
-
 42
42
-
 43
43
-
 44
44
-
 45
45
-
 46
46
-
 47
47
-
 48
48
-
 49
49
-
 50
50
-
 51
51
-
 52
52
-
 53
53
-
 54
54
-
 55
55
-
 56
56
-
 57
57
-
 58
58
-
 59
59
-
 60
60
-
 61
61
-
 62
62
-
 63
63
-
 64
64
-
 65
65
-
 66
66
-
 67
67
-
 68
68
-
 69
69
-
 70
70
-
 71
71
-
 72
72
-
 73
73
-
 74
74
-
 75
75
-
 76
76
-
 77
77
-
 78
78
-
 79
79
-
 80
80
-
 81
81
-
 82
82
-
 83
83
-
 84
84
-
 85
85
-
 86
86
-
 87
87
-
 88
88
-
 89
89
-
 90
90
-
 91
91
-
 92
92
-
 93
93
-
 94
94
-
 95
95
-
 96
96
-
 97
97
-
 98
98
-
 99
99
-
 100
100
-
 101
101
-
 102
102
-
 103
103
-
 104
104
-
 105
105
-
 106
106
-
 107
107
-
 108
108
-
 109
109
-
 110
110
-
 111
111
-
 112
112
-
 113
113
-
 114
114
-
 115
115
-
 116
116
-
 117
117
-
 118
118
-
 119
119
-
 120
120
-
 121
121
-
 122
122
-
 123
123
-
 124
124
-
 125
125
-
 126
126
-
 127
127
-
 128
128
-
 129
129
-
 130
130
-
 131
131
-
 132
132
-
 133
133
-
 134
134
-
 135
135
-
 136
136
-
 137
137
-
 138
138
-
 139
139
-
 140
140
-
 141
141
-
 142
142
-
 143
143
-
 144
144
-
 145
145
-
 146
146
-
 147
147
-
 148
148
-
 149
149
-
 150
150
-
 151
151
-
 152
152
-
 153
153
-
 154
154
-
 155
155
-
 156
156
-
 157
157
-
 158
158
-
 159
159
-
 160
160
-
 161
161
-
 162
162
-
 163
163
-
 164
164
-
 165
165
-
 166
166
-
 167
167
-
 168
168
-
 169
169
-
 170
170
-
 171
171
-
 172
172


Bosch GAS 50 M Professional Operating Instructions Manual
- Categorie
- Aspiratoare
- Tip
- Operating Instructions Manual
în alte limbi
- français: Bosch GAS 50 M Professional
Lucrări înrudite
-
Bosch GAS 50 Professional Instrucțiuni de utilizare
-
-
-
Bosch 3601JC3360 Manual de utilizare
-
Bosch GAS 35 M AFC Professional Manual de utilizare
-
Bosch GAS 35 L SFC Manual de utilizare
-
Bosch GAS 15 L Instrucțiuni de utilizare
-
Bosch GAS 25 L SFC Instrucțiuni de utilizare
-
Bosch 15 Manual de utilizare
-
Bosch GAS 35 L AFC Professional Original Instructions Manual
Alte documente
-
LG V-CD281HT Manual de utilizare
-
UFESA AC4416 Manualul proprietarului
-
-
-
Silvercrest SHAZ 22.2 A1 Operating Instructions Manual
-
-
-
EMS AirFlow Master Quick Manual