
User guide
Xperia Ear
XEA10

Contents
Introduction...................................................................................3
General overview.............................................................................. 3
Hardware overview........................................................................... 3
Getting started..............................................................................4
Charging your Xperia Ear..................................................................4
Turning the Xperia Ear on or o....................................................... 5
Pairing the Xperia Ear with an Android device.................................5
Wearing your Xperia Ear................................................................... 7
LED indicators................................................................................... 8
Resetting the Xperia Ear...................................................................8
Using your Xperia Ear.................................................................. 10
Using voice control..........................................................................10
Using head gestures....................................................................... 10
Calling...............................................................................................11
Messaging........................................................................................12
Searching for information............................................................... 13
Getting tasks done.......................................................................... 13
Getting up-to-date information......................................................13
Listening to music........................................................................... 13
Launching applications...................................................................14
Adjusting the volume......................................................................14
Changing interaction preferences.................................................. 14
Changing the voice interaction language...................................... 14
Changing the key behaviour...........................................................14
Checking dialogue history...............................................................15
Managing notifications................................................................... 15
Filtering emails................................................................................ 15
Anytime Talk.................................................................................... 15
Legal information........................................................................ 18
Declaration of Conformity for XEA10.............................................. 19
2

Introduction
General overview
The Xperia Ear lets you carry on communicating while you work and play. It reads
out messages, notifications, weather, news and more. So whatever you’re doing,
you don’t need to miss a thing.
• Use voice commands for hands-free use. Tell your Xperia Ear what you need from
your paired Android™ device and it will deliver. Commands include making a call,
playing a music track or dictating a quick message. Your Xperia Ear uses the
Assistant application by default to carry out voice commands.
• Set up your Xperia Ear using the Xperia Ear application. Set it to deliver information
for the day ahead, choose what happens when you tap it, and select notifications
for applications.
• With Anytime Talk, chat instantly with other users in your chat group whenever you
wear your Xperia Ear. You can also use head gestures to send pre-recorded
sounds.
The Assistant only supports a limited number of languages. For more information about
the Assistant and examples of how to use it, see http://s-assistant.sony.net/.
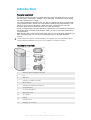
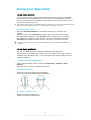
Hardware overview
1
Window to Xperia Ear battery level LED
2 Lid
3 Strap hole
4 Charging case battery level LED
5 Micro-USB port
6 LED indicator and primary microphone
7 Assistant/Call key
8 Secondary microphone
9 NFC detection area
10 Arc supporter
11 Earbud
12 Proximity sensor
13 Charging case connector
3
This is an internet version of this publication. © Print only for private use.

Getting started
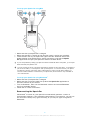
Charging your Xperia Ear
Your Xperia Ear comes with a portable charging case, which itself can be charged
from a power outlet or from a computer. Before using your Xperia Ear for the first
time, you need to charge it for at least 30 minutes. You can charge the Xperia Ear
and the charging case simultaneously.
Your Xperia Ear turns o automatically when placed inside its charging case.
To charge your charging case
1 Plug one end of the cable into the Micro-USB port of your Xperia Ear
charging case.
2 Plug the other end of the USB cable into the charger or into the USB port of a
computer. While the charging case’s battery is charging, the LED indicator at
the base of the case changes from red to orange. The LED indicator changes
to green when you reach 80% battery power.
Sony USB cables are recommended.
To charge your Xperia Ear
1 Open the charging case by pushing its lid forward with your thumb.
2 Put your Xperia Ear into the charging case and close the lid. While the Xperia
Ear’s battery is charging, the LED indicator on the lid changes from red to
orange. The LED indicator changes to green when you reach 80% battery
power.
If the lid is locked in the vertical position, do not try to close the lid because this may break
the hinge. Gently pull up the lid to unlock the hinge.
When you put your Xperia Ear into the charging case, the LED at the base of the case blinks
three times in a colour based on the battery level. A fully charged case can be used to
charge your Xperia Ear up to three times without connecting it to a power outlet or a
computer.
To check the battery level of your Xperia Ear
4
This is an internet version of this publication. © Print only for private use.

1 From your application screen, find and tap Xperia Ear.
2 The battery level is displayed.
While your Xperia Ear is in the charging case, the LED indicator on the lid displays
its estimated battery level. Another LED located beside the charger's Micro-USB
port displays the battery level of the charging case while it is connected to a power
outlet.
Red The battery level is less than 15% and charging.
Orange The battery level is between 15% and 80% and charging.
Green The battery level is above 80% and charging.
Enable the Battery Care function to maximise the battery lifespan. You can find Battery
Care in the Settings menu of the Xperia Ear application.
Turning the Xperia Ear on or o
To turn on the Xperia Ear
• The Xperia Ear automatically turns on when you remove it from the charging
case.
To turn o your headset
• Place your Xperia Ear inside the charging case.
If the Xperia Ear is not connected to an Android device for 15 minutes or longer, it will
automatically shut down.
Pairing the Xperia Ear with an Android device
For your Xperia Ear to work properly, you must install the latest version of the
Xperia Ear application on your Android device, and then pair it with your Xperia Ear.
When using the Xperia Ear with a Wi-Fi only Android tablet, the host application may not be
available for download, and functions such as calling, text messaging, mobile data trac
and the Assistant will not work.
The Xperia Ear application is available on Google Play™. We recommend using a Wi-Fi
connection to avoid data trac costs.
5
This is an internet version of this publication. © Print only for private use.

To set up your Xperia Ear using NFC
1 Make sure that your Xperia Ear is charged.
2 Make sure that NFC is turned on and that the screen is active and unlocked.
3 Touch the NFC area of your Xperia Ear against the NFC detection area of the
Android device, then follow the on-screen instructions to install the Xperia
Ear application and pair your Xperia Ear with an Android device.
If you have problems pairing your Xperia Ear with an Android device using NFC, you can pair
them manually using Bluetooth
®
.
You can connect and use your Xperia Ear with two devices at the same time - for example a
phone and a tablet, or a work phone and a private phone. To connect and use your Xperia
Ear with two devices, follow the steps outlined above on the second device. When you
have two Android devices connected to your Xperia Ear, the Assistant is only available on
one of the devices.
To set up your Xperia Ear using Bluetooth
®
1 Make sure that your Xperia Ear is charged.
2 Make sure that you have installed or updated the Xperia Ear application to
the latest version on your device.
3
Turn on Bluetooth
®
, then scan for Bluetooth
®
devices and select XEA10 from
the list of available devices.
4 Follow the on-screen instructions.
Reconnecting the Xperia Ear
If Bluetooth
®
is turned on, your Xperia Ear automatically performs a series of
reconnection attempts. If this automatic reconnection is unsuccessful, you can use
the Assistant/Call key to try again manually, or you can pair again using NFC or
Bluetooth
®
.
6
This is an internet version of this publication. © Print only for private use.

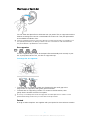
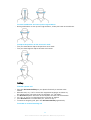
Wearing your Xperia Ear
You can wear the Xperia Ear in whichever ear you prefer. The arc supporter and the
earbud are designed to ensure a comfortable and secure fit. They are replaceable
and available in dierent sizes.
Using your Xperia Ear may in some cases distract you and cause danger, for example if you
are operating machinery or driving a vehicle. The use of headsets in such circumstances
may be restricted or prohibited in some countries.
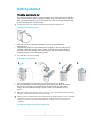
Arc supporter
The arc supporter helps you to fit the Xperia Ear comfortably and securely in your
ear. If you prefer not to use it, use the arc supporter cap.
To change the arc supporter
1 To remove the arc supporter, place your fingernail in the small gap at the
edge of the arc supporter, then gently pull it outwards.
2 To attach the arc supporter, position it as shown in the illustration, then
gently slide it forward until it fits into place.
Do not try to forcefully remove the arc supporter from the Xperia Ear. In order to avoid
permanent damage, make sure you follow the correct procedure.
Earbud
A range of earbud options are supplied with your Xperia Ear for maximum comfort.
7
This is an internet version of this publication. © Print only for private use.

Open type
The open type earbud is available in one size, designed to fit all ears.
Canal type
The canal type earbud maximises the listening experience by blocking out ambient
noise, providing a clearer sound quality. It is available in three dierent sizes:
small, medium and large.
Caring for your Xperia Ear and your skin
To help avoid skin irritation, clean your Xperia Ear regularly. Remove and rub the
earbud with a dry cloth.
If you start to experience skin irritation or an allergic reaction, stop wearing your Xperia Ear.
Contact your physician if symptoms persist.
LED indicators
There are three LED indicators to let you know of the status of the Xperia Ear and
the charging case. One on the Xperia Ear, one on the lid of the charging case and
one next to the charging case’s Micro-USB port.
Xperia Ear LED:
Flashing in blue In standby mode and not connected
Flashing in red Low battery
Flashing in white Incoming call/the Assistant is active
The LED on the charging case’s lid shows the battery level of the Xperia Ear:
Red The battery level is less than 15% and charging
Orange The battery level is between 15% and 80% and charging
Green The battery level is above 80% and charging
The LED next to the charging case’s Micro-USB port shows the battery level of
the case when it is connected to a power outlet:
Red The battery level is less than 15% and charging
Orange The battery level is between 15% and 80% and charging
Green The battery level is above 80% and charging
No light Charging complete
The LED indicator next to the charging case's Micro-USB port only indicates the case’s
battery level.
Resetting the Xperia Ear
Restart your Xperia Ear if it behaves unexpectedly. If restarting does not solve the
issue, you can perform a factory data reset.
8
This is an internet version of this publication. © Print only for private use.

To restart your Xperia Ear
• Press and hold down the Assistant/Call key for 10 seconds.
To perform a factory data reset
• Quickly press the Assistant/Call key twice, then press and hold it down for 5
seconds. If the factory data reset is successful, the LED indicator starts
flashing in green.
All information about paired devices is deleted when you reset your Xperia Ear. After a
factory data reset, the Xperia Ear will be turned o.
9
This is an internet version of this publication. © Print only for private use.

Using your Xperia Ear
Using voice control
You can use the voice control feature of the Xperia Ear to control your Android
device hands-free. Your Xperia Ear uses the Assistant application by default to
carry out voice commands. The Assistant responds to your various requests and
carries out specific daily tasks.
The Assistant only supports a limited number of languages. For more information about the
Assistant and examples of how to use it, see http://s-assistant.sony.net/.
To activate voice control
1 Press the Assistant/Call key on your Xperia Ear briefly to activate voice
control.
2 After the tone, ask the Assistant a question or give it a command in one of
the supported languages. If the Assistant doesn’t recognise your question
or command, try rephrasing the sentence. For more information about the
Assistant and examples of how to use it, see http://s-assistant.sony.net/.
You can select your preferred voice control application in the Xperia Ear application
settings.
Using head gestures
You can use head gestures to provide feedback to your Xperia Ear.
For example, if your Xperia Ear notifies you of an incoming message, and asks
whether you would like to reply, just nod or shake your head to give positive or
negative feedback.
To enable or disable head gestures
1 From your application screen, find and tap Xperia Ear > Settings > Head
gesture.
2 Tap the slider to enable or disable this function.
To use head gestures
• Nod your head to provide positive feedback.
• Shake your head to provide negative feedback.
To answer or decline a call
• Nod your head to answer a call.
• Shake your head to decline a call.
10
This is an internet version of this publication. © Print only for private use.

To cancel notification and start-up message readouts
• During notification or start-up message readouts, shake your head to cancel them.
To skip to the previous or the next music track
• Turn your head left to skip to the previous music track.
• Turn your head right to skip to the next music track.
Calling
To make a phone call
1 Press the Assistant/Call key on your Xperia Ear briefly to activate voice
control.
2 After the tone, say “Call” in one of the supported languages and then say
the contact name you want to call. For example, say “Call Peter”.
3 The Assistant repeats the name of the recipient and asks for confirmation.
4 Say “Yes” or “No” or use head gestures to confirm or decline.
5 If the Assistant fails to understand you, return to step 1.
6 To cancel an outgoing call, press the Assistant/Call key again briefly.
To answer or end an incoming call
11
This is an internet version of this publication. © Print only for private use.

1 Briefly press the Assistant/Call key on your Xperia Ear to answer a call.
2 Press the Assistant/Call key again to hang up.
You can also answer or decline a call by using head gestures. See
To answer or decline a
call
on page 10.
To reject an incoming call
• Press and hold the Assistant/Call key on your Xperia Ear.
To mute or unmute the microphone during a call
• Press and hold down the Assistant/Call key.
To return a missed call
1 Press the Assistant/Call key on your Xperia Ear briefly to activate voice
control.
2 After the tone, ask “Did I miss any calls?” in one of the supported languages.
3 The Assistant reads out who you have missed calls from.
4 After the tone, say “Call back” and then say the contact name you want to
call back. For example, say “Call back Peter”.
You can only return missed calls that you received in the last 24 hours.
To answer a second call and put the ongoing call on hold
• Briefly press the Assistant/Call key.
To switch between multiple calls
• Press the Assistant/Call key twice.
Messaging
To create and send a text message
1 Press the Assistant/Call key on your Xperia Ear briefly to activate voice
control.
2 After the tone, say “Send a message to” in one of the supported languages
and then say the contact name you want to text. For example, say “Send a
message to Peter”.
3 When prompted, dictate the message you want to send.
4 The Assistant repeats your message and asks for confirmation.
5 Say “Yes” or “No” or use head gestures to confirm or decline.
6 If the Assistant fails to understand you, return to step 1.
To reply to a text message
1 From your application screen, find and tap Xperia Ear > Settings > Assistant
settings > Reply to message.
2 When you receive a new message, the Assistant reads it back to you and
asks whether you would like to reply.
3 Say “Yes” in one of the supported languages or nod your head to reply.
4 When prompted, dictate the message you want to send.
5 The Assistant repeats your message and asks for confirmation.
6 Say “Yes” or “No” or use head gestures to confirm or decline.
This function can also be used by supported instant messaging services. For more
information about the Assistant and supported instant messaging services, see http://s-
assistant.sony.net/.
12
This is an internet version of this publication. © Print only for private use.

Searching for information
You can ask the Assistant to give you a generic description about anything, using
information available online.
To search for information using voice control
1 Press the Assistant/Call key on your Xperia Ear to activate voice control.
2 After the tone, ask the Assistant to look up a word in one of the supported
languages, for example, “Search for Jupiter on Wikipedia” or “Wikipedia
search for sushi”.
3 If the Assistant fails to understand your question or command, return to
step 1.
Getting tasks done
You can ask the Assistant to carry out specific daily tasks, such as creating a new
event in your calendar, getting directions, setting the alarm or timer, or starting the
stopwatch.
To get tasks done using voice control
1 Press the Assistant/Call key on your Xperia Ear to activate voice control.
2 After the tone, give the Assistant a command in one of the supported
languages, for example, “Set the timer for three minutes" or “Ring my cell”.
3 If the Assistant fails to understand your question or command, return to
step 1.
Getting up-to-date information
You can ask the Assistant to answer generic questions that help you to schedule
your day ahead, for example, questions about upcoming calendar events, date
and time, the news or the weather forecast.
To get up-to-date information using voice control
1 Press the Assistant/Call key on your Xperia Ear to activate voice control.
2 After the tone, ask the Assistant a question in one of the supported
languages, for example, “What’s my next event?” or “What’s the weather like
in Tokyo?”.
3 If the Assistant fails to understand your question or command, return to
step 1.
Listening to music
You can ask the Assistant to start playing music.
To start playing music using voice control
1 Press the Assistant/Call key on your Xperia Ear to activate voice control.
2 After the tone, say “Play [Song title]” in one of the supported languages to
listen to a specific song. To start playing a randomly selected song, say “Play
music”.
3 If the Assistant fails to understand your question or command, return to
step 1.
You can only use Sony’s Music application or the Google Play Music application.
You can use head gestures to skip to the previous or the next music track. See
To skip to
the previous or the next music track
on page 11.
13
This is an internet version of this publication. © Print only for private use.

Launching applications
You can ask the Assistant to launch applications.
To assign Magic Words to your applications
1 From your application screen, find and tap Xperia Ear > Settings > Magic
Words.
2 Select an application you want to set up Magic Words for and follow the on-
screen instructions.
To launch applications using voice control
1 Press the Assistant/Call key on your Xperia Ear to activate voice control.
2 After the tone, say “Launch” in one of the supported languages and then say
the magic word previously set for the application you want to launch, for
example, “Launch [Magic Word]."
3 If the Assistant fails to understand your question or command, return to
step 1.
Adjusting the volume
You can adjust the Assistant and in-call volume by using the volume keys on your
device or within the application settings.
To adjust the volume
• Press the volume key up or down on your Android device.
To adjust the volume from the application screen
1 Find and tap
> Settings.
2 Find Assistant and in-call volume and drag the slider to the desired
position.
Changing interaction preferences
You can choose the style of interaction you prefer when interacting with the
Assistant. In Normal mode, you will be asked to confirm most actions before they
are carried out. In Simple mode, some of the confirmation dialogues will be
skipped.
To change the interaction preference
1 From your application screen, find and tap Xperia Ear > Settings > Assistant
settings > Interaction preference.
2 Select an option.
Changing the voice interaction language
You can interact with the Assistant using one of the supported languages.
To change the voice interaction language
1 From your application screen, find and tap Xperia Ear > Settings > Assistant
settings > Voice interaction language.
2 Select an option.
Changing the key behaviour
You can trigger dierent functions by short or long pressing the Assistant/Call key
on your Xperia Ear.
14
This is an internet version of this publication. © Print only for private use.

To change the key behaviour
1 From your application screen, find and tap Xperia Ear > Settings.
2 Tap Short-press or Long press and then tap the slider to enable this
function.
3 Select an option.
Checking dialogue history
You can check the dialogue history to see recent interactions with the Assistant.
To check dialogue history
1 From your application screen, find and tap Xperia Ear >
.
2 Select an item.
Managing notifications
Receive personalised information for updates on the go. Place your Xperia Ear in
your ear to receive updates about notifications, your schedule, weather, news and
more.
To enable or disable start-up messages
1 From your application screen, find and tap Xperia Ear > Start-up messages.
2 Select the items you want to include in the start-up notification when you
place your Xperia Ear in your ear.
The Xperia Ear may not read out all messages and notifications, depending on when they
were received.
You can cancel start-up message readouts by using head gestures. See
To cancel
notification and start-up message readouts
on page 11.
To enable or disable voice notifications
1 From your application screen, find and tap Xperia Ear > Voice notifications.
2 Select the applications and services you want to receive notifications for.
You can cancel voice notification readouts by using head gestures. See
To cancel
notification and start-up message readouts
on page 11.
Filtering emails
You can ask the Assistant to read out your emails. You can set filters by sender or
subject. Only emails that meet the filter conditions will be read out.
To filter emails
1 From your application screen, find and tap Xperia Ear > Voice notifications.
2 Tap Email filter settings and choose, whether you want to create a filter for
sender or subject.
Anytime Talk
This application is the beta version. Anytime Talk is a service that requires a stable internet
connection. Depending on the network status, you may not be able to chat using Anytime
Talk. (4G network is recommended.)
Anytime Talk is an app that lets you use your Xperia Ear for instant voice chat with
up to four other users in a chat group. You can also use head gestures to reply with
pre-recorded sounds. Hear an Online/Oine sound when participants join or leave
the chat group.
15
This is an internet version of this publication. © Print only for private use.

Since Anytime Talk works through the internet, there is no limit to the
communication range.
All participants in the chat group must use an Xperia Ear or Xperia Ear Duo unit,
and complete the Anytime Talk setup using the host application on a paired
Android device. This function is not available on iOS.
Using Anytime Talk
To create a new chat group for the first time
1 Open the Xperia Ear app on the paired device.
2 Find and tap Anytime Talk.
3 Follow the on-screen instructions to sign up with your Google account.
4 Tap CREATE GROUP to create a group as a host.
5 Ask all guests to scan the QR code shown on your device, or tap Invite to
send an invitation to the guests via email or social media. You can invite up
to four guests.
6 After all guests have scanned the QR code, or accepted the invitation via
email or social media, tap Next.
7 Follow the on-screen instructions to record an Online/Oine sound and tap
FINISH to complete setup.
Ensure that all participants have joined before tapping Next.
To join a chat group for the first time
1 Open the Xperia Ear app on the paired device.
2 Find and tap Anytime Talk.
3 Follow the on-screen instructions to sign up with your Google account.
4 Tap JOIN GROUP to join a group as a guest.
5 Scan the QR code shown on the host’s device, or accept the invitation via
email or social media, then tap Next.
6 Follow the on-screen instructions to record an Online/Oine sound and tap
FINISH to complete the setup.
To add a guest to a chat group
1 When using the host app, find and tap Anytime Talk.
2 Tap Add guests.
Only the host can add or remove guests from the group.
To remove a guest from a chat group
1 When using the host app, find and tap Anytime Talk.
2 Tap > Delete chat group member(s).
3 Select the guest you want to remove.
Only the host can add or remove guests from the group.
To create or join another chat group
1 When using the host app, find and tap Anytime Talk.
2 Select Create new chat group or Join new chat group.
3 Follow the on-screen instructions.
You can only be in one chat group at a time.
16
This is an internet version of this publication. © Print only for private use.

To chat with Anytime Talk
1 To enter a chat group, remove the Xperia Ear from the charging case. Other
participants will hear your online sound.
2 Long press the Assistant/Call key to talk when you hear the online sound of
another participant.
3 To leave the chat group, place the Xperia Ear in the charging case. Your
oine sound lets other participants know that you left the group.
When you change the key behaviour settings, you can start Anytime Talk when you tap the
Assistant/Call key.
To record a gesture sound
1 When using the host app, find and tap Anytime Talk.
2 Tap Head gesture sound.
3 Tap Custom sound (nodding) or Custom sound (head shake).
4 Tap and hold
to record your voice, then tap OK.
To send gesture sound, you have to activate the microphone of your Xperia Ear. To activate
the microphone, press and hold down the Assistant/Call key.
17
This is an internet version of this publication. © Print only for private use.

Legal information
Sony XEA10
Prior to use, please read the
Important information
leaflet separately provided.
This User guide is published by Sony Mobile Communications Inc. or its local aliated company, without
any warranty. Improvements and changes to this User guide necessitated by typographical errors,
inaccuracies of current information, or improvements to programs and/or equipment, may be made by
Sony Mobile Communications Inc. at any time and without notice. Such changes will, however, be
incorporated into new editions of this User guide.
Some functions described in this User guide may not be available for all regions.
All rights reserved.
©2016 Sony Mobile Communications Inc.
4-12-3 Higashi-Shinagawa, Shinagawa-ku, Tokyo, 140-0002 Japan
Sony Belgium, bijkantoor van Sony Europe Limited, Da Vincilaan 7-D1, 1935 Zaventem, Belgium
Interoperability and compatibility among Bluetooth
®
devices varies. Device generally supports products
utilizing Bluetooth
®
spec. 1.2 or higher, and Headset or Handsfree profile.
Sony is the trademark or registered trademark of Sony Corporation. Bluetooth
®
is the trademark of the
Bluetooth (SIG) Inc. and is used under license. All other marks are the property of their respective owners.
All rights reserved.
All product and company names mentioned herein are the trademarks or registered trademarks of their
respective owners. Any rights not expressly granted herein are reserved. All other trademarks are property
of their respective owners.
Visit
www.sonymobile.com
for more information.
All illustrations are for illustration only and may not accurately depict the actual accessory.
18
This is an internet version of this publication. © Print only for private use.

Declaration of Conformity for XEA10
2.4GHz 100mW, NFC 13.56MHz
Hereby, Sony Mobile declares that the equipment type RD-0221 is in compliance
with Directive: 2014/53/EU. The full text of the EU declaration of conformity is
available at the following internet address: http://www.compliance.sony.de/
С настоящото Sony Mobile декларира, че радиосъоръжение тип RD-0221 е в
съответствие с Директива; 2014/53/EC. Цялостният текст на ЕС декларацията
за съответствие може да се намери на следния интернет адрес: http://
www.compliance.sony.de/
Sony Mobile ovime izjavljuje da je radijska oprema tipa RD-0221 u skladu s
Direktivom; 2014/53/EU. Cjeloviti tekst EU izjave o sukladnosti dostupan je na
sljedećoj internetskoj adresi: http://www.compliance.sony.de/
Sony Mobile tímto prohlašuje, že radiové zařízení typ RD-0221 je v souladu se
směrnicí; 2014/53/EU. Úplné znění EU prohlášení o shodě je k dispozici na této
internetové adrese: http://www.compliance.sony.de/
Hermed erklarer Sony Mobile, at radioudstyrstypen RD-0221 er i
overensstemmelse med direktiv; 2014/53/EU. EU-overensstemmelseserklaringens
fulde tekst kan findes pa folgende internetadresse: http://
www.compliance.sony.de/
Hierbij verklaart Sony Mobile dat het type radioapparatuur RD-0221 conform is met
Richtlijn; 2014/53/EU. De volledige tekst van de EU-conformiteitsverklaring kan
worden geraadpleegd op het volgende internetadres: http://
www.compliance.sony.de/
Käesolevaga deklareerib Sony Mobile, et käesolev raadioseadme tüüp RD-0221
vastab direktiivi; 2014/53/EL nouetele. ELi vastavusdeklaratsiooni täielik tekst on
kättesaadav järgmisel internetiaadressil: http://www.compliance.sony.de/
Sony Mobile vakuuttaa, että radiolaitetyyppi RD-0221 on direktiivin; 2014/53/EU
mukainen. EU-vaatimustenmukaisuusvakuutuksen täysimittainen teksti on
saatavilla seuraavassa internetosoitteessa: http://www.compliance.sony.de/
Le soussigné, Sony Mobile, déclare que l’équipement radioélectrique du type
RD-0221 est conforme a la directive; 2014/53/UE. Le texte complet de la
déclaration UE de conformité est disponible a l’adresse internet suivante: http://
www.compliance.sony.de/
Hiermit erklärt Sony Mobile, dass der Funkanlagentyp RD-0221 der Richtlinie;
2014/53/EU entspricht. Der vollständige Text der EU-Konformitätserklärung ist
unter der folgenden Internetadresse verfügbar: http://www.compliance.sony.de/
Με την παρούσα η Sony Mobile, δηλώνει ότι ο ραδιοεξοπλισμός RD-0221 πληροί
τους όρους της οδηγίας; 2014/53/EE. Το πλήρες κείμενο της δήλωσης
συμμόρφωσης ΕΕ διατίθεται στην ακόλουθη ιστοσελίδα στο διαδίκτυο: http://
www.compliance.sony.de/
Sony Mobile igazolja, hogy a RD-0221 típusú rádióberendezés megfelel a;
2014/53/EU irányelvnek. Az EU-megfelelőségi nyilatkozat teljes szövege elérhető a
következő internetes címen: http://www.compliance.sony.de/
Il fabbricante, Sony Mobile, dichiara che il tipo di apparecchiatura radio RD-0221 e
conforme alla direttiva; 2014/53/EU. Il testo completo della dichiarazione di
conformita UE e disponibile al seguente indirizzo Internet: http://
www.compliance.sony.de/
Ar šo Sony Mobile deklarē, ka radioiekārta RD-0221 atbilst Direktīvai; 2014/53/ES.
Pilns ES atbilstības deklarācijas teksts ir pieejams šādā interneta vietnē: http://
www.compliance.sony.de/
Mes, Sony Mobile, patvirtiname, kad radijo įrenginių tipas RD-0221 atitinka
Direktyvą; 2014/53/ES. Visas ES atitikties deklaracijos tekstas prieinamas šiuo
interneto adresu: http://www.compliance.sony.de/
19
This is an internet version of this publication. © Print only for private use.

Il-Kumpanija Sony Mobile tiddikjara li t-tagħmir tar-radju tat tip RD-0221 huwa
konformi mad-Direttiva; 2014/53/EU. It-test sħiħ tad-dikjarazzjoni ta’ konformita
tal-UE huwa disponibbli f’dan l-indirizz tal-Internet li ġej: http://
www.compliance.sony.de/
Herved erklarer Sony Mobile at radioutstyr typen RD-0221 er i samsvar med
direktiv; 2014/53/EU. EU-erklaring fulltekst finner du pa Internett under: http://
www.compliance.sony.de/
Sony Mobile niniejszym oświadcza, że typ urządzenia radiowego RD-0221 jest
zgodny z dyrektywą; 2014/53/UE. Pełny tekst deklaracji zgodności UE jest
dostępny pod następującym adresem internetowym: http://
www.compliance.sony.de/
O(a) abaixo assinado(a) Sony Mobile declara que o presente tipo de equipamento
de rádio RD-0221 está em conformidade com a Diretiva; 2014/53/UE. O texto
integral da declaraçao de conformidade está disponível no seguinte endereço de
Internet: http://www.compliance.sony.de/
Prin prezenta, Sony Mobile declară că tipul de echipament radio RD-0221 este în
conformitate cu Directiva; 2014/53/UE. Textul integral al declarației UE de
conformitate este disponibil la următoarea adresă internet: http://
www.compliance.sony.de/
Sony Mobile potrjuje, da je tip radijske opreme RD-0221 skladen z Direktivo;
2014/53/EU. Celotno besedilo izjave EU o skladnosti je na voljo na naslednjem
spletnem naslovu: http://www.compliance.sony.de/
Sony Mobile týmto vyhlasuje, že rádiové zariadenie typu RD-0221 je v súlade so
smernicou; 2014/53/EÚ. Úplné EÚ vyhlásenie o zhode je k dispozícii na tejto
internetovej adrese: http://www.compliance.sony.de/
Por la presente, Sony Mobile declara que el tipo de equipo radioeléctrico RD-0221
es conforme con la Directiva; 2014/53/UE. El texto completo de la declaración UE
de conformidad está disponible en la dirección Internet siguiente: http://
www.compliance.sony.de/
Härmed försäkrar Sony Mobile att denna typ av radioutrustning RD-0221
överensstämmer med direktiv; 2014/53/EU. Den fullständiga texten till EU-
försäkran om överensstämmelse finns pa följande webbadress: http://
www.compliance.sony.de/
Bu belgeyle, Sony Mobile Communications Inc., RD-0221 tipi telsiz cihazının
2014/53/EU sayılı Direktife uygun olduğunu beyan etmektedir. AB Uygunluk
beyanının tum metnine şu internet adresinden ulaşılabilir: http://
www.compliance.sony.de/
FCC Statement
This device complies with Part 15 of the FCC rules. Operation is subject to the following two conditions: (1)
This device may not cause harmful interference, and (2) This device must accept any interference received,
including interference that may cause undesired operation.
Any change or modification not expressly approved by Sony may void the user's authority to operate the
equipment.
This equipment has been tested and found to comply with the limits for a Class B digital device, pursuant to
Part 15 of the FCC Rules. These limits are designed to provide reasonable protection against harmful
interference in a residential installation. This equipment generates, uses and can radiate radio frequency
energy and, if not installed and used in accordance with the instructions, may cause harmful interference to
radio communications. However, there is no guarantee that interference will not occur in a particular
installation.
If this equipment does cause harmful interference to radio or television reception, which can be determined
by turning the equipment o and on, the user is encouraged to try to correct the interference by one or
more of the following measures:
• Reorient or relocate the receiving antenna.
• Increase the separation between the equipment and receiver.
• Connect the equipment into an outlet on a circuit dierent from that to which the receiver is connected.
• Consult the dealer or an experienced radio/TV technician for help.
AVISO IMPORTANTE PARA MÉXICO
La operación de este equipo está sujeta a las siguientes dos condiciones: (1) es posible que este equipo o
dispositivo no cause interferencia perjudicial y (2) este equipo o dispositivo debe aceptar cualquier
interferencia, incluyendo la que pueda causar su operación no deseada.
20
This is an internet version of this publication. © Print only for private use.
Pagina se încarcă...
-
 1
1
-
 2
2
-
 3
3
-
 4
4
-
 5
5
-
 6
6
-
 7
7
-
 8
8
-
 9
9
-
 10
10
-
 11
11
-
 12
12
-
 13
13
-
 14
14
-
 15
15
-
 16
16
-
 17
17
-
 18
18
-
 19
19
-
 20
20
-
 21
21


Sony XEA 10 - Xperia Ear Manualul proprietarului
- Tip
- Manualul proprietarului
- Acest manual este potrivit și pentru
în alte limbi
Lucrări înrudite
-
Sony Xperia Ear Duo Manualul utilizatorului
-
-
-
Sony MBH20 Manual de utilizare
-
-
-
 Sony Série Xperia Ear Duo Manual de utilizare
-
-
-
Sony VPL-VW995ES Manualul proprietarului
