3M Multi-Touch PCAP Displays Manualul utilizatorului
- Tip
- Manualul utilizatorului

3M Touch Systems, Inc. Proprietary Information – TSD-44310 REV C
3M™ Multi-Touch C2167PW Display User Guide
3M™ Multi-Touch C2167PW Display User Guide 1
3M™ Multi-Touch C2167PW дисплей Ръководство за потребителя 15
Zaslon 3M™ Multi-Touch C2167PW Korisnički priručnik 29
3M™ Vícedotekový C2167PW displej Příručka uživatele 43
3M™ Multi-Touch C2167PW skærm Brugervejledning 57
3M™ Multi-Touch C2167PW Display Gebruikershandleiding 71
3M™ Multi-Touch ekraani C2167PW kasutusjuhend 87
3M™ Multi-Touch C2167PW-näytön käyttöohje 101
Guide de l’utilisateur de l’écran Multi-Touch C2167PW 3M™ 115
Bedienungsanleitung 3M™ Multi-Touch C2167PW Display 131
Πολυσημειακή οθόνη αφής C2167PW της 3M™ Οδηγός Χρήστη 147
3M™ többérintéses C2167PW kijelző felhasználói útmutatója 163
Guida rapida all’uso del Display Multi-touch 3M™ C2167PW 177
3M™ Multi-Touch C2167PW displeja lietotāja rokasgrāmata 191
„3M™ Multi-Touch” C2167PW ekrano naudojimo vadovas 205
Gwida għall-Utent għal 3M™ Multi-Touch C2167PW Display 219
Ekran wielodotykowy 3M™ C2167PW Podręcznik użytkownika 233
Guia do Utilizador do Ecrã Multi-toque C2167PW da 3M™ 247
Ghid de utilizare a afişajului multi-tactil C2167PW 3M™ 261
3M™ Multidotykový displej C2167PW Príručka používateľa 275
Priročnik za uporabo večdotičnega zaslona 3M™ C2167PW 289
Pantalla multitáctil 3M™ C2167PW Guía del usuario 303
3M™ Flertrycksdisplay C2167PW Bruksanvisning 317


3M Touch Systems, Inc. Proprietary Information – TSD-44310 REV C
3M™ Multi-Touch
C2167PW Display
User Guide
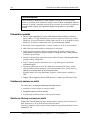
Please read, understand and follow all safety information contained in the
Quick Start Guide found at www.3M.co.uk/TouchUserGuides prior to the
use of this device. Retain the Quick Start Guide for future reference.

2 3M™ Multi-Touch Display User Guide
3M Touch Systems, Inc. Proprietary Information – TSD-44310 REV C
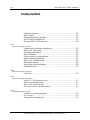
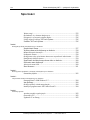
Contents
Important Notes .......................................................................................................... 3
Maintaining Your Touch Display ............................................................................... 3
Touch Sensor Care and Cleaning ............................................................................... 3
3M Touch Systems Support Services ......................................................................... 4
Contact 3M Touch Systems ....................................................................................... 4
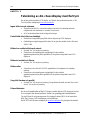
Chapter 1
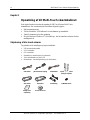
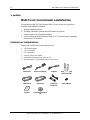
Setting Up Your Multi-Touch Chassis Display
Unpacking Your Touch Display ................................................................................. 5
Multi-Touch Chassis Display Dimensions ................................................................. 6
Attaching the Side Brackets ....................................................................................... 6
Connecting the Display .............................................................................................. 6
Supported Video Display Modes and Refresh Rates ................................................. 7
Configuring the Display Settings ............................................................................... 7
Adjusting the Multi-Touch Chassis Video Display .................................................... 8
User Controls For On Screen Display ........................................................................ 8
How to Use the OSD Menus ...................................................................................... 8
On-Screen Display Menus.......................................................................................... 9
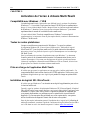
Chapter 2
Troubleshooting Your Multi-Touch Chassis Display
Error Messages ......................................................................................................... 10
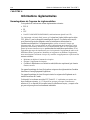
Chapter 3
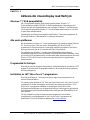
Enabling Your Multi-Touch Chassis Display
Windows™ 7 USB Compatibility ............................................................................ 12
All Other Platforms .................................................................................................. 12
Multi-Touch Application Support ............................................................................ 12
Installing 3M™ MicroTouch™ Software ................................................................ 12
Chapter 4
Regulatory Information
Regulatory Agency Approvals ................................................................................. 13
FCC Warning ........................................................................................................... 13
CE Conformity for Europe ....................................................................................... 13

3 3M™ Multi-Touch Display User Guide
3M Touch Systems, Inc. Proprietary Information – TSD-44310 REV C
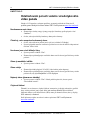
Intended Use
The 3M™ Touch Systems Touch Displays are designed for touch input and tested to
replace an existing display. These displays are intended for professional installation and
use in an indoor environment. They are not designed or tested for use in hazardous
locations. Use in any other application has not been evaluated by 3M and may lead to
an unsafe condition.
Important Notes
In extreme temperature and humidity situations, you may observe condensation
between the touch screen and the display. To minimize this condition, place the unit
where it will be used and allow a 24-hour environmental stabilization period prior to
powering on the display. Any noticeable condensation is temporary and will have no
long term affect on the operation of the display.
When unplugging power supply cord, hold the plug, do not pull by the cord.
Do not connect or disconnect this product during an electrical storm.
Install the display in a well-ventilated area. Always maintain adequate ventilation to protect the
display from overheating and to ensure reliable and continued operation.
Do not expose this display to direct sunlight or heat. Passive heat may cause damage to the
housing and other parts.
An inherent characteristic of the PCT sensor is a fine grid pattern that may be visible under
certain lighting conditions.
Do not install this display in areas where extreme vibrations may be generated. For example,
nearby manufacturing equipment may produce strong vibrations. The vibrations may cause the
display to exhibit picture discoloration or poor video quality.
The 3M touch controllers mentioned in this document, are USB compatible full speed
devices.
3M does not warrant that we are USB compliant pursuant to USB specifications.
Maintaining Your Touch Display
To maintain your display and keep your display operating at peak performance:
Keep your display and touch sensor clean.
Adjust the display video controls.
Do not install the display in a place where ventilation may be hindered.
Touch Sensor Care and Cleaning
3M Touch Systems recommends that you periodically clean the glass touch sensor
surface. Be sure to turn off your display before cleaning.
Typically, an isopropyl alcohol and water solution ratio of 50:50 is the best cleaning
agent for your touch sensor.

4 3M™ Multi-Touch Display User Guide
3M Touch Systems, Inc. Proprietary Information – TSD-44310 REV C
Apply the cleaner with a soft, lint-free cloth. Avoid using gritty cloths.
Always dampen the cloth and then clean the sensor. Be sure to spray the cleaning
liquid onto the cloth, not the sensor, so that drips do not seep inside the display or
stain the bezel.
3M Touch Systems Support Services
Visit the 3M Touch Systems website at http://www.3m.com/touch/ to download MT 7
software, drivers and obtain technical documentation.
Hot Line: 978-659-9200
Fax: 978-659-9400
Toll Free: 1-866-407-6666 (Option 3)
Email: US-TS[email protected]
Contact 3M Touch Systems
Contact information for all offices can be found at: http://www.3m.com/touch

5 3M™ Multi-Touch Display User Guide
3M Touch Systems, Inc. Proprietary Information – TSD-44310 REV C
Chapter 1
Setting Up Your Multi-Touch Chassis Display
This chapter describes how to set up your 3M Touch Systems Multi-Touch Chassis
Display. You need to complete the following tasks:
Unpack the components
Connect the video cable, touch display USB cables, and power cable
Power on the display and test your setup
If you are not running Windows® 7 (or Tablet PC), install software from the
enclosed CD.
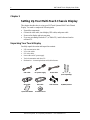
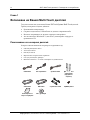
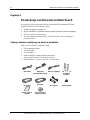
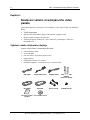
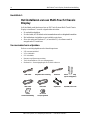
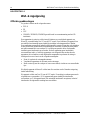
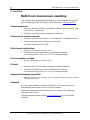
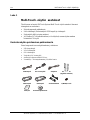
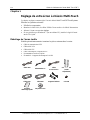
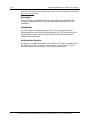
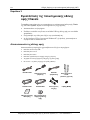
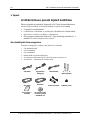
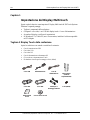
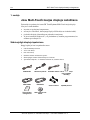
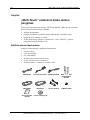
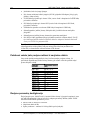
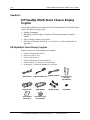
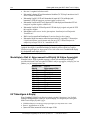
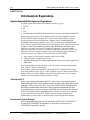
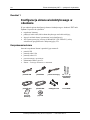
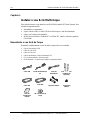
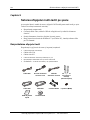
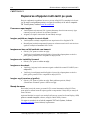
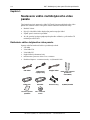
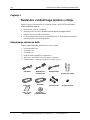
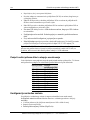
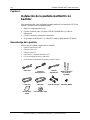
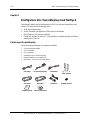
Unpacking Your Touch Display
Carefully unpack the carton and inspect the contents:
USB communication cable
VGA video cables
DVI video cables
Power cable and DC power supply
Touch documentation and driver CD
Hardware kit -- 4 mounting brackets and (8) M4x8 screws
USB cable
DC power supply
Power cable
Remote key
(sold separately)
VGA cable
DVI cable
Side brackets
8 (M4X8) Screws
Quick Start Guide
Touch Driver CD

6 3M™ Multi-Touch Display User Guide
3M Touch Systems, Inc. Proprietary Information – TSD-44310 REV C
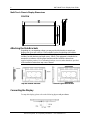
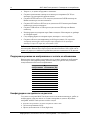
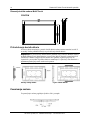
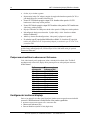
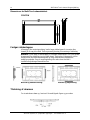
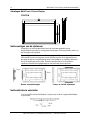
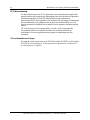
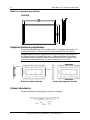
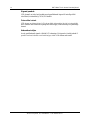
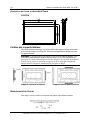
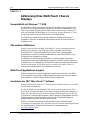
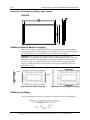
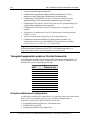
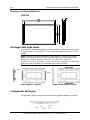
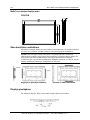
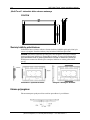
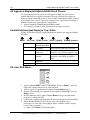
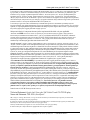
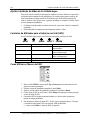
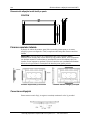
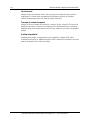
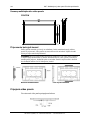
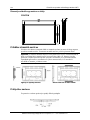
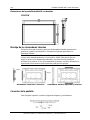
Multi-Touch Chassis Display Dimensions
C2167PW
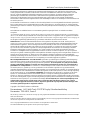
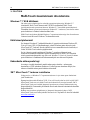
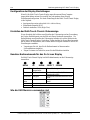
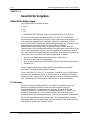
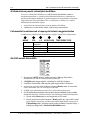
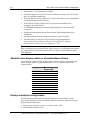
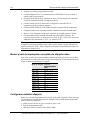
Attaching the Side Brackets
Depending on your mounting scheme, you may use the side brackets to mount your
displays onto your wall or device. Find a suitable location for attaching side brackets.
Note: You will need a screwdriver to attach the side brackets. Your touch monitor
includes four side brackets (and eight screws, M4x8). This equipment is intended to be
mounted in accordance with the proper hardware and the installation instructions
supplied with the product. Use of mounting brackets or screws other than those specified
in the installation instructions may cause a hazard.
Top and bottom brackets Left and right side brackets
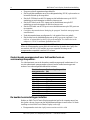
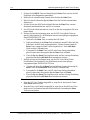
Connecting the Display
To setup this display, please refer to the following figures and procedures.

7 3M™ Multi-Touch Display User Guide
3M Touch Systems, Inc. Proprietary Information – TSD-44310 REV C
Be sure all equipment is turned off.
Connect the DC adapter to the power connector (DC IN) on the monitor and the other
end into an electrical outlet.
Connect the D-SUB cable from the display’s VGA input connector to the D-SUB
connector of your host computer and tighten the screws.
Connect the DVI cable from the display’s DVI input to the DVI connector of your
host computer and tighten the screws.
Connect the USB cable from the USB port of your display to the USB port of your
computer.
Configure the touch screen. Refer to the “Touch Screen Driver Installation” section.
Once the touch screen is configured, the monitor is ready for use.
Connect the remote control cable to RJ-type port (optional). Don't connect telephone
or internet cable to RJ-type port. Adapter rating is 12Vdc 3A minimum, marked with
LPS.
Note: To ensure the LCD display works well with your computer, please configure the
display mode of your graphics card to make it less than or equal to 1920 x 1020
resolution and make sure the timing of the display mode is compatible with the LCD
display.
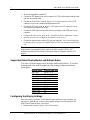
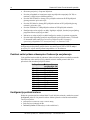
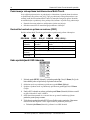
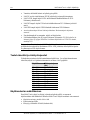
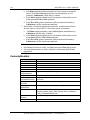
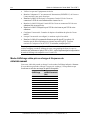
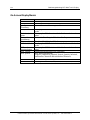
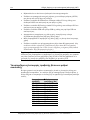
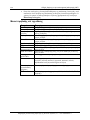
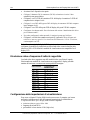
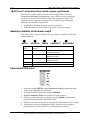
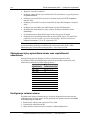
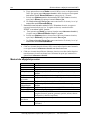
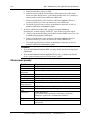
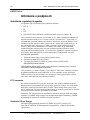
Supported Video Display Modes and Refresh Rates
Your video card should support one of the display modes specified below. If you select
an unsupported video mode, the display may stop working or display unsatisfactory
picture quality.
Display Mode
Refresh Rate (Hz)
640 x 480
60, 66, 72, 75
720 x 400
70
800 x 600
56, 60, 72, 75
832 x 624
75
1024 x 768
60, 70, 75
1152 x 864
75
1280 x 960
60
1280 x 1024
60, 75
1440 x 900
60, 75
1680 x 1050
60
1920 x 1080
60
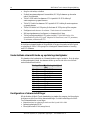
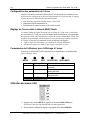
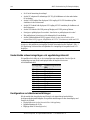
Configuring the Display Settings
After you connect your Multi-Touch Chassis Display and turn on your computer, you
may need to configure one or more of these display settings. The ideal setting for the
Multi-Touch Chassis Display is as follows:
Display mode less than or equal to 1920 x 1080 resolution

8 3M™ Multi-Touch Display User Guide
3M Touch Systems, Inc. Proprietary Information – TSD-44310 REV C
Refresh rate 60 Hz
Color depth at least 16-bit (high color)
Adjusting the Multi-Touch Chassis Video Display
This section provides guidelines for adjusting the video display and using the display
controls to adjust the image to your liking. The controls for adjusting the video display
are located on the back of the Multi-Touch Chassis Display. These buttons let you
display the on-screen menu and adjust the phase, image position, contrast, and brightness.
Before you make any adjustments:
Be sure to adjust the controls in your normal lighting conditions.
Display a test image or pattern whenever you adjust the video.
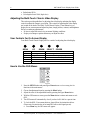
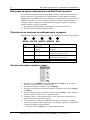
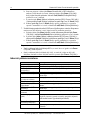
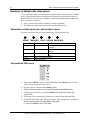
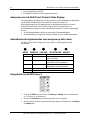
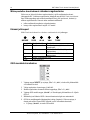
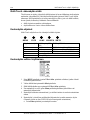
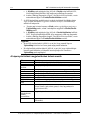
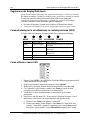
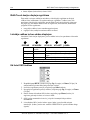
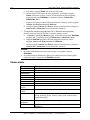
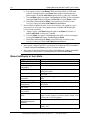
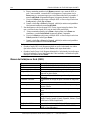
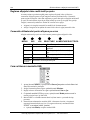
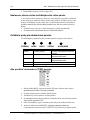
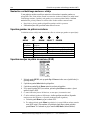
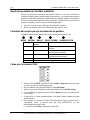
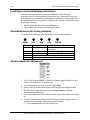
User Controls For On Screen Display
Your Multi-Touch Chassis Display has five controls for adjusting the video display.
MENU UP DOWN SELECT POWER
Key/OSD
Menu Off Status
Menu On Status
Menu
Menu appear
Menu disappear/return to main item
Up
Brightness
Main item select up/Adjust up
Down
Contrast
Main item select down/Adjust down
Select
Enter/Select sub-item function
Power
Power On/Off
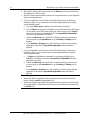
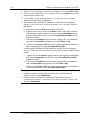
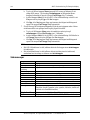
How to Use the OSD Menus
1. Press the MENU button and press Up or Down button to select among the five
functions in the main menus.
2. Choose the adjustment items by pressing the Select button.
3. Adjust the value of the adjustment items by pressing the Up or Down button.
4. With the OSD menu on screen, press the Menu button to return main menu or exit
OSD.
5. The OSD menu will automatically close if you have left it idle for a pre-set time.
6. To Lock the OSD / Power menu buttons, please follow the instructions below.
(Please note: the monitor has to be turned ON with a valid signal pre-set).
a. Press Menu key, the OSD menu will appear.

9 3M™ Multi-Touch Display User Guide
3M Touch Systems, Inc. Proprietary Information – TSD-44310 REV C
b. Press and hold the Menu key again with the OSD menu on the screen, the OSD
menu will disappear. Then press the Power key once while the menu key is still
being pressed. The Lock/Unlock menu will appear for 3 seconds.
c. Use the Select key to select OSD or Power setting then set at Lock by pushing
the Up or Down button.
d. When the Up or Down button is released, the previous setting will be saved and
exit the Lock/Unlock menu automatically.
7. To Unlock the OSD / Power menu buttons, please follow the instructions below.
Please note: the monitor has to be turned ON with a valid signal pre-set.
a. Press and hold the Menu key then press the Power key simultaneously and the
Lock/Unlock menu will appear for 3 seconds.
b. Use the Select key to select OSD or Power setting then set at Unlock by pushing
the Up or Down button.
c. When the Up or Down button is released, the previous setting will be saved and
exit the Lock/Unlock menu automatically.
Note:
When the OSD Lock Function is selected, this indicates that all the buttons except
Power are now disabled.
When the Power Lock function is selected, this indicates that the power key is
disabled; user cannot turn off the monitor using the Power key.
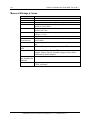
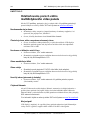
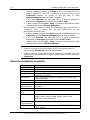
On-Screen Display Menus
Item
Content
Contrast
The monitor luminance level control.
Brightness
The monitor backlight level control.
Auto Adjust
Fine-tune the image to full screen automatically.
Left/Right
Moving screen image horizontal position to left or right.
Up/Down
Moving screen image vertical position to up or down.
Horizontal size
The screen image horizontal dot clock adjustment.
Fine
The screen image pixel phase adjustment.
OSD Left/Right
Moving OSD menu horizontal position to left or right.
OSD Up/Down
Moving OSD menu vertical position to up or down.
OSD Time out
OSD auto-disappear time selection.
OSD Language
OSD menu language selection.
(English, French, Japanese, German, Spanish, Italian, Traditional
Chinese and Simplified Chinese)
Factory Reset
Factory default value restored.
RGB
Color temperature selection (9300K, 6500K, 5500K, 7500K, User)

10 3M™ Multi-Touch Display User Guide
3M Touch Systems, Inc. Proprietary Information – TSD-44310 REV C
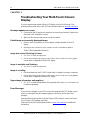
CHAPTER 2
Troubleshooting Your Multi-Touch Chassis
Display
If you are experiencing trouble with the LCD display, refer to the following. If the
problem persists, please refer to the 3M Touch Systems website at www.3m.com/touch.
No image appears on screen.
Check that all the I/O and power connectors are correctly and securely connected as
described in the "Installation" section.
Make sure the connector pins are not crooked or broken.
Partial image or incorrectly displayed image.
Check to see if the resolution of your computer is higher than that of the LCD
display.
Reconfigure the resolution of your computer to make it less than or equal to
1920 x 1080 recommended resolution.
Image has vertical flickering line bars.
Use “Fine” to make an adjustment.
Check and reconfigure the display mode of the vertical refresh rate of your graphic
card to make it compatible with the LCD display.
Image is unstable and flickering
Use “Fine” to make an adjustment.
Image is scrolling
Check and make sure the VGA/DVI signal cable (or adapter) is securely connected.
Check and reconfigure the display mode of the vertical refresh rate of your graphics
card to make it compatible with the LCD display.
Vague image (characters and graphics)
Use “Fine” to make an adjustment. If this problem still persists, use “Horizontal size”
to make an adjustment.
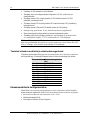
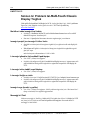
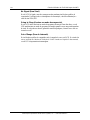
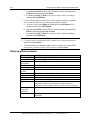
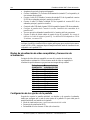
Error Messages
If you see error messages on your LCD screen, this means that the LCD display cannot
receive a clean signal from the computer graphics card. Below are the basic error
messages.
Pressing Menu will pull up the On Screen Display (OSD) menus to control the Picture,
Color, Display, OSD Settings, and Setup.
Please refer to the 3M Touch Systems website at www.3m.com/touch for additional
information.

11 3M™ Multi-Touch Display User Guide
3M Touch Systems, Inc. Proprietary Information – TSD-44310 REV C
No Signal
The LCD display has been powered on but cannot receive any signal from the computer
graphics card. Check all the power switches, power cables, and VGA/DVI signal cable.
Going to Sleep
The LCD display is in power save mode. In addition, the LCD display will enter power
save mode when experiencing a sudden signal disconnect. The monitor can be activated
by pressing any key, clicking the mouse or touching the screen.
Out of Range
The signal of the computer graphic card is not compatible with the LCD display. When
the signal is not included in the “Video Display Modes” listed in Chapter 2 of this
manual, the LCD monitor will display this message.

12 3M™ Multi-Touch Display User Guide
3M Touch Systems, Inc. Proprietary Information – TSD-44310 REV C
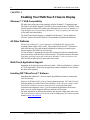
CHAPTER 3
Enabling Your Multi-Touch Chassis Display
Windows™ 7 USB Compatibility
3M multi-touch technology works seamlessly with the Windows™ 7 operating system.
The Multi-Touch display supports USB HID for direct communication. The Multi-Touch
Chassis Display leverages all the multi-touch functionality that is native to Windows™ 7.
Plug the display in to a system running Windows™ 7 and you’ll quickly enter the world
of true multi-touch functionality.
The Multi-Touch Chassis Display is compatible with Windows 7 with no additional
software. Refer to Microsoft's Windows 7 documentation for additional information.
All Other Platforms
When using a Windows™ 7 serial connection or for Windows XP, Vista or Linux
operating systems (either USB or serial), 3M provides MicroTouch MT 7 Software for
multi-touch drivers. This guide includes information for writing your own drivers to
interface with the 3M Multi-Touch Technology.
For non-Windows 7 operating system users this document provides the communication
protocol necessary to talk directly with the electronics. This enables software developers
using other operating systems such as Microsoft Windows™ Vista or Linux® to write
their own drivers and achieve the same multi-touch results.
Multi-Touch Application Support
Remember not all applications are multi-touch ready -- Multi-touch behavior is a function
of YOUR application. Check with your application vendor to determine if your software
has multi-touch capability.
Installing 3M™ MicroTouch™ Software
Remember that Windows™ 7 does not require any additional software to enable multi-
touch functionality.
However, for Windows™ XP, Vista or Linux® operating systems, 3M™ MicroTouch™
Software enables your Multi-Touch Chassis Display to work with your computer. 3M™
MicroTouch™ Software includes a control panel for setting your touch sensor
preferences and a diagnostic utility. If you are experiencing problems with the touch
sensor, you can use the diagnostic utilities provided to test the system.
For more information on installing this software and using the control panel, refer to the
3M™ MicroTouch™ Software User Guide on the accompanying CD or on the corporate
website at www.3m.com/touch.

13 3M™ Multi-Touch Display User Guide
3M Touch Systems, Inc. Proprietary Information – TSD-44310 REV C
CHAPTER 4
Regulatory Information
Regulatory Agency Approvals
Your product complies with the following regulatory standards:
FCC-B
CE
CCC
UL60950/IEC60950/EN60950 certified in compliance with the CB test scheme
This equipment has been tested and found to comply within limits for a Class B digital
device, pursuant to Part 15 of the FCC rules. These limits are designed to provide reasonable
protection against harmful interference in residential installations. This equipment generates,
uses, and can radiate radio frequency energy, and if not installed and used in accordance with
the instructions, may cause harmful interference to radio communications. However, there is
no guarantee that interference will not occur in a particular installation. If this equipment does
cause interference to radio or television equipment reception, which can be determined by
turning the equipment off and on, the user is encouraged to try to correct the interference by
one or more of the following measures:
Reorient or relocate the receiving antenna.
Move the equipment away from the receiver.
Consult the dealer or an experienced radio/television technician for additional
suggestions.
This Class B digital apparatus meets all requirements of the Canadian Interference-
Causing Equipment Regulations.
Cet appareil numérique de la classe B respecte toutes les exigences du Règlement sur le
matériel brouilleur du Canada.
This device complies with Part 15 of the FCC rules: Operation is subject to the following two
conditions: (1) This device may not cause harmful interference, and (2) this device must
accept any interference received, including interference that may cause undesired operation.
FCC Warning
To assure continued FCC compliance, the user must use grounded power supply cord and
the provided shielded video interface cable with bonded ferrite cores. If a BNC cable is
going to be used, use only a shielded BNC(5) cable. Also, any unauthorized changes or
modifications not expressly approved by the party responsible for compliance could void
the user’s authority to operate this device.
3M Touch Systems is not responsible for any radio or television interference caused by
using other than recommended cables and connectors or by unauthorized changes or
modifications to this equipment.
CE Conformity for Europe
The device complies with the requirements of the EU RoHS Directive 2011/65/EU, the
ECC directive 2004/108/EC with regard to “Electromagnetic compatibility” and
2006/95/EC with regard to "Safety".

14 3M™ Multi-Touch Display User Guide
3M Touch Systems, Inc. Proprietary Information – TSD-44310 REV C
The information in this document is subject to change without notice. No part of this document may be reproduced or
transmitted in any form or by any means, electronic or mechanical, for any purpose, without the express written
permission of 3M Touch Systems, Inc. 3M may have patents or pending patent applications, trademarks, copyrights, or
other intellectual property rights covering subject matter in this document. The furnishing of this document does not give
you license to these patents, trademarks, copyrights, or other intellectual property except as expressly provided in any
written license agreement from 3M Touch Systems, Inc.
The information provided in this document is intended as a guide only. For the latest detailed engineering specifications,
please contact your 3M Touch Systems, Inc. Application Engineer. 3M Touch Systems, Inc. is committed to continually
improving product designs, as a result, product specifications may be subject to change without notification.
Dispose of display and components in accordance with all applicable local and governmental regulations.
"RoHS 2011/65/EU compliant" means that the product or part does not contain any of the substances in excess of the
maximum concentration values (“MCVs”) in EU RoHS Directive 2011/65/EU, unless the substance is in an application
that is exempt under EU RoHS. The MCVs are by weight in homogeneous materials. This information represents 3M's
knowledge and belief, which may be based in whole or in part on information provided by third party suppliers to 3M.
NOTICE: Given the variety of factors that can affect the use and performance of a 3M Touch Systems, Inc. Product (the
“Product”), including that solid state equipment has operation characteristics different from electromechanical equipment,
some of which factors are uniquely within User’s knowledge and control, it is essential that User evaluate the 3M Touch
Systems, Inc. Product and software to determine whether it is suitable for User’s particular purpose and suitable for User’s
method of application. 3M Touch Systems, Inc. statements, engineering/technical information, and recommendations are
provided for User’s convenience, but their accuracy or completeness is not warranted. 3M Touch Systems, Inc. products
and software are not specifically designed for use in medical devices as defined by United States federal law. 3M Touch
Systems, Inc. products and software should not be used in such applications without 3M Touch Systems, Inc. express
written consent. User should contact its sales representative if User’s opportunity involves a medical device application.
IMPORTANT NOTICE TO PURCHASER: Specifications are subject to change without notice. These 3M Touch
Systems, Inc. Products and software are warranted to meet their published specifications from the date of shipment and for
the period stated in the specification. 3M Touch Systems, Inc. makes no additional warranties, express or implied,
including but not limited to any implied warranties of merchantability or fitness for a particular purpose. User is
responsible for determining whether the 3M Touch Systems, Inc. Products and software are fit for User’s particular
purpose and suitable for its method of production, including intellectual property liability for User's application. If the
Product, software or software media is proven not to have met 3M Touch Systems, Inc. warranty, then 3M Touch
Systems, Inc. sole obligation and User’s and Purchaser’s exclusive remedy, will be, at 3M Touch Systems, Inc. option, to
repair or replace that Product quantity or software media or to refund its purchase price. 3M Touch Systems, Inc. has no
obligation under 3M Touch Systems, Inc. warranty for any Product, software or software media that has been modified or
damaged through misuse, accident, neglect, or subsequent manufacturing operations or assemblies by anyone other than
3M Touch Systems, Inc. 3M Touch Systems, Inc. shall not be liable in any action against it in any way related to the
Products or software for any loss or damages, whether non-specified direct, indirect, special, incidental or
consequential (including downtime, loss of profits or goodwill) regardless of the legal theory asserted.
Copyright © 2015 3M All rights reserved.
Document Title: 3M™ Multi-Touch C2167PW Display User Guide
Document Number: TSD-44310, Revision C
3M, the 3M logo, MicroTouch, and the MicroTouch logo are either registered trademarks or trademarks of 3M in the United States and/or
other countries.
Windows and/or other Microsoft products referenced herein are either registered trademarks or trademarks of Microsoft Corporation in
the U.S. and/or other countries.
Linux is a registered trademark of Linus Torvalds in the U.S. and/or other countries
All other trademarks are the property of their respective owners.

Информация, собственост на 3M Touch Systems – TSD-44310 REV C
3M™ Multi-Touch
C2167PW дисплей
Ръководство за
потребителя
Моля, прочетете, разберете и следвайте цялата информация за
безопасност, съдържаща се в ръководството за бързо стартиране,
намиращо се на www.3M.co.uk/TouchUserGuides, преди да използвате
уреда. Запазете ръководството за бързо стартиране за бъдещи
справки.

16 3M™ Multi-Touch дисплей - Ръководство за потребителя
Информация, собственост на 3M Touch Systems – TSD-44310 REV C
Съдържание
Важни бележки ....................................................................................................... 17
Поддръжка на сензорния дисплей ........................................................................ 17
Грижи и почистване на сензора за докосване...................................................... 18
Поддържащи услуги на 3M Touch Systems .......................................................... 18
Контакти с 3M Touch Systems ............................................................................... 18
Глава 1
Включване на Вашия Multi-Touch дисплей
Разопаковане на сензорния дисплей ..................................................................... 19
Размери на Multi-Touch дисплея ........................................................................... 20
Закрепване на страничните скоби ......................................................................... 20
Свързане на дисплея .............................................................................................. 20
Поддържани режими на изобразяване и честоти на обновяване ....................... 21
Конфигуриране настройките на дисплея ............................................................. 21
Настройка на видео изображението на Multi-Touch дисплея ............................ 22
Потребителски контроли за изображението на екрана ....................................... 22
Как да използваме екранното меню ..................................................................... 22
Екранно меню “Дисплей” ...................................................................................... 23
Глава 2
Отстраняване на неизправности по Вашия Multi-Touch дисплей
Съобщения за грешка ............................................................................................. 24
Глава 3
Софтуер за Вашия Multi-Touch дисплей
USB съвместимост с Windows™ .......................................................................... 26
Всички други платформи ....................................................................................... 26
Помощ за прилагането на въвеждане с докосване .............................................. 26
Инсталиране на 3M™ MicroTouch™ софтуера ................................................... 26
Глава 4
Регулаторна информация
Одобрения от регулаторна агенция ...................................................................... 27
Предупреждение на FCC ....................................................................................... 27
CE съвместимост за Европа................................................................................... 27

17 3M™ Multi-Touch дисплей - Ръководство за потребителя
Информация, собственост на 3M Touch Systems – TSD-44310 REV C
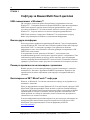
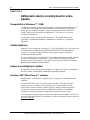
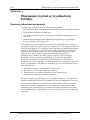
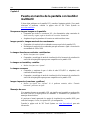
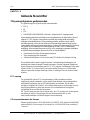
Предназначение
Сензорните дисплеи на 3M™ Touch Systems са разработени за въвеждане с
докосване и са тествани като заменят съществуващ дисплей. Тези дисплеи са
предназначени за професионален монтаж и употреба в затворени помещения. Те
не са разработени или тествани за употреба в опасни условия. Употребата за
всякакво друго приложение не е оценявана от 3М и може да доведе до
небезопасни условия.
Важни бележки
При условия на екстремна температура и влажност, трябва да вземете предвид
възможно образуване на кондензат между сензорния екран и дисплея. За да избегнете
това, поставете дисплея където ще бъде използван и го оставете в продължение на 24
часа да се стабилизира, преди да го включите към захранването. Евентуалното
образуване на кондензат е временно и няма да има дълготраен ефект върху работата на
дисплея.
Когато откачате мрежовия кабел, дръжте щепсела, а не дърпайте кабела.
Не свързвайте и не откачайте продукта по време на гръмотевична буря.
Монтирайте дисплея в добре проветрено помещение. Винаги поддържайте достатъчна
вентилация за предпазване на дисплея от прегряване, за да осигурите надеждна и
продължителна работа.
Не излагайте дисплея на пряка слънчева светлина или източници на топлина. Пасивното
нагряване може да повреди корпуса и други части.
Фината мрежа, която може да се види при известни условия на осветлението е присъща
характеристика на PCT сензора.
Не монтирайте дисплея на места, където могат да се появят екстремни вибрации.
Например, разположено наблизо производствено оборудване може да предизвика силни
вибрации. Вибрациите могат да предизвикат обезцветяване на картината или влошено
качество на видео изображението.
Сензорните контролери на 3M, споменати в този документ са USB съвместими
високоскоростни прибори.
3M не гарантира, че ние сме съвместими с USB според всички спецификации на USB.
Поддръжка на сензорния дисплей
За да поддържате Вашия дисплей и да имате винаги най-добри работни
характеристики:
Пазете дисплея и сензора за докосване чисти.
Настройте видео контролите на дисплея.
Не монтирайте дисплея на места, където вентилацията може да бъде затруднена.

18 3M™ Multi-Touch дисплей - Ръководство за потребителя
Информация, собственост на 3M Touch Systems – TSD-44310 REV C
Грижи и почистване на сензора за докосване
3M Touch Systems Ви препоръчва периодично да почиствате стъклената
повърхност на сензора за докосване. Преди почистване, изключете дисплея.
Обикновено, най-доброто почистващо средство за сензора е изопропилов алкохол,
в съотношение 50:50 с вода.
Нанасяйте почистващото средство с мека кърпа без власинки. Избягвайте
използването на твърди кърпи.
Винаги навлажнявайте кърпата и тогава почистете сензора. Нанасяйте
почистващото средство на кърпата, а не на сензора, за да не се просмукват капки
или да се замърсява жлеба.
Поддържащи услуги на 3M Touch Systems
Посетете уебстраницата на 3M Touch Systems, http://www.3m.com/touch/ за да
свалите софтуера за MT 7, драйвери и техническа документация.
Гореща линия: 978-659-9200
Факс: 978-659-9400
Безплатен телефон: 1-866-407-6666 (опция 3)
E- мейл: US-TS[email protected]m
Контакти с 3M Touch Systems
Контактната информация за всички офиси може да се намери на:
http://www.3m.com/touch
Pagina se încarcă...
Pagina se încarcă...
Pagina se încarcă...
Pagina se încarcă...
Pagina se încarcă...
Pagina se încarcă...
Pagina se încarcă...
Pagina se încarcă...
Pagina se încarcă...
Pagina se încarcă...
Pagina se încarcă...
Pagina se încarcă...
Pagina se încarcă...
Pagina se încarcă...
Pagina se încarcă...
Pagina se încarcă...
Pagina se încarcă...
Pagina se încarcă...
Pagina se încarcă...
Pagina se încarcă...
Pagina se încarcă...
Pagina se încarcă...
Pagina se încarcă...
Pagina se încarcă...
Pagina se încarcă...
Pagina se încarcă...
Pagina se încarcă...
Pagina se încarcă...
Pagina se încarcă...
Pagina se încarcă...
Pagina se încarcă...
Pagina se încarcă...
Pagina se încarcă...
Pagina se încarcă...
Pagina se încarcă...
Pagina se încarcă...
Pagina se încarcă...
Pagina se încarcă...
Pagina se încarcă...
Pagina se încarcă...
Pagina se încarcă...
Pagina se încarcă...
Pagina se încarcă...
Pagina se încarcă...
Pagina se încarcă...
Pagina se încarcă...
Pagina se încarcă...
Pagina se încarcă...
Pagina se încarcă...
Pagina se încarcă...
Pagina se încarcă...
Pagina se încarcă...
Pagina se încarcă...
Pagina se încarcă...
Pagina se încarcă...
Pagina se încarcă...
Pagina se încarcă...
Pagina se încarcă...
Pagina se încarcă...
Pagina se încarcă...
Pagina se încarcă...
Pagina se încarcă...
Pagina se încarcă...
Pagina se încarcă...
Pagina se încarcă...
Pagina se încarcă...
Pagina se încarcă...
Pagina se încarcă...
Pagina se încarcă...
Pagina se încarcă...
Pagina se încarcă...
Pagina se încarcă...
Pagina se încarcă...
Pagina se încarcă...
Pagina se încarcă...
Pagina se încarcă...
Pagina se încarcă...
Pagina se încarcă...
Pagina se încarcă...
Pagina se încarcă...
Pagina se încarcă...
Pagina se încarcă...
Pagina se încarcă...
Pagina se încarcă...
Pagina se încarcă...
Pagina se încarcă...
Pagina se încarcă...
Pagina se încarcă...
Pagina se încarcă...
Pagina se încarcă...
Pagina se încarcă...
Pagina se încarcă...
Pagina se încarcă...
Pagina se încarcă...
Pagina se încarcă...
Pagina se încarcă...
Pagina se încarcă...
Pagina se încarcă...
Pagina se încarcă...
Pagina se încarcă...
Pagina se încarcă...
Pagina se încarcă...
Pagina se încarcă...
Pagina se încarcă...
Pagina se încarcă...
Pagina se încarcă...
Pagina se încarcă...
Pagina se încarcă...
Pagina se încarcă...
Pagina se încarcă...
Pagina se încarcă...
Pagina se încarcă...
Pagina se încarcă...
Pagina se încarcă...
Pagina se încarcă...
Pagina se încarcă...
Pagina se încarcă...
Pagina se încarcă...
Pagina se încarcă...
Pagina se încarcă...
Pagina se încarcă...
Pagina se încarcă...
Pagina se încarcă...
Pagina se încarcă...
Pagina se încarcă...
Pagina se încarcă...
Pagina se încarcă...
Pagina se încarcă...
Pagina se încarcă...
Pagina se încarcă...
Pagina se încarcă...
Pagina se încarcă...
Pagina se încarcă...
Pagina se încarcă...
Pagina se încarcă...
Pagina se încarcă...
Pagina se încarcă...
Pagina se încarcă...
Pagina se încarcă...
Pagina se încarcă...
Pagina se încarcă...
Pagina se încarcă...
Pagina se încarcă...
Pagina se încarcă...
Pagina se încarcă...
Pagina se încarcă...
Pagina se încarcă...
Pagina se încarcă...
Pagina se încarcă...
Pagina se încarcă...
Pagina se încarcă...
Pagina se încarcă...
Pagina se încarcă...
Pagina se încarcă...
Pagina se încarcă...
Pagina se încarcă...
Pagina se încarcă...
Pagina se încarcă...
Pagina se încarcă...
Pagina se încarcă...
Pagina se încarcă...
Pagina se încarcă...
Pagina se încarcă...
Pagina se încarcă...
Pagina se încarcă...
Pagina se încarcă...
Pagina se încarcă...
Pagina se încarcă...
Pagina se încarcă...
Pagina se încarcă...
Pagina se încarcă...
Pagina se încarcă...
Pagina se încarcă...
Pagina se încarcă...
Pagina se încarcă...
Pagina se încarcă...
Pagina se încarcă...
Pagina se încarcă...
Pagina se încarcă...
Pagina se încarcă...
Pagina se încarcă...
Pagina se încarcă...
Pagina se încarcă...
Pagina se încarcă...
Pagina se încarcă...
Pagina se încarcă...
Pagina se încarcă...
Pagina se încarcă...
Pagina se încarcă...
Pagina se încarcă...
Pagina se încarcă...
Pagina se încarcă...
Pagina se încarcă...
Pagina se încarcă...
Pagina se încarcă...
Pagina se încarcă...
Pagina se încarcă...
Pagina se încarcă...
Pagina se încarcă...
Pagina se încarcă...
Pagina se încarcă...
Pagina se încarcă...
Pagina se încarcă...
Pagina se încarcă...
Pagina se încarcă...
Pagina se încarcă...
Pagina se încarcă...
Pagina se încarcă...
Pagina se încarcă...
Pagina se încarcă...
Pagina se încarcă...
Pagina se încarcă...
Pagina se încarcă...
Pagina se încarcă...
Pagina se încarcă...
Pagina se încarcă...
Pagina se încarcă...
Pagina se încarcă...
Pagina se încarcă...
Pagina se încarcă...
Pagina se încarcă...
Pagina se încarcă...
Pagina se încarcă...
Pagina se încarcă...
Pagina se încarcă...
Pagina se încarcă...
Pagina se încarcă...
Pagina se încarcă...
Pagina se încarcă...
Pagina se încarcă...
Pagina se încarcă...
Pagina se încarcă...
Pagina se încarcă...
Pagina se încarcă...
Pagina se încarcă...
Pagina se încarcă...
Pagina se încarcă...
Pagina se încarcă...
Pagina se încarcă...
Pagina se încarcă...
Pagina se încarcă...
Pagina se încarcă...
Pagina se încarcă...
Pagina se încarcă...
Pagina se încarcă...
Pagina se încarcă...
Pagina se încarcă...
Pagina se încarcă...
Pagina se încarcă...
Pagina se încarcă...
Pagina se încarcă...
Pagina se încarcă...
Pagina se încarcă...
Pagina se încarcă...
Pagina se încarcă...
Pagina se încarcă...
Pagina se încarcă...
Pagina se încarcă...
Pagina se încarcă...
Pagina se încarcă...
Pagina se încarcă...
Pagina se încarcă...
Pagina se încarcă...
Pagina se încarcă...
Pagina se încarcă...
Pagina se încarcă...
Pagina se încarcă...
Pagina se încarcă...
Pagina se încarcă...
Pagina se încarcă...
Pagina se încarcă...
Pagina se încarcă...
Pagina se încarcă...
Pagina se încarcă...
Pagina se încarcă...
Pagina se încarcă...
Pagina se încarcă...
Pagina se încarcă...
Pagina se încarcă...
Pagina se încarcă...
Pagina se încarcă...
Pagina se încarcă...
Pagina se încarcă...
Pagina se încarcă...
Pagina se încarcă...
Pagina se încarcă...
Pagina se încarcă...
Pagina se încarcă...
Pagina se încarcă...
Pagina se încarcă...
Pagina se încarcă...
Pagina se încarcă...
Pagina se încarcă...
Pagina se încarcă...
Pagina se încarcă...
Pagina se încarcă...
Pagina se încarcă...
Pagina se încarcă...
Pagina se încarcă...
Pagina se încarcă...
Pagina se încarcă...
Pagina se încarcă...
Pagina se încarcă...
Pagina se încarcă...
Pagina se încarcă...
Pagina se încarcă...
Pagina se încarcă...
Pagina se încarcă...
Pagina se încarcă...
Pagina se încarcă...
Pagina se încarcă...
Pagina se încarcă...
-
 1
1
-
 2
2
-
 3
3
-
 4
4
-
 5
5
-
 6
6
-
 7
7
-
 8
8
-
 9
9
-
 10
10
-
 11
11
-
 12
12
-
 13
13
-
 14
14
-
 15
15
-
 16
16
-
 17
17
-
 18
18
-
 19
19
-
 20
20
-
 21
21
-
 22
22
-
 23
23
-
 24
24
-
 25
25
-
 26
26
-
 27
27
-
 28
28
-
 29
29
-
 30
30
-
 31
31
-
 32
32
-
 33
33
-
 34
34
-
 35
35
-
 36
36
-
 37
37
-
 38
38
-
 39
39
-
 40
40
-
 41
41
-
 42
42
-
 43
43
-
 44
44
-
 45
45
-
 46
46
-
 47
47
-
 48
48
-
 49
49
-
 50
50
-
 51
51
-
 52
52
-
 53
53
-
 54
54
-
 55
55
-
 56
56
-
 57
57
-
 58
58
-
 59
59
-
 60
60
-
 61
61
-
 62
62
-
 63
63
-
 64
64
-
 65
65
-
 66
66
-
 67
67
-
 68
68
-
 69
69
-
 70
70
-
 71
71
-
 72
72
-
 73
73
-
 74
74
-
 75
75
-
 76
76
-
 77
77
-
 78
78
-
 79
79
-
 80
80
-
 81
81
-
 82
82
-
 83
83
-
 84
84
-
 85
85
-
 86
86
-
 87
87
-
 88
88
-
 89
89
-
 90
90
-
 91
91
-
 92
92
-
 93
93
-
 94
94
-
 95
95
-
 96
96
-
 97
97
-
 98
98
-
 99
99
-
 100
100
-
 101
101
-
 102
102
-
 103
103
-
 104
104
-
 105
105
-
 106
106
-
 107
107
-
 108
108
-
 109
109
-
 110
110
-
 111
111
-
 112
112
-
 113
113
-
 114
114
-
 115
115
-
 116
116
-
 117
117
-
 118
118
-
 119
119
-
 120
120
-
 121
121
-
 122
122
-
 123
123
-
 124
124
-
 125
125
-
 126
126
-
 127
127
-
 128
128
-
 129
129
-
 130
130
-
 131
131
-
 132
132
-
 133
133
-
 134
134
-
 135
135
-
 136
136
-
 137
137
-
 138
138
-
 139
139
-
 140
140
-
 141
141
-
 142
142
-
 143
143
-
 144
144
-
 145
145
-
 146
146
-
 147
147
-
 148
148
-
 149
149
-
 150
150
-
 151
151
-
 152
152
-
 153
153
-
 154
154
-
 155
155
-
 156
156
-
 157
157
-
 158
158
-
 159
159
-
 160
160
-
 161
161
-
 162
162
-
 163
163
-
 164
164
-
 165
165
-
 166
166
-
 167
167
-
 168
168
-
 169
169
-
 170
170
-
 171
171
-
 172
172
-
 173
173
-
 174
174
-
 175
175
-
 176
176
-
 177
177
-
 178
178
-
 179
179
-
 180
180
-
 181
181
-
 182
182
-
 183
183
-
 184
184
-
 185
185
-
 186
186
-
 187
187
-
 188
188
-
 189
189
-
 190
190
-
 191
191
-
 192
192
-
 193
193
-
 194
194
-
 195
195
-
 196
196
-
 197
197
-
 198
198
-
 199
199
-
 200
200
-
 201
201
-
 202
202
-
 203
203
-
 204
204
-
 205
205
-
 206
206
-
 207
207
-
 208
208
-
 209
209
-
 210
210
-
 211
211
-
 212
212
-
 213
213
-
 214
214
-
 215
215
-
 216
216
-
 217
217
-
 218
218
-
 219
219
-
 220
220
-
 221
221
-
 222
222
-
 223
223
-
 224
224
-
 225
225
-
 226
226
-
 227
227
-
 228
228
-
 229
229
-
 230
230
-
 231
231
-
 232
232
-
 233
233
-
 234
234
-
 235
235
-
 236
236
-
 237
237
-
 238
238
-
 239
239
-
 240
240
-
 241
241
-
 242
242
-
 243
243
-
 244
244
-
 245
245
-
 246
246
-
 247
247
-
 248
248
-
 249
249
-
 250
250
-
 251
251
-
 252
252
-
 253
253
-
 254
254
-
 255
255
-
 256
256
-
 257
257
-
 258
258
-
 259
259
-
 260
260
-
 261
261
-
 262
262
-
 263
263
-
 264
264
-
 265
265
-
 266
266
-
 267
267
-
 268
268
-
 269
269
-
 270
270
-
 271
271
-
 272
272
-
 273
273
-
 274
274
-
 275
275
-
 276
276
-
 277
277
-
 278
278
-
 279
279
-
 280
280
-
 281
281
-
 282
282
-
 283
283
-
 284
284
-
 285
285
-
 286
286
-
 287
287
-
 288
288
-
 289
289
-
 290
290
-
 291
291
-
 292
292
-
 293
293
-
 294
294
-
 295
295
-
 296
296
-
 297
297
-
 298
298
-
 299
299
-
 300
300
-
 301
301
-
 302
302
-
 303
303
-
 304
304
-
 305
305
-
 306
306
-
 307
307
-
 308
308
-
 309
309
-
 310
310
-
 311
311
-
 312
312
-
 313
313
-
 314
314
-
 315
315
-
 316
316
-
 317
317
-
 318
318
-
 319
319
-
 320
320
-
 321
321
-
 322
322
-
 323
323
-
 324
324
-
 325
325
-
 326
326
-
 327
327
-
 328
328
-
 329
329
-
 330
330
-
 331
331
-
 332
332


3M Multi-Touch PCAP Displays Manualul utilizatorului
- Tip
- Manualul utilizatorului
în alte limbi
Lucrări înrudite
Alte documente
-
Fujitsu SL 3230T Manual de utilizare
-
Miele APWM 061 Manual de utilizare
-
Miele APWM 002 Manual de utilizare
-
Yamaha RX V3900 - AV Network Receiver Manual de utilizare
-
Yamaha DSP-Z7 Manualul proprietarului
-
Yamaha RX-N600 Manual de utilizare
-
Yamaha RX-V3800 Manualul proprietarului
-
-
 MicroTouch Titanium Solo Rechargeable Trimmer Manual de utilizare
-
Citizen CT-666N Manual de utilizare
