EZVIZ C3W HUSKY AIR Manualul proprietarului
- Tip
- Manualul proprietarului

NL
www.ezvizlife.com
NO
PT
DK
FI
SW
SK
RO
HU


COPYRIGHT ©2018 Hangzhou Hikvision Digital Technology Co., Ltd. or its subsidiaries. ALL RIGHTS
RESERVED.
About this Manual
The Manual includes instructions for using and managing the product. Pictures, charts, images and all
other information hereinafter are for description and explanation only. The information contained in the
Manual is subject to change, without notice, due to firmware updates or other reasons. Please find the
latest version in the ™ website (http://www.ezvizlife.com).
Any and all information, including, among others, wordings, pictures, graphs are the properties
of Hangzhou Hikvision Digital Technology Co., Ltd. or its subsidiaries (hereinafter referred to be
“Hikvision”). This user manual (hereinafter referred to be “the Manual”) cannot be reproduced,
changed, translated, or distributed, partially or wholly, by any means, without the prior written
permission of Hikvision. Unless otherwise stipulated, Hikvision does not make any warranties,
guarantees or representations, express or implied, regarding to the Manual.
Trademarks Acknowledgement
™, ™, and other Hikvision’s trademarks and logos are the properties of Hikvision
in various jurisdictions. Other trademarks and logos mentioned below are the properties of their
respective owners.
Legal Disclaimer
TO THE MAXIMUM EXTENT PERMITTED BY APPLICABLE LAW, THE PRODUCT DESCRIBED, WITH ITS
HARDWARE, SOFTWARE AND FIRMWARE, IS PROVIDED “AS IS”, WITH ALL FAULTS AND ERRORS,
AND HIKVISION MAKES NO WARRANTIES, EXPRESS OR IMPLIED, INCLUDING WITHOUT LIMITATION,
MERCHANTABILITY, SATISFACTORY QUALITY, FITNESS FOR A PARTICULAR PURPOSE, AND NON-
INFRINGEMENT OF THIRD PARTY. IN NO EVENT WILL HIKVISION, ITS DIRECTORS, OFFICERS,
EMPLOYEES, OR AGENTS BE LIABLE TO YOU FOR ANY SPECIAL, CONSEQUENTIAL, INCIDENTAL, OR
INDIRECT DAMAGES, INCLUDING, AMONG OTHERS, DAMAGES FOR LOSS OF BUSINESS PROFITS,
BUSINESS INTERRUPTION, OR LOSS OF DATA OR DOCUMENTATION, IN CONNECTION WITH THE USE OF
THIS PRODUCT, EVEN IF HIKVISION HAS BEEN ADVISED OF THE POSSIBILITY OF SUCH DAMAGES.
TO THE MAXIMUM EXTENT PERMITTED BY APPLICABLE LAW, IN NO EVENT SHALL HIKVISION’S TOTAL
LIABILITY FOR ALL DAMAGES EXCEED THE PURCHASE PRICE THE PRODUCT.
HIKVISION does not undertake any liability for personal injury or property damage, as the result of
product interruption or service termination cause by: a) improper installation or usage other than as
requested; b) the protection of national or public interests; c) Force Majeure; d) yourself or the third
party, including not limitation, using any third party’s products, software, applications, and among
others.
REGARDING TO THE PRODUCT WITH INTERNET ACCESS, THE USE OF PRODUCT SHALL BE WHOLLY AT
YOUR OWN RISKS. HIKVISION SHALL NOT TAKE ANY RESPONSIBILITES FOR ABNORMAL OPERATION,
PRIVACY LEAKAGE OR OTHER DAMAGES RESULTING FROM CYBER ATTACK, HACKER ATTACK, VIRUS
INSPECTION, OR OTHER INTERNET SECURITY RISKS; HOWEVER, HIKVISION WILL PROVIDE TIMELY
TECHNICAL SUPPORT IF REQUIRED.
The purpose of the Products is to provide an adequate warning in the event of illegal encroachment in
certain area; however, the proper installation of the Products will not eliminate, but only reduce, that
accidents will not occur or that there will be no personal injury or property loss as a result. You are
highly recommended to raise your vigilance and strengthen the safety awareness in the daily life.

SURVEILLANCE LAWS VARY BY JURISDICTION. PLEASE CHECK ALL RELEVANT LAWS IN YOUR
JURISDICTION BEFORE USING THIS PRODUCT IN ORDER TO ENSURE THAT YOUR USE CONFORMS
TO THE APPLICABLE LAW. YOU FUTHER AGREE THAT THIS PRODUCT IS ONLY FOR CIVIL USE, AND
HIKVISION SHALL NOT BE LIABLE IN THE EVENT THAT THIS PRODUCT IS USED WITH ILLEGITIMATE
PURPOSES, SUCH AS THIRD PARTY RIGHTS INFRINGEMENT, MEDICAL TREATMENT, SAFETY EQUIPMENT
OR OTHER SITUATIONS WHERE THE PRODUCT FAILURE COULD LEAD TO DEATH OR PERSONAL INJURY,
OR WEAPON OF MASS DESTRUCTION, CHEMINCAL AND BIOLOGICAL WEAPON, NUCLEAR EXPLOSION,
AND ANY UNSAFE NUCLEAR ENERGY USES OR ANTI-HUMANITY USAGES. YOU SHOULD UNDERTAKE ALL
RESPONSIBILITIES FOR LOSSES OR DAMAGES RESULTING FROM THE ABOVE USAGES WHATSOEVER.
IN THE EVENT OF ANY CONFLICTS BETWEEN THE ABOVE AND THE APPLICABLE LAW, THE LATER
PREVAILS.
Regulatory Information
FCC Information
This device complies with Part 15 of the FCC Rules. Operation is subject to the following two
conditions:
(1) This device may not cause harmful interference, and
(2) This device must accept any interference received, including interference that may cause undesired
operation.
Note: This product has been tested and found to comply with the limits for a Class B digital device,
pursuant to Part 15 of the FCC Rules. These limits are designed to provide reasonable protection
against harmful interference in a residential installation. This product generates, uses, and can
radiate radio frequency energy and, if not installed and used in accordance with the instructions, may
cause harmful interference to radio communications. However, there is no guarantee that interference
will not occur in a particular installation. If this product does cause harmful interference to radio
or television reception, which can be determined by turning the equipment off and on, the user is
encouraged to try to correct the interference by one or more of the following measures:
—Reorient or relocate the receiving antenna.
—Increase the separation between the equipment and receiver.
—Connect the equipment into an outlet on a circuit different from that to which the receiver is
connected.
—Consult the dealer or an experienced radio/TV technician for help.
Please take attention that changes or modification not expressly approved by the party responsible for
compliance could void the user’s authority to operate the equipment.
This equipment should be installed and operated with a minimum distance 20cm between the radiator
and your body.
This device complies with Industry Canada licence-exempt RSS standard(s). Operation is subject to
the following two conditions:
(1) this device may not cause interference, and
(2) this device must accept any interference, including interference that may cause undesired
operation of the device.
Under Industry Canada regulations, this radio transmitter may only operate using an antenna of a type
and maximum (or

SAVE THIS MANUAL FOR FUTURE REFERENCE
lesser) gain approved for the transmitter by Industry Canada. To reduce potential radio interference
to other users, the antenna type and its gain should be so chosen that the equivalent isotropically
radiated power (e.i.r.p.) is not more than that necessary for successful communication.
EU Conformity Statement
This product and - if applicable - the supplied accessories too are marked with "CE" and comply
therefore with the applicable harmonized European standards listed under the Radio Equipment
Directive 2014/53/EU, the EMC Directive 2014/30/EU, the RoHS Directive 2011/65/EU.
2012/19/EU (WEEE directive): Products marked with this symbol cannot be disposed of as unsorted
municipal waste in the European Union. For proper recycling, return this product to your local
supplier upon the purchase of equivalent new equipment, or dispose of it at designated collection
points. For more information see: www.recyclethis.info.
2006/66/EC (battery directive): This product contains a battery that cannot be disposed of as
unsorted municipal waste in the European Union. See the product documentation for specific
battery information. The battery is marked with this symbol, which may include lettering to indicate
cadmium (Cd), lead (Pb), or mercury (Hg). For proper recycling, return the battery to your supplier or
to a designated collection point. For more information see: www.recyclethis.info.
Гарантийный срок-1 год
Срок службы-3 года
Производитель:Ханджоу Хиквижн Диджитал Технолоджи(Китай)
Импортер-поставщик в России: ЗАО ''Хиквижн''
Импортер-поставщик в Республике Беларусь:ООО ''Торговый Дом
''АВАНТ-ТЕХНО''
Сайт:www.ezviz.ru
EC DECLARATION OF CONFORMITY
Hereby, Hangzhou Hikvision Digital Technology Co., Ltd. declares that the radio equipment type [CS-CV310] is in
compliance with Directive 2014/53/EU.
The full text of the EC DECLARATION OF CONFORMITY is available at the following web link:
http://www.ezvizlife.com/declaration-of-conformity
.
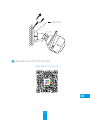
Safety Instruction
Due to the product shape and dimension, the name and address of the importer/manufacturer are printed
on the packa
ge.

1
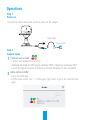
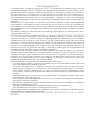
Operations
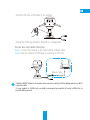
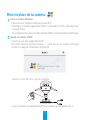
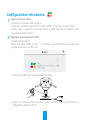
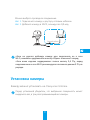
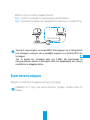
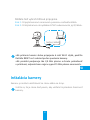
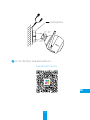
Step 1
Power-on
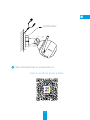
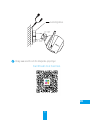
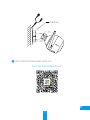
Connect the camera and power socket to power on the camera.
Power Cable
Power Socket
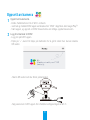
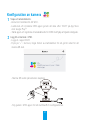
Step 2
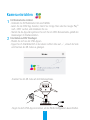
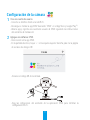
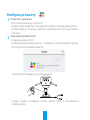
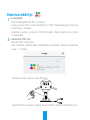
Camera Setup
1
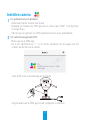
Create an user account.
- Connect your mobile phone to Wi-Fi.
- Download and install the EZVIZ app by searching “EZVIZ” in App Store and Google Play
TM
.
- Launch the app and register an EZVIZ user account following the start-up wizard.
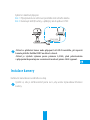
2
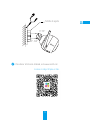
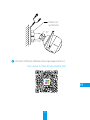
Add a camera to EZVIZ.
- Log in the EZVIZ app.
- On the Home screen, tap “+” on the upper-right corner to go to the scan QR code
page.

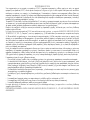
2
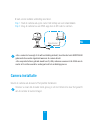
- Scan the QR code on the body of the camera.
- Follow the EZVIZ app wizard to finish Wi-Fi configuration.
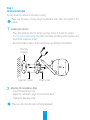
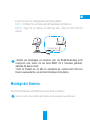
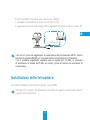
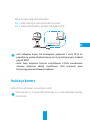
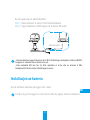
You can also select wired connection.
Step 1: connect the camera to the router with a network cable.
Step 2: add the camera to EZVIZ app by scanning its QR code.
N3
Network Cable
•Hold the RESET button for 5 seconds when camera is running if either adding cameras or Wi-Fi
connection fails.
•If your product is 2.4GHz only, we kindly recommend you switch off router’s 5GHz first to
proceed adding process.

3
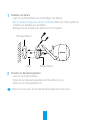
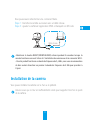
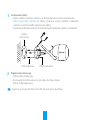
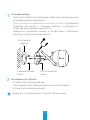
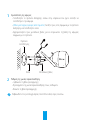
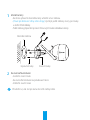
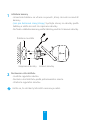
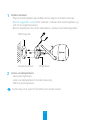
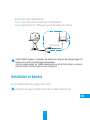
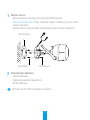
Step 3
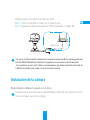
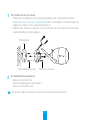
Camera Installation
You can install the camera on the wall or ceiling.
Make sure the wall is strong enough to withstand three times the weight of the
camera.
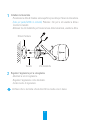
1
Installing the Camera
- Place drill template onto the surface you have chosen to mount the camera.
- (For the cement wall/ceiling only) Drill screw holes according to the template, and
insert three expansion screws.
- Use three metal screws to fix the camera base according to the template.
Mounting
Template
Expansion Screws
Metal Screws
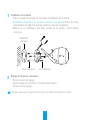
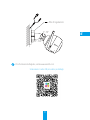
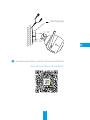
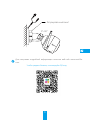
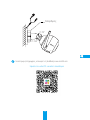
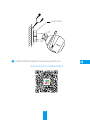
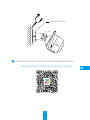
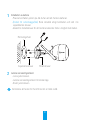
2
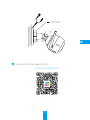
Adjusting the Surveillance Angle
- Loosen the adjusting screw.
- Adjust the surveillance angle as your desired place.
- Tighten the adjusting screw.
Make sure the microSD card slot facing downward.

4
Adjusting Screw
0°-90°
0°-360°
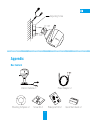
Appendix
Box Content
Internet Camera x1 Power Adapter x1
Mounting Template x1 Screw Kit x1 Waterproof Kit x1 Quick Start Guide x1

5
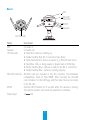
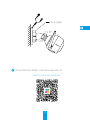
Basics
MicroSD
Card Slot
RESET
MIC
Speaker
LED Indicator
Name Description
MIC For audio in.
Speaker For audio out.
LED Indicator •Solid Red: Camera is starting up.
•Slowly Flashing Red: Wi-Fi connection has failed.
•Fastly Flashing Red: Device exception (e.g. MicroSD card error).
•Solid Blue: Video is being viewed or played back in EZVIZ App.
•Flastly Flashing Blue: Camera is ready for the Wi-Fi connection.
•Slowly Flashing Blue: Camera is running properly.
MicroSD Card Slot MicroSD card not included in the Box Contents. Recommended
compatibility: Class 10, Max.128GB. After inserting the microSD
card, initialize it in the EZVIZ app, and then video files can be stored
in the SD card.
RESET Hold the RESET button for 5 seconds when the camera is running.
The camera restarts, and resets all parameters to default.
Power Input 1A
12V

6
Troubleshooting
Q: “The device is offline.” or “The device is not registered.” prompts when adding
the camera by EZVIZ app.
A: 1. Make sure the network, that the camera is connceted to, is normal and the DHCP
of router is enabled.
2. Hold down the RESET button for 5 seconds to reset the parameters if you
manually changed the network parameters.
Q: How to use the microSD card for local storage?
A: 1. Make sure there is a microSD card inserted and the camera is added to your
EZVIZ account. Log in the EZVIZ app and enter the “Device Details” interface, if
the “Initialize Storage Card” button appears, you need to initialize the microSD
card first.
2. The microSD card recording for the motion detection is enabled by default.
Q: The mobile phone cannot receive alarm prompts when the camera is online.
A: 1. Make sure the EZVIZ app is running on your mobile phone and the Motion
Detection Notification is enabled.
2. For Android system, make sure the app is running in background; and for iOS,
enable the message push function in “Settings > Notification”.
3. If still no alarm prompts, hold down the RESET button for 5 seconds restore the
camera settings.
Q: Live view or playback failed.
A: Make sure your network is well connected. Viewing live video needs a good
bandwidth. You can refresh the video, or change a network and try again.
Q: How to connect to another Wi-Fi?
A: Hold the RESET button on the camera for 5 seconds to reset and restart the camera
and reconnect the Wi-Fi about 1 minute later.
For detailed information, please visit www.ezvizlife.com.

7
Kamera einrichten
1
Ein Benutzerkonto erstellen.
- Verbinden Sie Ihr Mobiltelefon mit einem WLAN.
- Laden Sie die EZVIZ-App herunter, indem Sie im App Store oder bei Google Play
TM
nach „EZVIZ“ suchen, und installieren Sie sie.
- Starten Sie die App und registrieren Sie sich für ein EZVIZ-Benutzerkonto gemäß den
Anweisungen im Startassistenten.
2
Eine Kamera zu EZVIZ hinzufügen.
- Melden Sie sich bei der EZVIZ-App an.
- Tippen Sie im Startbildschirm in der oberen rechten Ecke auf „+“, um auf die Seite
zum Scannen des QR-Codes zu gelangen.
- Scannen Sie den QR-Code auf dem Kameragehäuse.
- Folgen Sie dem EZVIZ-App-Assistenten, um die WLAN-Konfiguration abzuschließen.

8
Sie können auch eine kabelgebundene Verbindung wählen.
Schritt 1: Schließen Sie die Kamera über Netzwerkkabel am Router an.
Schritt 2: Fügen Sie die Kamera zur EZVIZ-App hinzu, indem Sie ihren QR-Code
scannen.
Netzwerkkabel
N3
•Sollten das Hinzufügen von Kameras oder die WLAN-Verbindung nicht
erfolgreich sein, halten Sie die Taste RESET für 5 Sekunden gedrückt,
während die Kamera läuft.
•Falls Ihr Produkt nur 2,4 GHz ist, empfehlen wir, zunächst die 5 GHz des
Routers auszuschalten, um mit dem Hinzufügen fortzufahren.
Montage der Kamera
Sie können die Kamera an der Wand oder an der Decke installieren.
Stellen Sie sicher, dass die Wand das Dreifache des Kameragewichts aushalten kann.

9
1
Installation der Kamera
- Legen Sie die Bohrschablone auf den Montageort der Kamera.
- (Nur für gemauerte/gegossene Decken und Wände) Bohren Sie Löcher gemäß der
Schablone zur Aufnahme von drei Dübeln.
- Befestigen Sie die Schablone der Kamera mit drei Schrauben.
Montageschablone
Dübel
Metallschrauben
2
Einstellen des Überwachungswinkels
- Lösen Sie die Einstellschraube.
- Stellen Sie den Überwachungswinkel nach Ihren Wünschen ein.
- Ziehen Sie die Einstellschraube fest.
Stellen Sie sicher, dass der microSD-Kartensteckplatz nach unten zeigt.

10
Einstellschraube
0° - 90°
0° - 360°
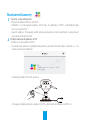
Nähere Informationen finden Sie auf www.ezvizlife.com.
Scannen Sie den QR-Code, um mehr zu erfahren.

11
Configuración de la cámara
1
Cree una cuenta de usuario.
- Conecte su teléfono móvil a la red Wi-Fi.
- Descargue e instale la app EZVIZ buscando “EZVIZ” en el App Store y Google Play
TM
.
- Abra la app y registre una cuenta de usuario de EZVIZ siguiendo las instrucciones
del asistente de instalación.
2
Agregue una cámara a EZVIZ.
- Inicie sesión en la app EZVIZ.
- En la pantalla de inicio, toque “+” en la esquina superior derecha para ir a la página
de escaneo de códigos QR.
- Escanee el código QR de la cámara.
- Siga las indicaciones del asistente de la aplicación EZVIZ para terminar la
configuración Wi-Fi.

12
También puede seleccionar la conexión por cable.
Paso 1: conecte la cámara al router con un cable de red.
Paso 2: agregue la cámara a la aplicación EZVIZ escaneando el código QR.
N3
Cable de red
•Si ocurre un fallo al añadir cámaras o al conectarse a una red Wi-Fi, mantenga pulsado
el botón RESET (Restablecer) durante 5 segundos con la cámara en funcionamiento.
•Si su producto es solo de 2,4 GHz, le recomendamos que primero desactive la banda de
5 GHz del enrutador para seguir con el proceso de conexión.
Instalación de la cámara
Puede instalar la cámara en la pared o en el techo.
Asegúrese de que la pared sea lo suficientemente resistente para soportar un peso
tres veces mayor que el de la cámara.

13
1
Instalación de la cámara
- Coloque la plantilla de perforación sobre la superficie escogida para el montaje
de la cámara.
- (Solo para montaje en paredes de cemento/techos) Taladre orificios para tornillos
usando la plantilla e inserte tres tornillos de expansión.
- Utilice 3 tornillos de metal para fijar la base de la cámara, según la plantilla.
Plantilla de
montaje
Tornillos de expansión
Tornillos metálicos
2
Ajuste del ángulo de vigilancia
- Afloje el tornillo de ajuste.
- Ajuste el ángulo de la cámara en el punto deseado.
- Apriete el tornillo de ajuste.
Asegúrese de que la ranura para tarjetas microSD esté orientada hacia abajo.

14
Tornillo de ajuste
0°-90°
0°-360°
Para obtener información detallada, visite www.ezvizlife.com.
Escanee el código QR para ver más.

15
Mise en place de la caméra
1
Créer un compte utilisateur.
- Connectez votre téléphone mobile au réseau Wi-Fi.
- Téléchargez et installez l’application EZVIZ en recherchant « EZVIZ » dans l’App Store
ou Google Play
TM
.
- Lancez l’application et créez un compte utilisateur EZVIZ en suivant l’assistant de démarrage.
2
Ajouter une caméra à EZVIZ
- Connectez-vous dans l’application EZVIZ.
- Sur l’écran d’accueil, touchez le bouton « + » situé dans le coin supérieur droit pour
accéder à la page de numérisation du code QR.
- Scannez le code QR sur le corps de la caméra.
- Suivez l'assistant de l'application EZVIZ pour terminer la configuration Wi-Fi.
Pagina se încarcă...
Pagina se încarcă...
Pagina se încarcă...
Pagina se încarcă...
Pagina se încarcă...
Pagina se încarcă...
Pagina se încarcă...
Pagina se încarcă...
Pagina se încarcă...
Pagina se încarcă...
Pagina se încarcă...
Pagina se încarcă...
Pagina se încarcă...
Pagina se încarcă...
Pagina se încarcă...
Pagina se încarcă...
Pagina se încarcă...
Pagina se încarcă...
Pagina se încarcă...
Pagina se încarcă...
Pagina se încarcă...
Pagina se încarcă...
Pagina se încarcă...
Pagina se încarcă...
Pagina se încarcă...
Pagina se încarcă...
Pagina se încarcă...
Pagina se încarcă...
Pagina se încarcă...
Pagina se încarcă...
Pagina se încarcă...
Pagina se încarcă...
Pagina se încarcă...
Pagina se încarcă...
Pagina se încarcă...
Pagina se încarcă...
Pagina se încarcă...
Pagina se încarcă...
Pagina se încarcă...
Pagina se încarcă...
Pagina se încarcă...
Pagina se încarcă...
Pagina se încarcă...
Pagina se încarcă...
Pagina se încarcă...
Pagina se încarcă...
Pagina se încarcă...
Pagina se încarcă...
Pagina se încarcă...
Pagina se încarcă...
Pagina se încarcă...
Pagina se încarcă...
Pagina se încarcă...
Pagina se încarcă...
Pagina se încarcă...
Pagina se încarcă...
Pagina se încarcă...
Pagina se încarcă...
Pagina se încarcă...
Pagina se încarcă...
Pagina se încarcă...
Pagina se încarcă...
Pagina se încarcă...
Pagina se încarcă...
Pagina se încarcă...
Pagina se încarcă...
Pagina se încarcă...
Pagina se încarcă...
Pagina se încarcă...
Pagina se încarcă...
Pagina se încarcă...
Pagina se încarcă...
Pagina se încarcă...
Pagina se încarcă...
Pagina se încarcă...
Pagina se încarcă...
Pagina se încarcă...
Pagina se încarcă...
-
 1
1
-
 2
2
-
 3
3
-
 4
4
-
 5
5
-
 6
6
-
 7
7
-
 8
8
-
 9
9
-
 10
10
-
 11
11
-
 12
12
-
 13
13
-
 14
14
-
 15
15
-
 16
16
-
 17
17
-
 18
18
-
 19
19
-
 20
20
-
 21
21
-
 22
22
-
 23
23
-
 24
24
-
 25
25
-
 26
26
-
 27
27
-
 28
28
-
 29
29
-
 30
30
-
 31
31
-
 32
32
-
 33
33
-
 34
34
-
 35
35
-
 36
36
-
 37
37
-
 38
38
-
 39
39
-
 40
40
-
 41
41
-
 42
42
-
 43
43
-
 44
44
-
 45
45
-
 46
46
-
 47
47
-
 48
48
-
 49
49
-
 50
50
-
 51
51
-
 52
52
-
 53
53
-
 54
54
-
 55
55
-
 56
56
-
 57
57
-
 58
58
-
 59
59
-
 60
60
-
 61
61
-
 62
62
-
 63
63
-
 64
64
-
 65
65
-
 66
66
-
 67
67
-
 68
68
-
 69
69
-
 70
70
-
 71
71
-
 72
72
-
 73
73
-
 74
74
-
 75
75
-
 76
76
-
 77
77
-
 78
78
-
 79
79
-
 80
80
-
 81
81
-
 82
82
-
 83
83
-
 84
84
-
 85
85
-
 86
86
-
 87
87
-
 88
88
-
 89
89
-
 90
90
-
 91
91
-
 92
92
-
 93
93
-
 94
94
-
 95
95
-
 96
96
-
 97
97
-
 98
98


EZVIZ C3W HUSKY AIR Manualul proprietarului
- Tip
- Manualul proprietarului
în alte limbi
- français: EZVIZ C3W HUSKY AIR Le manuel du propriétaire
- slovenčina: EZVIZ C3W HUSKY AIR Návod na obsluhu
- italiano: EZVIZ C3W HUSKY AIR Manuale del proprietario
- dansk: EZVIZ C3W HUSKY AIR Brugervejledning
- português: EZVIZ C3W HUSKY AIR Manual do proprietário
Lucrări înrudite
Alte documente
-
Hikvision DS-2XS2T41G1-ID/4G Ghid de inițiere rapidă
-
-
-
-
-
-
imou H.265 Manualul utilizatorului
-
-
Hikvision DS-KV9503-WBE1 Manualul utilizatorului
-
Hikvision DS-2CE16U1T-IT1F Ghid de inițiere rapidă