Samsung AX60R5080WD/EU Manual de utilizare

Categorie
Purificatoare de aer
Tip
Manual de utilizare

Acest manual este potrivit și pentru

Air Purifier
User manual
AX60R5080WD / AX60T5080WF
Thank you for purchasing this Samsung air purifier.
Before operating this unit, please read this user manual carefully and retain it for future reference.
2
Contents
Package Content 3
Accessories / Product specifications 3
At a Glance 4
At a Glance / General 4
Display and buttons 5
Removing the filter 6
Assembling the filter 7
Operation Features 10
Turning the power on/off / Controlling the fan speed 10
Sleep mode / Timed on/off function / Display lighting 11
Turning the Wi-Fi feature on/off / Clearing the filter replacement reminder / Lock function 12
Checking the air quality 13
Cleaning and Maintenance 14
Cleaning the air purifier exterior 14
Cleaning and drying the filter 15
SmartThings app 16
SmartThings app 16
Appendix 20
Before Requesting Service 20
Safety Precautions 23
Reference
28
Correct Disposal of This Product
(Waste Electrical & Electronic Equipment)
(Applicable in countries with separate collection systems)
This marking on the product, accessories or literature indicates that the product and its electronic accessories
(e.g. charger, headset, USB cable) should not be disposed of with other household waste at the end of
their working life. To prevent possible harm to the environment or human health from uncontrolled waste
disposal, please separate these items from other types of waste and recycle them responsibly to promote the
sustainable reuse of material resources.
Household users should contact either the retailer where they purchased this product, or their local
government office, for details of where and how they can take these items for environmentally safe recycling.
Business users should contact their supplier and check the terms and conditions of the purchase contract. This
product and its electronic accessories should not be mixed with other commercial wastes for disposal.
For information on Samsung’s environmental commitments and product-specific regulatory obligations,
e.g. REACH, WEEE, Batteries, visit: www.samsung.com/uk/aboutsamsung/sustainability/environment/our-
commitment/data/
3
Package Content
Package Content
Accessories
2-in-1 filter 1EA
(Deodorization Filter+Dust
Collecting Filter)
Pre-filter
1 EA
User manual 1 EA
Product specifications
The product dimensions are based on the maximum dimensions. They may vary depending on the
measurement position.
The product design and specifications are subject to change without prior notice for quality improvement.
Model name
Dimensions
(width × height × depth)
Area coverage
AX60R5080WD / AX60T5080WF 360 mm x 783 mm x 293 mm 60 m²
Package Content
4
At a Glance
General
08
11
01
02
03
09
10
06
07
04
12
05
At a Glance
01
Air outlet (top)
02
Display and buttons
03
Display lighting
04
Filter holder
05
Air inlet / Front panel
06
Handle (rear side)
07
Dongle mount
This model is provided with integrated Wi-Fi
connectivity and does not require an external
dongle to use this function.
08
Air outlet (side)
09
Laser PM sensor
10
Gas sensor
11
2-in-1 filter(Deodorization Filter+Dust Collecting
Filter)
12
Pre-filter
At a Glance
5
At a Glance
Display and buttons
08 09 1310 1211
03 04
05
06
01 07
02
01
Current fan speed
02
PM10 / PM2.5 / PM1.0 pollution / Concentration /
Timer indicator
03
Air quality indicator
04
Gas pollution indicator
05
Filter replacement indicator
06
Wi-Fi function indicator
07
Lock indicator
08
Power button
09
Fan speed button
10
Sleep mode /
Wi-Fi On or Off button
11
Timed on/off button
12
Lighting / Filter reset button
13
Air quality / Lock button
NOTE
PM10: Dust in the air with a diameter of 10 ㎛ or less
Fine particles with about 1/5 of the diameter
of a human hair
PM2.5: Dust in the air with a diameter of 2.5 ㎛
or less
Fine particles with about 1/20 of the diameter
of a human hair
PM1.0: Dust in the air with a diameter of 1.0
or less
Fine particles with about 1/50 of the diameter
of a human hair
* Diameter of a human hair: 50 to 70 ㎛
Bixby is the name of a Samsung AI solution and allows you to control the product with voice. To use the
voice recognition function, you must connect the SmartThings app on your smartphone to the product.
If the product does not support voice recognition directly, you can only control some functions using
Bixby on your Samsung smartphone.
NOTE
Bixby only supports some languages, and the supported functions may differ depending on the
geographical area.
6
At a Glance
Removing the filter
When using the 2-in-1 filter for the first time or replacing them with a new set, remove the vinyl
packaging first.
STEP 1 Remove the front panel.
Use your thumbs to press on the top of the product
and pull the front panel forward with other fingers.
STEP 2 Remove the pre-filter.
STEP 3 Release the 2-in-1 filter.

release the filter.
STEP 4 Remove the 2-in-1 filter.
STEP 5 Remove the vinyl packaging from the filter.
At a Glance
7
At a Glance
Assembling the filter
STEP 1 Place the 2-in-1 filter.
Let the filter sit inside the grooves at the
bottom.
Check the insert direction before placing the
filter.
STEP 2 Secure the 2-in-1 filter.
Rotate the filter holder 90° clockwise to hold
the filter in place.
STEP 3 Place the pre-filter.
STEP 4 Place the front panel.
First, insert the hook on the panel into the groove at
the bottom of the product.
01
02
01
02
03
01
02
8
At a Glance
At a Glance
STEP 5 Before using new filter, reset the filter
replacement reminders.
Press and hold the Lighting [
] button for
3 seconds or longer.
NOTE
The product is not as effective when it is operated without filter.
You may notice a subtle odour from fresh filter when using your newly purchased air purifier for the first
time,
which will disappear naturally in about a day.
Keep the windows and doors closed whenever you can while the product is running. Ventilate the air
regularly to avoid high concentration of carbon dioxide when you keep the room enclosed for a duration
of time. When the filter have a weak smell, regular ventilation also reduces the smell.
Carbon monoxide (CO) is a harmful gas that cannot be removed by the filter and usually comes from an
outdoor origin.
The frequency of filter cleaning and replacement may vary depending on the operating environment.
Tips for using the 2-in-1 filter
Operating the product without filter may cause abnormal air noise.
Be sure to use the product with the 2-in-1 filter.
In a room with persisting odours, using the product after ventilating the room first allows more effective
odour control.
Operating the product while cooking food that has a strong odour may cause the deodorization filter
to smell, and early replacement may be necessary.
If you operate the product after it has been unused for 2 weeks or more, or if there is a smell, run a cleaning
operation by running the product in a well-ventilated space at the High fan speed for 4 hours or more, or
dry the filter in the sunlight for 4 hours or more. This can help remove odours from the filter.
The filter replacement reminder generates an alert when the maximum filter operation time has been
reached based on the product uptime.
The frequency of filter cleaning and replacement may vary depending on the operating environment.
Do not wash the 2-in-1 filter with water. When using the product, be sure to keep the filter away from
water.
9
At a Glance
The replacement cycle of the 2-in-1 filter can be between 6 months to 1 year, provided that the product
operates 24 hours every day.
(Filter can be used longer when the duration of product operation is shorter.) Filter life depends on the air
quality.
The life span of filter may shorten depending on the usage environment, the frequency of use, and the
amount of contaminants adsorbed.
The indicator illuminates to notify when the filter need to be replaced. However, replace them regardless
of the indicator status if they are visually dirty or smell, or if the output air flow is noticeably slowing down.
The dust collecting filter is a high performance filter that removes fine particles in the air such as
particulate matter (PM) and cigarette smoke particles.
The deodorization filter is a high-performance active carbon (charcoal) filter, effectively controlling
household odours from a toilet, food, and such.
If the filter begin to smell when you operate the product due to absorbed odourants or heavy use, they
are no longer usable and need to be replaced.
The 2-in-1 filter is a comsumable material, and even if the warranty period is free, replacement of filter
that occurs during use will be charged.
You can purchase new replacement filter from a Samsung Service Centre.
10
Operation Features
Operation Features
Turning the power on/off
Press the Power button. The air purifier turns on with a
notification sound and automatically begins operation.
Sensor preparation begins upon startup with a display
indication and continues for 12 seconds. The air quality is
then indicated by colour and the concentration level.
Coloured air quality indicator: PM10, PM2.5 and PM1.0
levels, and gas
pollution display: PM10, PM2.5, PM1.0
Sensor loading display
When you turn off the power and turn it back on, the
product operates at the last fan speed you used.
Controlling the fan speed
Use the button to select the intensity of air flow to purify the
indoor air.
Press the Fan speed [
] button to change between the
options.
Each time you press the button, the fan speed changes in

In Auto mode, the fan speed is automatically adjusted to the
particle and odour levels around it to keep the room clean.
Operation Features
11
Operation Features
Sleep mode
Sleep mode provides a clean, quiet and comfortable room for
a good night's sleep.
Use Sleep mode to only allow the mode indicator and turn
off all other display indicators.
Changing the fan speed when Sleep mode has been active
for 10 seconds or more will cancel the mode and the sensor
loading display will appear.
(See ‘Sensor loading display’ on page 10.)
Lock feature becomes unavailable while Sleep mode is on.
Cancel
Press the Sleep mode [
] button or Fan speed [ ]
button.
Timed on/off function
The product automatically turns off after a specified duration.

Timed on/off [
] button when the product is powered on.
Time can be adjusted by hour.
Timed off is scheduled 3 seconds after selecting the desired
operating hours.
Cancel
Press and hold the Timed on/off [
] button for at least
 ] button to set the
timer to .
Display lighting
The air quality is displayed in pleasantly dimmed colour
lighting.
It reflects the PM10, PM2.5, PM1.0 or gas pollution level,
whichever is the worst.
Colours do not apply when using the product in Sleep mode.
Cancel
Press the Lighting [
] button.
12
Operation Features
Operation Features
Turning the Wi-Fi feature on/off
You can turn the Wi-Fi feature on or off.
Press and hold the Sleep mode [ ] button for 3 seconds
or more to turn the Wi-Fi on or off.
To use this feature, first register the product to Samsung
SmartThings app. Once connected, the Wi-Fi icon will
automatically light up.
The Wi-Fi icon only lights up when the product is
connected to SmartThings app.
About connecting to SmartThings app, see page 16.
Clearing the filter replacement reminder
This feature notifies when to replace the 2-in-1 filter
(Deodorization Filter+Dust Collecting Filter).
If you hear a beep and the filter replacement indicator
[ ] lights up while the product is in use, replace the
filter and press the Lighting [ 
more to reset. The replacement reminder turns off after [
] blink twice with the notification sound.
Likewise, if the filter have been replaced before [
]
activation for other reasons, reset the status by pressing
the Lighting [ ] button for longer than 3 seconds.
After resetting the filter, press the Lighting [
] button
to reset this feature as well.
CAUTION
The filter change indicator may not work properly if you
continue to use old filter without replacement or perform
the reset process without filter.
Lock function
Use this feature to lock all buttons and prevent unintended
button operation, especially by children.
Press and hold the Air quality [ ] button for 3 seconds or more
to activate this feature, which locks all buttons after a beep.
All buttons become inaccessible while Lock feature is on.
Cancel
Press and hold the Air quality
[ ]
button for 3 seconds or
more. The feature is released after a beep.
13
Operation Features
Checking the air quality
You can review the current air quality from the display panel with the colour (reflecting the PM10 / PM2.5 /
PM1.0 / gas pollution) and the concentration level indicators.
By default, the colour and PM10 / PM2.5 / PM1.0 level indicators reflect the PM10 concentration.
Each time you press the Air quality [ ]
The PM2.5 and PM1.0 levels are displayed for 10 seconds, before automatically changes to the PM10 level.
The air quality will be ‘Very Poorwhen the PM2.5 / PM1.0 levels are worse than the PM10 level.
If the concentration levels are same for all PM groups, the indicator will reflect the PM10 level
.
Air quality levels
Pollution level PM10 level (/m³) PM2.5 / PM1.0 level (/m³) Gas pollution level
Very poor Red 151 and over 76 and over 4
Poor Yellow 81 - 150 36 - 75 3
Moderate Green 31 - 80 16 - 35 2
Good Blue 30 and below 15 and below 1
PM10, PM2.5 and PM1.0 measurement will be displayed in numbers 05 – 999.
NOTE
The dust concentration may vary depending on the environmental conditions (for example, when the
product is near a construction site, road, or fabric sofa, or when a vacuum cleaner is used or bedding and
clothes are arranged near the product, etc.).
The following conditions may cause temporarily high readings of PM level:
When the product is used near fur rugs or used in vets, clothes stores, or other places prone to high
humidity, smoke or infestation
When humidifiers, electric pressure cookers, sprayers and such are being used in the same room
When the product is used where there is inflow of outside air with dust or other types of air pollution (e.g.
proximity to the building’s HVAC or ventilation systems, or loose window frames)
The gas pollution reading can be affected by odorous household items such as air fresheners, deodorants
and detergents.
If you are using more than one air purifier in the same room, the dust concentration reading on each unit
may not be same as they affect air circulation. The dust concentration reading may vary depending on
the sensor or product being used.
If there is no change in the intensity of gas (odour), it may not be reflected in the gas pollution reading
even though you can clearly smell it.
PM levels on the display may differ from the official forecasts.
Nearby electromagnetic waves or electrical noises may cause temporarily high readings of PM level.
14
Cleaning and Maintenance
Cleaning the air purifier exterior
Dampen a soft cloth with lukewarm water and wring it out, and then wipe the product exterior with it.
Wipe the grooves on the front panel with a cotton swab.
If it is too hard to clean the dust from the front panel, remove the panel and wash it with water.
CAUTION
Do not wipe the product with an alkaline detergent.
Do not wipe the product surface with sulphuric acid, hydrochloric acid, or organic solvents (thinner,
kerosene, acetone, etc.). Do not attach a sticker to the product. Failure to do so may result in damage to
the product surface.
Cleaning the sensors
If there is dust or foreign substance on a sensor,
use a vacuum cleaner to clean the sensor and its
surrounding.
CAUTION
Do not put any dust into the sensor openings.
Cleaning and Maintenance
Be sure to disconnect the power plug from the socket before cleaning the product.
15
Cleaning and Maintenance
Cleaning and drying the filter
NOTE
About removing/assembling the filter, see pages 6 and 7.
Cleaning the pre-filter
Depending on the dust accumulation, first remove dust
with a vacuum cleaner and gently wash the filter with a
pH-neutral detergent diluted in lukewarm water.
Cleaning interval: 2 weeks (when using the
product 24 hours every day)
CAUTION
Cleaning the pre-filter by rubbing with a brush or a
similar tool may damage the superfine fibres.
Drying the filter
Keep the filter in the shade until completely dry and
away from direct sunlight.
16
SmartThings app
To use the SmartThings app, connect the product to the network in the sequence described below.
The images shown may differ depending on your smartphone model, OS version and manufacturer.
You need to set up the Wi-Fi access point only when connecting the product to a Wi-Fi network. Once the
product is connected, you can use the SmartThings app via Wi-Fi, 3G, LTE or more wireless networks.
SmartThings app
1
Checking the power connections
Check if the power is connected to the product and
the access point.
2
Setting up and connecting to a Wi-Fi
access point using your smartphone
1
To connect the product to a Wi-Fi network,
turn on Wi-Fi at "Settings > Wi-Fi", and then
select the access point to connect to
Only alphanumeric characters are supported
for wireless access point names (SSIDs). If an
SSID has a special character, rename it before
connecting to it.
This product supports only Wi-Fi 2.4 GHz.
SAMSUNG_2G
SAMSUNG_5G
Select
On
2
Turning off "SMART NETWORK SWITCH" at
"Settings > Wi-Fi" on your Smartphone
If "SMART NETWORK SWITCH" or "Adaptive Wi-Fi"
is turned on, you cannot connect to the network.
Be sure to turn off these functions before
connecting to the network.
Off
Off
NOTE
The setup may differ depending on your
smartphone model, OS version and manufacturer.
3
Checking the Internet connectivity
After connecting to Wi-Fi, check that your
smartphone is connected to the Internet.
NOTE
A firewall may prevent your smartphone from
connecting to the Internet. Contact your Internet
service provider for troubleshooting.
3
Downloading the SmartThings
app and registering your Samsung
account
1
Downloading the SmartThings app
Search for "SmartThings" on Play Store or App
Store, and download the SmartThings app to
your smartphone.
If the SmartThings app is already installed on
your smartphone, update it to the latest version.
SmartThings (Samsung Connect)
Samsung Electronics Co., Ltd.
NOTE
For the tablets that are not supported by the
SmartThings app and the smart phones that has
an OS version earlier than the recommended
versions, the SmartThings app may not be found.
Android OS 6.0 or later (with at least 2 GB
RAM) is recommended.
Supported screen resolutions: 1280 x 720
(HD), 1920 x 1080 (FHD), 2560 x 1440 (WQHD)
The SmartThings app is not compatible with
some Apple devices including iPad and some
smartphones.
iPhone 6 or later with iOS 10.0 or later is
supported.
Supported screen resolutions: 1334x750,
1920x1080
The SmartThings app may change without
prior notice to improve product usability and
performance.
SmartThings app
17
SmartThings app
2
Registering your Samsung account
A Samsung account is required to use the
SmartThings app. To create your Samsung
account and log in to your account, follow the
instructions displayed on the SmartThings app.
You do not need to install an additional app.
NOTE
If you already have a Samsung account, log in
to the account. If you have a smartphone that
is a Samsung device and you have a Samsung
account, your smartphone is automatically
logged in to your account.
If you log in from a smartphone produced for
other country, you need to log in with its country
code when you create your Samsung account,
and the SmartThings app may not be used on
some smartphones.
4
Connecting the SmartThings app
to your product
1
Selecting the product to connect to
1) Start the SmartThings app about one minute
after turning on the product to connect to.
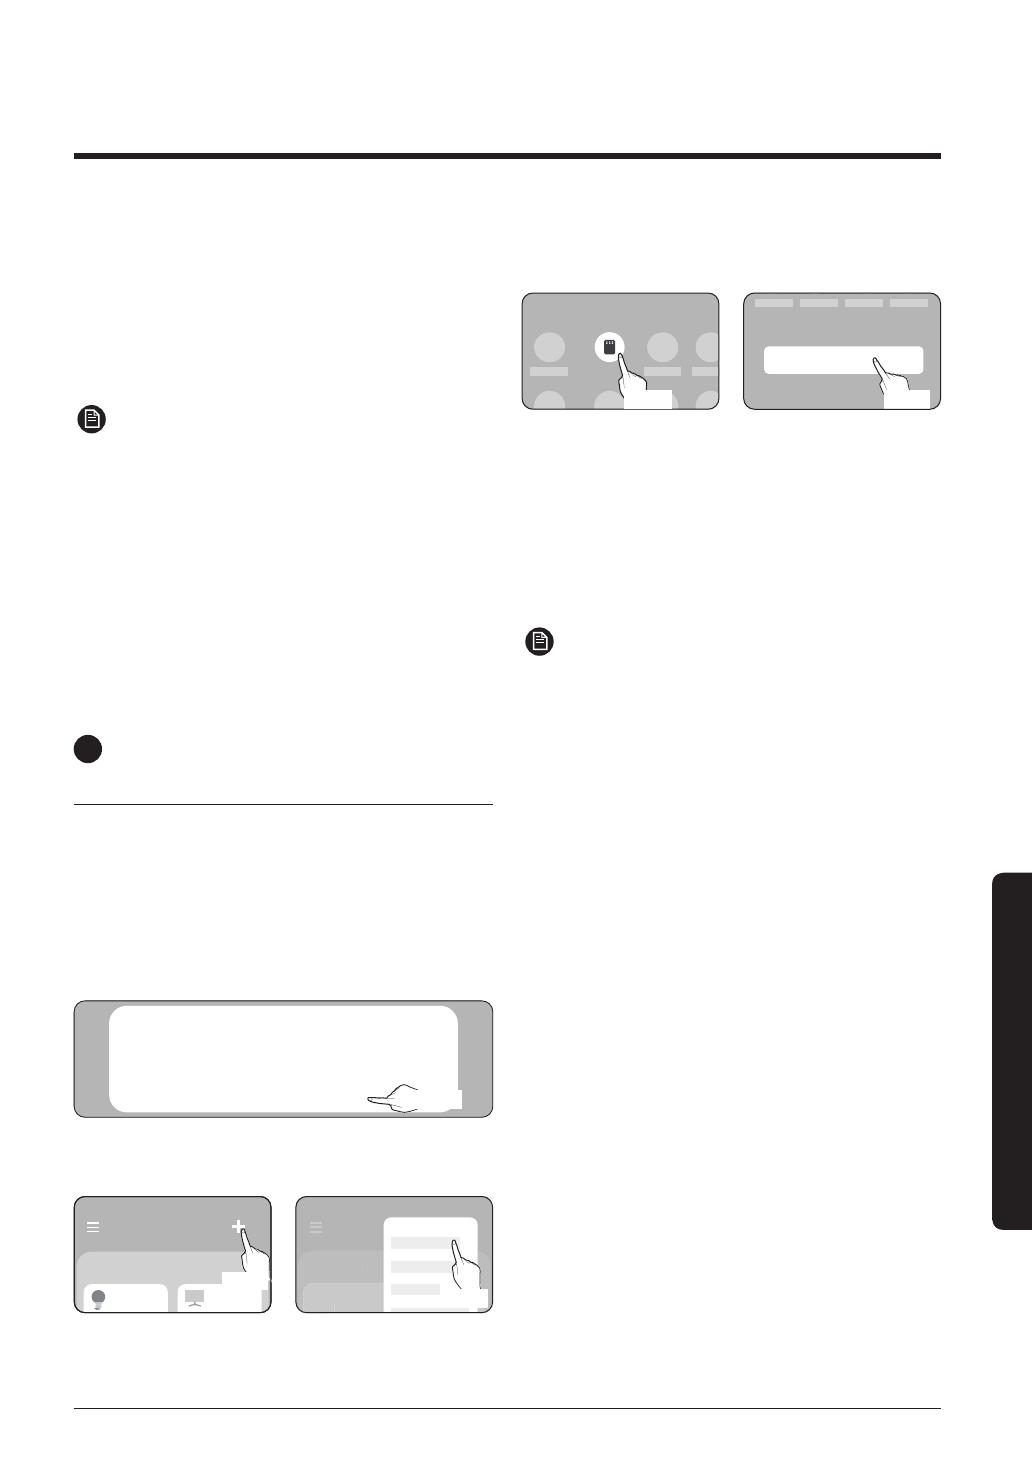
2) After the SmartThings app is started, select
ADD NOW’ when a pop-up window saying that a
product to connect to is found appears.
A new device has been found.
Add this device to
SmartThings?
Never Later
Add now
선택
Select
3) If the pop-up window does not appear, select "+",
and then "Add Devices."
My home
Living room >
My home
Living room
>
Add devices
Select
Select
You can add a product you want to connect to by
selecting it manually or by selecting "Auto detect".
Select manually: Samsung > Air purifier
Auto detect: [Air purifier] Samsung
Auto detect
Select
Air purifier
Samsung
Select
2
Connecting the SmartThings app to your
product
Follow the instructions displayed on the
SmartThings app to connect to your product.
For information on how to use the SmartThings
app, select the How To menu on the app.
NOTE
If any pop-window appears on the top of the
smartphone while connecting to your product, do
not select it.
If a pop-up window saying that the device is
already registered appears during connecting
to your product, get permission using "REQUEST
PERMISSION" from a user already connected
to the product, or create a new account using
"REGISTER MY ACCOUNT" to independently
connect to the product.
If a Samsung account-related country error
occurs during connecting to your product, log
out of your current Samsung account, log in
to your previous Samsung account, and then
delete all devices that have been connected
previously. Then, log in to your current
Samsung account again, and then configure the
settings.
If a failure message appears while adding a
device, see "Setting up and connecting to a Wi-Fi
access point using your smartphone" on page
16. The connection may fail temporarily due
to an installation location problem of the access
point or other problems.
If a message appears on the SmartThings app,
follow its instructions.
18
SmartThings app
SmartThings app
NOTE
For the security protocols for wireless/wired
access points, WPA-PSK and WPA2-PSK are
recommended. For the authentication methods,
AES is recommended. New Wi-Fi authentication
specifications and Wi-Fi nonstandard
authentication methods are not supported.
The product supports the IEEE802.11 b/g/n
(2.4 GHz) communication protocol. (Samsung
recommends IEEE802.11n.)
If your Internet service provider permanently
have registered the MAC address (a unique
identification number) of your PC or modem, you
may not be able to connect your product to the
Internet. Contact your Internet service provider
and ask how to connect devices other than your
PC (such as an air conditioner and an air purifier)
to the Internet.
Open Source Announcement
The software included in this product contains open
source software. You may obtain the complete
corresponding source code for a period of three years
after the last shipment of this product by sending an
email to mailto:oss[email protected]om.
It is also possible to obtain the complete
corresponding source code in a physical medium such
as a CD-ROM; a minimal charge will be required.
The following URL http://opensource.samsung.com/
opensource/SMART_AT_051/seq/0 leads to the
download page of the source code made available
and open source license information as related to
this product. This offer is valid to anyone in receipt
of this information.
19
SmartThings app
Controlling your air purifier with SmartThings app
Smartly control your air purifier using the SmartThings app.
Category Function Description
Monitoring
Indoor air quality
Check the indoor air cleanliness.
Touch the
icon to view the PM10 / PM2.5 / PM1.0 levels and gas
cleanliness.
Some of the options may not be available on your air purifier.
Models that use the dongle do not support PM1.0 pollution level display.
Outdoor air
quality
You can access to air quality information for your area.
Touch the
icon to view detailed air quality information for the region
you specified in the settings.
If you cannot view any outdoor air quality information, specify your region
in the settings.
Control
Power supply Turn your air purifier on or off.
Controlling the
fan speed
Select the fan speed you want.
Timed on/off
Set the timed on/off times.
You can set a total of up to 10 timed on/off times.
You cannot set the same time for both of the timed on and timed off times.
While you are setting a timed on/off time, no timed on/off indications are
displayed on your air purifier display.
Once you set a timed on/off time, it persists even if you unplug and plug
in the power cord of your air purifier.
Operation
functions
Touch the buttons for various additional functions you want to run.
Some of the options may not be available on your air purifier.
settings
Check the settings for region, lighting, mute, or filter.
If you change the region, your display panel will show the outdoor air
quality information for the new region.
You can check the filter replacement time and reset the filter
replacement reminder using Filter Info.
You can also view the information about replacement filter.
Some of the options may not be available on your air purifier.
Help
Useful information to help you understand air related information and
terms.
Device
information
View or open the version, tutorial, manual, store, self diagnosis, help desk.
Some of the options may not be available on your air purifier.
20
Appendix
Operation
The air purifier does not operate.
Check the power supply and turn on the air purifier again.
Make sure that the power plug is plugged in, and then turn on the
air purifier again.
If it still does not operate, try a different power outlet.
Make sure that the front panel is closed properly.
Sound
The air purifier makes strange noises.
If you move the product during operation, it may cause noise. Turn
off the power before moving the product.
Odours
The air purifier smells strange.
Because the air purifier sucks and circulates indoor air, if you use it
in a closed space for a long time, odours generated in your home
can saturate the filter.
Remove the pre-filter, 2-in-1. See if any of them smell and clean
or replace them when necessary.
You will be charged for replacing filter regardless of the
remaining warranty.
Open the doors and windows, and then operate the product
for 3 to 4 hours.
When grilling or frying food ingredients such as fish and meat,
ventilate the room well and operate the air purifier once the
odours are sufficiently removed.
Filter can become the source of odours when you use the product
along with air fresheners, diffusers, scented candles or cleaning
agents, or in a recently furnished room (e.g. new paint or wallpaper).
Ventilate until the odours are completely removed, and then
operate the product.
Operating your air purifier in a room that is constantly humid or
exposing it to moisture from a humidifier can cause the filter to
smell after some time.
If the filter smell due to moisture, dry them well in sunlight
before using them again.
Check the following before requesting service from the Service Centre.
Before Requesting Service
Appendix
1 / 1

Samsung AX60R5080WD/EU Manual de utilizare

Categorie
Purificatoare de aer
Tip
Manual de utilizare
Acest manual este potrivit și pentru

în alte limbi