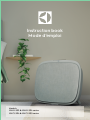
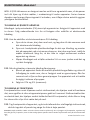
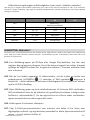
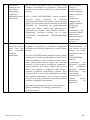
Electrolux WA71-304DG WELL A7 LUFTRENSER Manualul proprietarului
- Categorie
- Purificatoare de aer
- Tip
- Manualul proprietarului

Models:
WA51-303 & WA51-304 series
WA71-304 & WA71-305 series
Instruction book
Mode d’emploi

OPERATING MANUAL
Thank you for choosing the Electrolux WELL A7 / A5 series air purifier. Always use
original Electrolux consumables, accessories and spare parts to get the best results
out of your unit. This appliance is designed with the environment in mind and hence
all plastic parts are marked for recycling purposes.
GENERAL SAFETY INFORMATION
This USER MANUAL provides specific operating instructions for your model OR
series. Use the unit only as instructed in this manual. These instructions are not
meant to cover every possible condition and situation that may occur. Common
sense and caution must be practiced when installing, operating, and maintaining
any appliance.
WARNING! - CHILDREN & VULNERABLE PEOPLE SAFETY
Risk of suffocation, injury or permanent disability. Keep all packaging away from
children.
This appliance can be used by children aged from 8 years and above and persons
with reduced physical, sensory or mental capabilities or lack of experience and
knowledge if they have been given supervision or instruction concerning use of the
unit in a safe way and understand the hazards involved.
Cleaning and user maintenance shall not be made by children without supervision.
Children shall not play with the unit. Children under 3 years of age should be kept
away from the unit unless continuously supervised.
CAUTION! – AVOID INJURY OR DAMAGE TO THE UNIT OR PROPERTY
Do not direct airflow at fireplaces or other heat related sources as this could
cause flare ups.
Do not climb on or place objects on the unit.
Do not hang objects off the unit.
Do not place containers with liquids on the unit.
Turn OFF the unit at the power source when it will not be used for an extended
period.
Do not block or cover the air intake area, fan area and air outlet grill.
Ensure that any electrical/electronic equipment is at least 30cm away from the unit.
GB
CS
DA
FI
FR
DE
HR
HU
IT
NO
PL
RO
SK
SL
SR
SV
TR
www.electrolux.com
2

CAUTION! – WALL MOUNTING: AVOID INJURY OR DAMAGE TO PROPERTY
Always use appropriate screw and plastic plug for wall hang hook, depending on the
wall material (e.g. nailable plug with screws for concrete OR expandable plug with
screws for drywall, etc.). If you are not sure of the type of wall, have a qualified
builder OR constructor inspect and recommend the correct screw and plug type
according to local or national building standards.
Do not, under any circumstances, use the wall hang hook with only one screw.
Always use appropriate safety precautions and protective gear while drilling holes
into the wall OR handling such equipment (e.g. safety gloves, dust mask, etc.).
Do not pull on OR tug on the unit from the power cord while it is wall mounted. Please
ensure power cord is snug to the wall and the floor to avoid any undue tangling of
objects with the cord and thus accidental tugs to the unit.
Ensure the wall hang hook is secured to the wall firmly and at the correct angle (e.g.
parallel to the floor without any leaning) for best results.
If unsure of whether the wall hang hook has been secured correctly on the wall,
before mounting the unit, please test the hook by a) applying some pressure on it
from the top with your hands to see if it buckles and b) tugging the hook towards you
with some pulling motion to see if screws come loose.
INFORMATION ABOUT RADIO
WiFi working frequency and maximum output power: 2.4 GHz; 15dBm
RFID working frequency and maximum output power: 13.56 MHz; 30dBm ± 10%
Power consumption of the product in network standby is less than 2.0W
ELECTRICAL SAFETY INFORMATION
WARNING! – AVOID FIRE HAZARD OR ELECTRIC SHOCK
This unit can be used in 50Hz or 60Hz power supply without any change.
Do not use an extension cord or an adaptor plug.
Do not remove any prong from the power cord. Do not pinch, bend, or knot the
power cord.
Do not cut or damage the power cord. If the supplied power cord is damaged, it
should only be replaced by Electrolux, its service agent or similarly qualified persons.
This unit contains no user serviceable parts. Always call an authorized Electrolux
servicer for repairs.
Do not, under any circumstances, cut, remove or bypass the grounding prong (see
picture 26 on page 3; for UK see picture 27). If you are not sure the outlet is
adequately grounded or protected by a time delay fuse or circuit breaker, have a
qualified electrician install the proper outlet according to the National Electrical Code
3
www.electrolux.com

OR applicable local codes and ordinances.
Do not store or use gasoline or other flammable vapors and liquids in the vicinity
of this or any other appliance. Read product labels for flammability and other
warnings.
Do not let water or any other liquid or flammable detergent enter the unit to avoid
electric shock and/or a fire hazard. Be sure to unplug he unit before cleaning.
Never unplug the unit by pulling on the power cord. Always grip the plug firmly and
pull straight out from the receptacle.
CAUTION! – AVOID SERIOUS INJURY OR DEATH
Do not insert or place fingers or objects into the air discharge area or front facing
grille of the unit.
Do not start or stop the unit by unplugging the power cord or turning OFF the power
at the electrical box.
In the event of a malfunction (sparks, burning smell, etc.), immediately stop the
operation, disconnect the power cord, and call an authorized Electrolux servicer.
Do not operate the unit with wet hands.
Do not pull on the power cord.
Do not touch the fan blade when removing the filter(s).
DISPOSAL
This symbol on the unit or on its packaging indicates that the unit may
not be treated as household waste. To recycle your unit, please take it to
an official location where they can remove and recycle the battery and
electric parts in a safe and professional way. Follow your country’s rules
for the collection of electrical products and rechargeable batteries.
BEFORE STARTING
Read this manual carefully and pay special attention to safety information.
Pay special attention to the CAUTION sections!
Check that all key components & parts described are included.
www.electrolux.com
4

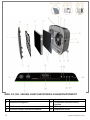
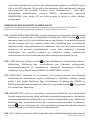
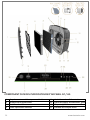
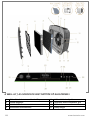
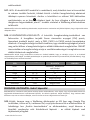
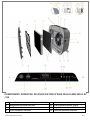
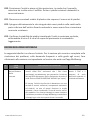
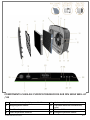
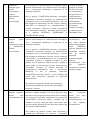
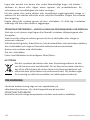
KEY COMPONETNS OF WELL A7 / A5 SERIES AIR PURIFIERS
1
Removable & customizable front panel
14
Power cord cavity
2
Front panel magnets
15
Fan motor cavity, grill
3
Mesh pre-filter
16
RFID tag(s)
4
Ultrafine particle filter
17
Front panel hooks
5
www.electrolux.com

5
VOC carboner
18
POWER bun (ON/OFF)
6
Air quindic
19
MODE buon
7
UI D: Useerface)
20
Mode disp
8
Removabeop h for carrng
21
er change icon
9
Air oue
22
eon
10
ng & hanging
23
WiFi icon
11
Sensor box
24
Ionizer icon
12
Sensor window
25
d ock icon
13
Removabe fee x2
26
FAN SPEED sider & indor
NOTE: Your specific model may not have all the components and features listed within this USER MANUAL. Please
check the product packaging OR the product specificaon page on our website for exact details of your model.
Electrolux reserves the right to change informaon contained herein without noce.
www.electrolux.com
6
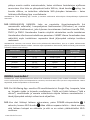
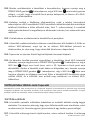
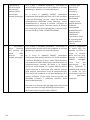
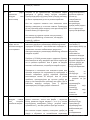
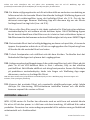
2
3
3
Min. 20 cm
Eye level
4
5
Min. 30 cm
Min. 20 cm
Min. 20 cm
6
789
3
RFID tag
1

7
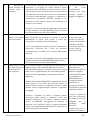
www.electrolux.com
10
11
12
14 15
13
18
19
20
21
22
23
24
16
17

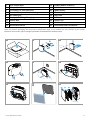
UNBOXING & SETUP – picture pages 6-7
Please be careful while unboxing the air purifier. The unit has several detachable
components which may have come loose in transport, so open the box with care and
while placed on a large flat surface OR the floor.
1. Gently remove the unit (e.g. with top handle when available) and the ancillary
components from the main box. Remove the plas�c packaging and discard as per
safety and local recycling instruc�ons.
2. If wall moun�ng:
a. Please review safety instruc�ons under the GENERAL SAFETY sec�on
before proceeding.
b. Iden�fy a spot on the wall where you would like to mount the unit. The
spot should be at least 20 cm below eye level when standing fully upright
(even lower is ideal & recommended), for op�mal viewing as well as
cleanability under the unit. Also ensure that nearest power socket is max
1,5 mts away and that there is a clearing of at least 20 cm between right
side (sensor window) of the unit and other nearby surface.
c. Gently place the provided hook flat against the surface of the wall and
with a pencil mark the two spots where screws are to be drilled. The hook
www.electrolux.com
8
26 27
28 29
25

should be placed such that the protruding tip (without the holes) is on
the top (refer to picture #2).
d. Depending on the wall, please use appropriate drill to make two holes
into the wall at the identified marks; and insert any plugs as needed.
e. Depending on the wall, please use appropriate screws for following step.
Place the hook flat against the surface of the wall, so that the holes are
concentric and the hook sits parallel to the floor without any inclination,
and then tighten the screws till the hook is securely in place and does not
move if tugged.
f. Lift the unit and place it onto the hook such that the top of the hook
securely fits into the inbuilt grip at the back of the unit.
g. Gently adjust the unit to remove any inclinations, just like a painting.
Ensure that the unit sits flat up against the wall.
h. When dismounting the unit, remember to disconnect the power cord
from the wall socket first.
3. If placing it on the floor:
a. Take the cylindrical feet and screw them into the unit by rotating
clockwise till you hear a click (or get some resistance).
b. Lift the unit and place it next to the power socket to be used.
c. Ensure a clearance of at least 30 cm between front (air inlet) and at least
20 cm between right side (sensor window) of the unit and other surfaces.
Also ensure ample free space above the top (air outlet grill), so the unit
can operate at its best in spreading pure air through the room.
d. When wall mounting, please remove the cylindrical feet from the base of
the unit for more efficient air distribution.
4. Remove the front panel by gently pulling it away from the unit with both hands.
5. Take out the mesh pre-filter, ultrafine particle filter and VOC carbon filter layers
and remove all plastic packaging. Discard as per safety and local recycling
instructions.
6. Place the filter layers back into the unit in the same order as originally found (i.e.
VOC carbon filter goes in first). While inserting, place take care to hold the filter
so that the RFID tag on the filter is located at the top-right – it should be near the
senor box hatch.
7. Attach the mesh pre-filter and the front panel back to the unit.
8. Plug the unit’s power cord to the nearest power socket so that the POWER button
9
www.electrolux.com

on the product UI gets illuminated.
9. For best results, operate the unit in an enclosed area with doors & windows
closed when feasible.
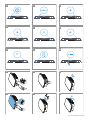
FIRST & ONGOING USE – picture pages 6-7
TURNING ON
10. Tap the POWER button once to turn ON the air purifier
NOTE: At every new run, it will take about 10 seconds for the sensors to calibrate and analyze the air quality before
ramping up to the appropriate fan speed. During this time, the air quality indicator will pulsate slowly in white.
CHANGING MODES & FAN SPEEDS
11. Tap the MODE button once to toggle between the two modes: SMART and
MANUAL
SMART: This is the default mode the unit will start in. In the SMART mode the
unit will utilize the sensor data as input to decide on the appropriate fan speed
and the UI display’s type & intensity level. The fan speed cannot be adjusted
manually by the user under this mode. Please see the AIR QUALITY INDICATOR
section for more details.
NOTE: The AQI light will turn off completely in a dark room when the unit is in smart mode, so as not to disturb.
MANUAL: In the MANUAL mode the unit will utilize the sensor data as input only
to show the air quality level via the air quality indicator but will not self-adjust
the fan speed. This mode is best utilized for a quick burst of cleaning, especially
when the user anticipates an increase in particulate matter in the room due to
household chores (e.g. vacuuming).
12. While in MANUAL mode, tap and scroll on the fan speed slider to adjust the speed
of cleaning – left most side being the lowest and right most side being the highest
speed.
NOTE: The unit will ramp up OR down to chosen speed setting gradually. The slider also acts as the indicator for the
current fan speed.
13. STANDBY & WiFi OFF: The air purifier is designed with ECODESIGN principles in
mind and hence will aim to limit power consumption to under 2.0W when unit is
powered OFF (unless user permission to override). When unit is powered ON, if
it has no WiFi connectivity OR is not onboarded, the WiFi radio signal will
automatically turn OFF after 30 minutes to conserve power – to bring the WiFi
www.electrolux.com
10

radio signal back ON manually please initiate ONBOARDING (step 21 only) or
unplug and then plug it back in to the socket.
FEATURE ICONS AND INDICATORS
NOTE: Not all indicators OR feature icons might be available on your model. Please consult packaging information or
the product specifications on the website for details on available features.
14. FILTER CHANGE: The high efficiency filter(s) in the unit cannot be washed, they
can only be replaced. The filter change icon will light up to remind you to
change your filter(s). Your air purifier may be equipped with more than one filter,
so please refer to the Wellbeing App for details on which filter layer is to be
replaced. Always ensure the plastic protective bag is removed from the filter
before its use in the unit. After the used filter is replaced, the filter change icon
will turn off automatically and no reset action is needed.
15. ALERT: The alert icon will light up to alert you of a possible electrical or
electronic error with your unit. Please refer to the Wellbeing App for details on
the error type, component details and any mitigating actions. More details can
be found in the ERRORS & TROUBLESHOOTING section below.
16. CHILD LOCK: The unit is equipped with a safety lock feature to disable the product
UI to avoid unintended pressing. The child lock feature can be toggled ON/OFF
via the Wellbeing App or by long pressing for 5 seconds the POWER and MODE
button simultaneously. The child lock icon will light up when the feature is
activated.
17. IONZIER: The unit is equipped with an ionizer module, which when enabled
generates negative ions to further aid with the air purification process. The
ionizer is OFF by default and can only be toggled ON/OFF via the Wellbeing App.
When the feature is activated the ionizer icon will light up. For more details on
how an ionizer helps reduce airborne particles, please refer to the product
information page on the website.
18. WiFi: The unit is equipped with a WiFi module, which enables remote control and
access to many more features including time-based tracking of your indoor air
quality data. When the unit is connected to the home WiFi, this icon will light
up. If the icon is blinking, it indicates a temporary loss of WiFi connectivity –
please refer to the Wellbeing App for more details.
NOTE: Download our Wellbeing App and follow the step-step onboarding instructions to bring the air purifier online.
11
www.electrolux.com

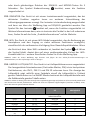
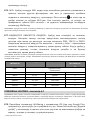
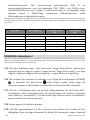
19. AIR QUALITY INDICATOR: The unit is equipped with an air quality sensor(s). The
laser-based particulate matter (PM) sensor is a high precision particle sensor that
can detect PM1, PM2.5 and PM10 levels. The air quality indicator will visually –
with the aid of a color scale - show the real-time air quality as per table below.
When in SMART mode, the air quality level will also determine the fan speed as
per table below.
NOTE: Please ensure regular cleaning of the sensor window to ensure it does not get clogged with dust and sensors
keep performing accurately. Also ensure optimal humidity levels (between 35-80%) for accurate reading from the
sensors.
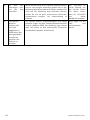
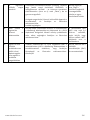
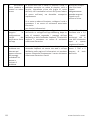
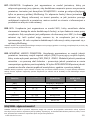
LIGHT COLOR
PM 2.5 (μg/m3)
AIR QUALITY STATUS
FAN SPEED
White
Calibrating | Onboarding
Green
0 - 12
Very Good
2
Yellow
13 - 35
Good
3
Orange
36 - 55
Poor
4
Red
56 - 150
Very Poor
5
Purple
151 – 250
Bad
5
Maroon
>250
Very Bad
5
ONBOARDING – picture pages 6-7
NOTE: Some steps in the onboarding flow may have changed, please follow step-step instructions in the latest version
of the App as reference in case of discrepancy. Please ensure home WiFi is running on 2.4 GHz band and not 5 GHz
band, as this will not be recognized by the air purifier.
20. Please find the Wellbeing App in the iOS App or Google Play store, download it,
sign up and login to the App. Here you will be able to ‘Add a device’ to the App
and follow the step-step instructions for onboarding the unit – steps below are
indicative.
21. After plugging the unit into the power socket, please long press the POWER
button for 5 seconds until the WiFi icon starts blinking rapidly – this
indicates that the unit’s hotspot is activated and is ready for being connected to
the WiFi.
22. Head over to the Wellbeing App and using the phone’s camera to scan the WiFi
barcode. The WiFi barcode can be found on the rating label sticker on the unit
(typically after the mesh pre-filter, reference image 7). You can also manually
enter the digits under the barcode into the App if scanning it does not work.
23. Connect the App to the unit’s hotspot.
www.electrolux.com
12

24. Choose the 2.4 GHz home WiFi that the unit should connect to from available list
and then enter the password for this home WiFi into the App – wait for the unit
to establish a connection.
25. Complete the steps of naming your newly onboarded air purifier!
26. Later, if you would ever like to reset the WiFi credentials stored on your unit
please long press the POWER button for 5 seconds until WiFi icon starts
blinking (i.e. like step 20, hotspot activated). While in this state, again, long press
the POWER button for 5 seconds until WiFi icon stops blinking and is not
lit. Unit’s WiFi settings are now reset and it will not aim to connect to your WiFi
network.
CLEANING, CARING & STORAGE – picture pages 6-7
NOTE: Always unplug the air purifier before cleaning to prevent shock or fire hazards. Never use abrasive, harsh
detergents OR wax for cleaning the unit. The high efficiency filters cannot be washed, they must always be replaced
when at the end of life.
CLEANING & CARING
27. Ensure the sensor window is kept unclogged for optimal performance of the unit.
It is natural for dust to accumulate in this area, hence ensure regular (e.g. once
per 4 weeks) vacuuming of the sensor window with a vacuum cleaner that has a
narrow nozzle/brush.
28. The plastic parts of the unit should be cleaned with an oil-free dry cloth. For stains
on plastic parts, use a slightly damp soft microfiber cloth to gently rub against the
stain.
29. The fabric attached to the front panel should be wiped with an oil-free dry cloth
or by using a vacuum cleaner with a soft brush to avoid breaking of the fibers.
The area around the air inlet on the front of the unit may accumulate more dust
than some other parts and hence may require more frequent cleaning to ensure
optimal performance.
STORAGE
30. When storing away, besides unplugging the unit and winding the power cord
loosely around the bottom feet, ensure that unit including the high efficiency
filters and the fabric front panel are covered up to avoid accumulation of dust.
13
www.electrolux.com

REPLACING FILTERS – picture pages 6-7
NOTE: The filters – except for the mesh pre-filter - cannot be washed and must always be replaced when at end of life.
The WELL A7 / A5 series air purifiers have a variety of filters to choose from, tailored to your lifestyle needs. Each filter
layer is equipped with a smart RFID tag to uniquely identify it as well as to track its usage over time. Head over to the
Wellbeing App or the product information page on our website for a guide on choosing the appropriate filter for your
needs.
31. For the best experience and to secure an uninterrupted use of the air purifier,
please monitor the filter’s remaining lifetime in the Wellbeing App and order a
replacement filter in advance of the lifetime hitting 0%. If you have notifications
enabled, the Wellbeing App will inform you when the filter life is close to end of
life (e.g. at 5%).
32. When one or more of the filters is at end of life, the filter change icon will light
up on the product UI to indicate the need for replacement. Please head over to
the Wellbeing App to correctly identify which filter is at end of life and needs
replacement. When filter is at end of life, the unit’s fan speed may be capped in
SMART mode.
33. The used filter might be heavily coated with dust and particulate matter so before
opening the front panel, please ensure a disposable bag or packaging is at hand to
place the used filter in.
34. Remove the front panel and the mesh pre-filter and put them aside. Next remove
the filter layer which is at end of life and place it in the disposable bag at hand.
35. Next, please remove the plastic packaging from the replacement filter and insert
the filter in the appropriate place. Please ensure the VOC carbon filter goes in
first inside the unit, followed by the ultrafine particle filter. Reinsert the mesh
pre-filter and close the front panel. The filter change icon on the product UI will
no longer be lit and the Wellbeing App will indicate the same, with a new filter
lifetime reading.
NOTE: In case the change is only reflected on the product UI and not the Wellbeing App, please restart the App and
the unit, before further troubleshooting.
36. Discard the used filter as well as any plastic packaging according to local recycling
guidelines. The RFID tags contain circuitry and hence are to be disposed
separately from the rest of the filter.
www.electrolux.com
14

CUSTOMIZING – picture pages 6-7
The WELL A7 / A5 series Air Purifier was designed with a unique form and aesthetic
sense to ensure it fits in with your home and its furnishings, unlike other appliances.
In addition, the series comes with many customization kits for the unit that add to
the aesthetics but also functionality of the unit.
TOP HANDLE CUSTOMIZATION
The polyurethane leather (PU) handle at the top of the unit is attached to the unit by
way of two screws. Follow the steps below to attach or replace an existing top handle.
37. If you are replacing an existing top PU handle:
a. Remove the two screws, twisting counterclockwise and set aside along
with existing handle.
b. Remove any protective plastic packaging from the new handle and fit it
onto the unit by tightening the screws, twisting clockwise, till you meet
some resistance. Ensure a snug fit with no gap in between the unit and
the screw.
c. Test out the handle by lifting the unit 5-6 cm above the ground with it
and giving it a gentle shake.
38. If you are adding a top handle for the first time:
a. At the top of the unit, in between the product UI & the air outlet grill you
will find two circular cavities secured with a rubber plug. Uncover the
cavity by removing these rubber plugs from the unit by gently pulling on
the sides of the plug.
b. Follow the steps 37b. and 37c (above).
FRONT PANEL CUSTOMIZATION
The look of the front panel can be customized with a fabric cover to help accentuate
it but also to ensure the unit blends well with the decor of the room. The fabric cover
has an elastic seam that helps secure it to the front panel, hence no screws or staples
are necessary for its installation.
39. Please detach the front panel from the unit and if it already has a removable
fabric cover please gently take it off the panel – ensuring not to bend the panel.
NOTE: Some models in the WELL A7 series come with a fabric permanently attached to the front panel, this fabric is
not removable from the panel, but you can still customize the panel with another fabric cover on top of the existing
fabric.
15
www.electrolux.com

40. Remove any plastic packaging from the new fabric cover to be used.
41. Starting at the top left corner of the front panel, tuck the elastic band behind the
panel and while holding that corner in place work your way with the other hand
to the top right corner while continuously tucking the elastic band of the fabric
cover behind the edge of the panel. Now pull the fabric cover towards the bottom
edge of the panel and securely tug the rest of the fabric edge behind the bottom
part of the panel.
42. Smooth out any wrinkles on the fabric cover by pushing against the wrinkles.
43. Attach the front panel with the newly fit fabric cover back to the unit and check
the edges to ensure there is no blockage of the air inlet area.
NOTE: Customizable fabric covers are machine washable, as per the care instructions provided with the kit. It is
important that the elastic band along the edges of the fabric cover is unbroken and tight as it helps ensure an optimum
flow of air into the unit, with minimal decrease in performance. If you notice that the elastic band is broken or very
loose, it is time to replace the fabric cover.
FEET CUSTOMIZATION
The thermoplastic elastomer (TPE) feet are attached to the unit by way of inbuilt
screws. The feet – like the top handle – are detachable. Follow the steps below to
attach or replace an existing set of feet.
44. Place the unit flat on its back, so the front panel faces the ceiling. Unscrew the
existing feet, if any, by twisting counterclockwise.
45. Remove any protective plastic covering the new set of feet.
46. Gently nudge the inbuilt screw of the new feet into the cavity at the bottom of
the unit and secure them by twisting clockwise till you meet some resistance.
47. Test out the stability of the feet by placing the unit back upright and lifting it
about 5-6 cm above the ground and giving it a gentle shake.
www.electrolux.com
16

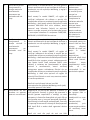
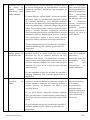
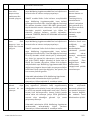
ERRORS & TROUBLESHOOTING
The table below is only a limited list. For the latest and complete section on
troubleshooting, FAQ and error guide please refer to the corresponding section on
our website or the Wellbeing App.
#
ISSUE
TROUBLESHOOTING
NOTES
1
The air purifier’s
alert icon is lit
If you have just bought the unit OR inserted new
filter(s), please ensure that the filter(s) are
positioned in the correct way for the RFID tags to be
read by the sensor (refer to point 6 within
ONBOARDING & SETUP section above).
Generally, the unit comes with a variety of
sophisticated sensors, electronics and other
electrical components and if one of these is
malfunctioning, you will see the alert icon on the
product UI light up. For more details on steps to
resolve, please head over to the Wellbeing App and
check for details whenever you see this icon lit.
Please have at hand
the unit’s PNC and
SERIAL number when
calling for support.
2
The air purifier is
running at max
fan speed all the
time for extended
periods
If in MANUAL mode, please check the fan speed
slider on the product UI or within Wellbeing App and
adjust it to desired level.
If in SMART mode, please check air quality indicator
on the product UI or within Wellbeing App – if all PM
values are constantly showing 999-1000 without any
reduction then most likely the sensor is clogged.
Please use a vacuum cleaner to clean the sensor via
the sensor window – detailed instructions in
CLEANING, CARING & STORAGE section above.
The PM sensor in
the unit is highly
accurate and
sensitive and it is
normal for the
purifier to react to
poor air quality by
ramping up the
fan speed – to get
your indoor air
quality back to
safe levels.
17
www.electrolux.com

3
The air purifier is
running at lowest
fan speed all the
time for extended
periods
If in MANUAL mode, please check the fan speed
slider on the product UI or within Wellbeing App and
adjust it to desired level.
If in SMART mode, please check air quality indicator
on the product UI or within Wellbeing App – if all PM
values are constantly reading very good without any
increase then this is normal behavior for the unit -
your air quality is very good! If the PM2.5 value is high
and the unit is still operating at lowest fan speed,
then please check filter change icon on the product
UI or within Wellbeing App and if lit please replace
used filter with a new one, this should resolve the
specific fan speed issue.
If neither of the above steps OR instructions in the
Wellbeing App help, please refer to item 9 in the
table.
The unit is designed
so that when a filter
is at end of life, at
least within the
SMART mode, it will
discourage usage till
the filter is replaced,
by limiting the fan
speed so as not to
reintroduce the
captured particulate
matter back into the
air.
4
The air purifier
produces a loud or
abnormal noise
Please ensure the air inlet (around front panel) and
air outlet grill (top of the unit) are unobstructed and
that there is a clearance of at least 30 cm between
these areas and the nearest surface. If using a custom
fabric cover, try to reapply the fabric cover to the
panel tighter OR try operating without it to see if
noise pattern becomes normal.
If neither of the above steps OR instructions in the
Wellbeing App help, please refer to item 9 in the
table.
An abnormal pattern
of noise OR an
unusually high pitch
is not by design,
hence it is best to
rectify this.
5
The air purifier or
fan does not
operate
Ensure that the house, wall socket being used, and
the unit are all receiving power. If needed, try
pushing the power plug firmly into the wall socket to
check if this resolves the issue.
If you have recently (re)placed a filter please remove
and reinsert it. Check to make sure that the filter is
oriented correctly, so the RFID sensor can detect it.
If neither of the above steps OR instructions in the
Wellbeing App help, please refer to item 9 in the
table.
As a safety
mechanism, to avoid
risk of injury from
the fan blade, the
unit will not operate
if it does not detect
the presence of
filter(s).
www.electrolux.com
18

6
The air purifier is
running but the air
quality does not
improve
If in SMART mode, closely monitor the difference in
air quality levels within the Wellbeing App for next 20
minutes – if you do not see any improvement of the
air quality values in the Wellbeing App during this
period then follow the step below.
Change to MANUAL mode and adjust the fan speed
to a higher level to see if this helps resolve the issue.
If you still do not see any improvement, please try the
step below.
Try and close any open doors OR windows to the
outside of the room and rerun the unit at the highest
fan speed for 20 minutes. If this resolves the issue,
we recommend that you operate the unit in this
sealed environment as much as possible, till the air
quality outside (or in other rooms) is also at a good
level.
If the unit is placed in
a room larger t h a n
the recommended
size, it will take longer
for the air quality to
improve – please be
patient and maintain
the unit at the highest
speed feasible.
The unit comes with
multiple filters –
please ensure you
have the appropriate
filters to tackle the
pollutant you seek to
remove.
7
The air purifier
produces or emits
a strange smell
The first time you run the unit, you may perceive a
plastic, glue or paint smell – especially near the air
outlet grill – this is unavoidable in some cases (like
the ‘new car smell’) but should disappear quickly.
If you perceive a burning smell, please disconnect the
unit and contact Electrolux authorized service center
for further support.
Always ensure that
the filters are
covered in
appropriate
packaging while
stored away
between uses.
8
I am unable to
onboard the air
purifier to the App
If you are unable to onboard the unit and connect it
to the Wellbeing App after a couple of attempts
following the steps in the Wellbeing App and FAQ,
then the best course of action is to contact an
Electrolux authorized service center for support.
The WiFi chip in the
unit operates only at
2.4Ghz so please
ensure your home
WiFi is operating at
this bandwidth.
9
I have another
issue not listed
here OR none of
the above steps
have helped
resolve the
issue
You can search for more troubleshooting and FAQ
guides on our website OR the Wellbeing App under
the product information pages, or directly contact
Electrolux authorized service center for support.
Thank you!
Please have at hand
the unit’s PNC and
SERIAL number.
19
www.electrolux.com

NÁVOD K OBSLUZE
Děkujeme, že jste si zvolili čističku vzduchu řady Electrolux WELL A7/A5. Aby vaše
zařízení pracovalo co nejlépe, používejte vždy originální spotřební materiál,
příslušenství a náhradní díly Electrolux. Spotřebič je navržen s ohledem na životní
prostředí a všechny plastové díly jsou proto recyklovatelné.
VŠEOBECNÉ BEZPEČNOSTNÍ INFORMACE
V NÁVODU K POUŽITÍ naleznete konkrétní pokyny pro provoz vašeho modelu NEBO
řady. Zařízení používejte pouze v souladu s pokyny v tomto návodu. Tyto pokyny
nemají za cíl pokrýt všechny možné podmínky a situace, které mohou nastat. Při
instalaci, provozu a údržbě jakéhokoliv spotřebiče je nutné postupovat opatrně a
řídit se zdravým rozumem.
VAROVÁNÍ! – BEZPEČNOST DĚTÍ A POSTIŽENÝCH OSOB
Hrozí nebezpečí udušení, zranění nebo trvalého postižení. Všechny obaly
uschovejte z dosahu dětí.
Tento spotřebič smí používat děti starší osmi let nebo osoby se sníženými fyzickými,
smyslovými nebo duševními schopnostmi nebo osoby bez patřičných zkušeností a
znalostí, pouze pokud tak činí pod dozorem nebo obdrželi instrukce týkající se
bezpečného provozu zařízení, a pokud rozumí rizikům spojeným s provozem
zařízení.
Čištění a uživatelskou údržbu nesmí provádět děti bez dozoru. Zabraňte dětem, aby
si se zařízením hrály. Děti mladší tří let bez stálého dozoru držte z dosahu zařízení.
UPOZORNĚNÍ! – PŘEDEJDĚTE ZRANĚNÍ NEBO POŠKOZENÍ ZAŘÍZENÍ ČI MAJETKU
Nesměrujte proud vzduchu na krby nebo jiné zdroje tepla, protože by mohlo
dojít k vyšlehnutí plamene.
Na zařízení nestoupejte ani na něj nestavte předměty.
Na zařízení nezavěšujte žádné předměty.
Na zařízení nepokládejte nádoby s kapalinami.
Nebudete-li zařízení delší dobu používat, odpojte je od napájení.
Neblokujte ani nezakrývejte oblast přívodu vzduchu, oblast ventilátoru a mřížku
výstupu vzduchu.
Ujistěte se, že jakékoliv elektrické/elektronické vybavení se nachází alespoň 30 cm od
zařízení.
GB
CS
DA
FI
FR
DE
HR
HU
IT
NO
PL
RO
SK
SL
SR
SV
TR
www.electrolux.com
20
Pagina se încarcă ...
Pagina se încarcă ...
Pagina se încarcă ...
Pagina se încarcă ...
Pagina se încarcă ...
Pagina se încarcă ...
Pagina se încarcă ...
Pagina se încarcă ...
Pagina se încarcă ...
Pagina se încarcă ...
Pagina se încarcă ...
Pagina se încarcă ...
Pagina se încarcă ...
Pagina se încarcă ...
Pagina se încarcă ...
Pagina se încarcă ...
Pagina se încarcă ...
Pagina se încarcă ...
Pagina se încarcă ...
Pagina se încarcă ...
Pagina se încarcă ...
Pagina se încarcă ...
Pagina se încarcă ...
Pagina se încarcă ...
Pagina se încarcă ...
Pagina se încarcă ...
Pagina se încarcă ...
Pagina se încarcă ...
Pagina se încarcă ...
Pagina se încarcă ...
Pagina se încarcă ...
Pagina se încarcă ...
Pagina se încarcă ...
Pagina se încarcă ...
Pagina se încarcă ...
Pagina se încarcă ...
Pagina se încarcă ...
Pagina se încarcă ...
Pagina se încarcă ...
Pagina se încarcă ...
Pagina se încarcă ...
Pagina se încarcă ...
Pagina se încarcă ...
Pagina se încarcă ...
Pagina se încarcă ...
Pagina se încarcă ...
Pagina se încarcă ...
Pagina se încarcă ...
Pagina se încarcă ...
Pagina se încarcă ...
Pagina se încarcă ...
Pagina se încarcă ...
Pagina se încarcă ...
Pagina se încarcă ...
Pagina se încarcă ...
Pagina se încarcă ...
Pagina se încarcă ...
Pagina se încarcă ...
Pagina se încarcă ...
Pagina se încarcă ...
Pagina se încarcă ...
Pagina se încarcă ...
Pagina se încarcă ...
Pagina se încarcă ...
Pagina se încarcă ...
Pagina se încarcă ...
Pagina se încarcă ...
Pagina se încarcă ...
Pagina se încarcă ...
Pagina se încarcă ...
Pagina se încarcă ...
Pagina se încarcă ...
Pagina se încarcă ...
Pagina se încarcă ...
Pagina se încarcă ...
Pagina se încarcă ...
Pagina se încarcă ...
Pagina se încarcă ...
Pagina se încarcă ...
Pagina se încarcă ...
Pagina se încarcă ...
Pagina se încarcă ...
Pagina se încarcă ...
Pagina se încarcă ...
Pagina se încarcă ...
Pagina se încarcă ...
Pagina se încarcă ...
Pagina se încarcă ...
Pagina se încarcă ...
Pagina se încarcă ...
Pagina se încarcă ...
Pagina se încarcă ...
Pagina se încarcă ...
Pagina se încarcă ...
Pagina se încarcă ...
Pagina se încarcă ...
Pagina se încarcă ...
Pagina se încarcă ...
Pagina se încarcă ...
Pagina se încarcă ...
Pagina se încarcă ...
Pagina se încarcă ...
Pagina se încarcă ...
Pagina se încarcă ...
Pagina se încarcă ...
Pagina se încarcă ...
Pagina se încarcă ...
Pagina se încarcă ...
Pagina se încarcă ...
Pagina se încarcă ...
Pagina se încarcă ...
Pagina se încarcă ...
Pagina se încarcă ...
Pagina se încarcă ...
Pagina se încarcă ...
Pagina se încarcă ...
Pagina se încarcă ...
Pagina se încarcă ...
Pagina se încarcă ...
Pagina se încarcă ...
Pagina se încarcă ...
Pagina se încarcă ...
Pagina se încarcă ...
Pagina se încarcă ...
Pagina se încarcă ...
Pagina se încarcă ...
Pagina se încarcă ...
Pagina se încarcă ...
Pagina se încarcă ...
Pagina se încarcă ...
Pagina se încarcă ...
Pagina se încarcă ...
Pagina se încarcă ...
Pagina se încarcă ...
Pagina se încarcă ...
Pagina se încarcă ...
Pagina se încarcă ...
Pagina se încarcă ...
Pagina se încarcă ...
Pagina se încarcă ...
Pagina se încarcă ...
Pagina se încarcă ...
Pagina se încarcă ...
Pagina se încarcă ...
Pagina se încarcă ...
Pagina se încarcă ...
Pagina se încarcă ...
Pagina se încarcă ...
Pagina se încarcă ...
Pagina se încarcă ...
Pagina se încarcă ...
Pagina se încarcă ...
Pagina se încarcă ...
Pagina se încarcă ...
Pagina se încarcă ...
Pagina se încarcă ...
Pagina se încarcă ...
Pagina se încarcă ...
Pagina se încarcă ...
Pagina se încarcă ...
Pagina se încarcă ...
Pagina se încarcă ...
Pagina se încarcă ...
Pagina se încarcă ...
Pagina se încarcă ...
Pagina se încarcă ...
Pagina se încarcă ...
Pagina se încarcă ...
Pagina se încarcă ...
Pagina se încarcă ...
Pagina se încarcă ...
Pagina se încarcă ...
Pagina se încarcă ...
Pagina se încarcă ...
Pagina se încarcă ...
Pagina se încarcă ...
Pagina se încarcă ...
Pagina se încarcă ...
Pagina se încarcă ...
Pagina se încarcă ...
Pagina se încarcă ...
Pagina se încarcă ...
Pagina se încarcă ...
Pagina se încarcă ...
Pagina se încarcă ...
Pagina se încarcă ...
Pagina se încarcă ...
Pagina se încarcă ...
Pagina se încarcă ...
Pagina se încarcă ...
Pagina se încarcă ...
Pagina se încarcă ...
Pagina se încarcă ...
Pagina se încarcă ...
Pagina se încarcă ...
Pagina se încarcă ...
Pagina se încarcă ...
Pagina se încarcă ...
Pagina se încarcă ...
Pagina se încarcă ...
Pagina se încarcă ...
Pagina se încarcă ...
Pagina se încarcă ...
Pagina se încarcă ...
Pagina se încarcă ...
Pagina se încarcă ...
Pagina se încarcă ...
Pagina se încarcă ...
Pagina se încarcă ...
Pagina se încarcă ...
Pagina se încarcă ...
Pagina se încarcă ...
Pagina se încarcă ...
Pagina se încarcă ...
Pagina se încarcă ...
Pagina se încarcă ...
Pagina se încarcă ...
Pagina se încarcă ...
Pagina se încarcă ...
Pagina se încarcă ...
Pagina se încarcă ...
Pagina se încarcă ...
Pagina se încarcă ...
Pagina se încarcă ...
Pagina se încarcă ...
Pagina se încarcă ...
Pagina se încarcă ...
Pagina se încarcă ...
Pagina se încarcă ...
Pagina se încarcă ...
Pagina se încarcă ...
Pagina se încarcă ...
Pagina se încarcă ...
Pagina se încarcă ...
Pagina se încarcă ...
Pagina se încarcă ...
Pagina se încarcă ...
Pagina se încarcă ...
Pagina se încarcă ...
Pagina se încarcă ...
Pagina se încarcă ...
Pagina se încarcă ...
Pagina se încarcă ...
Pagina se încarcă ...
Pagina se încarcă ...
Pagina se încarcă ...
Pagina se încarcă ...
Pagina se încarcă ...
Pagina se încarcă ...
Pagina se încarcă ...
Pagina se încarcă ...
Pagina se încarcă ...
Pagina se încarcă ...
Pagina se încarcă ...
Pagina se încarcă ...
Pagina se încarcă ...
Pagina se încarcă ...
Pagina se încarcă ...
Pagina se încarcă ...
Pagina se încarcă ...
Pagina se încarcă ...
Pagina se încarcă ...
Pagina se încarcă ...
Pagina se încarcă ...
Pagina se încarcă ...
-
 1
1
-
 2
2
-
 3
3
-
 4
4
-
 5
5
-
 6
6
-
 7
7
-
 8
8
-
 9
9
-
 10
10
-
 11
11
-
 12
12
-
 13
13
-
 14
14
-
 15
15
-
 16
16
-
 17
17
-
 18
18
-
 19
19
-
 20
20
-
 21
21
-
 22
22
-
 23
23
-
 24
24
-
 25
25
-
 26
26
-
 27
27
-
 28
28
-
 29
29
-
 30
30
-
 31
31
-
 32
32
-
 33
33
-
 34
34
-
 35
35
-
 36
36
-
 37
37
-
 38
38
-
 39
39
-
 40
40
-
 41
41
-
 42
42
-
 43
43
-
 44
44
-
 45
45
-
 46
46
-
 47
47
-
 48
48
-
 49
49
-
 50
50
-
 51
51
-
 52
52
-
 53
53
-
 54
54
-
 55
55
-
 56
56
-
 57
57
-
 58
58
-
 59
59
-
 60
60
-
 61
61
-
 62
62
-
 63
63
-
 64
64
-
 65
65
-
 66
66
-
 67
67
-
 68
68
-
 69
69
-
 70
70
-
 71
71
-
 72
72
-
 73
73
-
 74
74
-
 75
75
-
 76
76
-
 77
77
-
 78
78
-
 79
79
-
 80
80
-
 81
81
-
 82
82
-
 83
83
-
 84
84
-
 85
85
-
 86
86
-
 87
87
-
 88
88
-
 89
89
-
 90
90
-
 91
91
-
 92
92
-
 93
93
-
 94
94
-
 95
95
-
 96
96
-
 97
97
-
 98
98
-
 99
99
-
 100
100
-
 101
101
-
 102
102
-
 103
103
-
 104
104
-
 105
105
-
 106
106
-
 107
107
-
 108
108
-
 109
109
-
 110
110
-
 111
111
-
 112
112
-
 113
113
-
 114
114
-
 115
115
-
 116
116
-
 117
117
-
 118
118
-
 119
119
-
 120
120
-
 121
121
-
 122
122
-
 123
123
-
 124
124
-
 125
125
-
 126
126
-
 127
127
-
 128
128
-
 129
129
-
 130
130
-
 131
131
-
 132
132
-
 133
133
-
 134
134
-
 135
135
-
 136
136
-
 137
137
-
 138
138
-
 139
139
-
 140
140
-
 141
141
-
 142
142
-
 143
143
-
 144
144
-
 145
145
-
 146
146
-
 147
147
-
 148
148
-
 149
149
-
 150
150
-
 151
151
-
 152
152
-
 153
153
-
 154
154
-
 155
155
-
 156
156
-
 157
157
-
 158
158
-
 159
159
-
 160
160
-
 161
161
-
 162
162
-
 163
163
-
 164
164
-
 165
165
-
 166
166
-
 167
167
-
 168
168
-
 169
169
-
 170
170
-
 171
171
-
 172
172
-
 173
173
-
 174
174
-
 175
175
-
 176
176
-
 177
177
-
 178
178
-
 179
179
-
 180
180
-
 181
181
-
 182
182
-
 183
183
-
 184
184
-
 185
185
-
 186
186
-
 187
187
-
 188
188
-
 189
189
-
 190
190
-
 191
191
-
 192
192
-
 193
193
-
 194
194
-
 195
195
-
 196
196
-
 197
197
-
 198
198
-
 199
199
-
 200
200
-
 201
201
-
 202
202
-
 203
203
-
 204
204
-
 205
205
-
 206
206
-
 207
207
-
 208
208
-
 209
209
-
 210
210
-
 211
211
-
 212
212
-
 213
213
-
 214
214
-
 215
215
-
 216
216
-
 217
217
-
 218
218
-
 219
219
-
 220
220
-
 221
221
-
 222
222
-
 223
223
-
 224
224
-
 225
225
-
 226
226
-
 227
227
-
 228
228
-
 229
229
-
 230
230
-
 231
231
-
 232
232
-
 233
233
-
 234
234
-
 235
235
-
 236
236
-
 237
237
-
 238
238
-
 239
239
-
 240
240
-
 241
241
-
 242
242
-
 243
243
-
 244
244
-
 245
245
-
 246
246
-
 247
247
-
 248
248
-
 249
249
-
 250
250
-
 251
251
-
 252
252
-
 253
253
-
 254
254
-
 255
255
-
 256
256
-
 257
257
-
 258
258
-
 259
259
-
 260
260
-
 261
261
-
 262
262
-
 263
263
-
 264
264
-
 265
265
-
 266
266
-
 267
267
-
 268
268
-
 269
269
-
 270
270
-
 271
271
-
 272
272
-
 273
273
-
 274
274
-
 275
275
-
 276
276
-
 277
277
-
 278
278
-
 279
279
-
 280
280
-
 281
281
-
 282
282
-
 283
283
-
 284
284
-
 285
285


Electrolux WA71-304DG WELL A7 LUFTRENSER Manualul proprietarului
- Categorie
- Purificatoare de aer
- Tip
- Manualul proprietarului
în alte limbi
- Türkçe: Electrolux WA71-304DG WELL A7 LUFTRENSER El kitabı
- français: Electrolux WA71-304DG WELL A7 LUFTRENSER Le manuel du propriétaire
- slovenčina: Electrolux WA71-304DG WELL A7 LUFTRENSER Návod na obsluhu
- Deutsch: Electrolux WA71-304DG WELL A7 LUFTRENSER Bedienungsanleitung
- italiano: Electrolux WA71-304DG WELL A7 LUFTRENSER Manuale del proprietario
- svenska: Electrolux WA71-304DG WELL A7 LUFTRENSER Bruksanvisning
- dansk: Electrolux WA71-304DG WELL A7 LUFTRENSER Brugervejledning