Philips HP6319/01 Manual de utilizare
- Categorie
- Aparate de ras pentru femei
- Tip
- Manual de utilizare

HP6319/01

2

3
1 2 3 4
5
6 7 8
9 10 11 12
13 14 15 16
17 18 19 20

4

HP6319/01
ENGLISH 6
12
19
25
31
37
43
50
56
62
68
74
81
87
93
99

6
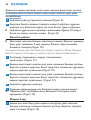
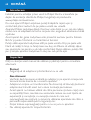
Introduction
Congratulations on your purchase and welcome to Philips! To fully benet
from the support that Philips offers, register your product at
www.philips.com/welcome.
With your new Philips ladyshave Body Contour you can quickly, easily and
comfortably remove unwanted hair from dry or wet skin.
The Philips ladyshave Body Contour is equipped with a oating shaving
head, which optimally adapts to the skin in order to ensure a perfectly
smooth shave.
This ladyshave is designed for cordless use only and can be charged with
the charger supplied.
You can use the ladyshave either dry or wet. If you shave while you take a
bath or shower, we advise you to use soap or shaving foam for the most
comfortable shave. After use, you can simply rinse the ladyshave in the
shower or under the tap.
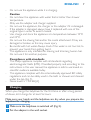
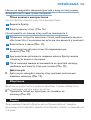
Important
Read this user manual carefully before you use the appliance and save it
for future reference.
Danger
Make sure the adapter and the charger do not get wet.
Warning
Check if the voltage indicated on the adapter and on the appliance
corresponds to the local mains voltage before you connect the
appliance.
The adapter contains a transformer. Do not cut off the adapter to
replace it with another plug, as this causes a hazardous situation.
This appliance is not intended for use by persons (including children)
with reduced physical, sensory or mental capabilities, or lack of
experience and knowledge, unless they have been given supervision
or instruction concerning use of the appliance by a person
responsible for their safety.
Children should be supervised to ensure that they do not play with
the appliance.
-
-
-
-
-
ENGLISH

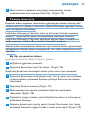
Do not use the appliance while it is charging.
Caution
Do not clean the appliance with water that is hotter than shower
temperature.
Only use the adapter and charger supplied.
Do not use the appliance, the charger or the adapter if it is damaged.
If the adapter is damaged, always have it replaced with one of the
original type in order to avoid a hazard.
Use, charge and store the appliance at a temperature between 15°C
and 35°C.
Do not use the shaving foils and/or the comb attachment if they are
damaged or broken, as this may cause injury.
Be careful with hot water. Always check if the water is not too hot, to
prevent your hands from getting burnt.
This appliance is only intended for shaving and trimming human hair.
Do not use it for another purpose.
Compliance with standards
This Philips appliance complies with all standards regarding
electromagnetic elds (EMF). If handled properly and according to the
instructions in this user manual, the appliance is safe to use based on
scientic evidence available today.
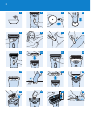
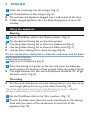
This appliance complies with the internationally approved IEC safety
regulations and can be safely used in the bath or shower and cleaned
under the tap (Fig. 1).
Noise level: Lc = 69 dB [A].
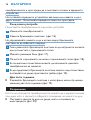
Charging
When you charge the ladyshave for the rst time or after a long period
of disuse, let it charge for at least 16 hours.
Make sure your hands and the ladyshave are dry when you prepare the
ladyshave for charging.
1 Make sure the ladyshave is switched off (Fig. 2).
2 Put the adapter in the wall socket.
-
-
-
-
-
-
-
-
-
-
-
-
ENGLISH 7

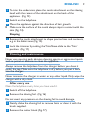
3 Insert the small plug into the charger (Fig. 3).
4 Put the ladyshave on the charger (Fig. 4).
Do not keep the appliance plugged into a wall socket all the time.
A fully charged appliance has a cordless shaving time of up to 20
minutes.
Shaving
1 Set the Trim/Shave slide to the ‘Shave’ position. (Fig. 5)
2 Put the desired shaving foil on the shaving head.
Use the golden shaving foil to shave the underarms (Fig. 6).
Use the golden shaving foil to shave the bikini zone (Fig. 7).
Use the silver shaving foil to shave the legs (Fig. 8).
Do not use the silver shaving foil to shave the underarms and the bikini
line to prevent injuries.
3 Switch on the ladyshave (Fig. 9).
4 Place the shaving unit gently on the skin and move the ladyshave
slowly against the direction of hair growth while you press it lightly.
The angle between the skin and the ladyshave should be 70° to get
the best results. (Fig. 8)
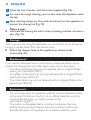
Put the comb attachment onto the shaving head to trim hairs to an
even length (about 5mm), e.g. in the bikini zone (Fig. 10).
The comb attachment can be put onto the shaving head in different
positions, depending on the area to be trimmed.
1 Set the Trim/Shave slide to the ‘Trim’ position. (Fig. 11)
2 To trim the bikini zone, place the comb attachment on the shaving
head with the recess of the attachment on the front of the
appliance (Fig. 12).
,
,
,
,
,
,
,
ENGLISH8

3 To trim the underarms, place the comb attachment on the shaving
head with the recess of the attachment on the back of the
appliance. (Fig. 13)
4 Switch on the ladyshave.
5 Move the appliance against the direction of hair growth.
Make sure the surface of the comb always stays in contact with the
skin (Fig. 14).
Shaping
1 Remove the comb attachment to shape precise lines and contours,
e.g. in the bikini zone (Fig. 15).
2 Lock the trimmer by setting the Trim/Shave slide to the ‘Trim’
position. (Fig. 11)
Cleaning and maintenance
Never use scouring pads, abrasive cleaning agents or aggressive liquids
such as petrol or acetone to clean the appliance.
Always remove the ladyshave from the charger before you clean it
under the tap. Make sure the ladyshave is dry before you put it back
into the charger.
Never immerse the charger in water or any other liquid. Only wipe the
charger with a dry cloth.
Clean the ladyshave every time you have used it.
1 Switch off the ladyshave.
2 Remove the shaving foil. (Fig. 16)
Do not exert any pressure on the shaving foil to avoid damage.
3 Gently shake the shaving foil to remove hairs or clean it with the
brush supplied.
4 Remove the cutter block (Fig. 17).
,
ENGLISH 9

5 Clean the hair chamber with the brush supplied (Fig. 18).
6 For extra thorough cleaning, you can also rinse the ladyshave under
the tap.
7 After cleaning, always put the comb attachment on the appliance to
protect the shaving foil (Fig. 10).
Lubricate the shaving foil with a drop of sewing machine oil twice a
year (Fig. 19).
Storage
When you are not using the ladyshave, you can store it in the shower by
hanging it upside down from the shower loop.
Attach the shower loop to the appliance as shown in the
picture (Fig. 20).
Replacement
If you use the ladyshave two or more times a week, we advise you to
replace the shaving foils and cutter block every one to two years.
The silver shaving foil may only be replaced with an original Philips
shaving foil (type HP6119/01).
The golden shaving foil may only be replaced with an original Philips
shaving foil (type HP6121).
The cutter block may only be replaced with an original Philips cutter
block (type HP6111).
Environment
Do not throw away the appliance with the normal household waste
at the end of its life, but hand it in at an ofcial collection point for
recycling. By doing this, you help to preserve the
environment (Fig. 21).
The built-in rechargeable battery contains substances that may
pollute the environment. Always remove the battery before you
discard and hand in the appliance at an ofcial collection point.
,
,
-
-
-
-
-
ENGLISH10

Dispose of the battery at an ofcial collection point for batteries. If
you have trouble removing the battery, you can also take the
appliance to a Philips service centre. The staff of this centre will
remove the battery for you and will dispose of it in an
environmentally safe way.
1 Take the ladyshave off the charger.
2 Let the motor run until the battery is completely empty.
3 Pull the upper part of the ladyshave off the lower part with some
force (Fig. 22).
4 Remove the battery with a screwdriver (Fig. 23).
Guarantee & service
If you need information or if you have a problem, please visit the Philips
website at www.philips.com or contact the Philips Customer Care
Centre in your country (you nd its phone number in the worldwide
guarantee leaet). If there is no Customer Care Centre in your country,
go to your local Philips dealer or contact the Service Department of
Philips Domestic Appliances and Personal Care BV.
ENGLISH 11

12
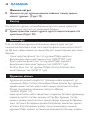
Поздравления за вашата покупка и добре дошли във Philips! За да се
възползвате изцяло от предлаганата от Philips поддръжка,
регистрирайте продукта си на www.philips.com/welcome.
С новата си дамска самобръсначка Ladyshave Body Contour на Philips
можете бързо, лесно и удобно да почиствате нежелани косми по
суха или мокра кожа.
Дамската самобръсначка Body Contour на Philips е снабдена с
плаваща бръснеща глава, която се нагажда по кожата, за да осигури
идеално гладко бръснене.
Тази дамска самобръсначка е предвидена за използване само на
батерии и може да се зарежда с приложеното зарядно устройство.
Можете да използвате дамската самобръсначка както върху суха,
така и върху влажна кожа. Ако се бръснете по време на душ или във
ваната, съветваме ви за по-голямо удобство да използвате сапун или
пяна за бръснене. След употреба можете просто да изплакнете
самобръсначката под душа или на чешмата.
Преди да използвате уреда, прочетете внимателно това
ръководство за експлоатация и го запазете за справка в бъдеще.
Пазете адаптера и зарядното устройство от намокряне.
Преди да включите уреда в контакта, проверете дали
напрежението, посочено на адаптера и на уреда, отговаря на
това на местната електрическа мрежа.
В адаптера има трансформатор. Не отрязвайте адаптера, за да го
замените с друг щепсел, тъй като това носи опасност.
Този уред не е предназначен за ползване от хора (включително
деца) с намалени физически усещания или умствени недъзи или
без опит и познания, ако са оставени без наблюдение и не са
инструктирани от страна на отговарящо за тяхната безопасност
лице относно начина на използване на уреда.
-
-
-
-

Наглеждайте децата, за да не си играят с уреда.
Не ползвайте уреда, докато се зарежда.
Не мийте уреда с вода, по-гореща от нормалното за душ.
Използвайте само приложените адаптер и зарядно устройство.
Не използвайте уреда, зарядното устройство или адаптера, ако
са повредени.
С оглед на предотвратяване на злополука, винаги заменяйте
повредения адаптер само с оригинален такъв.
Използвайте, зареждайте и съхранявайте уреда при температура
между 15°C и 35°C.
Не използвайте бръснещата пластина или приставката гребен,
ако са повредени или счупени, тъй като това може да доведе до
нараняване.
Внимавайте с горещата вода. Винаги проверявайте дали водата
не е прекалено гореща, за да предпазите ръцете си от изгаряне.
Този уред е предназначен само за бръснене и подстригване на
човешки косми. Не го използвайте за каквито и да е други цели.
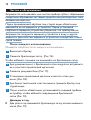
Този уред Philips е в съответствие с всички стандарти по
отношение на електромагнитните излъчвания (EMF). Ако се
употребява правилно и съобразно напътствията в Ръководството,
уредът е безопасен за използване според наличните досега
научни факти.
Този уред съответства на международно одобрените норми за
безопасност IEC и може да се използва безопасно в банята или
под душа, както и да се мие с течаща вода (фиг. 1).
Ниво на шума: Lc= 69 dB [A].
Когато зареждате самобръсначката за пръв път или след
продължителен период на бездействие, оставете я да се зарежда в
продължение на поне 16 часа.
-
-
-
-
-
-
-
-
-
-
-
-
-
13

Съблюдавайте ръцете ви и самобръсначката да са сухи при
подготовката на уреда за зареждане.
1 Уверете се, че самобръсначката е изключена (фиг. 2).
2 Включете адаптера в контакта.
3 Включете малкия жак в зарядното устройство (фиг. 3).
4 Сложете самобръсначката на зарядното (фиг. 4).
Не оставяйте кабела постоянно включен в контакта.
Напълно зареденият уред може да се използва за автономно
бръснене в продължение на 20 минути.
1 Поставете плъзгача за подстригване/бръснене в положение за
бръснене. (фиг. 5)
2 Поставете желаната бръснеща пластина на бръснещата глава.
Използвайте златистата бръснеща пластина за бръснене под
мишниците (фиг. 6).
Използвайте златистата бръснеща пластина за бръснене на
бикини линията (фиг. 7).
Използвайте сребристата бръснеща пластина за бръснене на
краката (фиг. 8).
Не използвайте сребристата бръснеща пластина за бръснене под
мишниците и на бикини линията, за да избегнете наранявания.
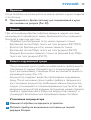
3 Включете самобръсначката (фиг. 9).
4 Поставете внимателно бръснещата глава върху кожата си и
движете самобръсначката бавно срещу посоката на растежа на
космите, като оказвате лек натиск.
Ъгълът между кожата и самобръсначката трябва да е 70°, за да
постигнете най-добър резултат. (фиг. 8)
,
,
,
,
,
,
14

Поставете гребена върху бръснещата глава, за да подстрижете
космите до еднаква дължина (около 5 мм), например на бикини
линията (фиг. 10).
Гребенът може да се поставя върху бръснещата глава в различни
положения, в зависимост от мястото, което ще подстригвате.
1 Поставете плъзгача за подстригване/бръснене в положение за
подстригване. (фиг. 11)
2 За да подстрижете бикини линията, поставете гребена върху
бръснещата глава с прореза на приставката към предната част
на уреда (фиг. 12).
3 За да подстрижете подмишниците, поставете гребена върху
бръснещата глава с прореза на приставката към задната част на
уреда. (фиг. 13)
4 Включете самобръсначката.
5 Винаги движете уреда срещу посоката на растежа на космите.
Внимавайте повърхността на гребена винаги да допира
кожата (фиг. 14).
1 Махнете гребена, за да оформите фини линии и контури,
например бикини линията (фиг. 15).
2 Включете приставката за подстригване с преместване на
плъзгача за подстригване/бръснене в положение за
подстригване. (фиг. 11)
Никога не използвайте за почистване на уреда фибро гъби,
абразивни почистващи препарати или агресивни течности, като
бензин или ацетон.
Винаги изваждайте дамската самобръсначка от зарядното
устройство, преди да я миете с течаща вода. Уверете се, че
,
,
15

самобръсначката е суха, преди да я поставите отново в зарядното
устройство.
Не потапяйте зарядното устройство във вода или каквато и да е
друга течност. Почиствайте зарядното само със суха кърпа.
Почиствайте самобръсначката след всяка употреба.
1 Изключете самобръсначката.
2 Свалете бръснещата пластина. (фиг. 16)
Не упражнявайте какъвто и да е натиск върху бръснещата
пластина, за да избегнете повреда.
3 Леко разклатете бръснещата пластина, за да изтръскате космите
или я почистете с приложената четка.
4 Махнете режещия блок (фиг. 17).
5 Почистете отделението за косми с приложената четка (фиг. 18).
6 За по-щателно почистване можете да изплакнете дамската
самобръсначка на чешмата.
7 За да предпазите бръснещата пластина, винаги след почистване
поставяйте на уреда приставката гребен (фиг. 10).
Смазвайте бръснещата пластина с капка фино масло (за шевни
машини) два пъти годишно (фиг. 19).
Когато не използвате самобръсначката, можете да я държите висяща
под душа, като я закачите в обърнато положение на халката за душ.
Поставете халката за душ на уреда, както е показано на
илюстрацията (фиг. 20).
,
,
16

Ако използвате самобръсначката два или повече пъти седмично,
съветваме ви да сменяте бръснещите пластини и режещия блок на
всеки 1 до 2 години.
Сребристата бръснеща пластина може да се заменя само с
оригинална бръснеща пластина на Philips (тип HP6119/01).
Златистата бръснеща пластина може да се заменя само с
оригинална бръснеща пластина на Philips (тип HP6121).
Режещият блок може да се заменя само с оригинален режещ
блок на Philips (тип HP6111).
След края на срока на експлоатация на уреда не го изхвърляйте
заедно с нормалните битови отпадъци, а го предайте в
официален пункт за събиране, където да бъде рециклиран. По
този начин вие помагате за опазването на околната
среда (фиг. 21).
Вградената акумулаторна батерия съдържа вещества, които
замърсяват околната среда. Винаги изваждайте батерията, преди
да изхвърлите уреда или да го предадете в официален пункт за
събиране. Изхвърляйте батерията в официален пункт за събиране
на батерии. Ако имате проблеми при изваждане на батерията,
можете също да занесете уреда в сервизен център на Philips. Там
служителите ще извадят батерията и ще я изхвърлят по начин,
опазващ околната среда.
1 Махнете самобръсначката от зарядното устройство.
2 Оставете мотора да работи, докато батерията се изтощи
докрай.
3 Издърпайте горната част на самобръсначката от долната с
малко усилие (фиг. 22).
4 Извадете батерията с отвертка (фиг. 23).
-
-
-
-
-
17

Ако се нуждаете от информация или имате проблем, посетете
Интернет сайта на Philips на адрес www.philips.com или се обърнете
към Центъра за обслужване на клиенти на Philips във вашата страна
(телефонния му номер можете да намерите в международната
гаранционна карта). Ако във вашата страна няма Център за
обслужване на клиенти, обърнете се към местния търговец на уреди
на Philips или се свържете с Отдела за сервизно обслужване на
битови уреди на Philips [Service Department of Philips Domestic
Appliances and Personal Care BV].
18

19
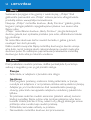
Úvod
Blahopřejeme vám k nákupu a vítáme vás ve společnosti Philips. Abyste
mohli plně využít podpory, kterou Philips poskytuje, zaregistrujte svůj
výrobek na adrese www.philips.com/welcome.
S novým dámským holicím strojkem Philips Body Contour můžete rychle,
jednoduše a pohodlně odstraňovat nežádoucí chloupky na suché nebo na
mokré pokožce.
Dámský holicí strojek Philips Body Contour je vybavený plovoucí holicí
hlavou, která se optimálně přizpůsobí pokožce, aby bylo dosaženo
dokonale hladkého oholení.
Tento dámský holicí strojek je určený pouze pro použití bez síťové šňůry
a lze jej nabíjet pomocí dodané nabíječky.
Dámský holicí strojek můžete použít na mokré či suché holení. Jestliže se
holíte během koupele nebo sprchování, doporučujeme pro co
nejpohodlnější holení použít mýdlo nebo holicí pěnu. Po použití můžete
holicí strojek jednoduše opláchnout pod sprchou nebo pod kohoutkem.
Před použitím přístroje si důkladně přečtěte tuto uživatelskou příručku a
uschovejte ji pro budoucí použití.
Dbejte na to, aby zástrčka ani přívodní kabel nenavlhly.
Výstraha
Zkontrolujte, zda napětí uvedené na adaptéru a na přístroji odpovídá
napětí sítě. Teprve pak připojte přístroj k napájení.
Adaptér obsahuje transformátor. Proto tento adaptér nikdy
nenahrazujte jinou zástrčkou, protože by mohla vzniknout
nebezpečná situace.
Osoby (včetně dětí) s omezenými fyzickými a duševními schopnostmi
nebo nedostatkem zkušeností a znalostí by neměly s přístrojem
manipulovat, pokud nebyly o používání přístroje předem instruovány
nebo nejsou pod dohledem osoby zodpovědné za jejich bezpečnost.
Dohlédněte na to, aby si s přístrojem nehrály děti.
Holicí strojek Ladyshave nepoužívejte během nabíjení.
-
-
-
-
-
-

Přístroj nečistěte vodou s teplotou vyšší, než je teplota koupele.
Používejte pouze přiložený adaptér a nabíječku.
Nepoužívejte holicí strojek Ladyshave, nabíječku ani adaptér, pokud
jsou poškozené.
Pokud byl poškozen adaptér, musí být vždy nahrazen originálním
typem, abyste předešli možnému nebezpečí.
Přístroj používejte, nabíjejte a uchovávejte při teplotě mezi 15 °C a
35 °C.
Nepoužívejte holicí fólie ani hřebenový nástavec, pokud jsou
poškozené nebo rozbité, protože by mohlo dojít ke zranění.
Při použití horké vody buďte opatrní. Vždy předem zkontrolujte, zda
není voda příliš horká, abyste si neopařili ruce.
Tento přístroj je určen pouze pro holení a stříhání lidských chloupků.
Nepoužívejte jej k jiným účelům.
Soulad s normami
Tento přístroj společnosti Philips odpovídá všem normám týkajícím se
elektromagnetických polí (EMP). Pokud je správně používán v souladu
s pokyny uvedenými v této uživatelské příručce, je jeho použití podle
dosud dostupných vědeckých poznatků bezpečné.
Přístroj odpovídá mezinárodním bezpečnostním předpisům
schváleným organizací IEC, lze jej bez obav používat ve vaně nebo
ve sprše a bezpečně čistit pod tekoucí vodou (Obr. 1).
Hladina hluku: Lc = 69 dB [A]
Pokud dámský holicí strojek nabíjíte poprvé nebo po dlouhé době
nepoužívání, nechte jej nabíjet alespoň 16 hodin.
Při přípravě dámského holicího strojku na nabíjení dbejte na to, aby
vaše ruce i přístroj byly suché.
1 Přesvědčte se, že je holicí strojek vypnutý (Obr. 2).
2 Zasuňte adaptér do zásuvky.
3 Zasuňte malou zástrčku do nabíječky (Obr. 3).
-
-
-
-
-
-
-
-
-
-
-
20
Pagina se încarcă...
Pagina se încarcă...
Pagina se încarcă...
Pagina se încarcă...
Pagina se încarcă...
Pagina se încarcă...
Pagina se încarcă...
Pagina se încarcă...
Pagina se încarcă...
Pagina se încarcă...
Pagina se încarcă...
Pagina se încarcă...
Pagina se încarcă...
Pagina se încarcă...
Pagina se încarcă...
Pagina se încarcă...
Pagina se încarcă...
Pagina se încarcă...
Pagina se încarcă...
Pagina se încarcă...
Pagina se încarcă...
Pagina se încarcă...
Pagina se încarcă...
Pagina se încarcă...
Pagina se încarcă...
Pagina se încarcă...
Pagina se încarcă...
Pagina se încarcă...
Pagina se încarcă...
Pagina se încarcă...
Pagina se încarcă...
Pagina se încarcă...
Pagina se încarcă...
Pagina se încarcă...
Pagina se încarcă...
Pagina se încarcă...
Pagina se încarcă...
Pagina se încarcă...
Pagina se încarcă...
Pagina se încarcă...
Pagina se încarcă...
Pagina se încarcă...
Pagina se încarcă...
Pagina se încarcă...
Pagina se încarcă...
Pagina se încarcă...
Pagina se încarcă...
Pagina se încarcă...
Pagina se încarcă...
Pagina se încarcă...
Pagina se încarcă...
Pagina se încarcă...
Pagina se încarcă...
Pagina se încarcă...
Pagina se încarcă...
Pagina se încarcă...
Pagina se încarcă...
Pagina se încarcă...
Pagina se încarcă...
Pagina se încarcă...
Pagina se încarcă...
Pagina se încarcă...
Pagina se încarcă...
Pagina se încarcă...
Pagina se încarcă...
Pagina se încarcă...
Pagina se încarcă...
Pagina se încarcă...
Pagina se încarcă...
Pagina se încarcă...
Pagina se încarcă...
Pagina se încarcă...
Pagina se încarcă...
Pagina se încarcă...
Pagina se încarcă...
Pagina se încarcă...
Pagina se încarcă...
Pagina se încarcă...
Pagina se încarcă...
Pagina se încarcă...
Pagina se încarcă...
Pagina se încarcă...
Pagina se încarcă...
Pagina se încarcă...
Pagina se încarcă...
Pagina se încarcă...
Pagina se încarcă...
Pagina se încarcă...
Pagina se încarcă...
Pagina se încarcă...
Pagina se încarcă...
Pagina se încarcă...
-
 1
1
-
 2
2
-
 3
3
-
 4
4
-
 5
5
-
 6
6
-
 7
7
-
 8
8
-
 9
9
-
 10
10
-
 11
11
-
 12
12
-
 13
13
-
 14
14
-
 15
15
-
 16
16
-
 17
17
-
 18
18
-
 19
19
-
 20
20
-
 21
21
-
 22
22
-
 23
23
-
 24
24
-
 25
25
-
 26
26
-
 27
27
-
 28
28
-
 29
29
-
 30
30
-
 31
31
-
 32
32
-
 33
33
-
 34
34
-
 35
35
-
 36
36
-
 37
37
-
 38
38
-
 39
39
-
 40
40
-
 41
41
-
 42
42
-
 43
43
-
 44
44
-
 45
45
-
 46
46
-
 47
47
-
 48
48
-
 49
49
-
 50
50
-
 51
51
-
 52
52
-
 53
53
-
 54
54
-
 55
55
-
 56
56
-
 57
57
-
 58
58
-
 59
59
-
 60
60
-
 61
61
-
 62
62
-
 63
63
-
 64
64
-
 65
65
-
 66
66
-
 67
67
-
 68
68
-
 69
69
-
 70
70
-
 71
71
-
 72
72
-
 73
73
-
 74
74
-
 75
75
-
 76
76
-
 77
77
-
 78
78
-
 79
79
-
 80
80
-
 81
81
-
 82
82
-
 83
83
-
 84
84
-
 85
85
-
 86
86
-
 87
87
-
 88
88
-
 89
89
-
 90
90
-
 91
91
-
 92
92
-
 93
93
-
 94
94
-
 95
95
-
 96
96
-
 97
97
-
 98
98
-
 99
99
-
 100
100
-
 101
101
-
 102
102
-
 103
103
-
 104
104
-
 105
105
-
 106
106
-
 107
107
-
 108
108
-
 109
109
-
 110
110
-
 111
111
-
 112
112


Philips HP6319/01 Manual de utilizare
- Categorie
- Aparate de ras pentru femei
- Tip
- Manual de utilizare
în alte limbi
- slovenčina: Philips HP6319/01 Používateľská príručka
- eesti: Philips HP6319/01 Kasutusjuhend
Lucrări înrudite
-
Philips HP6317/01 Manual de utilizare
-
Philips HP6335/00 Manual de utilizare
-
Philips HP6383/20 Manual de utilizare
-
Philips HP6368 Manual de utilizare
-
-
Philips HP6368/00 Manual de utilizare
-
Philips HP6317/02 Manual de utilizare
-
Philips TT2000/10 Manual de utilizare
-
Philips TT2030/10 Manual de utilizare
-